Zone 1 | Tuberosity Avulsion | Peroneus Brevis | Conservative | Excellent Prognosis
- Zone 1 is PROXIMAL to the 4-5 intermetatarsal articulation
- Avulsion mechanism via peroneus brevis or lateral band of plantar fascia
- Excellent blood supply - metaphyseal bone heals well
- Conservative treatment is standard - CAM boot or hard-soled shoe
- Very low nonunion rate (under 5%) compared to Jones (25-50%)
- “The 4-5 intermetatarsal joint is the KEY LANDMARK for zone classification
- “Zone 1 does NOT extend into the 4-5 joint - Jones fractures DO
- “Inversion injury causes avulsion; adduction stress causes Jones
- “Fibrous union is common but rarely symptomatic - not an indication for surgery
- “Conservative treatment succeeds in over 95% of cases
Critical Exam Points - Pseudo-Jones vs Jones:
- ZONE 1 = PROXIMAL to 4-5 intermetatarsal joint (Pseudo-Jones)
- ZONE 2 = INTO the 4-5 intermetatarsal joint (True Jones)
- Mechanism differs: Zone 1 = inversion avulsion; Zone 2 = adduction stress
- Prognosis differs: Zone 1 = excellent healing; Zone 2 = high nonunion
- Treatment differs: Zone 1 = conservative; Zone 2 = consider surgery (especially athletes)
- The terminology is confusing - examiners test whether you understand the anatomical distinction
- Zone 1 (Pseudo-Jones)
- Tuberosity - PROXIMAL to 4-5 joint
- Zone 2 (True Jones)
- Metadiaphyseal junction - INTO 4-5 joint
- Zone 1 (Pseudo-Jones)
- Inversion with plantarflexion
- Zone 2 (True Jones)
- Adduction stress to forefoot
- Zone 1 (Pseudo-Jones)
- Peroneus brevis/lateral plantar fascia
- Zone 2 (True Jones)
- N/A - not avulsion
- Zone 1 (Pseudo-Jones)
- Excellent (metaphyseal)
- Zone 2 (True Jones)
- Poor (watershed zone)
- Zone 1 (Pseudo-Jones)
- Under 5%
- Zone 2 (True Jones)
- 25-50% with conservative Rx
- Zone 1 (Pseudo-Jones)
- Conservative - CAM boot 4-6 weeks
- Zone 2 (True Jones)
- Consider IM screw (athletes)
- Zone 1 (Pseudo-Jones)
- 6-8 weeks
- Zone 2 (True Jones)
- 12-16 weeks (conservative)
AVULSIONAVULSION - Zone 1 Features
Hook:Zone 1 AVULSION fractures have a favorable course - they're Above the joint, heal Very well, and Usually need conservative care
PSEUDOPSEUDO - Why It's NOT a Jones
Hook:PSEUDO-Jones = Proximal location, Superior healing - it's NOT a true Jones fracture
Overview
Pseudo-Jones Fractures - Fifth Metatarsal Tuberosity Avulsion
Pseudo-Jones fractures (Zone 1 avulsion fractures) are the most common fracture of the fifth metatarsal base, accounting for 93% of proximal fifth metatarsal fractures. Despite the confusing terminology, they have an excellent prognosis with conservative management and should be clearly differentiated from true Jones fractures.
Anatomy and Pathophysiology
Fifth Metatarsal Base Anatomy
Zone 1 - Tuberosity (Pseudo-Jones Territory)
Key Anatomical Features:
- Located at the styloid process (tuberosity) of the fifth metatarsal
- PROXIMAL to the 4-5 intermetatarsal articulation
- Site of peroneus brevis insertion on dorsolateral aspect
- Lateral band of plantar fascia inserts on plantar aspect
- Metaphyseal bone with excellent blood supply
Blood Supply - Why Zone 1 Heals Well
Metaphyseal Vascularity:
- Zone 1 is in the metaphyseal region with abundant blood supply
- Multiple periosteal and nutrient vessels supply this area
- No watershed zone like the metadiaphyseal junction (Zone 2)
- Cancellous bone promotes rapid healing
Zone 1: Metaphyseal - excellent periosteal and medullary blood supply Zone 2: Watershed zone - nutrient artery meets periosteal supply = poor healing Zone 3: Limited periosteal vessels only = also poor healing
This vascular difference explains the dramatically different nonunion rates between zones.
Mechanism of Injury
- Foot in plantarflexion
- Sudden inversion stress (typical ankle sprain mechanism)
- Peroneus brevis contracts to resist inversion
- Avulsion of tuberosity fragment occurs
- Direct lateral band of plantar fascia tension during inversion
- Accounts for more plantar-based fracture patterns
Zone 1 (Pseudo-Jones): Inversion injury with muscle/tendon avulsion Zone 2 (True Jones): Adduction force to forefoot with foot plantarflexed
The mechanism is often the first clue to the fracture type - inversion = likely Zone 1.
Textbooks - and the first half of this page - reflexively credit peroneus brevis with avulsing the tuberosity. The examinable nuance is that this is contested. The classic cadaveric/imaging study (Richli and Rosenthal, AJR 1984) found that the structure under tension at the moment of a typical inversion avulsion is the lateral cord (band) of the plantar aponeurosis, which inserts on the plantar-lateral tuberosity, rather than peroneus brevis - and that the avulsed fragment is usually pulled plantarward and proximally by this band, not dorsally by the tendon. The lateral band of the plantar fascia and the abductor digiti minimi also attach here and contribute.
Why it matters in the viva and clinically:
- It explains why the fragment line is typically transverse/plantar and why peroneus brevis function is almost always preserved even with a sizeable avulsion (so excising a small symptomatic fragment rarely weakens eversion).
- A safe, defensible answer is: "the tuberosity is avulsed by the combined pull of peroneus brevis and the lateral cord of the plantar aponeurosis; cadaveric work suggests the plantar aponeurosis is the dominant avulsing structure." Do not state peroneus brevis as the sole cause as though it were settled fact.
Associated Injuries
Common Concurrent Injuries:
- Lateral ankle ligament sprain (very common - same mechanism)
- Peroneal tendon strain
- Anterior process calcaneus fracture
- Cuboid fracture
- Lateral process talus fracture
TWISTTWIST - Associated Injuries
Hook:TWIST injuries from inversion - check for associated pathology beyond the Zone 1 fracture
Classification
Lawrence and Botte Classification
The Three Zones - Critical for Exams
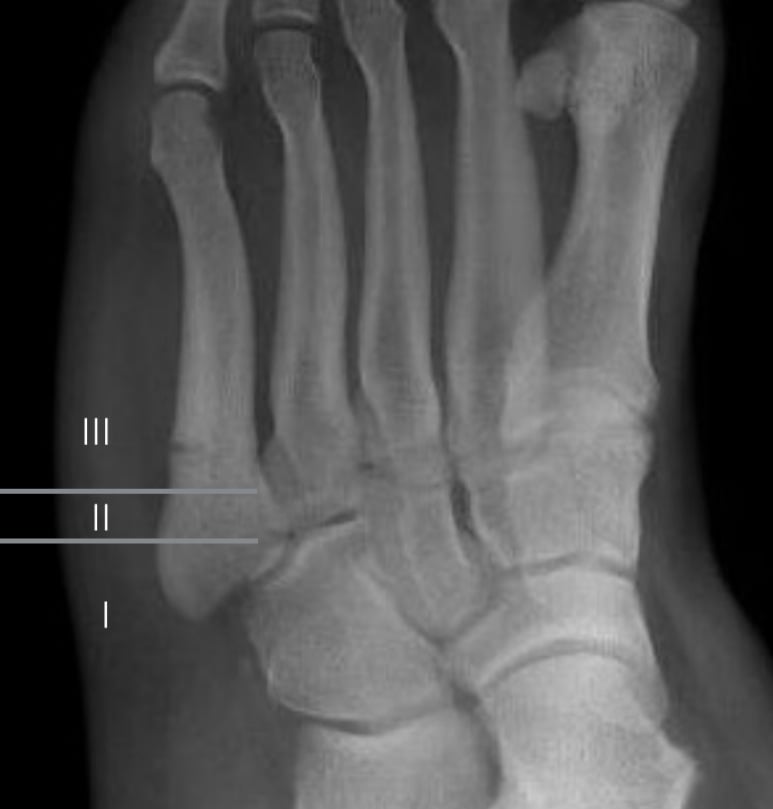
Location: Styloid process/tuberosity - PROXIMAL to 4-5 intermetatarsal joint
Mechanism: Inversion injury with avulsion by peroneus brevis or lateral plantar fascia
Blood Supply: Excellent (metaphyseal bone)
Prognosis:
- Union rate over 95% with conservative treatment
- Nonunion under 5%
- Excellent functional outcomes
Treatment: Conservative - CAM boot or hard-soled shoe, WBAT, 4-6 weeks
Stewart Subclassification:
- Type 1: Small flake avulsion (fragment under 5mm) - most common
- Type 2: Large fragment avulsion (fragment over 5mm)
- Type 3: Comminuted tuberosity fracture - may extend to cuboid articulation
- Description
- Fragment under 5mm
- Treatment
- Conservative (boot/shoe)
- Prognosis
- Excellent
- Description
- Fragment over 5mm
- Treatment
- Conservative (boot)
- Prognosis
- Excellent
- Description
- Multiple fragments
- Treatment
- Consider ORIF if over 2mm displacement
- Prognosis
- Good
Candidates routinely conflate two different joints at the proximal fifth metatarsal, and examiners exploit it:
- The fourth-to-fifth intermetatarsal articulation is the classification LANDMARK - it is what defines Zone 1 (proximal to it) versus Zone 2 (into it). A Zone 1 avulsion by definition does not enter the 4-5 intermetatarsal joint.
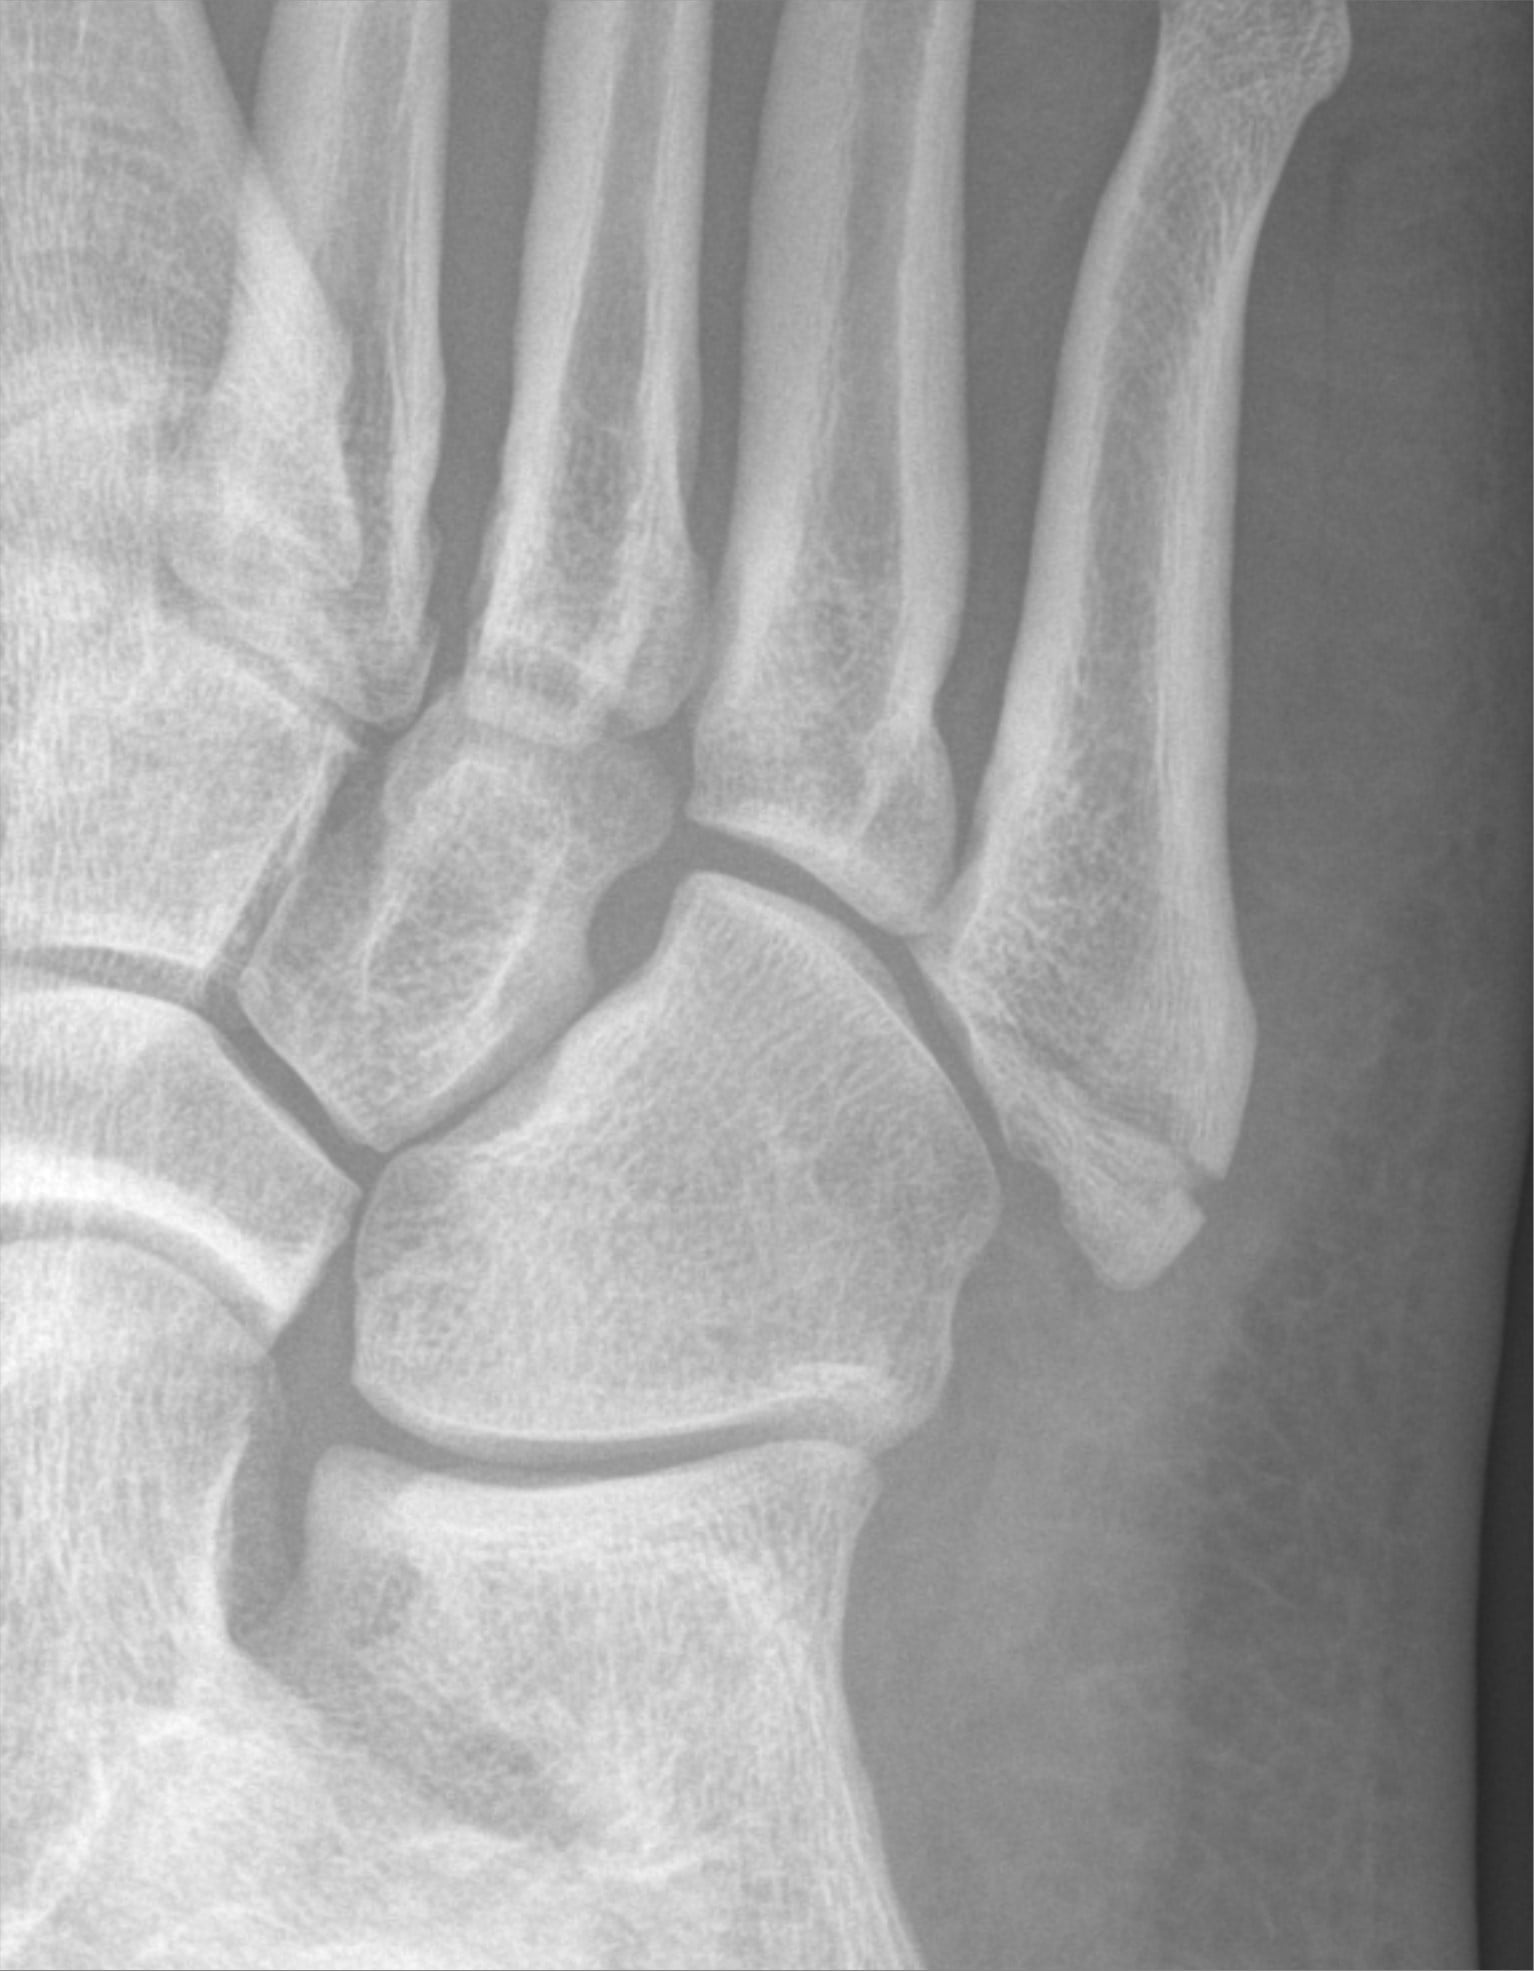
- The articular surface a Zone 1 fragment can actually involve is the fifth metatarsal-CUBOID (metatarsocuboid) joint - the proximal articular face of the tuberosity. This is the surface that matters for the operative decision, and it is a different joint from the 4-5 landmark.
So the surgical threshold is articular-surface-specific, not landmark-specific. The avulsion stays conservative even when comminuted, unless the metatarsocuboid articular surface is disrupted - the genuine ORIF triggers are a displaced intra-articular fragment with more than about 2 mm of step-off at the metatarsocuboid joint, a fragment involving a large share (commonly cited as more than roughly 30 percent) of that articular surface, or a symptomatic nonunion. In those cases get a CT to map the metatarsocuboid joint before fixing. Saying "it extends into the 4-5 joint so I will operate" is wrong twice over: a fracture into the 4-5 joint is by definition a Zone 2 Jones, not a Zone 1, and it is the cuboid joint - not the 4-5 joint - that drives Zone 1 operative decisions.
Key Radiographic Features
Zone 1 Characteristics:
- Fracture line transverse or oblique
- Does NOT extend into 4-5 intermetatarsal articulation
- Typically non-displaced or minimally displaced
- Fragment pulled proximally and dorsally by peroneus brevis
Differentiating Features:
- Zone 1
- Transverse/oblique
- Zone 2
- Often more horizontal
- Zone 1
- NO
- Zone 2
- YES - extends into joint
- Zone 1
- Proximal tuberosity
- Zone 2
- At metadiaphyseal junction
The 4-5 intermetatarsal articulation is the KEY landmark:
- Zone 1: Fracture is PROXIMAL to this joint
- Zone 2: Fracture extends INTO this joint
- Zone 3: Fracture is DISTAL to this joint
Look for this on X-ray - it's the defining feature for classification.
Clinical Assessment
History
- Mechanism: Inversion ankle injury (same as ankle sprain)
- Immediate pain at lateral foot/base of 5th metatarsal
- Unable to weight bear initially
- Often presents thinking they have "just an ankle sprain"
- Exact mechanism of injury
- Ability to weight bear
- Previous foot/ankle injuries
- Athletic activity level
- Occupation and functional demands
Examination
- Swelling over lateral foot at MT5 base
- Ecchymosis may extend along lateral foot
- Compare to contralateral side
- Tenderness over MT5 tuberosity (Zone 1)
- Compare tenderness location to metadiaphyseal junction (Zone 2)
- Check lateral malleolus (concurrent ankle injury)
- Palpate anterior process of calcaneus
- Weight-bearing ability
- Active ankle ROM
- Peroneal muscle strength (compare sides)
- Gait pattern
Always examine for:
- Lateral ankle ligaments (ATFL, CFL)
- Peroneal tendons
- Anterior process calcaneus
- Cuboid
- Lisfranc joint (if significant midfoot swelling)
The same inversion mechanism can cause multiple injuries.
Ottawa Foot Rules
Indications for Foot X-ray:
- Bone tenderness at base of 5th metatarsal
- Bone tenderness at navicular
- Inability to weight bear (4 steps) immediately and in ED
Zone 1 fractures will typically trigger the "base of 5th metatarsal" criterion.
Investigations
Imaging
Standard Radiographs
- AP foot
- Lateral foot
- Oblique foot (best for MT5 base)
- Zone identification - where is fracture relative to 4-5 joint?
- Displacement - gap or step-off
- Comminution - single vs multiple fragments
- Associated injuries - check entire foot
Special Considerations
- Accessory ossicle near MT5 base
- Smooth, rounded, corticated margins
- Bilateral in many cases
- Not to be confused with acute fracture
- Sesamoid in peroneus longus tendon
- Near cuboid tunnel
- Different location from Zone 1 fractures
Acute Fracture: Irregular margins, fits with adjacent bone, acute tenderness Os Vesalianum: Smooth corticated margins, doesn't "fit" perfectly, may be bilateral, often incidental
If uncertain, contralateral foot X-ray may help differentiate.
Differential Diagnosis
- Distinguishing Features
- Inversion injury, tenderness over tuberosity proximal to 4-5 joint
- Imaging Clue
- Transverse/oblique line NOT entering 4-5 joint
- Action
- Conservative (boot/shoe)
- Distinguishing Features
- Adduction load, tenderness at metadiaphyseal junction
- Imaging Clue
- Line enters the 4-5 intermetatarsal joint
- Action
- Consider IM screw (athletes)
- Distinguishing Features
- Insidious activity-related pain in athletes
- Imaging Clue
- Distal to 4-5 joint; sclerosis/periosteal reaction if chronic
- Action
- Often surgical; high refracture risk
- Distinguishing Features
- Often asymptomatic/incidental, may be bilateral
- Imaging Clue
- Smooth corticated margins, does not 'fit' adjacent bone
- Action
- No treatment; compare contralateral foot
- Distinguishing Features
- Lateral pain near cuboid; peroneus longus pathology
- Imaging Clue
- Sesamoid within peroneus longus near cuboid tunnel, distinct location
- Action
- Treat associated tendinopathy
- Distinguishing Features
- Same inversion mechanism, tenderness over ATFL/CFL
- Imaging Clue
- No fracture line; soft-tissue swelling
- Action
- Functional rehab
- Distinguishing Features
- Tenderness localised away from MT5 base
- Imaging Clue
- Fracture line in cuboid or anterior calcaneal process
- Action
- Treat per pattern; do not miss
Advanced Imaging (Rarely Needed)
- Large comminuted fractures
- Assessment of 5th metatarsal-cuboid joint involvement
- Pre-operative planning if ORIF considered
- Suspected concurrent soft tissue injury
- Stress reaction without clear fracture line
- Usually not needed for typical Zone 1 fractures
Management
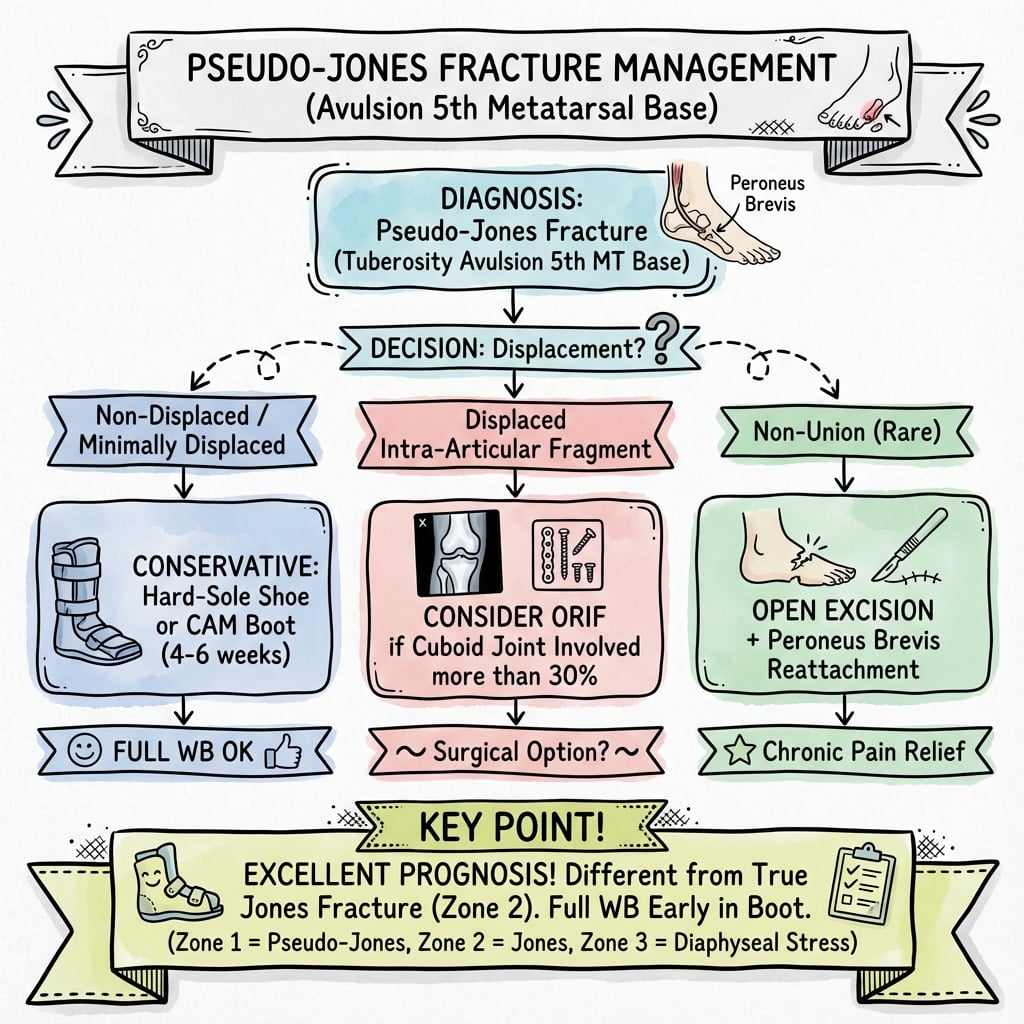
Treatment Algorithm
Key Decision Points:
-
Is this truly Zone 1 (proximal to 4-5 joint)?
- YES: Conservative treatment
- NO (Zone 2/3): Different algorithm - consider surgery
-
Is there significant displacement or comminution?
- Minimal displacement: Conservative
- Over 2mm step-off in joint: Consider ORIF
-
What is the patient's functional demand?
- Most patients: Conservative
- High-level athletes with large fragments: Discuss options
Non-Operative Treatment - First Line for Zone 1
- All non-displaced or minimally displaced Zone 1 fractures
- Displaced fractures not involving articular surface significantly
- Most Type 1 and Type 2 fractures (over 95% of cases)
- Weight-bearing as tolerated from day 1
- Duration: 4-6 weeks
- Transition to supportive shoe when comfortable
- No routine follow-up X-rays if progressing well
- For very small avulsions with minimal symptoms
- Weight-bearing as tolerated
- Duration: 3-4 weeks
- May be sufficient for small flake fractures
- 1-2 weeks non-weight-bearing with crutches
- Then progress to CAM boot with WBAT
- Reserved for patients with severe pain on initial weight-bearing
- Indication
- Most Zone 1 fractures
- Duration
- 4-6 weeks
- Weight Bearing
- WBAT from day 1
- Indication
- Small avulsion, minimal symptoms
- Duration
- 3-4 weeks
- Weight Bearing
- WBAT
- Indication
- Severe pain
- Duration
- 1-2 weeks then progress
- Weight Bearing
- Progress to WBAT
Expected Outcomes:
- Union rate over 95%
- Return to full activity: 6-8 weeks
- Fibrous union common but asymptomatic
Rehabilitation
- Pain control, ice, elevation
- Gentle ROM exercises
- Weight-bearing in boot/shoe as tolerated
- Progress weight-bearing
- Ankle and foot ROM
- Begin light strengthening
- Transition out of boot
- Progressive strengthening
- Balance and proprioception
- Return to normal footwear
- Sport-specific rehabilitation if applicable
- Full activity by 8-10 weeks typically
BOOTBOOT - Conservative Protocol
Hook:Zone 1 fractures need just a BOOT - simple conservative treatment with excellent outcomes
Follow-Up Protocol
- Clinical review at 2 weeks for symptom check
- No routine X-rays needed if progressing well
- Final review at 6 weeks for discharge
- Persistent pain beyond 8 weeks
- Worsening symptoms
- Failure to progress with rehabilitation
- Concern for missed concurrent injury
Special Populations
- Same conservative protocol applies
- No evidence supports early surgery for Zone 1
- Return to sport: 6-8 weeks typically
- May use rigid-soled athletic shoe earlier
- Conservative treatment remains standard
- Lower functional demands often allow faster progression
- Monitor for concurrent ankle instability
- Consider osteoporosis workup if appropriate
- Prolonged immobilization may be needed
- Monitor for skin complications in boot
- Lower threshold for imaging if healing delayed
- Watch for Charcot arthropathy if neuropathic
Surgical Technique
ORIF of Zone 1 Fracture (Rare Indication)
Indications for Surgery
- Type 3 comminuted fracture with over 2mm intra-articular step-off
- Symptomatic nonunion (under 2% of cases)
- Failed conservative treatment with persistent symptoms
Preoperative Planning
- CT scan to assess fragment size and joint involvement
- Ensure fragment is large enough for screw fixation
- Consider fragment excision if too small
Complications
Potential Complications
Nonunion (Under 5%)
- Radiographic nonunion but asymptomatic
- Occurs in up to 30% of cases
- Does NOT require treatment if painless
- Provides adequate functional stability
- Persistent pain with activity
- Tenderness over fracture site
- Pain with peroneal muscle contraction
- Conservative trial first (extend immobilization)
- Surgical options: ORIF with bone graft or fragment excision
- Excellent results with surgery if truly symptomatic
Malunion
- Healing in displaced position
- Usually asymptomatic
- Rarely affects function
- Observation if asymptomatic
- Surgery rarely needed
Hardware Complications (If ORIF Performed)
- Irritation of peroneus brevis tendon
- Painful over lateral foot
- May require hardware removal
- Screw breakage (rare)
- Loss of fixation
- Usually occurs with inadequate fragment size
Sural Nerve Injury
- 2-5% with surgical approach
- Temporary dysesthesia common
- Permanent numbness rare
- Careful surgical dissection
- Identify and protect sural nerve branches
Peroneus Brevis Pathology
- Rare with conservative treatment
- Can occur with surgical dissection
- Chronic irritation from hardware
- Transient weakness common after injury
- Resolves with rehabilitation
- Persistent weakness rare (under 5%)
Complex Regional Pain Syndrome
- Rare (under 1%)
- More common with prolonged immobilization
- Disproportionate pain
- Swelling, skin changes
- Allodynia, vasomotor changes
- Early mobilization
- Physical therapy
- Pain management referral
Refracture
- Very rare with Zone 1 fractures (under 1%)
- More common with premature return to activity
- Adequate healing time (6-8 weeks minimum)
- Progressive return to activity
- Gradual increase in loading
The most common "complication" is asymptomatic fibrous union which occurs in up to 30% of cases. This is NOT a true complication and does NOT require treatment. Educate patients that radiographic healing may be incomplete but functional outcomes remain excellent.
Postoperative Care
Post-ORIF Rehabilitation Protocol
Immediate Postoperative (Weeks 0-2)
- Below-knee splint or cast
- Non-weight-bearing with crutches
- Elevate foot above heart level
- Ice therapy
- First dressing change at 48 hours
- Monitor for infection, swelling
- Sutures removed at 10-14 days
- Pain control
- Reduce swelling
- Protect fixation
Early Mobilization (Weeks 2-6)
- Transition to CAM boot at 2 weeks
- Begin partial weight-bearing (25-50%)
- Gentle ankle ROM exercises (non-resistance)
- Continue elevation and ice
- Progress to full weight-bearing in boot
- Active ROM exercises
- Begin light strengthening (theraband)
- Clinical and radiographic assessment at 6 weeks
- X-ray at 2 weeks (check hardware position)
- X-ray at 6 weeks (assess healing)
- Further imaging only if symptomatic
Advanced Rehabilitation (Weeks 6-12)
- Transition out of boot if healing progresses
- Progress to supportive athletic shoe
- Progressive weight-bearing exercises
- Balance and proprioception training
- Initiate impact activities (walking program)
- Sport-specific rehabilitation
- Plyometric exercises if athlete
- Running progression
- Agility drills
- 10-12 weeks for full contact sports
- Must demonstrate full ROM, strength
- No pain with activity
- Clearance from surgeon
Weight-Bearing Progression
- Weeks
- 0-2
- Weight Bearing
- Non-weight-bearing
- Immobilization
- Splint
- Weeks
- 2-4
- Weight Bearing
- Partial (25-50%)
- Immobilization
- CAM boot
- Weeks
- 4-6
- Weight Bearing
- Full in boot
- Immobilization
- CAM boot
- Weeks
- 6-8
- Weight Bearing
- Full in shoe
- Immobilization
- Supportive shoe
- Weeks
- 8-12+
- Weight Bearing
- Unrestricted
- Immobilization
- Regular footwear
Complications to Monitor
- Wound infection
- Compartment syndrome (rare)
- DVT (rare)
- Fixation failure
- Delayed union
- Sural nerve symptoms
- Hardware prominence/irritation
- Chronic pain
- Stiffness
Hardware Removal
- Symptomatic hardware (irritation)
- Patient preference after healing
- Peroneal tendon irritation
- Minimum 6-9 months after surgery
- Only if fracture fully healed
- Not routinely required
Conservative treatment: Return to activity 6-8 weeks Surgical treatment: Return to activity 10-12 weeks
The faster recovery with conservative treatment is one reason surgery is reserved for specific indications only. Most patients do better avoiding surgery for Zone 1 fractures.
Outcomes and Prognosis
Expected Outcomes
- Over 95% union with conservative treatment
- Fibrous union common but rarely symptomatic
- Symptomatic nonunion under 5%
- Full return to activity: 6-10 weeks
- Excellent long-term function in vast majority
- Minimal residual symptoms expected
- Patient satisfaction high with conservative management
- Sedentary work: 2-3 weeks
- Light manual work: 4-6 weeks
- Heavy manual work: 8-10 weeks
- Low-impact activities: 4-6 weeks
- Running and cutting sports: 6-8 weeks
- Full contact sports: 8-10 weeks
Prognostic Factors
- Minimally displaced fracture
- Early mobilization with protection
- Good patient compliance
- Absence of concurrent injuries
- Large comminuted fragment
- Significant displacement with joint involvement
- Delayed presentation (over 3 weeks)
- Poor vascularity (diabetics, smokers)
Comparison with Zone 2 Outcomes
- Zone 1 (Pseudo-Jones)
- Over 95%
- Zone 2 (Jones)
- 50-75%
- Zone 1 (Pseudo-Jones)
- 4-8 weeks
- Zone 2 (Jones)
- 8-20 weeks
- Zone 1 (Pseudo-Jones)
- 6-10 weeks
- Zone 2 (Jones)
- 12-20 weeks
- Zone 1 (Pseudo-Jones)
- Under 5%
- Zone 2 (Jones)
- 30-50% (varies)
- Zone 1 (Pseudo-Jones)
- Under 1%
- Zone 2 (Jones)
- 10-20%
Many Zone 1 fractures show radiographic fibrous union but are completely asymptomatic. This is NOT an indication for surgery. Treat the patient, not the X-ray.
Symptomatic nonunion requiring surgery occurs in under 2% of cases.
Guidelines, Registries & Global Practice
Global Epidemiology, Guidelines and Practice Variation
Global Epidemiology
Metatarsal fractures are among the most common foot fractures, and the fifth metatarsal is the most frequently fractured of all the metatarsals (Petrisor, Foot Ankle Int 2006; PMID 16539897). Within the proximal fifth metatarsal, the tuberosity avulsion (Zone 1 / pseudo-Jones) is the predominant pattern, while the metaphyseal Jones (Zone 2) and proximal diaphyseal stress (Zone 3) fractures are far less common but disproportionately problematic (Lawrence and Botte, Foot Ankle 1993; PMID 8406253).
- Evidence
- Fifth metatarsal
- Source
- Petrisor 2006 (PMID 16539897)
- Evidence
- 42 years; female excess in older groups
- Source
- Petrisor 2006 (PMID 16539897)
- Evidence
- Tuberosity avulsion (Zone 1)
- Source
- Lawrence/Botte 1993 (PMID 8406253)
- Evidence
- Inversion with plantarflexion (ankle-sprain type)
- Source
- Lawrence/Botte 1993 (PMID 8406253)
- Presentation tracks sporting and recreation patterns internationally: clusters occur during field-sport seasons (football, rugby, soccer) and inversion-type injuries are common year-round where beach, court and uneven-ground recreation predominate - a pattern reproduced across coastal and sporting populations worldwide.
Guideline and Society Positions (Side-by-Side)
No single college issues a dedicated "pseudo-Jones" guideline; practice is anchored in the validated diagnostic rules and the AO/society teaching frameworks below. There is broad international agreement that Zone 1 avulsions are managed non-operatively.
- Position on Zone 1 avulsion
- Imaging indicated for tenderness at base of fifth metatarsal or inability to weight-bear; rules out fracture with high sensitivity
- Evidence level
- Level I (meta-analysis of decision rule)
- Position on Zone 1 avulsion
- Early functional, weight-bearing management; surgery not indicated for stable injuries
- Evidence level
- Level II
- Position on Zone 1 avulsion
- Tuberosity avulsions: symptomatic, functional treatment (stiff-soled shoe / boot); ORIF reserved for large displaced intra-articular fragments
- Evidence level
- Expert consensus
- Position on Zone 1 avulsion
- Conservative care with early mobilisation; Zone 1 distinguished sharply from Zone 2 where fixation is considered
- Evidence level
- Level IV
Registry Evidence
No national joint or fracture registry tracks pseudo-Jones fractures specifically; these are non-implant, non-arthroplasty injuries and fall outside arthroplasty registries (AOANJRR, NJR, AJRR). Population-level burden is therefore derived from epidemiological cohorts (Petrisor 2006, PMID 16539897) rather than registry data. This absence is itself an exam-relevant point: prognostic and treatment evidence rests on small cohorts and a single randomised comparison of conservative methods (Gray 2008, PMID 20307430).
International Practice Variation
- Immobilisation choice varies but outcomes do not: a randomised comparison found plaster slipper and tubigrip support gave equivalent 12-week outcomes, with plaster only modestly better for early pain (Gray 2008, PMID 20307430). Many centres now default to a removable CAM walker boot or stiff-soled shoe with weight-bearing as tolerated.
- Athlete pathways diverge by zone, not by Zone 1 management: across North American, European and Australasian sports-medicine practice, Zone 2/3 fractures in elite athletes are frequently fixed with an intramedullary screw for earlier, more reliable union (Roche/Calder 2013, PMID 22956165; Japjec 2015, PMID 26563480), whereas Zone 1 avulsions are managed conservatively regardless of athletic demand.
- Follow-up imaging is increasingly minimised internationally for typical Zone 1 injuries, reflecting the recognition that asymptomatic radiographic fibrous union is common and not an indication for surgery.
Viva Scenarios
Clinical Decision Scenarios
Practise clinical reasoning and management decisions out loud
“A 35-year-old woman presents after inverting her ankle stepping off a curb. X-ray shows a transverse fracture at the base of the fifth metatarsal, proximal to the 4-5 intermetatarsal articulation. What is the diagnosis and how would you manage this?”
“An examiner shows you two X-rays of fifth metatarsal base fractures and asks you to explain the difference between them and how this affects management.”
“A Zone 1 fracture at 3 months shows fibrous union on X-ray, but the patient is asymptomatic. The referring doctor asks if surgery is needed. What is your advice?”
MCQ Practice Points
High-Yield Exam Facts
Classification Must-Knows
-
The 4-5 intermetatarsal articulation is the critical landmark:
- Zone 1: PROXIMAL to this joint
- Zone 2: Extends INTO this joint
- Zone 3: DISTAL to this joint
-
Zone 1 accounts for 93% of proximal fifth metatarsal fractures - it's the most common pattern.
-
Terminology confusion:
- "Pseudo-Jones" = Zone 1 (NOT a true Jones fracture)
- "True Jones" = Zone 2
- Don't confuse them on exams
Mechanism Differentiation
-
Zone 1 mechanism: Inversion with plantarflexion (ankle sprain mechanism) causing avulsion by peroneus brevis
-
Zone 2 mechanism: Adduction force to forefoot - different from Zone 1
-
Avulsion structures: Peroneus brevis (dorsolateral) or lateral band of plantar fascia (plantar)
Blood Supply and Healing
-
Zone 1 has excellent blood supply - metaphyseal bone with abundant periosteal and medullary vessels
-
Zone 2 is a watershed zone - where nutrient artery meets periosteal supply = poor healing
-
This vascular difference explains the nonunion rates:
- Zone 1: Under 5%
- Zone 2: 25-50%
Treatment Principles
-
Over 95% of Zone 1 fractures heal with conservative treatment - this is the key point
-
Standard treatment: CAM boot, weight-bearing as tolerated, 4-6 weeks
-
Surgery is indicated in less than 5% of Zone 1 fractures:
- Over 2mm intra-articular step-off
- Symptomatic nonunion (rare)
- NOT indicated for routine Zone 1 fractures
-
Fibrous union is common (up to 30%) but asymptomatic - NOT an indication for surgery
Common Exam Traps
-
TRAP: Assuming all proximal 5th metatarsal fractures need surgery
- CORRECT: Zone 1 is conservative, Zone 2/3 consider surgery
-
TRAP: Treating radiographic fibrous union with surgery
- CORRECT: Only treat symptomatic nonunion (under 2% incidence)
-
TRAP: Confusing Zone 1 location
- CORRECT: Zone 1 is PROXIMAL to 4-5 joint, not INTO the joint
-
TRAP: Ordering routine follow-up X-rays
- CORRECT: Only needed if symptoms not improving
Differential Diagnosis Pearls
-
Os vesalianum: Smooth corticated margins, may be bilateral, doesn't "fit" with adjacent bone
-
Acute fracture: Irregular margins, fits with adjacent bone, acute tenderness
-
Associated injuries to check: Lateral ankle ligaments (ATFL, CFL), peroneal tendons, anterior process of calcaneus
Return to Activity
-
Conservative treatment return to activity: 6-8 weeks (faster than Zone 2)
-
Surgical treatment return to activity: 10-12 weeks (slower than conservative!)
-
This is why conservative treatment is preferred - better outcomes, faster recovery
Key Numbers to Memorize
- 93% - Percentage of proximal MT5 fractures that are Zone 1
- Over 95% - Union rate with conservative treatment
- Under 5% - Nonunion rate for Zone 1
- 4-6 weeks - Duration of CAM boot treatment
- 6-8 weeks - Return to full activity
- 30% - Incidence of asymptomatic fibrous union
- Under 2% - Symptomatic nonunion requiring surgery
Q: What is the critical anatomical landmark for classifying proximal fifth metatarsal fractures? A: The 4-5 intermetatarsal articulation. Zone 1 is PROXIMAL to this joint, Zone 2 extends INTO this joint, and Zone 3 is DISTAL to this joint.
Q: Why do Zone 1 fractures heal so much better than Zone 2 fractures? A: Zone 1 fractures occur in metaphyseal bone with excellent periosteal and medullary blood supply. Zone 2 fractures occur at a watershed zone where the nutrient artery meets periosteal vessels, resulting in poor vascularity and high nonunion rates (25-50% vs under 5%).
Q: A 25-year-old athlete has a Zone 1 fracture and wants to return to sport quickly. Should you offer surgical fixation? A: No. Conservative treatment with CAM boot provides faster return to activity (6-8 weeks) than surgery (10-12 weeks) and has over 95% success rate. Surgery is not indicated for routine Zone 1 fractures even in athletes.
Q: X-ray at 3 months shows fibrous union but patient is asymptomatic. What is your management? A: No treatment required. Fibrous union occurs in up to 30% of Zone 1 fractures and is rarely symptomatic. Treat the patient, not the X-ray. Surgery is only indicated for symptomatic nonunion (under 2% incidence).
Q: How do you differentiate Zone 1 from Zone 2 fractures by mechanism? A: Zone 1 (Pseudo-Jones) results from inversion injury with peroneus brevis avulsion - same mechanism as ankle sprain. Zone 2 (True Jones) results from adduction force to the forefoot with foot plantarflexed.
Q: What are the 5 most commonly tested concepts for Pseudo-Jones fractures? A: (1) Zone classification based on 4-5 joint relationship, (2) Zone 1 vs Zone 2 differentiation in location/mechanism/prognosis/treatment, (3) Conservative treatment as standard with over 95% success, (4) Fibrous union management - asymptomatic = no treatment, (5) The 4-5 intermetatarsal articulation as the key anatomical landmark.
DEFINITION
- Zone 1 = Tuberosity avulsion fracture
- PROXIMAL to 4-5 intermetatarsal articulation
- NOT a true Jones fracture (Zone 2)
- Most common proximal MT5 fracture (93%)
KEY LANDMARK
- 4-5 intermetatarsal articulation is THE critical landmark
- Zone 1: PROXIMAL to this joint
- Zone 2: INTO this joint
- Zone 3: DISTAL to this joint
MECHANISM
- Inversion with plantarflexion
- Avulsion by peroneus brevis or lateral plantar fascia
- Same mechanism as ankle sprain
- Different from Zone 2 (adduction stress)
PROGNOSIS
- Excellent - over 95% union with conservative treatment
- Metaphyseal bone = good blood supply
- Nonunion rate: under 5% (vs 25-50% for Zone 2)
- Fibrous union common but asymptomatic
TREATMENT
- Conservative = standard of care
- CAM boot or hard-soled shoe
- Weight-bearing as tolerated
- Duration: 4-6 weeks
Evidence Base
Zone Classification System (Defining Paper)
- Seminal paper describing at least three distinct fracture types at the proximal fifth metatarsal: the tuberosity avulsion fracture (Zone 1), the Jones (metaphyseal) fracture, and the proximal diaphyseal stress fracture. Emphasised that the diaphyseal stress fracture is commonly confused with the Jones fracture, obscuring vital differences in prognosis and treatment.
- Established that anatomical, biomechanical and vascular characteristics explain the diverse healing potentials; most fractures heal with immobilisation, whereas displaced intra-articular fractures, delayed unions and nonunions usually require operative methods.
Conservative Treatment of Tuberosity Avulsions (RCT)
- Prospective randomised comparison of two conservative methods (plaster slipper vs tubigrip support) for 37 tuberosity avulsion fractures of the proximal fifth metatarsal. Final clinical and radiological outcomes at 12 weeks were comparable between groups; plaster gave a modestly better pain/function score only during the first 2 weeks.
- Two patients in each group (4 of 37) showed no clear radiographic union at 12 weeks, yet only one patient remained symptomatic and required surgery - directly supporting that radiographic fibrous union is common but symptomatic nonunion is rare.
Evidence-Based Diagnostic Pathway (Ottawa Rules)
- Systematic literature review building an evidence-based algorithm for acute ankle and foot injuries. Recommends application of the Ottawa Ankle/Foot Rules to rule out fractures (including the base of the fifth metatarsal), and supports early functional treatment as giving the fastest recovery and the lowest reinjury rate.
- Establishes that for stable injuries conservative, functional management is at least as effective as operative treatment without the associated complications - the principle that underlies non-operative care of Zone 1 avulsions.
Jones Fracture: Surgery vs Conservative (Systematic Review)
- Systematic review of 26 studies of Jones (Zone 2) fractures. Acute fractures treated non-operatively had a pooled union rate of 76%, versus 96% with intramedullary screw fixation; delayed unions healed in 44% non-operatively versus 97% operatively.
- Intramedullary screw fixation is more likely to achieve union for all types of Jones fracture, but early return to play before full radiological union risks refracture - reinforcing why the guarded Zone 2 prognosis contrasts sharply with the benign Zone 1 avulsion.
Proximal Fifth Metatarsal Fractures in Athletes
- Series of 42 athletes with Zone 2 and Zone 3 fractures. All 33 fractures fixed with intramedullary screw healed (26 within 8 weeks), whereas only 4 of 9 conservatively managed fractures united, with 4 of the 5 nonunions later requiring osteosynthesis.
- Demonstrates that for Zone 2/3 fractures in athletes, intramedullary screw fixation gives earlier and more reliable union and return to sport - the opposite emphasis to Zone 1, where conservative care suffices.
Epidemiology of Metatarsal Fractures
- Prospective study of 355 patients with 411 metatarsal fractures over one year in an adult population (Edinburgh). The fifth metatarsal was the most commonly fractured metatarsal, and mean patient age was 42 years with a relative excess of women in older age groups.
- Provides the population-level denominator confirming that fifth metatarsal fractures - of which the proximal tuberosity avulsion is the dominant pattern - are among the most common foot fractures encountered in adult practice.