Syndesmotic Level | Stability Determines Treatment | Ring Injury Concept
- Weber classification is based on fibular fracture level relative to syndesmosis
- Ankle is a ring structure - isolated fractures rare, look for second injury
- Weber B stability determined by deltoid ligament and syndesmosis integrity
- Medial clear space greater than 4.5mm indicates deltoid rupture = unstable
- Syndesmotic screws placed 2-4cm above joint, parallel to joint line
- “Weber C = syndesmosis disrupted by definition = unstable
- “Mortise view: 15-20 degree internal rotation shows true joint space
- “Maisonneuve = proximal fibula fracture + syndesmosis rupture - examine whole leg
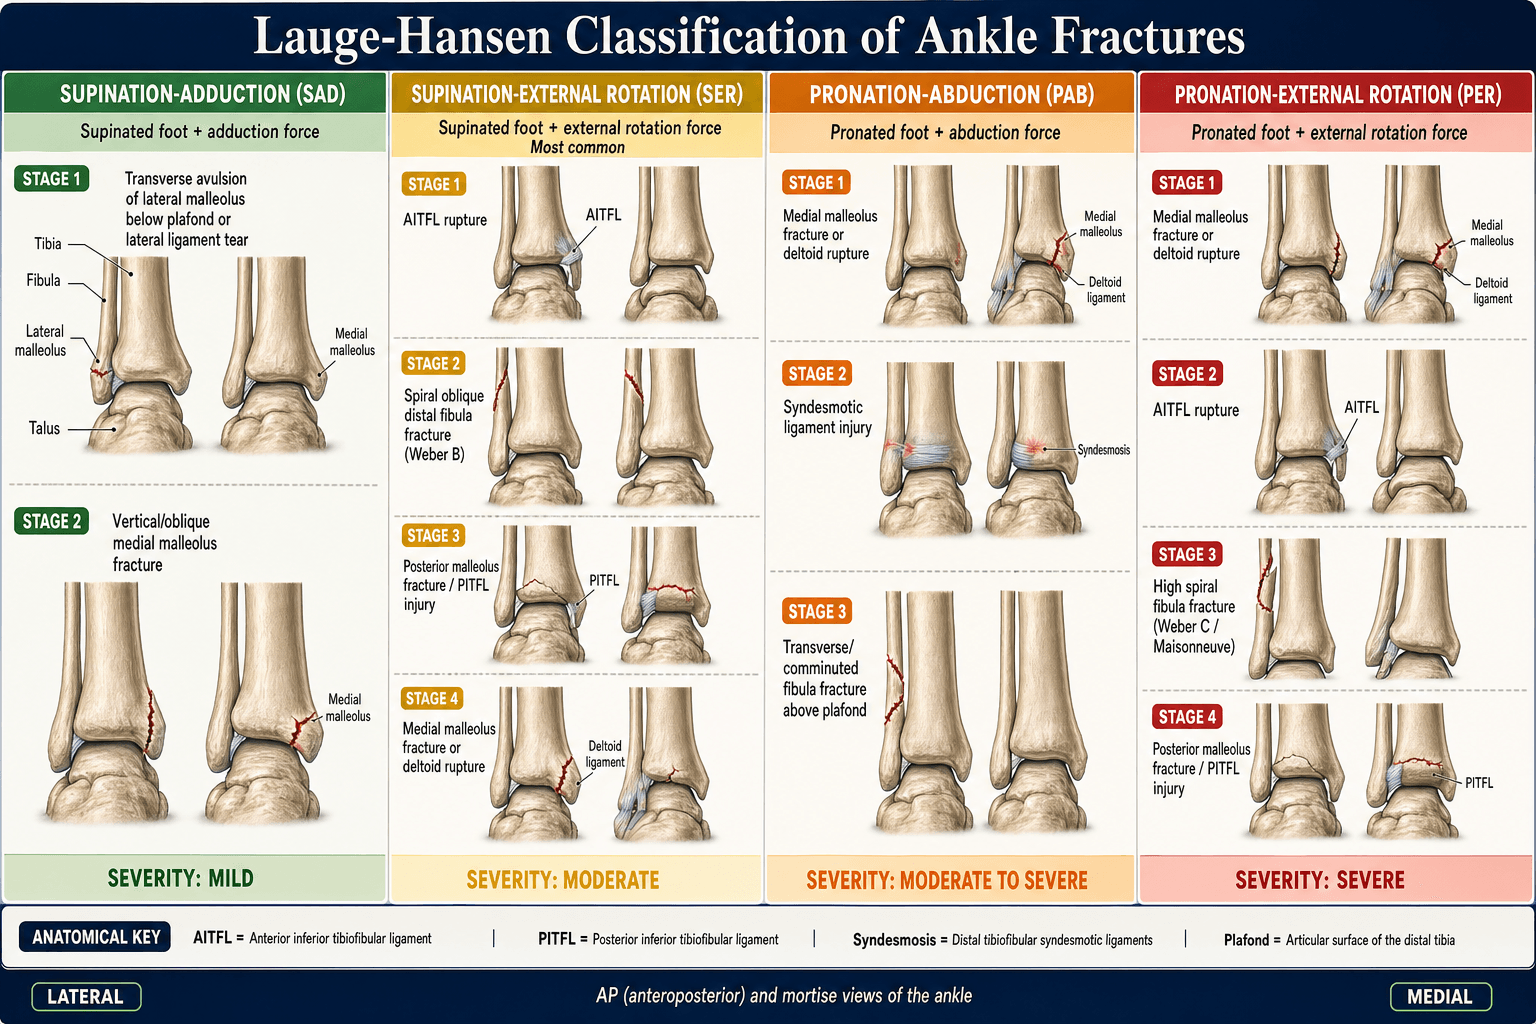
- “Lauge-Hansen describes mechanism; Weber describes fibula level

Ankle is an osseoligamentous ring. Isolated malleolar fractures rare - always look for second lesion (deltoid rupture, syndesmosis injury, proximal fibula fracture).
Stress radiographs critical for Weber B. If medial clear space greater than 4.5mm on gravity or external rotation stress = unstable = surgical.
Weber = fibula level (A/B/C). Lauge-Hansen = mechanism (SER, SAD, PER, PAB). Both useful but Weber guides treatment.
Screw placement 2-4cm above joint. 3.5-4.5mm cortical, 3-4 cortices. Remove at 8-12 weeks before weight-bearing.
- Stability
- Stable
- Key Finding
- Below syndesmosis, no medial injury
- Treatment
- Moon boot, weight-bear as tolerated
- Stability
- Potentially stable
- Key Finding
- Medial clear space normal on stress
- Treatment
- Cast/boot, close follow-up
- Stability
- Unstable
- Key Finding
- Medial clear space greater than 4.5mm
- Treatment
- ORIF fibula + deltoid exploration
- Stability
- Unstable
- Key Finding
- Multiple malleoli fractured
- Treatment
- ORIF all fragments
- Stability
- Always unstable
- Key Finding
- Above syndesmosis = disrupted
- Treatment
- ORIF + syndesmosis fixation
SPEPLauge-Hansen Mechanism
Hook:SPEP: First letter = foot position, Second = force direction. SER is most common - Spiral fibula at Syndesmosis level!
2-3-4Syndesmosis Screw Placement
Hook:2-3-4 rule: 2cm up, 3-4 cortices, 3.5-4.5mm screw. Remove before full weight-bearing at 8-12 weeks!
Overview and Epidemiology
Ankle fractures are the most common lower limb fracture requiring surgical intervention. Correct assessment of stability is paramount - unstable fractures treated non-operatively have poor outcomes with post-traumatic arthritis in up to 50% at 20 years.
- Bimodal distribution: young males (sports/high-energy), elderly females (low-energy/osteoporotic)
- Female predominance increases with age
- Winter peaks (ice-related falls)
- Sports: soccer, basketball, skiing
- SER (Supination-External Rotation): 40-75% - most common
- PER (Pronation-External Rotation): 5-20%
- SAD (Supination-Adduction): 10-20%
- PAB (Pronation-Abduction): 5-20%
Anatomy and Biomechanics
The ankle mortise functions as an osseoligamentous ring. Just like a pretzel, you cannot break a ring in one place - there must be a second disruption. Always look for the second lesion!
- Function
- Maintains tibiofibular relationship
- Clinical Relevance
- Weber C = always disrupted. Squeeze test positive.
- Function
- Primary medial stabilizer
- Clinical Relevance
- Deep portion critical - resists lateral talar shift
- Function
- Lateral ankle stability
- Clinical Relevance
- Commonly injured in Weber A, usually heal well
- Function
- PITFL attachment, articular surface
- Clinical Relevance
- Fix if over 25% articular surface or greater than 2mm step
- AITFL: Anterior inferior tibiofibular ligament - first to tear
- PITFL: Posterior inferior tibiofibular ligament - strongest
- IOL: Interosseous ligament
- ITL: Inferior transverse ligament (deep PITFL)
- Superficial: Tibionavicular, tibiocalcaneal, tibiotalar
- Deep: Anterior and posterior tibiotalar (critical)
- Deep deltoid resists lateral talar shift
- Rupture = medial clear space widening
The superficial peroneal nerve crosses the surgical field anterolaterally, 7-10cm proximal to the tip of the fibula. It becomes subcutaneous at this level and is at risk during lateral approach. Always identify and protect!
Classification Systems
Weber Classification (Danis-Weber)

- Fibula Level
- Below syndesmosis
- Syndesmosis
- Intact
- Stability
- Stable
- Treatment
- Non-operative usually
- Fibula Level
- At syndesmosis
- Syndesmosis
- Partial/Intact
- Stability
- Variable
- Treatment
- Stress testing required
- Fibula Level
- Above syndesmosis
- Syndesmosis
- Disrupted
- Stability
- Unstable
- Treatment
- Surgical fixation
Weber classification correlates with syndesmotic injury. Higher fracture = greater syndesmotic disruption = more unstable. Weber C is unstable by definition.
ABCWeber Classification Memory Aid
Hook:A is Always stable (below), B is Borderline (stress it), C is Clearly unstable (above)!
Clinical Assessment
- Mechanism: Twisting, inversion/eversion, direct blow
- Ability to weight-bear: Ottawa rules
- Previous ankle injuries: Instability, arthritis
- Medical comorbidities: Diabetes, PVD, smoking
- Look: Swelling, deformity, skin condition, blisters
- Feel: Bony tenderness (medial, lateral, posterior malleoli)
- Move: ROM (limited by pain), stability testing
- Neurovascular: Dorsalis pedis, posterior tibial, sensation
Maisonneuve fracture: Proximal fibula fracture with syndesmotic rupture. Always palpate full length of fibula and get full-length tibia/fibula views if suspicious. The ankle may look relatively benign!

- Technique
- Compress fibula to tibia at mid-calf
- Positive Finding
- Pain at ankle syndesmosis
- Interpretation
- Syndesmosis injury
- Technique
- ER force to foot with knee at 90 degrees
- Positive Finding
- Pain at syndesmosis, widening on fluoro
- Interpretation
- Syndesmosis instability
- Technique
- Lateral translation of talus
- Positive Finding
- greater than 3mm translation
- Interpretation
- Deltoid insufficiency
- Technique
- Direct AP stress to fibula
- Positive Finding
- greater than 3mm translation
- Interpretation
- Syndesmosis disruption
X-rays indicated if: Bone tenderness at posterior edge or tip of either malleolus OR Inability to weight-bear 4 steps immediately and in ED. Sensitivity over 98% for fractures.
DIMSAnkle Stability Assessment
Hook:If DIMS are disrupted, surgery will FIX it - assess all four before deciding treatment!
Investigations
Imaging Protocol
Three views essential: AP, Lateral, Mortise (15-20 degree internal rotation). Mortise view critical for assessing joint congruency and clear spaces.
Gravity stress or external rotation stress views. Essential to determine stability if isolated Weber B with normal mortise. Widening greater than 4.5mm medial clear space = unstable.
Indicated for: posterior malleolus assessment, pilon fracture exclusion, preoperative planning for complex patterns, syndesmosis evaluation.
Rarely needed. May help assess deltoid ligament integrity if unclear. Useful for occult fractures or persistent symptoms.
- Normal Value
- less than 4mm
- Abnormal
- greater than 4.5mm
- Significance
- Deltoid rupture, talar shift
- Normal Value
- less than 4mm
- Abnormal
- greater than 4mm
- Significance
- Talar subluxation
- Normal Value
- less than 6mm
- Abnormal
- greater than 6mm
- Significance
- Syndesmosis widening
- Normal Value
- greater than 6mm (AP), greater than 1mm (mortise)
- Abnormal
- Reduced
- Significance
- Syndesmosis injury
- Normal Value
- 0 degrees
- Abnormal
- greater than 2 degrees
- Significance
- Ligamentous instability
15-20 degrees internal rotation of the leg to parallel the intermalleolar axis with the X-ray beam. This provides a true AP view of the ankle mortise and allows accurate measurement of clear spaces.
Clear-space measurements detect talar shift, but the commonest correctable error is a shortened or malrotated fibula, and you must know the specific checks that confirm an anatomic fibular reduction (a short/externally-rotated fibula is the classic cause of a malreduced, arthritis-prone ankle):
- Talocrural angle: the angle between a line perpendicular to the tibial plafond and a line through the two malleolar tips; normal is about 83 degrees (within a few degrees of the uninjured side). A reduced angle indicates fibular shortening.
- The "dime sign" / ball sign (Shenton line of the ankle): on the mortise view there is a smooth, unbroken curve between the recess in the lateral talar process and the tip of the lateral malleolus (like a coin fitting into the contour). A break/step in this arc means the fibula is short (the curve no longer matches) - the single best quick check for fibular length.
- Tibiofibular line / equal clear spaces: the medial, superior and lateral clear spaces should be equal and symmetric; the subchondral bone of the plafond and medial malleolus should form a continuous line into the fibula.
- Rotation: compare the fibular contour and the talocrural angle to the contralateral (template) ankle intra-operatively; loss of the normal fibular twist or an abnormal incisura position signals malrotation.
Exam point: confirm fibular reduction by an intact dime/ball sign, a talocrural angle of about 83 degrees matching the other side, and symmetric clear spaces - a broken dime arc means the fibula is short and must be re-reduced before fixation.
Differential Diagnosis
- Distinguishing Features
- Bony tenderness over malleoli, inability to weight-bear, visible fracture
- Key Investigation
- Mortise + AP + lateral radiographs
- Pitfall to Avoid
- Assuming an isolated fibula fracture is stable without stressing the medial side
- Distinguishing Features
- Tenderness over ATFL/CFL, no bony tenderness, Ottawa rules negative
- Key Investigation
- Clinical; radiograph only if Ottawa positive
- Pitfall to Avoid
- Over-imaging; missing an associated avulsion or Weber A fracture
- Distinguishing Features
- Medial/syndesmotic ankle pain plus proximal fibula tenderness
- Key Investigation
- Full-length tibia/fibula views; check medial clear space
- Pitfall to Avoid
- Examining only the ankle and missing the high fibula fracture
- Distinguishing Features
- High-energy axial load, articular comminution, marked swelling
- Key Investigation
- CT for articular mapping
- Pitfall to Avoid
- Treating it like a rotational ankle fracture and operating through swollen soft tissues
- Distinguishing Features
- Positive squeeze and external-rotation tests, pain above joint line, no fracture
- Key Investigation
- Stress/weight-bearing views; MRI if uncertain
- Pitfall to Avoid
- Labelling a frankly unstable syndesmosis as a simple sprain
- Distinguishing Features
- Persistent deep ankle pain, mechanical catching after a 'sprain'
- Key Investigation
- MRI (radiographs often normal)
- Pitfall to Avoid
- Attributing ongoing pain to soft tissue and missing the lesion
Management Algorithm

Non-Operative Management
Indications:
- Stable, isolated Weber A fractures
- Stable Weber B fractures (negative stress views, MCS normal)
- Non-ambulatory or severely comorbid patients
- Significant soft tissue compromise
Non-Operative Protocol
Below-knee backslab, elevation, ice. Non-weight-bearing or TTWB as tolerated.
Convert to CAM boot or below-knee cast. Check alignment with repeat X-rays.
Progressive weight-bearing as pain allows. Physiotherapy for ROM and strength.
Return to normal activities. May take 3-6 months for full recovery.
Non-operative Weber B fractures need weekly X-rays for first 2 weeks to ensure no late displacement. If any widening occurs, convert to operative management.
Surgical Technique
ORIF Lateral Malleolus
Supine with bump under ipsilateral hip. Tourniquet to thigh. May use lateral decubitus for posterior work.
Direct lateral incision over fibula. Protect superficial peroneal nerve (anterolateral). Full-thickness skin flaps.
Anatomic reduction with pointed reduction clamp. Assess length, rotation, alignment. Fibula is key to ankle stability.
1/3 tubular plate or anatomic plate. Interfragmentary lag screw if oblique fracture. 3+ screws proximal, 2+ distal.
Intraoperative stress test under fluoro. Hook test, external rotation. If positive, syndesmosis screw required.


- Two 4.0mm partially threaded screws (most common)
- Perpendicular to fracture line
- Alternative: tension band wire, plate
- Small fragments: K-wires + tension band
- Fix if over 25% articular surface or greater than 2mm step
- Posterolateral approach or anterior-to-posterior screws
- Reduces PITFL, improves syndesmosis stability
- May allow avoidance of syndesmosis screw
Complications
- Incidence
- 10-20%
- Risk Factors
- Diabetes, smoking, swelling
- Management
- Staged surgery, optimize soft tissues
- Incidence
- 5-15%
- Risk Factors
- Technical error, inadequate imaging
- Management
- Revision if symptomatic, prevent with good technique
- Incidence
- 15-25%
- Risk Factors
- CT shows up to 50% in some series
- Management
- Intraoperative CT, careful reduction
- Incidence
- 10-30%
- Risk Factors
- Initial cartilage damage, malreduction
- Management
- Depends on initial injury severity
- Incidence
- 10-30%
- Risk Factors
- Subcutaneous implants
- Management
- Removal after union if symptomatic
- Incidence
- under 5%
- Risk Factors
- Smoking, diabetes, osteoporosis
- Management
- Bone graft, revision fixation
- Incidence
- 1-5%
- Risk Factors
- Immobilization, tourniquet
- Management
- Chemoprophylaxis, early mobilization
CT studies show 16-50% syndesmosis malreduction rate with screws alone. Consider intraoperative CT if available. Even 2mm of malreduction associated with worse outcomes. Ensure fibula is in incisura with reduction clamp before screw insertion.
Postoperative Care and Rehabilitation
Rehabilitation Timeline
Backslab, strict elevation. Wound check at 10-14 days. Non-weight-bearing.
CAM boot. Begin ROM exercises out of boot. Touch weight-bearing progressing to partial.
Remove syndesmosis screws. Progress to full weight-bearing. Active mobilization.
Wean from boot. Full weight-bearing. Proprioception and strength training.
Sport-specific rehabilitation. Full return when strength 90% of contralateral.
Outcomes and Prognosis
- Impact
- Most important
- Notes
- 1mm talar shift reduces contact area 42%
- Impact
- Critical
- Notes
- Malreduction = worse outcomes
- Impact
- Significant
- Notes
- Cannot be modified surgically
- Impact
- Moderate
- Notes
- Younger better functional outcomes
- Impact
- Negative
- Notes
- Higher complication rates
- Impact
- Negative
- Notes
- Impaired healing, higher infection
1mm of lateral talar shift reduces tibiotalar contact area by 42%. This dramatically increases contact pressures and accelerates post-traumatic arthritis. Anatomic reduction is the single most important factor for outcomes.
Guidelines, Registries & Global Practice
- Ankle fractures are among the most common lower-limb fractures, roughly 100-190 per 100,000 per year and around 9% of all fractures in older adults (AIM trial population)
- Bimodal pattern: young men (high-energy/sport) and older women (low-energy/osteoporotic)
- Incidence is rising in the elderly worldwide as populations age
- Winter and ice-related falls drive seasonal peaks in temperate regions
- Weber and Lauge-Hansen are the universal classification languages for communication
- Stability assessment (clinical + stress imaging) drives the operative decision everywhere
- Anatomic reduction of fibular length/rotation and the mortise is the shared goal
- Stress testing of isolated Weber B is treated as standard of care internationally
- Region
- International
- Key Position on Ankle Fractures
- Reduction-first principles; fibula is key to length/rotation; intra-operative stress (hook/external rotation) mandatory before deciding on syndesmotic fixation
- Region
- UK
- Key Position on Ankle Fractures
- Time-critical care for open fractures, soft-tissue-led timing, senior decision-making; supports non-operative pathways (e.g. close contact casting) in selected older adults
- Region
- US
- Key Position on Ankle Fractures
- Emphasis on anatomic mortise restoration and syndesmotic reduction quality; growing acceptance of suture-button devices and early weight-bearing after stable fixation
- Region
- Europe
- Key Position on Ankle Fractures
- Supports intra-operative syndesmotic reduction assessment and consideration of post-operative CT for high-risk syndesmotic injuries
- Region
- UK RCT
- Key Position on Ankle Fractures
- In patients over 60, close contact casting is functionally equivalent to ORIF at 6 months with fewer wound problems but more malunion - informs shared decision-making
Where intra-operative fluoroscopy, CT and suture-button implants are readily available, practice trends toward open syndesmotic reduction, post-operative CT verification and early weight-bearing. In limited-resource settings, robust syndesmosis screw fixation (cheap, reliable, no special instrumentation) and clinically guided cast management remain entirely appropriate; close contact casting is a valuable low-cost option for frail elderly patients regardless of setting.
Key documentation requirements:
- Document examination of full length of fibula (Maisonneuve)
- Document neurovascular status pre and post-operatively
- Document stress testing results for Weber B fractures
- Informed consent must include: infection, DVT, malunion, nonunion, post-traumatic arthritis, need for hardware removal
- If non-operative: document patient informed of need for close follow-up and risk of late displacement
Specific risks to discuss: Wound complications (especially if swollen, diabetic, smoker), superficial peroneal nerve injury, need for syndesmosis screw removal, hardware irritation requiring removal, post-traumatic arthritis regardless of treatment, DVT/PE.
Controversies and Areas of Uncertainty
Suture buttons reduce implant failure and removal and allow physiological motion, but high-quality long-term RCT data show functional outcomes are broadly equivalent to screws. Cost and surgeon familiarity still favour screws in many settings - the "best" device remains debated.
Whether to engage 3 or 4 cortices, use 3.5 or 4.5mm screws, and whether to routinely remove screws are all unresolved. Many surgeons now leave intact or even broken screws in asymptomatic patients rather than performing routine removal.
Routine deltoid ligament repair in supination-external rotation injuries with medial clear space widening has not been shown to improve outcomes when the lateral column and syndesmosis are anatomically stabilised; selective repair remains controversial.
The AIM trial shows casting can equal surgery in selected older adults. In diabetics and neuropaths, the optimal construct (extended fixation, transarticular nails, prolonged non-weight-bearing) and the threshold for surgery are still debated given high complication rates.
The classic "fix if over 25% of the articular surface" threshold is increasingly questioned. Modern thinking favours fixing based on syndesmotic stability, fragment morphology (Bartonicek/Haraguchi classification) and articular step, not size alone - because even small fragments carrying the PITFL can restore syndesmotic stability when fixed.
The morphology classifications named above are themselves examinable, because fragment shape (not just size) now drives the decision to fix and the approach:
Haraguchi (CT-based, 3 types):
- Type I - posterolateral-oblique: the commonest; a triangular posterolateral fragment.
- Type II - medial-extension (transverse): the fracture extends across to the medial malleolus (a posteromedial component) - higher chance of an intra-articular die-punch fragment.
- Type III - small-shell: a small avulsion shell off the posterior rim.
Bartonicek/Rammelt (CT-based, 5 types, emphasises the fibular notch/incisura and stability):
- Type 1: extra-incisural fragment (rim only, intact notch) - stable.
- Type 2: posterolateral fragment extending into the incisura.
- Type 3: posteromedial two-part fragment (involving the medial malleolus).
- Type 4: large posterolateral triangular fragment (over a third of the notch).
- Type 5: irregular osteoporotic fragment.
Why it matters: fragments involving the incisura (Bartonicek 2-4) are the ones whose fixation restores syndesmotic stability via the attached PITFL and improves articular congruity - so a CT to characterise the fragment, and posterior (posterolateral or posteromedial) buttress fixation of an incisura-involving fragment, is preferred over a stand-alone syndesmosis screw.
Exam point: classify the posterior malleolus on CT - Haraguchi I/II/III by location and Bartonicek 1-5 by incisura involvement - and fix the incisura-involving fragments to restore both the joint surface and syndesmotic stability.
MCQ Practice Points
Q: Which structure is the primary restraint to lateral talar shift? A: The deep deltoid ligament (specifically the deep tibiotalar fibers). The superficial deltoid resists eversion. Disruption of the deep deltoid allows the talus to shift laterally, increasing medial clear space.
Q: A Weber B fracture is defined by the fibula fracture being at what level? A: At the level of the syndesmosis. This correlates with partial syndesmosis injury potential. Weber A is below (intact syndesmosis), Weber C is above (disrupted syndesmosis).
Q: What is the upper limit of normal for medial clear space on a mortise view? A: 4mm (or equal to superior clear space). Greater than 4-4.5mm suggests deltoid ligament rupture and indicates an unstable injury requiring surgical management.
Q: What is the effect of 1mm lateral talar shift on tibiotalar contact? A: 42% reduction in contact area. This is the basis for emphasis on anatomic reduction - even small amounts of talar shift dramatically increase contact pressures and accelerate post-traumatic arthritis.
Q: At what level should a syndesmosis screw be placed above the joint line? A: 2-4cm above the joint line, parallel to the tibial plafond. Some surgeons prefer 3-4cm to minimize risk of articular damage. Screw directed 25-30 degrees anterior to coronal plane.
Exam Viva Scenarios
Practise clinical reasoning and management decisions out loud
“A 45-year-old woman presents after twisting her ankle stepping off a curb. She is unable to weight-bear. X-rays show a spiral oblique fracture of the lateral malleolus at the level of the syndesmosis with no obvious medial injury. How would you classify and manage this fracture?”
“You decide to proceed with ORIF for an unstable Weber B fracture with positive stress views. The patient is in theatre. Walk me through your surgical technique.”
“You review a patient 6 months post ankle ORIF in clinic. They have persistent lateral ankle pain and stiffness. CT shows malreduced syndesmosis with external rotation of the fibula. How do you manage this?”
Key Anatomy
- Ring structure - isolated injury rare, look for second lesion
- Syndesmosis: AITFL, PITFL, IOL, ITL - PITFL strongest
- Deep deltoid = primary restraint to lateral talar shift
- Superficial peroneal nerve 7-10cm above fibula tip
Weber Classification
- Weber A = below syndesmosis = stable
- Weber B = at syndesmosis = need stress views
- Weber C = above syndesmosis = unstable by definition
- Lauge-Hansen describes mechanism (SER most common 40-75%)
Treatment Algorithm
- Stable Weber A/B: Non-operative, CAM boot, close follow-up
- Unstable Weber B (MCS greater than 4.5mm): ORIF fibula +/- syndesmosis
- Weber C: ORIF fibula + syndesmosis fixation always
- Bimalleolar/Trimalleolar: ORIF all components
Surgical Pearls
- Operate within 6-8h or wait for wrinkle sign (7-14 days)
- Protect superficial peroneal nerve anterolaterally
- Always stress syndesmosis intraoperatively
- Syndesmosis screw: 2-4cm above joint, 3-4 cortices, parallel to plafond
Complications
- Syndesmosis malreduction 15-50% (CT detects more than plain XR)
- 1mm talar shift = 42% reduction in contact area
- Wound complications 10-20% (higher if swollen/diabetic)
- Post-traumatic arthritis 10-30% at 10 years
Evidence Base
Suture Button vs Syndesmosis Screw - Long-Term RCT
- RCT of 43 patients with PER-type/Weber C unstable syndesmosis injuries randomised to a single tricortical syndesmosis screw or a suture button. At a mean 7.1-year follow-up, both implants maintained reduction equally well (2 malreductions screw vs 1 suture button), with comparable osteoarthritis rates and functional scores (mean OMAS 88 screw vs 78 suture button, not statistically significant).
Suture Button vs Screw - Meta-analysis of RCTs
- Meta-analysis of 5 RCTs (280 patients): suture button gave a slightly higher 1-year AOFAS score (mean difference 5.5 points) and a markedly lower implant failure rate (OR 0.03) than syndesmosis screws, with no difference in most other outcomes.
Early vs Delayed Weight-Bearing RCT
- Multicentre RCT of 110 patients after ORIF of unstable ankle fractures. Early weight-bearing and motion at 2 weeks gave significantly better 6-week ankle range of motion, Olerud-Molander and SF-36 scores than 6 weeks of non-weight-bearing cast immobilisation, with no fixation failures or loss of reduction and fewer hardware removals.
Posterior Malleolus Fixation Restores Syndesmotic Stability
- In a cadaveric PER-type model, fixation of the posterior malleolus (where the intact PITFL stays attached to the fragment) restored syndesmotic stiffness to 70% of intact, compared with only 40% after a syndesmosis screw.
Syndesmosis Malreduction and Functional Outcome
- Prospective bilateral-CT study of 68 syndesmotic injuries: 39% were malreduced compared with the uninjured side. Malreduction was far more common after closed (44%) than open (15%) reduction, and malreduced patients had significantly worse SMFA and Olerud-Molander scores at minimum 2 years.
Lateral Talar Shift and Contact Area (landmark)
- Cadaveric study of 23 tibiotalar joints: just 1mm of lateral talar shift reduced the tibiotalar contact area by an average of 42%, with the largest change occurring over the first millimetre of displacement.
Casting vs ORIF in Older Adults (AIM trial)
- Pragmatic equivalence RCT of 620 patients aged over 60 with unstable ankle fractures: close contact casting gave equivalent 6-month Olerud-Molander function to ORIF (mean difference -0.65 points) at lower cost. ORIF had more infection/wound problems (10% vs 1%), while casting had more malunion (15% vs 3%) and 19% later converted to surgery.