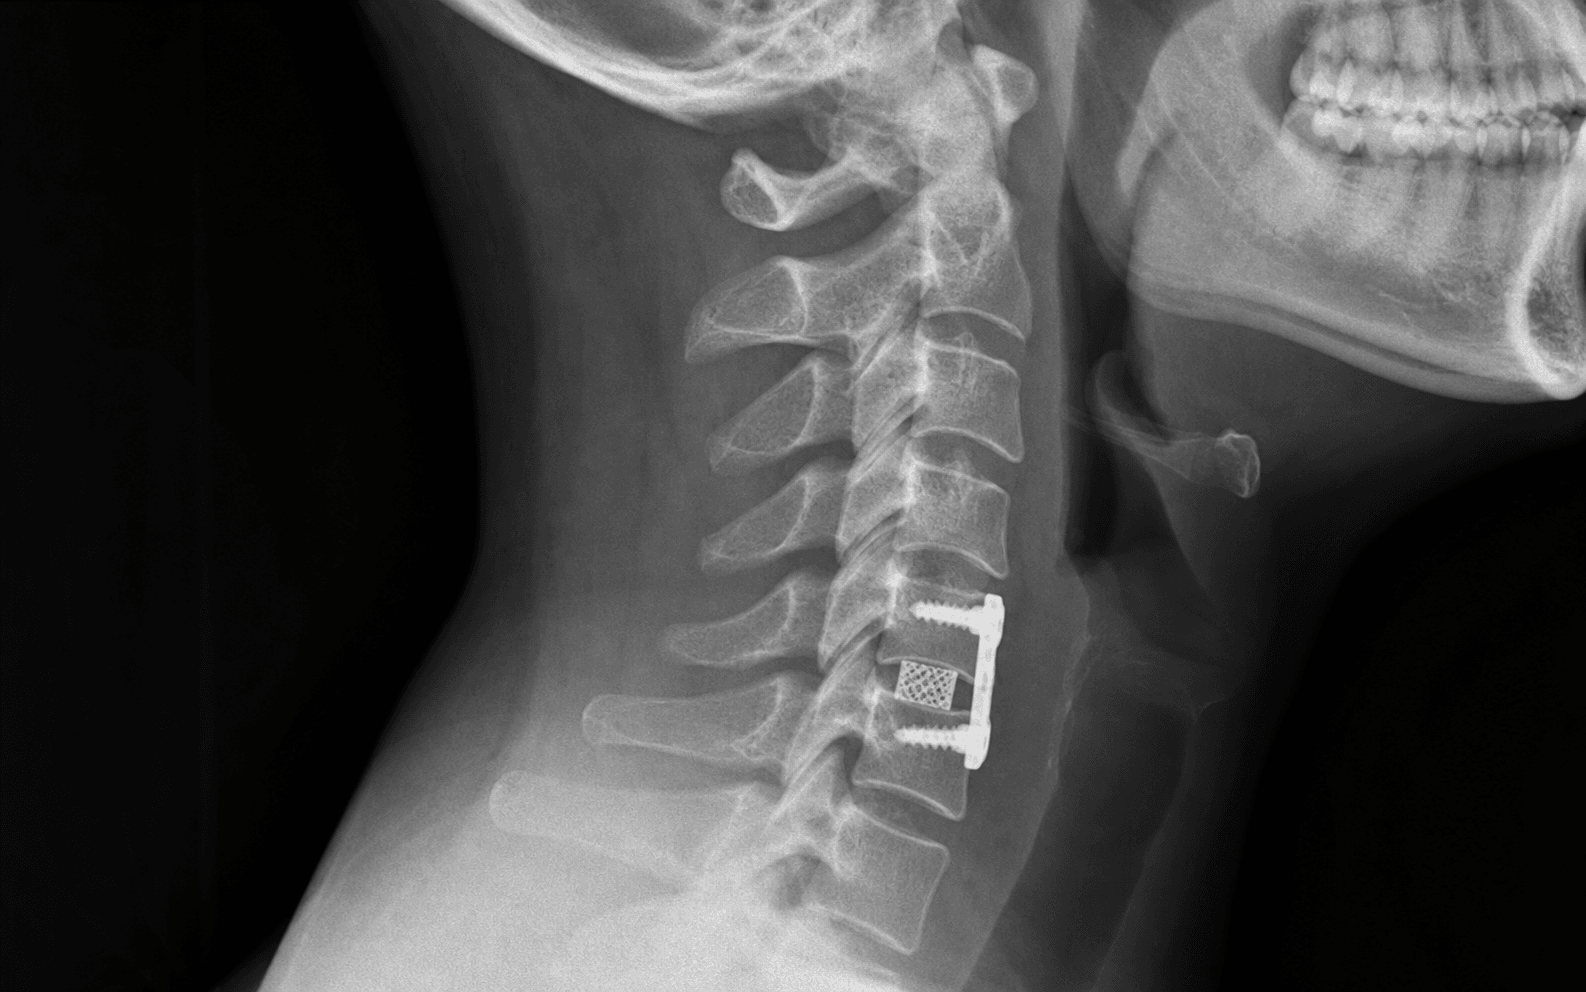
Smith-Robinson approach · Left-sided transverse incision · Avascular plane medial to the carotid sheath · Discectomy with decompression · Cage plus anterior plate fixation
- Surface landmarks to localise the level: mandible angle C2–C3, hyoid C3–C4, thyroid cartilage C4–C5, cricoid C6 — Chassaignac's tubercle (the anterior tubercle of the C6 transverse process) is the most reliable palpable landmark.
- The Smith-Robinson interval is the avascular plane between the carotid sheath and SCM laterally and the strap muscles, trachea and esophagus medially.
- A left-sided approach is preferred: the left recurrent laryngeal nerve loops under the aortic arch and ascends predictably in the tracheoesophageal groove, whereas the right RLN loops under the subclavian artery and is more variable.
- Confirm the level with a spinal needle and a LATERAL fluoroscopic image before incision — wrong-level surgery is a never-event.
- Complete the discectomy back to the posterior longitudinal ligament, then remove the PLL to expose the dura: there is no epidural space anteriorly in the cervical spine.
- The anterior plate raises single-level fusion from about 92 percent to about 97 percent (Fraser/Härtl); RLN palsy is retraction-driven (2–11 percent temporary, under 1 percent permanent).
When & Why
Indication. Symptomatic cervical radiculopathy or myelopathy from anterior pathology at a single level that has failed conservative management, where the imaging level correlates with the clinical findings. Primary indications:
- Cervical radiculopathy from a disc herniation with dermatomal symptoms that correlate with imaging.
- Cervical radiculopathy from osteophyte formation or foraminal stenosis causing nerve-root compression.
- Cervical myelopathy with cord compression at a single level — ACDF is preferred over a posterior approach here.
- Radiculopathy that has failed six to twelve weeks of conservative treatment. Relative indications:
- A soft disc herniation with a motor deficit (a relatively urgent indication).
- Axial neck pain from degenerative disc disease (less predictable outcomes).
- Single-level cervical instability requiring fusion (trauma, tumour or infection).
Preferred for one to two levels and anterior pathology (soft disc, osteophyte). Direct decompression and fusion through the Smith-Robinson approach.
Preferred for three or more levels, posterior pathology (laminectomy or laminoplasty), or when correcting kyphosis is not required.
Reserved for severe instability, multilevel disease with kyphosis, or complex revision.
Expected outcomes. Radiculopathy gives 90–95 percent good or excellent results. Myelopathy improves or stabilises in around 80 percent (less predictable than radiculopathy). Single-level fusion exceeds 95 percent with a plate. Contraindications. Absolute: active cervical infection, severe medical comorbidity precluding anaesthesia, or no structural pathology that correlates with the symptoms. Relative: severe osteoporosis (poor screw purchase, subsidence), previous anterior cervical surgery on the same side (raises RLN risk), previous neck irradiation, severe kyphotic deformity (consider posterior), three or more levels (consider posterior or staged), and diffuse idiopathic skeletal hyperostosis. Pre-operative work-up. Cervical spine radiographs (AP, lateral, flexion-extension) for alignment, instability and osteophytes; MRI for disc, cord signal and root or cord compression; CT if bony detail or foraminal dimensions are needed. Correlate the image with the exam — radiculopathy gives dermatomal pain, myotomal weakness and reflex change; myelopathy gives gait disturbance, hand clumsiness, hyperreflexia and a positive Hoffmann or Babinski. Add EMG and nerve conduction studies if the diagnosis is unclear, and CT myelogram if MRI is contraindicated. Optimise before listing. Smoking cessation (a minimum of four to six weeks pre-op, continued post-op — smoking markedly impairs fusion), diabetic control (HbA1c target less than 8 percent), review of anticoagulation, and pre-operative laryngoscopy if there has been previous anterior neck surgery to document baseline vocal cord function. Consent. Dysphagia is common early (about 50 percent) and usually settles; hoarseness from RLN injury (2–11 percent temporary, less than 1 percent permanent); adjacent-segment disease over the long term (about 2–3 percent per year); and the small but serious risks of haematoma with airway compromise, esophageal and vertebral artery injury, dural tear and spinal cord injury.
The Operation
The goal is to decompress the neural elements through the avascular Smith-Robinson plane, restore disc height and fuse the segment with an interbody cage and anterior plate. The exposure — finding and protecting the structure at risk in each layer — is laid out in full below (and in depth on the Smith-Robinson approach to the anterior cervical spine page), and is the heart of the operation.
Operative sequence
- Supine with a small shoulder roll (slight neck extension improves anterior exposure), head neutral or slightly rotated right for a left-sided approach, arms tucked and all pressure points padded.
- Tape the shoulders caudally for lower levels (C6–T1) so they are seen on lateral fluoroscopy.
- Establish a neuromonitoring baseline (MEPs and SSEPs) after induction; any later deterioration must be investigated.
- Use the surface landmarks as a guide: mandible angle C2–C3, hyoid C3–C4, thyroid cartilage C4–C5, and the cricoid at C6 — Chassaignac's tubercle is the most reliable palpable landmark.
- Place a spinal needle into the target disc under fluoroscopy and obtain a LATERAL image to confirm the level (an AP view is insufficient). Wrong-level surgery is a never-event.
- Mark a 4–5 cm transverse incision in a skin crease centred on the target level.
- Transverse skin incision 4–5 cm along the crease; divide subcutaneous tissue down to platysma.
- Divide platysma transversely (its fibres run vertically, so a transverse cut reduces tension on closure) and achieve meticulous haemostasis to avoid a post-operative haematoma.
- Identify the deep cervical fascia beneath platysma.
- Palpate the medial border of SCM and incise the deep cervical fascia along it.
- Develop the avascular plane between the carotid sheath and SCM laterally (retracted laterally) and the strap muscles, trachea and esophagus medially (retracted medially). Blunt finger dissection sweeps the carotid sheath laterally and the trachea and esophagus medially.
- Feel the carotid pulse laterally to confirm you are in the correct interval; if you meet bleeding you are in the wrong plane — reassess.
- The omohyoid crosses the field around C5–C6; retract it superiorly or inferiorly, or divide it. The strap muscles are sternohyoid, sternothyroid and omohyoid.
- Continue bluntly onto the shiny white prevertebral fascia over the vertebral bodies; palpate the midline (the ALL is a longitudinal ridge) and confirm the disc spaces (soft) between the bodies (hard).
- Elevate the longus colli subperiosteally from the midline to about 15 mm laterally before placing retractor blades, and seat the blades under the elevated longus colli. This protects the sympathetic chain that runs on the anterolateral vertebral bodies beneath its lateral edge — injury causes Horner syndrome (miosis, ptosis, anhidrosis).
- Insert Caspar distraction pins into the bodies above and below the target disc (into body, not endplate).
- Confirm the level again with lateral fluoroscopy now that the retractors are in place (the second confirmation).
- Seat the self-retaining retractor blades under longus colli bilaterally and apply distraction to open the disc space; release the retractors periodically to reduce RLN neuropraxia and dysphagia from prolonged retraction.
- Incise the anterior longitudinal ligament over the disc with a scalpel and remove disc material with pituitary rongeurs and curettes.
- Remove osteophytes from the vertebral margins with a high-speed burr, preserving endplate integrity (violating it causes subsidence).
- Proceed posteriorly, removing all disc material back to the posterior longitudinal ligament. The uncovertebral joints (of Luschka) lie lateral to the disc and form the lateral boundary of the foramen.
- Remove the PLL with Kerrison rongeurs to expose the dura. There is no epidural space anteriorly in the cervical spine, so the dura lies immediately behind the PLL; dural pulsations confirm adequate central decompression.
- Perform bilateral foraminotomy by removing the medial uncinate processes to decompress the exiting nerve roots, and confirm each root is freely mobile on a nerve hook.
- The vertebral artery runs in the transverse foramen from C6 to C1, about 14–18 mm from the midline — stay within this during lateral decompression.
- Remove the cartilaginous endplate with curettes to expose bleeding cancellous bone (essential for fusion) while preserving the subchondral bone plate (prevents subsidence).
- Create flat, parallel surfaces for cage seating; balance adequate preparation against weakening the endplate.
- Select an interbody device: PEEK is most common (radiolucent, with tantalum markers); titanium integrates better but produces MRI artifact; structural allograft is a biological option.
- Size with trials for a slight press-fit that restores disc height but avoids overdistraction (more than about 2 mm raises the risk of post-operative radiculopathy).
- Pack the cage with graft (local autograft, allograft or synthetic), insert it flush with or 1–2 mm posterior to the anterior body margin, and confirm position on fluoroscopy.
- Apply a plate spanning from the mid-superior to the mid-inferior body; it is load-sharing and raises the single-level fusion rate from about 92 percent (ACDF alone) to about 97 percent (ACDF with plate) in the Fraser/Härtl meta-analysis.
- Insert the screws with a 12–15 degree convergent (toward midline) trajectory; avoid breaching the lateral cortex (vertebral artery, nerve root) or the posterior cortex (spinal cord).
- Confirm plate and screw position on AP and lateral fluoroscopy; do not let the plate overhang the adjacent disc (it accelerates adjacent-segment disease).
- Remove the distractor pins and confirm neuromonitoring is unchanged from baseline; check final cage and plate position on fluoroscopy.
- Release the retractors, achieve meticulous haemostasis with bipolar (careful near the RLN), irrigate, and consider a drain (controversial).
- Close platysma (3-0 Vicryl), subcutaneous (3-0 Vicryl) and skin (subcuticular 4-0 Monocryl); extubate awake in theatre to assess the airway and voice immediately.
Structures at risk — what is in each layer
Left: loops under the aortic arch and ascends in the tracheoesophageal groove (predictable). Right: loops under the subclavian artery and may run more lateral. Injury causes hoarseness; bilateral injury causes airway obstruction needing tracheostomy.
Runs with the superior thyroid artery around C3–C4. Injury causes voice fatigue and loss of pitch (cricothyroid muscle).
On the anterolateral vertebral bodies under the lateral edge of longus colli. Injury causes Horner syndrome (miosis, ptosis, anhidrosis). Protected by subperiosteal longus colli elevation with blades placed underneath.
Carotid artery, internal jugular vein and vagus (which gives off the RLN) — lateral to the field. Retract gently laterally; the IJV can tear with aggressive retraction.
In the transverse foramen of C1–C6, 14–18 mm from the midline. At risk during lateral decompression and foraminotomy — stay within 14 mm of the midline.
Posterior to the trachea, retracted medially. Perforation rate 0.1–0.5 percent and potentially fatal; higher risk in revision and with prolonged retraction.
The dura is immediately posterior to the PLL (no anterior epidural space). Decompression must be controlled — instruments pushed through the PLL risk cord injury.
Left-sided, entering the jugulo-subclavian junction; at risk at C6–C7 and T1 on the left. Injury causes a chyle leak.
Stridor, progressive dyspnoea, neck swelling and anxiety after ACDF suggest a retropharyngeal haematoma that can progress to complete airway obstruction within minutes. Call for senior help, prepare for a difficult airway (the haematoma distorts the anatomy), have ENT and a surgical airway on standby, and if the patient is deteriorating open the wound at the bedside to decompress before returning to theatre for formal evacuation and haemostasis. Do not wait and observe a deteriorating patient.
Apfelbaum's cadaveric videofluoroscopy of 900 cases showed the retractor displaces the larynx against the endotracheal tube, compressing the intralaryngeal segment of the RLN. Monitoring ET cuff pressure and deflating the cuff after retractor placement cut temporary palsy from 6.4 percent to 1.69 percent, with only 3 of 900 permanent. Release the retractors periodically.
The left RLN loops under the aortic arch and ascends reliably in the tracheoesophageal groove; the right loops under the subclavian (higher) and may take a more lateral path. Go right only for revision of a prior left approach, pre-existing left cord palsy, or right-dominant pathology. Bilateral injury is catastrophic — never re-approach the same side as a known prior palsy.
Aftercare & Complications
Aftercare and rehabilitation | Phase | Timing | Activity | |-------|--------|----------| | 1 | 0–2 weeks | Soft collar for comfort; soft diet while dysphagia settles; gentle shoulder and arm range of motion | | 2 | 2–6 weeks | Wean the collar; isometric neck exercises; desk-based activity | | 3 | 6–12 weeks | Progressive return to normal activity; avoid heavy lifting and contact sport until fusion is maturing | | 4 | 3–6 months | Full activity once imaging confirms bridging fusion | Most patients go home within 24–48 hours, and many single-level ACDFs are now day-case in selected patients. Dysphagia and a sore throat are common in the first few days and usually settle. Extubate awake in theatre and watch the airway closely for the first 24 hours. Complications
- Recognition
- Difficulty swallowing, choking, odynophagia, aspiration
- Prevention
- Minimise retractor time, release retractors periodically, avoid excessive cage height
- Management
- Usually self-limiting over 6–12 weeks; speech-pathology assessment; soft diet; rare severe cases need gastrostomy
- Recognition
- Hoarseness immediately post-op, weak cough, aspiration
- Prevention
- Left-sided approach, minimise retraction force, release retractors periodically, deflate the ET cuff after retractor placement
- Management
- Most temporary (neuropraxia, recover 6–12 weeks); permanent under 1 percent — ENT referral, voice therapy, medialisation if persistent
- Recognition
- Progressive dyspnoea, stridor, neck swelling — can progress to complete obstruction
- Prevention
- Meticulous haemostasis, consider a drain, monitor closely for 24 hours
- Management
- Emergency — call for help, prepare a difficult airway, bedside wound evacuation if deteriorating, return to theatre for evacuation
- Recognition
- Immediate (recognised intra-op) or delayed (fever, neck swelling, mediastinitis)
- Prevention
- Careful medial retraction, avoid sharp instruments near the esophagus, gentle handling
- Management
- If early: primary repair, nil by mouth, antibiotics. Delayed: drainage, antibiotics, flap cover; high mortality if missed
- Recognition
- Massive arterial bleeding during foraminotomy or lateral decompression
- Prevention
- Stay within 14 mm of the midline, recognise anomalous artery patterns, careful burring
- Management
- Direct pressure, haemostatic pack, may need IR embolisation; accept some stenosis rather than blind repair
- Recognition
- Immediate motor or sensory loss, worsened myelopathy
- Prevention
- Controlled decompression, neuromonitoring, no instruments posterior to the PLL
- Management
- If intra-op change: stop, check position, consider steroids. Post-op: urgent MRI, revision if compression
- Recognition
- Clear fluid in the wound, postural headache, meningitis if infected
- Prevention
- Careful PLL removal, recognise the dura (blue-grey, pulsating)
- Management
- Primary repair or patch (muscle or fat, fibrin glue), watertight closure, lumbar drain, bedrest if persistent
- Recognition
- Ptosis, miosis, anhidrosis on the operative side
- Prevention
- Subperiosteal longus colli elevation, retractor blades under longus colli, avoid lateral dissection
- Management
- Usually temporary (resolves over weeks to months); reassure the patient
- Recognition
- Loss of disc height on follow-up radiograph, recurrent symptoms, kyphosis
- Prevention
- Preserve endplate integrity, appropriate cage sizing, plate fixation, smoking cessation
- Management
- Asymptomatic: observe. Symptomatic or kyphotic: revision with a larger cage or corpectomy
- Recognition
- New radiculopathy or myelopathy at the level above or below, years later
- Prevention
- Maintain lordosis, avoid overlong plates; arthroplasty may reduce it in selected patients
- Management
- Conservative first; if it fails, extend fusion or decompression, or arthroplasty at the new level
Viva & Exam Focus
MHTCSurface landmarks — MHTC
SCOPESmith-Robinson approach — SCOPE
Clinical Decision Scenarios
Practise clinical reasoning and management decisions out loud
“You are performing a single-level ACDF at C5–C6 on a 45-year-old with radiculopathy. During closure, the anaesthetist mentions the patient is 'a bit stridorous' after extubation. What is your immediate management?”
“A patient wakes up from ACDF with a hoarse voice. How do you assess and counsel this patient?”
“Why do many surgeons prefer a left-sided approach for ACDF, and in what situations would you consider a right-sided approach?”
Key numbers
- Surface landmarks: mandible C2–C3, hyoid C3–C4, thyroid C4–C5, cricoid C6 (most reliable — Chassaignac's tubercle)
- Vertebral artery: 14–18 mm from the midline — stay within this during foraminotomy
- RLN injury: 2–11 percent total, 90–95 percent temporary, under 1 percent permanent
- Dysphagia (Bazaz): 50.2 percent at 1 month, 17.8 percent at 6 months, 12.5 percent at 12 months; under 5 percent moderate or severe persistent
- Single-level fusion: about 92 percent ACDF alone versus about 97 percent with an anterior plate (Fraser/Härtl)
Critical anatomy
- Smith-Robinson interval: avascular plane between SCM and carotid laterally and strap muscles, trachea and esophagus medially
- Left RLN loops under the aortic arch, predictable in the tracheoesophageal groove (preferred side)
- Right RLN loops under the subclavian, more variable, may be more lateral
- Sympathetic chain under lateral longus colli — elevate subperiosteally and place blades underneath
- No anterior epidural space — dura is immediately posterior to the PLL
Wrong-level prevention
- Surface landmarks are an initial guide only (often unreliable)
- Spinal needle in the disc under fluoroscopy before incision
- Must obtain a LATERAL image to confirm (AP is insufficient)
- Re-confirm after the retractors are placed
- Wrong-level surgery is a never-event — document the confirmation
Emergencies
- Retropharyngeal haematoma: stridor, dyspnoea, neck swelling — difficult airway, may need bedside evacuation
- Bilateral RLN injury: complete airway obstruction, needs tracheostomy
- Vertebral artery injury: massive bleeding during foraminotomy — pack, consider IR embolisation
- Esophageal perforation: delayed presentation with fever and sepsis — high mortality if missed
Technique essentials
- Left-sided approach preferred (predictable RLN anatomy)
- Elevate longus colli subperiosteally; blades underneath protect the sympathetic chain
- Release retractors periodically (reduces RLN neuropraxia and dysphagia)
- Complete discectomy to PLL, then remove PLL to see dura
- Foraminotomy: stay within 14 mm of the midline
- Screws: 12–15 degrees convergent toward the midline
Background & Evidence
Pathoanatomy. Cervical radiculopathy most often follows disc degeneration with posterior or posterolateral disc herniation, or osteophyte formation with foraminal stenosis, compressing the exiting nerve root. Cervical myelopathy follows cord compression — from a disc, an osteophyte or ossification of the posterior longitudinal ligament — within a canal narrowed by typical cervical spondylosis. The uncovertebral joints (of Luschka) hypertrophy laterally and contribute to foraminal narrowing; the vertebral artery runs in the transverse foramen from C6 to C1. Guidelines, registries and global practice Approach side — global consensus. A left-sided Smith-Robinson approach is favoured by many surgeons for the predictable left RLN course, but high-quality evidence (including the Apfelbaum data) shows retraction technique matters more than side. North American, UK (BASS and SBNS) and European (EUROSPINE) practice all accept either side; the right side is reserved for revision of a prior left approach, pre-existing left cord palsy, or right-dominant pathology. ACDF versus cervical disc arthroplasty (CDA). Multiple FDA IDE randomised trials and their long-term (7–10 year) follow-up report non-inferior or superior outcomes for CDA at one and two levels in carefully selected patients, with lower re-operation for adjacent-level disease. NICE (UK) and most European bodies endorse arthroplasty as an option for single-level radiculopathy in patients without facet arthropathy, instability or significant osteoporosis; ACDF remains the default where motion preservation is contraindicated. Bone graft. Tricortical iliac crest autograft (the original Smith-Robinson construct) is now largely replaced globally by structural allograft or interbody cages with local or allograft fill, avoiding donor-site morbidity. Routine recombinant BMP-2 in the anterior cervical spine is specifically cautioned against by the FDA because of airway-threatening swelling. Registry and quality data. Large national datasets — the UK British Spine Registry, the US national inpatient sample and the Quality Outcomes Database — consistently reproduce dysphagia as the dominant early complication and confirm low rates of catastrophic airway, esophageal and vascular events, supporting day-case or short-stay single-level ACDF in appropriately selected patients.
References
Anterior cervical plating significantly increases single-level fusion rate
- Meta-analysis of 21 studies, 2682 patients with degenerative cervical disease
- Single-level fusion: 84.9 percent for discectomy alone, 92.1 percent for ACDF, 97.1 percent for ACDF with anterior plate (p=0.0002)
- Anterior plate significantly improved fusion at one, two and three levels
- For three-level disease, corpectomy with plate outperformed three-level ACDF with plate
Dysphagia after anterior cervical surgery: incidence and natural history
- Prospective study of 249 consecutive patients followed to 12 months
- Dysphagia in 50.2 percent at 1 month, 32.2 percent at 2 months, 17.8 percent at 6 months, 12.5 percent at 12 months
- Only 4.8 percent had moderate or severe dysphagia at 6 months
- Female sex and multiple operative levels were risk factors; hardware and procedure type were not
Cause and prevention of recurrent laryngeal nerve palsy in anterior cervical surgery
- 900 consecutive anterior cervical procedures with cadaveric videofluoroscopy
- Retractor displaces the larynx against the endotracheal tube, compressing the intralaryngeal segment of the RLN
- Monitoring ET cuff pressure and deflating after retractor placement cut temporary palsy from 6.4 percent to 1.69 percent (p=0.0002)
- Only 3 of 900 patients had permanent palsy
Adjacent-segment disease after anterior cervical arthrodesis: long-term incidence
- 374 patients, 409 arthrodeses, followed up to 21 years
- Symptomatic adjacent-segment disease occurred at a near-constant 2.9 percent per year
- Kaplan-Meier predicted 25.6 percent would develop adjacent-segment disease within 10 years
- Risk was higher after single-level than multilevel fusion and greatest at C5–6 and C6–7, suggesting progressive spondylosis rather than fusion-driven overload
ACDF-associated complications in a large consecutive series
- Retrospective review of 1015 first-time ACDF patients (Smith-Robinson approach)
- Overall morbidity 19.3 percent; isolated postoperative dysphagia 9.5 percent was the commonest
- Symptomatic RLN palsy 3.1 percent, postoperative haematoma 5.6 percent (2.4 percent needed reoperation)
- Esophageal perforation 0.3 percent, dural penetration 0.5 percent, Horner syndrome 0.1 percent; single death from esophageal perforation (0.1 percent mortality)
Further reading 1. Smith GW, Robinson RA. The treatment of certain cervical-spine disorders by anterior removal of the intervertebral disc and interbody fusion. J Bone Joint Surg Am. 1958;40-A(3):607–624. 2. Netterville JL, Koriwchak MJ, Winkle M, et al. Vocal fold paralysis following the anterior approach to the cervical spine. Ann Otol Rhinol Laryngol. 1996;105(2):85–91. 3. Hilibrand AS, Robbins M. Adjacent segment degeneration and adjacent segment disease: the consequences of spinal fusion? Spine J. 2004;4(6 Suppl):190S–194S. 4. Kaiser MG, Haid RW Jr, Subach BR, et al. Anterior cervical plating enhances arthrodesis after discectomy and fusion with cortical allograft. Neurosurgery. 2002;50(2):229–238. 5. Winslow CP, Winslow TJ, Wax MK. Dysphonia and dysphagia following the anterior approach to the cervical spine. Arch Otolaryngol Head Neck Surg. 2001;127(1):51–55. 6. Epstein NE. Airway complications of multilevel anterior cervical surgery. J Spinal Disord. 2001;14(2):135–140.