Post-traumatic gunstock deformity · Lateral closing-wedge osteotomy
- Cubitus varus is a cosmetic (gunstock) deformity, almost always from a supracondylar fracture malunion. It reflects malreduction, NOT a growth disturbance — it does NOT remodel with growth, so observation is not a cure.
- The standard operation is a lateral closing-wedge osteotomy: cut the wedge with its base laterally and apex at the medial cortex, then close it by adducting the forearm. The intact medial cortex (the medial hinge) is the pivot — without it the osteotomy is unstable.
- The wedge angle equals the varus on the affected side PLUS the desired valgus on the normal side. Always template against the contralateral elbow and confirm the correction intra-operatively by matching the carrying angle and Baumann angle to the normal side.
- The ulnar nerve is the structure most at risk — injured by the medial K-wire. Protect it: palpate the nerve, flex the elbow to roll it posteriorly, and start the wire anterior to the medial epicondyle.
- Up to two-thirds of closing-wedge patients develop a lateral condylar prominence (Wong) — the characteristic cosmetic trade-off. Cubitus varus is usually a 3D deformity (varus plus extension and internal rotation), so plan rotation and sagittal correction too.
When & Why
Indication. A cosmetically unacceptable cubitus varus deformity — a negative carrying angle that is more than about 10 degrees different from the contralateral side — that has failed to remodel, with the deformity stable (minimum 2 years after the original injury, typically in a child older than 6 years). The most common cause by far is a supracondylar humeral fracture malunion (the classic gunstock deformity); it is rare with modern anatomic closed reduction and percutaneous pinning but was historically frequent after closed or inadequate treatment. Other causes include lateral condyle nonunion with overgrowth, physeal arrest, and congenital deformity. Assess three things before offering surgery. - Is it really cubitus varus, and how bad is it? Measure the carrying angle with the elbow fully extended and the forearm supinated, and compare to the contralateral normal side. Normal is 5 to 15 degrees of valgus (slightly greater in females); cubitus varus shows a zero or negative carrying angle.
- Is the deformity three-dimensional? Classic cubitus varus has a coronal (varus), a sagittal (extension or hyperextension) and an axial (internal rotation of the distal fragment) component — about 80 percent are multiplanar rather than pure varus on 3D CT (Takeyasu). Missing the rotation is a common error: assess it clinically by comparing shoulder rotation with the elbow flexed.
- Is there posterolateral rotatory instability (PLRI)? Varus alignment shifts load onto the lateral column and stretches the lateral collateral ligament complex over years. PLRI can develop two to three decades after the original injury (O'Driscoll), presenting as lateral elbow pain and instability when pushing up from a chair. Established PLRI is itself an indication for correction and may need a simultaneous lateral collateral ligament reconstruction. Functional issues are uncommon but real — altered throwing mechanics in particular — and the parents' cosmetic concern is a legitimate, primary driver. Surgery is elective: counsel the family that the deformity will not correct itself, that the operation is principally cosmetic, and that a lateral closing-wedge osteotomy maintains correction in 90 percent or more of cases. The one decision that matters — which osteotomy. Every technique corrects the varus; the choice is the cut geometry, driven by the desire to avoid the lateral prominence versus technical complexity:
The workhorse. Wedge base laterally, apex at the medial cortex. Simple, stable, predictable correction. Its drawback is the lateral condylar prominence it creates.
A semicircular cut. No shortening, allows multiplanar correction, and less lateral prominence — but technically demanding.
A step-cut translation osteotomy. Large bony contact and rigid, allows medial translation to reduce prominence — but the cuts are complex.
Medial opening-wedge (needs graft, less stable) and 3D-printed patient-specific templating (precise but adds cost and planning time) are further options for selected, often complex or revision, cases. Consent specifically for: ulnar nerve injury (the medial K-wire), under- or over-correction, lateral condylar prominence, pin-tract infection, elbow stiffness, loss of fixation, and (if left uncorrected) the risk of late PLRI. Setup. Supine on a radiolucent table, arm on an arm board or hand table with the shoulder abducted and the elbow accessible for a lateral approach, upper-arm tourniquet (250–300 mmHg for a child). Bring the C-arm in from the opposite side. Check that true AP and lateral fluoroscopy of the elbow are obtainable before you prep and drape — once draped, a poor view cannot be fixed and you cannot check the correction against your template.
The Operation
The goal: expose the distal humerus through the lateral (modified Kocher) approach, template the correction with two guide K-wires, cut a lateral closing wedge while keeping the medial hinge intact, close the osteotomy to restore the carrying angle, and fix it with crossed K-wires (children) or a lateral plate (adolescents and adults). The exposure and the medial hinge are the two things that make or break the case.
Operative sequence
- Measure the carrying angle on both sides clinically (elbow extended, forearm supinated) and review AP and lateral radiographs of both elbows.
- Calculate the wedge angle: varus on the affected side PLUS the target valgus (typically 10 degrees). Worked example: 15 degrees of varus plus a 10-degree valgus target equals a 25-degree wedge.
- Template the osteotomy on a tracing over the radiograph — wedge base laterally, apex at the medial cortex. Estimate the wedge base width as roughly 2 multiplied by the sine of the wedge angle multiplied by the bone diameter at the osteotomy level.
- Assess the sagittal plane for an extension component and the axial plane for internal rotation, so you can correct all three.
- Supine on a radiolucent table, arm on a board with the shoulder abducted, upper-arm tourniquet (250–300 mmHg).
- Bring the C-arm from the opposite side and confirm true AP and lateral views are obtainable before draping.
- Prep and drape the whole arm from shoulder to fingertips, exposing room for both medial and lateral K-wire placement. Mark the lateral epicondyle, the olecranon, and the planned 8–10 cm lateral incision.
- Make an 8–10 cm straight lateral incision centred over the lateral supracondylar ridge, starting proximal to the lateral epicondyle.
- Incise skin and subcutaneous tissue and identify the lateral intermuscular septum — it is the key landmark.
- Develop the internervous plane between triceps posteriorly (radial nerve) and brachioradialis and brachialis anteriorly (radial nerve) — the modified Kocher interval.
- Elevate subperiosteally on the lateral and posterior humerus at the supracondylar level (1–2 cm proximal to the olecranon fossa).
- Protect the radial nerve proximally — it pierces the lateral intermuscular septum about 10 cm proximal to the lateral epicondyle. Do not extend the proximal dissection beyond that point.
- Keep the anterior periosteum intact as a barrier protecting the brachial artery and median nerve, which lie anteromedial to the distal humerus.
- Identify the osteotomy site at the supracondylar level — 1–2 cm proximal to the olecranon fossa and proximal to the growth plates in a child.
- Place the first guide K-wire perpendicular to the humeral shaft from the lateral cortex; this marks the distal cut.
- Place the second K-wire at the calculated wedge angle proximally; this marks the proximal cut. The angle between the two wires equals the planned correction.
- Confirm both wires are at the supracondylar level, proximal to the olecranon fossa and capitellum, on AP and lateral fluoroscopy. If rotation must be corrected, mark the rotational position on the cortex with osteotome scratches.
- With an oscillating saw, make the first (distal) cut perpendicular to the shaft along the distal K-wire, keeping the anterior periosteum intact.
- Carry the cut to, but NOT through, the medial cortex — leave the medial hinge intact.
- Make the second (proximal) cut along the proximal K-wire, converging toward the medial cortex, and remove the lateral-based wedge (save it as possible graft).
- Irrigate copiously during cutting to prevent thermal necrosis. The wedge has its base laterally and its apex at the intact medial hinge.
- Gently close the osteotomy by adducting the forearm (varus stress to the distal fragment); the medial hinge acts as the pivot and the lateral gap closes.
- Apply gradual pressure until the lateral cortices oppose.
- If rotation must be corrected, externally rotate the distal fragment before closing; if a hyperextension component must be corrected, flex the distal fragment slightly before closing.
- Check alignment clinically with the elbow fully extended and the forearm supinated, comparing the carrying angle to the contralateral side, and confirm on fluoroscopy that the Baumann angle now matches the normal side.
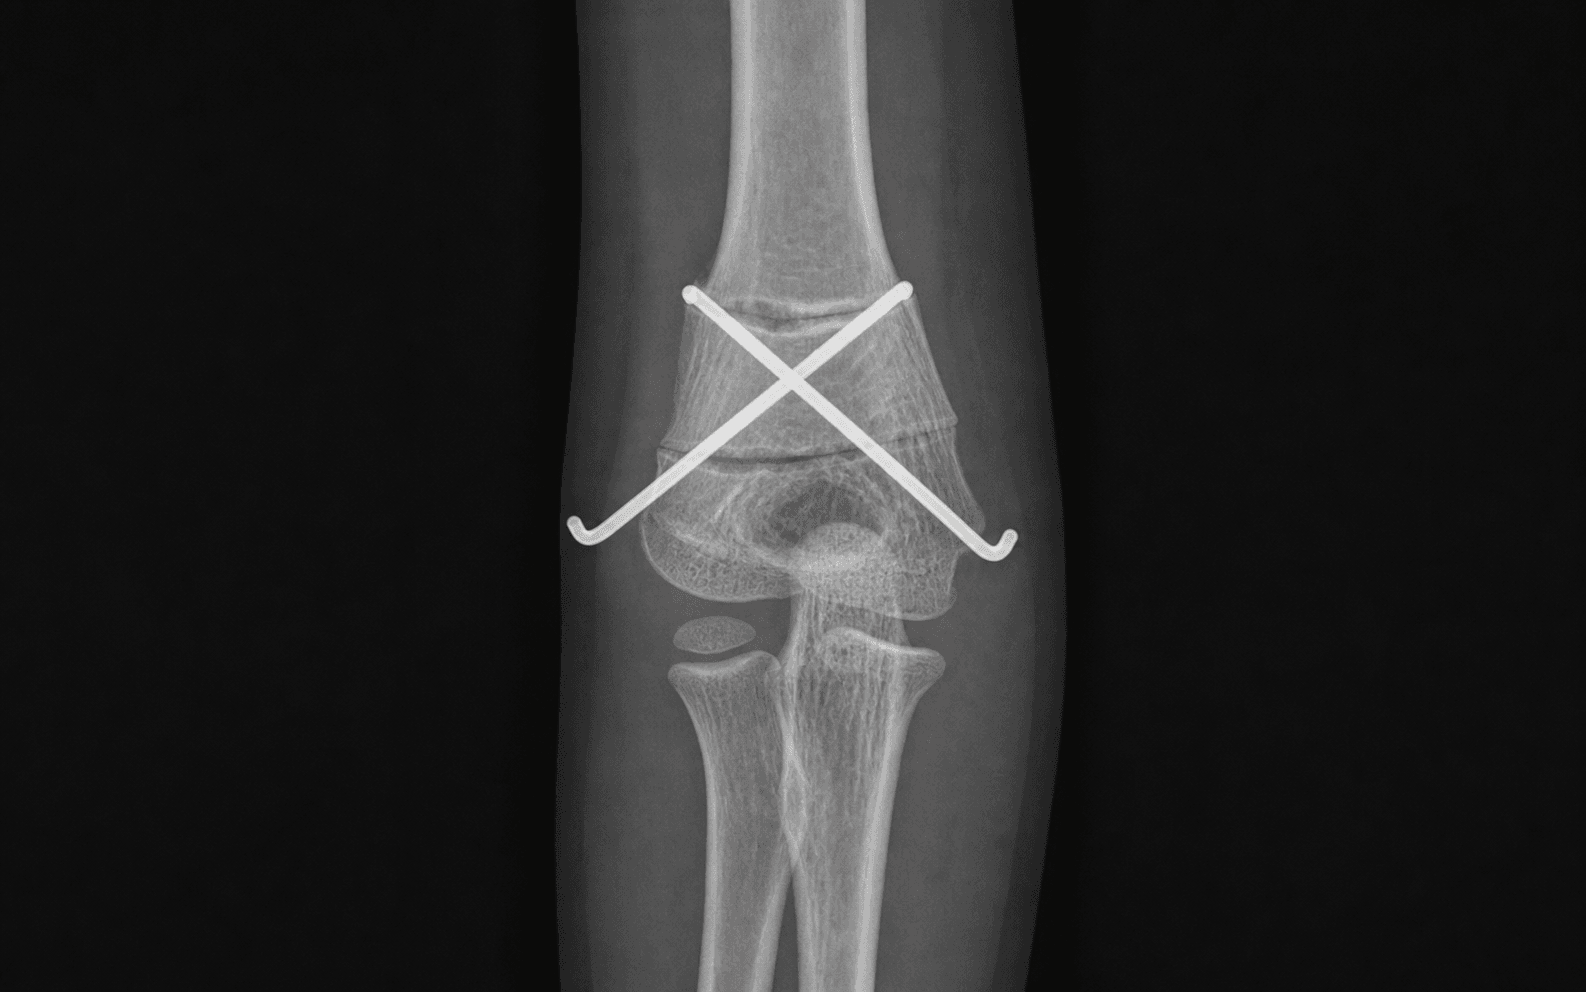
- Crossed K-wires (children, most common): insert a 1.6–2.0 mm wire from the lateral epicondyle directing proximally and medially across the osteotomy, then a second from the medial epicondyle directing proximally and laterally. The wires should cross at the osteotomy site; a third lateral wire adds stability. For the medial wire, protect the ulnar nerve: palpate it, flex the elbow to roll it posteriorly, and start the wire anterior to the medial epicondyle.
- Lateral plate (adolescents and adults): apply a 3.5 mm lateral column plate (LCP or recon) contoured to the lateral humerus, with at least three screws proximal and three distal to the osteotomy; use unicortical or carefully placed bicortical screws to avoid the anterior neurovascular structures.
- Confirm fixation and the final Baumann and carrying angles on AP and lateral fluoroscopy.
- Release the tourniquet and achieve haemostasis; irrigate and close periosteum where possible (2-0 absorbable), then deep fascia and subcutaneous layers (3-0 absorbable) and skin (4-0 subcuticular or nylon).
- Bend and cut K-wires percutaneously about 1 cm from the skin; apply a well-padded above-elbow posterior splint or cast at 90 degrees of flexion.
- Obtain final AP and lateral images in the cast; document the wedge angle, the correction achieved, the fixation used, and the distal neurovascular status.
- Check distal pulses, capillary refill and finger movement before leaving theatre — a tight cast can cause compartment syndrome, especially in a child.
The medial K-wire endangers the ulnar nerve. Before driving it, palpate the nerve in the cubital tunnel, flex the elbow to move it posteriorly, and start the wire anterior to the medial epicondyle; insert with the elbow flexed, then extend for fluoroscopy. If the nerve is not confidently identified and protected, do not place a medial wire — a two-lateral-wire construct is safer than an iatrogenic ulnar palsy.
Keep the medial cortex intact as a hinge: it is the pivot that lets the wedge close, it prevents translation, and it makes the construct stable. If the medial cortex cuts through, the osteotomy becomes unstable — translate the distal fragment medially to restore a hinge or convert to rigid plate fixation.
Cubitus varus is usually a 3D deformity. If you correct only the coronal varus and leave the internal rotation and hyperextension, the arm still looks and functions wrong. Assess rotation clinically (shoulder rotation with elbow flexed) and add external rotation and flexion at the osteotomy as templated.
- Location
- Pierces the lateral intermuscular septum about 10 cm proximal to the lateral epicondyle; wraps the radial neck distally
- How to protect it
- Stay subperiosteal on the humerus; avoid dissection distal to the lateral epicondyle; do not extend the proximal dissection too far
- Location
- Posterior to the medial epicondyle in the cubital tunnel
- How to protect it
- At risk from the medial K-wire: palpate it, flex the elbow, start the wire anterior to the epicondyle
- Location
- Anteromedial to the distal humerus in the antecubital fossa
- How to protect it
- Keep the anterior periosteum intact as a barrier; avoid penetrating the anterior cortex with the saw or screws
- Location
- Continuation of the musculocutaneous nerve, lateral to the biceps tendon at the elbow crease
- How to protect it
- Protect during anterior dissection; injury causes lateral forearm numbness
- Location
- 1–2 cm distal to the osteotomy site in a skeletally immature child
- How to protect it
- Keep the osteotomy at the supracondylar level, proximal to the olecranon fossa
Aftercare & Complications
Rehabilitation | Phase | Timing | Immobilisation | Therapy | |-------|--------|----------------|---------| | 1 | 0–1 week | Above-elbow posterior splint at 90 degrees | Elevation, finger and shoulder active motion only | | 2 | 1–6 weeks | Convert to above-elbow cast once swelling settles (4–6 weeks with a plate; 6–8 weeks with K-wires) | None — protected until union | | 3 | 6–8 weeks | K-wires removed at 6–8 weeks | Begin active-assisted elbow flexion-extension, avoiding varus–valgus stress | | 4 | 8–12 weeks | Cast off; removable splint for heavy tasks | Progressive ROM and strengthening physiotherapy | | 5 | 3–4 months | — | Full activity once union is solid and ROM restored | Radiographs are taken at 2, 6 and 12 weeks. A plate, if used, is removed 6–12 months after union if prominent or symptomatic. About 90 percent or more maintain the correction; patients and parents should be counselled that the lateral condylar prominence is common and usually acceptable. Complications
- Recognition
- Medial-sided numbness, weak grip, clawing of ring and little fingers
- Prevention
- Palpate the nerve before the medial K-wire; flex the elbow; start the wire anterior to the epicondyle
- Management
- Observe for 3 months if neuropraxia; explore and release if no recovery; repair if transected
- Recognition
- Carrying angle not matching the contralateral side at follow-up
- Prevention
- Precise pre-operative templating; intra-operative comparison to the normal side; check the Baumann angle
- Management
- Revision osteotomy if the deformity is unacceptable; a minor over-correction (about 5 degrees of valgus) is preferable to residual varus
- Recognition
- Change in carrying angle on serial radiographs; K-wire migration or plate loosening
- Prevention
- Adequate wire purchase crossing at the osteotomy; a plate with 6 or more screws; proper cast immobilisation
- Management
- Re-fixation if detected early; accept the malunion or plan revision if consolidated
- Recognition
- A visible or palpable bump at the lateral elbow — a cosmetic concern
- Prevention
- Inherent to the closing wedge; consider a dome or step-cut osteotomy for severe cases; translate the distal fragment medially
- Management
- Reassurance (usually acceptable); bone trimming at hardware removal if symptomatic
- Recognition
- Erythema, purulent discharge or pain at the K-wire entry site
- Prevention
- Daily pin-site care; remove wires early once united
- Management
- Oral antibiotics for superficial infection; intravenous antibiotics and wire removal for deep infection; curettage if osteomyelitis
- Recognition
- Loss of the flexion-extension arc by more than 20 degrees versus pre-operative
- Prevention
- Avoid prolonged immobilisation; begin ROM at about 6 weeks; intensive physiotherapy
- Management
- Static progressive splinting; arthroscopic or open release if persistent beyond 6 months
Viva & Exam Focus
VARUSVARUS — planning the correction
WEDGEWEDGE — the osteotomy principles
Clinical Decision Scenarios
Practise clinical reasoning and management decisions out loud
“A 10-year-old presents 2 years after a supracondylar fracture with an obvious gunstock deformity. The parents are concerned about appearance and function. How do you assess and counsel this family?”
“Describe the surgical technique for a lateral closing-wedge osteotomy. How do you prevent ulnar nerve injury during K-wire fixation?”
“What is the relationship between cubitus varus and posterolateral rotatory instability, and how does it influence your management?”
Indication
- Cosmetically unacceptable cubitus varus — more than about 10 degrees versus the contralateral side
- Post-traumatic gunstock deformity from supracondylar malunion (the most common cause)
- Secondary posterolateral rotatory instability
- Functional limitation such as altered throwing mechanics
- Minimum 2 years post-injury, skeletal age typically over 6 years
Deformity is 3D
- Coronal: varus angulation (loss of the normal 5 to 15 degrees valgus)
- Sagittal: hyperextension (loss of the anterior humeral line)
- Axial: internal rotation of the distal fragment
- Baumann angle (normal about 70 to 80 degrees) is INCREASED on the varus side — compare side to side
- About 80 percent are multiplanar rather than pure varus on 3D CT
Exposure
- Lateral (modified Kocher) approach over the supracondylar ridge
- Internervous plane: triceps versus brachioradialis/brachialis
- At risk: radial nerve (10 cm proximal), ulnar nerve (medial K-wire), brachial artery and median nerve (anterior)
The osteotomy
- Two guide K-wires mark the cut; the angle between them is the correction
- Wedge angle equals the varus angle plus the target valgus
- The medial hinge MUST remain intact — it is the pivot
- Close by adducting the forearm; correct rotation and sagittal as templated
Fixation
- Crossed K-wires (1.6–2.0 mm) for children — simple, needs a cast
- A 3.5 mm lateral plate for adolescents and adults — allows early motion
- Wires cross at the osteotomy level; ulnar nerve protection for the medial wire
- Above-elbow cast at 90 degrees for 4 to 6 weeks
Complications
- Ulnar nerve injury from the medial K-wire — the most common technical error
- Under- or over-correction — precise templating is essential
- Lateral condylar prominence — inherent to the closing wedge
- Loss of fixation, pin-tract infection and elbow stiffness
Exam tips
- Cubitus varus does NOT remodel with growth
- Normal carrying angle is 5 to 15 degrees of valgus (greater in females)
- Wedge base width is roughly 2 multiplied by sin(angle) multiplied by bone diameter
- A dome osteotomy avoids lateral prominence but is technically demanding
- Always compare the Baumann angle to the contralateral side
Background & Evidence
Epidemiology. Cubitus varus is the most common late deformity after a paediatric supracondylar humeral fracture. It was historically frequent after closed or inadequate treatment but is now uncommon with modern anatomic closed reduction and percutaneous pinning. It is principally a cosmetic deformity in childhood; functional problems are uncommon, but the altered mechanics predispose to tardy posterolateral rotatory instability in adulthood. Pathoanatomy. The deformity reflects malreduction of the fracture, not a growth disturbance — which is why it does not remodel with growth. It is usually three-dimensional: a coronal varus tilt, a sagittal extension or hyperextension component (the anterior humeral line passes anterior to the capitellum), and axial internal rotation of the distal fragment. On 3D CT analysis about 80 percent of limbs are multiplanar and only 20 percent are pure varus (Takeyasu), which is why plain-film rotation and tilt measurements can be inaccurate and rotational malalignment is easily underestimated. Key radiographic parameters. - Baumann angle (humeral shaft to the physeal line on the AP view): normal is approximately 70 to 80 degrees (commonly cited mean about 75 degrees). It increases with varus tilt and decreases with valgus. A side-to-side difference of more than 5 degrees versus the normal elbow is the most reliable indicator of malalignment.
- Humerus-elbow-wrist angle (the carrying angle on AP): normal 5 to 15 degrees of valgus; negative (varus) in the deformity.
- Anterior humeral line (lateral view): normally passes through the middle third of the capitellum; it passes anterior to it when there is an extension component. Osteotomy options compared.
- Principle
- Remove a lateral wedge, base laterally and apex medially, and close
- Advantages
- Simple, stable, the most common and predictable
- Disadvantages
- Lateral condylar prominence and step-off
- Principle
- A semicircular cut
- Advantages
- No shortening, multiplanar and adjustable, less prominence
- Disadvantages
- Technically demanding
- Principle
- A step-cut translation osteotomy
- Advantages
- Large surface contact, stable, allows medial translation
- Disadvantages
- Complex cuts
- Principle
- Open the medial side with graft
- Advantages
- No lateral prominence
- Disadvantages
- Needs graft, less stable
- Principle
- Custom patient-specific guided cuts
- Advantages
- Precise multiplanar correction
- Disadvantages
- Expensive, adds planning time
The PLRI link. Because the varus carrying angle shifts the mechanical axis and the pull of the olecranon and triceps laterally, the lateral collateral ligament complex is chronically overloaded and stretches over years. O'Driscoll's series showed 24 patients (25 limbs) developing PLRI two to three decades after the original injury, with operative correction (osteotomy with or without LCL reconstruction) giving good or excellent results in 19 of 22 operated limbs — establishing that cubitus varus is not purely cosmetic and that established instability is a real, treatable late complication. Key evidence. The lateral closing-wedge osteotomy with preset guide wires gives reproducible correction (Voss, 97 percent corrected to within 5 degrees of the normal side with no nerve palsies). Its two main drawbacks — lateral prominence and the need for cast immobilisation — are addressed by the rigid step-cut or translation osteotomy plated for early motion (Kim), while Wong quantified the prominence as the characteristic cosmetic complication. These studies define the modern practice: a templated closing wedge is the workhorse, with dome, step-cut or 3D-planned alternatives reserved for cases where lateral prominence or a complex multiplanar correction must be avoided.
References
Uniplanar supracondylar humeral osteotomy with preset Kirschner wires for posttraumatic cubitus varus
- Lateral closing-wedge osteotomy in 36 children for post-traumatic cubitus varus
- 35 of 36 (97%) corrected to within 5 degrees of the contralateral elbow
- No nerve palsies and no infections in the series
- Of patients operated before age 6 with more than 2 years of follow-up, none had recurrent deformity
Management of cubitus varus and valgus
- Step-cut translation osteotomy fixed with a Y-shaped humeral plate in 19 varus and 13 valgus cases
- 26 excellent and 6 good results by modified Oppenheim criteria
- Mean varus correction of the humerus-elbow-wrist angle from 26 degrees to a final 8.6 degrees of valgus
- Plate fixation gave firm fixation permitting early motion and minimised lateral prominence (mean prominence index increase only 8.2%)
The lateral condylar prominence: a complication of supracondylar osteotomy for cubitus varus
- 27 patients reviewed after a supracondylar closing-wedge osteotomy
- 22 of 27 had excellent or good functional results
- 14 of those 22 (about two-thirds) developed a significant lateral condylar prominence from lateral translation on closing the wedge
- Prominence was milder in younger children (remodelling) and worse around or after skeletal maturity
Tardy posterolateral rotatory instability of the elbow due to cubitus varus
- 24 patients (25 limbs) with cubitus varus developed posterolateral rotatory instability two to three decades after the deformity
- Mean varus deformity 15 degrees; all presented with lateral elbow pain and instability
- Medial shift of the mechanical axis, and olecranon and triceps pull, stretches the lateral collateral ligament complex over time
- Operative correction (osteotomy with or without LCL reconstruction) gave good or excellent results in 19 of 22 operated limbs
Three-dimensional analysis of cubitus varus deformity after supracondylar fractures of the humerus
- 25 humeri assessed with CT-based 3D models superimposed on the mirrored normal side
- 80% had multiplanar deformity (varus plus extension and/or internal rotation), only 20% pure varus
- Conventional rotation and tilting measurements were inaccurate by 10 degrees or more in a substantial proportion of cases
- The humerus-elbow-wrist angle and maximal flexion were the more reliable plain measures
Further reading 1. Oppenheim WL, Clader TJ, Smith C, Bayer M. Supracondylar humeral osteotomy for traumatic childhood cubitus varus deformity. Clin Orthop Relat Res 1984;188:34–39. 2. Bellemore MC, Barrett IR, Middleton RW, et al. Supracondylar osteotomy of the humerus for correction of cubitus varus. J Bone Joint Surg Br 1984;66:566–572. 3. DeRosa GP, Graziano GP. A new osteotomy for cubitus varus. Clin Orthop Relat Res 1988;236:160–165. 4. Ippolito E, Moneta MR, D'Arrigo C. Post-traumatic cubitus varus. Long-term follow-up of corrective supracondylar humeral osteotomy in children. J Bone Joint Surg Am 1990;72:757–765. 5. Morrey BF. Post-traumatic stiffness: distraction arthroplasty. In: Morrey BF, ed. The Elbow and Its Disorders. 4th ed. Philadelphia: Saunders; 2009:1039–1062.