Direct lateral approach · The load-bearing implant for stable trochanteric fractures
- Tip-Apex Distance (TAD) under 25 mm is the single most important predictor of fixation success — sum the magnification-corrected tip-to-apex distance on AP and lateral.
- The DHS is a LOAD-BEARING device: it needs an intact (or reconstructable) medial cortex and an intact lateral wall to function.
- Aim for a centre-centre, or inferior-centre on the lateral, lag-screw position on BOTH views — a superior screw raises cut-out risk three- to four-fold and is never acceptable.
- Use it only for STABLE patterns — AO 31-A1 (ideal) and A2.1 — with a lateral wall over 20 mm (Palm criteria).
- Reverse obliquity (A3), a lateral wall under 20 mm, or subtrochanteric extension means a cephalomedullary nail, not a DHS.
- Triple reaming creates the smooth three-diameter channel that lets the lag screw slide — this sliding delivers the dynamic compression as the fracture impacts.
- Accept anatomic or slight valgus reduction with medial-cortex contact — varus is biomechanically doomed (failure around 40 percent versus 5 percent).
- Operate within 36 to 48 hours once the patient is fit, and mobilise weight-bearing as tolerated from day 1 with VTE prophylaxis.
When & Why
Indication. A displaced intertrochanteric (peritrochanteric) femoral fracture that is stable — AO/OTA 31-A1 (simple, two-fragment, the ideal pattern) or 31-A2.1 (one intermediate fragment) — with an intact lateral wall over 20 mm on the AP radiograph (Palm criteria) and an intact or reconstructable medial cortex. In elderly osteoporotic bone the DHS remains the reference implant for these stable patterns; the Cochrane meta-analysis (Parker and Handoll) confirms a lower reoperation rate than the Gamma nail for stable trochanteric fractures. The one decision that matters — DHS, nail, or arthroplasty. Implant choice is driven by fracture stability and lateral-wall integrity, not surgeon preference:
The reference implant for STABLE trochanteric fractures (A1, A2.1) with a lateral wall over 20 mm and an intact medial cortex. Load-bearing; works by controlled impaction along the sliding lag screw. Cochrane: lower reoperation rate than the Gamma nail for these patterns.
A load-sharing intramedullary device with a shorter moment arm. Preferred for UNSTABLE patterns — reverse obliquity (A3), lateral wall under 20 mm, subtrochanteric extension, and multifragmentary A2.2/A2.3. Resists varus collapse even without medial support.
Reserved for salvage — pathological or metastatic fractures with poor bone stock, severe osteoporosis where fixation will fail, or failed DHS fixation with cut-out. Higher blood loss and dislocation risk than internal fixation.
- Reverse-obliquity intertrochanteric fracture (AO 31-A3) — the fracture line runs superomedial to inferolateral and the DHS cannot resist varus collapse.
- Lateral wall under 20 mm or comminuted — there is no buttress for the barrel plate, and reaming may shatter the wall intraoperatively.
- Subtrochanteric extension — the DHS cannot control the long lever arm of the distal fragment.
- Pathological or metastatic fracture — inadequate bone for screw purchase.
- Relative cautions: severe osteoporosis (eggshell cortex, high cut-out), combined neck-shaft fracture, the young high-demand patient (consider anatomic ORIF), and morbid obesity.
Consent. Procedure-specific risks: cut-out (5 to 15 percent, the commonest mechanical failure), non-union (under 5 percent), malunion (varus, shortening, external rotation), AVN (under 2 percent — rare, because the extracapsular fracture and lateral approach leave the femoral-head blood supply intact), infection (1 to 3 percent), and DVT/PE (10 to 20 percent without prophylaxis). General risks: bleeding needing transfusion (20 to 30 percent), medical complications (cardiac, respiratory, delirium in up to 25 percent), and mortality — 30-day 5 to 10 percent, 1-year 20 to 30 percent in the elderly hip-fracture population. Functional outcome: about half return to pre-injury function at one year and many continue to need a mobility aid. Global practice. National hip-fracture registries (UK NHFD, ANZHFR, Scandinavian) show a steady shift toward cephalomedullary nailing — now used in roughly half or more of trochanteric fractures — but the sliding hip screw remains appropriate and cost-effective for stable A1 and A2.1 patterns, with no survival benefit from nailing in stable patterns. VTE prophylaxis follows the operating society guideline (AAOS, NICE NG89, EFORT): an LMWH or a DOAC plus mechanical prophylaxis and early mobilisation.
The Operation
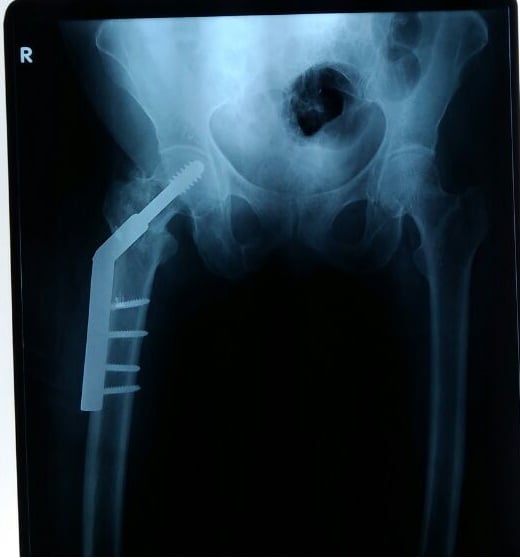
The goal is to reduce the fracture on a fracture table, expose the proximal lateral femur through a direct lateral approach that splits vastus lateralis, and place a lag screw up the femoral neck centre-centre with a Tip-Apex Distance under 25 mm, then seat a barrel plate flush on the lateral cortex so the screw can slide and compress the fracture as the patient bears weight. The exposure is laid out in full as the first steps below.
Operative sequence
- General or spinal anaesthesia on a radiolucent fracture table; the affected leg in a traction boot, the contralateral leg flexed and abducted in a hemilithotomy or scissored position.
- Apply longitudinal traction and 10 to 15 degrees of internal rotation to correct the typical shortening and external rotation of the distal fragment.
- A well-padded perineal post positioned LATERAL to the genitals to prevent pudendal nerve compression.
- Confirm clear AP and lateral C-arm views of the whole hip and proximal femur BEFORE draping — the C-arm comes from the contralateral side, between the legs.
- Gentle longitudinal traction plus internal rotation; check reduction on AP and lateral.
- Accept anatomic or slight valgus (5 to 10 degrees) with restored medial-cortical continuity, no posterior sag on the lateral view, a neck-shaft angle of 125 to 135 degrees, and rotation corrected (the patella faces the ceiling).
- Varus is never acceptable; if reduction is inadequate, use a Schanz-pin joystick in the greater trochanter to manipulate the proximal fragment before proceeding.
- Palpate the greater trochanter; make an 8 to 12 cm longitudinal incision starting just distal to the GT tip and extending distally along the lateral femoral shaft (longer in obese patients).
- Incise skin and subcutaneous fat to the fascia lata; incise the fascia lata (iliotibial band) in line with the skin and retract the edges to expose vastus lateralis.
- Stay below the GT — too proximal enters gluteus medius (abductor weakness); too anterior risks the lateral femoral cutaneous nerve.
- Split vastus lateralis in line with its fibres (preferred — less bleeding, preserves function) OR elevate it anteriorly off the lateral intermuscular septum for more exposure.
- This is an INTRAmuscular plane, not an internervous one: vastus lateralis is femoral-nerve supplied throughout its belly, so splitting in the fibre direction minimises denervation.
- Expose the lateral cortex for the planned plate length; coagulate the perforating branches of the profunda femoris as they cross the field; strip periosteum only where the plate will sit.
- Fix the 135-degree angle guide to the lateral cortex at the level of the lesser trochanter; entry point at the junction of the proximal and middle thirds of the femur.
- Advance the guide wire under fluoroscopy toward the femoral-head centre — aim CENTRE-CENTRE on AP, and centre-centre or INFERIOR-CENTRE on lateral.
- NEVER superior — it raises cut-out risk three- to four-fold. Advance to within 5 to 10 mm of subchondral bone, then calculate the Tip-Apex Distance.
- TAD equals the magnification-corrected tip-to-apex distance on AP PLUS the magnification-corrected tip-to-apex distance on lateral (correct using the known screw diameter).
- Target under 25 mm: at a TAD under 25 mm cut-out is roughly 2 to 5 percent; over 30 mm the risk rises about six-fold (30 percent or more).
- If TAD is over 25 mm, reposition the guide wire — do not proceed.
- Ream over the guide wire to the measured depth (5 to 10 mm short of subchondral bone), irrigating continuously to avoid thermal necrosis.
- The triple reamer cuts a three-diameter channel — outer for the barrel, middle for the lag-screw threads, inner for the screw core.
- This smooth channel is what lets the lag screw SLIDE within the barrel for dynamic compression as the fracture impacts — the "dynamic" in Dynamic Hip Screw.
- Select the lag-screw length from the measurement (typically 85 to 105 mm) and insert it over the guide wire to within 5 to 10 mm of subchondral bone.
- Confirm centre-centre or inferior-centre position on both views and that all threads lie within the femoral head.
- Calculate and DOCUMENT the final TAD — it must be under 25 mm; reposition before plating if it is not.
- Slide the barrel over the lag screw and seat the plate FLUSH on the lateral cortex — if it sits proud the screw cannot slide and the construct fails by static loading.
- Align the plate with the femoral-shaft axis (no flexion, extension or rotation); apply one provisional distal cortical screw.
- Fill the remaining holes with bicortical cortical screws (minimum four cortices of distal fixation — two screws by two cortices).
- Consider an anti-rotation screw in the proximal hole above the barrel for added rotational control of the head fragment.
- Confirm all screws are bicortical on fluoroscopy and that none lies in the fracture zone.
- Remove the guide wire; apply compression through the barrel to engage the dynamic lag effect; release traction gradually and confirm the reduction is stable.
- Final checklist: reduction maintained (valgus acceptable, medial cortex intact); lag screw centre-centre or inferior-centre on both views; TAD under 25 mm documented; screw 5 to 10 mm from subchondral bone with no joint penetration; plate flush; all screws bicortical; rotation and length equal to the other leg.
- Copious saline irrigation and meticulous haemostasis; consider a drain for the anticoagulated patient or where a large haematoma is expected.
- Repair vastus lateralis if it was elevated; close fascia lata with a strong absorbable suture (it gives soft-tissue cover over the implant), then subcutis and skin.
- Mobilise weight-bearing as tolerated from day 1 for stable fixation; give VTE and antibiotic prophylaxis per the local guideline.
- Varus malalignment is never acceptable — DHS failure is around 40 percent in varus versus 5 percent in an anatomic or valgus reduction.
- Persistent posterior sag on the lateral view leads to an apex-posterior deformity.
- Over-distraction prevents impaction and healing; loss of medial-cortical contact removes the load-bearing buttress.
Accept anatomic or slight valgus (5 to 10 degrees) with medial-cortex contact and no posterior sag on the lateral view. Valgus is preferable; varus is biomechanically doomed. Confirm the patella faces the ceiling and verify the reduction on BOTH views before any instrumentation.
Baumgaertner's Tip-Apex Distance is the single most important modifiable predictor of success. Sum the magnification-corrected tip-to-apex distance on AP and lateral; it must be under 25 mm — over 30 mm carries about a six-fold higher cut-out rate. Aim centre-centre (inferior-centre on lateral is acceptable); a superior screw is never acceptable. Document the TAD in the operative note.
If the plate is proud on the lateral cortex the lag screw cannot slide within the barrel and the construct behaves as a rigid plate under cyclic load — it fails. Seat it flush, parallel to the shaft, and hold it with one provisional screw before definitive fixation.
- Perforating branches of the profunda femoris traverse vastus lateralis from posterior to anterior — coagulate them as you meet them or they bleed significantly.
- Superior gluteal nerve lies 3 to 5 cm proximal to the GT tip — keep the dissection below the GT (the safe zone) to protect abductor innervation.
- Sciatic nerve is about 5 cm posterior to the GT — no posterior retractors, and avoid excessive traction.
- Profunda femoris and the femoral vessels lie anteromedial — stay strictly lateral, with no posterior or anterior cortical breach.
Aftercare & Complications
Rehabilitation - VTE prophylaxis per the local guideline — an LMWH or a DOAC, commonly continued for around 28 to 35 days, plus mechanical prophylaxis and early mobilisation; tranexamic acid reduces transfusion requirement.
- Orthogeriatric co-management for medical optimisation, delirium prevention and bone-health assessment.
- Mobilise weight-bearing as tolerated from day 1 for stable fixation; sit out of bed on day 0 to 1, stand with a frame on day 1, with physiotherapy for gait, transfers and range of motion.
- Radiographs at 2, 6 and 12 weeks; watch for cut-out (typically within the first 3 months); fracture union is expected by 8 to 12 weeks.
- Hardware removal is not routine — consider it only if symptomatic (lateral-thigh pain, trochanteric bursitis). Complications
- Recognition
- Lag screw migrates superolaterally through the head on follow-up films; pain, inability to weight-bear, limb shortening; usually within 3 months
- Prevention
- TAD under 25 mm, centre-centre or inferior-centre position, avoid varus, adequate screw purchase
- Management
- Early with good bone stock: rare screw reposition. Late or poor stock: salvage arthroplasty — hemiarthroplasty or THA
- Recognition
- Persistent fracture line beyond 6 months, weight-bearing pain, implant failure (screw breakage, plate pull-off)
- Prevention
- Anatomic or valgus reduction, medial-cortex contact, avoid distraction, controlled impaction
- Management
- Revision fixation with bone graft if stock adequate and patient fit; conversion to THA if poor stock or elderly
- Recognition
- Varus, shortening and external rotation; limb-length discrepancy and abnormal gait
- Prevention
- Intraoperative AP and lateral reduction check; compare rotation to the other leg; accept only anatomic or valgus
- Management
- Mild (varus under 15 degrees, shortening under 2 cm): shoe lift. Severe symptomatic: corrective osteotomy if fit
- Recognition
- Wound erythema, discharge, fever, CRP over 100; late presentation may be indolent pain
- Prevention
- Cefazolin 2 g (3 g if over 120 kg) within 60 minutes, sterile technique, haemostasis, soft-tissue cover
- Management
- Superficial: oral antibiotics, wound care. Deep: debridement, 6 weeks IV antibiotics; exchange or remove if implant loose
- Recognition
- DVT: calf swelling, pain. PE: dyspnoea, chest pain, hypoxia, tachycardia
- Prevention
- LMWH or DOAC plus mechanical prophylaxis and early mobilisation; commonly 28 to 35 days
- Management
- Therapeutic anticoagulation; consider thrombolysis for massive PE; IVC filter if anticoagulation contraindicated
- Recognition
- Seen during reaming or screw insertion, or as varus collapse and lost fixation on follow-up films
- Prevention
- Assess lateral wall preoperatively (Palm over 20 mm); gentle reaming; nail if under 20 mm
- Management
- Intraoperative: convert to a cephalomedullary nail. Late or failed: revision nail or arthroplasty
- Recognition
- Sudden pain, inability to weight-bear, visible deformity; films show plate separation or screw fracture
- Prevention
- Bicortical purchase, appropriate implant selection, avoid excessive dynamisation, treat osteoporosis
- Management
- Revision fixation versus arthroplasty depending on bone quality and fracture healing
- Recognition
- High-risk elderly with multiple comorbidities; frailty and cognitive impairment predict worse outcomes
- Prevention
- Orthogeriatric co-management, surgery within 36 to 48 hours, early mobilisation, VTE prophylaxis, delirium and falls prevention
- Management
- Multidisciplinary care — orthogeriatrics, physiotherapy, OT, social work; advance care planning; bone-health optimisation
Additional complications - Avascular necrosis (under 2 percent) — rare in extracapsular fractures because the deep branch of the medial femoral circumflex artery on the posterosuperior neck is undisturbed by the lateral approach and the extracapsular fracture; it may occur if the guide wire or lag screw perforates posterosuperiorly and injures the MFCA.
- Nerve injury (under 1 percent) — sciatic (posterior retractor or excessive traction), superior gluteal (dissection above the GT), or pudendal (perineal post); most are neuropraxias that recover.
- Heterotopic ossification — radiographic in 5 to 10 percent, symptomatic in only 1 to 2 percent; more likely with head injury, burns, or prolonged immobilisation; excise only if severely restrictive.
Viva & Exam Focus
TADTAD — Tip-Apex Distance calculation
Hook:Baumgaertner's TAD sums the magnification-corrected tip-to-apex distance on AP and lateral. A TAD under 25 mm carried a near-zero cut-out rate in his series; over 25 mm the rate climbs steeply (over 30 mm carries about a six-fold higher risk).
STABLESTABLE — when a DHS is appropriate
Hook:The DHS works by controlled impaction along the sliding lag screw, which needs stable bony architecture to transmit load. Any destabilising feature — lateral-wall loss, reverse obliquity, subtrochanteric extension — should push you toward a cephalomedullary nail.
Clinical Decision Scenarios
Practise clinical reasoning and management decisions out loud
“An 82-year-old woman falls at home and presents with a shortened, externally rotated right leg. Radiographs show an intertrochanteric fracture. How do you manage her?”
“Explain the biomechanical difference between a DHS and a cephalomedullary nail for intertrochanteric fractures.”
“At the 6-week follow-up your DHS patient has increasing groin pain and cannot weight-bear. What is your differential and management?”
Indications
- Stable intertrochanteric fractures — AO 31-A1 (ideal), A2.1 (suitable)
- Lateral wall intact — over 20 mm on the AP (Palm criteria)
- Medial cortex intact or reconstructable (load-bearing)
- Avoid: reverse obliquity (A3), subtrochanteric extension, lateral wall under 20 mm, pathological fracture
Exposure
- Direct lateral approach splits vastus lateralis — intramuscular, NOT internervous (all femoral nerve)
- Control perforating profunda branches as you meet them
- Sciatic nerve about 5 cm posterior to the GT — no posterior retractors
- Superior gluteal nerve 3 to 5 cm above the GT — safe zone is below the GT
Critical technique
- TAD under 25 mm (Baumgaertner): magnification-corrected AP plus lateral
- Centre-centre, or inferior-centre on lateral, on BOTH views — never superior
- Accept anatomic or slight valgus — varus is never acceptable (around 40 percent failure)
- Triple reaming makes the sliding channel — the dynamic in DHS
DHS versus nail
- DHS is load-bearing — needs an intact medial cortex
- Nail is load-sharing with a shorter moment arm — works without medial support
- DHS for stable A1/A2.1 with lateral wall over 20 mm
- Nail for A3, lateral wall under 20 mm, subtrochanteric extension, unstable A2.2/A2.3
- Cochrane: equivalent for stable, nail superior for unstable
Complications
- Cut-out 5 to 15 percent — commonest; prevented by TAD under 25 mm and centre-centre position
- Non-union under 5 percent; malunion (varus, shortening, external rotation)
- Lateral wall fracture 2 to 5 percent — convert to a nail
- DVT/PE 10 to 20 percent without prophylaxis — LMWH/DOAC plus mechanical, around 28 to 35 days
- Mortality: 30-day 7 to 10 percent, 1-year 20 to 30 percent
Aftercare
- Weight-bearing as tolerated from day 1 for stable fixation
- VTE prophylaxis: LMWH or DOAC plus mechanical, commonly 28 to 35 days
- Orthogeriatric co-management improves survival
- Follow-up films at 2, 6 and 12 weeks; union by 8 to 12 weeks
Guidelines and registries
- NICE NG124: sliding hip screw for stable trochanteric; nail for subtrochanteric and reverse obliquity
- AAOS and AO Foundation: choice driven by stability and lateral-wall integrity
- Registries (NHFD, ANZHFR, Scandinavian): rising nail use, no survival benefit over DHS for stable patterns
- Antibiotic prophylaxis: single dose cefazolin 2 g IV within 60 minutes
Background & Evidence
Epidemiology. Roughly half of all hip fractures are extracapsular (trochanteric), about 45 percent intracapsular and 5 percent subtrochanteric. It is predominantly an osteoporotic injury of the elderly — mean age in the low-to-mid 80s, female-to-male ratio about 3 to 1 — and global incidence is projected to rise sharply with population ageing, increasingly concentrated in Asia. AO/OTA 31-A classification. Implant choice follows the fracture pattern and lateral-wall integrity:
- Subtypes
- A1.1 along the intertrochanteric line; A1.2 through the greater trochanter; A1.3 below the lesser trochanter
- Implant
- DHS — A1 is the ideal pattern
- Subtypes
- A1 one intermediate fragment; A2.2 several; A2.3 extending more than 1 cm below the lesser trochanter
- Implant
- DHS if A2.1 with intact lateral wall; NAIL for A2.2/A2.3
- Subtypes
- A3.1 oblique; A3.2 transverse; A3.3 wedge or comminuted
- Implant
- NAIL mandatory — the DHS cannot resist varus collapse
The lateral wall (Palm criteria). Measure lateral wall thickness on the AP radiograph: the distance from the lateral cortex to the level where the lag screw will sit (Palm et al., JBJS 2007). Over 20 mm is intact and a DHS is appropriate; under 20 mm is deficient, the barrel plate loses its buttress, and a nail is preferred. The lateral wall can also fracture INTRAoperatively — in about three-quarters of cases it happens during the procedure itself — converting a stable to an unstable pattern; A2.2 and A2.3 patterns are far more prone to this than A1 and A2.1. Outcomes and registry trends. - Registries (UK NHFD, ANZHFR, Scandinavian) show a steady shift toward cephalomedullary nailing, now used in roughly half or more of trochanteric fractures; sliding-hip-screw use is declining but remains appropriate and cost-effective for stable A1 and A2.1 patterns, with no survival benefit from nailing in stable patterns.
- Operate within 36 to 48 hours in patients fit for theatre (NICE NG124, AAOS); avoidable delay beyond a few days increases mortality.
- Outcomes: 30-day mortality about 7 to 10 percent; 1-year mortality about 20 to 30 percent (highest in the first 3 months); about half return to pre-injury function and around a quarter of previously community-dwelling patients move to institutional care.
- Position on stable trochanteric fractures
- Extramedullary sliding hip screw preferred; intramedullary nail for subtrochanteric and reverse-obliquity patterns
- Position on stable trochanteric fractures
- Both implants acceptable for stable patterns; nailing favoured for unstable, reverse-obliquity and subtrochanteric fractures
- Position on stable trochanteric fractures
- Implant choice driven by fracture stability and lateral-wall integrity, not surgeon preference
Prophylaxis. - VTE: pharmacological prophylaxis (an LMWH or a DOAC) plus mechanical prophylaxis and early mobilisation, commonly extended to around 28 to 35 days (AAOS, NICE NG89, EFORT, ACCP).
- Antibiotic: a single dose of cefazolin 2 g IV (3 g if over 120 kg) within 60 minutes of incision; vancomycin or teicoplanin if penicillin-allergic. A single dose is sufficient.
References
- Baumgaertner MR, Curtin SL, Lindskog DM, Keggi JM. The value of the tip-apex distance in predicting failure of fixation of peritrochanteric fractures of the hip. J Bone Joint Surg Am. 1995;77(7):1058-1064. PMID 7608228. DOI 10.2106/00004623-199507000-00012. 2. Palm H, Jacobsen S, Sonne-Holm S, Gebuhr P. Integrity of the lateral femoral wall in intertrochanteric hip fractures: an important predictor of a reoperation. J Bone Joint Surg Am. 2007;89(3):470-475. PMID 17332094. DOI 10.2106/JBJS.F.00679. 3. Parker MJ, Handoll HHG. Gamma and other cephalocondylic intramedullary nails versus extramedullary implants for extracapsular hip fractures in adults. Cochrane Database Syst Rev. 2010;(9):CD000093. PMID 20824825. DOI 10.1002/14651858.CD000093.pub5. 4. Anglen JO, Weinstein JN. Nail or plate fixation of intertrochanteric hip fractures: changing pattern of practice. A review of the American Board of Orthopaedic Surgery database. J Bone Joint Surg Am. 2008;90(4):700-707. PMID 18381305. DOI 10.2106/JBJS.G.00517. 5. Moran CG, Wenn RT, Sikand M, Taylor AM. Early mortality after hip fracture: is delay before surgery important? J Bone Joint Surg Am. 2005;87(3):483-489. PMID 15741611. DOI 10.2106/JBJS.D.01796. 6. Rompen IF, Knobe M, Link BC, et al. Cement augmentation for trochanteric femur fractures: a meta-analysis of randomized clinical trials and observational studies. PLoS One. 2021;16(6):e0251894. PMID 34129607. DOI 10.1371/journal.pone.0251894. 7. NICE Guideline NG124. Hip fracture: management. National Institute for Health and Care Excellence. 2011 (updated 2023). 8. American Academy of Orthopaedic Surgeons (AAOS). Management of Hip Fractures in Older Adults: Evidence-Based Clinical Practice Guideline. 2021. 9. Registry sources: UK National Hip Fracture Database (NHFD); Australian and New Zealand Hip Fracture Registry (ANZHFR); Swedish and Norwegian hip fracture registries — annual reports on implant use and outcomes.
The value of the tip-apex distance in predicting failure of fixation of peritrochanteric fractures of the hip
- 198 peritrochanteric fractures: 16 of 19 failures were lag-screw cut-out through the femoral head
- Mean TAD was 24 mm in successfully healed fractures versus 38 mm in those that cut out (p = 0.0001)
- NONE of the 120 screws with a TAD of 25 mm or less cut out
- Strong dose-response: cut-out rate rises with increasing TAD regardless of other fracture variables
Integrity of the lateral femoral wall in intertrochanteric hip fractures: an important predictor of a reoperation
- 214 fractures treated with a 135-degree sliding compression hip screw
- Reoperation in 3 percent (5 of 168) with an intact lateral wall versus 22 percent (10 of 46) with a fractured lateral wall (p less than 0.001)
- 74 percent of lateral-wall fractures occurred intra-operatively during the procedure itself
- Lateral-wall fracture occurred in only 3 percent of A1/A2.1 patterns versus 31 percent of A2.2/A2.3 patterns (p less than 0.001)
Gamma and other cephalocondylic intramedullary nails versus extramedullary implants for extracapsular hip fractures in adults
- 43 randomised trials; 22 trials (3749 participants) compared the Gamma nail with the sliding hip screw
- The Gamma nail was associated with increased operative and later femoral fracture and a higher reoperation rate
- No major difference between implants in wound infection, mortality or medical complications
- Intramedullary nails showed fewer fixation complications than fixed nail-plates for unstable and subtrochanteric patterns
Early mortality after hip fracture: is delay before surgery important?
- Prospective study of 2660 surgically treated hip fractures
- Mortality was 9 percent at 30 days, 19 percent at 90 days and 30 percent at 1 year
- In patients fit for surgery, delay of up to 4 days did NOT increase mortality; delay beyond 4 days did (90-day HR 2.25)
- Medical comorbidity requiring treatment before surgery raised 30-day mortality 2.5-fold (HR 2.3)
Cement augmentation for trochanteric femur fractures: a meta-analysis of randomized clinical trials and observational studies
- Pooled 4 RCTs (437 patients) and 3 observational studies (293 patients)
- Lower overall complication rate with cement augmentation: 28.3 percent versus 47.2 percent (OR 0.3)
- Fewer reinterventions (OR 0.2) and less lag-screw sliding and varus deviation
- Mortality was equal between groups and cement-related complications were rare