Zone-specific surgical repair of extensor tendon injuries from the DIP joint to the forearm | Requires precise anatomical knowledge and a tailored rehabilitation protocol
- The Kleinert-Verdan zone classification (I-VIII) determines prognosis, the structures at risk and the surgical approach. The ODD zones (I, III, V) lie OVER joints and carry the worse prognosis; Zone VI under the extensor retinaculum has the highest adhesion rate (30-40%); Zones VII-VIII proximal to the retinaculum have the best outcomes (85-95% good-excellent).
- Zone I is a mallet finger: treat closed injuries with continuous extension splinting for 6-8 weeks, and reserve surgery for open injuries, a fragment greater than 30% of the articular surface, or DIP subluxation greater than 1mm.
- Zone III is the central slip: a missed injury progresses to a boutonniere deformity as the lateral bands sublux volar to the PIP axis. Diagnose with the Elson test and, after repair, splint the PIP in extension for 6 weeks with the DIP FREE.
- Use a figure-of-eight or modified Kessler core suture (3-0 or 4-0 braided non-absorbable, 5-7mm purchase each side) plus a running 5-0 or 6-0 epitendinous suture, which adds 10-20% strength and prevents gapping at the repair site.
When & Why
Indication. An acute extensor tendon laceration or open rupture anywhere from the DIP joint to the distal forearm, or a closed rupture that needs reconstruction. Within this, the specific surgical triggers are a Zone I mallet with an open injury, a fragment greater than 30% of the articular surface, or DIP subluxation greater than 1mm; a Zone III central slip rupture (acute repair prevents boutonniere); a Zone V sagittal band injury with extensor subluxation; and any open Zone II, IV, VI, VII or VIII laceration with loss of active extension. Timing matters. Primary repair is ideal within 24 hours of injury and acceptable up to 7-10 days. Beyond that, tendon retraction, fibrosis and muscle contracture make direct repair harder and reconstruction more likely. Assess the wound character (sharp laceration versus crush, clean versus contaminated) and any associated nerve, artery, bone or joint injury before committing to a plan. Relative contraindications. Severe contamination (delay the repair after irrigation and debridement), significant soft-tissue loss (consider staged reconstruction with a graft or flap), and expected patient non-compliance (early motion protocols are then inappropriate — choose static immobilisation). Consent specifically for repair rupture (2-5% overall, highest in Zones III, V and VI), adhesions and restricted motion (30-40% in Zone VI), extensor lag (10-30 degrees, common in Zones V-VI), zone-specific deformity (boutonniere in Zone III, mallet in Zone I) if inadequately managed, dorsal sensory nerve injury or neuroma (radial sensory nerve in Zones VI-VII), infection (1-3%, higher with contaminated or delayed wounds), and the need for prolonged hand therapy. Setup. Supine with the arm on a radiolucent hand table, an upper-arm tourniquet (250 mmHg, 90 minutes maximum), and loupe magnification of 2.5 to 3.5x (mandatory for nerve and tendon identification). General or regional anaesthesia (axillary or supraclavicular block), or WALANT (Wide Awake Local Anaesthesia No Tourniquet) for selected cases where intra-operative active testing of the repair is wanted. Position is zone-specific: Zones I-IV with the hand pronated and flat on the table for dorsal access; Zones V-VIII with the forearm supinated or neutral depending on the tendon injured.
The Operation
The goal is to identify the injured zone, retrieve the retracted tendon ends, repair them with a strong low-profile core-plus-epitendinous construct that glides, address the zone-specific structures (terminal tendon, central slip, sagittal band, retinaculum), test the repair, and splint in the zone-appropriate position. The exposure — incision, protection of the dorsal sensory nerves and retrieval of the tendon — is laid out as the first steps below, because the whole operation depends on a clean, well-exposed field.
Operative sequence
- Supine, hand table, upper-arm tourniquet at 250 mmHg, loupes on; zone-specific position of the hand.
- Identify the injured zone with the Kleinert-Verdan map before you cut: I over the DIP (mallet), II over the middle phalanx, III over the PIP (central slip), IV over the proximal phalanx, V over the MCP (sagittal band), VI under the extensor retinaculum (worst prognosis), VII over the dorsal wrist, VIII at the distal forearm musculotendinous junction (best prognosis).
- Centre a longitudinal incision over the injury and extend it proximally and distally for exposure (typically 3-5 cm total).
- For the digital zones (I-IV) use Bruner zig-zag or mid-axial incisions if extensile exposure is needed — they preserve the neurovascular structures and avoid longitudinal scar contracture.
- For Zones V-VIII use straight longitudinal incisions over the dorsal hand, wrist and forearm.
- Avoid transverse incisions over joints: they cause scar contracture and limit range of motion.
- In the subcutaneous plane, identify and protect the dorsal sensory nerves before any tendon work.
- The radial sensory nerve is superficial at the Zone VI-VII level, emerging about 8 cm proximal to the radial styloid and branching over the anatomical snuffbox — it is the structure most often injured.
- The dorsal branch of the ulnar nerve (DBUN) and the dorsal branches of the radial nerve (DBRUN) run along the mid-lateral line of the digits in Zones I-V.
- In through-and-through injuries, examine the volar wound for digital neurovascular bundle injury.
- Retrieve retracted tendon ends with a blunt probe or a dedicated tendon retriever, handling gently and keeping the tendons moist with saline-soaked gauze.
- Know the retraction pattern: EPL retracts all the way to the forearm (Zone VIII); EDC retracts to the dorsal hand, though the juncturae tendinum may limit this; the digital extensors usually retract to the hand level.
- If the proximal end has retracted beyond the primary incision, make a separate proximal window to retrieve it cleanly rather than force blind dissection.
- Inspect the tendon ends. Sharp lacerations need minimal trimming (1 mm or less); crush injuries may need debridement to healthy tendon but keep this to 2 mm maximum.
- Extensor tendons have less excursion than flexors (about 5 cm versus 7 cm for FDP), so every millimetre of length matters and a gap greater than 1 cm is hard to close without undue tension.
- If a gap remains after minimal debridement, consider a central slip advancement (Zone III), an FDS transfer (chronic boutonniere) or a tendon graft rather than a repair under excess tension.
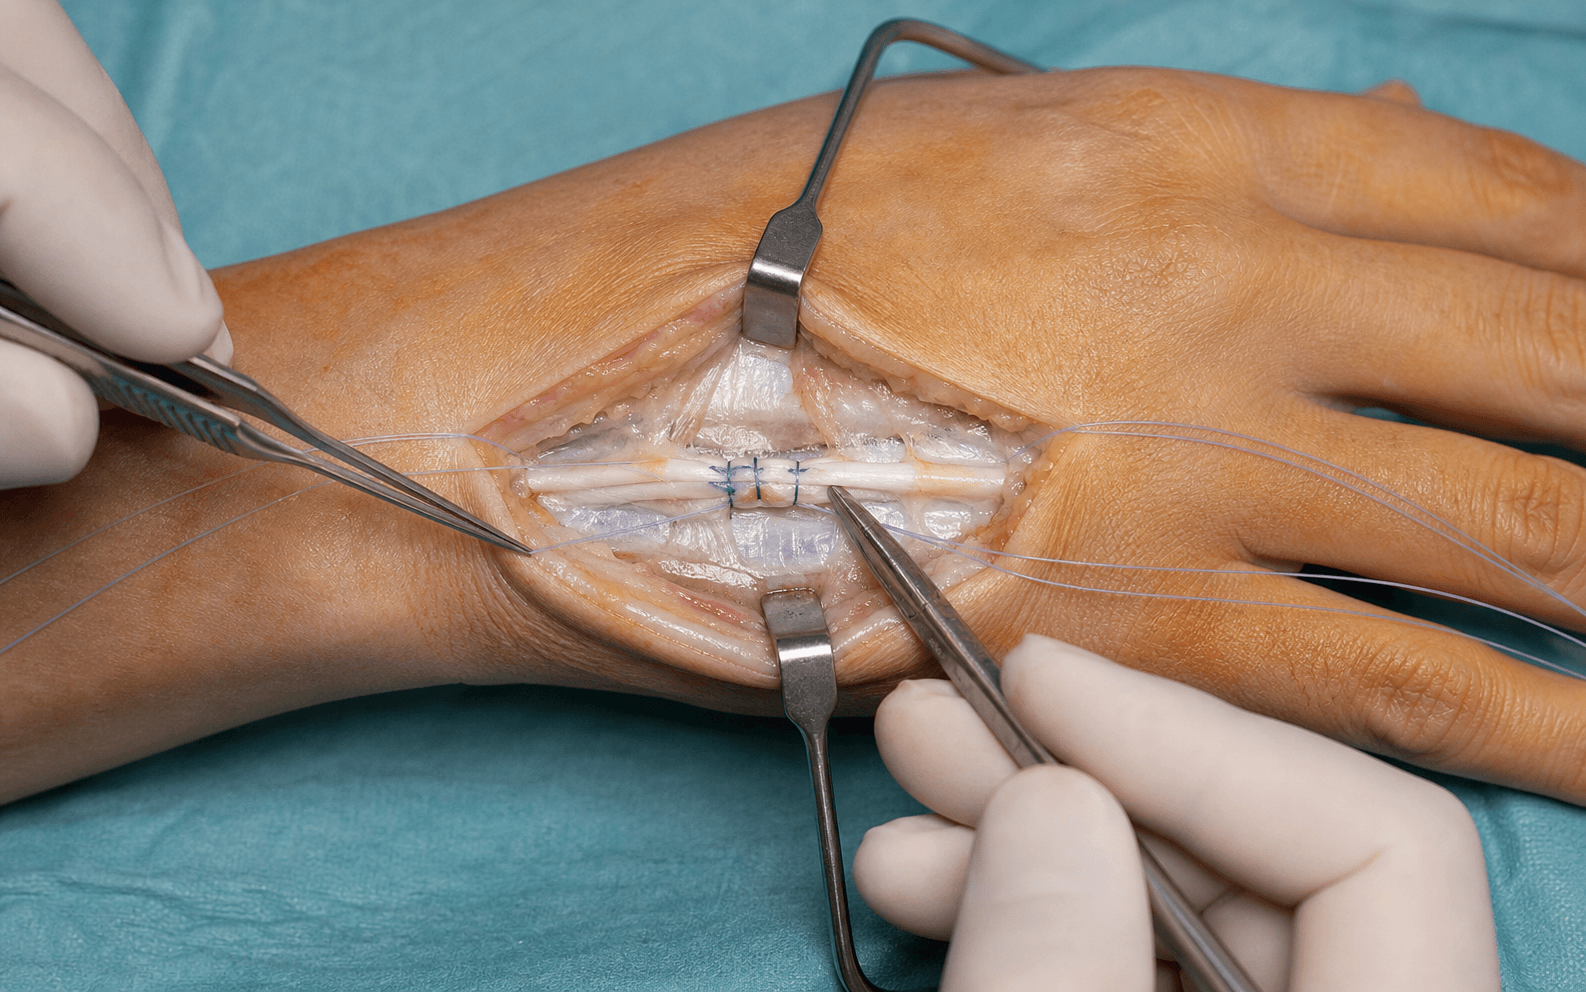
- For Zones II-VIII use a figure-of-eight (the common extensor pattern) or a modified Kessler with locking loops.
- Use a 3-0 or 4-0 braided non-absorbable suture (e.g. Ethibond, FiberWire), taking 5-7 mm of purchase on each side.
- Pass transversely through the tendon, cross to the opposite side, pass transversely again and return to create the figure-of-eight; tie the knot on the dorsal surface and bury it to reduce irritation and triggering.
- A modified Kessler (locking horizontal mattress) gives similar strength and is preferred in the thicker tendons such as ECRL/ECRB at Zones VII-VIII.
- Run a 5-0 or 6-0 monofilament (nylon or Prolene) epitendinous suture circumferentially around the whole tendon in a simple running or cross-stitch, with 1-2 mm bites.
- This adds 10-20% to the repair strength (more critical in extensors than flexors because the thin tendons limit the core suture), prevents gapping during motion, smooths the repair bulk so it does not trigger, and re-approximates the paratenon for gliding.
- Begin at the core-suture knot, run circumferentially, and tie and bury the final knot.
- Zone I (mallet): for a tendinous tear use a horizontal mattress or figure-of-eight with 4-0 suture; for a bony avulsion use extension-block K-wire pinning across the DIP (0.035-0.045 inch wire), a pull-out wire suture tied over a dorsal button, or ORIF (a 1.3 mm lag screw or a tension band) when the fragment is large.
- Zone III (central slip): repair the central slip with a figure-of-eight 3-0 or 4-0 non-absorbable suture, using drill holes in the middle phalanx for a bony avulsion; after repair the lateral bands must lie dorsal to the PIP axis, and passive DIP flexion should not produce a PIP extension lag.
- Zone V (sagittal band): centralise the extensor tendon over the MCP and repair the sagittal band with 3-0 or 4-0 non-absorbable suture, using a pants-over-vest pattern if the tissue is poor; repair any concomitant tendon laceration.
- Zone VI (retinaculum): see Step 10 for the retinaculum decision, but ensure an absolutely smooth repair — any irregularity seeds adhesions.
- Release the tourniquet temporarily (and check perfusion at the same time).
- Passively flex and extend the wrist and digits through full range and watch the repair site — there should be no gapping (a gap greater than 1-2 mm means revise).
- Confirm the tendon glides smoothly with no catching or triggering (palpate during passive motion), that tension is snug but allows full passive range, and — where multiple tendons are repaired — that each digit moves independently with no inadvertent tethering.
- In WALANT cases, ask the patient for gentle active extension — the ultimate test of strength and excursion.
- Release only the involved compartment and preserve the adjacent compartments to prevent bowstringing of the other tendons.
- Three options: reconstruct the retinaculum (prevents bowstringing but risks adhesions), leave it open (fewer adhesions but possible bowstringing, usually cosmetic), or a compromise — a loose reconstruction or a windowed repair with absorbable suture that allows gliding while limiting bowstringing.
- The compromise is the common choice: it balances the two competing risks in the worst-prognosis zone.
- Close the skin with a 4-0 or 5-0 absorbable subcuticular suture, reinforced with skin adhesive, with no tension on the edges (allow for swelling) and slight wound-edge eversion.
- Apply a non-adherent layer, fluffed gauze for padding and oedema control, and the zone-specific splint immediately (see Aftercare).
- The splint position is zone-specific and is the single most important determinant of whether the repair holds and glides.
The ODD zones (I, III, V) lie OVER joints and have the wOrse prognosis; Zone VI is the worst overall with a 30-40% adhesion rate; Zones VII-VIII are the best with 85-95% good-excellent results when repaired properly. State this zone-specific prognosis to the examiner and let it drive both your patient counselling and your rehabilitation protocol.
Three errors cause failure at retrieval: a missed EPL injury in Zone VI, because the juncturae from EDC initially compensate and the patient still has weak but present thumb extension (test isolated thumb IP extension); excessive dissection that damages the paratenon and seeds adhesions; and radial sensory nerve injury during proximal retrieval in Zones VI-VII. Keep dissection minimal, the tendon moist, and the nerves identified at all times.
Unlike flexor tendons where you may accept 5 mm of debridement, extensors demand length preservation because their excursion is shorter. Trim sharp lacerations by 1 mm or less and crush injuries by 2 mm maximum to healthy tissue. If the gap is still greater than 1 cm, move to advancement, transfer or graft rather than a repair under tension.
The epitendinous suture increases repair strength by 10-20% and significantly reduces gap formation. In extensor repairs — where the core suture is limited by thin tendon substance, especially in Zones I-II — it is even more critical than in flexor repairs. Treat it as mandatory in every extensor repair.
The two-minute testing phase prevents most technical failures. Systematically check: no gap with passive motion, smooth gliding with no catch, full passive range possible, and independent finger motion. If there is any concern, revise before closure — it is far easier than a return to theatre at six weeks.
Zone VI is the worst-prognosis zone because the repair sits within the retinaculum compartments. Release only the involved compartment, leave the retinaculum open or loosely reconstructed to allow gliding, and begin early protected motion — here, accept a slightly higher rupture risk because adhesions are the greater problem.
Aftercare & Complications
Rehabilitation. Splint position is zone-specific and drives the outcome. Immobilise in the position below, then progress to motion and strengthening on the schedule shown. | Zone | Splint position | Duration | |------|-----------------|----------| | I (DIP) | DIP extension 0-5 degrees; PIP and MCP free | 6-8 weeks continuous, then night splinting 2-4 weeks | | II-IV (digit) | Wrist extension 30-40 degrees; MCP slight flexion; IPs extended | 4-6 weeks | | III (central slip) | PIP extension (0 to 10 degrees); DIP FREE | 6 weeks strict, then dynamic extension 2-4 weeks | | V (sagittal band) | MCP extension (0-10 degrees flexion); IPs FREE | 4 weeks, then dynamic extension 2 weeks | | VI-VIII (wrist/forearm) | Wrist extension 30-40 degrees; digits in composite extension | 4-6 weeks (3-4 weeks if the repair is strong) | Mobilisation strategy. Three approaches are in use; the choice balances rupture risk against stiffness, and Zone VI benefits most from early motion.
Strict immobilisation for 3-4 weeks, then gradual active range of motion, dynamic splinting at 4-6 weeks and strengthening at 6-8 weeks. Safest — a 1-2% rupture rate — but more stiffness (especially Zone VI) and slower recovery.
Relative-motion, synergistic or short-arc protocols begun early. Fewer adhesions, faster recovery and better Zone VI outcomes, at the cost of a higher rupture risk (3-5%) and the need for a compliant patient and a skilled therapist.
Static immobilisation for 2-3 weeks, then early protected motion at 3-6 weeks and dynamic splinting at 6-8 weeks. Balances safety against outcomes and suits most patients.
Recovery timeline. Weeks 0-2: strict immobilisation or very gentle protected motion, oedema control, and active range of motion of the non-immobilised joints. Weeks 2-4: continue immobilisation or initiate early protected motion (place-and-hold, short arc) and gentle tendon gliding. Weeks 4-6: transition to active range of motion or progress protected motion, with dynamic extension splinting and light functional activity. Weeks 6-8: emphasise active range of motion, discontinue static splinting if the zone allows, and begin light strengthening. Weeks 8-12: aggressive strengthening, resistance exercises, sport-specific training and gradual return to manual labour. Months 3-6: return to full activity; a 10-20 degree extensor lag is common and acceptable if functional. Expected outcomes by zone.
- Good-excellent outcome
- 80-90% achieve functional DIP extension
- Key issue
- 10-20 degree lag acceptable; swan-neck if overcorrected
- Good-excellent outcome
- 85-95% good-excellent
- Key issue
- Minimal lag (less than 10 degrees); low complication rate
- Good-excellent outcome
- 70-80% with proper management
- Key issue
- Boutonniere in 15-20% if the central slip is inadequately repaired
- Good-excellent outcome
- 75-85% good
- Key issue
- 10-20 degree lag common; recurrent subluxation 10-15%
- Good-excellent outcome
- 60-80% good (worst zone)
- Key issue
- 30-40% develop significant adhesions; tenolysis in 10-20%
- Good-excellent outcome
- 85-95% excellent (best zones)
- Key issue
- Minimal adhesions; good excursion; early motion well tolerated
A sudden loss of extension with a palpable gap is a rupture — return to theatre for re-repair if early. A progressive loss of motion despite therapy is adhesions — consider tenolysis after 3-6 months. An extensor lag greater than 30 degrees at 12 weeks warrants consideration of late reconstruction. Disproportionate pain, swelling and temperature or colour change suggest CRPS — escalate to aggressive therapy and medication.
Complications.
- Recognition
- Sudden loss of active extension during rehab, a palpable gap at the repair site, increased swelling and pain; a partial rupture may show as a progressive extensor lag
- Prevention
- Secure core plus epitendinous repair, zone-appropriate splinting for 4-8 weeks, patient education, and avoidance of early aggressive motion when repair quality is marginal
- Management
- If early (less than 6 weeks) re-repair if tissue quality is adequate, otherwise reconstruction (graft or transfer); if late, reconstruction; a Zone VI rupture with minimal functional loss may be accepted
- Recognition
- Progressive loss of flexion despite therapy, firm resistance to passive motion, lack of independent tendon excursion, most apparent at 8-12 weeks
- Prevention
- Atraumatic technique, minimal soft-tissue trauma, a smooth repair, early protected motion (especially Zone VI) and aggressive gliding exercises
- Management
- Intensive hand therapy first (dynamic splinting, passive stretch); if a plateau is reached after 3-6 months with functional limitation, tenolysis — best at 3-6 months post-repair
- Recognition
- Loss of terminal active extension with full passive extension possible; distinguish lag (full passive range) from stiffness (limited passive and active)
- Prevention
- A secure repair without gapping, proper splint duration, appropriate early mobilisation and therapy emphasising active extension
- Management
- A lag less than 20 degrees is usually acceptable if functional; for a lag greater than 30 degrees use dynamic extension splinting for 3-6 months and consider late reconstruction if severe and non-functional
- Recognition
- PIP flexion with DIP hyperextension; early weak PIP extension on the Elson test, late fixed contracture as the lateral bands sublux volarly
- Prevention
- Recognise the central slip injury (Elson test), secure central slip repair, splint the PIP extended with the DIP free for 6 weeks, and avoid early PIP flexion
- Management
- Acute or flexible: a splinting trial (serial static or dynamic PIP extension, DIP free) for 3-6 months; chronic or fixed: surgical reconstruction (terminal tendon turndown, lateral band mobilisation, FDS transfer)
- Recognition
- DIP flexion with inability to actively extend; a bony fragment on x-ray; possible DIP subluxation if the fragment is greater than 30% of the articular surface
- Prevention
- Strict extension splinting for 6-8 weeks for closed injuries, surgical fixation for open injuries or large fragments, and patient compliance education
- Management
- Acute flexible: extend the splinting trial for 6-8 weeks; chronic flexible: may respond to prolonged splinting; chronic fixed: DIP arthrodesis
- Recognition
- Painful snapping or clunking over the MCP with flexion-extension, visible or palpable ulnar subluxation of the extensor tendon, weak MCP extension
- Prevention
- Recognise the sagittal band injury at the initial repair, secure repair with non-absorbable suture, splint the MCP extended for 4 weeks, and avoid early aggressive MCP flexion
- Management
- Acute or early: MCP extension splinting trial for 6-8 weeks; chronic or recurrent: surgical reconstruction (juncturae slip, EDC slip sling, extensor centralisation) — 80-85% success
- Recognition
- Increasing pain, erythema, warmth, purulent drainage, fever, raised WCC or CRP; distinguish superficial cellulitis from deep tenosynovitis or septic arthritis
- Prevention
- Antibiotics if contaminated, meticulous irrigation, debridement of devitalised tissue, delayed closure if contamination is significant, and aseptic technique
- Management
- Superficial cellulitis: oral antibiotics and local wound care; deep infection: admission, intravenous antibiotics, urgent washout and irrigation, culture-directed therapy
Viva & Exam Focus
ZONESZONES — zone-specific prognosis
REPAIRREPAIR — technique essentials
Zone-specific danger structures. Name the structure at risk in each zone and how you protect it — a reliable way to score the anatomy question.
Superficial to the first dorsal compartment at the Zone VI-VII level, emerging about 8 cm proximal to the radial styloid and branching over the anatomical snuffbox. Identify it early, retract it carefully, and avoid excessive lateral skin undermining.
Run along the mid-lateral line of the digits in Zones I-V. Use mid-axial or Bruner incisions in the digits and identify the nerves before extending the wound.
Lie volarly and are at risk in through-and-through injuries. Examine the volar wound and assess perfusion and sensation; explore if the trauma is penetrating.
Zone VI over the dorsal wrist has six compartments (I APL/EPB, II ECRL/ECRB, III EPL, IV EDC/EIP, V EDM, VI ECU). Release only the involved compartment and preserve the adjacent retinaculum.
Lies deep to the extensor mechanism at the odd zones (I, III, V). Assess for joint violation, irrigate copiously if the capsule is opened, and keep a low threshold for exploration.
Clinical Decision Scenarios
Practise clinical reasoning and management decisions out loud
“A 35-year-old carpenter presents with a laceration over the dorsum of his right wrist after a saw injury. He has lost the ability to extend his thumb IP joint. Walk me through your assessment and management.”
“You are asked to see a 28-year-old woman in fracture clinic with a 3-week history of PIP joint pain and progressive deformity after a basketball injury. She now has PIP flexion and DIP hyperextension. What is your diagnosis and management?”
“You repair a Zone VI EDC laceration to the ring finger. At 8 weeks post-op the patient has full passive motion but can only actively flex the MCP to 45 degrees instead of 90 degrees. What has happened and what do you recommend?”
Indications
- Acute extensor tendon laceration (primary repair ideal within 24 hours, acceptable up to 7-10 days).
- Open extensor tendon rupture (traumatic or iatrogenic).
- Closed rupture needing reconstruction (mallet greater than 30% of the articular surface; chronic boutonniere that has failed splinting).
- Sagittal band injury with extensor subluxation (Zone V).
- Relative contraindications: severe contamination (delayed repair after irrigation and debridement), significant soft-tissue loss (staged reconstruction), expected non-compliance.
Critical anatomy
- Kleinert-Verdan zones: I DIP (mallet), II middle phalanx, III PIP (central slip/boutonniere), IV proximal phalanx, V MCP (sagittal band), VI retinaculum (worst prognosis), VII wrist, VIII forearm (best prognosis).
- Sagittal bands (Zone V): transverse fibres stabilising the extensor over the MCP; ulnar injury more common than radial.
- Central slip (Zone III): extends the PIP, inserts on the dorsal base of the middle phalanx; injury causes boutonniere as the lateral bands sublux volarly.
- Extensor retinaculum (Zone VI): six compartments — I APL/EPB, II ECRL/ECRB, III EPL, IV EDC/EIP, V EDM, VI ECU.
- Danger structures: radial sensory nerve (Zones VI-VII), dorsal digital nerves DBUN/DBRUN (Zones I-V), digital neurovascular bundles volar in through-and-through injuries.
Sequential critical steps
- Zone identification (I-VIII) and injury assessment (time, contamination, associated nerve/artery/bone/joint injury).
- Longitudinal wound extension (Bruner or mid-axial for digits, straight for hand/wrist/forearm) with protection of the dorsal sensory nerves.
- Tendon retrieval if retracted (EPL to forearm, EDC to hand) with a blunt probe or retriever, and a proximal window if needed.
- Minimal tendon end preparation (1-2 mm debridement maximum, preserve length, assess the gap).
- Core suture: figure-of-eight or modified Kessler, 3-0 or 4-0 braided non-absorbable, 5-7 mm purchase each side.
- Running epitendinous suture: 5-0 or 6-0 monofilament circumferentially, adds 10-20% strength, prevents gapping.
- Zone-specific repair: I extension-block pinning or ORIF if indicated, III central slip figure-of-eight, V sagittal band repair, VI retinaculum decision.
- Repair testing: passive wrist and digit motion (no gap greater than 2 mm), smooth gliding (no triggering), appropriate tension (full passive range possible).
- Zone VI retinaculum management: reconstruct loosely versus leave open versus a windowed compromise — balance bowstringing against adhesions.
- Skin closure: 4-0 or 5-0 absorbable subcuticular, no tension on the edges, immediate zone-specific splinting.
Danger structures (numbered)
- Radial sensory nerve: superficial at Zone VI-VII, emerging 8 cm proximal to the radial styloid over the snuffbox — identify early.
- Dorsal digital nerves (DBUN/DBRUN): mid-lateral line of the digits in Zones I-V — use mid-axial or Bruner incisions.
- Digital neurovascular bundles: volar, at risk in through-and-through injuries — examine the volar wound.
- EPL tendon: unique oblique course in the third compartment around Lister's tubercle; retracts to the forearm if lacerated in Zones VI-VII.
- Joint capsule (DIP/PIP/MCP): deep to the extensor mechanism at the odd zones — assess for violation and irrigate if opened.
Technique pearls
- Zone prognosis: the odd zones (I/III/V) over joints are worse; Zone VI is worst (30-40% adhesions); Zones VII-VIII are best (85-95% excellent).
- The epitendinous suture is not optional — adds 10-20% strength, critical in the thin extensor tendons.
- Zone I (mallet): non-operative if closed and under 30% joint and under 1 mm subluxation; operative if open or over 30% joint or over 1 mm subluxation; DIP extension splint for 6-8 weeks.
- Zone III (central slip): PIP extension splint for 6 weeks with the DIP FREE (prevent extensor lag from oblique retinacular ligament shortening); Elson test is diagnostic.
- Zone V (sagittal band): repair the sagittal band and centralise the extensor; MCP extension splint for 4 weeks with the IPs free.
- Zone VI controversy: a loose retinaculum reconstruction with windows balances bowstringing against adhesions, with early protected motion critical.
- Mobilisation: static is safer (1-2% rupture) but stiffer; early motion has fewer adhesions but 3-5% rupture — a hybrid approach is common.
Complications (frequency)
- Repair rupture (2-5% overall, highest in Zones III/V/VI): sudden loss of extension with a gap; re-repair if early (less than 6 weeks), reconstruction if late.
- Adhesions (30-40% in Zone VI, 10-20% elsewhere): full passive but limited active range; hand therapy for 3-6 months, tenolysis if a plateau with functional loss.
- Extensor lag (10-30 degrees, common in Zones V-VI): loss of terminal extension with full passive range; dynamic splinting; acceptable if less than 20 degrees and functional.
- Boutonniere (Zone III, up to 20% if inadequately repaired): flexible — a splinting trial for 3-6 months; fixed — reconstruction (Fowler, FDS transfer).
- Mallet deformity (Zone I, 10-15% non-operative): extend the splinting trial; chronic fixed — DIP arthrodesis.
- Sagittal band insufficiency (Zone V, 10-15% recurrent subluxation): MCP extension splint trial; reconstruction if it fails (juncturae sling).
- Infection (1-3%): superficial — oral antibiotics; deep — intravenous antibiotics and urgent washout.
Post-operative protocol
- Zone I: DIP extension for 6-8 weeks continuous (PIP and MCP free), then night splinting for 2-4 weeks.
- Zones II-IV: wrist in 30-40 degrees of extension, digits extended for 4-6 weeks, then gradual range of motion.
- Zone III: PIP extension for 6 weeks with the DIP FREE (critical), then dynamic extension splinting for 2-4 weeks.
- Zone V: MCP extension (0-10 degrees flexion) for 4 weeks with the IPs free, then dynamic splinting for 2 weeks.
- Zones VI-VIII: wrist in 30-40 degrees of extension for 4-6 weeks (3-4 weeks if the repair is strong).
- Timeline: 0-3 weeks protection, 3-6 weeks range of motion, 6-8 weeks strengthening, 12 weeks full activity; hand therapy is essential in all zones, especially Zone VI.
Exam tips (high-yield)
- Know the zone-specific prognosis cold: Zones VII-VIII 85-95%, Zone VI 60-80%, Zone III 70-80% with proper management, Zone I 80-90%.
- State the technique: a figure-of-eight or modified Kessler with 3-0 or 4-0 braided non-absorbable plus a running 5-0 or 6-0 epitendinous.
- Zone VI controversy: the worst prognosis is due to adhesions; balance with a loose retinaculum reconstruction and early protected motion, accepting a slightly higher rupture risk.
- Boutonniere prevention: recognise the central slip injury with the Elson test, repair primarily, splint the PIP extended for 6 weeks with the DIP free.
- Complications: overall rupture 2-5%; Zone VI adhesions 30-40% are the most common; extensor lag 10-30 degrees is acceptable if less than 20 degrees and functional.
- EPL pearls: the juncturae can mask the injury — test isolated thumb IP extension; Zone VII has an excellent prognosis; the radial sensory nerve is the critical danger structure.
- Mobilisation: the controversy is static versus early motion; a hybrid (static for 2-3 weeks, then early protected motion) suits most, and Zone VI benefits most from early motion.
Background & Evidence
Pathoanatomy and biomechanics. The extensor tendons are thin and flat over the digits, which limits the core-suture purchase and the achievable repair strength compared with the round flexor tendons — every suture configuration shortens the tendon and produces some loss of MCP and PIP flexion. Their excursion is also shorter than the flexors (about 5 cm versus 7 cm for FDP), so a small loss of length or a minor adhesion translates into a measurable loss of motion. An under-appreciated point is that loss of FLEXION (from tendon shortening and adhesions) often exceeds loss of extension in both frequency and magnitude, so patients must be counselled about stiffness as much as lag. Classification. Two systems guide management: the Kleinert-Verdan topographic zones that determine prognosis and the structures at risk, and the Doyle classification for the Zone I mallet finger that determines operative versus non-operative treatment.
- Location
- Over the DIP joint
- Key structure / issue
- Terminal tendon — mallet finger
- Prognosis
- 80-90% functional DIP extension
- Location
- Over the middle phalanx
- Key structure / issue
- Simple tendon repair
- Prognosis
- 85-95% good-excellent
- Location
- Over the PIP joint
- Key structure / issue
- Central slip — boutonniere risk
- Prognosis
- 70-80% with proper management
- Location
- Over the proximal phalanx
- Key structure / issue
- Straightforward tendon repair
- Prognosis
- 85-95% good-excellent
- Location
- Over the MCP joint
- Key structure / issue
- Sagittal band — subluxation risk
- Prognosis
- 75-85% good
- Location
- Under the extensor retinaculum
- Key structure / issue
- Adhesions — worst zone
- Prognosis
- 60-80% good (30-40% adhesions)
- Location
- Over the dorsal wrist
- Key structure / issue
- Multiple tendons at risk
- Prognosis
- 85-95% excellent
- Location
- Distal forearm musculotendinous junction
- Key structure / issue
- Robust tendons, good cover
- Prognosis
- 85-95% excellent (best zone)
- Description
- Closed injury with or without a small dorsal avulsion fragment (most common)
- Typical management
- Continuous extension splinting for 6-8 weeks
- Description
- Open injury — laceration over the DIP with tendon division
- Typical management
- Surgical repair
- Description
- Open injury with loss of skin and tendon substance
- Typical management
- Repair plus soft-tissue cover
- Description
- Transepiphyseal fracture in children
- Typical management
- Reduction and fixation
- Description
- Hyperflexion injury with 20-50% articular involvement
- Typical management
- Operative fixation if subluxed
- Description
- Hyperextension injury with greater than 50% articular surface and volar DIP subluxation
- Typical management
- ORIF — lag screw or tension band
Key evidence. The modern understanding rests on four lines of work. Newport (1990) established that distal zones (I-IV) have significantly poorer results than proximal zones (V-VIII), that associated fracture, dislocation, capsular or flexor injury worsens the outcome, and that loss of flexion exceeds loss of extension — the basis for zone-specific counselling. Newport and Williams (1992) showed in a cadaveric model that extensor repairs are considerably weaker than equivalent flexor repairs, that every technique shortens the tendon and loses flexion, and that the Kleinert modification of the Bunnell suture is strongest with no gapping — the basis for a locking core configuration and careful protection of the repair. Crosby and Wehbé (1999) then showed that immediate dynamic splinting with tendon mobilisation gives near-full range of motion and faster recovery than historical static series, establishing early controlled motion. Most recently, Collocott and colleagues (2019, 2017) showed in a randomised trial and systematic review that early active mobilisation outperforms immobilisation, and that a relative-motion extension orthosis gives earlier hand function, range of motion and satisfaction than controlled active motion for Zones V-VI, with no ruptures — supporting relative-motion protocols as a preferred early-motion regimen.
References
Long-term results of extensor tendon repair
- Retrospective series of 62 patients, 101 injured digits, mostly treated with static splinting.
- Distal zones (I-IV) had significantly poorer results than proximal zones (V-VIII).
- Patients without associated injury achieved 64% good/excellent results and mean total active motion of 212 degrees; associated fracture, dislocation, joint capsule or flexor injury worsened outcomes.
- Loss of flexion exceeded loss of extension in both frequency and magnitude.
Rupture of the central slip of the extensor hood of the finger: a test for early diagnosis
- Closed central slip rupture is easily missed until a late boutonniere deformity appears; the Boyes test becomes positive only late.
- Describes the Elson test: PIP flexed 90 degrees over a table edge, the patient extends the PIP against resistance.
- Central slip rupture produces weak or absent PIP extension force AND rigid (fixed) DIP extension as the lateral bands transmit force only to the terminal tendon.
- With an intact central slip, the PIP extends strongly and the DIP stays floppy.
Biomechanical characteristics of extensor tendon suture techniques
- Cadaveric comparison of extensor tendon core-suture techniques over flat, thin tendons.
- All techniques shortened the tendon and produced measurable loss of MCP and PIP flexion; extensor repairs were considerably weaker than equivalent flexor repairs.
- The Kleinert modification of the Bunnell suture was strongest, produced no gapping, and caused the least worrisome flexion loss.
- Confirms that extensor tendon substance limits the achievable repair strength regardless of technique.
Early protected motion after extensor tendon repair
- 30 hands with 50 extensor lacerations (excluding mallet) treated with repair plus immediate dynamic splinting and tendon mobilisation.
- 45 of 50 tendons regained full range of motion (mean total active motion 262 degrees); the remaining 5 had an extension lag of 10 degrees or less.
- All patients regained at least 93% of predicted normal strength by 9-12 weeks and returned to prior activity at a mean of 10 weeks.
- Results including complex lacerations were better than historical immobilisation series.
A randomised clinical trial comparing early active motion programs for zones V and VI extensor tendon repairs (relative motion extension versus controlled active motion)
- RCT of 42 patients with Zone V-VI extensor repairs randomised to a relative-motion extension (RME) orthosis versus controlled active motion (CAM).
- At 4 weeks the RME group had significantly better Sollerman Hand Function Test, QuickDASH and total active motion scores.
- Patient satisfaction with the orthosis was significantly higher with RME; days to return to work were similar between groups.
- No tendon ruptures occurred in either group.
Further reading. 1. Doyle JR. Extensor tendons: acute injuries. In: Green DP, Hotchkiss RN, Pederson WC, eds. Green's Operative Hand Surgery. 4th ed. Churchill Livingstone; 1999:1950-1987 — the comprehensive reference review of extensor tendon anatomy, classification and zone-specific surgical technique. 2. Kleinert HE, Verdan C. Report of the Committee on Tendon Injuries. J Hand Surg Am. 1983;8(5 Pt 2):794-798 — the original description of the universal zone classification system (Kleinert-Verdan zones I-VIII). 3. Evans RB, Thompson DE. The application of force to the healing tendon. J Hand Ther. 1993;6(4):266-284. doi:10.1016/S0894-1130(12)80331-5 — the biomechanical basis for the epitendinous suture adding 10-20% to extensor repair strength. 4. Browne EZ Jr, Ribik CA. Early dynamic splinting for extensor tendon injuries. J Hand Surg Am. 1989;14(1):72-76. doi:10.1016/0363-5023(89)90062-4 — the early description of dynamic splinting protocols that underpin modern extensor rehabilitation. 5. Blair WF, Steyers CM. Extensor tendon injuries. Orthop Clin North Am. 1992;23(1):141-148 — review of complications including adhesions (30-40% in Zone VI), extensor lag management, and tenolysis indications and outcomes. 6. Collocott SJ, Kelly E, Ellis RF. Optimal early active mobilisation protocol after extensor tendon repairs in zones V and VI: a systematic review. Hand Ther. 2017;23(1):3-18. doi:10.1177/1758998317729713 — early active mobilisation outperforms immobilisation; controlled active motion and relative-motion extension splinting give similar range of motion, but relative motion allows earlier return to work.