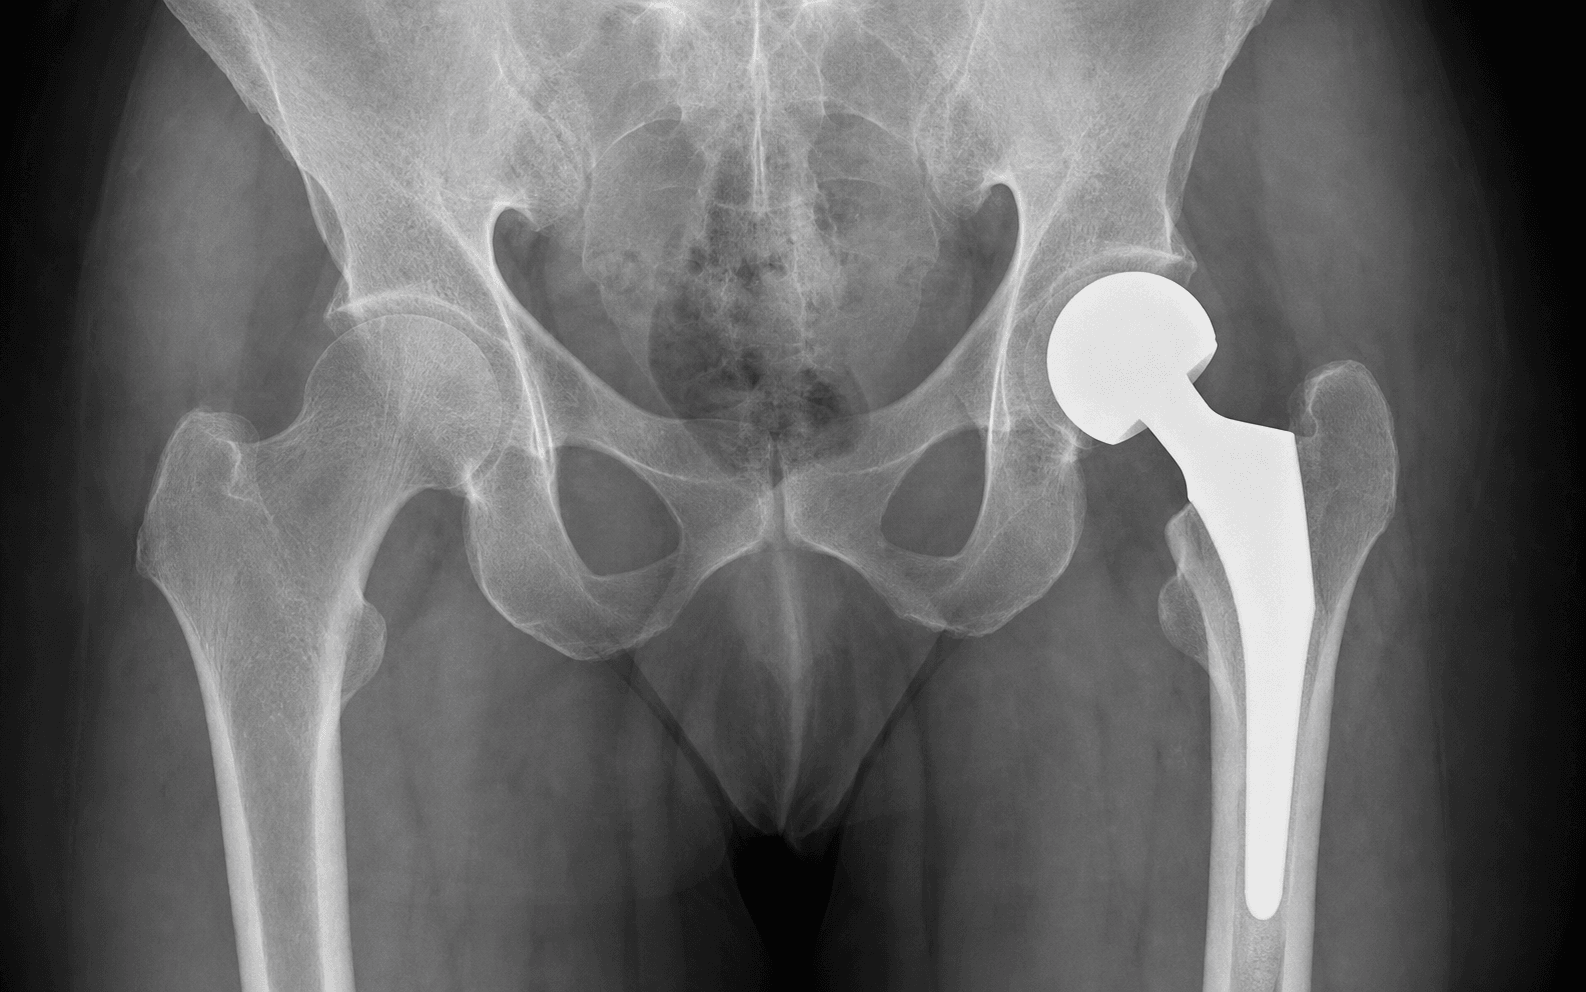
Cemented hemiarthroplasty · Displaced intracapsular (Garden III/IV) fracture in the low-demand elderly · Posterior (Moore/Southern) approach
- The classic patient is elderly (over 70), low-demand or cognitively impaired, with a displaced intracapsular (Garden III or IV) femoral neck fracture and a normal acetabulum. The hemi-versus-THA decision turns on pre-injury mobility, cognition and life expectancy.
- Use a CEMENTED stem. WHiTE 5 (NEJM 2022) and the Norwegian Hip Fracture Register show cemented fixation gives better early quality of life and far fewer periprosthetic fractures than uncemented, with no mortality difference.
- Third-generation cementing — restrictor, pulsatile lavage, retrograde gun, pressurisation — together with anaesthetic communication prevents Bone Cement Implantation Syndrome (BCIS).
- Enhanced posterior soft-tissue repair (capsule plus short external rotator reattachment through bone) cuts dislocation from 5-10 percent down to 1-2 percent.
- Surgery within 36 hours with orthogeriatric co-management reduces mortality. 30-day mortality is 5-8 percent and 1-year mortality 20-30 percent, reflecting the frailty of the population rather than the procedure.
When & Why
Indication. A displaced intracapsular femoral neck fracture (Garden III or IV) in an elderly, low-demand patient in whom the native femoral head cannot be reliably saved and the acetabulum is healthy. The operation replaces the femoral head and neck with a stem that articulates directly with the native acetabulum, restoring a stable, painless hip for immediate weight-bearing. Absolute indications:
- Displaced intracapsular femoral neck fracture in an elderly patient (typically over 70 years)
- Low functional demand — walks with aids, limited community ambulation
- Cognitive impairment (dementia), making compliance with hip precautions unreliable
- Limited life expectancy (under 5-10 years)
- Significant medical comorbidities favouring a shorter operative time
- No pre-existing acetabular arthritis on imaging Relative indications:
- Undisplaced fractures (Garden I or II) in the very elderly with severe osteoporosis, where fixation is likely to fail
- Pathological fractures from metastatic disease (palliative hemiarthroplasty)
- Failed internal fixation of a femoral neck fracture (salvage)
- An elderly patient with rheumatoid arthritis and poor bone quality The one decision that matters — hemi, THA, or fixation. Every displaced fracture in an older patient must be matched to the patient, not the X-ray:
The default for the low-demand, cognitively impaired elderly patient. Cemented stem, faster than THA, no acetabular preparation. The HEALTH trial showed no reoperation benefit to THA and more dislocation with THA.
Reserved for the active, cognitively intact patient who walked independently outdoors with no more than a stick, with good life expectancy and a normal acetabulum. Better best-case function, but higher dislocation.
Reserved for the young (physiological age under 65) and for undisplaced (Garden I or II) fractures. Fixation failure in displaced elderly fractures runs at around 20-40 percent, which is exactly why arthroplasty dominates this population.
Total hip arthroplasty is preferred over hemiarthroplasty when the patient is active with independent community ambulation, is cognitively intact with a life expectancy over 10 years, is younger (around 60-70) with a displaced fracture, or has pre-existing acetabular arthritis or an inflammatory arthropathy.
The HEALTH trial (NEJM 2019, 1,495 independently ambulating patients) found NO significant difference in secondary hip procedures at 24 months (7.9 percent THA vs 8.3 percent hemi, HR 0.95, p=0.79) and only a clinically unimportant functional advantage for THA, while dislocation or instability was HIGHER with THA (4.7 percent vs 2.4 percent). Reserve THA for active, cognitively intact patients; otherwise hemiarthroplasty is faster, simpler, and at least as good.
Contraindications. Absolute: active sepsis or local infection, medical instability precluding surgery, or a palliative patient with very limited life expectancy (comfort measures only). Relative: severe osteoporosis with concern for periprosthetic fracture (usually still proceed), anticoagulation that cannot be reversed (delay if possible), and significant cardiac disease raising BCIS risk (consider uncemented). Pre-operative optimisation and timing. The target is surgery on the day of, or the day after, admission, and within 36-48 hours (NICE NG124). Registry data across the UK NHFD, Norwegian, Swedish and Australian or New Zealand audits consistently associate surgery beyond 48 hours with increased mortality. Delay only for a clear reversible problem — anaemia requiring transfusion, fluid or electrolyte derangement, reversible coagulopathy, uncontrolled diabetes or arrhythmia — and do NOT delay for non-correctable comorbidities or minor abnormalities. Every patient gets early orthogeriatric review, a comprehensive geriatric assessment, and delirium prevention. Anticoagulation and transfusion. For warfarin, target an INR under 1.5 (vitamin K with or without prothrombin complex). Withhold DOACs for 24-48 hours depending on renal function. Continue aspirin (no increased bleeding risk in hip fracture) and balance clopidogrel against delay (often proceed). Transfuse to a haemoglobin over 80 g/L for most patients, or over 100 g/L with significant cardiac disease — the FOCUS trial showed no benefit to a liberal transfusion strategy.
Across national hip-fracture audits a substantial minority of patients still wait longer than 48 hours for surgery. Delayed surgery is associated with increased 30-day mortality, pressure injuries, pneumonia and delirium. Advocate strongly for timely surgery and orthogeriatric co-management.
Implant selection. A CEMENTED stem is the recommended standard for elderly hip-fracture patients (NICE NG124, Cochrane, multiple national registries): WHiTE 5 showed better quality of life at 4 months and far fewer periprosthetic fractures (0.5 percent vs 2.1 percent) with cement, and the Norwegian Hip Fracture Register (n=30,178) showed uncemented fixation carried 1.5 times the reoperation risk and 5.1 times the periprosthetic-fracture risk with no mortality difference. Consider UNCEMENTED only for significant cardiopulmonary disease or pulmonary hypertension (BCIS risk), previous BCIS, or a very narrow or sclerotic canal where cementing is impractical. Bipolar versus unipolar head choice shows no difference in acetabular erosion, pain or function (Cochrane) — most surgeons use bipolar but unipolar is equally acceptable. Stem options include a collared stem (prevents subsidence, loads the calcar), a polished tapered stem such as the Exeter (subsides into the mantle), or a composite-beam stem designed for cement fixation. Consent. Counsel the family honestly: this is a major operation with 5-8 percent 30-day mortality and 20-30 percent 1-year mortality that reflects the frailty of the population. Discuss dislocation (1-5 percent), bone cement implantation syndrome, periprosthetic fracture, infection (1-2 percent), DVT or PE, and the need for extended VTE prophylaxis. For patients with dementia, acknowledge that hip precautions will be difficult to maintain. Around 60-70 percent return to their pre-fracture mobility level.
The Operation
The goal: through the posterior (Moore or Southern) approach, expose the hip through a true internervous plane, remove the fractured head and neck, prepare and cement the femoral canal with third-generation technique, insert a well-sized stem and head articulating with a healthy acetabulum, and then perform an enhanced posterior soft-tissue repair that protects against dislocation. The exposure — laid out in steps 1 to 5 below — is the heart of the operation and is described in depth on the posterior approach to the hip page.
Operative sequence — posterior (Moore/Southern) approach
- Lateral decubitus, affected side up, secured in a beanbag or dedicated hip positioner; the pelvis must be stable or version will be wrong.
- Prep from iliac crest to below the knee; drape the limb free to allow manipulation.
- Axillary roll for the brachial plexus; pad every bony prominence (head or face, fibular head for the common peroneal nerve, malleoli, genitalia in males). Elderly patients with thin skin are especially vulnerable.
- Confirm antibiotic prophylaxis (cefazolin 2 g IV within 60 minutes of incision) and document all padding before draping.
- Palpate the landmarks: the greater trochanter (the key landmark), the posterior superior iliac spine (the incision curves toward it), the gluteal fold (inferior extent of gluteus maximus), and the femoral shaft axis.
- Curvilinear incision centred on the greater trochanter, extending 8-10 cm distally along the femoral shaft and curving 6-8 cm proximally toward the PSIS.
- Incise skin and subcutaneous tissue, then the fascia lata in line with the incision.
- Split gluteus maximus in line with its fibres. This is a TRUE internervous plane — superior gluteal nerve above, inferior gluteal nerve below — so no muscle is denervated.
- Never extend the proximal dissection more than 5 cm above the greater trochanter tip: the superior gluteal nerve runs on the deep surface of gluteus medius beyond that point.
- Retract gluteus maximus to expose the short external rotators. From superior to inferior: piriformis, superior gemellus, obturator internus, inferior gemellus, and quadratus femoris (most inferior, lying on the lesser trochanter).
- The sciatic nerve lies 2-3 cm posterior to the posterior acetabular wall; it emerges below piriformis in about 90 percent and through piriformis in about 10 percent. Visualise or palpate it BEFORE placing retractors.
- Place the posterior retractor on BONE (the ischium), never in soft tissue. Keep the hip and knee flexed to relax the nerve and limit retraction time.
- Tag and then detach the short external rotators (piriformis and the conjoint tendon) from their femoral insertion, preserving the tags for later repair.
- Perform a T-capsulotomy or a posterior longitudinal capsulotomy; tag the capsule too — it is an important posterior stabiliser.
- Internally rotate and flex the hip to dislocate. The fractured head usually remains in the acetabulum, still attached to the ligamentum teres, and may need to be levered out with a bone hook.
- Extract the femoral head with a corkscrew or bone hook.
- Measure the head diameter with the sizing gauge — typically 38-58 mm, most commonly 46-50 mm. This directly determines the prosthetic head size.
- Inspect the acetabulum carefully. Normal cartilage — proceed with hemiarthroplasty. Exposed bone, osteophytes or rheumatoid protrusion — reconsider conversion to total hip arthroplasty. This decision point must be discussed with the family pre-operatively.
- Cut the femoral neck at the templated level, typically 1-1.5 cm above the lesser trochanter.
- Preserve the calcar femorale for collar seating. Use the oscillating saw with copious irrigation and soft-tissue protection, perpendicular to the femoral neck axis.
- Too high a cut leaves insufficient calcar support and risks subsidence; too low risks a calcar fracture or intraoperative fracture.
- Open the canal with a box chisel or starter awl, aiming laterally to avoid varus.
- Ream or broach sequentially to the templated size — never skip sizes. Maintain 10-15 degrees of anteversion matching native femoral version.
- The broach must be stable with no toggle. Any crack heard means STOP, assess for fracture, and be ready to cable or cerclage.
- Insert the trial stem and a trial head matching the measured size and reduce the hip.
- Assess stability — for the posterior approach, test in flexion with internal rotation (it should require at least 90 degrees flexion and 45 degrees internal rotation to dislocate).
- Check leg length (knees together, heels level, compared with the contralateral side) and soft-tissue tension with a shuck test. If unstable, use a larger head (greater jump distance) or a higher offset before accepting strict precautions.
- Place a cement restrictor 2 cm distal to the planned stem tip.
- Pulsatile lavage to remove fat, marrow and debris.
- Dry the canal with swabs and suction.
- Vacuum-mix high-viscosity cement (e.g. Simplex P or Palacos) to the doughy phase.
- Fill retrograde with a cement gun from the restrictor proximally.
- Maintain digital or mechanical pressurisation during filling.
- Insert the stem slowly with controlled pressure, and keep pressurising until the cement cures.
- This achieves 2-4 mm of cement interdigitation into cancellous bone and reduces radiolucent lines and aseptic loosening.
- Warn the anaesthetist BEFORE cementing; have vasopressors and resuscitation ready (see the BCIS alert below).
- Insert the definitive stem and hold position until the cement is fully cured.
- For a bipolar head, assemble the inner head to the stem taper, then the outer shell, and confirm the locking mechanism is engaged (audible or visual click). For a unipolar head, seat the single head component.
- Reduce the hip and repeat the stability, leg-length and tension checks from the trial. Document all component sizes (stem, head diameter, neck length).
- Repair the posterior capsule with strong suture (e.g. number 2 Ethibond or FiberWire).
- Reattach the short external rotators (piriformis and conjoint tendon) to their femoral insertion through drill holes in the greater trochanter or by a trans-osseous technique.
- This enhanced repair reduces dislocation from 5-10 percent down to 1-2 percent and should be standard for every posterior approach hemiarthroplasty.
- Copious irrigation (1-2 litres saline) and meticulous haemostasis.
- Close the fascia lata over gluteus maximus with a strong absorbable suture (e.g. 0 Vicryl) — this is the strength layer. Optional drain depending on bleeding and anticoagulation.
- Subcutaneous absorbable suture to obliterate dead space; skin with staples or a subcuticular suture and a sterile waterproof dressing.
- Order a post-operative radiograph in recovery before leaving theatre.
The superior gluteal nerve exits the greater sciatic notch ABOVE piriformis and runs on the deep surface of gluteus medius. It is at risk if the dissection extends more than 5 cm proximal to the tip of the greater trochanter — this is the "safe zone" limit, and violating it causes abductor weakness and a Trendelenburg gait.
BCIS presents during or shortly after cementing as hypotension, hypoxia, arrhythmia or cardiovascular collapse from embolisation of fat, marrow and cement. Prevent it with pulsatile lavage, a cement restrictor, slow controlled stem insertion, and clear communication with the anaesthetist before cementing. If it occurs: stop, give 100 percent oxygen, fluids and vasopressors, and commence CPR if there is cardiovascular collapse. Consider an uncemented stem in patients with severe cardiopulmonary disease, pulmonary hypertension, or previous BCIS.
The major danger of the posterior approach. Lies 2-3 cm posterior to the posterior acetabular wall, emerging below piriformis. Transient injury in 0.5-2 percent. Protect it by flexing the hip and knee to relax the nerve, placing the posterior retractor on the ischium, and limiting retraction time.
Motor to gluteus medius and minimus. Exits the greater sciatic notch 3-5 cm above the greater trochanter tip. Protect it by never extending the incision or dissection more than 5 cm proximal to the trochanter tip.
Emerge below piriformis with the sciatic nerve and course to gluteus maximus. Stay within the safe zone above piriformis, or clearly below it with direct visualisation.
Lie anteromedial to the hip joint in the femoral triangle, around 4-5 cm anterior to the capsule. Keep the anterior retractor on bone only and never let it slide medially into soft tissue.
Always tag the capsule and the short external rotators with stay sutures BEFORE detaching them. Without tags, an anatomical repair is impossible. Enhanced repair — capsule plus short external rotator reattachment through bone with strong non-absorbable suture — is evidence-based and reduces dislocation from 5-10 percent to 1-2 percent. It is worth the extra minute.
Start canal preparation lateral to avoid varus — a varus stem increases fracture risk and gives poor outcomes. Ream or broach sequentially, never skipping sizes, and stop at any crack to assess for fracture. A correctly placed neck cut (1-1.5 cm above the lesser trochanter) preserves the calcar for collar support; too high risks subsidence and too low risks a calcar fracture.
Aftercare & Complications
Immediate post-operative care and mobilisation | Phase | Timing | Weight-bearing and precautions | Therapy | |-------|--------|-------------------------------|---------| | 1 | Day 0-1 | Full weight-bearing as tolerated; sit out of bed | Stand and walk with a frame | | 2 | Weeks 1-6 | Hip precautions (posterior): avoid flexion over 90 degrees, adduction past midline, internal rotation | Gait training, transfers, stairs | | 3 | Weeks 6-12 | Precautions continue (difficult in dementia) | Progressive independence | | 4 | Beyond 12 weeks | Return to function | Discharge to physiotherapy only if needed | - Full weight-bearing from Day 1 — there are no restrictions on loading a cemented hemiarthroplasty.
- VTE prophylaxis: LMWH or a DOAC for an extended duration of around 28-35 days (NICE NG89, AAOS), plus mechanical prophylaxis until mobile. Tranexamic acid intra-operatively if not contraindicated.
- Orthogeriatric co-management continues for medical optimisation, delirium prevention and discharge planning.
- Follow-up: radiograph before discharge, wound check at 2 weeks, review at 6 weeks with radiographs, then only if symptomatic. Red flags: increasing pain after initial improvement (infection or dislocation), wound discharge or erythema, fever, or new inability to weight-bear. Complications
- Recognition
- Sudden pain, leg shortened and externally rotated (posterior), unable to bear weight
- Prevention
- Enhanced posterior repair, correct component version, hip precautions, larger head
- Management
- Closed reduction under sedation; if recurrent, revise component position or use a constrained liner
- Recognition
- Hypotension, hypoxia, arrhythmia or reduced consciousness during or after cementing; may be fatal (0.1%)
- Prevention
- Lavage, restrictor, slow insertion, anaesthetic communication; consider uncemented in high-risk
- Management
- Stop, 100% oxygen, fluids, vasopressors, cardiac support; often needs ICU
- Recognition
- Intraoperative crack during broaching or insertion; postoperative fall with acute pain
- Prevention
- Avoid varus broaching, sequential sizing, cable or cerclage an intraoperative crack
- Management
- Vancouver classification guides treatment: B1 plate and cables; B2 or B3 revision stem
- Recognition
- Wound erythema, discharge, fever, raised CRP or ESR; may present late
- Prevention
- Perioperative antibiotics, laminar flow, sterile technique, haemostasis
- Management
- Superficial: antibiotics. Deep: DAIR if early (under 3 weeks) or two-stage revision if late
- Recognition
- Calf swelling, pain or cord; PE: dyspnoea, pleuritic chest pain, hypoxia
- Prevention
- Chemical prophylaxis for around 28-35 days, early mobilisation, mechanical prophylaxis
- Management
- Therapeutic anticoagulation; IVC filter if anticoagulation contraindicated
- Recognition
- Gradual groin pain and declining mobility over years; radiographic protrusion
- Prevention
- Match the native femoral head size; avoid oversizing
- Management
- Conversion to THA with acetabular reconstruction
- Recognition
- Patient awareness of a difference, altered gait, back pain
- Prevention
- Templating, intraoperative measurement, modular components
- Management
- Shoe raise if under 2 cm and symptomatic; revision rarely indicated
- Recognition
- Foot drop, sensory loss in the posterior leg or foot, weak ankle dorsiflexion
- Prevention
- Careful retractor placement, hip and knee flexed, limit retraction time
- Management
- Most are neuropraxic: observe and splint; EMG at 6 weeks; recovery may take 12-18 months
Medical complications are common and reflect frailty: cardiac events (MI, arrhythmia) and respiratory complications (pneumonia, ARDS) each around 5-10 percent, delirium in 15-40 percent (especially with pre-existing cognitive impairment), pressure injuries 5-10 percent (reduced by early surgery), and urinary retention or UTI in 20-30 percent. 1-year mortality of 20-30 percent reflects the population, not the procedure.
Viva & Exam Focus
CEMENTCEMENT — third-generation cementing technique
HEMIHEMI — hemiarthroplasty versus THA decision
Clinical Decision Scenarios
Practise clinical reasoning and management decisions out loud
“An 85-year-old woman with a background of dementia falls in her nursing home. Radiographs show a displaced intracapsular femoral neck fracture (Garden IV). How would you manage her?”
“During cementing of a hemiarthroplasty, the patient becomes hypotensive and oxygen saturations drop. What is happening and how do you manage it?”
“How would you counsel a patient's family regarding the choice between hemiarthroplasty and total hip arthroplasty for a displaced femoral neck fracture?”
Indication
- Displaced intracapsular fracture (Garden III or IV) in an elderly (over 70) patient
- Low-demand or cognitively impaired; limited life expectancy
- Normal acetabulum on imaging
- THA preferred if active, cognitively intact, or acetabular arthritis
The decision
- HEALTH (NEJM 2019): no reoperation difference; higher dislocation with THA
- WHiTE 5 (NEJM 2022): cemented better QoL, fewer periprosthetic fractures
- Norwegian register: uncemented 1.5x reoperation, 5.1x periprosthetic fracture
- Cochrane: cemented less pain and better mobility; unipolar equals bipolar
Exposure (posterior)
- True internervous plane through gluteus maximus (superior vs inferior gluteal nerve)
- Short external rotators superior to inferior: piriformis, gemelli, obturator internus, quadratus femoris
- Safe zone: never dissect more than 5 cm above the greater trochanter tip
- Sciatic nerve: retract on the ischium, hip and knee flexed
Cementing (CEMENT)
- Canal restrictor 2 cm distal to stem tip
- Extensive pulsatile lavage, dry the canal
- Retrograde gun, vacuum-mixed high-viscosity cement
- Pressurise during insertion until cure; warn the anaesthetist first
Enhanced posterior repair
- Always repair capsule AND short external rotators
- Reduces dislocation from 5-10 percent to 1-2 percent
- Tag structures before cutting; strong suture through drill holes in the trochanter
BCIS
- Hypotension, hypoxia, collapse during or after cementing
- Prevent: lavage, restrictor, slow insertion, anaesthetic communication
- Manage: stop, 100 percent oxygen, fluids, vasopressors, CPR if needed
- Consider uncemented in severe cardiac disease or pulmonary hypertension
Aftercare
- Full weight-bearing from Day 1
- VTE prophylaxis for around 28-35 days
- Hip precautions 6-12 weeks: no flexion over 90 degrees, no adduction, no internal rotation
- Orthogeriatric co-management throughout
Danger structures
- Sciatic nerve: 2-3 cm posterior to the acetabulum
- Superior gluteal nerve: never dissect over 5 cm above the trochanter
- Inferior gluteal vessels: below piriformis with the sciatic nerve
- Femoral vessels: anteromedial — anterior retractor on bone only
Background & Evidence
Epidemiology. Femoral neck fractures are classic fragility fractures of the elderly. Around 60-70 percent of patients return to their pre-fracture mobility level after hemiarthroplasty, but most never regain full pre-fracture independence. 30-day mortality is 5-8 percent and 1-year mortality 20-30 percent across international hip-fracture registries — figures that reflect the frailty of the population rather than the operation itself. Long term, acetabular erosion develops in 10-20 percent at 10 years and around 5-10 percent require conversion to THA, although many patients do not survive long enough for this to matter. Garden classification of femoral neck fractures. This is the standard system used to grade displacement and guide management — undisplaced (Garden I or II) fractures are generally fixed, while displaced (Garden III or IV) fractures in the elderly are arthroplasty candidates.
- Radiographic features
- Incomplete or impacted valgus fracture
- Stability
- Stable
- Radiographic features
- Complete but undisplaced
- Stability
- Stable
- Radiographic features
- Complete, partially displaced (varus position)
- Stability
- Unstable
- Radiographic features
- Complete, fully displaced with no trabecular continuity
- Stability
- Unstable
Key randomised evidence. The HEALTH trial (NEJM 2019, 1,495 independently ambulating patients, 80 centres in 10 countries) found no significant difference in secondary hip procedures at 24 months (7.9 percent THA vs 8.3 percent hemi, HR 0.95, p=0.79) and only a clinically unimportant functional gain for THA, while dislocation or instability was higher with THA (4.7 percent vs 2.4 percent) and mortality similar (14.3 percent vs 13.1 percent). The WHiTE 5 trial (NEJM 2022, 1,225 patients aged 60 or over) found cemented hemiarthroplasty gave better EQ-5D quality of life at 4 months (0.371 vs 0.315, adjusted difference 0.055, p=0.02) and far fewer periprosthetic fractures (0.5 percent vs 2.1 percent, odds ratio 4.37 for uncemented). The FAITH trial (Lancet 2017) compared sliding hip screw with cancellous screws for fixation — a fixation question, not arthroplasty — and found no overall difference in reoperation, though the sliding hip screw was favoured in displaced or basicervical fractures and in smokers; the high failure rate of fixation in displaced elderly fractures (around 20-40 percent) underpins the move to arthroplasty. The Cochrane review (Parker 2010, 23 RCTs, 2,861 patients) found cemented prostheses gave less residual pain and better mobility than uncemented, no difference between unipolar and bipolar designs, and only a trend to better function with THA at the cost of higher dislocation. Registry evidence. The Norwegian Hip Fracture Register (30,178 bipolar hemiarthroplasties) showed uncemented fixation carried 1.5 times the overall reoperation risk and 5.1 times the periprosthetic-fracture risk, with no difference in 1-year mortality, pain or quality of life. Swedish, UK (NHFD) and Australian (AOANJRR) data are broadly concordant — higher early revision and periprosthetic fracture with uncemented hemiarthroplasty in the frail elderly. Approach-specific evidence. The posterior approach is faster with less blood loss and better abductor preservation than the lateral (Hardinge) approach, which has a lower dislocation rate but damages the abductors. Enhanced posterior repair — capsular repair plus short external rotator reattachment — reduces dislocation from 5-10 percent to 1-2 percent and should be standard for the posterior approach. Process-of-care benchmarks (UK NHFD, ANZHFR, Fragility Fracture Network): surgery within 36-48 hours of admission, orthogeriatric assessment for every patient, mobilisation on the first postoperative day, and bone-health assessment with falls prevention before discharge. NICE NG124 recommends operating on the day of or the day after admission, using cemented implants, offering THA only to patients who walked independently outdoors with no more than a stick and are cognitively intact, and using an anterolateral or posterior approach with capsular repair.
References
Total Hip Arthroplasty or Hemiarthroplasty for Hip Fracture (HEALTH Trial)
- 1,495 independently ambulating patients aged 50 or over with displaced femoral neck fracture, 80 centres in 10 countries
- Secondary hip procedure at 24 months 7.9 percent (THA) vs 8.3 percent (hemi), HR 0.95, p=0.79 — not significant
- Hip instability or dislocation higher with THA (4.7 percent vs 2.4 percent); function only marginally better with THA
- Mortality similar (14.3 percent vs 13.1 percent)
Cemented or Uncemented Hemiarthroplasty for Intracapsular Hip Fracture (WHiTE 5)
- 1,225 patients aged 60 or over with intracapsular fracture, cemented vs modern hydroxyapatite-coated uncemented hemiarthroplasty
- EQ-5D quality of life at 4 months better with cement (0.371 vs 0.315; adjusted difference 0.055, p=0.02)
- Periprosthetic fracture 0.5 percent (cemented) vs 2.1 percent (uncemented), odds ratio 4.37
- Mortality at 12 months not significantly different (23.9 percent vs 27.8 percent)
Cemented or Uncemented Hemiarthroplasty for Femoral Neck Fracture? Norwegian Hip Fracture Register
- 30,178 bipolar hemiarthroplasties (7,539 uncemented, 22,639 cemented), 2005-2017
- Uncemented: higher overall reoperation risk (HRR 1.5) and periprosthetic-fracture reoperation (HRR 5.1)
- No difference in 1-year mortality (HRR 1.0)
- No difference in 1-year pain or quality-of-life PROMs
Arthroplasties (with and without bone cement) for proximal femoral fractures in adults (Cochrane)
- 23 randomised trials, 2,861 mainly elderly female patients
- Cemented prostheses: less pain and better mobility than uncemented
- Unipolar vs bipolar hemiarthroplasty: no significant difference in outcomes
- THA: trend to better function than hemiarthroplasty but higher dislocation
Bone cement implantation syndrome
- Defines BCIS and its Donaldson severity grades (1 hypoxia or hypotension; 2 plus reduced consciousness; 3 cardiovascular collapse)
- Caused by embolisation of fat, marrow and cement and a humoral or anaphylactoid response during pressurised cementing
- Risk factors: cardiopulmonary disease, ASA 3-4, osteoporosis, long-stem or pathological cases
- Risk reduced by lavage, restrictor, slow insertion, and selecting uncemented fixation in the highest-risk patients
Hip fracture: management (NG124)
- Operate on the day of, or the day after, admission
- Use cemented implants for arthroplasty in hip fracture
- Offer THA (rather than hemiarthroplasty) to patients who could walk independently outdoors with no more than a stick, are not cognitively impaired, and are medically fit
- Use a proven femoral stem design and an anterolateral or posterior approach with capsular repair
Hip arthroplasty for the treatment of displaced fractures of the femoral neck in elderly patients
- Review supporting arthroplasty over internal fixation for displaced femoral neck fractures in older patients
- Internal fixation in displaced elderly fractures carries a high failure and reoperation rate
- Arthroplasty gives more reliable pain relief and lower reoperation in this group
Fracture fixation in the operative management of hip fractures (FAITH)
- International multicentre RCT of sliding hip screw vs cancellous screws for femoral neck fractures
- No overall difference in reoperation
- Sliding hip screw favoured in displaced or basicervical fractures and in smokers
- A fixation trial — relevant because high fixation failure in displaced elderly fractures underpins the move to arthroplasty
Australian Orthopaedic Association National Joint Replacement Registry (AOANJRR) — Hip Arthroplasty Annual Report
- National registry reporting revision rates for hip arthroplasty by fixation, bearing and approach
- Concordant with international data showing higher early revision with uncemented hemiarthroplasty in the frail elderly
- Tracks implant survival and revision burden across the Australian population
Randomised comparison of reduction and fixation, bipolar hemiarthroplasty, and total hip arthroplasty for displaced subcapital fractures of the femur
- UK RCT comparing internal fixation, bipolar hemiarthroplasty and THA for displaced subcapital fractures
- Arthroplasty gave better results than internal fixation in the elderly
- THA gave better function than hemiarthroplasty but with more dislocation