Transgluteal abductor-splitting exposure for total hip arthroplasty — stable and widely used, with the superior gluteal nerve as the critical danger.
- There is no true internervous plane — the approach splits tensor fascia lata and gluteus medius, both supplied by the superior gluteal nerve, making it a muscle-splitting rather than muscle-separating exposure.
- The superior gluteal nerve lies a mean 5 cm proximal to the tip of the greater trochanter (Jacobs and Buxton) — keep the gluteus medius split within this safe zone to avoid abductor denervation.
- Split gluteus medius at the musculotendinous junction (anterior third to half) and reflect it with minimus as a continuous medius–minimus sleeve to minimise denervation.
- Reflect vastus lateralis anteriorly off the vastus ridge to expose the proximal femur and complete the exposure.
- Meticulous repair of the abductor sleeve back to the greater trochanter with non-absorbable suture is the critical closure step — poor repair causes a Trendelenburg gait in up to 20 percent of patients.
When & Why
What it exposes. The Hardinge direct lateral (transgluteal) approach gives excellent access to the proximal femur and the acetabulum through the same incision. It is the workhorse exposure for primary total hip arthroplasty, hemiarthroplasty for femoral neck fractures, hip resurfacing, and simple revision THA (liner exchange, head and neck swap). Why direct lateral. Its great strength is inherent stability — the posterior soft-tissue sleeve and short external rotators are preserved, giving a lower dislocation rate (about 2 to 3 percent) than the posterior approach (5 to 7 percent), with excellent femoral exposure for stem insertion and good visualisation of the anterior and superior acetabulum. The trade-off is that it splits the abductor mechanism, putting the superior gluteal nerve at risk and carrying a higher rate of abductor weakness and limp than an abductor-sparing approach. Posterior acetabular wall access is comparatively limited. History and variants. The transgluteal route was described by McFarland and Osborne in 1954; Hardinge's 1982 modification — splitting the anterior half of gluteus medius at the musculotendinous junction and raising it in continuity with vastus lateralis as a single sleeve — is the current standard. The Dall modification detaches the anterior gluteus medius insertion completely for repair through bone tunnels, favoured by some for revision cases. Registry utilisation. Across the major national joint registries (NJR England and Wales, AOANJRR, Swedish and Norwegian), the direct lateral and posterior are consistently the two commonest approaches for primary THA — the direct lateral is widely used in the UK, Scandinavia and Australasia, while the posterior predominates in North America and the direct anterior has grown since the 2010s but remains a minority approach. Registry analyses generally show equivalent long-term implant survivorship across approaches, with surgeon and unit volume stronger predictors of revision than approach choice. Position and landmarks. The patient is in lateral decubitus with the affected hip up on a radiolucent table, the pelvis perpendicular to the floor (confirmed on a C-arm true AP — obturator foramina symmetric, coccyx over the pubic symphysis), supported at the pubis and sacrum. Pad the down-leg fibular head (peroneal nerve) and protect the axillary brachial plexus, drape the limb free from iliac crest to mid-calf, and mark the greater trochanter, anterior superior iliac spine and femoral shaft as incision landmarks.
The pelvis must be perpendicular to the floor. Pelvic tilt or rotation causes acetabular malposition (anteversion or retroversion errors). Confirm a true AP pelvis with the C-arm before starting — the obturator foramina should be symmetric and the coccyx should align with the pubic symphysis.
Document the baseline Trendelenburg sign and abductor strength before surgery. Pre-existing weakness from prior surgery or pathology must be noted — otherwise any post-operative weakness will be blamed on the operation. A BMI greater than 35 increases the technical difficulty of this approach.
The Exposure
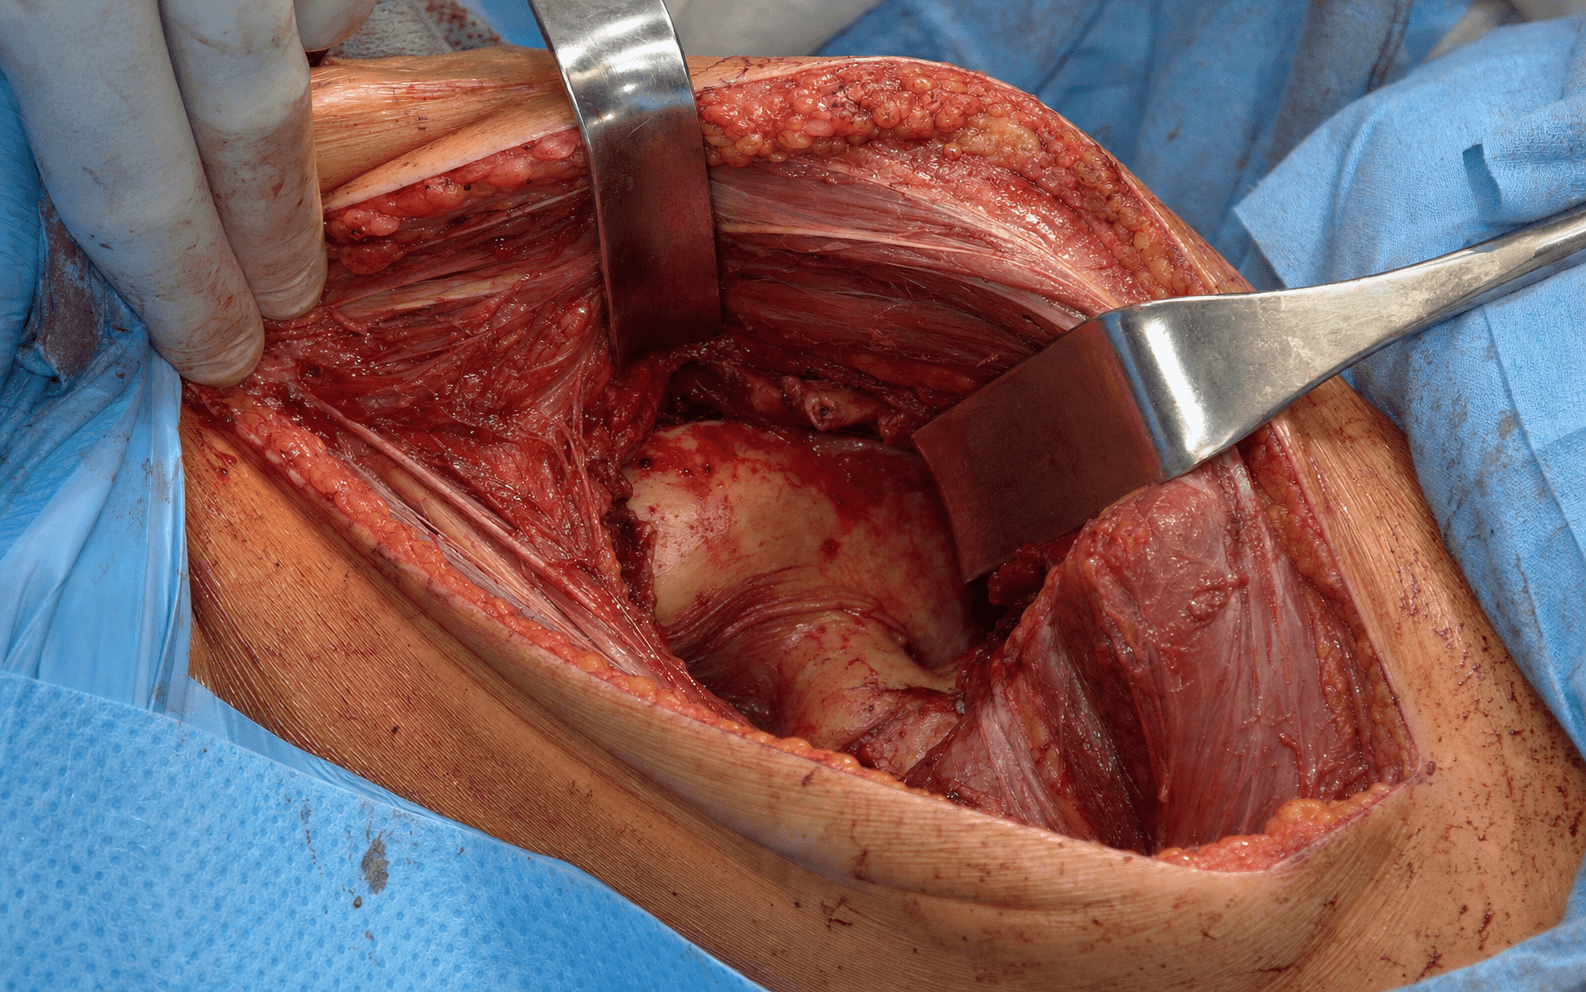
The direct lateral approach works down through the fascia lata, splits the anterior third of tensor fascia lata, then splits gluteus medius at its musculotendinous junction and reflects a continuous abductor sleeve anteriorly with vastus lateralis to expose the capsule.
Exposure sequence
- Position the patient in lateral decubitus with the affected hip up; the pelvis must be perpendicular to the floor (confirm with a C-arm true AP).
- Pad the down-leg fibular head (peroneal nerve) and protect the axillary brachial plexus; support the pelvis at the pubis and sacrum.
- Centre a straight lateral incision over the greater trochanter, parallel to the femoral shaft, roughly 10 to 15 cm long (about 8 cm minimum for a primary), from 5 cm proximal to 5 cm distal to the trochanter; deepen through skin and subcutaneous fat to the fascia lata.
- Incise the fascia lata in line with the skin incision, exposing tensor fascia lata (TFL) anteriorly and gluteus maximus posteriorly.
- Split the anterior third of TFL longitudinally by blunt dissection, extending proximally onto gluteus medius and distally onto vastus lateralis.
- Gluteus medius is now visible deep to the split, its fibres running obliquely, with the musculotendinous junction marked by the transition from red muscle to white tendon.
- Identify the anterior border of the gluteus medius insertion on the trochanter and, with diathermy, incise its tendon in line with the anterior third, lifting the tendon sleeve anteriorly off the greater trochanter.
- Continue the split proximally into the muscle belly for about 4 to 5 cm and stop — this exposes gluteus minimus, which is split in the same line so that medius and minimus are reflected anteriorly together as a continuous sleeve.
- Perform a trochanteric bursectomy to improve the view and reduce post-operative inflammation.
- Distally, expose the vastus lateralis origin from the vastus ridge (lateral linea aspera).
- Elevate the vastus lateralis origin anteriorly off the vastus ridge with diathermy over 5 to 8 cm, preserving the lateral femoral circumflex vessels deep to it where possible.
- This anterior reflection exposes the proximal lateral femur, the greater trochanter and the anterior capsule.
- Retract the medius–minimus sleeve and vastus lateralis anteriorly with a Charnley retractor to expose the hip capsule from anterior to lateral.
- Make a T-shaped capsulotomy — a longitudinal limb along the femoral neck anteriorly and a transverse limb along the acetabular rim superiorly — and place stay sutures in the capsular flaps for later repair (the anterior capsule may alternatively be excised, but the posterior capsule is preserved for stability).
- Place a bent Hohmann retractor around the femoral neck anteriorly and a second posteriorly so the neck is circumferentially exposed.
- Confirm the level from pre-operative templating — typically about 1 cm proximal to the lesser trochanter at roughly 45 degrees to the femoral shaft.
- With soft tissues protected, cut the neck with an oscillating saw perpendicular to the neck axis and remove the head with a corkscrew extractor.
- This gives simultaneous access to the femoral canal and the acetabulum; clear loose osteophytes and assess acetabular version and inclination before preparing the components.
- Meticulous abductor repair is the critical step. Reattach gluteus medius and minimus to the greater trochanter, either through bone tunnels with heavy non-absorbable suture (for example No. 2 braided polyester) or to the vastus ridge, using at least 4 to 6 interrupted sutures with the hip in neutral (not abducted, which tensions the repair).
- Close in layers: the TFL split and fascia lata with absorbable suture, subcutaneous tissue with 2-0 absorbable suture, then skin with staples or a subcuticular stitch.
- A drain is optional; remove it at 24 hours if used.
The superior gluteal nerve enters the abductor mass a mean 5 cm proximal to the tip of the greater trochanter (Jacobs and Buxton, JBJS Am 1989), where it supplies gluteus medius, gluteus minimus and TFL. Never extend the gluteus medius split beyond this safe zone — injury causes permanent abductor paralysis and a Trendelenburg gait. Measure from the trochanter with a ruler before any proximal extension. A true absolute safe zone does not exist (Khan and Knowles), so split at the musculotendinous junction and respect individual anatomical variation.
Splitting the anterior third of TFL positions you directly over the anterior half of gluteus medius, which is the safe zone for the Hardinge split. The superior gluteal nerve enters the muscle posteriorly, so an anterior split at the musculotendinous junction minimises denervation.
Dangers & Extensions
Structures at risk
- Location
- Mean 5 cm proximal to the greater trochanter
- Mechanism of injury
- Proximal extension of the gluteus medius split
- Prevention
- Keep the split within 5 cm of the trochanter; split at the musculotendinous junction; measure with a ruler
- Location
- Main hip abductors
- Mechanism of injury
- Excessive splitting or a poor repair
- Prevention
- Split only the anterior half; meticulous non-absorbable repair to the trochanter
- Location
- Anterior to the hip in the psoas interval
- Mechanism of injury
- Anterior retractor placement
- Prevention
- Place the anterior retractor under direct vision; feel for the femoral pulse
- Location
- Posterior to the hip
- Mechanism of injury
- Posterior retractor or excessive lengthening
- Prevention
- Place the posterior retractor carefully; avoid lengthening greater than about 4 cm
- Location
- Anterolateral thigh
- Mechanism of injury
- Proximal incision extension
- Prevention
- Keep the incision posterior to the ASIS; limit proximal extension
Approach-specific complications - Abductor dysfunction (5 to 20 percent): the signature trade-off of the approach, from superior gluteal nerve injury, excessive splitting or a poor repair. Prevent it by staying within the safe zone and repairing the abductor sleeve meticulously; persistent weakness is managed with physiotherapy, and revision repair or trochanteric advancement if refractory.
- Heterotopic ossification (10 to 30 percent radiographic, about 5 percent symptomatic): commoner than after the posterior approach (Foster and Hunter noted a 61 percent radiographic rate). Risk factors are male sex, diffuse idiopathic skeletal hyperostosis, previous HO and surgical delay; prophylaxis is indomethacin 25 mg three times daily for six weeks or single-dose radiation in high-risk patients, with excision reserved for symptomatic mature HO at around 12 months.
- Dislocation (about 2 to 3 percent): lower than the posterior approach and usually posterior in direction when it occurs. Prevent it by restoring offset and avoiding combined flexion, adduction and internal rotation; manage with closed reduction and reserve revision for recurrent instability.
- Approximate dislocation rate
- 2 to 3 percent
- Approximate dislocation rate
- 5 to 7 percent
- Approximate dislocation rate
- 1 to 2 percent
- Description
- Islands of bone in the soft tissue
- Clinical impact
- None
- Description
- Bone spurs from pelvis or femur with a gap over 1 cm
- Clinical impact
- Minimal
- Description
- Bone spurs with a gap under 1 cm
- Clinical impact
- May limit motion
- Description
- Apparent ankylosis
- Clinical impact
- Severe limitation
Trendelenburg grading (to monitor abductor recovery)
- Description
- No pelvic drop
- Significance
- Normal abductor function
- Description
- Mild drop (under 2 cm)
- Significance
- Minor weakness, often compensated
- Description
- Moderate drop (2 to 4 cm)
- Significance
- Significant weakness, visible limp
- Description
- Severe drop (over 4 cm)
- Significance
- Severe weakness, assistive device needed
Extensile options and troubleshooting. If exposure is inadequate, extend distally (more trochanter, more vastus lateralis) — never proximally, where the superior gluteal nerve lies. Bleeding from the proximal wound suggests superior gluteal artery injury: pack and apply pressure, and never clamp blindly (the nerve is immediately adjacent); if it persists, ligate under direct vision or pack overnight. Target component position is roughly 40 to 45 degrees acetabular inclination and 15 to 20 degrees anteversion, with stem anteversion of 10 to 15 degrees and offset restoration to tension the abductors. Aftercare and abductor recovery. Patients mobilise weight-bearing as tolerated from day 0 with DVT prophylaxis (for example rivaroxaban 10 mg daily for five weeks, enoxaparin, or aspirin) alongside mechanical prophylaxis. Hip precautions after the direct lateral approach are controversial; if used conservatively, avoid combined flexion, adduction and internal rotation for six weeks, and abductor strengthening is the rehabilitation priority. Temporary weakness with a Trendelenburg gait is expected for 3 to 6 months (50 to 70 percent of patients), persisting in 5 to 20 percent and leaving a permanent Trendelenburg in 3 to 5 percent. Weakness beyond six months warrants MRI (repair integrity) and EMG (nerve function). Return to driving is typically 6 to 8 weeks.
Procedures Through This Approach
- Total hip replacement via the direct lateral (Hardinge/transgluteal) approach — the principal operation done through this exposure.
- Hemiarthroplasty for femoral neck fracture — fast, stable and familiar, with a lower dislocation rate than the posterior approach.
- Hip arthrodesis — accessed through the same lateral exposure.
- Hip resurfacing arthroplasty and simple revision THA (liner exchange, head and neck swap).
Viva & Exam Focus
HARDINGEHARDINGE — key steps of the direct lateral approach
Hook:HARDINGE walks you through the direct lateral approach — the nerve danger zone is the step that fails the exam.
SGNSGN — the superior gluteal neurovascular bundle
Hook:The superior gluteal nerve (not the artery) is the abductor's lifeline — keep the split within 5 cm of the greater trochanter.
Exam viva scenarios
Practise clinical reasoning and management decisions out loud
“Walk me through the Hardinge direct lateral approach to the hip. What are the key anatomical landmarks and structures at risk?”
“A 68-year-old woman is 6 months after a THA through a Hardinge approach and has a persistent Trendelenburg gait with hip abductor weakness. How do you assess and manage this?”
“During a Hardinge approach THA you extend the gluteus medius split proximally to improve acetabular exposure and meet significant arterial bleeding from the proximal wound. How do you manage this?”
Key anatomy
- TFL is the anterior muscle of the ITB, innervated by the superior gluteal nerve
- Gluteus medius is the main abductor, supplied by the superior gluteal nerve
- The superior gluteal nerve exits 5 cm proximal to the greater trochanter (DANGER ZONE)
- There is NO true internervous plane (both TFL and GM are from the same nerve)
Surgical steps
- 1. Lateral decubitus, pelvis perpendicular to the floor
- 2. Incision over the GT, 5 cm proximal and 5 cm distal
- 3. Split the anterior third of TFL longitudinally
- 4. Split the anterior half of GM at the musculotendinous junction
- 5. Reflect vastus lateralis anteriorly (off the vastus ridge)
- 6. T-shaped capsulotomy (or excise the anterior capsule)
- 7. Femoral neck osteotomy and proceed with the arthroplasty
- 8. CRITICAL: repair GM to the GT with non-absorbable suture
Structures at risk
- Superior gluteal nerve: 5 cm proximal to the GT — limit dissection to 4 cm
- Gluteus medius: split anterior half only, meticulous repair
- Femoral nerve: anterior — place the retractor under direct vision
- Sciatic nerve: posterior — careful retractor placement
Advantages
- Lower dislocation rate (about 3 percent versus 5 to 7 percent posterior)
- Excellent femoral exposure for the stem
- One of the two commonest approaches worldwide (registry data)
- Good anterior and superior acetabular access
Disadvantages and complications
- Abductor dysfunction: 5 to 20 percent (nerve injury or poor repair)
- No true internervous plane (denervation risk)
- Limited posterior acetabular wall access
- Trendelenburg gait if the nerve is injured or the repair is poor
Key pearls
- NEVER dissect more than 4 cm proximal to the GT (nerve at 5 cm)
- Split GM at the musculotendinous junction (anterior half)
- Non-absorbable suture for GM repair (for example No. 2 braided)
- The pelvis must be perpendicular (it affects cup position)
- The 5 cm safe-zone rule traces to Jacobs and Buxton (JBJS Am 1989)
References
Guidelines, registries and global practice - Across the major registries (NJR England and Wales, AOANJRR, Swedish and Norwegian) the direct lateral and posterior approaches are consistently the two commonest for primary THA — the posterior predominates in North America, the direct lateral remains common in the UK, Scandinavia and Australasia, and the direct anterior has risen since the 2010s but remains a minority approach.
- No named-society guideline mandates a specific approach; selection is surgeon- and patient-specific. Where dislocation risk is the priority (cognitive impairment, neuromuscular disease, high BMI) the lower dislocation rate of the direct lateral is an advantage; where abductor preservation and gait are paramount, an abductor-sparing approach may be preferred.
- Registry analyses generally show equivalent long-term implant survivorship across approaches, with surgeon and unit volume stronger predictors of revision than approach choice.
- Abductor dysfunction and limp are foreseeable and must be specifically consented for; superior gluteal nerve injury is largely preventable by keeping the split within 5 cm of the trochanter, and the abductor repair technique should be documented.
Across advanced orthopaedic practice and advanced orthopaedic practice vivas you must describe the Hardinge approach in detail — positioning, the muscle intervals (anterior TFL split, gluteus medius split at the musculotendinous junction as a continuous medius–vastus lateralis sleeve), the structure at risk (superior gluteal nerve, mean 5 cm proximal to the trochanter — Jacobs and Buxton), and the critical closure (secure abductor repair with non-absorbable suture). Be ready to contrast it with the posterior approach: lower dislocation but more abductor morbidity (Jolles and Bogoch, Cochrane).
The direct lateral approach to the hip
- Original description of the abductor-splitting (transgluteal) modification that bears Hardinge's name
- Anterior portion of gluteus medius and vastus lateralis raised in continuity as a single myofascial sleeve off the trochanter
- Avoids trochanteric osteotomy while giving good access to both femur and acetabulum
- Emphasises secure reattachment of the abductor sleeve to restore function
The course of the superior gluteal nerve in the lateral approach to the hip
- Bilateral cadaveric dissection of 10 specimens defining superior gluteal nerve branching
- Branch termination forms an arcuate pattern along the middle third of the deep surface of gluteus medius
- Defined a safe area extending up to 5 cm proximal to the greater trochanter
- If the intramuscular split stays within 5 cm of the GT, risk to the nerve is minimised
Damage to the superior gluteal nerve during the direct lateral approach to the hip: a cadaveric study
- Dissection of 44 hips after a simulated direct lateral approach
- Inferior division of the superior gluteal nerve damaged in 3 of 44 (6.8 percent) specimens
- Concludes a true absolute 'safe zone' does not exist — nerve branching is variable
- Physical nerve damage is uncommon and depends on individual branching pattern
Posterior versus lateral surgical approach for total hip arthroplasty in adults with osteoarthritis
- Cochrane systematic review of 4 prospective cohort studies (241 participants)
- No statistically significant difference in dislocation between posterior and direct lateral (1.3 percent vs 4.2 percent)
- Risk of nerve injury (all nerves combined) significantly HIGHER with the direct lateral approach (20 percent vs 2 percent)
- Internal rotation in extension significantly greater after the posterior approach
The direct lateral approach to the hip for arthroplasty. Advantages and complications
- Consecutive series of 83 hip arthroplasties via the direct lateral approach
- Excellent visualisation of the proximal femur and acetabulum, with operative time and blood loss comparable to other approaches
- Low dislocation rate of 2.5 percent with no redislocations
- High radiographic heterotopic ossification rate (61 percent) noted as a potential drawback