Mini-posterior (Southern/Moore) approach | Adult reconstruction
- Primary THA through a shortened 6–10 cm posterior (Southern/Moore) incision — the same operation as a standard posterior approach in a smaller window. It needs specialised retractors and lighting; never trade exposure, component position or the posterior repair for incision length.
- The posterior repair is the difference-maker. Tag the short external rotators (piriformis, conjoined tendon) and the capsule BEFORE release, then repair BOTH layers through transosseous tunnels in the greater trochanter — this drops dislocation from 4–5 percent to 1–2 percent.
- The sciatic nerve lies posterior to the short external rotators and exits below piriformis in about 90 percent of patients. Keep the knee flexed to relax it, release the rotators at their femoral insertion, avoid aggressive posterior retraction, and limit lengthening to less than 4 cm.
- Test stability in the posterior position of risk — flexion past 90 degrees, adduction and internal rotation. If unstable, upsize the head, increase offset, or use a constrained or dual-mobility liner.
- Limit the gluteus maximus split to 5 cm above the greater trochanter to protect the superior gluteal neurovascular bundle, and restore offset and leg length to tension the abductors and posterior soft tissues.
When & Why
Indication. A primary total hip arthroplasty performed through the posterior (posterolateral, Southern/Moore) approach, using a shortened 6–10 cm incision in place of the standard 15–20 cm. The minimally invasive (mini-posterior) variant is the same operation through a smaller window — same surgical principles, same structures at risk, same posterior repair — chosen when the surgeon is experienced with the approach and the patient's body habitus allows safe exposure. Standard indications for THA apply: end-stage hip osteoarthritis, inflammatory arthritis, avascular necrosis, and post-traumatic arthritis. Mini-posterior versus standard posterior — the only real differences are incision length, instrumentation, and learning curve:
- MIS Posterior
- 6–10 cm
- Standard Posterior
- 15–20 cm
- MIS Posterior
- Gluteus maximus split
- Standard Posterior
- Same
- MIS Posterior
- Tag and repair
- Standard Posterior
- Same (essential)
- MIS Posterior
- Specialised retractors and lighting
- Standard Posterior
- Direct
- MIS Posterior
- Steeper
- Standard Posterior
- Established
- MIS Posterior
- Same when done well
- Standard Posterior
- Same
- MIS Posterior
- Possibly faster early
- Standard Posterior
- Standard
- Complex anatomy — dysplasia, prior surgery, post-traumatic stiffness
- Obese patients (better access than a direct anterior approach)
- When excellent femoral exposure is required (a key posterior-approach strength)
- Revision surgery Consent specifically for dislocation (about 1–2 percent with a sound posterior repair, higher if the repair is omitted) and the posterior hip precautions that follow; leg-length discrepancy; sciatic or other nerve injury (about 0.5–1 percent in primary THA); periprosthetic fracture; infection (about 1–2 percent); and the lifetime risk of revision. Setup. Lateral decubitus on a standard table, the pelvis held truly vertical by anterior and posterior posts or a bean-bag, the operative leg free for dislocation and manipulation, all pressure points padded, and the greater trochanter, ASIS and posterior superior iliac spine marked before draping. Pelvic tilt directly changes the cup-orientation read taken off the patient, so a true vertical pelvis is essential — an anteriorly tilted pelvis makes the measured anteversion read less than the true value.
The Operation
The goal is to expose the hip through the mini-posterior interval, dislocate posteriorly, prepare and implant the acetabular and femoral components under direct vision, and then reconstruct the posterior soft-tissue sleeve (capsule plus short external rotators) through bone — the step that defines the modern posterior approach. The exposure is laid out step by step below.
Operative sequence
- Lateral decubitus on a standard table, pelvis stabilised by anterior and posterior posts or a bean-bag; the operative leg is free for dislocation and manipulation.
- Confirm the pelvis is truly vertical — any tilt directly changes the cup orientation read off the patient, so an anteriorly tilted pelvis makes the measured anteversion read less than the true value.
- Pad every pressure point and support the upper arm; mark the greater trochanter, ASIS and posterior superior iliac spine, and the intended incision line before draping.
- Confirm leg-length reference marks before incision.
- Mini-posterior incision: 6–10 cm (versus 15–20 cm standard), centred over or just posterior to the greater trochanter, running obliquely from posterosuperior to anteroinferior along the gluteus maximus fibres.
- Incise skin and subcutaneous tissue in line with the incision; identify the fascia lata and the gluteus maximus fascia.
- Key point: the mini-posterior is the same operation through a smaller window — it needs specialised retractors and lighting, and you never trade exposure, component position or the posterior repair for incision length, especially on the learning curve.
- Watch for: an incision made too small (forcing tissue trauma and poor visualisation), excessive skin-retractor tension (edge necrosis), and a mal-placed incision compromising exposure.
- Incise the gluteus maximus fascia in line with its fibres and split the muscle bluntly between fibres — this is a muscle split, not a detachment.
- Limit the split to 5 cm above the greater trochanter, then insert self-retaining or specialised MIS retractors.
- Key point: do not extend the split more than 5 cm proximal to the trochanter — the superior gluteal nerve exits above piriformis and runs between gluteus medius and minimus; injuring it gives a Trendelenburg gait.
- Watch for: superior gluteal nerve injury from over-proximal splitting, forceful-retraction muscle damage, and gluteus maximus denervation from inferior gluteal nerve injury.
- Expose the posterior hip capsule and the overlying short external rotators. From superior to inferior: piriformis (the key landmark), the gemelli with obturator internus between them, and quadratus femoris most inferior.
- The sciatic nerve exits the greater sciatic notch below piriformis (in about 90 percent; in about 10 percent it splits piriformis) and runs posterior to these muscles.
- Key point (POGO-Q — Piriformis, Obturator internus, Gemelli, Obturator externus deep, Quadratus femoris): know where the sciatic nerve is at all times, even if you do not formally expose it.
- Watch for: sciatic injury from blind dissection, misidentified anatomy, and inferior gluteal nerve and vessel damage.
- Place tagging sutures in piriformis and the conjoined tendon (superior gemellus, obturator internus, inferior gemellus) BEFORE releasing them.
- Divide the rotators close to their femoral insertion (well away from the sciatic nerve proximally); preserve quadratus femoris where possible — the medial circumflex femoral artery (MCFA) runs deep to it.
- Keep the knee flexed throughout to relax the sciatic nerve.
- Key point: tagging before cutting is critical for later repair; release at the femoral insertion, not near the nerve; piriformis and the conjoined tendon are the two repaired most importantly.
- Watch for: inadequate tagging (prevents a sound repair and raises dislocation), sciatic injury during release (release close to the femur), and MCFA injury from aggressive quadratus release.
- Expose the posterior capsule and perform a T- or L-shaped capsulotomy (T: a vertical limb along the acetabular margin and a horizontal limb at the femoral neck; L: along the acetabular rim and the neck).
- Tag the capsule edges for later repair; clear capsule off the acetabular rim only as much as exposure requires.
- Key point: tag the capsule for repair — repairing the capsule AND the rotators together is what drops dislocation below 1–2 percent.
- Watch for: failure to tag the capsule, over-excising capsule (compromising repair), and labral injury affecting press-fit stability.
- Dislocate the hip posteriorly with flexion, adduction and internal rotation; a corkscrew placed in the femoral head gives control during dislocation.
- Controlled dislocation prevents fracture; some surgeons prefer the neck cut in situ with the head delivered afterwards.
- Key point: posterior dislocation equals flexion plus adduction plus internal rotation; control the head to avoid levering and fracture.
- Watch for: uncontrolled dislocation (soft-tissue damage), femoral neck fracture from force, and acetabular rim fracture from leveraging.
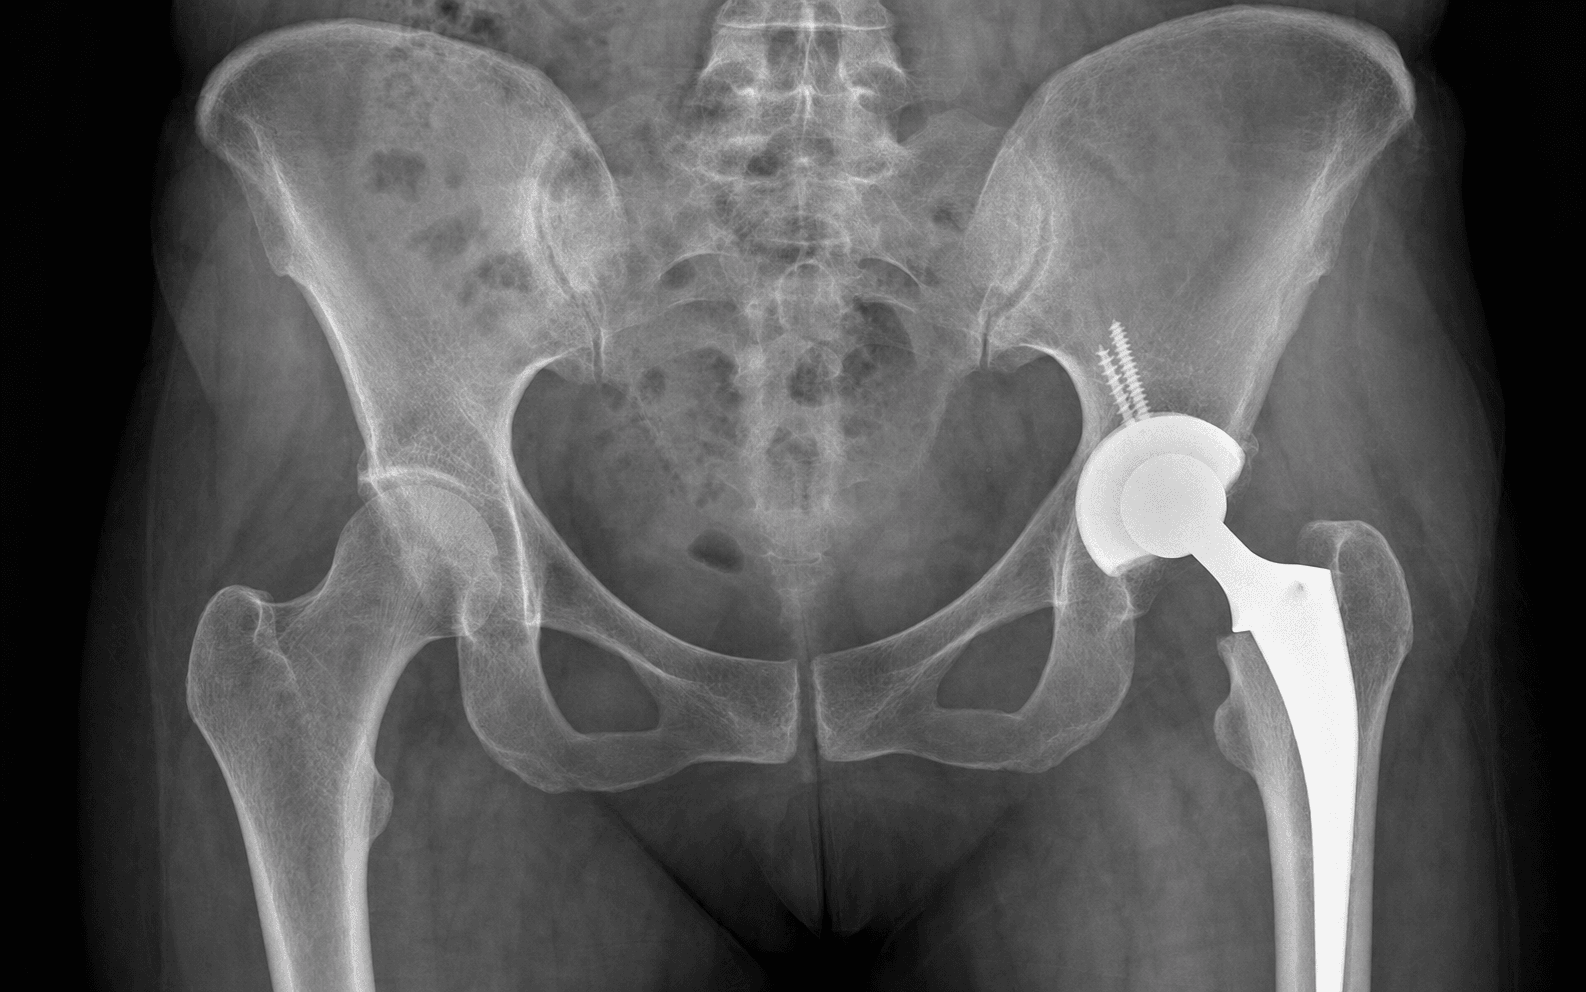
- Make the neck cut with an oscillating saw to the templated level — classically about 45 degrees off the lesser trochanter — and remove the head.
- Excellent direct visualisation of the femoral canal is a key advantage of the posterior approach.
- Key point: the posterior approach gives excellent femoral exposure — a major advantage over anterior approaches — with native version typically 10–15 degrees of anteversion.
- Watch for: a wrong neck-cut level (leg length and offset), calcar fracture during head removal, and inadequate bone removal causing canal fracture at broaching.
- Open the canal with a box osteotome; broach sequentially with trial stems, confirming appropriate version (about 10–15 degrees anteversion) by aligning with the posterior femoral condyles.
- The posterior approach allows direct visualisation of the canal and of version; confirm stable broach seating before the final implant.
- Key point: version is visualised directly — align to the posterior condyles as the reference; avoid varus and retroversion.
- Watch for: wrong version (excess anteversion raises anterior dislocation risk), femoral fracture from aggressive broaching, and varus stem placement from inadequate lateralisation.
- Place retractors around the acetabulum — anterior (inferior to ASIS), inferior (in the obturator foramen) and posterior as needed; retract the femur anteriorly with a bone hook or dedicated retractor.
- Ream sequentially to bleeding subchondral bone, preserving the peripheral rim for press-fit.
- Key point: the femur must be retracted anteriorly for acetabular visualisation; target cup position is 40 ± 10 degrees inclination and 15 ± 10 degrees anteversion (Lewinnek safe zone), with combined anteversion (cup plus stem) of 25–45 degrees for stability.
- Watch for: cup malposition (the commonest technical error in THA), anterior wall perforation with over-medialisation, and femoral nerve injury from aggressive anterior retraction.
- Press-fit the cup with 1–2 mm of under-reaming; confirm position before final impaction; add supplemental screws if fixation is questionable.
- Insert the planned liner (polyethylene, ceramic, or dual mobility).
- Key point: orient the cup by direct vision or with guides, accounting for pelvic position in lateral decubitus; navigation improves accuracy where available; confirm rigid fixation before inserting the liner.
- Watch for: cup malposition (impingement and dislocation), inadequate press-fit (add screws if there is any movement), and liner malseating.
- Insert the definitive femoral stem (cemented or press-fit per plan); confirm version and stable seating; trial the head for stability and leg length.
- Key point: the posterior approach allows excellent femoral component insertion; confirm version against the posterior condyles and trial extensively before the final head.
- Watch for: wrong version (critical for stability), periprosthetic fracture on insertion, and cement extravasation in a cemented technique.
- Reduce with the trial head and test stability in ALL positions — especially the posterior dislocation position of flexion past 90 degrees, adduction and internal rotation.
- Assess leg length against the contralateral side and confirm adequate soft-tissue tension.
- Key point: it is critical to test the position of risk; if unstable, upsize the head, increase offset, use a constrained liner or dual mobility, or adjust the components; document the stable range of motion achieved.
- Watch for: unrecognised instability (the hip will dislocate postoperatively), leg-length discrepancy, and over-lengthening (sciatic risk if more than 4 cm).
- Insert the definitive head, reduce the hip, and perform a final stability check; confirm acceptable leg length and offset; irrigate the joint thoroughly (minimum 3 L).
- Key point: the final components should replicate the trial findings; larger heads (32 mm, 36 mm) are more stable, and adequate offset restores abductor and posterior soft-tissue tension.
- Watch for: component mismatch with the trial, inadequate irrigation leaving debris, and failure to confirm final stability.
- Create 2–3 drill holes in the posterior facet of the greater trochanter and pass transosseous sutures.
- Repair in TWO layers: first the posterior capsule to bone, then the short external rotators (piriformis plus conjoined tendon) over the capsule — reconstructing a posterior soft-tissue tension band that resists the flexion-adduction-internal-rotation dislocation vector.
- Key point: the posterior repair is the difference in the modern posterior approach — it reduces dislocation from 4–5 percent to 1–2 percent; through-bone fixation is stronger than soft-tissue-only.
- Watch for: inadequate repair strength (use transosseous, not soft-tissue only), failure to repair one or both layers, and trochanter fracture from aggressive drilling.
Five structures define the danger zones of the posterior approach — know the location of each before you make a cut.
Lies posterior to the short external rotators; exits the greater sciatic notch below piriformis (about 90 percent) and runs over the gemelli, obturator internus and quadratus femoris, about 1–2 cm posterior to the acetabular rim. Keep the knee flexed, release the rotators at their femoral insertion, avoid posterior retraction, and limit lengthening to less than 4 cm.
Exits the greater sciatic notch above piriformis and runs between gluteus medius and minimus. Do not extend the gluteus maximus split more than 5 cm above the greater trochanter, and avoid forceful proximal retraction.
Exits below piriformis and supplies gluteus maximus. Use careful dissection near piriformis; avoid blind dissection posterior to the rotators; preserve it to maintain gluteus maximus function.
Its deep branch (usually off the profunda femoris) runs deep to obturator externus and along the superior border of quadratus femoris — the dominant blood supply to the femoral head. Avoid dividing or aggressively retracting through quadratus near its upper border; less critical once the head is excised, but preserving it limits troublesome bleeding.
Lie anterior to the hip capsule in the femoral triangle. Avoid overly anterior acetabular retractor placement and check retractor position during cup insertion.
The sciatic nerve is the structure that makes the posterior approach unforgiving. It exits the greater sciatic notch below piriformis and lies immediately posterior to the short external rotators. Protect it with three habits: keep the knee flexed to slacken the nerve; release the rotators at their femoral insertion (not proximally near the nerve); and avoid aggressive posterior retraction. Limit limb lengthening to less than 4 cm. Overall nerve-injury incidence in primary THA is 0.5–1 percent, higher in revision surgery and dysplasia.
Skipping the posterior repair is indefensible. Create the tunnels, repair the capsule to bone first, then lay the short external rotators over it as a second layer. Through-bone fixation is stronger than soft-tissue-to-soft-tissue, and the combined sleeve — not the rotators alone — restores the posterior restraint to flexion, adduction and internal rotation. With this repair, dislocation falls from 4–5 percent to 1–2 percent, on par with anterolateral and direct lateral approaches.
Aftercare & Complications
Closure and post-operative care - Irrigate the wound thoroughly (minimum 3 L); reapproximate the gluteus maximus fascia; close the subcutaneous layer with absorbable sutures; close the skin (staples or subcuticular); apply a sterile dressing.
- Weight bearing as tolerated immediately.
- Posterior hip precautions for 6–12 weeks: avoid flexion past 90 degrees, avoid adduction past the midline, and avoid internal rotation.
- VTE prophylaxis per institutional protocol; standard THA rehabilitation pathway. Complications
- Recognition
- Hip pain, shortened leg, external rotation; X-ray confirms; occurs with flexion/adduction/internal-rotation activities
- Prevention
- Posterior repair (capsule plus rotators); appropriate component position; larger head size (32–36 mm); patient education on precautions
- Management
- Closed reduction under sedation; if recurrent — constrained liner, larger head, revise malpositioned components, or augment with dual mobility
- Recognition
- Foot drop, numbness in the sciatic distribution; weak plantarflexion and dorsiflexion; EMG abnormal at 3–4 weeks
- Prevention
- Knee flexion during surgery; release rotators at the femoral insertion; avoid aggressive posterior retraction; limit lengthening to less than 4 cm
- Management
- Immediate post-op assessment; evacuate any haematoma if suspected; EMG at 3–4 weeks; most recover with time; foot-drop AFO if needed
- Recognition
- Trendelenburg gait; abductor weakness; abductor atrophy over time
- Prevention
- Limit the gluteus maximus split to 5 cm above the greater trochanter; avoid forceful proximal retraction
- Management
- Abductor-strengthening therapy; may be permanent if the nerve is transected
- Recognition
- Sudden give during broaching or stem insertion; visible crack on the femur
- Prevention
- Appropriate canal preparation; sequential broaching; avoid excessive force; consider prophylactic cerclage in osteoporotic bone
- Management
- Cerclage wiring; may need a longer stem; ORIF if displaced; protected weight bearing
- Recognition
- Impingement, instability, limp, leg-length discrepancy; abnormal position on X-ray
- Prevention
- Careful cup inclination and anteversion; verify femoral version; use navigation if available; intraoperative imaging
- Management
- Revise the malpositioned component if symptomatic; may require cup and/or stem revision
- Recognition
- Wound drainage, fever, raised inflammatory markers (CRP, ESR); positive aspiration
- Prevention
- Prophylactic antibiotics; laminar flow; minimise traffic; meticulous technique; screen and eradicate S. aureus carriers
- Management
- Aspiration and culture; DAIR if early; two-stage revision if chronic; antibiotic suppression if not a surgical candidate
Viva & Exam Focus
POGO-QPOGO-Q — Short external rotators (superior to inferior)
Hook:Tag piriformis and the conjoined tendon (obturator internus plus gemelli) for repair; quadratus is often preserved; the sciatic nerve exits below piriformis.
REPAIRREPAIR — Posterior soft-tissue reconstruction
Hook:Posterior repair reduces dislocation from 4–5 percent to 1–2 percent — the key to modern posterior-approach success.
Clinical Decision Scenarios
Practise clinical reasoning and management decisions out loud
“You are performing a posterior approach THA. Describe the importance of posterior repair and your technique for performing it.”
“How do you protect the sciatic nerve during the posterior approach to the hip?”
“Compare the posterior approach to the direct anterior approach for primary THA. When would you choose each?”
Key indications
- Primary THA — surgeon preference and expertise
- Revision surgery (excellent femoral exposure)
- Complex anatomy (dysplasia, prior surgery)
- Obese patients (better access than anterior)
- When excellent femoral visualisation is needed
MIS posterior specifics
- Incision: 6–10 cm (versus 15–20 cm standard)
- Same surgical principles as the standard posterior
- Requires specialised retraction and lighting
- Learning curve — do not compromise safety for incision size
- Cosmetic advantage but no proven long-term outcome difference
Short external rotators — POGO-Q
- Piriformis — most superior; the sciatic nerve exits below
- Obturator internus — between the gemelli
- Gemelli — superior and inferior
- Obturator externus — deep, below quadratus
- Quadratus femoris — most inferior; MCFA deep to it
Five danger zones
- Sciatic nerve — posterior to rotators; knee flexion protects; release at femoral insertion
- Superior gluteal NV bundle — above piriformis; limit split to 5 cm above GT
- Inferior gluteal nerve and vessels — below piriformis; supplies gluteus maximus
- MCFA — deep to quadratus femoris; supplies the femoral head
- Femoral nerve and vessels — anterior; avoid aggressive anterior retraction
Posterior repair — critical step
- Reduces dislocation from 4–5 percent to 1–2 percent
- Tag rotators before release
- Create bone tunnels in the GT posterior facet
- Repair capsule as the first layer
- Repair rotators over the capsule as the second layer
- Creates a posterior tension band resisting dislocation
Stability testing
- Test in the posterior dislocation position
- Position of risk: flexion, adduction, internal rotation
- Document the stable range of motion achieved
- If unstable: larger head, higher offset, constrained liner
Sciatic nerve protection
- Exits below piriformis in 90 percent
- Knee flexion relaxes the nerve
- Release rotators at the femoral insertion (away from the nerve)
- Avoid aggressive posterior retraction
- Limit lengthening to less than 4 cm
Exam tips
- Posterior repair equals capsule plus rotators (both essential)
- Dislocation rate with repair: 1–2 percent (comparable to DAA)
- Excellent femoral exposure is the key advantage
- Sciatic nerve injury: 0.5–1 percent (knee flexion protects)
- Hip precautions: 6–12 weeks (avoid flexion, adduction, internal rotation)
- Pelvic tilt in lateral decubitus affects cup orientation
Background & Evidence
Posterior versus direct anterior approach. Both are performed worldwide; registry and Level I data show comparable revision and dislocation when each is done by an experienced surgeon. The posterior approach remains the most widely used because of its versatility and excellent femoral exposure.
- Posterior
- 1–2% (with repair)
- Direct anterior (DAA)
- 0.5–1%
- Posterior
- Short external rotators
- Direct anterior (DAA)
- None (internervous)
- Posterior
- Excellent
- Direct anterior (DAA)
- Challenging
- Posterior
- Good
- Direct anterior (DAA)
- Good
- Posterior
- Established
- Direct anterior (DAA)
- Significant
- Posterior
- Rare
- Direct anterior (DAA)
- 10–15%
- Posterior
- Optional
- Direct anterior (DAA)
- Commonly used
- Posterior
- 6–12 weeks
- Direct anterior (DAA)
- Often none
- Posterior
- Lateral decubitus
- Direct anterior (DAA)
- Supine
- Posterior
- Feasible
- Direct anterior (DAA)
- Challenging
Guidelines, registries and global practice. - Registry evidence (implant survivorship and dislocation): national joint registries (NJR England and Wales, AOANJRR Australia, SHAR Sweden, Norwegian, NZJR, AJRR USA) consistently report dislocation and instability among the leading early causes for revision after primary THA, alongside infection and periprosthetic fracture.
- Larger femoral head sizes (32 mm and 36 mm) and dual-mobility constructs are associated with lower instability-related revision in registry data, supporting head-size upsizing or dual mobility when intraoperative stability is marginal.
- Practice variation: "hip precautions" practice differs globally — many high-volume centres have moved to relaxed or no precautions after a well-repaired posterior approach, citing equivalent dislocation rates; others retain 6 weeks of flexion, adduction and internal-rotation restriction. Evidence increasingly supports individualised rather than blanket precautions.
- Society guidance: AAOS, NICE and BOA (UK), AO Foundation and EFORT emphasise accurate component positioning, restoration of offset and leg length, and meticulous soft-tissue repair as the determinants of stability — not the specific approach. There is no single mandated approach.
References
Posterior soft-tissue repair reduces dislocation by greater than 8-fold (meta-analysis)
- Pooled dislocation rate was 0.49% WITH posterior soft-tissue repair versus 4.46% WITHOUT repair (5 comparative studies)
- Relative risk of dislocation without repair was 8.21 (95% CI 4.05-16.67)
- Separate review of 11 studies: anterolateral 0.70%, direct lateral 0.43%, posterior-with-repair 1.01% - statistically comparable across approaches
Enhanced posterior soft-tissue repair: the original landmark series
- Surgeon 1: dislocation fell from 4% (395 hips, no enhanced closure) to 0% (395 hips with enhanced closure)
- Surgeon 2: dislocation fell from 6.2% (160 hips) to 0.8% (124 hips) after adopting the enhanced repair
- Repair reconstructs the posterior capsule and short external rotators back to bone through transosseous tunnels in the greater trochanter
Direct anterior versus posterior approach: no difference in dislocation (RCT meta-analysis)
- 24 randomised controlled trials, 2010 patients comparing direct anterior with posterior or lateral approaches
- No significant difference in dislocation, periprosthetic fracture, neurapraxia or VTE between approaches
- Direct anterior gave better early Harris Hip Score at 6 weeks and shorter stay but longer operative time
Mini-incision posterior THA: safe but no early clinical benefit (RCT)
- 219 hips randomised to a short incision (10 cm or less) versus a standard 16 cm incision, single high-volume surgeon, posterior approach
- No difference in transfusion, pain, analgesia, early walking ability, length of stay, component placement or 6-week function scores
- Mini-incision was safe and reproducible in expert hands but conferred no measurable early advantage
Neurologic injury after THA: incidence and risk factors
- Reported nerve-injury incidence 0.09% to 3.7% in primary THA and up to 7.6% in revision THA
- Mechanisms: direct injury, leg lengthening, retractor malposition, cement extravasation or thermal damage, positioning and postoperative haematoma
- Risk factors: developmental dysplasia, female sex, post-traumatic arthritis and revision surgery
Direct anterior versus posterior approach in THA: systematic review and meta-analysis
- Systematic review and meta-analysis comparing the direct anterior and posterior approaches for total hip arthroplasty
- Sits alongside the Ang (2023) RCT meta-analysis as part of the comparative evidence base on the two most common approaches