Restore the mortise · Fix the fibula first · Assess the syndesmosis last
- Indications for ORIF: a Weber B with talar shift greater than 1mm or a positive stress test, ALL Weber C (the syndesmosis is always injured), bimalleolar, and trimalleolar fractures with a posterior fragment greater than 25-33% or any posterior talar subluxation.
- Restore fibular length first. As little as 1mm of lateral talar shift cuts tibiotalar contact area by 42% (Ramsey and Hamilton, 1976); shortening, lateral shift and external rotation all raise peak contact pressures (Thordarson, 1997).
- Assess the syndesmosis ONLY after all bony fixation is complete, with the ankle dorsiflexed and in neutral rotation under fluoroscopy — syndesmotic malreduction is the number-one cause of poor outcomes and is found in up to half of cases on CT (Gardner, 2006; Sagi, 2012).
- Fix the posterior malleolus for a fragment greater than 25-33% OR any posterior talar subluxation — subluxation matters more than size, and CT is essential because plain films underestimate the fragment by about 30%.
- Respect the soft-tissue envelope: operate only once the wrinkle sign is positive (delay 5-14 days if swollen). Operating through swollen tissue carries a 20-30% wound-complication rate versus 2-5% with recovered soft tissues.
When & Why
Indication. Operative fixation is reserved for the unstable ankle fracture — one in which the talus has shifted or is likely to shift out of the mortise. The decision rests on the Weber level, the Lauge-Hansen mechanism, and the radiographic markers of instability, not on the patient's pain alone. Absolute indications
- Weber B with instability — talar shift greater than 1mm, a medial clear space greater than 4mm, or a positive external-rotation stress test.
- All Weber C fractures — the syndesmosis is injured by definition, so ORIF plus syndesmotic fixation is required.
- Bimalleolar fractures — unstable by definition; both malleoli are fixed.
- Trimalleolar fractures — fix the lateral and medial malleoli, and the posterior malleolus if it is greater than 25-33% of the articular surface or there is any posterior talar subluxation.
- Open fractures — urgent irrigation, debridement and fixation.
- Irreducible dislocations (interposed periosteum or tendon) and neurovascular compromise — urgent reduction. Relative indications include a Weber A with significant displacement or rotation, an isolated medial malleolus displaced greater than 2mm, the young active patient (lower threshold to operate), and failure of non-operative care (displacement or loss of reduction in a cast). Contraindications. Absolute: active infection, or severe peripheral vascular disease with no healing potential. Relative: major medical comorbidity, the non-ambulatory patient, severe neuropathy with Charcot risk, and — critically — a poor soft-tissue envelope, for which surgery is delayed, not abandoned.
About half of Weber B fractures have a syndesmotic injury. A Weber B with medial tenderness, a medial clear space greater than 4mm, or a positive stress test is unstable and needs surgery — so stress-test every Weber B you are tempted to treat conservatively.
If the skin wrinkles over the ankle with passive dorsiflexion, the soft tissues have recovered and it is safe to proceed. If the skin is tense and will not wrinkle, delay surgery 5-14 days with elevation and ice. Operating through swollen tissue drives a 20-30% wound-complication rate, against 2-5% once the wrinkle sign is positive.
Consent. Counsel the patient that union is greater than 95% with adequate fixation, return to most activities takes 3-6 months, and 80-90% achieve good-to-excellent function after anatomic reduction — but post-traumatic arthritis develops in 15-40% by 10 years (higher with any residual incongruity). Common risks are symptomatic hardware (10-30%), stiffness (10-20%) and permanent swelling (20-30%); less common are infection (2-5% in closed fractures), nerve injury (usually temporary), DVT/PE (1-2% with prophylaxis) and syndesmotic malreduction (up to 50% in some series). Alternatives are non-operative care (Weber A, a truly stable Weber B, the elderly non-ambulatory patient) or bridging external fixation for severe soft-tissue injury.
Operative indications are consistent across AAOS and UK BOAST/BOFAS guidance — unstable Weber B/C, bimalleolar and displaced trimalleolar fractures, with stress-confirmed instability and timing built around the soft-tissue envelope. For adults over 60 with unstable fractures, the UK Willett AIM trial (2016) showed close-contact casting gives 6-month function equivalent to ORIF with far fewer wound complications — increasingly reflected in elderly-fracture pathways worldwide.
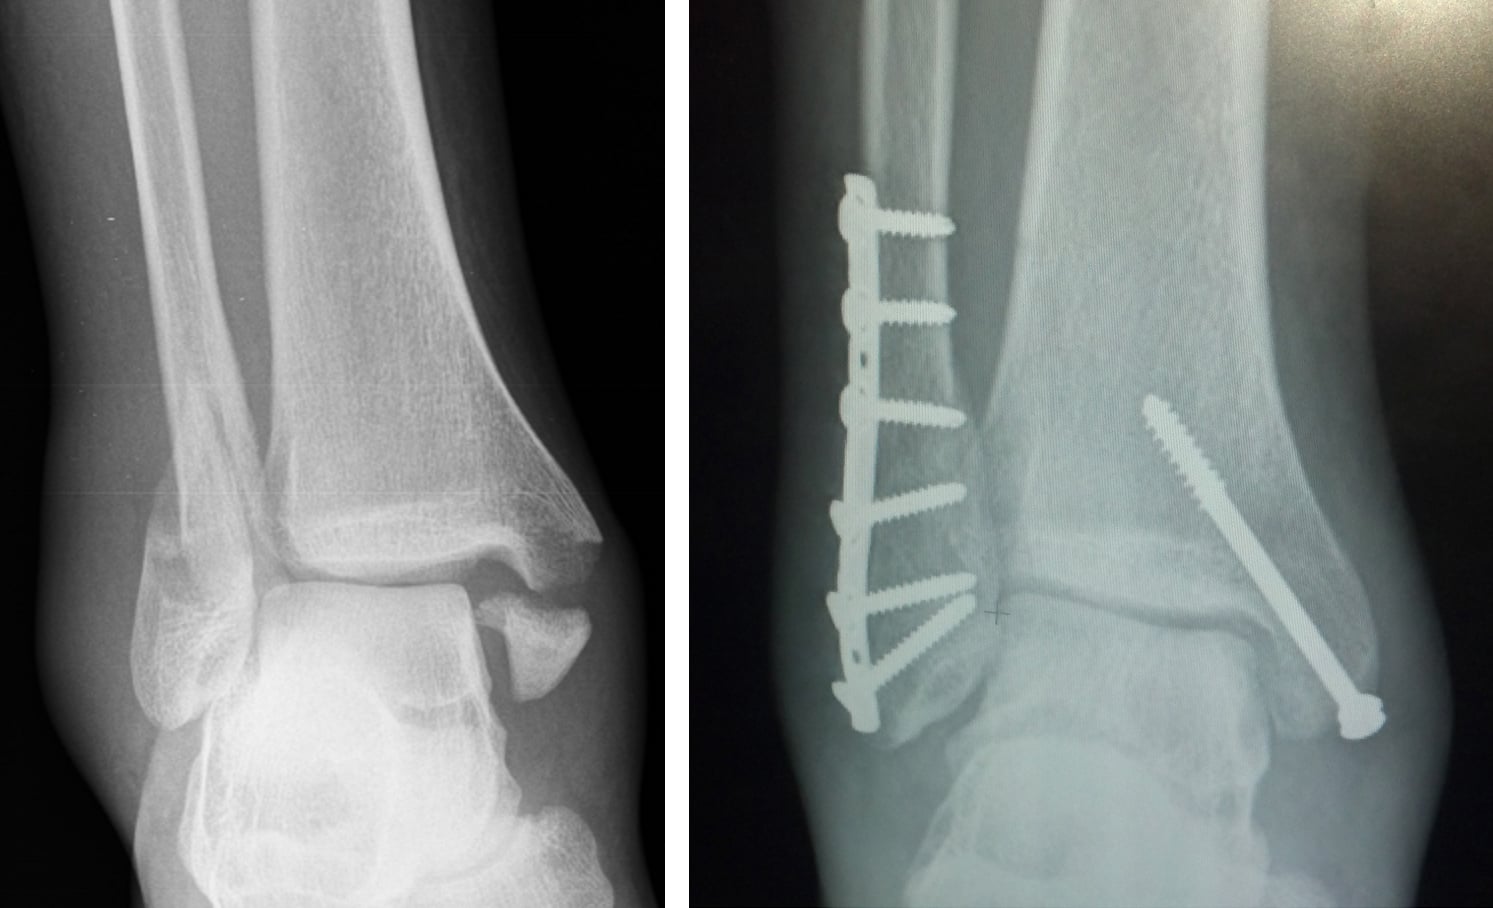
Setup. Supine on a radiolucent table with a bump under the ipsilateral hip to internally rotate the leg 15-30 degrees and bring the lateral malleolus up. Thigh tourniquet. Position the contralateral leg so the C-arm can reach a true mortise view. Plan the fixation sequence: Fibula, Medial malleolus, Syndesmosis, Posterior malleolus (FMSP).
The Operation
The goal is to restore the ankle mortise anatomically: fix the fibula first to restore length and rotation, then the medial malleolus, then assess and fix the syndesmosis, and finally the posterior malleolus if indicated. The exposures are laid out step by step below (and in depth on the approach to the fibula and medial approach to the ankle pages).
Operative sequence
- Supine, radiolucent table, bump under the ipsilateral hip for 15-30 degrees of internal rotation (brings the lateral malleolus up).
- Thigh tourniquet at 250-300mmHg — never a calf tourniquet (peroneal nerve risk); pad all pressure points (fibular head, malleoli, heel).
- Test EVERY fluoroscopic view before prepping — AP, mortise (15-20 degrees internal rotation) and lateral. The C-arm comes from the contralateral side; repositioning a prepped patient is difficult.
- Mark the incision POSTERIOR to the fibular shaft. Staying posterior protects the superficial peroneal nerve, which emerges from the anterior compartment 10-12cm proximal to the lateral malleolus tip and runs anterolaterally.
- An 8-10cm incision centered on the fracture, from about 8-10cm proximal to the tip distally to the joint line.
- Careful subcutaneous dissection; if a superficial peroneal nerve branch is seen, protect it with a vessel loop — never divide it.
- The sural nerve lies 1.5-2cm posterior to the fibula at the joint level with the lesser saphenous vein — avoid excessive posterior dissection.
- Incise the periosteum longitudinally and elevate subperiosteally to protect the peroneal tendons in the retromalleolar groove.
- Clear the fracture of interposed tissue; assess the pattern (spiral, oblique, comminuted).
- Reduction goals: restore length (compare to the contralateral side — 2mm shortening is unacceptable), correct rotation (use the posterior malleolar fragment as a guide), and achieve an anatomic reduction.
- Spiral or long oblique: a lag screw perpendicular to the fracture line plus a lateral neutralization plate (lag screw outside the plate if the spiral is greater than twice the fibular diameter, through the plate if shorter).
- Short oblique: a posterolateral antiglide (buttress) plate — biomechanically superior to a lateral plate.
- Comminuted: bridge plating; do NOT strip periosteum and devascularise fragments.
- Mortise and lateral views: tibiofibular clear space less than 6mm; tibiofibular overlap greater than 6mm on AP and greater than 1mm on mortise; confirm length and rotation against the contralateral side.
- If the medial clear space stays greater than 4mm after anatomic fibular fixation, the deltoid is torn or the syndesmosis is injured.
- Incision 5-7cm just POSTERIOR to the subcutaneous tibial border — staying posterior protects the saphenous vein and nerve anteriorly.
- Identify and protect the saphenous structures; incise the periosteum.
- Clear any interposed deltoid ligament from the fracture site — the commonest cause of a medial malleolus that will not reduce.
- Stay anterior to avoid the posterior tibial neurovascular bundle in the tarsal tunnel (Tom, Dick, And Nervous Harry).
- Reduce with a pointed reduction clamp; verify articular reduction (a step greater than 1mm is unacceptable).
- Standard fixation: two PARALLEL 4.0mm partially-threaded cancellous screws — partially threaded so the threads engage only the far fragment and compress. Entry at the malleolar tip, directed posterolaterally into the best metaphyseal bone.
- Keep the screws parallel — convergent screws spread the fracture, divergent screws lose purchase.
- A vertical (supination-adduction) fracture may need a buttress or antiglide plate; comminuted or osteoporotic bone needs buttress plating. A tension-band wire is an alternative for a transverse fragment.
- Perform the external rotation stress test ONLY once the fibula and medial side are fixed — you cannot assess the syndesmosis with unstable malleoli.
- Ankle dorsiflexed (the talus is widest anteriorly), neutral rotation; apply an external rotation force and watch under fluoroscopy.
- Abnormal: tibiofibular clear space greater than 6mm, loss of overlap, or medial clear space greater than 4mm. Cotton (hook) test: lateral traction on the talus should not displace it more than 2mm.
- Weber C: always assess (the syndesmosis is injured by definition). Weber B: assess if there is any doubt (50% have syndesmotic injury).
- Apply a large pointed reduction clamp from fibula to tibia, 2-3cm proximal to the joint, in the AP direction.
- CRITICAL: ankle in full dorsiflexion and neutral rotation. The talus is 2-4mm wider anteriorly, so dorsiflexion seats the fibula anatomically in the incisura; plantarflexion overtightens it, and internal rotation malreduces the fibula posteriorly.
- Two 3.5mm cortical screws engaging 3-4 cortices, or a suture-button device. Confirm reduction on fluoroscopy BEFORE definitively fixing.
- Indication: a fragment greater than 25-33% of the articular surface OR any posterior talar subluxation. Subluxation is the more important trigger — a 20% fragment with posterior shift still needs fixation.
- Indirect technique: A-P lag screws (3.5mm or 4.0mm) through the lateral approach — faster and less dissection, but no direct visualisation; confirm no joint penetration on lateral fluoroscopy.
- Direct technique: a posterolateral approach with a buttress plate — better reduction but more dissection, prone positioning, and sural-nerve risk.
- Run the MORTISE checklist (below): medial clear space less than 4mm and symmetric; tibiofibular clear space less than 6mm; overlap greater than 6mm AP and greater than 1mm mortise; no talar subluxation; articular congruence; all screws out of the joint; posterior malleolus reduced.
- Compare to the contralateral side and document every image.
- DO NOT accept a malreduction — revise immediately. Delayed revision has worse outcomes.
- Copious irrigation (at least 3L), meticulous hemostasis, close the periosteum if possible, then a layered tension-free skin closure.
- A well-padded posterior slab or bulky Jones dressing; elevate the leg above heart level; DVT prophylaxis per risk.
- Normal
- Less than 4mm (equal to the superior joint space)
- Abnormal
- Greater than 4mm
- Normal
- Less than 6mm on every view
- Abnormal
- Greater than 6mm
- Normal
- Greater than 6mm
- Abnormal
- Less than 6mm
- Normal
- Greater than 1mm
- Abnormal
- Less than 1mm
Emerges from the anterior compartment 10-12cm proximal to the lateral malleolus tip and runs anterolaterally. Place the fibula incision POSTERIOR to the shaft; protect any branch with a vessel loop.
Lies 1.5-2cm posterior to the fibula at the joint level with the lesser saphenous vein. At risk in the posterolateral approach — avoid excessive posterior dissection.
Anterior to the medial malleolus with the great saphenous vein. Place the medial incision POSTERIOR to the subcutaneous tibial border and protect them anteriorly.
Posterior to the medial malleolus in the tarsal tunnel (Tom, Dick, And Nervous Harry). Stay anterior with the medial approach and avoid posterior dissection.
Lie directly posterior to the fibula in the retromalleolar groove. Subperiosteal dissection and posterior retractors protect them during plating.
Drill a 3.5mm glide hole in the near cortex and a 2.5mm thread hole in the far cortex. The screw must be perpendicular to the FRACTURE LINE, not the bone axis — that is what gives compression across the fracture. Add a neutralization plate to protect the lag screw from rotational and bending forces.
The talus is 2-4mm wider anteriorly than posteriorly. Dorsiflexing the ankle brings the wider anterior talus into the mortise and forces the fibula into its anatomic position in the incisura. Reduce the syndesmosis in plantarflexion and you overtighten it — the patient loses dorsiflexion post-operatively.
The commonest reason a medial malleolus fracture will not reduce is interposed deltoid ligament pulled into the fracture gap. Always inspect the fracture site and clear any interposed soft tissue before you reduce — direct visualisation is essential.
If any fluoroscopic parameter is outside range, revise immediately — do not leave the operating theatre hoping it will settle. A non-true mortise view can give falsely abnormal readings, so first confirm 15-20 degrees of internal rotation and compare with the contralateral side; if it is genuinely malreduced, take the fixation down and redo it. Delayed revision has worse outcomes.
Up to half of syndesmotic fixations are malreduced on CT and plain films miss most of them. Reduce under direct vision where possible, scrutinise the intra-operative imaging, and have a low threshold for a post-operative CT with contralateral comparison in higher-risk injuries.
Aftercare & Complications
Rehabilitation | Phase | Timing | Immobilisation / weight-bearing | Therapy | |-------|--------|----------------------------------|---------| | Protection | 0–2 weeks | Splint or Jones dressing, non-weight-bearing, elevation | None — rest | | Early ROM | 2–6 weeks | Removable boot, non-weight-bearing | Wound check at 2 weeks; gentle active ROM out of the boot | | Progressive WB | 6–12 weeks | Progress to full weight-bearing as tolerated | ROM, light strengthening | | Strengthening | 12+ weeks | Return to activities | Physiotherapy, proprioception, sport-specific work | Most patients return to desk work by about 6 weeks and heavier activity by 3-6 months. Syndesmotic screws are removed by some surgeons at around 12 weeks (controversial — outcomes are similar with or without removal); suture-buttons do not require removal. Complications
- Recognition
- Erythema, drainage, wound breakdown within 2-4 weeks
- Prevention
- Wait for the wrinkle sign, minimise soft-tissue trauma, peri-operative antibiotics
- Management
- Superficial: oral antibiotics and wound care. Deep: debridement, IV antibiotics, hardware removal if loose
- Recognition
- Persistent lateral pain, instability, widened mortise on follow-up, clear space greater than 6mm
- Prevention
- Stress test AFTER bony fixation, anatomic fibular reduction first, dorsiflexed neutral-rotation clamp
- Management
- Revision ORIF with syndesmotic correction — outcomes worse with delayed revision
- Recognition
- Lateral pain over the plate, footwear difficulty, palpable hardware
- Prevention
- Low-profile plates, countersink screw heads, counsel the patient pre-operatively
- Management
- Removal after union confirmed (minimum 12 months). Suture-button needs no removal
- Recognition
- Progressive pain and stiffness, joint-space narrowing, osteophytes
- Prevention
- Anatomic reduction (step less than 1mm), restore fibular length within 2mm
- Management
- Conservative first; debridement, osteophyte excision, fusion or arthroplasty for severe disease
- Recognition
- Talar shift on weight-bearing films, valgus tilt, medial clear space greater than 4mm
- Prevention
- Restore length within 2mm, correct rotation using the posterior malleolar fragment
- Management
- Corrective fibular osteotomy — can improve outcomes even years later
- Recognition
- Pain and motion at the fracture site beyond 6 months, lucency around hardware
- Prevention
- Stable fixation, address smoking, diabetes and nutrition
- Management
- Revision ORIF with bone grafting
Viva & Exam Focus
MORTISEMORTISE — fluoroscopic parameters to confirm reduction
FMSPFMSP — the fixation sequence
Clinical Decision Scenarios
Practise clinical reasoning and management decisions out loud
“A 45-year-old woman presents after a twisting injury to her ankle. X-rays show a Weber B fracture with 2mm medial clear space widening. The soft tissues are significantly swollen. How would you manage this patient?”
“You are fixing a Weber C fracture. After reducing and plating the fibula, you apply a syndesmotic reduction clamp. The registrar questions why you are dorsiflexing the ankle. Explain your rationale and describe your syndesmotic fixation technique.”
“On your post-operative mortise view, you notice the tibiofibular clear space measures 7mm despite what appeared to be good intraoperative reduction. The fibular plate position looks good. What are your thoughts and what would you do?”
Classification
- Weber A/B/C by fibula level versus the syndesmosis: A = below (stable), B = at level (variable), C = above (unstable, always fix the syndesmosis)
- Lauge-Hansen by mechanism: SER ~60% (commonest), SA ~20%, PER ~10%, PA ~5%
- Examiners expect you to correlate both: 'This is a Weber B, or SER Stage II, injury'
- Weber B is the grey zone — 50% have syndesmotic injury, so stress test every one
Critical measurements (MORTISE)
- Medial clear space less than 4mm (equal to the superior joint space)
- Tibiofibular clear space less than 6mm
- Tibiofibular overlap greater than 6mm on AP, greater than 1mm on mortise
- 1mm of lateral talar shift cuts tibiotalar contact area by 42% (Ramsey and Hamilton) — restore fibular length and prevent any talar shift
- Always obtain a TRUE mortise view (15-20 degrees internal rotation) for accurate measurements
Fixation sequence (FMSP)
- Fibula first — restore length and rotation using the posterior malleolar fragment as a guide
- Medial malleolus next — remove interposed deltoid, articular reduction with step less than 1mm
- Syndesmosis assessment — stress test AFTER bony fixation (cannot assess with unstable malleoli)
- Posterior malleolus if greater than 25-33% OR posterior subluxation (subluxation matters more than size)
Syndesmotic fixation keys
- Ankle DORSIFLEXED (talus 2-4mm wider anteriorly — forces anatomic reduction)
- NEUTRAL rotation (internal rotation malreduces the fibula posteriorly)
- Clamp 2-3cm proximal to the joint in the AP direction (not medial-lateral)
- Confirm reduction on fluoroscopy BEFORE definitive fixation
- Screws versus suture-button both effective — suture-button needs no removal
Danger structures
- Superficial peroneal nerve: 10-12cm proximal to the tip, runs anteriorly (incise POSTERIOR to the fibula)
- Saphenous vein/nerve: anterior to the medial malleolus (incise POSTERIOR to the tibial border)
- Sural nerve: 1.5-2cm posterior to the fibula at the joint level (posterolateral approach risk)
- Posterior tibial NV bundle: posterior to the medial malleolus in the tarsal tunnel
- Peroneal tendons: directly posterior to the fibula — subperiosteal dissection protects them
Soft-tissue timing
- Wrinkle sign must be positive before surgery — skin wrinkles with ankle dorsiflexion
- If swollen, delay surgery 5-14 days with elevation and ice
- Operating through swollen tissue: 20-30% wound complication rate
- Operating after soft-tissue recovery: 2-5% wound complication rate
- Ankle soft tissues are unforgiving — be patient with timing
Complications
- Syndesmotic malreduction: number-one cause of poor outcomes, up to 50% in some series
- Wound dehiscence: 2-5% with proper timing, never close under tension
- Hardware symptoms: 10-30%, counsel pre-operatively, removal after union confirmed
- Post-traumatic arthritis: 15-40% at 10 years, correlates with reduction quality
- Non-union: less than 5%, address smoking, diabetes and nutrition
Exam pearls
- Always give BOTH Weber and Lauge-Hansen — examiners expect correlation
- Syndesmotic malreduction is the top exam talking point — know how to prevent and recognise it
- Posterior malleolus: know the 25% versus 33% debate but stress that subluxation matters more than size
- Describe stress testing precisely: external rotation force with the ankle dorsiflexed, looking for tibiofibular widening greater than 6mm
- Lag screw: glide hole in the near cortex, thread hole in the far cortex, perpendicular to the fracture line
- Elderly unstable fractures: close-contact casting is an evidence-based alternative to ORIF (Willett AIM trial)
Background & Evidence
Epidemiology. Ankle fractures are an increasing problem in adults (Court-Brown, 1998), driven by an ageing, osteoporotic population — bimodal distribution, with young high-energy men and older low-energy women. The Lauge-Hansen mechanism predicts the associated injuries: supination-external-rotation (SER) is by far the commonest (~60%), then supination-adduction (SA ~20%), pronation-external-rotation (PER ~10%) and pronation-abduction (PA ~5%). Pathoanatomy. The ankle is a mortise — the tibial plafond, medial and lateral malleoli form a box around the talus, which is 2-4mm wider anteriorly than posteriorly (the basis for dorsiflexed syndesmotic reduction). Stability depends on the ring of bones and ligaments: a single break in the ring may be stable, but two breaks (e.g. a high fibula fracture plus a medial malleolus/deltoid injury) make it unstable. The syndesmosis (AITFL, PITFL, interosseous ligament, inferior transverse ligament) holds the fibula in the incisura fibularis; the deltoid (superficial and deep) resists eversion and talar lateral shift.
- Fibula level
- Below the syndesmosis
- Syndesmosis
- Intact
- Stability
- Stable
- Treatment
- Usually non-operative
- Fibula level
- At the syndesmosis level
- Syndesmosis
- Variable (50% injured)
- Stability
- Variable — stress test
- Treatment
- ORIF if displaced or unstable
- Fibula level
- Above the syndesmosis
- Syndesmosis
- Always injured
- Stability
- Unstable
- Treatment
- ORIF plus syndesmotic fixation
- Frequency
- ~60%
- Foot position
- Supinated
- Force
- External rotation
- Injury sequence
- AITFL, then spiral fibula, then PITFL/posterior malleolus, then medial malleolus/deltoid
- Frequency
- ~20%
- Foot position
- Supinated
- Force
- Adduction
- Injury sequence
- Transverse lateral malleolus, then vertical medial malleolus
- Frequency
- ~10%
- Foot position
- Pronated
- Force
- External rotation
- Injury sequence
- Medial malleolus/deltoid, then AITFL, then spiral fibula above the syndesmosis, then PITFL
- Frequency
- ~5%
- Foot position
- Pronated
- Force
- Abduction
- Injury sequence
- Medial malleolus/deltoid, then AITFL/syndesmosis, then comminuted fibula
Weber tells you WHERE (the anatomic level) and predicts syndesmotic status; Lauge-Hansen tells you HOW (the mechanism) and predicts associated injuries. Examiners expect you to correlate them: "This is a Weber B, or SER Stage II, injury."
Key evidence.
- 1mm of lateral talar shift reduces tibiotalar contact area by about 42% (Ramsey and Hamilton, 1976); fibular shortening, lateral shift and external rotation each raise peak talar contact pressures, shortening being the most deleterious (Thordarson, 1997).
- Syndesmotic malreduction occurs in roughly half of cases on CT and is largely undetected by plain radiographs (Gardner, 2006); malreduction correlates with significantly worse functional scores at 2 years (Sagi, 2012).
- Suture-button versus screw: similar malreduction and functional outcomes; the suture-button maintains reduction better over time and needs no routine removal (Kortekangas, 2015).
- Posterior malleolus: open fixation of the fragment with its intact PITFL gives outcomes at least equivalent to a syndesmotic screw (Miller, 2009).
- In adults over 60 with unstable fractures, close-contact casting gives 6-month function equivalent to surgery with far fewer wound complications (Willett AIM trial, 2016).
References
Changes in tibiotalar area of contact caused by lateral talar shift
- Classic cadaveric study of talar shift in the ankle mortise
- As little as 1mm of lateral talar shift reduced the tibiotalar contact area by approximately 42%
- Established the biomechanical rationale for anatomic mortise reduction
The effect of fibular malreduction on contact pressures in an ankle fracture malunion model
- Cadaveric model: fibular shortening, lateral shift and external rotation each shifted load to the mid- and posterolateral talar dome
- Peak contact pressures reached 4.1 MPa, highest with maximal shortening and with combined deformities
- Shortening was the most deleterious single deformity
Malreduction of the tibiofibular syndesmosis in ankle fractures
- In 25 patients with operatively fixed syndesmotic injuries, postoperative CT showed incongruity of the fibula in the incisura in 13 of 25 (52%), averaging 3.6mm (range 2.0-8.0mm)
- Plain radiographs detected only 6 of these (sensitivity 31%, specificity 83% versus CT)
- In 77% of malreductions the fibula was internally rotated or anteriorly translated
The functional consequence of syndesmotic joint malreduction at a minimum 2-year follow-up
- Bilateral CT in 68 patients: 27 (39%) were malreduced versus the uninjured side at 2 years
- Open syndesmotic reduction was malreduced in only 15% versus 44% with closed reduction
- Malreduced patients had significantly worse SMFA and Olerud-Molander scores (P less than 0.05)
Posterior malleolar stabilization of syndesmotic injuries is equivalent to screw fixation
- 31 unstable fractures with MRI-confirmed syndesmotic injury and intact PITFL
- Open posterior malleolar fixation (capturing the PITFL footprint) gave FAOS outcomes equivalent to syndesmotic screws
- Reduction was maintained at minimum 12-month follow-up
TightRope versus syndesmotic screw fixation: accuracy and maintenance of reduction assessed with bilateral CT
- RCT of 43 Weber C/PER fractures: suture-button (n=21) versus single 3.5mm tricortical screw (n=22)
- No significant difference in malreduction, function (Olerud-Molander, FAOS) or osteoarthritis at 2 years
- Follow-up CT showed reduction was better maintained with the suture-button (3 malreduced with screw versus 1 with TightRope)
Close contact casting versus surgery for initial treatment of unstable ankle fractures in older adults (AIM trial)
- Multicentre RCT of close-contact casting versus ORIF for unstable ankle fractures in adults over 60
- Equivalent Olerud-Molander Ankle Score at 6 months in the intention-to-treat analysis
- Significantly fewer wound complications in the casting group
Further reading 1. Court-Brown CM, McBirnie J, Wilson G. Adult ankle fractures — an increasing problem? Acta Orthop Scand. 1998;69(1):43-47. 2. Michelson JD. Fractures about the ankle. J Bone Joint Surg Am. 1995;77(1):142-152. 3. Egol KA, Pahk B, Walsh M, et al. Outcome after unstable ankle fracture: effect of syndesmotic stabilization. J Orthop Trauma. 2010;24(1):7-11. 4. Donken CC, Al-Khateeb H, Verhofstad MH, et al. Surgical versus conservative interventions for treating ankle fractures in adults. Cochrane Database Syst Rev. 2012;(8):CD008470. 5. van den Bekerom MP, Haverkamp D, Kloen P. Biomechanical and clinical evaluation of posterior malleolar fractures: a systematic review of the literature. J Trauma. 2009;66(1):279-284.