Gold standard pelvic trauma | Direct SI joint access | Intermediate risk
- The standard open approach for SI joint disruption and unstable posterior pelvic ring injuries, giving direct visualisation of the posterior SI joint for reduction and fixation.
- Longitudinal incision centred over the PSIS, 2-3cm lateral to the midline, extending 8-10cm (2cm superior and 6-8cm inferior to the PSIS).
- Subperiosteal elevation exposes the outer table of the ilium and the posterior SI joint capsule; dissection stays posterior to the joint, so the L5 root (which lies anterior) is safe.
- The structure most at risk is the superior cluneal nerves (L1-L3 dorsal rami), crossing the iliac crest 6-8cm lateral to the PSIS — counsel patients preoperatively about lateral buttock hypesthesia.
- Used as the gateway for both percutaneous iliosacral screw fixation (through a stab lateral to the wound) and open posterior tension-band plating.
When & Why
What it exposes. The posterior approach gives direct access to the outer table of the ilium, the posterior SI joint capsule and the posterior sacrum, with the PSIS as the constant landmark. It is the workhorse exposure for SI joint disruption, sacral fractures with posterior-ring instability, and crescent fractures of the ilium. Why posterior (and not anterior). The anterior approach to the SI joint is now rarely used because of its high L5 nerve-root injury rate (reported around 5 to 15 percent). The posterior route keeps the L5 root safe because the nerve lies anterior to the sacral ala, roughly 1-2cm anterior to the SI joint — dissection that stays posterior to the joint never encounters it. The posterior approach and percutaneous screws achieve equivalent or better stability with far lower neurological morbidity. Primary indications.
- Acute SI joint disruption — vertical shear pelvic injuries (Young-Burgess APC-III, LC-III, VS patterns) and combined-mechanism injuries with posterior instability.
- Denis Zone I and II sacral fractures with SI joint involvement.
- Failed closed reduction requiring direct visualisation.
- Complex posterior pelvic ring injuries — crescent fractures of the ilium with SI joint extension, comminuted sacral fractures needing buttress plating, dysmorphic sacral anatomy precluding percutaneous fixation, and transiliac-transsacral injuries. Relative indications.
- Percutaneous screw failures — malpositioned screws requiring revision, loss of fixation in osteoporotic bone, inadequate reduction after a percutaneous attempt.
- Chronic SI joint instability — symptomatic malunion after nonoperative management, progressive deformity with neurologic symptoms, and failed conservative management beyond six months. Contraindications.
- Absolute — active infection overlying the proposed incision; severe soft tissue injury (for example a Morel-Lavallée lesion) precluding safe closure; medical comorbidities prohibiting surgery.
- Relative — obesity (BMI greater than 40, consider staged fixation); prior posterior pelvic surgery with scarring; neurogenic bowel requiring prone-positioning caution; osteoporosis requiring augmentation planning. Open vs percutaneous — the key decision. Examiners test understanding of when each technique applies: dysmorphic anatomy, the need for direct reduction, the quality of closed reduction, comminution, and surgeon experience all factor in. Percutaneous iliosacral screws suit simple disruptions with good anatomy and an adequate reduction; open posterior plating is reserved for dysmorphic sacra, comminution, reduction needs, osteoporotic bone, and revision cases.
The Exposure
The exposure is built around prone positioning on a radiolucent table with the PSIS as the landmark, verified fluoroscopy, and then a stepwise subperiosteal dissection to the posterior SI joint.
Positioning. General anaesthesia with endotracheal intubation and a Foley catheter. The patient is placed prone on a radiolucent Jackson table or chest rolls, arms on arm boards at less than 90 degrees abduction. Hips are extended to relax the gluteal muscles, the pelvis is tilted to correct any rotational deformity, and leg length is equalised with a bump. Pad every pressure point — gel pads under the chest (avoid brachial plexus compression), forehead padding (avoid facial nerve compression), knee padding (avoid peroneal nerve compression), and feet off the end of the table (avoid compartment syndrome). Landmarks. Palpate the posterior superior iliac spine (PSIS) — the primary landmark — the iliac crest extending laterally from it, the sacral spinous processes as the midline reference, and the ischial tuberosity as the caudal landmark (rarely palpable prone). The SI joint lies 2-3cm medial to the PSIS and runs obliquely, about 25 degrees from the sagittal plane. Fluoroscopy — verify before incision. A large C-arm with pelvic capability must be able to deliver an AP pelvis, an inlet view (40 degrees caudal tilt), an outlet view (40 degrees cephalad tilt), and a lateral sacral view (difficult prone). Confirm all views are obtainable before draping; the inlet and outlet views are the safety net for every screw.
Exposure sequence
- A longitudinal incision centred over the PSIS, 2-3cm lateral to the midline, extending 8-10cm (about 2cm superior and 6-8cm inferior to the PSIS); extend more inferiorly if transiliac plating is planned.
- Sharp incision through skin and subcutaneous tissue down to the gluteal fascia.
- Identify the superior cluneal nerves if encountered — they cross the iliac crest 6-8cm lateral to the PSIS; if they lie in the field, divide and cauterise them sharply (this should have been discussed at consent).
- Incise the fascia over the iliac crest in line with the skin, extending to periosteum, and develop the plane between gluteus maximus and the underlying bone.
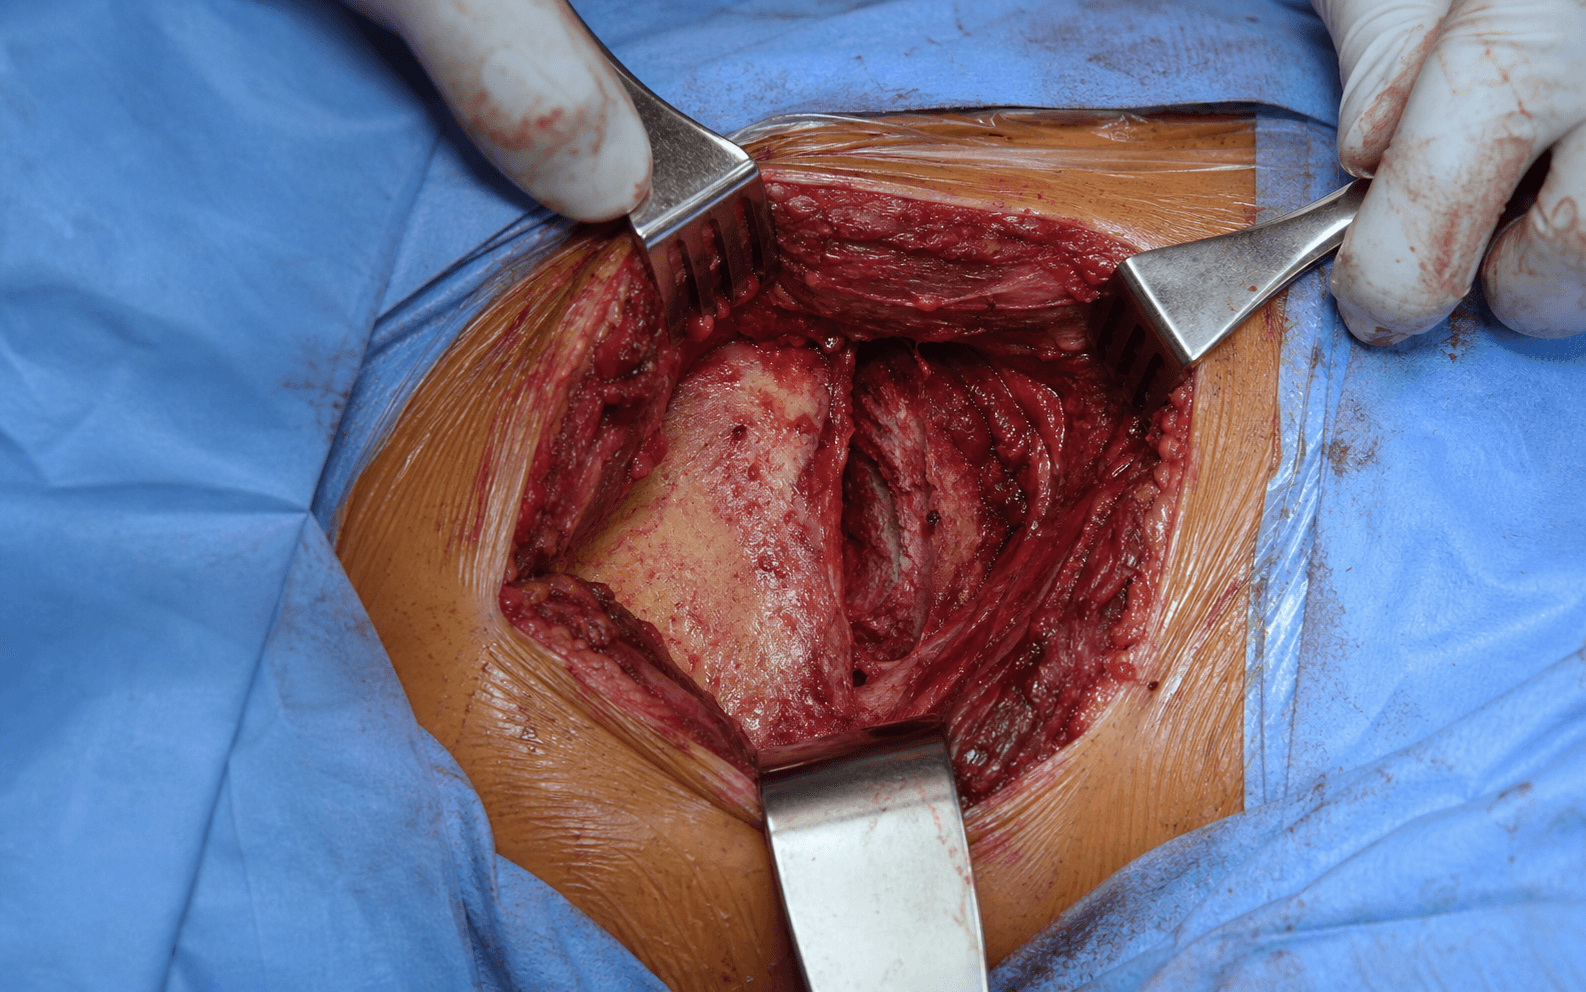
- Subperiosteal elevation of gluteus maximus off the outer table of the ilium with a Cobb elevator, sweeping the muscle posteriorly; expose the ilium 3-4cm posterior to the PSIS.
- Work medially off the posterior ilium and elevate the paraspinal muscles from the sacrum to expose the posterior SI joint capsule.
- Superior limit — preserve the iliolumbar ligaments if possible.
- Medial limit — the posterior SI joint line; do not violate anterior SI structures (this keeps the L5 root and vessels safe).
- Inferior limit — the superior border of the greater sciatic notch, where the superior gluteal vessels lie.
- Lateral limit — 5-6cm lateral to the PSIS, adequate for plate placement.
- Palpate the SI joint as a ridge between ilium and sacrum, 2-3cm medial to the PSIS; if visualisation of the joint surfaces is needed, incise the posterior capsule longitudinally, preserving the interosseous ligaments where possible (the strongest stabilisers).
- Use pointed reduction forceps across the SI joint (one tine on ilium, one on sacrum) to compress the joint, or place a 5.0mm Schanz pin in the iliac wing as a joystick to correct rotational and vertical displacement, often combined with manual manipulation and assistant traction on the leg.
- Confirm reduction on fluoroscopy (AP, inlet, outlet) and by direct vision of the joint surfaces — aim for less than 5mm displacement; rotation is as critical as translation.
- Hold the reduction temporarily with the forceps or 2.0mm K-wires while definitive fixation is placed.
- Percutaneous iliosacral screws (when reduction is good and corridors favourable): stab incision lateral to the main wound, advance a guidewire under fluoroscopy into the S1 body (the largest corridor) — perpendicular to the joint on the inlet view, within the S1 body on the outlet view (not anterior, not into the canal), anterior-cortex penetration confirmed on lateral — then over-drill and insert a 6.5-7.3mm cannulated screw (add an S2 screw for rotational control if its corridor is adequate).
- Posterior SI plating (dysmorphic anatomy, comminution, osteoporosis, revision): position a pre-contoured SI or reconstruction plate (3.5mm or 4.5mm) as a posterior tension-band construct spanning the joint with screws in the ilium and into the S1/S2 bodies under fluoroscopy; a transiliac plate is used for bilateral instability.
- Mandatory fluoroscopy — AP (reduction maintained, implant position), inlet (screws not anterior to sacrum), outlet (screws not in canal or foramina), and lateral (screw trajectory anterior/posterior).
- Manual stress-testing of the pelvis to confirm no gapping; check all screws are fully seated and the plate is contoured with no prominent hardware over the PSIS.
- Re-approximate the fascia over the iliac crest with #1 absorbable suture, ensuring fascia covers the hardware (reduces prominence) in this high-tension area.
- Close the subcutaneous layer with 2-0 absorbable suture to eliminate dead space, then skin with 3-0 or 4-0 nylon interrupted vertical-mattress sutures (evert the edges — the wound over the iliac crest is under tension); staples are an acceptable alternative.
- Place a 10Fr flat drain deep to the fascia if dissection was extensive, removing it when output falls below 30mL per 24 hours.
Reduction is more important than fixation: spend the time achieving an anatomic reduction before placing any implants. Malunion from an inadequate reduction causes chronic pain and gait abnormality, and may need revision surgery — reported in 5-10 percent of cases.
Superior cluneal nerve injury causing lateral hip numbness is the most common "complication" and should be expected and consented, not avoided. Wound closure over the iliac crest is high-tension — use interrupted (not continuous) sutures to prevent zipper dehiscence, and close the fascia meticulously to reduce wound complications.
Dangers & Extensions
Fixation technique selection. The choice between percutaneous screws and open posterior plating drives morbidity, time, and biomechanics.
- Percutaneous screws
- Simple disruption, good anatomy, adequate reduction
- Posterior plating
- Dysmorphic anatomy, comminution, reduction needs, osteoporosis
- Percutaneous screws
- Minimal (stab incisions)
- Posterior plating
- Moderate (open exposure required)
- Percutaneous screws
- 60-90 minutes
- Posterior plating
- 90-120 minutes
- Percutaneous screws
- Steep (fluoroscopy skills critical)
- Posterior plating
- Moderate (direct visualisation helps)
- Percutaneous screws
- Compression across the joint
- Posterior plating
- Tension band posteriorly
- Percutaneous screws
- Difficult (limited options if it fails)
- Posterior plating
- Easier (can add screws to the plate)
- Percutaneous screws
- Very low (less than 1 percent)
- Posterior plating
- 2-5 percent (iliac crest incision)
- Percutaneous screws
- 1-2 percent (trajectory errors)
- Posterior plating
- Less than 1 percent (direct visualisation)
Structures at risk, by layer
- Structure at risk
- Superior cluneal nerves (L1-L3 dorsal rami) crossing 6-8cm lateral to PSIS
- Protection
- Identify and preserve, or sharply divide with preoperative consent
- Structure at risk
- L5 nerve root (1-2cm anterior to the joint)
- Protection
- Stay posterior to the joint — never dissect anteriorly; the root is safe with this approach
- Structure at risk
- S1-S4 nerve roots
- Protection
- Verify every screw on inlet and outlet views; avoid the foramina
- Structure at risk
- Superior gluteal artery and vein
- Protection
- Limit inferior dissection to the superior border of the notch
- Structure at risk
- Iliolumbar vessels
- Protection
- Preserve the iliolumbar ligaments superiorly where possible
Extensile options. Extend the incision inferiorly across the iliac crest for transiliac plating in bilateral instability, and escalate to lumbopelvic (triangular) fixation for spinopelvic dissociation and vertically unstable transforaminal sacral fractures. Closure is as described above — interrupted mattress skin sutures over the high-tension crest, meticulous fascial closure, and a drain for extensive dissection. Complications and their prevention.
- Intraoperative — neurovascular injury (less than 2 percent): L5 root injury is rare because the root is anterior; sacral nerve injury comes from screw malposition into the foramina (prevent with fluoroscopy and anatomic knowledge, recognise with neuromonitoring); superior gluteal vessel injury follows excessive inferior dissection (limit to the superior border of the notch). Loss of reduction and hardware malposition (screw into canal, foramina, or anterior to sacrum) are prevented by maintaining reduction forceps and using multiple fluoroscopic views.
- Early (within 1 month) — wound complications in 2-5 percent (superficial dehiscence is most common; risk factors obesity, smoking, diabetes, tension — prevent with meticulous tension-free closure; deep infection less than 1 percent needs irrigation and debridement; seroma/haematoma benefits from a drain). Neurologic: expected cluneal numbness, transient sciatic symptoms from positioning, permanent deficit rare (less than 1 percent). Thromboembolic events are elevated in pelvic trauma — chemical and mechanical prophylaxis are mandatory.
- Late (beyond 1 month) — hardware loosening or breakage, prominent hardware over the PSIS (may need removal), SI joint arthritis from residual instability or malunion, and chronic pain syndromes. Malunion occurs in 5-10 percent from inadequate reduction; nonunion in less than 5 percent with adequate fixation.
Procedures Through This Approach
- Percutaneous iliosacral screw fixation (S1 and S2 corridors) — the workhorse for reducible disruptions with favourable sacral anatomy, performed through a stab lateral to the main wound.
- Open posterior SI plating and transiliac tension-band plating — for dysmorphic anatomy, comminution, osteoporosis, and revision cases.
- Triangular (lumbopelvic) osteosynthesis — for vertically unstable transforaminal sacral fractures and spinopelvic dissociation.
- Open reduction of sacral fractures (Denis Zones I-III) needing buttress plating, and crescent fractures of the ilium with SI joint extension.
- Drainage or debridement of posterior pelvic infections and haematomas, and removal of prominent iliac-crest hardware.
Viva & Exam Focus
SCREWSCREW — posterior SI joint fixation planning
CLUNEALCLUNEAL — posterior SI joint nerve risks
Clinical Decision Scenarios
Practise clinical reasoning and management decisions out loud
“A 32-year-old motorcyclist has a vertical shear pelvic injury. The AP pelvis shows 2cm superior migration of the right hemipelvis and widening of the right SI joint, and CT shows complete SI joint disruption with a small sacral ala fracture (Denis Zone I). You plan posterior SI joint fixation. Describe your surgical approach and fixation strategy, the fluoroscopic views you need, how you avoid nerve injury, and what you tell the patient about postoperative numbness.”
“You have placed two iliosacral screws via a posterior approach for SI joint disruption. On final fluoroscopy the S2 screw appears to lie in the S2 foramen on the outlet view, but the patient has no neurologic deficit. What is your immediate management, how do you confirm the position, what are the risks of leaving it, and how do you revise it safely?”
Key decisions
- Open vs percutaneous: dysmorphic anatomy, reduction quality, comminution
- Anterior vs posterior: anterior rarely needed (high L5 risk of 5-15 percent)
- Isolated posterior fixation vs combined: a complete ring disruption needs both
- Plate vs screw: osteoporosis and comminution favour plating
Technical pearls
- Incision 2-3cm lateral to the PSIS, 8-10cm (2cm superior, 6-8cm inferior)
- Superior cluneal nerve crosses the crest 6-8cm lateral to the PSIS (counsel re: numbness)
- Reduction is more important than fixation
- S1 screw: perpendicular on inlet, anterior cortex on lateral
- Wound closure: interrupted sutures over the high-tension iliac crest
Complication avoidance
- L5 root is anterior — safe with the posterior approach
- Check inlet/outlet/lateral for every screw (avoid canal and foramina)
- Limit inferior dissection (superior gluteal vessels at the notch)
- Meticulous fascial closure reduces wound dehiscence
- DVT prophylaxis is critical (high risk in pelvic trauma)
Must-know statistics
- 80-90 percent of SI joint surgeries use the posterior approach
- Less than 2 percent nerve injury (vs 5-15 percent anterior)
- 2-5 percent wound complication rate (iliac crest tension)
- 5-10 percent malunion if reduction is inadequate
- Operative time 90-120 minutes for open plating, 60-90 minutes percutaneous
Fluoroscopic views
- AP pelvis
- Inlet — 40 degrees caudal tilt
- Outlet — 40 degrees cephalad tilt
- Lateral sacrum (difficult prone)
References
Epidemiology. Unstable posterior pelvic ring injuries arise almost exclusively from high-energy mechanisms — road traffic collisions, falls from height, and crush or industrial injuries — and concentrate in young men and, increasingly, in elderly patients with low-energy fragility fractures of the sacrum. Associated injuries are present in roughly 80 percent of operative cases; haemorrhage from the posterior pelvic venous plexus and superior gluteal vessels is a leading cause of early mortality, so haemodynamic control precedes definitive fixation.
- Key recommendation
- Reduce and stabilise the posterior ring in all rotationally and vertically unstable (Tile C / Young-Burgess APC-III, LC-III, VS) patterns; image-guided iliosacral or trans-sacral screws are the workhorse, with open posterior plating reserved for irreducible or comminuted patterns
- Key recommendation
- Complex pelvic fracture is a major-trauma pathway item — CT with contrast for all suspected injuries, definitive fixation at or transfer to a major trauma centre, early haemorrhage control before fixation
- Key recommendation
- Senior decision-making, CT-based planning, and definitive care within agreed timelines at a specialist pelvic unit
- Key recommendation
- A physiology-driven algorithm — resuscitate and control haemorrhage (binder, angioembolisation or pre-peritoneal packing) first; definitive posterior fixation once stable
Registry and outcome signals. Across series, image-guided percutaneous iliosacral screw fixation is first-line for reducible disruptions with favourable osseous corridors; open posterior plating or triangular/lumbopelvic constructs are reserved for dysmorphic anatomy, comminution, or fixation that cannot be reliably achieved percutaneously. The anterior approach to the SI joint is now rarely used because of its high L5 nerve-root injury rate (reported around 5 to 15 percent); the posterior approach and percutaneous screws achieve equivalent or better stability with lower neurological morbidity. Global practice variation. In high-resource settings, CT-based planning, intraoperative 3D imaging or navigation, and trans-sacral screws are increasingly standard. In resource-limited settings without reliable fluoroscopy or navigation, open posterior reduction and plating remains a safe default because it permits fixation under direct vision without dependence on advanced imaging. Antibiotic prophylaxis follows local antimicrobial-stewardship guidance (typically a first-generation cephalosporin such as cefazolin at induction, re-dosed for long procedures); thromboprophylaxis is mandatory given the high venous thromboembolism risk of pelvic trauma.
Acute Pelvic Fractures: I. Causation and Classification
- Foundational review establishing that the posterior sacroiliac complex is the most important contributor to pelvic-ring stability, with the anterior structures contributing only about 40 percent of stiffness.
- Defined the Tile classification: type A stable, type B partially stable (rotationally unstable, for example open-book and bucket-handle), type C complete posterior sacroiliac disruption (rotationally and vertically unstable).
- Type A and B injuries account for 70 to 80 percent of all pelvic fractures; type C results almost exclusively from high-energy trauma.
Internal Fixation of Pelvic Ring Fractures
- Compared three treatment strategies for unstable pelvic ring injuries over a four-year period: skeletal traction or pelvic sling, anterior external fixation, and open internal fixation.
- Demonstrated that internal fixation achieved superior reduction and union in a satisfactory position compared with traction or external fixation alone.
- Established that posterior-ring stabilisation, not anterior fixation in isolation, is required to control vertically and rotationally unstable patterns.
Early Results of Percutaneous Iliosacral Screws Placed with the Patient in the Supine Position
- First 68 patients treated with supine percutaneous iliosacral screw fixation after closed reduction of posterior pelvic ring disruptions.
- Established that the percutaneous technique minimally violates the soft-tissue envelope, reducing blood loss and the high infection rates associated with open posterior exposures.
- Defined the fluoroscopy-dependent technique that underpins modern image-guided iliosacral screw placement.
A Comprehensive Analysis with Minimum 1-Year Follow-up of Vertically Unstable Transforaminal Sacral Fractures Treated with Triangular Osteosynthesis
- Prospective cohort of 40 patients with vertically unstable comminuted transforaminal sacral fractures treated with triangular (lumbopelvic plus iliosacral) osteosynthesis; reduction was maintained until healing in 95 percent.
- Substantial complication burden: wound complications requiring debridement in 13 percent, iatrogenic L5 nerve injury in 13 percent (attributed to fracture manipulation and reduction), and asymmetric L5 tilt with L5-S1 facet distraction in 15 percent.
- Nearly all patients (95 percent) had painful prominent implants requiring a second operation for removal; the construct allowed early full weight-bearing at 6 weeks.
Percutaneous Iliosacral Screw Fixation in S1 and S2 for Posterior Pelvic Ring Injuries: Technique and Perioperative Complications
- 38 consecutive patients (83 screws) fixed in S1 and S2 with cannulated screws under conventional C-arm fluoroscopy; a mean of 16 minutes per screw.
- Second surgery for screw malpositioning or loosening was required in 4 patients; 2 had persistent postoperative hypaesthesia, with no motor weakness and no postoperative bleeding.
- The presence of an S2 screw was not associated with increased perioperative complications, confirming the S2 corridor is safe with standard fluoroscopy.
Percutaneous Iliosacral Screw Fixation: Early Treatment for Unstable Posterior Pelvic Ring Disruptions
- 20 consecutive patients (41 screws) with unstable posterior ring injuries; 75 percent were fixed within 72 hours of injury.
- Mean operative time 52 minutes and mean blood loss 233 mL, with no loss of fixation and no wound complications over a mean 9.6-month follow-up.
- Framed the rationale by contrasting open posterior fixation (reported infection rates of 6 to 25 percent and wound complications around 25 percent) with the minimal morbidity of the percutaneous technique.
Variations in Sacral Morphology and Implications for Iliosacral Screw Fixation
- Defined the radiographic and CT hallmarks of the dysmorphic upper sacrum: upper sacrum colinear with the iliac crests on the outlet view, mammillary bodies at the mid-ala, non-circular anterior upper foramina, an acute alar slope, a residual upper sacral disc, and a tongue-in-groove SI joint on CT.
- Showed that the dysmorphic S1 corridor is narrow and obliquely oriented, making a transiliac-transsacral S1 screw unsafe and mandating either an oblique S1 trajectory or use of the larger S2 corridor.
- Established that recognising dysmorphism preoperatively on CT is essential to avoid foraminal and L5 nerve-root injury during percutaneous fixation.