Suture anchor technique · Sports / Knee surgery
- A complete quadriceps rupture means the patient cannot straight-leg raise or extend the knee against gravity — a surgical priority. Non-operative care of a complete rupture leaves permanent disability.
- The tendon has THREE layers — rectus femoris (superficial), VMO and vastus lateralis (intermediate) and vastus intermedius (deep). The Krackow sutures and the retinacular repair must engage ALL three layers.
- The Krackow locked whipstitch is the strongest tendon-grasping suture and resists pull-through far better than a simple or figure-of-8 stitch.
- Tie the repair at 30-40 degrees of flexion. Tied at 0 degrees it is too loose through functional range of motion; tied at 90 degrees it is too tight in extension.
- Patella baja on a lateral radiograph (Insall-Salvati less than 0.8) is the diagnostic clue — and always check the other knee, because ruptures are bilateral in 5-10 percent of patients.
When & Why
The cardinal indication. Surgery is for a rupture of the extensor mechanism severe enough to stop active knee extension — most often a complete quadriceps tendon rupture where the patient cannot straight-leg raise or extend the knee against gravity. A complete rupture is a functional emergency: acute repair (within two to three weeks) gives the best tissue quality and the best outcome, so the diagnosis must not be missed behind a swollen knee. Absolute indications - Complete quadriceps tendon rupture (inability to straight-leg raise or extend the knee against gravity)
- Partial rupture greater than 50 percent of tendon thickness with weak extension
- A partial rupture that has failed non-operative management
- Bony avulsion of the quadriceps tendon insertion Relative indications - Partial rupture less than 50 percent with an intact straight-leg raise (trial conservative care first)
- A high-demand patient with a partial tear wanting rapid return
- A chronic rupture greater than six weeks old (expect retraction and scarring — may need augmentation or a V-Y lengthening) Timing. Acute repair within two to three weeks is preferred because the tissue is healthy and the gap small. Repair within six weeks is still achievable with standard technique. Beyond six weeks the tendon retracts and degenerates, and you should plan for augmentation or a V-Y quadricepsplasty. Contraindications, and who needs augmentation. Absolute contraindications are active septic arthritis or a soft-tissue infection over the knee, medical comorbidities that preclude anaesthesia, and a patient who cannot comply with postoperative immobilisation. Relative contraindications are uncontrolled diabetes (optimise toward HbA1c less than 8 percent where possible), active skin lesions over the site, severe peripheral vascular disease, morbid obesity (technical difficulty, higher failure) and dementia or non-compliance (bracing adherence is critical). In these same high-risk groups — diabetes (about five times the rupture risk), chronic kidney disease or dialysis (about ten times), chronic steroid use, current or recent quinolone antibiotics, gout, and a previous local injection — plan to augment the repair. Diagnosis and decision. The mechanism is an eccentric quadriceps load — a stumble or a missed step, often trivial in a tendinopathic tendon. The patient feels a pop, becomes immediately unstable, and cannot weight-bear. On examination look for a suprapatellar gap (which haematoma can mask), inability to straight-leg raise (pathognomonic of complete rupture) and inability to extend the knee against gravity from a flexed position; always compare with the contralateral side and document the neurovascular status. Imaging: a lateral radiograph shows patella baja (Insall-Salvati less than 0.8) and may show a bony avulsion fragment; ultrasound is a dynamic, operator-dependent check of the gap; MRI is the gold standard, confirming the diagnosis, the extent of the tear and — critically — the tissue quality (degenerate versus healthy), which drives the fixation strategy. Consent specifically for repair failure or re-rupture (pooled approximately 2 percent in systematic-review data, but higher with delayed repair, degenerate tissue or high-risk comorbidity such as diabetes), a mild residual extensor lag, residual quadriceps weakness, stiffness, infection, a six to twelve month recovery, and the absolute need for bracing compliance. Setup and positioning. Supine on a standard table with a bump under the ipsilateral hip for neutral rotation, and a thigh tourniquet inflated to 250-300mmHg. The knee must flex freely to 90 degrees — test this before draping, because 90 degrees of flexion is needed to tension the repair. Anaesthesia is general or spinal; a femoral nerve block gives good analgesia but delays postoperative quadriceps assessment. The approach is an anterior midline longitudinal incision over the tendon and superior patella. Surface landmarks are the superior pole of the patella, the quadriceps tendon (taut normally, with a palpable gap here), the VMO bulge medially, and the retracted proximal tendon edge.
The Operation
The goal is to expose the rupture through a midline approach, evacuate the haematoma and assess every layer, prepare a bleeding bone bed on the superior patella, re-secure the tendon with Krackow sutures through heavy suture anchors engaging all three layers, tie the repair at 30-40 degrees of flexion, repair the retinaculum (including the VMO insertion), and immobilise in full extension. The exposure is laid out in full as the first steps below.
Operative sequence
- A midline longitudinal incision from 6-8cm proximal to the superior pole of the patella, extending to the mid-patella (total 10-12cm), through skin and subcutaneous tissue. The rupture is usually obvious — a visible gap and haematoma. Extend proximally for chronic tears with a retracted tendon.
- Most ruptures lie 1-2cm proximal to the insertion, in the hypovascular watershed zone described by Yepes between the medial and lateral arterial arcades; a substantial minority occur at the osseotendinous junction or as a bony avulsion, more often in older patients. Trace the full medial-to-lateral extent of the tear, including the retinaculum.
- Pearl: a midline incision gives the best exposure and minimises nerve injury; for chronic ruptures (greater than six weeks) extend proximally to mobilise the retracted quadriceps, and follow the torn retinacular edges — they guide you to the injury.
- Watch: inadequate exposure hides the full tear; an incision placed too medial risks saphenous nerve branches; partial tears at the medial or lateral margin are easily missed.
- Evacuate the haematoma with suction and copious irrigation, then assess the pattern systematically: complete versus partial; intrasubstance (1-2cm above the patella) versus bony avulsion; acute (healthy tissue) versus chronic (degenerate, retracted); and which layers are involved — rectus (superficial), VMO/VL (intermediate), vastus intermedius (deep).
- Gently retract the patella distally with a Langenbeck retractor to visualise the proximal tendon edge.
- Pearl: complete rupture means discontinuity of ALL three layers — test each layer independently. Partial tears often retain an intact intermediate layer (VMO/VL) that maintains some continuity and a weak straight-leg raise. Chronic tears (greater than six weeks) show retraction, scarring and tissue degeneration and need a different plan.
- Watch: missing a partial tear at the medial or lateral margin (trace the full width of the tear and retinaculum); underestimating chronic changes (the gap is often larger than expected); failing to assess tendon quality, because degenerate tissue will not hold sutures.
- Identify the proximal stump — it may be markedly retracted in chronic tears. Use Allis clamps for traction. Debride frayed, degenerate edges minimally (1-2mm) to create a perpendicular edge while preserving tendon length. Assess excursion by pulling the tendon distally with the knee at 30-40 degrees.
- Healthy tendon is white/pink, glistening and firm; degenerate tendon is grey, friable and will not hold sutures and needs aggressive debridement or augmentation. Mark the layers with sutures to maintain orientation.
- Pearl: tendon quality is the critical predictor of success. Grey, friable tissue needs aggressive debridement or augmentation; an acute tear needs only minimal debridement. If you cannot approximate the tendon without excessive force at 30-40 degrees of flexion, plan a proximal release or augmentation.
- Watch: excessive debridement shortens the tendon and raises repair tension; inadequate debridement leaves degenerate tissue that fails; loss of layer orientation causes malrotation.
- Use a rongeur or curette to strip fibrous tissue and create a bleeding bone surface on the superior pole of the patella (the insertion site). Make a flat 1-1.5cm footprint from the anterior to the posterior cortex. Expose cortical bone without penetrating or over-thinning the patella.
- Pearl: the goal is the best tendon-to-bone healing environment. Remove ALL cartilage and fibrous tissue (it impedes healing); light burring increases surface area; avoid excessive bone removal (it weakens the patella and risks fracture). Create a rectangular footprint matching the tendon width.
- Watch: excessive bone removal weakens the patella (fracture risk, especially with osteoporosis); inadequate debridement impairs healing; aggressive posterior preparation can violate the articular surface.
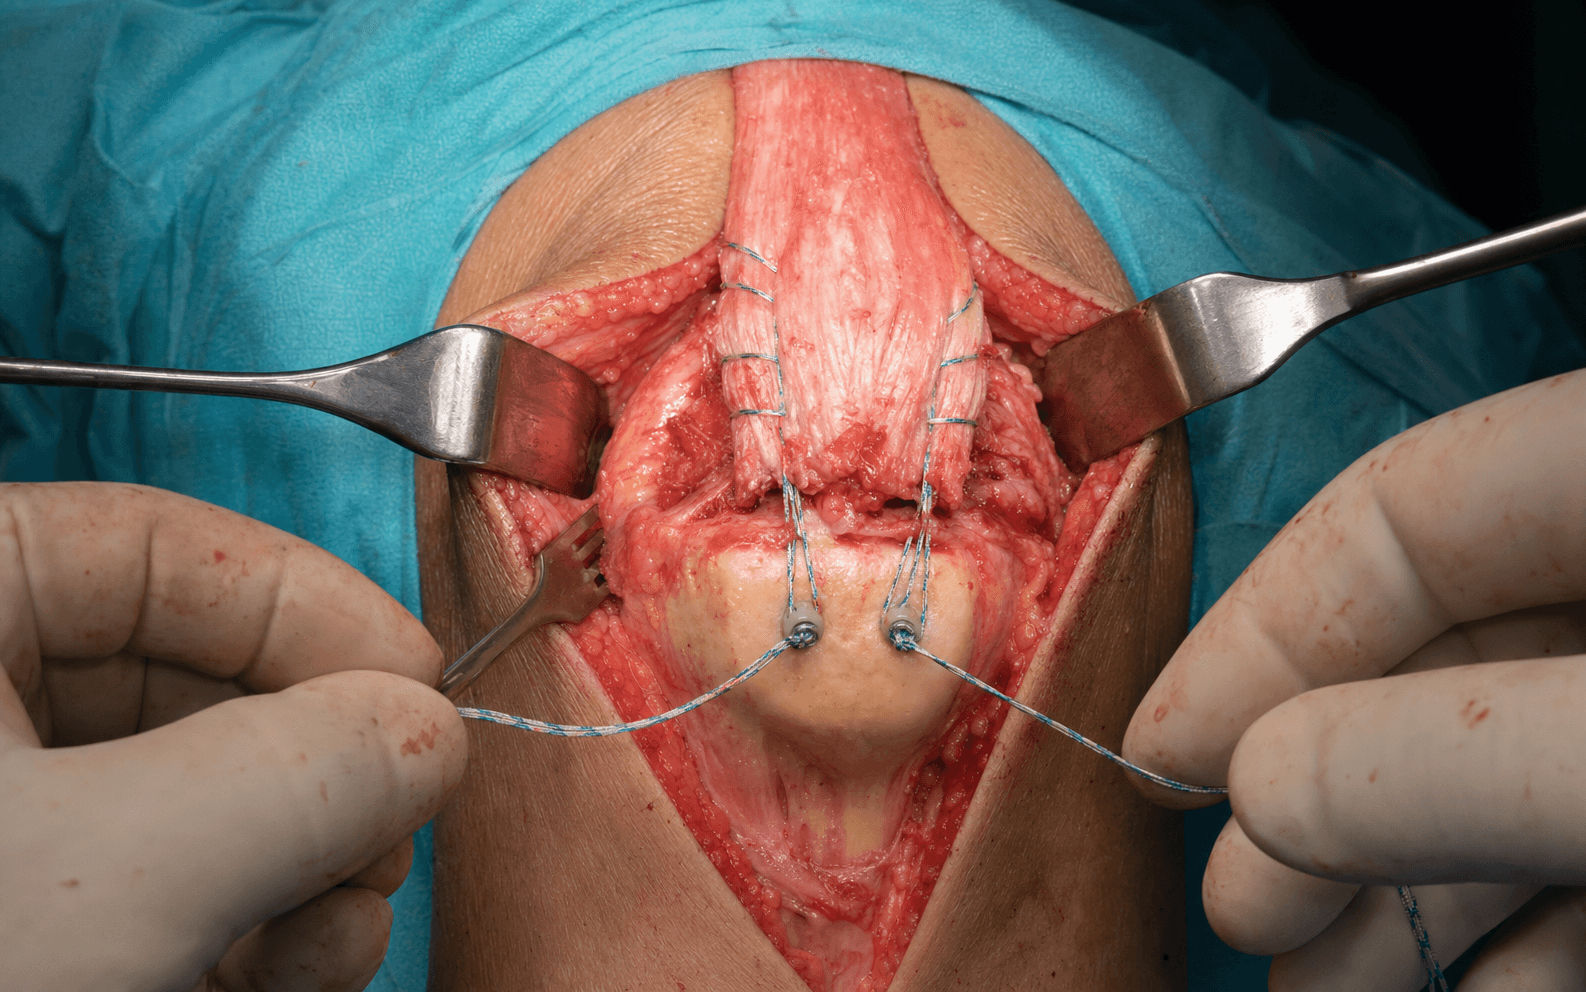
- Insert 3-4 suture anchors (5.5mm or 6.5mm) into the superior pole of the patella: in the coronal plane, 5mm from the articular surface, spaced 7-10mm apart transversely, driven perpendicular to the bone surface, each loaded with two heavy sutures (#2 or #5). Confirm secure fixation and no articular penetration.
- Knotless anchors (SwiveLock, PushLock) avoid a prominent anterior knot stack and reproduce a double-row footprint; their construct strength is comparable to — not clearly superior to — single-row anchor and transosseous techniques in cadaveric work. Use a minimum of three anchors for a standard tear and four for large or chronic tears.
- Pearl: suture anchors are the modern gold standard — faster than tunnels, with cyclic biomechanics comparable to transosseous tunnels, and they avoid drilling the patella (so fewer stress-riser fractures). Position anchors 5mm from the articular surface.
- Watch: an anchor placed too posterior breaches the joint and damages cartilage; too anterior it pulls out of thin cortex; divergence loses fixation; an over-drilled or over-tapped pilot hole lets the anchor spin without purchase.
- Pass the anchor sutures through the proximal tendon using a locked Krackow technique: start at the tendon edge, pass from anterior to posterior, lock by passing under the previous throw, and run 4-6 bites extending 3-4cm from the edge. Each suture must engage ALL three layers (superficial, intermediate, deep). Use a curved Mayo or Keith needle.
- An alternative is a Mason-Allen horizontal mattress with a locking loop.
- Pearl: the Krackow (locked whipstitch) is the strongest tendon-grasping configuration — the locking throws spread load over 4-6 points per limb and resist pull-through far better than a simple or figure-of-8 stitch. Engage ALL three layers, not just the superficial rectus, and use heavy sutures (#2 minimum, #5 ideal).
- Watch: superficial sutures only (rectus layer) let the intermediate and deep layers pull through; fewer than four bites gives inadequate fixation; sutures too close to the edge cheese-wire and pull out; unequal tension distorts the tendon.
- This is the critical step: position the knee at 30-40 degrees of flexion for tying. Pull the sutures to advance the tendon to the insertion, then tie sequentially — central sutures first (to set the tension), then medial, then lateral. Use surgeon's knots (a 2-1-1 pattern) with 6-8 throws, tensioning so the tendon is snugly opposed to bone with 1-2mm of compression.
- Pearl: repair tension is the critical decision. Tie at 30-40 degrees (the position of maximum extensor force); tied at 0 degrees the repair is too loose at functional flexion, tied at 90 degrees too tight in extension. Aim for the tendon to stay snug through 0-90 degrees, and confirm by passively flexing to 90 degrees after tying — the repair should hold with no gap greater than 3mm.
- Watch: over-tightening causes tendon necrosis and paradoxical gap formation; under-tightening gaps the repair in flexion; tying with the knee extended leaves the repair too loose through functional range; unequal tension creates eccentric forces and lateral patellar tracking.
- Repair the torn medial and lateral retinaculum with 2-0 braided absorbable suture (Vicryl) in an interrupted figure-of-8 or simple pattern, starting at the patellar insertion and working proximally. Ensure the VMO insertion is secure.
- For chronic tears, mobilise adhesions and advance the retinacular tissue; consider imbrication (a vest-over-pants overlap) for extra strength.
- Pearl: retinacular repair adds 30-40 percent to construct strength — it is essential, not optional, because most ruptures propagate through the retinaculum. Repair BOTH sides, and secure the VMO insertion (critical for patellar tracking).
- Watch: an inadequate retinacular repair weakens the construct; an over-tight repair limits range of motion and tilts the patella; the lateral retinacular tear is easily missed because tears propagate medial-to-lateral.
- Where indicated, augment the repair. Suture tape (InternalBrace, FiberTape): load the anchor with the repair sutures and the tape, pass the tape superficial to the repair and anchor it distally — this raises the failure load by 40-60 percent. Autograft (semitendinosus) is woven through the repair; allograft (Achilles or fascia lata) is laid over as an overlay.
- Augmentation is indicated for a chronic rupture greater than six weeks, a revision after failed primary repair, poor intra-operative tissue quality, high-risk patients (diabetes, chronic kidney disease, steroids) and any repair under high tension.
- Pearl: suture tape augmentation increases the failure load by 40-60 percent in biomechanical studies and is the most practical option when the tissue or patient is high-risk.
- Watch: do not rely on augmentation to compensate for a poor primary repair; tape placed too superficially can irritate and need removal; allograft carries a small disease-transmission risk and incorporates slowly.
- Release the tourniquet and test the repair. First check full extension — the knee should passively extend fully with no extensor lag. Then the flexion test: gently and passively flex the knee to 90 degrees; the repair should remain intact with no gapping, and you should feel firm resistance throughout the arc. A gap greater than 3mm at 90 degrees means the repair is too loose — re-tension it.
- Document the maximum safe flexion angle achieved, and pass it to the physiotherapy team.
- Pearl: this is the proof of an adequate repair. Under anaesthesia, passively extend fully (tests for lag), then flex smoothly to 90 degrees feeling for firm resistance throughout — a sudden loss of resistance or visible gapping means failure and demands revision.
- Watch: forced flexion beyond the repair's capacity fails it intra-operatively; subtle gapping is missed and becomes a postoperative extensor lag; testing beyond 90 degrees in a borderline repair is an unnecessary risk.
- Achieve meticulous haemostasis with bipolar cautery. Close the paratenon with 3-0 absorbable suture (it restores a smooth gliding surface). Consider a 10Fr drain if there is concern about haematoma. Close the subcutaneous layer with 2-0 absorbable suture and the skin with staples or 3-0 nylon.
- Pearl: paratenon closure is often forgotten but improves gliding and cosmesis; a drain for 24 hours helps prevent haematoma (which raises infection risk and adhesions); re-inflate and deflate the tourniquet to find bleeders before closure.
- Watch: haematoma raises infection risk (2-5 percent) and causes adhesions and stiffness; a tight closure risks skin necrosis and breakdown; a drain placed anteriorly can erode through thin skin.
- Apply a sterile dressing and place the knee in a hinged brace or cylinder cast LOCKED in FULL EXTENSION (0 degrees). This is mandatory.
- See Aftercare for the full rehabilitation protocol. In brief: brace locked at 0 degrees for four weeks and non-weight-bearing, isometric quadriceps from day 1-2, then progressive unlocking and protected weight-bearing over the weeks that follow, with full range expected by 16-20 weeks and return to sport at a minimum of six months.
- Pearl: extension immobilisation is mandatory — it offloads the repair during early healing. A hinged brace is preferred (it allows wound checks); a cylinder cast is more secure. Continue locked extension for 4-6 weeks, then progress range of motion.
- Watch: no immobilisation nearly guarantees failure; flexion immobilisation causes a permanent flexion contracture; an over-tight dressing risks compartment syndrome; early unrestricted range overloads the repair.
Where and how you tie the repair decides whether it holds. Position the knee at 30-40 degrees of flexion — the position of maximum extensor force — and tie central sutures first, then medial, then lateral, so the tendon is snug throughout 0-90 degrees. Tied at 0 degrees the repair is too loose at functional flexion and will gap; tied at 90 degrees it is too tight in extension and risks necrosis with paradoxical gap formation. After tying, passively flex to 90 degrees and confirm there is no gap greater than 3mm before you move on.
The quadriceps tendon has three layers (rectus superficially, VMO/VL intermediately, vastus intermedius deeply). Every Krackow pass must go anterior-to-posterior through full thickness so it catches all three — a repair that catches only the superficial rectus will fail when the intermediate and deep layers pull through. Reinforce with the retinacular repair (which adds 30-40 percent to construct strength) and secure the VMO insertion, or patellar tracking is lost.
Anchors are faster, need less patellar bone work, and avoid the anterior-cortex stress risers that tunnels create — so the patellar-fracture risk is lower. Cyclic biomechanics are comparable to tunnels (Lighthart found no significant displacement difference), and Hart found tunnels actually had a higher ultimate load than double-row anchors, though both were clinically adequate. So do not claim anchors are mechanically superior; choose on bone quality, knot prominence and familiarity, and reach for tunnels (or augmentation) in osteoporotic bone where an anchor may pull out.
Aftercare & Complications
Rehabilitation | Phase | Timing | Brace / weight-bearing | Therapy | |-------|--------|------------------------|---------| | 1 | 0-4 weeks | Hinged brace locked in full extension; non-weight-bearing with crutches | Isometric quadriceps sets from day 1-2; brace stays locked for ambulation | | 2 | 4-6 weeks | Unlock to 30 degrees for supervised therapy; re-lock for walking | Gentle assisted flexion; wound and scar care | | 3 | 6-8 weeks | Progress flexion toward 60 degrees | Patellar mobilisation; early closed-chain work | | 4 | 8-12 weeks | Progress to 90 degrees; begin partial weight-bearing | Progressive resistance; gait re-education | | 5 | 12-20 weeks | Brace weaned; full active range of motion | Functional strengthening — full ROM expected by 16-20 weeks | | Return to sport | 6-9 months | — | Sport-specific drills; a minimum of six months | Expect a six to twelve month recovery. Long-term outcomes are good after timely repair: at a mean of 76 months Boudissa reported a mean Lysholm of 93.7 with 98 percent good or very good subjective results, a mean active flexion of 133 degrees and a 97 percent return to the pre-injury occupation. Quadriceps strength typically recovers to roughly 80-90 percent of the contralateral side by 12-18 months, with residual weakness commoner in older patients. Complications
- Recognition
- Sudden pain, loss of extension and a palpable gap, often after a fall or forced flexion early postoperatively
- Prevention
- Secure Krackow technique with heavy sutures engaging all layers; augmentation in high-risk patients; strict bracing and protected rehabilitation; patient education
- Management
- Acute (less than 4 weeks): immediate revision with augmentation and prolonged immobilisation. Chronic: allograft reconstruction or V-Y quadricepsplasty
- Recognition
- Inability to fully actively extend; usually a 5-10 degree lag on the heel-to-bed lift test
- Prevention
- Appropriate tension (tie at 30-40 degrees); secure fixation of all layers; early isometrics; later aggressive strengthening
- Management
- Therapy usually improves it over 6-12 months; a lag less than 10 degrees is often functionally acceptable; rarely needs revision
- Recognition
- Unable to reach 120 degrees flexion; difficulty with stairs and squatting
- Prevention
- Balance protection with progressive mobilisation; supervised range-of-motion work; avoid over-tightening the repair; patellar mobilisation
- Management
- Therapy with passive stretching and patellar mobilisation; manipulation under anaesthesia if less than 4 months and severe (greater than 30 degrees loss); arthroscopic adhesiolysis if refractory
- Recognition
- Objective weakness on isokinetic testing; difficulty with stairs and running; visible atrophy
- Prevention
- Early isometric exercises; aggressive strengthening after 12 weeks; avoid prolonged immobilisation
- Management
- Progressive resistance and eccentric training; most recover 80-90 percent by 12-18 months; residual weakness is commoner in older patients
- Recognition
- Sudden patellar pain, a palpable fracture and loss of construct stability; confirmed on radiograph
- Prevention
- Prefer suture anchors (avoid tunnels); if tunnels are used, space them more than 7mm apart; avoid osteoporotic bone
- Management
- Non-displaced: conservative extended immobilisation. Displaced: ORIF, which is challenging over an underlying repair
- Recognition
- Wound erythema, warmth and drainage; fever; raised white-cell count and CRP
- Prevention
- Prophylactic antibiotics (cefazolin 2g); meticulous haemostasis; minimise operative time
- Management
- Superficial: oral antibiotics and wound care. Deep: washout and debridement, preserving the repair if possible; intravenous antibiotics for 6 weeks
- Recognition
- Limited flexion, anterior knee pain and difficulty kneeling; Insall-Salvati less than 0.8 postoperatively
- Prevention
- Avoid over-tensioning the repair; progressive range of motion after 4-6 weeks; patellar mobilisation exercises
- Management
- Prevention is critical — established baja is hard to correct; therapy for range of motion; rarely proximal patellar tendon lengthening
- Recognition
- A palpable mass at the repair site; limited range of motion; calcification on radiograph
- Prevention
- Atraumatic technique; minimise bone-bed trauma; consider indomethacin 25mg three times daily for 6 weeks in high-risk patients
- Management
- Most are asymptomatic — observe if mild; excise if it forms a mechanical block, delayed until mature at 12-18 months
Viva & Exam Focus
LAYERSLAYERS — quadriceps tendon anatomy, superficial to deep
KRACKOWKRACKOW — tendon suture principles
- Where it lies
- Crosses the anterior knee medially; vulnerable to medial retraction
- Why it matters — and how to protect it
- Injury leaves a numb patch on the anterior knee — common and usually well tolerated; avoid an incision or retraction placed too medial
- Where it lies
- 2-4cm proximal the patellar insertion, within the tendon substance
- Why it matters — and how to protect it
- Bleeding obscures the field; use careful dissection and bipolar cautery
- Where it lies
- The articular surface deep to the tendon, visible when the knee is flexed
- Why it matters — and how to protect it
- Damaged by an anchor placed too posterior or a trans-osseous tunnel exiting posteriorly; keep anchors 5mm from the articular margin
- Where it lies
- Medial patellar border, oblique fibres
- Why it matters — and how to protect it
- Critical for patellar tracking — must be repaired; failure causes lateral maltracking and recurrent instability
Clinical Decision Scenarios
Practise clinical reasoning and management decisions out loud
“A 62-year-old diabetic man stumbles on a step and presents with a swollen knee and inability to walk. He cannot straight-leg raise. Describe your assessment and management.”
“Describe the anatomy of the quadriceps tendon and explain how this relates to repair technique.”
“Compare suture-anchor fixation with the trans-osseous tunnel technique for quadriceps tendon repair. What are the advantages and disadvantages of each?”
Indications
- Complete quadriceps rupture equals inability to straight-leg raise or extend against gravity
- Partial rupture greater than 50 percent with weak extension
- All complete ruptures need surgical repair — non-operative care leaves disability
Critical anatomy
- THREE layers: rectus (superficial), VMO/VL (intermediate), vastus intermedius (deep)
- Converge 2-3cm above the patella; most ruptures 1-2cm above the insertion
- The hypovascular watershed zone 1-2cm above the patella is the usual tear site (Yepes)
- Patient profile: greater than 50 years, diabetes (5x), CKD (10x), steroids
Operative steps
- Midline incision; evacuate the haematoma; assess all three layers
- Prepare a bleeding bone bed on the superior patella
- 3-4 suture anchors 5mm from the articular surface
- Krackow locked sutures through ALL three layers (4-6 bites over 3-4cm)
- Tie at 30-40 degrees flexion; test to 90 degrees with no gap greater than 3mm
- Repair the retinaculum (adds 30-40 percent strength)
Danger zones
- The articular surface (anchor placed too posterior)
- The VMO insertion (critical for tracking)
- The superior geniculate vessels (within the tendon)
Key numbers
- Anchors avoid patellar tunnels and their stress risers (lower fracture risk)
- Re-rupture rate: pooled approximately 2 percent (Ciriello); higher with delay, diabetes or CKD
- Heterotopic ossification approximately 7 percent pooled; deep infection approximately 1 percent
- Krackow is the strongest tendon-grasping stitch; cyclic strength comparable to tunnels
Exam tips
- Patella BAJA on a lateral radiograph (Insall-Salvati less than 0.8) is the diagnostic clue
- Check the contralateral side — 5-10 percent are bilateral
- Tie the repair at 30-40 degrees flexion, NOT in extension
- Extension immobilisation is mandatory — locked brace for 4-6 weeks
- Consider augmentation in high-risk patients: diabetes, CKD, chronic tears
Background & Evidence
Epidemiology. Quadriceps tendon rupture is overwhelmingly a condition of older adults (typically greater than 50 years, in contrast to patellar tendon rupture, which affects those less than 40 years). Risk factors that weaken the tendon multiply the risk substantially — diabetes (about five times), chronic kidney disease or dialysis (about ten times), chronic steroid use, quinolone antibiotics, gout and previous local injection. Ruptures are bilateral in 5-10 percent of patients, so the contralateral side must always be examined. In pooled case data the commonest mechanism is a simple fall. Pathoanatomy. The quadriceps tendon is a three-layer conjoined tendon: the superficial rectus femoris (two heads — straight from AIIS and reflected from the superior acetabulum; the only head crossing hip and knee), the intermediate vastus medialis and lateralis (VMO fibres run 55 degrees oblique and are critical for patellar tracking; VL 30 degrees), and the deep vastus intermedius lying on the femur. The layers converge 2-3cm above the patella. Most ruptures occur 1-2cm proximal to the insertion, in the hypovascular watershed zone between the medial and lateral arterial arcades (Yepes); in older patients a higher proportion occur at the osseotendinous junction or insertion, sometimes as a bony avulsion. The tear propagates through the retinaculum, which is why retinacular repair adds 30-40 percent to construct strength. Fixation choice. Suture anchors and trans-osseous tunnels are both valid; the choice rests on bone quality, knot prominence and surgeon familiarity rather than peak strength.
The modern default. Three to four anchors 5mm from the articular surface, each with two heavy sutures. Faster than tunnels and they avoid drilling the patella, so fewer stress-riser fractures; cyclic biomechanics are comparable to tunnels (Lighthart). Knotless anchors remove anterior knot prominence and reproduce a double-row footprint.
Traditional, low-cost, suture-only fixation. Useful in osteoporotic bone where an anchor may pull out. Three tunnel pairs spaced more than 7mm apart; the tunnels themselves are stress risers, the main drawback. Hart found tunnels had a higher ultimate load than double-row anchors, though both were clinically adequate.
For chronic tears, revisions, poor tissue or high-risk patients (diabetes, CKD, steroids). Suture tape (InternalBrace, FiberTape) over the repair raises the failure load by 40-60 percent; autograft (semitendinosus) or allograft (Achilles, fascia lata) are alternatives.
References
Further reading 1. Saragaglia D, Pison A, Rubens-Duval B. Acute and old ruptures of the extensor apparatus of the knee in adults (excluding knee replacement). Orthop Traumatol Surg Res. 2013;99(1 Suppl):S67-76. 2. Konrath GA, Chen D, Lock T, et al. Outcomes following repair of quadriceps tendon ruptures. J Orthop Trauma. 1998;12(4):273-279. 3. Ramseier LE, Werner CM, Heinzelmann M. Quadriceps and patellar tendon rupture. Injury. 2006;37(6):516-519. 4. Ilan DI, Tejwani N, Keschner M, Leibman M. Quadriceps tendon rupture. J Am Acad Orthop Surg. 2003;11(3):192-200. 5. Swamy GN, Nanjayan SK, Yallappa S, Bishnoi A, Pickering SA. Is ultrasound diagnosis reliable in acute extensor tendon injuries of the knee? Acta Orthop Belg. 2012;78(6):764-770.
Relationship between hypovascular zones and patterns of ruptures of the quadriceps tendon
- Lead-oxide arterial perfusion of 33 cadaveric quadriceps tendons identified a consistent hypovascular zone 1-2cm proximal to the superior pole of the patella
- Vascular supply is organised into three arcades — medial, lateral and peripatellar
- The hypovascular zone corresponds to the documented site of spontaneous quadriceps tendon ruptures
Clinical outcomes after repair of quadriceps tendon rupture: a systematic review
- 12 studies, 319 patients, mean age 57 years; most common mechanism a simple fall (61.5 percent)
- Tears clustered 1-2cm above the superior pole of the patella, and at the osseotendinous junction in older patients
- Pooled re-rupture rate was only 2 percent; heterotopic ossification 6.9 percent, deep infection 1.1 percent; the type of repair did not influence clinical results, and the worst outcomes followed delayed repair
Acute quadriceps tendon ruptures: a series of 50 knees with an average follow-up of more than 6 years
- 50 knees reviewed at a mean 76 months; mean Lysholm 93.7 and 98 percent good or very good subjective results
- Mean active flexion 133 degrees; 97 percent of working patients returned to their pre-injury occupation
- Treatment was surgical repair plus immobilisation for at least 6 weeks followed by intensive rehabilitation
Suture anchor versus suture through tunnel fixation for quadriceps tendon rupture: a biomechanical study
- Cadaveric comparison cycled to 150N; no significant difference in displacement between suture anchors and transosseous tunnels
- Displacement after 1000 cycles was 4.65mm (anchors) versus 4.50mm (tunnels)
- Suture anchors required less dissection over the patella and avoided suture passage around the patellar tendon
Quadriceps tendon rupture: a biomechanical comparison of transosseous equivalent double-row suture anchor versus transosseous tunnel repair
- 10 matched cadaveric knees compared a transosseous-equivalent double-row anchor repair with a three-tunnel transosseous repair
- Stiffness and gap formation were similar, but ultimate tensile load was higher for tunnels (591N) than for double-row anchors (447N)
- Both constructs were judged sufficiently strong; anchor failures occurred at the suture eyelets