Posterior (Moore/Southern, Kocher-Langenbeck modified) approach — the worldwide workhorse for primary THR, working the internervous plane between the superior gluteal nerve (abductors) and the inferior gluteal nerve (gluteus maximus).
- Posterior is the most common approach worldwide (60 to 70 percent of primary THR) — the workhorse, with excellent acetabular visualization and an extensile exposure.
- It uses the internervous plane between the superior gluteal nerve (gluteus medius and minimus) and the inferior gluteal nerve (gluteus maximus); splitting gluteus maximus in line with its fibers preserves its nerve supply.
- Enhanced posterior repair of the capsule plus the short external rotators reduces dislocation from around 5 percent to 1 to 2 percent, making the posterior approach equivalent to the anterior when properly performed.
- The critical danger structure is the sciatic nerve (15 to 30 mm posterior to the joint); protection relies on hip flexion during release, gentle tissue handling, and preservation of quadratus femoris.
- Target acetabular orientation is 40 degrees inclination and 20 degrees anteversion (the Lewinnek safe zone); the transverse acetabular ligament guides version and a bleeding-dot sign confirms adequate reaming.
- Firm, clean head impaction on a dry taper prevents trunnionosis (taper corrosion, metallosis) — a major modern reason for revision.
When & Why
Indication. Total hip replacement is offered for a painful, destroyed hip that has failed conservative care. The commonest underlying pathology is primary osteoarthritis (about 85 percent of all THR); other absolute indications are avascular necrosis (Ficat stage III to IV with head collapse), a displaced femoral neck fracture (Garden III/IV in the older patient), inflammatory arthritis (rheumatoid, ankylosing spondylitis), and post-traumatic arthritis. Relative indications include severe developmental dysplasia (Crowe III to IV) with secondary arthritis, protrusio acetabuli, the sequelae of slipped capital femoral epiphysis or Perthes disease, and a failed previous operation (osteotomy, hemiarthroplasty, resurfacing). Why the posterior approach. It is the most widely taught exposure and the right default for the majority of primary THR. Its strengths:
The most widely taught approach (60 to 70 percent of primary THR worldwide). The anatomy is familiar, and the exposure extends proximally for revision and complex acetabular work.
Superior visualization of the acetabulum makes accurate cup positioning easier than from a lateral or anterior route, and the femoral fracture risk is lower than the direct anterior learning curve.
Effective in obese, muscular and thin patients alike — unlike the direct anterior approach, which is difficult in the obese patient (BMI over 35).
Contraindications. Absolute: active infection (septic arthritis, soft-tissue infection, bacteraemia — stage for two-stage revision), inadequate bone stock or a patient who cannot participate (severe dementia, non-ambulatory), and medical unfitness (ASA 4 to 5, recent MI or stroke). Relative: a remote infection, a neuropathic (Charcot) joint, abductor deficiency (consider a constrained liner), a previous posterior approach with recurrent posterior dislocation (consider anterior or dual mobility), and morbid obesity (BMI over 40 — higher wound, infection and dislocation risk). Approach-specific cautions. If the patient has recurrent posterior dislocation or cannot comply with precautions (cognitive or psychiatric impairment), weigh an anterior approach or a dual-mobility construct. A previous sciatic nerve injury is a relative contraindication because re-injury risk rises. Consent. Counsel specifically on dislocation and the precautions that prevent it, leg-length discrepancy (the commonest patient complaint and the commonest medicolegal issue), sciatic or superior gluteal nerve injury, infection, periprosthetic fracture, DVT/PE, and the long-term possibility of revision. Setup. Lateral decubitus, affected side up, with the pelvis held perpendicular to the table (the single most important positioning principle — any pelvic rotation systematically mal-positions the cup). General or spinal anaesthesia (spinal reduces blood loss); tranexamic acid 1 to 2 g IV at induction; cefazolin 2 g IV pre-incision (vancomycin if MRSA risk). The detail of positioning and landmarks is laid out as Step 1 of the operation below.
The Operation
The goal is to expose the hip through the posterior approach, dislocate and remove the arthritic head, prepare and implant the acetabular and femoral components in the correct orientation, restore leg length and offset, and close with an enhanced posterior soft-tissue repair that restores stability. The exposure is laid out in full as the first steps of the sequence below (and in depth on the posterior (Moore/Southern) approach to the hip page).
Operative sequence
- Lateral decubitus, affected side up. Secure the pelvis perpendicular to the table — confirm with a C-arm AP pelvis view or an alignment guide (any tilt causes systematic cup malposition).
- Anterior support at the ASIS/pubis, posterior support at the sacrum. Pad every bony prominence: axilla (brachial plexus), fibular head (peroneal nerve — the commonest pressure palsy), and the malleolus.
- Flex the table 10 to 15 degrees at the hip to open the exposure. Prep from iliac crest to knee with chlorhexidine-alcohol.
- Landmarks: iliac crest, ASIS, PSIS, greater trochanter (the primary landmark — the most prominent bony point and the center of the incision), and the femoral shaft axis.
- Center the incision over the greater trochanter. Start about 10 cm proximal along a line toward the PSIS, curve over the trochanter, and extend 10 to 15 cm distally along the femoral shaft axis (20 to 25 cm total — shorter in thin patients, longer in the obese).
- Deepen through subcutaneous fat and incise the fascia lata/IT band longitudinally, in line with its fibers (not perpendicular — this minimizes bleeding and eases closure), exposing the gluteus maximus belly.
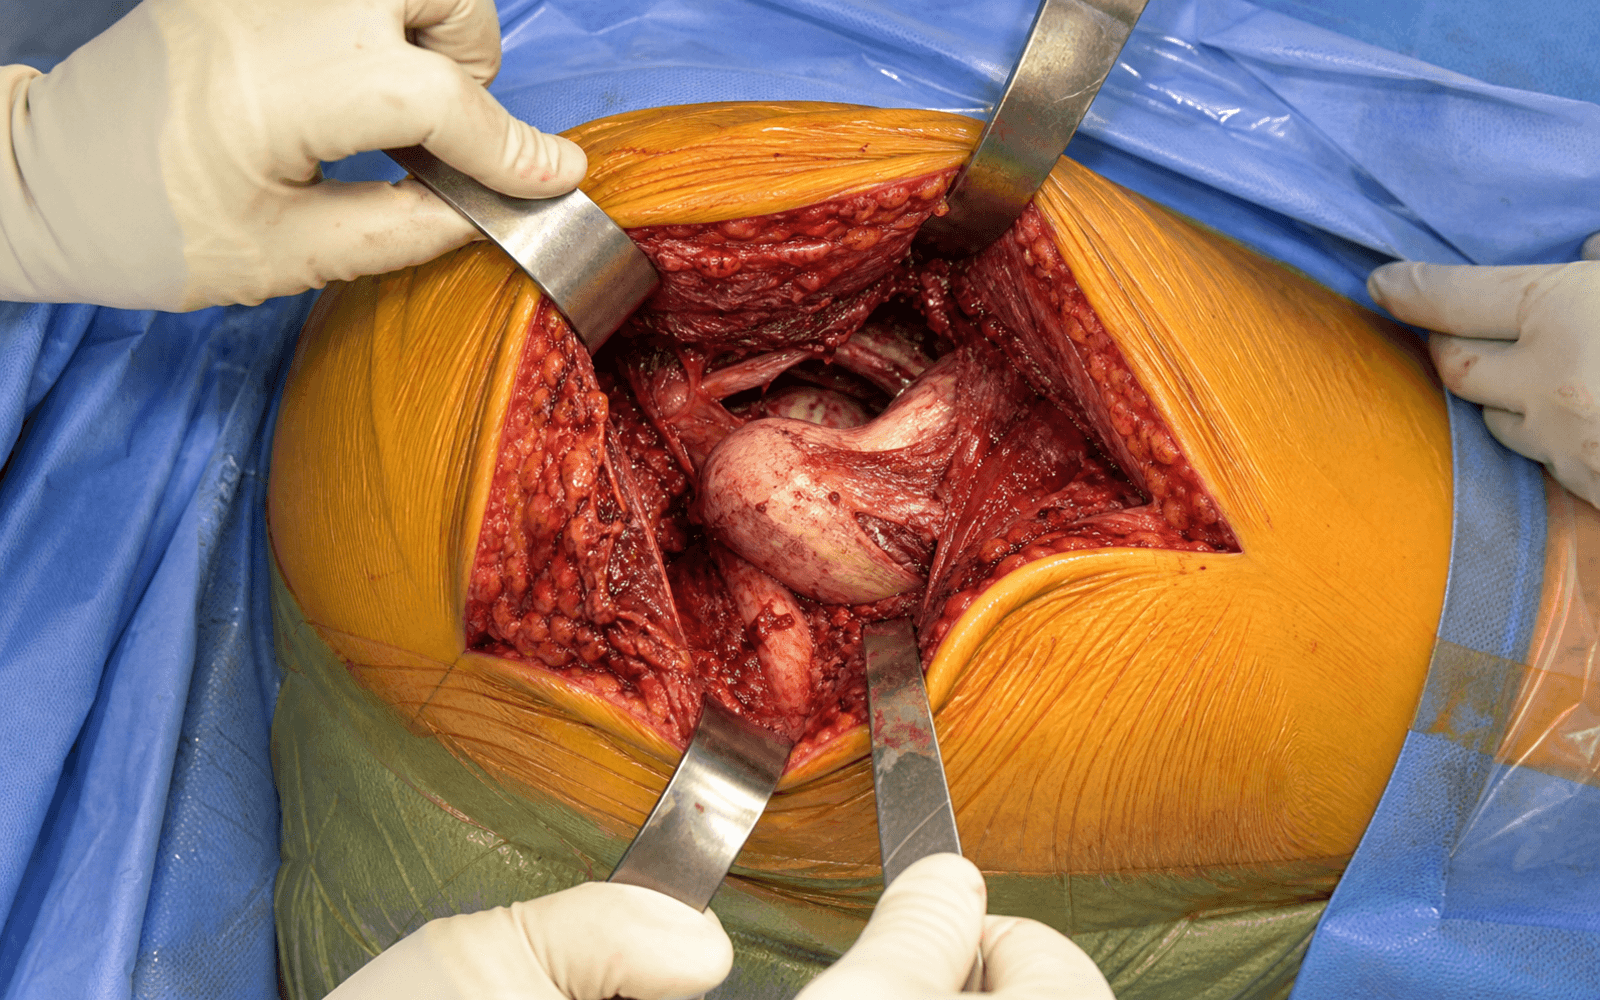
- Split gluteus maximus bluntly, in line with its oblique fibers (superomedial to inferolateral), typically 8 to 10 cm in the mid-substance, using finger dissection or scissors-spread. Insert a self-retaining (Charnley) retractor.
- This is intermuscular, not internervous — gluteus maximus has a single nerve supply (inferior gluteal). Minimal bleeding if done correctly. The deeper layer is fat and bursa overlying the short external rotators; clear it to expose the rotator tendons.
- Working superior to inferior, identify: piriformis (the superior landmark — the sciatic nerve exits below it in 85 percent or through/around it in 15 percent, and the superior gluteal neurovascular bundle exits above it); the conjoined tendon of superior gemellus, obturator internus and inferior gemellus (inserting on the medial greater trochanter); and quadratus femoris (the inferior landmark).
- The sciatic nerve lies superficial (posterior) to quadratus femoris, and the ascending branch of the medial femoral circumflex artery runs along its superior border. Preserve quadratus when possible — it protects the nerve.
- Flex the hip 60 to 90 degrees and internally rotate 20 to 30 degrees: this puts the rotators under tension (easier to identify and release) and relaxes the sciatic nerve.
- Release the rotators 1 cm from the greater trochanteric insertion so a cuff of tendon remains on bone for later repair. Tag piriformis and the conjoined tendon separately with heavy Ethibond number 2 for easy identification at repair.
- Preserve quadratus femoris if possible (releasing it increases nerve risk). Release the posterior capsule with or just after the rotators.
- Incise the posterior capsule along the femoral neck in a T-shape (superior and inferior limbs along the neck, plus a posterior vertical limb), or an inverted T. Tag the capsular leaves — the capsule will be repaired.
- Enter the joint, confirm the diagnosis (OA, AVN, fracture), and assess bone quality.
- Standard neck cut: 1 cm above the lesser trochanter (higher reduces offset; lower risks seating difficulty). Cut perpendicular to the anatomic neck axis (about 45 degrees to the shaft), from anterosuperior to posteroinferior, protecting posterior soft tissues.
- Remove the head with a corkscrew or head clamp using gentle traction — avoid force (posterior wall or shaft fracture risk).
- Always send the head for culture even without suspicion of infection (1 to 2 percent unexpected positive). Head size approximates the cup outer diameter minus 8 to 10 mm, and guides cup sizing.
- Deliver the femur anteriorly with FADER position — Flexion 90 to 110 degrees, ADduction 30 to 40 degrees across the body, External rotation 20 to 30 degrees — bringing the acetabulum into optimal view.
- Place three Hohmann retractors: anterior over the ilium (stay on bone — the femoral vessels are medial), superior over the rim, and inferior over the transverse ligament (watch the sciatic nerve).
- Remove the labrum circumferentially and the pulvinar from the fossa. Identify the transverse acetabular ligament (TAL) at the inferior rim — it marks the true floor and guides version (parallel to the TAL is about 20 degrees anteversion).
- Start 2 to 4 mm smaller than the templated size and ream progressively in 2 mm increments. Ream to the bleeding-dot sign — speckled, healthy bleeding subchondral bone confirming adequate depth.
- Hold the reamer at 40 degrees inclination and 20 degrees anteversion (the Lewinnek safe zone, 30 to 50 degrees inclination / 10 to 30 degrees anteversion), using the TAL as the version reference.
- Ream to good rim fit (70 to 80 percent contact); the final reamer is typically 1 to 2 mm smaller than the cup (line-to-line or slight underreaming). Avoid medial reaming — it weakens the wall and risks protrusio.
- Select a cup 1 to 2 mm larger than the final reamer for press-fit. Impact it to 40 degrees inclination and 20 degrees anteversion using the inserter alignment guide, with progressive firm taps (a rising pitch signals seating). Seat it flush with the rim and confirm no toggling.
- Add supplemental screws for poor bone quality, a large cup (over 60 mm), inadequate press-fit, dysplasia or revision. Safe zone is posterosuperior (10 to 2 o'clock on a right hip). Avoid the anteroinferior zone (external iliac vessels) and the posteroinferior zone (sciatic nerve).
- Dislocate the femur anteriorly (flexion and external rotation); use a curved Hohmann around the posterior neck to protect soft tissues. Open the canal with a box chisel, removing anteromedial calcar bone.
- Broach sequentially from 2 to 3 sizes below templated, in slight valgus (avoid varus — fracture risk), until cortical chatter (uniform endosteal contact). Broach depth sets the final stem depth; target stem anteversion of 10 to 15 degrees (combined with cup 20 degrees gives total 30 to 35 degrees, preventing impingement).
- Assemble trial stem, head (variable neck lengths from minus 4 to plus 12 mm) and liner (impact the liner until the Morse-taper snap). Reduce and assess four parameters.
- Stability (most critical): test the posterior dislocation position — flex 90 degrees plus adduction plus internal rotation — and the anterior position (extension, adduction, external rotation); the hip must stay stable.
- Leg length: equal to the other side or 5 mm longer (avoid lengthening over 10 mm — nerve stretch). Offset: adequate abductor tension, no clunking. ROM: flexion 110 to 120 degrees, extension 10 to 20 degrees, abduction 45 degrees, rotation about 45 degrees each way.
- Adjust with head size and neck length; rarely revise cup position.
- Clean and dry the femoral canal thoroughly (suction, brush, dry gauze) — critical for uncemented fixation. Impact the final liner until the loud snap (3 to 5 firm taps).
- Insert the final stem at 10 to 15 degrees anteversion, typically seating 1 to 2 mm proud of the broach (a rising pitch signals seating).
- Head impaction is critical. Clean and dry both tapers (the stem trunnion and the head bore), then impact firmly with a proper impactor (5 to 8 firm hits). Inadequate impaction drives trunnionosis — taper corrosion, ALVAL and metallosis, a major reason for revision.
- Reduce the hip with gentle traction (an audible/tactile clunk). Re-test stability through the full range — flexion/adduction/internal rotation posteriorly, extension/adduction/external rotation anteriorly — and confirm smooth, impingement-free motion.
- Verify leg length from a fixed pelvic point (ASIS or iliac crest) to the medial malleolus, accepting within 10 mm of the other side (target equal or 5 mm longer). Document the findings.
- Repair the capsule first (most important for stability): side-to-side with interrupted absorbable Vicryl number 2 (4 to 6 sutures), the superior leaf most critical.
- Then repair the short external rotators to the greater trochanter — piriformis and the conjoined tendon — through bone tunnels or suture anchors, using heavy Ethibond number 2, restoring the original length-tension. Repair quadratus if it was released.
- Close gluteus maximus and fascia lata with Vicryl number 1, subcutaneous with Vicryl 2-0, and skin with staples or subcuticular monocryl 3-0. Drains are controversial and most surgeons avoid them (they increase infection risk).
The sciatic nerve runs 15 to 30 mm posterior to the capsule and is the structure that defines a safe posterior approach. Protect it by keeping the hip flexed during external rotator release (flexion relaxes the nerve, extension stretches it), preserving quadratus femoris (the nerve lies on its posterior surface), using gentle tissue handling with no aggressive posterior or inferior retraction, and limiting any leg lengthening to less than 4 cm (lengthening over 4 cm roughly quadruples palsy risk). Injury runs at 0.5 to 2 percent transient and under 0.5 percent permanent.
In lateral decubitus the pelvis must be perpendicular to the table. Any pelvic rotation causes systematic cup anteversion or retroversion error and leg-length discrepancy — a leading cause of dislocation. Confirm perpendicularity with a C-arm AP pelvis view or an alignment device before you drape, and re-check if the patient shifts.
Repair the capsule first (side-to-side, Vicryl number 2), then reattach piriformis and the conjoined tendon to the greater trochanter through bone tunnels or anchors. The Kwon 2006 meta-analysis put the relative risk of dislocation without repair at 8.21 — enhanced repair is the modern standard of care and makes the posterior approach equivalent to the anterior for stability.
Aftercare & Complications
Recovery timeline | Time | Mobility and weight-bearing | Focus | |------|----------------------------|-------| | Day 0 to 2 | Mobilise same day; WBAT if uncemented/stable, TDWB if osteoporotic or cemented | Multimodal analgesia, neurovascular checks, start VTE prophylaxis | | 2 weeks | Walker or crutches, progress mobility | Wound check; remove staples if non-absorbable | | 6 weeks | Progress to full weight bearing | AP pelvis and lateral hip X-ray; discontinue precautions if repair sound | | 3 months | Return to driving (right hip 6 to 8 weeks, left 4 to 6), low-impact sport | Strengthening and ROM | | 6 months | Impact and contact sport case-by-case (generally discourage contact sport) | Most patients at functional baseline | | Lifelong | Annual review | X-ray for loosening, wear, osteolysis | Hip precautions (traditional, 6 to 12 weeks). Avoid flexion over 90 degrees (use a raised toilet seat, avoid low chairs), adduction past the midline (use an abduction pillow between the legs), and internal rotation (do not cross the legs or twist) — these protect the repair while it heals. Evolving practice: a randomised trial (Tetreault and Della Valle, 2020) showed that with sound component positioning and an enhanced posterior repair, relaxing or omitting precautions did not increase early dislocation and sped return to function, and many centres worldwide now use minimal or no formal restrictions. VTE prophylaxis. Most major societies (AAOS, NICE, ACCP/CHEST) recommend extended prophylaxis, commonly to about 35 days. Options include aspirin (endorsed by AAOS/NICE for standard-risk patients), LMWH (enoxaparin 40 mg SC daily), a DOAC (rivaroxaban 10 mg daily, apixaban 2.5 mg twice daily), or warfarin (INR 2 to 3). Add mechanical prophylaxis (compression stockings, intermittent pneumatic compression), early mobilisation, and regional (spinal) anaesthesia. Infection prophylaxis. Cefazolin 2 g IV pre-incision (3 g if over 120 kg), vancomycin 15 mg/kg if MRSA risk, continued for 24 hours postoperatively. Complications
- Recognition
- Sudden pain and a pop; leg shortened and internally rotated (posterior) or flexed/externally rotated (anterior); X-ray confirms. Most occur within 3 months, half within 6 weeks
- Prevention
- Enhanced posterior repair, cup anteversion 20 degrees, combined anteversion 30 to 35 degrees, larger head (36 mm better than 28 mm), correct offset, avoid impingement, dual mobility in high-risk patients
- Management
- First dislocation: closed reduction under sedation, postreduction CT, extend precautions to 12 weeks, abduction orthosis. Recurrent (over 2): revision — assess cup position, consider dual-mobility or constrained liner
- Recognition
- Intra-operative: sudden loss of resistance, audible crack. Postoperative: pain, unable to bear weight. Vancouver classification: AG/AL (trochanters), B1 (stem stable), B2 (stem loose), B3 (poor bone stock), C (below stem)
- Prevention
- Avoid varus broaching, gentle technique, appropriate stem size, treat osteoporosis, consider cemented stems in high-risk patients
- Management
- AG/AL: cerclage wire, protected weight bearing. B1: ORIF with plate/cables around the stable stem. B2: revision to a longer stem bypassing the fracture by 2 cortical diameters plus ORIF. B3: impaction grafting or allograft-prosthesis composite. C: ORIF with plate
- Recognition
- Immediate postoperative inability to dorsiflex (foot drop, common peroneal division), numbness lateral leg/foot; EMG at 3 weeks confirms severity; MRI if haematoma suspected
- Prevention
- Keep the hip flexed during release, preserve quadratus femoris, gentle handling, limit lengthening to under 4 cm, avoid posterior retractor pressure
- Management
- Complete palsy or haematoma: consider urgent exploration/decompression within 24 hours. Otherwise: AFO, physiotherapy, monitor with EMG; tibialis posterior-to-anterior transfer if no recovery by 12 months
- Recognition
- Patient reports a feeling of unequal length; measure ASIS to medial malleolus and assess pelvic tilt; confirm radiographically (teardrop to lesser trochanter)
- Prevention
- Careful templating, intra-operative measurement from a fixed pelvic point, trial reduction, target equal or 5 mm longer, avoid lengthening over 10 mm
- Management
- Under 10 mm: reassurance, most adapt. 10 to 20 mm: shoe lift and gait physiotherapy. Over 20 mm and intolerant: consider revision. Prevention beats treatment
- Recognition
- Early: pain, swelling, falling ROM, raised ALP. Late: progressive stiffness, mature bone on X-ray by 12 weeks. Brooker I (islands) to IV (ankylosis)
- Prevention
- High-risk patients (previous HO, ankylosing spondylitis, DISH, head injury, hypertrophic OA): indomethacin for several weeks, or single-dose radiation (7 to 8 Gy, pre-op or within 72 hours)
- Management
- Mild (Brooker I to II): no treatment, ROM exercises. Severe (III to IV): wait 12 to 18 months for maturation, then excise with prophylaxis (without it, recurrence is 50 to 90 percent)
- Recognition
- Early (under 3 months): wound drainage, erythema, raised CRP/ESR. Delayed (3 to 24 months): pain, loosening. Late (over 24 months): sinus tract. Aspiration: WBC over 3000, PMN over 80 percent, positive culture
- Prevention
- Laminar flow, antibiotic prophylaxis (cefazolin 2 g pre-incision, 24 hours), chlorhexidine-alcohol prep, double gloving, minimize traffic and operative time, gentle tissue handling
- Management
- Acute (under 3 weeks, stable implants): DAIR plus 6 to 12 weeks IV antibiotics. Chronic or loose: two-stage revision (the standard), success 85 to 95 percent. One-stage revision in selected cases. Suppression for the non-surgical candidate
- Recognition
- DVT: calf pain/swelling, Wells score, D-dimer, duplex ultrasound. PE: dyspnoea, chest pain, tachycardia, hypoxia; CTPA confirms
- Prevention
- Early mobilisation, compression stockings, pneumatic compression; chemical prophylaxis (aspirin, LMWH or DOAC) extended to about 35 days; regional anaesthesia
- Management
- Therapeutic anticoagulation (DOAC or LMWH-to-warfarin) for 3 to 6 months. Massive unstable PE: ICU, thrombolysis, embolectomy; IVC filter if recurrent despite anticoagulation
- Recognition
- Pelvis drops on the contralateral side in stance, positive Trendelenburg test, abductor weakness; EMG confirms
- Prevention
- Avoid proximal dissection more than 5 cm above the greater trochanter; limit superior retractor placement; the nerve exits above piriformis
- Management
- Mostly conservative: abductor strengthening, gait training, cane in the opposite hand; most partially recover 6 to 12 months. Severe/persistent: abductor reconstruction or constrained liner
- Recognition
- Intra-operative: sudden bleeding, expanding haematoma, instability. Postoperative: dropping haemoglobin, distal ischaemia. Delayed: pseudoaneurysm, AV fistula
- Prevention
- Stay on bone with the anterior retractor (iliopsoas protects the femoral vessels), avoid medial wall perforation, place screws in the posterosuperior safe zone, control MFCA branches
- Management
- Have a vascular surgeon available. External iliac: immediate direct repair or interposition graft, fasciotomy if ischaemia over 4 hours. Pseudoaneurysm/AV fistula: endovascular or open repair. Mortality is high if recognition is delayed
- Recognition
- Pain, swelling, metallosis, raised chromium/cobalt, ALVAL on MARS MRI (fluid, pseudotumour); may present years later
- Prevention
- Adequate head impaction (5 to 8 firm hits), clean and dry both tapers, avoid mismatched metals, consider ceramic heads, avoid excessive head offset
- Management
- Asymptomatic with low ions: observe. Symptomatic or ions over 7 ppb: MARS MRI; revision with head/stem exchange, debridement of metallosis, ceramic-on-polyethylene bearing. ALVAL may not reverse
Viva & Exam Focus
P-GOGO-QShort external rotators — superior to inferior
FADERFADER position for acetabular exposure
15 to 30 mm posterior to the capsule; exits below piriformis (85 percent) or through it (15 percent). Protect with hip flexion during release, preservation of quadratus femoris, gentle handling, and lengthening under 4 cm. Injury 0.5 to 2 percent transient, under 0.5 percent permanent.
Exits above piriformis and runs 30 to 50 mm proximal to the greater trochanter, between gluteus medius and minimus. Avoid proximal dissection more than 5 cm above the trochanter and limit superior retractor placement. Injury under 0.5 percent (Trendelenburg gait).
30 to 50 mm medial to the anterior joint, on iliopsoas (nerve lateral, artery central, vein medial). Stay on bone with the anterior acetabular retractor and avoid medial wall perforation. Injury rare (under 0.1 percent) but catastrophic.
Branch of profunda femoris; runs posteriorly between the rotators and supplies the femoral head. A common minor bleeding source during rotator release — control with electrocautery, ligate if needed.
Variable, 20 to 50 mm medial to the ASIS. Relevant to the direct anterior approach rather than the posterior; injury (1 to 2 percent) gives meralgia paraesthetica.
Not a nerve — the positioning principle. Any pelvic rotation in lateral decubitus systematically mal-positions the cup. Confirm with a C-arm AP view or alignment device before draping.
Clinical Decision Scenarios
Practise clinical reasoning and management decisions out loud
“How does the posterior approach compare to the direct anterior approach for primary total hip replacement?”
“What is the enhanced posterior repair technique, and what evidence supports its use in reducing dislocation after posterior-approach THR?”
“How do you protect the sciatic nerve during the posterior approach to the hip, and what would you do if you recognised a sciatic nerve injury postoperatively?”
Approach anatomy
- Internervous plane: superior gluteal nerve (gluteus medius/minimus) versus inferior gluteal nerve (gluteus maximus)
- Short external rotators superior to inferior: piriformis (superior landmark), superior gemellus, obturator internus, inferior gemellus, quadratus femoris (inferior, preserve)
- Sciatic nerve exits below piriformis (85 percent) or through it (15 percent), 15 to 30 mm posterior to the capsule
- Greater trochanter is the primary landmark in lateral decubitus — center of the incision
Positioning
- Lateral decubitus, pelvis perpendicular to the table (critical for cup orientation) — confirm with C-arm
- Anterior support at ASIS/pubis, posterior at sacrum; pad axilla (brachial plexus) and fibular head (peroneal nerve)
- Any pelvic rotation causes systematic cup malposition — a leading cause of dislocation
Danger zones
- Sciatic nerve (15 to 30 mm posterior): hip flexion during release, preserve quadratus, lengthening under 4 cm
- Superior gluteal neurovascular bundle (30 to 50 mm above the trochanter): avoid proximal dissection over 5 cm
- Femoral neurovascular bundle (30 to 50 mm medial): stay on bone with the anterior retractor
- Medial femoral circumflex artery: runs between the rotators, control with cautery
Enhanced posterior repair
- Capsular repair first (most important): side-to-side Vicryl number 2, 4 to 6 sutures, superior leaf critical
- External rotator repair: piriformis plus conjoined tendon to the greater trochanter (bone tunnels or anchors, Ethibond number 2)
- Cuts dislocation roughly eight-fold (Kwon 2006, RR 8.21; from about 4 to 6 percent down to about 0.5 to 1 percent)
- Standard of care — not repairing is below standard
Acetabular component
- FADER position (Flexion, ADduction, External Rotation) brings the acetabulum into view
- Transverse acetabular ligament guides version — parallel to the TAL is about 20 degrees anteversion
- Ream to the bleeding-dot sign; target 40 degrees inclination and 20 degrees anteversion (Lewinnek)
- Cup 1 to 2 mm larger than the final reamer; screws in the posterosuperior safe zone (10 to 2 o'clock, right hip)
Femoral component
- Neck cut 1 cm above the lesser trochanter — higher reduces offset, lower risks seating difficulty
- Broach until cortical chatter; avoid varus broaching (fracture risk 1 to 3 percent)
- Final stem 1 to 2 mm proud of the broach; target stem anteversion 10 to 15 degrees (combined 30 to 35 degrees)
- Head impaction is critical — clean both tapers, 5 to 8 firm hits, prevents trunnionosis
Trial reduction
- Four parameters: stability (most critical), leg length (commonest complaint), offset, ROM
- Stability test: flex 90 degrees plus adduct plus internally rotate (posterior dislocation position) — must be stable
- Target leg length equal to the other side or 5 mm longer; avoid lengthening over 10 mm
- Adjust with head size and neck length
High-yield pearls
- Posterior is the commonest approach worldwide (60 to 70 percent) — excellent cup view, extensile, works in all body types
- Enhanced repair makes posterior equivalent to anterior for dislocation (both 1 to 2 percent)
- Surgeon experience matters more than approach choice — long-term outcomes are equivalent
- Complications: dislocation 2 to 5 percent (1 to 2 percent with repair), fracture 1 to 3 percent, sciatic nerve 0.5 to 2 percent
Background & Evidence
Epidemiology. Primary osteoarthritis is the underlying diagnosis in about 85 percent of all total hip replacements; the remainder are avascular necrosis, inflammatory arthritis, developmental dysplasia, post-traumatic arthritis and femoral neck fracture. The posterior (Kocher-Langenbeck modified, Moore/Southern) approach is the most commonly used worldwide, accounting for roughly 60 to 70 percent of primary THR, favoured for its familiarity, extensile exposure and excellent acetabular visualization. Survivorship (registry and pooled data). Across major registries (NJR England and Wales, AOANJRR Australia, SHAR Sweden, NZJR New Zealand, AJRR USA), 10-year all-cause revision for primary OA runs at roughly 4 to 7 percent. The Evans 2019 Lancet systematic review and meta-analysis pooled 25-year construct survival at about 58 percent from national registries and about 78 percent from published case series — a useful figure for counselling younger patients on lifetime revision risk. Survivorship is best in older patients with well-positioned components and modern highly cross-linked polyethylene bearings; cementless fixation predominates worldwide, while several registries (for example SHAR) show excellent cemented stem survival in older patients. Early revision is higher in patients under 55 and in metal-on-metal or large-head bearings, now largely abandoned. Functional outcomes. More than 90 percent of patients achieve excellent pain relief, most regain independent mobility and return to activities of daily living, and 80 to 85 percent report being very satisfied (a further 10 to 15 percent satisfied with reservations). The common reasons for dissatisfaction are leg-length discrepancy (the commonest), residual pain (often an extra-articular source), reduced ROM, a feeling of instability, and squeaking (ceramic-on-ceramic). Dislocation by approach. The Kwon 2006 meta-analysis makes the case that, with soft-tissue repair, dislocation risk is comparable across the common approaches:
- Dislocation rate
- 4.46 percent
- Dislocation rate
- 1.01 percent
- Dislocation rate
- 0.70 percent
- Dislocation rate
- 0.43 percent
References
Posterior approach to total hip replacement using enhanced posterior soft tissue repair
- Two senior surgeons independently adopted an identical enhanced posterior capsulotendinous repair
- Surgeon 1: dislocation fell from 4 percent (395 hips) to 0 percent (395 hips); Surgeon 2: 6.2 percent (160 hips) to 0.8 percent (124 hips)
- Reductions were highly statistically significant
A posterior approach to primary total hip arthroplasty with soft tissue repair
- Consecutive posterolateral THAs without (250 hips) then with (96 hips) posterior soft-tissue repair
- Dislocation fell from 6.4 percent (no repair) to 1.0 percent (with repair), statistically significant
- Identical technique apart from the posterior repair
Does surgical approach affect total hip arthroplasty dislocation rates?
- Meta-analysis: posterior approach dislocation 4.46 percent without repair versus 0.49 percent with repair
- Relative risk of dislocation 8.21 (95 percent CI 4.05 to 16.67) without soft-tissue repair
- With repair, posterior (1.01 percent), anterolateral (0.70 percent) and direct lateral (0.43 percent) approaches had comparable dislocation rates
Dislocations after total hip-replacement arthroplasties
- Defined the acetabular safe zone: 15 plus or minus 10 degrees anteversion and 40 plus or minus 10 degrees inclination
- Dislocation rate 1.5 percent inside the safe zone versus 6.1 percent outside it
- Anterior dislocation associated with increased cup anteversion; greatest dislocation risk in the first 30 days
Effect of femoral head diameter and operative approach on risk of dislocation after primary total hip arthroplasty
- 21,047 primary THAs; larger heads reduced long-term dislocation across all approaches
- 10-year posterolateral dislocation: 12.1 percent (22 mm) versus 6.9 percent (28 mm) versus 3.8 percent (32 mm) heads
- The effect of head size was greatest for the posterolateral approach
How long does a hip replacement last? A systematic review and meta-analysis of case series and national registry reports with more than 15 years of follow-up
- Pooled 25-year construct survival 77.6 percent from case series and 57.9 percent from national registries
- Registry data (Australia, Finland) likely less biased than single-centre series
- About 58 percent of hip replacements can be expected to last 25 years
Are postoperative hip precautions necessary after primary total hip arthroplasty using a posterior approach? Preliminary results of a prospective randomized trial
- 594 hips randomised to restricted versus unrestricted postoperative regimens after posterior-approach THA
- No difference in early dislocation (1.03 percent restricted versus 0.68 percent unrestricted)
- Unrestricted patients returned to driving and daily activities sooner
Epidemiology of dislocation after total hip arthroplasty
- Population-based review of the epidemiology of dislocation after primary THR
- Dislocation risk is multifactorial: surgical approach, component orientation, head size, patient factors and soft-tissue tension
Mortality after total hip replacement surgery: a systematic review
- Systematic review of mortality rates and risk factors following primary THR
- Mortality is low overall but elevated in the early postoperative period in higher-risk patients
Surgical approach, abductor function, and total hip arthroplasty dislocation
- Review of surgical approaches and their impact on abductor function and dislocation
- The posterior approach preserves the abductor mechanism, while transgluteal approaches carry abductor morbidity
Registry and guideline evidence. Convergent data from the national joint registries (NJR England/Wales, AOANJRR Australia, SHAR Sweden, NZJR New Zealand, AJRR USA) underpin the implant survivorship and bearing/fixation comparisons cited above. Side-by-side national-society guidance — AAOS, NICE (NG157) and the AO Foundation — is referenced where recommendations genuinely differ, for example aspirin versus LMWH/DOAC for VTE prophylaxis.