Gardner-Wells tongs traction and halo ring-vest immobilisation for cervical spine injury | intermediate
- Gardner-Wells tong pins sit about 1 cm above the pinna, in line with the external auditory meatus, and crucially BELOW the equator (greatest diameter) of the skull so that traction does not pull the tongs off the head. Start with about 4.5 kg (10 lb) and add roughly 2.3 kg (5 lb) per cervical level, with a NEUROLOGICAL EXAM and a LATERAL RADIOGRAPH after every weight increment.
- The halo ANTERIOR pin safe zone is the anterolateral skull, below the greatest skull circumference, above the lateral two-thirds of the orbit (the supraorbital ridge). This deliberately AVOIDS the temporalis muscle (laterally — thin bone, chewing pain), and AVOIDS medially the supraorbital and supratrochlear nerves and the frontal sinus.
- Traction and halo distraction are CONTRAINDICATED in injuries with potential cranio-cervical (atlanto-occipital) dissociation — applying axial pull can lethally distract an already disconnected occipito-cervical junction. Use extreme caution in ankylosing spondylitis, where the rigid fused column is at high risk of over-distraction and cord injury.
- Anterior halo pins are tightened in opposing diagonal pairs simultaneously to a torque of about 6 to 8 inch-pounds (roughly 0.7 to 0.9 Nm) in adults; the patient closes the eyes during anterior pin tightening so the skin is not tethered in a way that prevents eyelid closure. Re-torque ONCE at about 48 hours, then do not routinely re-torque.
When & Why
Two related external devices are built around the same cranial-pin principle. Gardner-Wells tongs are a temporary skull anchor for serial weighted cervical traction (closed reduction of a dislocation, or provisional realignment). A halo ring and vest is the most rigid external cervical orthosis, immobilising selected injuries definitively. The indications, the contraindications and the special situations that change everything are set out below. Indications — Gardner-Wells tongs (traction) - Closed reduction of cervical facet dislocations (unilateral or bilateral) — serial weighted traction with neuromonitoring
- Temporary cervical traction to realign and provisionally stabilise an unstable subaxial injury before definitive surgery
- Restoration of length and alignment in burst fractures and fracture-dislocations awaiting fixation
- Intra-operative traction to aid reduction and positioning Indications — halo ring and vest (immobilisation) - Definitive non-operative immobilisation of selected upper and subaxial cervical injuries (for example some C1 ring or Jefferson fractures, selected odontoid type II or III fractures, Hangman's type I to II)
- Adjunct or provisional immobilisation before or after operative stabilisation, or to protect a fusion
- The most rigid external cervical orthosis — it controls flexion-extension, rotation and lateral bending better than a collar or SOMI brace
- Paediatric cervical instability, with appropriate pin-number and torque modification Contraindications and cautions The single most dangerous error in cervical traction is applying it to an injury it will make worse. Before any distraction force: - Atlanto-occipital dissociation (AOD) — ABSOLUTE contraindication to traction. Axial pull can lethally distract an already disconnected occipito-cervical junction. Recognise it on the lateral radiograph and CT with the Powers ratio, the basion-dental and basion-axial intervals, and the condyle-C1 interval (CCI). Immobilise (collar, or a careful halo without distraction) and proceed to occipito-cervical fixation.
- Ankylosing spondylitis and DISH — HIGH RISK. The fused, brittle column behaves like a long bone and over-distracts easily; even a low-energy fall produces a highly unstable three-column injury. Reduce and immobilise in the patient's pre-injury (often kyphotic) alignment, use minimal or no traction, image frequently, and obtain an MRI for an epidural haematoma (which is common). Most of these injuries need operative stabilisation.
- Caution with any injury where distraction may worsen alignment (for example a Type IIA Hangman's flexion-distraction injury). For the halo vest specifically, relative contraindications include severe chest wall injury or pulmonary compromise (the vest restricts respiration), the elderly with poor reserve (high complication and mortality), an uncooperative patient, cranial defects or a cranioplasty at pin sites, and severe obesity.
The Operation
The goal is to anchor the skull safely below its equator and then either apply controlled incremental traction (tongs) or connect a rigid ring to a well-fitted vest (halo). The exposure is the pin placement itself — the safe zones and the structures they protect are the heart of the whole technique. The two procedures are laid out as separate step-by-step timelines.
Gardner-Wells tongs — pin placement and traction reduction
- Position the patient supine on a bed capable of traction (a pulley at the head of the bed). Clip and clean the pin sites and infiltrate local anaesthetic down to periosteum at each site.
- The pin sites lie about 1 cm (one finger-breadth) above the pinna, in line with the external auditory meatus, and crucially below the equator (greatest diameter) of the skull. This position lets axial traction seat the pins firmly rather than pull the tongs off.
- Insert the spring-loaded pins symmetrically and tighten the opposing pins until the spring-loaded pin indicator protrudes about 1 mm, confirming correct and symmetric compression. Do not over-tighten.
- The spring indicator gives a consistent, controlled force on both sides without over-penetration; check it again after the first day, but do not keep re-tightening beyond that.
- Begin with about 4.5 kg (10 lb). After confirming a stable baseline neurological exam and a satisfactory lateral radiograph, add weight incrementally — a common rule is roughly 2.3 kg (5 lb) per cervical level of injury, added in steps.
- After EVERY weight increment perform a focused neurological examination AND a lateral cervical radiograph. Continue until reduction is achieved or a limit is reached.
- Facet dislocations are often unlocked with the neck in slight flexion; once the facets disengage, change the vector toward extension to complete reduction.
- When reduction is confirmed radiographically and neurology is preserved, reduce the weight to a maintenance load that holds alignment until definitive treatment.
I mark each pin site about one finger-breadth above the pinna, directly in line with the external auditory meatus, and I make sure both sit below the widest part of the skull. If I place them above the equator the tongs will slide off as soon as I hang weight. The pins go in perpendicular to the skull.
I start at about 10 lb and add weight in steps. After every single increment I re-examine the patient neurologically and shoot a lateral film. The moment I see over-distraction on the film, or any new neurological deficit, I stop and take weight off — over-distraction is the thing that injures the cord.
- Pins placed above the skull equator — the tongs slip off under traction
- Over-distraction — a widened disc space, facet gapping or occipito-cervical widening on the lateral film; remove weight immediately
- A new neurological deficit with any increment — remove weight, re-image, reassess
- Adding weight without re-imaging or re-examining between increments
- Traction in ankylosing spondylitis — the rigid column over-distracts easily; minimise force and reduce in pre-injury alignment
- Specification
- About 1 cm above pinna, in line with EAM
- Rationale
- Reliable purchase below skull equator
- Specification
- BELOW the equator
- Rationale
- Prevents tongs slipping off under traction
- Specification
- Spring indicator protrudes about 1 mm
- Rationale
- Symmetric, controlled, avoids over-penetration
- Specification
- About 4.5 kg (10 lb)
- Rationale
- Safe baseline before incremental loading
- Specification
- Roughly 2.3 kg (5 lb) per level
- Rationale
- Stepwise, controlled distraction force
- Specification
- Neuro exam plus lateral radiograph
- Rationale
- Detect over-distraction or deficit early
- Specification
- New deficit or over-distraction
- Rationale
- Cord at risk — remove weight, re-image
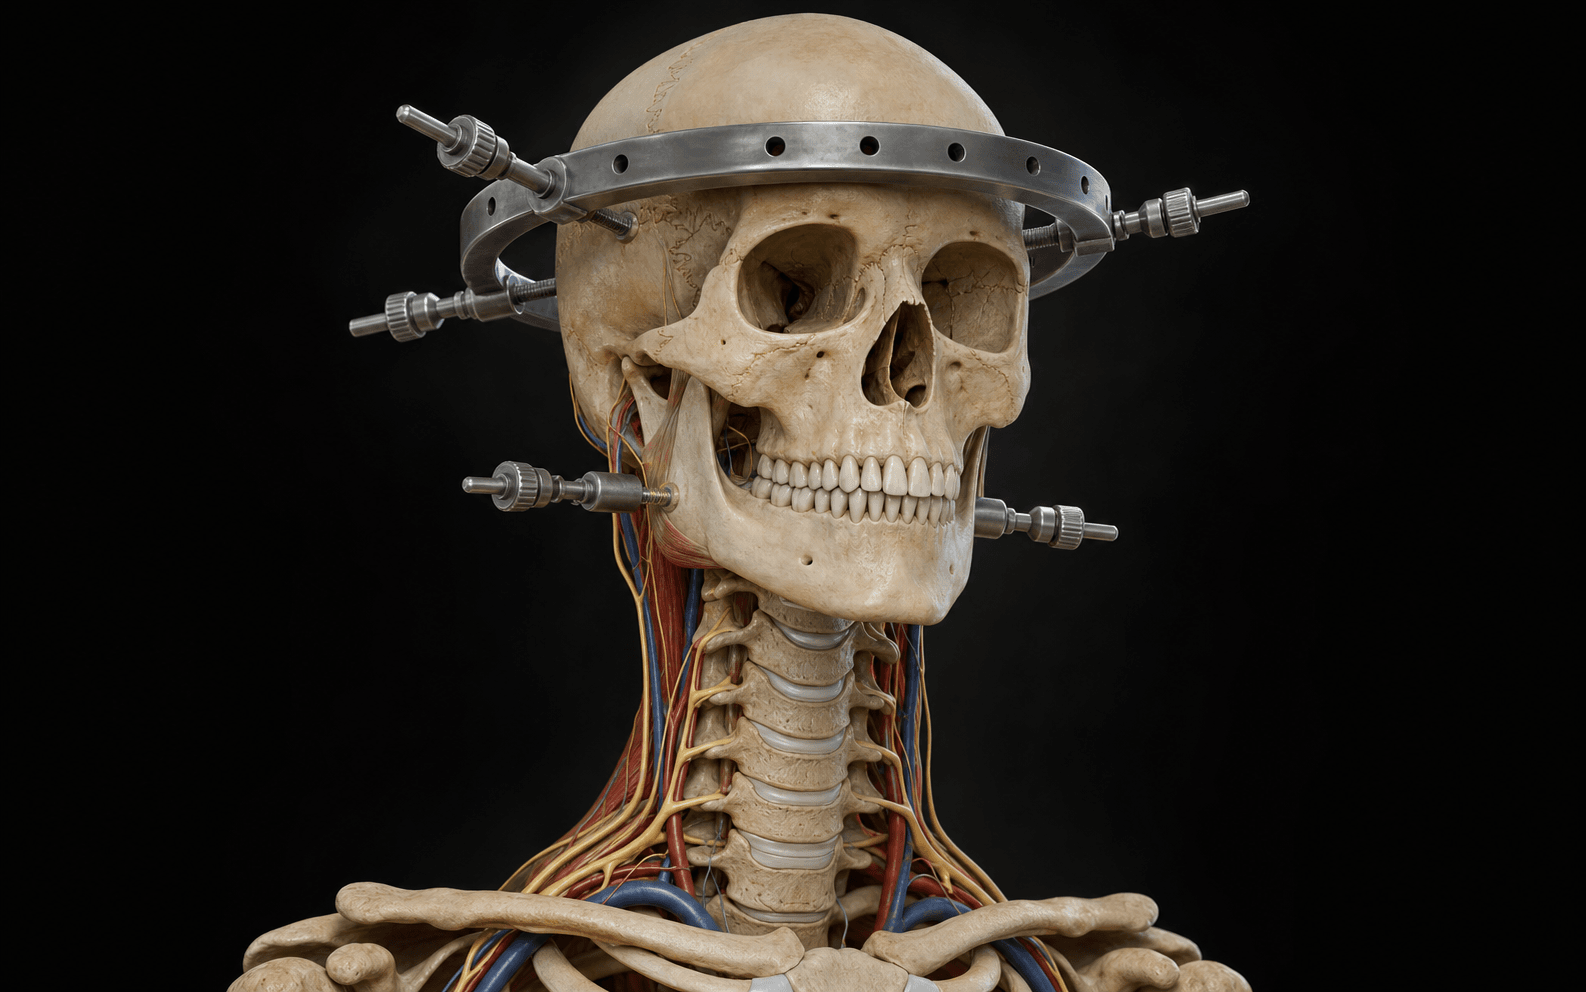
Halo ring and vest — application
- Choose a ring (or open-back crown) that clears the skull by about a finger-breadth all round.
- Position the ring below the skull equator, about 1 cm above the eyebrows and ears, lying just above the ears so it does not contact them. Too high and it slips; too low and it sits on the ears or eyebrows.
- The anterior pins go into the safe zone: the anterolateral skull, below the greatest skull circumference, above the supraorbital ridge over the LATERAL two-thirds of the orbit.
- This deliberately avoids the temporalis muscle laterally (chewing pain, trismus, thin squamous bone), the supraorbital and supratrochlear nerves medially (forehead and scalp numbness), and the frontal sinus medially (CSF leak, sinus infection).
- The patient closes the eyes during anterior pin tightening so the forehead skin is not tethered in a position that prevents the eyelids closing afterwards.
- The posterior pins are placed posterolaterally, diagonally opposite the anterior pins, below the equator.
- They sit in thicker bone and are generally lower risk, but should still be kept off any cranial defect or shunt.
- Tighten opposing diagonal pins simultaneously (anterior-left with posterior-right, then anterior-right with posterior-left) so the ring stays centred and the forces balance.
- Tighten to a torque of about 6 to 8 inch-pounds (roughly 0.7 to 0.9 Nm) in adults, using a torque-limiting screwdriver, then lock the pins.
- Apply the well-fitting vest (sized to the chest), padded over bony prominences.
- Connect the ring to the vest with four rigid uprights, adjusting cervical alignment (flexion, extension, translation) under lateral fluoroscopy or radiograph before final tightening.
- Re-torque the pins ONCE at about 48 hours (the bone settles), then do not routinely re-torque. A pin that loosens later is managed individually.
- Provide the patient and family with a wrench taped to the vest for emergency CPR access (front panel removal).
For the anterior pins I aim for the anterolateral forehead above the outer two-thirds of the eyebrow, below the widest part of the skull. That keeps me out of the temporalis laterally and away from the supraorbital nerve and frontal sinus medially. I ask the patient to gently close their eyes as I tighten, so I do not tether the skin and stop them blinking.
I tighten the pins in opposing diagonal pairs at the same time so the ring stays centred and the forces balance. I use a torque screwdriver to about 6 to 8 inch-pounds in an adult. After that I lock them, and I re-torque once at about 48 hours — but I do not keep re-torquing after that.
- Pins too lateral into temporalis — chewing pain, trismus, thin squamous bone penetration
- Pins too medial — supraorbital or supratrochlear nerve injury, or a frontal sinus breach
- Tightening anterior pins with the eyes open — skin tethered, the eyelid cannot close
- A pin above the skull equator — the ring migrates and loosens
- Over-tightening — risks dural penetration and intracranial abscess
- Adult
- 4 pins
- Young child (paediatric)
- More pins (commonly 8 to 10)
- Adult
- About 6 to 8 inch-pounds
- Young child (paediatric)
- Lower (about 2 to 5 inch-pounds)
- Adult
- Clinical safe zones
- Young child (paediatric)
- CT skull to map thickness and sutures
- Adult
- Anterolateral, lateral 2/3 of orbit
- Young child (paediatric)
- Same principle, more sites at low torque
- Adult
- Once at about 48 hours
- Young child (paediatric)
- Generally not re-torqued
- Adult
- Thick adult skull
- Young child (paediatric)
- Thin, soft skull spreads load over more pins
In a small child I do not just scale down the adult construct — I deliberately use more pins, often eight to ten, at a much lower torque, because the skull is thin. I always get a CT of the skull first to plan where the bone is thick enough and to keep clear of the sutures and the frontal sinus.
In an awake, examinable patient, serial weighted closed reduction with a neurological exam after each increment is the classic safe pathway. In an obtunded or unexaminable patient, many surgeons obtain an MRI before or during reduction to assess for a herniated disc and to allow safe monitoring, given the inability to detect a new deficit clinically.
Aftercare & Complications
Pin-site care protocol - Clean each pin site (for example chlorhexidine or saline per local protocol) on a regular schedule
- Inspect daily for erythema, discharge, looseness or pain
- Keep hair short around pin sites and avoid crusting build-up
- Re-torque ONCE at about 48 hours; thereafter do NOT routinely re-torque — a single loose pin is tightened once (if within the early window) or replaced and relocated, not all pins repeatedly
- Keep an emergency wrench attached to the vest for rapid front-panel removal during CPR Complications The two commonest halo complications are pin loosening and pin-site infection. Over-tightening can cause dural penetration and intracranial abscess, and the vest itself can cause pressure sores, dysphagia and restricted respiration.
- Frequency
- Commonest
- Recognition
- Pain, audible or palpable movement, drainage at the pin site; loss of resistance on torque check
- Prevention and management
- Prevention: correct torque (about 6 to 8 inch-pounds adult), safe-zone placement, single re-torque at 48 hours. Management: re-torque a single loose pin ONCE if early; if it will not hold, insert a new pin at an adjacent safe site and remove the loose one
- Frequency
- Common
- Recognition
- Erythema, warmth, purulent discharge, increasing pain, sometimes fever
- Prevention and management
- Prevention: regular pin-site care, avoid over- or under-tightening. Management: local care plus oral antibiotics for superficial infection; for deep infection or persistent drainage relocate the pin and consider imaging to exclude osteomyelitis or abscess
- Frequency
- Rare but serious
- Recognition
- Severe headache, CSF leak at the pin, meningitic features, focal deficit; a pin grossly over-inserted
- Prevention and management
- Prevention: do NOT over-tighten; use a torque-limiting driver; respect skull thickness (CT in children). Management: remove the pin, neurosurgical referral, imaging (CT or MRI), antibiotics, drainage of any abscess
- Frequency
- Common, especially elderly or immobile
- Recognition
- Pain or skin breakdown under the vest, especially over the scapulae, sternum and iliac crests
- Prevention and management
- Prevention: correct vest size, adequate padding over prominences, regular skin checks. Management: adjust and re-pad the vest and treat the wound; severe breakdown may force a change of immobilisation strategy
- Frequency
- Notable, especially with extension posture
- Recognition
- Difficulty swallowing, coughing or choking with feeds, recurrent chest infections
- Prevention and management
- Prevention: avoid excessive cervical extension when setting the vest; speech and swallow review. Management: adjust the construct toward neutral, modify the diet, aspiration precautions
- Frequency
- From medial anterior pins
- Recognition
- Numbness of the forehead or anterior scalp; sometimes neuralgic pain
- Prevention and management
- Prevention: place anterior pins over the LATERAL two-thirds of the orbit, lateral to the nerves. Management: usually expectant; relocate the offending pin; most sensory changes recover
- Frequency
- Variable, especially subaxial
- Recognition
- New deformity or neurological change; malalignment on serial radiographs (snaking)
- Prevention and management
- Prevention: appropriate patient selection (halo controls the upper cervical spine better than the subaxial) and good vest fit. Management: re-image and adjust the uprights; if alignment cannot be held, proceed to operative stabilisation
- Frequency
- Vest-related, especially elderly or COPD
- Recognition
- Reduced chest expansion, breathlessness, falling vital capacity
- Prevention and management
- Prevention: avoid the device in significant chest or pulmonary compromise; correct vest fit. Management: respiratory support and reconsider the device; the elderly tolerate halo poorly, with raised complication and mortality rates
- Frequency
- Common, cosmetic
- Recognition
- Small permanent scars at healed pin sites on the forehead
- Prevention and management
- Prevention: minimise the number of anterior pins and place them correctly. Management: reassurance; scar revision is rarely needed
Modern halo rings, pins and uprights are typically made of aluminium and titanium (MRI-compatible) rather than ferromagnetic steel, allowing MRI when needed — but confirm the specific device's MRI labelling and use MRI-conditional graphite or composite uprights and vest hardware where required. Check every component (ring, pins, uprights, vest fasteners) before entering the scanner; some older or mixed sets contain ferromagnetic parts.
Viva & Exam Focus
TONGSGardner-Wells application and traction
HALOHalo ring and vest — safe application
The trap: applying cervical traction to an injury with potential cranio-cervical (atlanto-occipital) dissociation can lethally distract the occipito-cervical junction across an already disrupted segment. The fix: before any traction, exclude AOD on the lateral radiograph or CT (Powers ratio, basion-dental and basion-axial intervals, condyle-C1 interval). If dissociation is suspected, traction is CONTRAINDICATED — immobilise and proceed to occipito-cervical fixation.
The temporalis muscle lies over the lateral squamous temporal bone, which is thin. A pin placed too laterally pierces the muscle, causing painful chewing and trismus, and risks penetrating the thin squamous bone into the cranium. Keep anterior pins in the anterolateral safe zone, below the greatest circumference and anterior to the temporalis.
The supraorbital and supratrochlear nerves emerge over the medial orbit; the frontal sinus sits medially behind the central forehead. A medial anterior pin injures these nerves (forehead numbness, scalp anaesthesia) or breaches the frontal sinus (CSF leak, infection). Place anterior pins over the LATERAL two-thirds of the orbit, lateral to the nerves and sinus.
The skull is widest at its equator (greatest circumference). Pins placed above the equator slope superiorly, so axial traction pulls the device OFF the head. Place Gardner-Wells pins and the halo ring BELOW the equator — for tongs about 1 cm above the pinna in line with the external auditory meatus, and for the halo ring about 1 cm above the eyebrows and ears.
The fused rigid column behaves like a long bone; fractures are highly unstable three-column injuries with poor bone quality and a fixed deformity. Traction readily over-distracts and can cause catastrophic cord injury. Reduce in the patient's pre-injury (often kyphotic) position, use minimal or no traction, and image frequently — many require operative stabilisation.
For traction: STOP and image if a weight increment produces a new neurological deficit or radiographic over-distraction (a widened disc or facet, or occipito-cervical gapping); remove weight immediately for any new deficit. For halo pins: over-tightening risks dural penetration and intracranial abscess, while under-tightening causes loosening and infection. Tighten opposing pins simultaneously to about 6 to 8 inch-pounds in adults.
Clinical Decision Scenarios
Practise clinical reasoning and management decisions out loud
“A 28-year-old man is brought in after a diving injury with a unilateral C5/6 facet dislocation. He is awake, alert and cooperative with an incomplete cord syndrome. The radiograph and CT show no evidence of atlanto-occipital dissociation. How would you proceed with closed reduction using Gardner-Wells tongs?”
“You are applying a halo ring and vest to a patient with a type II odontoid fracture. Talk me through where you place the anterior pins and the structures you must avoid.”
“An elderly patient with ankylosing spondylitis sustains a fall and has a low cervical fracture through the fused column. The on-call junior suggests applying Gardner-Wells traction in neutral alignment. What are your concerns and how would you manage this?”
Indications
- Gardner-Wells tongs: closed reduction of cervical facet dislocations; temporary traction for unstable subaxial injuries before fixation
- Halo vest: most rigid external orthosis — selected C1, odontoid and Hangman's injuries, adjunct or provisional immobilisation, paediatric instability
- Halo controls the UPPER cervical spine far better than the subaxial (snaking allows segmental motion lower down)
- Traction CONTRAINDICATED in atlanto-occipital dissociation; HIGH RISK in ankylosing spondylitis and DISH
Gardner-Wells tongs
- Pin site: about 1 cm above the pinna, in line with the external auditory meatus, BELOW the skull equator
- Below the equator prevents the tongs slipping off under axial traction
- Spring-loaded indicator protrudes about 1 mm at correct symmetric compression
- Start about 4.5 kg (10 lb); add roughly 2.3 kg (5 lb) per cervical level incrementally
- Neuro exam PLUS lateral radiograph after EVERY weight increment — stop for a deficit or over-distraction
Halo anterior pin safe zone
- Anterolateral skull, below the greatest circumference, above the LATERAL two-thirds of the orbit
- AVOID the temporalis laterally — chewing pain, trismus, thin squamous bone
- AVOID the supraorbital and supratrochlear nerves medially — forehead and scalp numbness
- AVOID the frontal sinus medially — CSF leak and infection
- The patient CLOSES THE EYES during anterior pin tightening so the skin is not tethered preventing eyelid closure
Halo ring, pins and torque
- Ring about 1 cm above the eyebrows and ears, below the skull equator, clearing the head a finger-breadth all round
- Posterior pins posterolateral, in thicker bone, diagonally opposite the anterior pins
- Tighten OPPOSING DIAGONAL pins simultaneously to about 6 to 8 inch-pounds (0.7 to 0.9 Nm) in adults
- Re-torque ONCE at about 48 hours, then do NOT routinely re-torque
- Keep an emergency wrench taped to the vest for CPR front-panel removal
Complications
- Commonest: PIN LOOSESENING and PIN-SITE INFECTION
- Over-tightening: dural penetration and intracranial abscess (serious)
- Vest-related: pressure sores, dysphagia or aspiration, restricted respiration (poorly tolerated in the elderly)
- Anterior pin: supraorbital or supratrochlear nerve injury from medial placement
- Loss of reduction (especially subaxial snaking); pin-site scarring
Paediatric halo
- MORE pins (commonly 8 to 10) at LOWER torque (about 2 to 5 inch-pounds)
- A thinner, softer skull spreads the load over more pins
- Pre-operative CT of the skull to map bone thickness, sutures and the frontal sinus
- Same safe-zone principles; pins are generally not re-torqued
Special situations
- Atlanto-occipital dissociation: NO traction; recognise on the Powers ratio, BDI and BAI, and the condyle-C1 interval; needs occipito-cervical fixation
- Ankylosing spondylitis and DISH: reduce in the pre-injury (kyphotic) alignment, minimal or no traction, MRI for an epidural haematoma, usually operative
- MRI: modern aluminium and titanium constructs are MRI-compatible — confirm each component's labelling before scanning
- Awake patient: serial monitored reduction; obtunded patient: consider MRI before or during reduction
Background & Evidence
Why pin position matters. The skull is widest at its equator (the greatest circumference). Pins placed BELOW the equator are pulled INTO the skull by axial traction and resist slippage, whereas pins ABOVE the equator are pulled OFF the head. Gardner-Wells tongs are spring-loaded, with a pin indicator that protrudes about 1 mm at the correct compression, giving a consistent, symmetric force without over-penetration. The vector of traction can also be adjusted (slight flexion, neutral or extension) to favour reduction of a specific injury pattern — facet dislocations often reduce with initial slight flexion, then extension once the facets are unlocked. Halo construct rigidity. The halo is the most rigid external orthosis because it fixes the skull directly to the trunk through four rigid uprights and a well-moulded vest, eliminating the skin-and-soft-tissue slack that limits collars. It controls the upper cervical spine far better than the subaxial spine; snaking (segmental motion within the construct) still occurs at lower levels, which is why halo immobilisation fails in some unstable subaxial patterns.
- Flexion-extension control
- Minimal
- Rotation control
- Minimal
- Typical use
- Comfort or soft-tissue strain only
- Flexion-extension control
- Moderate
- Rotation control
- Moderate
- Typical use
- Stable injuries, post-operative support
- Flexion-extension control
- Good (especially flexion)
- Rotation control
- Moderate
- Typical use
- Mid and lower cervical injuries
- Flexion-extension control
- Greatest (most rigid)
- Rotation control
- Greatest
- Typical use
- Unstable upper cervical or selected subaxial
Key evidence. Cotler's series (1993) established that serial weighted Gardner-Wells traction in awake, cooperative patients — with a neurological exam and lateral radiograph after every increment — can reduce cervical dislocations safely even with large weights. Vaccaro (1999) addressed neurological outcomes and the role of MRI around closed reduction, supporting reduction in the awake patient and MRI consideration in the obtunded. The complication burden of the device itself was defined by Garfin and colleagues: their JBJS (1986) and J Neurosurg (179-patient, 1986) reviews established pin loosening and pin-site infection as the dominant complications, with pressure sores and dysphagia prominent in the vest cohort — the basis for the safe-zone, torque and pin-site-care principles still taught today.
References
Foundational evidence for the technique, its complication profile and the role of MRI around reduction. 1. Cotler JM, Herbison GJ, Nasuti JF, Ditunno JF, An H, Wolff BE (1993). Closed reduction of traumatic cervical spine dislocation using traction weights up to 140 pounds. Spine (Phila Pa 1976). PMID 8327686. — Serial weighted Gardner-Wells traction in awake patients with neurological and radiographic monitoring after each increment. 2. Vaccaro AR, Falatyn SP, Flanders AE, Balderston RA, Northrup BE, Cotler JM (1999). Safety and efficacy of early closed reduction of cervical spine fracture-dislocations. Spine (Phila Pa 1976). PMID 10222536. — Neurological outcomes and the role of MRI around closed reduction of cervical fracture-dislocations. 3. Garfin SR, Botte MJ, Waters RL, Nickel VL (1986). Complications in the use of the halo fixation device. J Bone Joint Surg Am. PMID 3949840. — Foundational series defining the halo complication profile and pin placement and torque principles. 4. Garfin SR, Botte MJ, Centeno RS, Nickel VL (1986). Complications associated with the halo-vest. A review of 179 patients. J Neurosurg. PMID 3944631. — Pin loosening, infection, pressure sores and dysphagia in a large halo-vest cohort. 5. Botte MJ, Byrne TP, Abrams RA, Garfin SR (1996). Halo skeletal fixation: techniques of application and prevention of complications. J Am Acad Orthop Surg. — Practical review of pin safe zones, torque and pin-site care for halo application.
Closed reduction of traumatic cervical spine dislocation using traction weights up to 140 pounds
- Awake, alert patients underwent serial weighted Gardner-Wells traction with neurological and radiographic monitoring after each weight increment
- Reduction was achieved safely with large weights in selected cooperative patients when monitored closely
- Continuous neurological assessment and serial lateral radiographs after each increment are central to safety
Safety and efficacy of early closed reduction of cervical spine fracture-dislocations
- Examined neurological outcomes and the role of MRI around closed reduction of cervical fracture-dislocations
- Closed reduction in the awake, examinable patient was generally safe with serial monitoring
- Highlighted the debate over disc herniation and the value of MRI in obtunded patients before or after reduction
Complications in the use of the halo fixation device
- Large series documenting the complication profile of the halo device
- Pin loosening and pin-site infection were among the most common complications
- Established practical principles for pin placement, torque and pin-site care
Complications associated with halo-vest. A review of 179 patients
- Review of 179 patients treated in a halo vest detailing pin and vest complications
- Documented pin loosening, pin-site infection, pressure sores and dysphagia among the recognised problems
- Reinforced the importance of vest fit and pin-site protocols