Posterior medial access | posteromedial tibial plateau and corner | popliteal neurovascular risk
- Definition: access to the posteromedial tibial plateau and posteromedial corner through the interval between the medial head of gastrocnemius (lateral) and semimembranosus (medial); the medial gastrocnemius is retracted laterally and shields the popliteal bundle that lies deep in the floor of the wound.
- Main indication: posteromedial tibial plateau fractures (Schatzker IV / Moore type I medial split with a posteromedial fragment) and the posteromedial component of bicondylar Schatzker V to VI patterns; posteromedial corner soft-tissue work is a rarer indication.
- Popliteal bundle — highest risk: the artery, vein and tibial nerve run in the floor of the popliteal fossa, deep and posterior to the posterior capsule and popliteus. Risk comes from dissection lateral to the interval, aggressive retraction, or the drill or screw exiting the far cortex.
- Stay on bone: subperiosteal dissection on the posterior tibial cortex, with the medial gastrocnemius interposed between the field and the bundle, is the central safety principle.
- Saphenous nerve risk: the saphenous nerve and great saphenous vein cross the proximal subcutaneous field — injury causes medial leg or foot numbness; counsel preoperatively.
- Dual-approach strategy: frequently combined with an anterolateral approach for bicondylar fractures (Schatzker V, VI) so that each column is buttressed.
When & Why
What it exposes. The posteromedial (Lobenhoffer) approach gives direct access to the posteromedial tibial plateau, the posteromedial corner and the posterior capsule, with the medial head of gastrocnemius interposed as a curtain between the field and the popliteal neurovascular bundle. It is the workhorse exposure for a posteromedial split or shear fragment that cannot be reduced or buttressed from the front. Why posteromedial (and not anterior). A posteromedial fragment sits on a steep shear plane (mean sagittal angle 73 degrees) that a laterally based locking plate does not control; the fragment tends to displace caudally in flexion. A direct posterior buttress or antiglide plate resists this displacement. An anterior or anteromedial approach simply cannot reach or buttress a posterior coronal fragment. Primary indications — trauma
- Posteromedial tibial plateau fractures: Schatzker IV with posteromedial extension, coronal split fractures of the posterior medial plateau, and the posteromedial component of bicondylar Schatzker V to VI patterns.
- Failed reduction via an anteromedial approach, where the posterior fragment is not accessible from the front. Secondary indications
- Posteromedial corner injuries: avulsion of the semimembranosus insertion, posterior oblique ligament (POL) repair, posteromedial capsular repair, combined ligamentous reconstruction.
- Posterior medial meniscus: root tear (open repair), peripheral posterior horn inside-out repair, medial meniscus transplantation. Relative contraindications
- Active infection overlying the incision; severe vascular compromise requiring vascular surgery first.
- Severe peripheral vascular disease (high vessel-injury risk), severe soft-tissue injury (compartment syndrome, degloving), and obesity (BMI greater than 40) — a very difficult exposure. Position & landmarks. Two positions are used. Prone gives the best direct access to the posteromedial corner with gravity-assisted retraction, but cannot be combined with an anterior approach in the same sitting and makes fluoroscopy harder. Supine with the leg hanging off the side of the table (knee flexed 90 degrees over the table edge) allows same-sitting anterior conversion and easier fluoroscopy, but gravity works against you and the field is cramped. Palpate and mark the medial femoral epicondyle and adductor tubercle (proximal landmarks), the posteromedial tibial margin, and the medial head of gastrocnemius and semimembranosus tendon — the interval between them is the line of the approach. Use a radiolucent table and a large C-arm throughout.
The Exposure
Work down through the layers along the posteromedial tibia, protecting the saphenous nerve superficially, then develop the interval between the medial head of gastrocnemius (lateral) and semimembranosus (medial) down to the posterior capsule, keeping the gastrocnemius retracted laterally as a curtain over the popliteal bundle and staying strictly subperiosteal on the posterior tibial cortex.
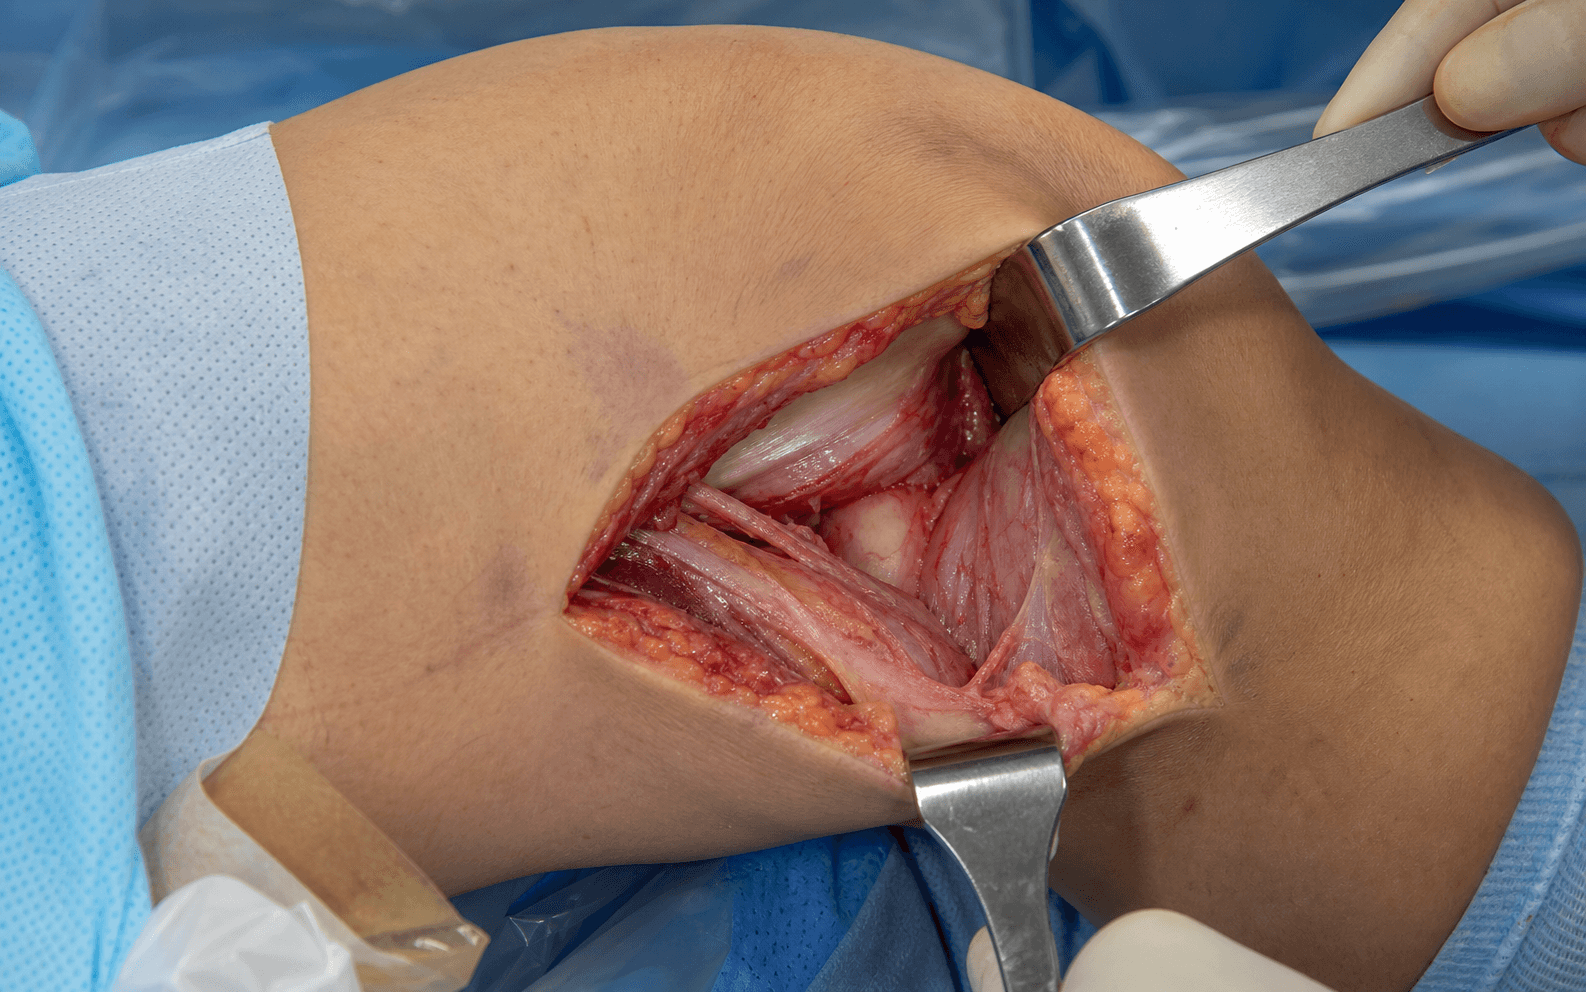
Exposure sequence
- A longitudinal, slightly curvilinear incision just posterior to the medial midline, from the medial femoral epicondyle proximally to 6 to 8 cm distal to the joint line (8 to 12 cm overall).
- Sharp dissection through skin and subcutaneous tissue; identify and protect the saphenous nerve and great saphenous vein if encountered, preserving the vein where possible for collateral drainage.
- Palpate the medial head of gastrocnemius laterally (a soft muscle belly) and the semimembranosus tendon medially (cord-like); the natural plane between them is the line of the approach.
- Incise the overlying fascia and develop the plane with blunt dissection, separating the two muscles with retractors.
- Continue blunt dissection toward the posterior capsule, strictly subperiosteal on the posterior tibial cortex; retract the medial head of gastrocnemius laterally so it interposes between the field and the popliteal bundle, with the tibial nerve shielded behind it.
- The posterior capsule comes into view. Never carry dissection lateral out of the interval or deep toward the floor of the fossa without direct vision.
- Retract gastrocnemius laterally and semimembranosus medially; incise the posterior capsule longitudinally, directly on bone, to expose the posterior aspect of the medial tibial plateau.
- Visualize the posteromedial articular surface, assess the fracture pattern (coronal split, posterior depression, comminution) and palpate for a posterior meniscus tear.
- For a coronal split, compress the fragments with pointed reduction forceps and pry up any depressed fragment from posterior; alternatively place a K-wire or small Schanz pin in the posterior fragment as a joystick.
- If a combined anterior approach is planned, reduce from the front first, then secure the posterior fragment from the posteromedial side. Hold the reduction with K-wires and confirm on AP, lateral and oblique fluoroscopy.
- Apply an anatomic posteromedial buttress or antiglide plate just distal to the joint line, aligned with the posterior tibial border; this resists caudal displacement of the steep fragment in flexion.
- Aim proximal screws anterolaterally (not straight anterior) to engage the opposite cortex and support the articular fragment; confirm trajectory and length on fluoroscopy, err on the side of too short, and use a drill stop or sleeve to prevent an uncontrolled plunge through the far cortex.
- For a simple coronal split, lag screws alone (posteromedial to anterolateral, typically 6.5 mm partially threaded cannulated screws) may suffice. Repair any avulsed semimembranosus, POL capsular tear or meniscal root at the same setting.
- Re-approximate the posterior capsule with 0 or #1 Vicryl (watertight, to reduce hemarthrosis); the gastrocnemius and semimembranosus fall back together and need no suture (interval approach).
- Close the fascia with #1 Vicryl, consider a deep 10 Fr Blake drain (remove when output is less than 30 mL per 24 hours), and close subcutaneous (2-0 Vicryl) and skin (3-0 nylon or staples).
The artery, vein and tibial nerve run immediately deep and posterior to the popliteus and posterior capsule — millimetres from the field once the capsule is opened. The artery lies deepest (closest to bone), the vein superficial to it, and the tibial nerve most superficial. Keep the medial head of gastrocnemius retracted laterally as a protective curtain, stay strictly subperiosteal, never dissect deep into the floor or lateral out of the interval without direct vision, and control every drill and screw length. Any unexpected bleeding is a popliteal injury until proven otherwise: direct pressure (never blind clamping), call vascular surgery immediately, and gain proximal and distal control.
The updated Schatzker (Kfuri/Schatzker) and three-column concepts direct you to a posterior main fracture plane on CT — that plane dictates prone or floating positioning and where the buttress plate must sit. A lateral plate alone does not control a 73-degree posteromedial shear fragment.
Dangers & Extensions
Structures at risk, by layer
- Structure at risk
- Saphenous nerve and great saphenous vein
- Protection
- Careful superficial dissection; identify and protect; counsel on a 5 to 10 percent numbness risk
- Structure at risk
- Popliteal artery, vein and tibial nerve (floor of the fossa)
- Protection
- Retract gastrocnemius laterally as a curtain; stay subperiosteal; no blind deep or lateral dissection; control drill and screw length
- Structure at risk
- Tibial nerve (less than 1 percent)
- Protection
- Gentle lateral gastrocnemius retraction; do not over-retract; respect the interval
- Structure at risk
- Common peroneal nerve (fibular neck)
- Protection
- Not at risk — too lateral for this approach
Posteromedial versus anteromedial
- Posteromedial
- Posterior medial plateau, posteromedial corner
- Anteromedial
- Anterior or entire medial plateau
- Posteromedial
- Coronal split, posterior extension
- Anteromedial
- Anterior or whole medial plateau
- Posteromedial
- High — popliteal bundle in the floor of the fossa
- Anteromedial
- Low — vessels far posterior
- Posteromedial
- Saphenous; tibial if retraction excessive
- Anteromedial
- Saphenous, infrapatellar branch
- Posteromedial
- Limited to posterior plateau
- Anteromedial
- Excellent anterior plateau access
- Posteromedial
- Aim anterolaterally with controlled length
- Anteromedial
- Safe in all directions
- Posteromedial
- Steep (complex anatomy, high risk)
- Anteromedial
- Moderate (more familiar)
Extensions and the dual-approach strategy. For bicondylar fractures (Schatzker V, VI) the posteromedial incision is usually combined with an anterolateral approach so that the medial and lateral columns are each buttressed. Many units stage fixation — a temporary spanning external fixator first, definitive dual plating once the soft-tissue envelope recovers (often 7 to 14 days); some centres perform same-sitting dual plating in favourable soft tissues. The posteromedial incision can be extended proximally along the medial femoral condyle or distally along the posteromedial tibial border if more exposure is needed. Complications. Popliteal vessel injury is uncommon in reported series but is the highest-stakes complication (limb-loss risk of 10 to 15 percent if repair is delayed beyond 6 hours). Tibial nerve injury occurs in less than 1 percent. Saphenous nerve numbness (5 to 10 percent) is common and often unavoidable — counsel preoperatively. Compartment syndrome runs at 5 to 10 percent in high-energy medial plateau fractures; wound problems and infection are under 2 percent in favourable soft tissues, rising to 10 to 15 percent wound dehiscence and 5 to 8 percent infection in obesity. Late problems include post-traumatic arthritis in 20 to 30 percent despite anatomic reduction, malunion from inadequate reduction, and prominent hardware needing removal in 10 to 15 percent. Postoperative care. Neurovascular checks are mandatory every 1 to 2 hours for the first 24 hours; avoid a femoral nerve block (it masks compartment syndrome); deflate the tourniquet before closure and check pulses. Weight-bearing is toe-touch for 6 to 8 weeks for simple patterns and non-weight-bearing for 8 to 12 weeks for complex or bicondylar patterns. Begin gentle passive ROM early, avoiding varus stress to protect the medial fixation.
Procedures Through This Approach
- ORIF of posteromedial tibial plateau fractures — Schatzker IV with posteromedial extension, Moore type I posteromedial split fracture-dislocations, and the posteromedial component of bicondylar Schatzker V to VI fractures (often the medial half of a dual-approach strategy).
- Posteromedial corner repair — semimembranosus avulsion fixation, posterior oblique ligament and posteromedial capsular repair, combined ligamentous reconstruction.
- Posterior medial meniscus work — root repair, peripheral posterior horn inside-out repair, medial meniscus transplantation.
- Popliteal vessel exploration — in combination with vascular surgery, for repair of a popliteal injury.
Viva & Exam Focus
POPLITEALPOPLITEAL — critical anatomy of the posteromedial approach
Clinical Decision Scenarios
Practise clinical reasoning and management decisions out loud
“A 42-year-old pedestrian struck by a car has a medial tibial plateau fracture with a coronal split and posteromedial extension on CT. Describe your posteromedial approach — the interval, the structures at risk, how you protect the popliteal vessels, your screw trajectory and your postoperative monitoring.”
“You are planning a posteromedial approach for a Schatzker IV fracture in an obese patient (BMI 38). What are your concerns and how do you modify your technique?”
Indications
- Posteromedial tibial plateau: Schatzker IV with posterior extension, Moore type I split
- Posteromedial component of bicondylar Schatzker V to VI
- Posteromedial corner repair, posterior meniscus root repair
Interval & anatomy
- Between the medial head of gastrocnemius (lateral) and semimembranosus (medial)
- Popliteal bundle in the floor of the fossa — deep and posterior, highest risk
- Saphenous nerve superficial medially; common peroneal nerve not at risk
Safety
- Retract gastrocnemius laterally as a curtain over the bundle
- Stay strictly subperiosteal; no blind deep or lateral dissection
- Control drill and screw length; aim screws anterolaterally
- Vascular surgery available; avoid a femoral nerve block
Key numbers
- Posteromedial fragment in 59 percent of bicondylar fractures; mean 73-degree shear angle
- Saphenous numbness 5 to 10 percent; compartment syndrome 5 to 10 percent
- Post-traumatic arthritis 20 to 30 percent; hardware removal 10 to 15 percent
References
Guidelines, registries & global practice. The posteromedial (Lobenhoffer) approach is a specialised, high-risk exposure for surgeons experienced in periarticular trauma; there is no single national standard exam candidates must quote, but the convergent message across major trauma bodies is CT-driven planning, fragment-specific exposure and a posterior buttress for the unstable posteromedial fragment.
- Core message for approach selection
- Fine-cut CT with 3D reconstruction mandatory; a posteromedial fragment is an indication for a dedicated posterior or posteromedial exposure, not reliance on a lateral plate
- Core message for approach selection
- A medial or posteromedial column fragment warrants direct medial or posteromedial fixation; lateral fixation alone does not control posterior shear
- Core message for approach selection
- A posterior main fracture plane on CT directs prone or floating positioning and posterior buttress placement
- Core message for approach selection
- Posterior segments are the most commonly involved; posterior approaches should be used more liberally
Optimizing the management of Moore type I postero-medial split fracture dislocations of the tibial head: description of the Lobenhoffer approach
- First English-language description of the direct posterior (Lobenhoffer) approach to the proximal tibia
- Designed for Moore type I posteromedial split fracture-dislocations whose displaced posteromedial fragment is hard to reduce and buttress through traditional anterior or anteromedial approaches
- Patient prone; medial head of gastrocnemius mobilised and retracted, with semimembranosus and the neurovascular bundle protected behind it
- Less soft-tissue dissection than other posterior exposures, allowing a true posterior antiglide or buttress plate to resist caudal fragment displacement in flexion
Incidence and Morphology of the Posteromedial Fragment in Bicondylar Tibial Plateau Fractures
- CT review of 111 bicondylar tibial plateau fractures: a posteromedial fragment was present in 65 cases (59 percent incidence)
- On average the fragment accounted for 25 percent of the total plateau joint surface, with greater than 5 mm articular displacement in 55 percent of cases
- Steep vertical fracture pattern (mean sagittal angle 73 degrees) indicates shear instability with a tendency to vertical displacement
- Pattern is poorly resisted by laterally based locking fixation, supporting direct reduction and posteromedial buttressing
Revisiting the Schatzker Classification of Tibial Plateau Fractures
- Updates the 1974 Schatzker classification using CT, splitting the plateau into medial and lateral columns with a coronal equator into anterior and posterior quadrants
- Unicondylar types I to IV gain anterior or posterior modifiers; bicondylar types V and VI gain anterior or posterior plus lateral or medial modifiers to localise the main fracture plane
- Introduces the concept of the main fracture plane to guide patient positioning, choice of surgical approach and where to apply hardware
- Explicitly recognises posterior (including posteromedial) fracture planes that the original two-dimensional system could not capture
Functional Outcomes of Severe Bicondylar Tibial Plateau Fractures Treated with Dual Incisions and Medial and Lateral Plates
- 83 AO/OTA type 41-C3 bicondylar fractures fixed with medial and lateral plates through anterolateral and posteromedial exposures; only 2 deep infections
- Satisfactory articular reduction (2 mm or less step or gap) achieved in 17 of 31 patients (55 percent) with complete radiographs
- Accurate articular reduction was independently associated with a better Musculoskeletal Function Assessment score (p = 0.029)
- Despite surgery, significant residual functional dysfunction was common versus normative data, worst in leisure, employment and movement domains
Intra-articular Tibial Plateau Fracture Characteristics According to the Ten Segment Classification
- CT-based 10-segment mapping of 246 affected knees (161 OTA/AO type 41-B, 85 type 41-C)
- Posterior segments were the most frequently involved segments in both type B and type C fractures
- In high-energy type C fractures the posterolateral-central (85.9 percent), posterocentral (84.7 percent) and anterolateral-central (78.8 percent) segments were most often affected
- Authors conclude that the limited visibility and importance of posterior segments justify using posterior approaches more often