Revision total knee replacement for instability — diagnose the mode, rule out infection, correct alignment and rotation, then escalate constraint only as far as the collaterals demand. Medial parapatellar approach.
- Rule out infection BEFORE any instability revision — aspiration with a 14-day culture, ESR and CRP, and alpha-defensin if equivocal. Infection is a contraindication to a single-stage instability revision; an infected knee needs a two-stage protocol.
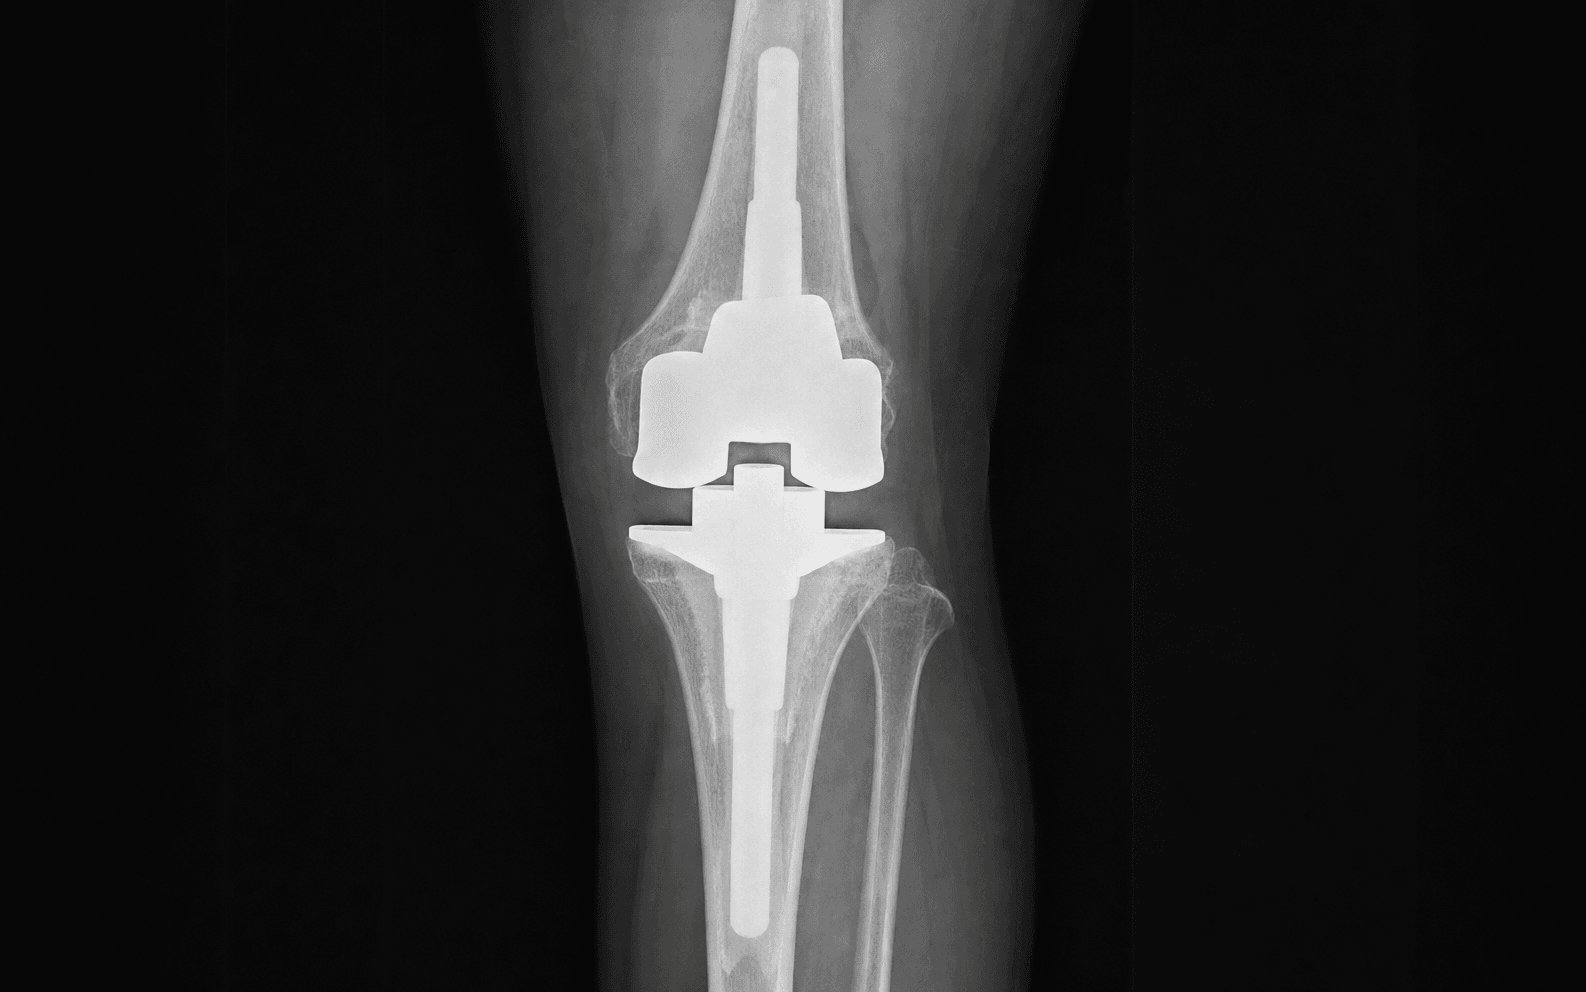
- The constraint ladder: both collaterals competent leads to a posterior-stabilized (PS) insert; one collateral incompetent leads to a constrained condylar knee (CCK); both collaterals incompetent leads to a rotating hinge.
- CCK: taller post (15 to 20 mm), deeper box cut (add 3 to 5 mm), resists varus-valgus stress but is NOT linked — it still needs one competent collateral, usually the MCL.
- Rotating hinge: a LINKED articulation through a central axle that allows rotation but fully constrains varus-valgus and AP translation. Stems greater than 100 mm are mandatory because of torque transfer. It is a salvage procedure.
- Flexion-extension gap balance: tight extension plus loose flexion means the femoral component is flexed or the tibial slope is excessive; tight flexion plus loose extension means the femur is extended or undersized.
- Component malrotation is the most common correctable cause — the femur must sit parallel to the surgical epicondylar axis and the tibia centered on the tubercle. Use the minimum constraint necessary: PS survival is 90 to 95 percent at 10 years versus 60 to 75 percent for a rotating hinge.
When & Why
Indication. Symptomatic instability after a total knee replacement — recurrent giving way (most often on stairs), mid-flexion instability, or a knee that feels loose — that has a correctable mechanical cause. Before any revision, diagnose the specific mode of instability, because a constrained implant is never a substitute for correcting the underlying problem. The mandatory gate — rule out infection first. Every unstable TKR is infected until proven otherwise. Before planning an instability revision:
- Bloods: ESR (greater than 30 mm/hr suspicious) and CRP (greater than 10 mg/L suspicious).
- Joint aspiration: cell count (greater than 3000 WBC suspicious), differential (greater than 80 percent PMNs suspicious), and culture held for 14 days for slow-growing organisms.
- Alpha-defensin if the picture is equivocal (high sensitivity and specificity). If infection is confirmed, abandon the instability plan and follow a two-stage protocol (resection, antibiotic spacer, reimplantation after eradication). Why the diagnosis drives the operation. Vince defined the four mechanical modes of instability — varus-valgus, recurvatum, flexion (mid-flexion) and global. Isolated polyethylene insert exchange and isolated ligament reconstruction generally do NOT work for true mechanical instability; of all the causes, only collateral ligament failure typically mandates a constrained implant. Most other causes are corrected by re-establishing alignment, sizing and component rotation first. Constraint is the last lever, not the first. Preoperative assessment (imaging and examination under anaesthesia).
- Standing radiographs: AP and lateral (component position, fixation, bone loss, joint space); a long-leg hip-knee-ankle alignment film (mechanical axis, normally 0 degrees plus or minus 3 degrees); a flexion weight-bearing PA (true joint space, polyethylene wear); a Merchant view (patellar tracking).
- CT (if available): component rotation (femoral relative to the epicondylar axis, tibial relative to the tubercle and transmalleolar axis) and Aori bone-loss quantification.
- Examination under anaesthesia: varus and valgus stress at 0 degrees and 30 degrees flexion (collateral competence — greater than 5 mm opening is incompetent), Lachman and posterior drawer, and a recurvatum test (posterolateral corner). Consent specifically for the possibility of needing a more constrained (CCK or hinge) implant than planned, blood loss and transfusion, infection, stiffness, common peroneal nerve palsy (especially with valgus correction or lengthening), extensor mechanism disruption, and the higher re-operation and loosening rates of constrained implants. Setup. Supine on a standard table, thigh tourniquet (inflate to 100 mmHg above systolic, maximum 2 hours), a leg holder or foot post so the knee can be taken freely from full extension to 90 degrees flexion for gap assessment; abduct the contralateral leg if a long-leg alignment check is needed.
The Operation
The goal: expose the knee through the medial parapatellar approach, remove the failing components or polyethylene as required, correct alignment and rotation, balance the flexion-extension gaps into a rectangle, reconstruct any bone loss, and implant the minimum-constraint device that the collateral ligaments will support — escalating only when a collateral is incompetent. The exposure is laid out as the first steps below.
Operative sequence
- Supine, thigh tourniquet, leg holder or foot post so the knee moves freely from full extension to 90 degrees flexion — you must be able to assess both gaps.
- Plan the medial parapatellar approach (used in about 95 percent of revisions); have extensile options ready — tibial tubercle osteotomy, quadriceps snip, or V-Y quadricepsplasty — if exposure is tight.
- If several previous scars exist, use the most lateral suitable scar to preserve the medial skin blood supply.
- A midline skin incision over the previous scar, 15 to 20 cm, from proximal to the mid-patella to the tibial tubercle; extend as needed.
- Arthrotomy through the retinaculum and capsule along the medial border of the patella and quadriceps tendon, from the quadriceps tendon proximally to the proximal tibia distally; extend into the VMO fibres if more room is needed.
- This is the workhorse exposure for revision TKR — fully extensile and exposure-friendly.
- Evert the patella gently with the knee flexed.
- If tight, perform a lateral retinacular release first (mind the common peroneal nerve and the lateral genicular vessels); if still tight, a quadriceps snip (a 45-degree oblique cut in vastus lateralis 2 to 3 cm above the patella) — rarely a V-Y quadricepsplasty.
- AVOID patellar tendon avulsion at all costs — it is a devastating complication.
- Extensive synovectomy and release of adhesions around the components (instability cases are often heavily scarred).
- Remove the polyethylene insert and read its wear pattern: anterior wear means tight extension; posterior means tight flexion; medial means varus; lateral means valgus — it points to the underlying maltracking or imbalance.
- Femoral: rotation (parallel to the surgical epicondylar axis? Whiteside's line? 3 degrees external rotation to the posterior condyles?), flexion-extension position (flexed tightens extension, extended tightens flexion), varus-valgus, fixation (radiolucent lines, subsidence), bone loss (Aori F1 to F3).
- Tibial: rotation (centered on the tubercle? parallel to the transmalleolar axis?), slope (0 to 7 degrees posterior, typically 3 to 5 degrees — excessive or reverse is pathological), varus-valgus, fixation, bone loss (Aori T1 to T3).
- Patella: tracking, tilt, subluxation, whether resurfaced, and bone stock.
- Loose: lever out with osteotomes or extraction devices.
- Well-fixed cementless: Gigli saw and reciprocating saw around ingrown areas, careful osteotomes.
- Cemented: high-speed burr to disrupt the cement, osteotomes, ultrasonic cement removal.
- Preserve every millimetre of bone — it counts for reconstruction.
- Trial polyethylene inserts of varying thickness (8, 10, 12, 15, 18, 20 mm).
- Extension gap (full extension): varus and valgus stress — normal is 1 to 2 mm opening with a firm endpoint; tight is less than 1 mm; loose is greater than 3 mm.
- Flexion gap (90 degrees): varus-valgus stress and AP drawer — same thresholds.
- Goal: equal and balanced gaps, a RECTANGLE — medial equals lateral in both extension and flexion.
- Tight extension, loose flexion: femoral component flexed, tibial slope excessive, or extension space not released — recut more distal femur, reduce tibial slope, release the posterior capsule and remove osteophytes.
- Loose extension, tight flexion: femoral component extended or undersized, or internal rotation — downsize or reposition the femur, correct rotation, remove posterior osteophytes.
- Global laxity: ligament insufficiency, bone loss, undersizing — thicker insert, or escalate constraint (CCK if one collateral intact, hinge if both gone).
- Asymmetric: varus knee — staged medial release (pes anserinus, superficial MCL, posteromedial capsule, deep MCL last); valgus knee — pie-crust the tight lateral structures (LCL, popliteus, ITB, posterolateral capsule) with multiple 15-blade stabs rather than a formal release.
- Test the MCL and LCL with trial components in place: varus stress in extension and 30 degrees flexion (MCL), valgus stress (LCL) — greater than 5 mm opening means incompetent.
- Both competent: PS. One incompetent: CCK (taller 15 to 20 mm post, deeper box cut, NOT linked). Both incompetent: rotating hinge (linked axle, stems greater than 100 mm mandatory). See the full ladder in the table below.
- Build on the Aori grade: small defect — cement or a small augment; one condyle greater than 5 mm — modular augments plus screws plus a short stem (50 to 75 mm); both condyles deficient — metaphyseal cones or sleeves plus a long stem (100 to 150 mm).
- Femoral augments may be posterior (flexion contracture or bone loss), distal (extension gap), or offset (varus or valgus correction).
- Vacuum-mix and pressurise the cement (most revisions are cemented on the tibia at minimum).
- Sequence: (1) augments or cones first, (2) stems, (3) femoral component — confirm rotation to the epicondylar axis, (4) tibial component — confirm rotation to the tubercle and the correct slope, (5) polyethylene insert — lock it and confirm the audible click and visual seating.
- Test extension (full? varus-valgus stable to less than 2 mm?), flexion 90 to 120 degrees, mid-flexion 30 to 60 degrees (the most unstable zone), patellar tracking (central throughout), and a smooth 0 to 120 degrees. Do not accept instability — it will fail.
- Irrigate copiously (3 to 6 litres saline, pulse lavage), meticulous haemostasis with the tourniquet down, consider topical tranexamic acid (1 to 2 g in 100 ml saline, 5-minute dwell).
- Repair the arthrotomy with interrupted absorbable sutures (0 or 1 Vicryl); if a quadriceps snip was made, repair it with non-absorbable sutures (Ethibond number 2 or 5).
- Layered closure, waterproof compressive dressing; a knee immobiliser for 24 to 48 hours if the extensor mechanism or stability is a concern.
- Indication
- Both collaterals competent; minimal bone loss (Aori 1, 2A)
- Mechanism
- Cam-post (post 12 to 18 mm) substitutes the PCL; relies on the collaterals
- Survival / loosening
- 90 to 95 percent at 10 years; loosening 2 to 5 percent at 5 years
- Indication
- Both competent but mild laxity; extensor weakness
- Mechanism
- Elevated anterior lip (6 to 8 mm) resists anterior translation
- Survival / loosening
- Similar to standard PS
- Indication
- ONE collateral incompetent; moderate bone loss (Aori 2B)
- Mechanism
- Taller post (15 to 20 mm), deeper box cut (add 3 to 5 mm), wider box — NOT linked
- Survival / loosening
- Modern second-generation 90 to 94 percent (Mancino 93.6 percent at 9 years); older designs 75 to 85 percent
- Indication
- BOTH collaterals incompetent; massive bone loss (Aori 3); salvage
- Mechanism
- LINKED central axle; allows 15 to 20 degrees rotation but fully constrains varus-valgus and AP; stems greater than 100 mm mandatory
- Survival / loosening
- Mid-term 82 percent non-tumour and 69 percent tumour (Abdulkarim 2019); infection the leading failure mode
- Indication
- Historical; palliative only
- Mechanism
- Linked, no rotation allowed
- Survival / loosening
- Greater than 50 percent loosening at 5 years — avoid; the rotating hinge is superior
- Popliteal neurovascular bundle: intimately related to the posterior capsule, more so in flexion. Avoid aggressive posterior capsule release or osteophyte removal; flex the knee to bring the vessels anteriorly, retract gently, and palpate the pulse.
- Common peroneal nerve: wraps the fibular neck 2 to 3 cm distal to the head, tethered in the fibular tunnel. Highest risk with valgus correction greater than 20 degrees or lengthening greater than 2 cm — limit the lateral release, use the pie-crust technique, and consider a prophylactic fibular tunnel release if lengthening is anticipated.
- MCL: from the medial femoral epicondyle to the proximal medial tibia 6 to 8 cm distal to the joint line. Release in stages for a varus knee and avoid the deep MCL — a complete release creates instability that then forces a CCK.
A thicker polyethylene insert compensates for global laxity when the components are well-positioned — it does not correct malrotation, a varus tibia, or a flexed femur. If you find yourself reaching for an insert greater than 18 to 20 mm, stop and re-examine the component position before escalating constraint.
Higher constraint means higher stress at the bone-implant interface and accelerated loosening. Step up the ladder only as far as the collateral competence demands, reassessing intra-operatively rather than committing to a preoperative plan alone: PS, then CCK, then rotating hinge.
Aftercare & Complications
Rehabilitation | Phase | Weight bearing | Range of motion | Therapy | |-------|---------------|-----------------|---------| | 0 to 2 weeks | WBAT if cemented; PWB if cones or graft; TDWB if extensor repair or tubercle osteotomy | CPM 0 to 60 degrees day 1, increase 10 degrees daily toward 0 to 90 degrees by week 2 | Quad sets, straight leg raises, ankle pumps | | 2 to 6 weeks | Progress per fixation | Passive and active-assisted ROM; cautious with constrained implants | Gait training, isometric to isotonic strengthening | | 6 to 12 weeks | Wean the assistive device | Full ROM as stability allows | Proprioception, balance, advanced strengthening | | 3 to 6 months | Full | Maintenance | Return to function | Cautious, slower ROM is used for rotating-hinge and constrained implants because of the higher stress. Return to desk work is typically 6 weeks; heavy manual work 12 to 16 weeks. Anticoagulation and antibiotics. Extended DVT prophylaxis for 4 to 6 weeks (LMWH enoxaparin 40 mg daily, or a DOAC — rivaroxaban 10 mg daily or apixaban 2.5 mg twice daily), longer than the 2 weeks typical of a primary TKR because revision is high-risk. Antibiotics for 24 to 48 hours per institutional protocol (cefazolin or vancomycin). Surveillance. Wound check and X-ray at 6 weeks, then 3 months, 6 months and 1 year, and annually for life thereafter — monitoring for radiolucent lines (greater than 2 mm and progressive is concerning for loosening), osteolysis, subsidence and wear. Constrained implants warrant especially close annual surveillance. Complications
- Recognition
- Giving way; greater than 3 mm varus-valgus or AP laxity; components unchanged on radiograph
- Prevention
- Accurate assessment, do not under-constrain, correct rotation and alignment, rectangular gaps, test before closure
- Management
- Re-operation for more constraint (PS to CCK, CCK to hinge), thicker insert if components well-positioned, reposition if malrotated
- Recognition
- Weight-bearing pain, tenderness over the component, progressive radiolucent lines greater than 2 mm, subsidence, osteolysis
- Prevention
- Minimum necessary constraint, accurate alignment and rotation, stems for load transfer, avoid over-stuffing, good cement technique
- Management
- Revision: remove loose components, address bone loss, consider more constraint if the collaterals are compromised
- Recognition
- Wound drainage, fever, pain out of proportion, ESR greater than 30, CRP greater than 10, aspiration WBC greater than 3000, PMNs greater than 80 percent, positive culture
- Prevention
- Perioperative antibiotics within 1 hour, tension-free closure, meticulous haemostasis, laminar flow, minimise surgical time
- Management
- Early (less than 3 weeks): washout, liner exchange, retain components, 6 weeks IV antibiotics. Late: two-stage revision
- Recognition
- Foot drop, decreased sensation lateral leg and dorsal foot, immediate or within 48 hours
- Prevention
- Limit valgus correction to less than 20 degrees single-stage, avoid lengthening greater than 2 cm, pie-crust not formal release, prophylactic fibular tunnel release if lengthening anticipated
- Management
- Document immediately, ankle-foot orthosis, EMG and nerve conduction at 3 weeks, physiotherapy; most recover 6 to 18 months (60 to 80 percent); exploration rarely helps
- Recognition
- Inability to straight-leg-raise, palpable defect, patella alta (tendon) or baja (quadriceps), MRI if unclear
- Prevention
- Gentle eversion, lateral release if tight, quadriceps snip if needed, protect repairs with TDWB and a brace for 12 weeks
- Management
- Acute (less than 2 weeks): primary Krakow repair (number 5 non-absorbable) plus cerclage or tape augmentation, TDWB 12 weeks. Chronic: Achilles or extensor-mechanism allograft — guarded outcomes
- Recognition
- Limited flexion at 6 to 12 weeks, pain on flexion; rule out malposition; heterotopic ossification
- Prevention
- Avoid over-stuffing, accurate position, early passive ROM, adequate pain control for therapy
- Management
- Early (less than 12 weeks): manipulation under anaesthesia. Late: arthrolysis (50 to 60 percent improve), revision if malposition
- Recognition
- Progressive laxity, asymmetric joint space, osteolysis, metallosis if severe
- Prevention
- Minimum constraint, highly cross-linked polyethylene, accurate alignment, annual surveillance
- Management
- Isolated liner exchange if components well-fixed and well-positioned; full revision if loosening or malposition
- Recognition
- Anterior pain, catching, lateral tilt or subluxation on Merchant view, fracture if trauma or AVN
- Prevention
- Accurate femoral and tibial rotation, restore the joint line, lateral release only if tight, avoid over-stuffing the patella
- Management
- Malrotation: revise the component. Lateral tightness: release. Fracture: non-displaced immobilise; displaced ORIF; comminuted poor bone — patellectomy last resort
Viva & Exam Focus
CONSTRAINTCONSTRAINT — decision tree for implant selection
GAPSGAPS — flexion-extension gap balancing
Clinical Decision Scenarios
Practise clinical reasoning and management decisions out loud
“A 68-year-old woman presents 3 years after a primary TKR with recurrent instability and giving way, especially on stairs. X-rays show a PS TKR with mild varus alignment of the tibial component. How do you assess and manage this?”
“During a revision TKR for instability you find the extension gap is tight (less than 1 mm opening) but the flexion gap is loose (greater than 3 mm laxity). What are the likely causes and how do you correct this mismatch?”
“A 72-year-old man has severe instability. Intra-operatively both the MCL and LCL are incompetent (greater than 10 mm opening) with severe tibial bone loss (Aori T3, both condyles deficient greater than 10 mm). What implant, fixation strategy, and outcomes do you expect?”
Indication & the first gate
- Recurrent instability or giving way post-TKR; chronic flexion-extension imbalance; component malposition; ligament insufficiency
- Rule out infection first — aspiration, ESR and CRP, alpha-defensin; two-stage protocol if infected
Constraint ladder
- Both collaterals competent (less than 5 mm) leads to PS
- One collateral incompetent leads to CCK (taller post 15 to 20 mm, NOT linked)
- Both collaterals incompetent leads to rotating hinge (linked axle, stems greater than 100 mm)
- Minimum necessary constraint: PS 90 to 95 percent, CCK 75 to 85 percent, hinge 60 to 75 percent at 10 years
Gap balancing
- Goal: equal and RECTANGULAR gaps (medial equals lateral)
- Tight extension plus loose flexion means femoral flexed or slope excessive
- Tight flexion plus loose extension means femoral extended, undersized or malrotated
- Asymmetric: staged medial release (varus), pie-crust the lateral side (valgus)
Component rotation
- Femoral: parallel to the surgical epicondylar axis (gold standard)
- Tibial: centered on the tubercle, parallel to the transmalleolar axis
- Malrotation is the commonest correctable cause of instability
Aori bone loss
- T1/F1 intact, standard components
- T2A/F2A less than 5 mm, cement or small augment
- T2B/F2B greater than 5 mm one condyle, augments plus screws plus short stem 50 to 75 mm
- T3/F3 severe both condyles, cones or sleeves plus long stem 100 to 150 mm
Danger structures
- Popliteal bundle — flex the knee, avoid aggressive posterior release
- Common peroneal nerve — risk with valgus greater than 20 degrees or lengthening greater than 2 cm
- MCL — staged release, avoid the deep layer
- Extensor mechanism — gentle eversion, snip if needed, avoid avulsion
Aftercare & outcomes
- WBAT if cemented, PWB for cones or graft, TDWB for extensor repair
- Extended DVT prophylaxis 4 to 6 weeks
- Annual X-ray surveillance for life, especially for constrained implants
Background & Evidence
Epidemiology. Instability is among the leading indications for revision total knee replacement. Its modes were classified by Vince (2006): varus-valgus, recurvatum, flexion (mid-flexion) and global. The risk and the achievable outcome scale with the constraint needed — posterior-stabilized revisions do best, rotating-hinge salvage the worst — which is why the minimum-necessary-constraint principle is the organising idea of the whole operation. The modes of instability and their cause. Most instability is mechanical and correctable: component malposition (rotation, varus-valgus, flexion-extension, tibial slope — the commonest correctable cause), ligament insufficiency (the MCL above all), flexion-extension gap mismatch, polyethylene wear, or extensor-mechanism weakness. Vince's central teaching is that isolated insert exchange and isolated ligament reconstruction generally do not work for true mechanical instability; only collateral ligament failure typically mandates a constrained implant, and everything else is fixed by re-establishing alignment, sizing and rotation.
- Definition
- Intact metaphyseal bone
- Reconstruction
- Standard component, no augment
- Definition
- Damaged metaphysis, one condyle or rim defect less than 5 mm
- Reconstruction
- Cement fill or small augment
- Definition
- Defect greater than 5 mm in one condyle
- Reconstruction
- Modular metal augments plus screws plus a short stem (50 to 75 mm)
- Definition
- Severe damage to both condyles, deficient metaphysis, loss of structural support
- Reconstruction
- Metaphyseal cones or sleeves plus a long stem (100 to 150 mm)
Constraint survival — why the ladder matters. The reason for stepping up only as far as needed is that higher constraint transfers more load to the bone-implant interface and loosens faster. Posterior-stabilized knees survive 90 to 95 percent at 10 years with only 2 to 5 percent loosening at 5 years. Modern second-generation CCK series report 90 to 94 percent mid-term survival (Mancino 2020: 93.6 percent at 9 years, infection rather than loosening the main failure mode) — better than the 75 to 85 percent quoted for older constrained designs. Rotating-hinge survival is lower again: pooled meta-analysis (Abdulkarim 2019) gives about 82 percent non-tumour and 69 percent tumour survival at 6 to 10 years, with infection — not loosening — the single leading failure mode at roughly 30 percent of failures. The hinge also limits ROM to about 0 to 90 degrees versus 0 to 115 degrees for a PS knee. This gradient is exactly why a rotating hinge is a salvage procedure for the unreconstructable knee, not an ideal primary solution.
References
The unstable total knee arthroplasty: causes and cures
- Defines the four mechanical modes of TKA instability: varus-valgus, recurvatum, flexion and global
- Isolated polyethylene insert exchange and isolated ligament reconstruction generally do NOT work for true mechanical instability
- Of all causes, only collateral ligament failure typically mandates a constrained implant — most others are corrected by re-establishing alignment, sizing and position
Malrotation causing patellofemoral complications after total knee arthroplasty
- CT comparison of 30 knees with patellofemoral complications versus 20 well-functioning controls using the epicondylar axis and tibial tubercle as references
- Combined (femoral plus tibial) internal component rotation correlated with severity: 1 to 4 degrees with tilt or lateral tracking, 3 to 8 degrees with subluxation, 7 to 17 degrees with dislocation or patellar component failure
- Well-functioning control knees were in combined EXTERNAL rotation (0 to 10 degrees)
Bone loss with revision total knee arthroplasty: defect classification and alternatives for reconstruction
- Established the AORI (Anderson Orthopaedic Research Institute) classification of femoral (F) and tibial (T) bone defects: Type 1 intact metaphysis, Type 2 damaged metaphysis (A one condyle, B both), Type 3 deficient metaphysis with loss of structural support
- Reconstruction principle: select the LEAST constraint required for stability to reduce stress at the implant-fixation interface in compromised bone
- Defects can be reliably repaired with cement, metal augments or allograft provided long-stemmed components without excessive constraint are used
Satisfactory mid-term outcomes of condylar-constrained knee implants in primary total knee arthroplasty
- 54 knees with severe coronal deformity and/or intraoperative instability, second-generation CCK, mean 9-year follow-up
- Overall survivorship 93.6 percent; no aseptic loosening or migration, only 2 revisions for infection; Knee Society knee score improved from 43 to 86
- The authors explicitly conclude a higher degree of constraint should be used cautiously, with the first choice left to less constrained implants
Rotating-hinge knee prosthesis as a viable option: literature review and meta-analysis
- Meta-analysis of 21 studies of rotating-hinge knees, separated into non-tumour and tumour indications
- Survival: short-term (1 to 5 years) 92 percent non-tumour and 77 percent tumour; mid-term (6 to 10 years) 82 percent non-tumour and 69 percent tumour
- Infection was the most common cause of failure (31.5 percent non-tumour, 37.6 percent tumour), with aseptic loosening, dislocation and fracture also frequent