Kocher-Langenbeck approach · Judet-Letournel associated pattern
- Associated pattern — posterior column PLUS posterior wall; reduction must be sequential.
- Reduce and fix the COLUMN first (restores length, rotation and articular continuity), then reduce the WALL to the restored column — the column is the scaffold upon which the wall sits.
- Posterior wall involvement greater than 40 percent makes the hip unstable and mandates surgical fixation.
- Spring-plate technique for the comminuted wall — a pre-contoured reconstruction plate acts as a template and multiple lag screws compress the fragments against it.
- Identify the sciatic nerve early by finger palpation below piriformis and protect it throughout — temporary injury rate 10 to 15 percent, permanent 1 to 3 percent.
- Marginal impaction (the CT 'gull sign') is present in 30 to 40 percent of posterior wall fractures and must be elevated and bone-grafted before the wall is reduced.
- Dynamic stress test — 90 degrees hip flexion plus internal rotation must remain stable before you leave the table; a subluxing hip means the reconstruction is inadequate.
- The Kocher-Langenbeck approach has the highest heterotopic ossification rate of any pelvic approach (30 to 50 percent) — prophylaxis is mandatory.
When & Why
The pattern. The posterior column/wall fracture is one of the five associated (complex) patterns of the Judet-Letournel classification. Unlike a simple posterior wall fracture, it disrupts BOTH the posterior column (running from the iliac wing to the ischial tuberosity and carrying the posterior half of the articular surface) and a fragment of the posterior wall behind the hip joint. The classic mechanism is a posterior hip dislocation with axial load — the dashboard injury, often a motorcyclist. Absolute indications - Posterior column fracture with greater than 2 mm displacement
- Associated posterior wall fracture with greater than 40 percent wall involvement
- Hip joint instability on dynamic examination
- Marginal impaction requiring elevation
- Incarcerated osteochondral fragments Relative indications - Posterior wall of 20 to 40 percent with marginal impaction
- Posterior column fracture in polytrauma (a staged approach)
- Posterior component of a transverse plus posterior wall pattern Contraindications - Active infection
- Severe medical comorbidities precluding major surgery
- Fractures over 3 weeks old with excessive callus (relative — an extensile approach may be needed)
- Severe osteoporosis with articular comminution — consider total hip arthroplasty instead Timing — the optimal window is days 3 to 7. This allows resuscitation and medical optimisation, brings haemorrhage under control and swelling down, and leaves fracture lines visible before callus forms, while avoiding the inflammatory peak of days 2 to 3. Operating too early (days 0 to 2) risks ongoing haemorrhage in a haemodynamically unstable patient with inadequate imaging; operating too late (over 2 to 3 weeks) means callus obscures fracture lines, bleeding from granulation tissue increases, reduction is harder and complications rise. Pre-operative planning — imaging is decisive. Obtain an AP pelvis, Judet obliques (obturator and iliac) and a CT with 3D reconstruction, which is mandatory for pattern classification, marginal impaction (the 'gull sign'), fragment size and displacement, and femoral head injury. Systematically work through: - Confirm the posterior column/wall pattern
- Measure posterior wall involvement — greater than 40 percent means unstable
- Identify marginal impaction
- Assess for intra-articular fragments
- Check the femoral head for impaction or fracture
- Evaluate the contralateral hip for templating Patient optimisation. Start DVT prophylaxis on admission, have blood cross-matched (expected loss 1 to 2 L), arrange a cell saver, and apply skeletal traction if the hip is subluxed. Consent specifically for sciatic nerve injury (foot drop), heterotopic ossification and stiffness, femoral head avascular necrosis, post-traumatic arthritis, substantial blood loss, and the possibility of re-operation or late conversion to arthroplasty. Setup. Lateral decubitus on a radiolucent table, affected side up, secured with a bean bag or pelvic positioners, an axillary roll in place, and all pressure points padded (head, axilla, fibular head, malleoli). The hip must be freely mobile for reduction manoeuvres and dynamic testing. Confirm all three fluoroscopic views are obtainable BEFORE draping — AP pelvis, obturator oblique (affected side down 45 degrees) and iliac oblique (affected side up 45 degrees). Give antibiotics within 60 minutes (cefazolin 2 g IV) and tranexamic acid 1 g IV at induction, and prep with alcoholic chlorhexidine.
The Operation
The goal: expose the posterior column and wall through the Kocher-Langenbeck approach, identify and protect the sciatic nerve, restore the column first and then the wall, and confirm a stable, concentric hip. The exposure is laid out in full below (and in depth on the Kocher-Langenbeck approach to the hip page).
3.5 mm reconstruction plates (8 to 14 hole), 3.5 mm cortical and cancellous screws, 2.7 mm plates and screws for small fragments, and 2.0 to 2.5 mm K-wires for provisional fixation.
Ball-spike pushers, pointed reduction forceps, Weber and Jungbluth clamps, a Schanz pin for femoral head manipulation, and bone hooks and levers.
A nerve stimulator to confirm sciatic nerve identity, vessel loops and ribbon retractors for nerve protection, a cell saver, and a radiolucent table with C-arm access.
Autograft from the posterior iliac crest (accessible in the field) to pack impacted defects; allograft cancellous chips as backup.
Operative sequence
- Lateral decubitus on a radiolucent table, affected side up; confirm the pelvis is perpendicular to the floor with a spirit level.
- Check C-arm access for all three views before draping, and ensure the hip can be fully flexed, extended and rotated — essential for reduction manoeuvres and dynamic stability testing.
- Centre the incision on the greater trochanter: 8 to 10 cm proximal along the posterior border of the trochanter, curving over its apex, then 10 to 15 cm distally along the posterior femoral shaft (total 20 to 25 cm).
- Mark the landmarks — greater trochanter and posterior superior iliac spine — before incising, as position may shift intra-operatively.
- Split gluteus maximus in line with its fibres (running superolaterally to inferomedially); the split can be extended proximally and distally as needed.
- Identify and preserve the inferior gluteal neurovascular bundle running with the muscle. Once through the muscle you are at the short external rotators, with the sciatic nerve immediately deep — proceed carefully.
- BEFORE any further dissection, identify the sciatic nerve by finger palpation below the piriformis — it is a thick, cord-like structure running from the greater sciatic notch, between the ischial tuberosity and greater trochanter, distally with the hamstrings.
- Confirm visually, trace it proximally to the greater sciatic notch and distally 6 to 8 cm, place a vessel loop or ribbon retractor for protection, and use a nerve stimulator to confirm identity if there is any doubt.
- Identify the short external rotators from superior to inferior: piriformis (the key landmark — the sciatic nerve exits below it), superior gemellus, obturator internus tendon (the thickest and easiest to identify), inferior gemellus, and quadratus femoris.
- Tag each tendon with a heavy suture (number them for anatomic repair) and detach from the femoral insertion leaving a 5 mm cuff, then reflect them posteriorly to expose the posterior capsule.
- Perform a LIMITED capsulotomy — a small T-shaped or cruciate incision over the fracture site. DO NOT perform a complete capsulectomy: this sacrifices the superior retinacular vessels (medial femoral circumflex artery branches) and increases avascular necrosis risk.
- Inspect the joint for intra-articular fragments (remove them), marginal impaction ('gull sign'), femoral head injury, labral damage, and reduction quality.
- Elevate subperiosteally from the lateral ilium distally, staying distal to the superior gluteal nerve (below piriformis level).
- Expose the posterior column from the greater sciatic notch to the ischial tuberosity, the posterior wall fragments, and the quadrilateral surface (by palpation). Place retractors carefully with the sciatic nerve always visualised and protected.
- Present in 30 to 40 percent of posterior wall fractures — recognised on CT as the 'gull sign' (articular cartilage depressed into subchondral bone).
- Create a window through the posterior wall fracture, elevate the impacted osteochondral fragment with a curved osteotome working from inferior to superior (preserving cartilage), and pack the resulting defect with cancellous autograft from the posterior iliac crest before reducing the wall.
- Reduce the COLUMN before the WALL — the column provides the foundation. Débride the fracture haematoma, use a ball-spike on the column fragment to restore length by pushing it distally, and correct rotation (the fragment is usually internally rotated).
- Hold the reduction provisionally with pointed reduction forceps or K-wires, and assess it by direct vision, palpation of the articular surface, and fluoroscopy. The target is anatomic reduction — less than 1 mm step or gap.
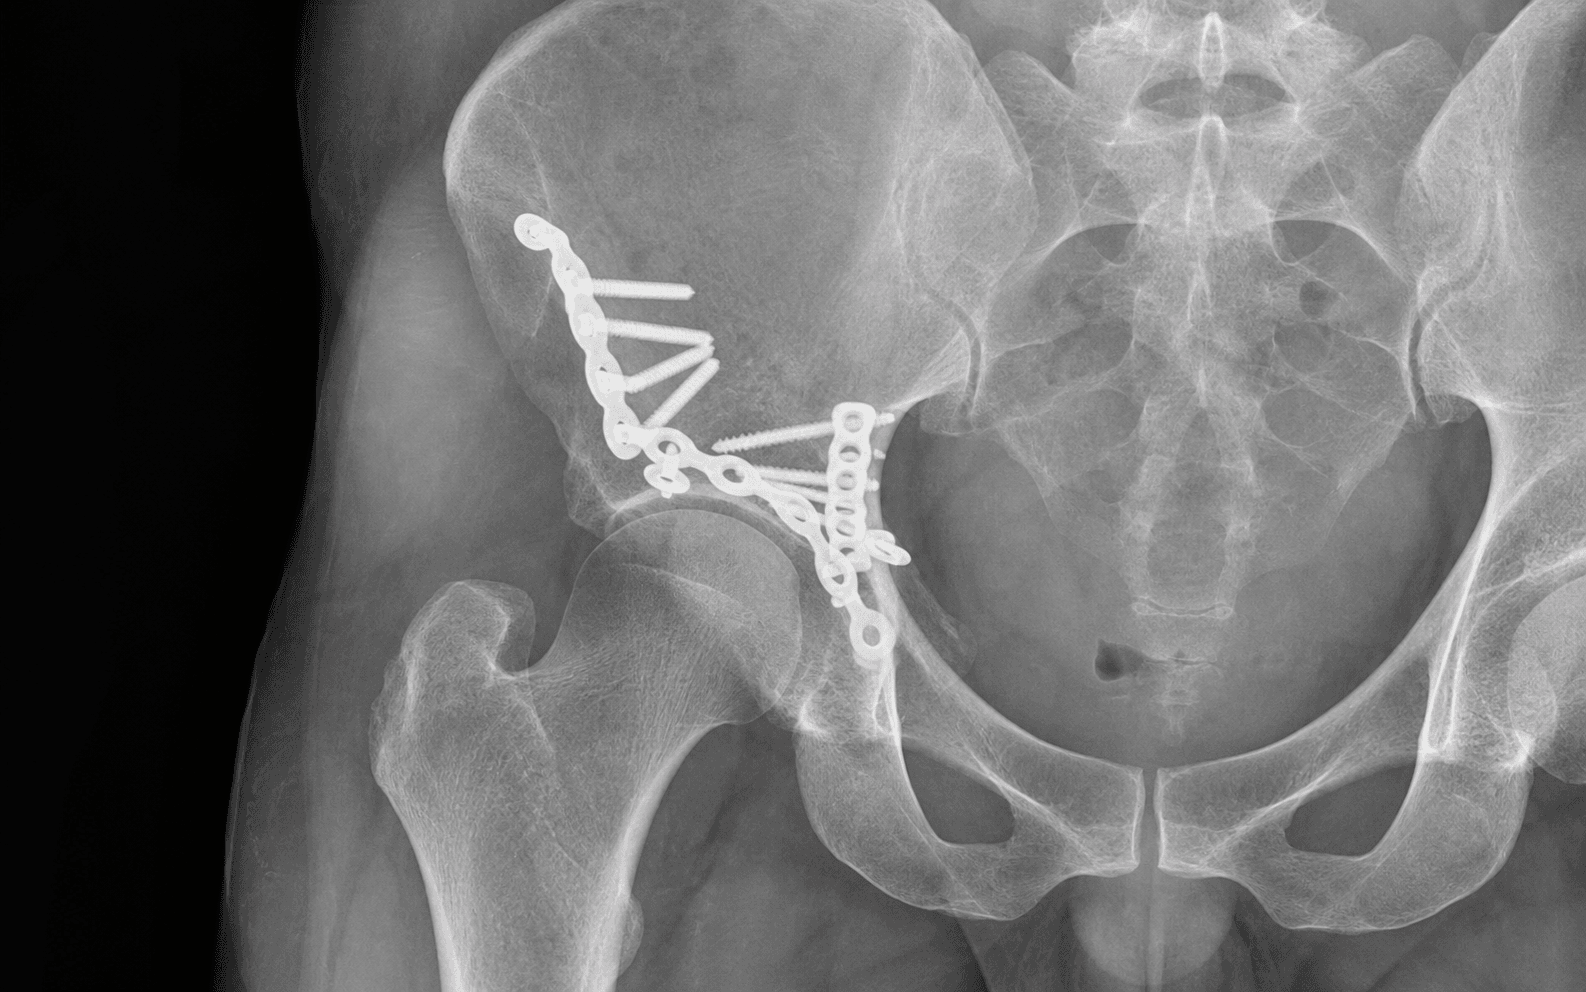
- Apply a 3.5 mm reconstruction plate along the lateral surface of the posterior column, from the posterior ilium to the ischial tuberosity, pre-contoured to the anatomy, with a minimum of three screws (six cortices) each side of the fracture and lag screws through the plate for large fragments.
- Respect the Letournel safe zone: posterior column screws should be POSTERIOR to the column axis and PARALLEL to the joint surface — avoid an anteromedial trajectory, which threatens the obturator vessels 5 to 15 mm from the medial surface. Palpate the anterior cortex when drilling and check every screw with fluoroscopy.
- With the column restored, reduce the wall fragments to the now-anatomic column: identify every fragment and its correct orientation, use a ball-spike and pointed reduction forceps, reduce the largest fragments first, hold with provisional K-wires, and confirm the reduction through the capsulotomy (no articular surface step).
- For a COMMINUTED wall (multiple fragments), contour a 3.5 mm reconstruction plate to the normal posterior wall anatomy (using the contralateral CT or opposite hip as a template), position it over the reduced fragments, and insert 8 to 12 lag screws through it. The plate acts as a TEMPLATE — the screws pull the comminuted fragments against it, restoring the anatomical contour.
- For a SIMPLE wall (one to two large fragments), use direct lag-screw fixation through a plate with buttress plating as needed.
- Remove all retractors and provisional fixation, flex the hip to 90 degrees and internally rotate it, then assess for subluxation or dislocation.
- A STABLE hip (concentrically reduced) means adequate wall restoration; an UNSTABLE hip that subluxes means the fixation is inadequate and you must add more — more screws, a larger plate, or address a missed component.
- Obtain all three views: AP pelvis (overall alignment and hip congruency), obturator oblique (affected side down 45 degrees — the best view of the posterior wall), and iliac oblique (affected side up 45 degrees — the posterior column profile).
- Confirm anatomic reduction (less than 1 mm step or gap), no intra-articular hardware (use a radiopaque probe if in any doubt), adequate bicortical screw purchase, a concentric hip joint, and that every fracture component is addressed.
- Irrigate copiously (3 L or more of warm saline) and secure meticulous haemostasis; repair the posterior capsule with absorbable suture; reattach the short external rotators anatomically using the tagged sutures; place a deep 19 Fr drain to gluteus maximus level; then close the gluteus maximus split, fascia lata, subcutaneous tissue and skin.
- Give heterotopic ossification prophylaxis — MANDATORY: indomethacin 75 mg orally daily for 6 weeks starting on day 1, OR a single 700 cGy radiation dose within 72 hours if an NSAID is contraindicated. Without prophylaxis the HO rate is 30 to 50 percent — the highest of any pelvic approach.
Before any deep dissection, identify the sciatic nerve by finger palpation below the piriformis, confirm it visually, trace it from the greater sciatic notch to the distal thigh, and protect it with a vessel loop and ribbon retractor throughout the case. Avoid hip extension with retractors in place — it stretches the nerve. The peroneal division is more vulnerable than the tibial, so foot drop is the classic presentation.
Piriformis is the key landmark: the sciatic nerve exits BELOW it, and the superior gluteal neurovascular bundle exits ABOVE it. Never dissect proximal to the piriformis — injury to the superior gluteal nerve causes permanent abductor weakness and a Trendelenburg gait. Staying distal to the superior border of piriformis is your safe zone.
Posterior column screws must be POSTERIOR to the column axis and PARALLEL to the joint surface. An anteromedial trajectory threatens the obturator vessels 5 to 15 mm from the medial surface. Palpate the anterior cortex when drilling to confirm trajectory, and check every screw with fluoroscopy — no intra-articular hardware.
For this fracture pattern the lateral decubitus position is preferred over prone — it allows better hip manipulation, dynamic stability testing, and fluoroscopy access. Prone may be considered for bilateral fractures or specific surgeon preference.
Addressing marginal impaction improves good outcomes from roughly 50 percent to 80 percent (Letournel). Failure to recognise and treat it is a major cause of poor results — always look for the 'gull sign' on the pre-operative CT.
For a comminuted posterior wall, pre-contour the plate to ideal anatomy and use it as a template. Multiple lag screws through the plate compress the comminuted fragments against its surface, recreating the anatomical contour. This is the key technique for comminuted posterior wall fractures.
'By finger palpation below the piriformis muscle first — it feels like a thick cord. Then visual confirmation, tracing it from the greater sciatic notch to the distal thigh. I use a nerve stimulator to confirm identity, then protect it with a vessel loop and ribbon retractor throughout the case.'
Aftercare & Complications
Rehabilitation | Phase | Timing | Weight-bearing | Focus | |-------|--------|----------------|-------| | Recovery | 0 to 2 days | — | Neurovascular check (peroneal division), check X-ray (AP and Judet), VTE prophylaxis (LMWH), HO prophylaxis from day 1, drain removal at 48 to 72 hours | | Early | Days 1 to 3 | Toe-touch for 6 to 12 weeks | Mobilise with physiotherapy, active hip ROM within comfort | | 6 weeks | 6 weeks | Progress if healing | Clinical and radiological review, assess for HO on X-ray | | 12 weeks | 12 weeks | Full weight bearing if united | Return to normal activities | | Long-term | 6 months, 1 year, then annually | — | Monitor for post-traumatic arthritis; MRI at 6 to 12 months if symptomatic for AVN; EMG/NCS at 3 weeks for any sciatic deficit | Most patients return to unrestricted activity by 12 weeks once the fracture is united. Long-term follow-up watches for post-traumatic arthritis and femoral head avascular necrosis, which may declare 6 to 24 months after injury. Complications
- Recognition
- Foot drop, sensory loss in the peroneal/tibial distribution; peroneal division more vulnerable
- Prevention
- Early identification by palpation below piriformis, vessel-loop protection, avoid hip extension with retractors, gentle technique
- Management
- Document immediately; EMG/NCS at 3 weeks for prognosis; neuropraxia recovers 3 to 6 months; explore if no recovery by 3 to 6 months or if worsening
- Recognition
- Stiffness, decreased ROM, hip pain; periarticular bone on X-ray
- Prevention
- MANDATORY prophylaxis — indomethacin 75 mg daily for 6 weeks OR radiation 700 cGy within 72 hours
- Management
- For symptomatic Brooker III/IV, excise after maturation (12 to 18 months) with repeat prophylaxis
- Recognition
- Groin pain, limp, collapse on imaging — usually 6 to 24 months post-injury
- Prevention
- Limited capsulotomy, preserve the superior capsule, gentle femoral head handling
- Management
- MRI for diagnosis; if collapse, total hip arthroplasty; in young pre-collapse patients consider core decompression
- Recognition
- Progressive hip pain, stiffness, radiographic joint-space loss
- Prevention
- Anatomic reduction (less than 1 mm), address marginal impaction, congruent hip
- Management
- Activity modification, analgesics; ultimately total hip arthroplasty when symptomatic
- Recognition
- Hip subluxation or dislocation post-operatively; pain, deformity
- Prevention
- Adequate wall restoration (over 40% rule), intra-operative dynamic testing
- Management
- Revision fixation if hardware failure; consider a constrained liner if soft tissue is deficient; arthroplasty if arthritic
- Recognition
- Buttock pain, especially sitting; palpable hardware
- Prevention
- Contour plates carefully, countersink screws
- Management
- Hardware removal once healed (12 to 18 months) — usually straightforward
Viva & Exam Focus
S-C-O-P-ESCOPE — pre-operative assessment
Exits the greater sciatic notch BELOW piriformis, 10 to 20 mm posterior to the posterior column. Temporary injury in 10 to 15 percent, permanent in 1 to 3 percent. Identify early by palpation below piriformis, protect with a vessel loop and ribbon retractor throughout, and avoid hip extension with retractors in place. The peroneal division is more vulnerable — foot drop is the classic presentation.
Exits the greater sciatic notch ABOVE piriformis, 30 to 40 mm superior to the joint. Injury causes abductor insufficiency and a Trendelenburg gait. Stay distal to the superior border of piriformis — this is the safe zone. Never dissect proximal to piriformis. Piriformis is the key landmark: sciatic nerve below, superior gluteal above.
Runs along the posterior femoral neck in the superior retinacular vessels; injury risks femoral head AVN (2 to 5 percent). Use a LIMITED posterior capsulotomy only and preserve the superior capsule; handle the femoral head gently. Most AVN comes from the initial injury or dislocation rather than the surgery — but surgical technique still matters.
Lie 5 to 15 mm from the medial surface of the posterior column; an anteromedial screw trajectory risks haemorrhage. Keep posterior column screws POSTERIOR to the column axis and PARALLEL to the joint — the Letournel safe zone. Bicortical screws are safe if the trajectory is correct; palpate the anterior cortex when drilling.
Clinical Decision Scenarios
Practise clinical reasoning and management decisions out loud
“A 35-year-old motorcyclist sustains a posterior hip dislocation and is found to have a posterior column and posterior wall acetabular fracture. The CT shows 50 percent posterior wall involvement and marginal impaction. How would you manage this patient?”
“During the Kocher-Langenbeck approach for the above patient, your assistant notes the patient has developed a foot drop after final positioning. What are your considerations?”
“At 6-month follow-up, a patient who underwent Kocher-Langenbeck ORIF for a posterior column/wall fracture complains of hip stiffness. X-ray shows Brooker Class III heterotopic ossification. How would you manage this?”
Pattern recognition
- Associated pattern: posterior column PLUS posterior wall
- Mechanism: posterior hip dislocation with axial load (dashboard injury)
- CT is essential: measure wall percentage and identify marginal impaction
- Judet obliques: the obturator oblique is the best view of the posterior wall
Reduction sequence
- COLUMN first (restores the foundation) then WALL second
- Column: restore length and rotation, plate the lateral surface
- Wall: reduce to the column, spring plate for comminution
- Marginal impaction: elevate and bone-graft BEFORE wall reduction
Critical structures
- Sciatic nerve: below piriformis, 10-20 mm posterior to column (10-15% injury rate)
- Superior gluteal NVB: ABOVE piriformis — do not dissect proximal to piriformis
- MFCA: a limited capsulotomy preserves the superior retinacular vessels
- Obturator vessels: avoid an anteromedial screw trajectory
Key numbers
- Greater than 40% posterior wall means unstable (requires fixation)
- 30-40% incidence of marginal impaction
- 30-50% HO rate without prophylaxis (the highest of any approach)
- 10-15% temporary sciatic nerve injury, 1-3% permanent
- Indomethacin 75 mg daily for 6 weeks OR radiation 700 cGy within 72 hours
Dynamic testing
- 90 degrees hip flexion plus internal rotation
- The hip must remain concentrically reduced
- If it subluxes the wall fixation is inadequate — add more
- Document stability in the operative note
Background & Evidence
Classification. The Judet-Letournel system divides acetabular fractures into five elementary (simple) and five associated (complex) patterns. The posterior column/wall injury is one of the five associated patterns — it combines disruption of the posterior column (from the iliac wing to the ischial tuberosity, including the posterior half of the articular surface) with a posterior wall fragment. Posterior wall involvement greater than 40 percent renders the hip unstable and is the key threshold for fixation. Heterotopic ossification — the Brooker classification. The Kocher-Langenbeck approach carries the highest HO rate of any pelvic approach, so grading matters for both prognosis and the decision to excise.
- Radiographic feature
- Bone islands within the soft tissue
- Radiographic feature
- Exophytes from the pelvis or femur with a gap greater than 1 cm
- Radiographic feature
- Exophytes from the pelvis or femur with a gap less than 1 cm
- Radiographic feature
- Complete bony ankylosis
What the evidence shows. Across operative acetabular fractures, anatomical reduction is the single most important surgeon-controllable predictor of hip survival: Matta achieved reduction within 1 mm in 71 percent of fractures operated within three weeks, with good or excellent clinical results in roughly three-quarters and femoral head osteonecrosis in 3 percent. Moed's posterior-wall series achieved anatomic reduction in 97 of 100 fractures with good-to-excellent results in roughly 90 percent, and identified delayed reduction of an associated dislocation, age 55 or older, intra-articular comminution and osteonecrosis as independent risk factors for a poor outcome. The Giannoudis meta-analysis of 3,670 operatively treated fractures sets the benchmark complication figures — late post-traumatic osteoarthritis in roughly 20 percent, heterotopic ossification and femoral head osteonecrosis each under 10 percent across treated cohorts, and only 8 percent needing further surgery — while framing reduction quality, approach selection and timing as the levers the surgeon controls. Finally, the Burd randomised trial is the reason to prefer single-dose radiotherapy over indomethacin for HO prophylaxis when a patient has a concomitant long-bone fracture: indomethacin raised long-bone non-union from 7 percent to 26 percent.
References
Fractures of the acetabulum: accuracy of reduction and clinical results in patients managed operatively within three weeks after the injury
- 262 displaced acetabular fractures (259 patients) operated within 21 days; mean follow-up 6 years
- Anatomical reduction (under 1 mm) achieved in 71%; the rate fell with greater fracture complexity, older age, and a longer injury-to-surgery interval
- Overall clinical result excellent in 40% and good in 36% (good or excellent in roughly three-quarters), closely correlated with radiographic reduction
- Femoral head osteonecrosis in 3% and progressive head wear in 5%
Results of operative treatment of fractures of the posterior wall of the acetabulum
- 100 unstable posterior wall fractures treated with ORIF; 94 followed for a mean of 5 years
- Anatomic reduction in 97 of 100; good-to-excellent clinical result in roughly 90%
- Independent risk factors for a poor outcome: delay over 12 hours to reduction of an associated dislocation, age 55 or older, intra-articular comminution, and osteonecrosis
- The deceptively simple radiographic appearance belies a real risk of poor results
Outcomes of acetabular fracture fixation with ten years' follow-up
- 161 surgically fixed acetabular fractures followed for a minimum of 10 years
- Result excellent in 47%, good in 25%, fair in 7% and poor in 20% on modified Merle d'Aubigne scoring
- Poor prognostic factors: increasing age, delay to surgery, quality of reduction, and certain fracture patterns
- Medium-to-long-term complications were common and functional outcome variable
Operative treatment of displaced fractures of the acetabulum: a meta-analysis
- Pooled analysis of 3670 operatively treated acetabular fractures
- Most common late complication was post-traumatic osteoarthritis at roughly 20%; heterotopic ossification and femoral head osteonecrosis each under 10% across treated cohorts
- Only 8% required further surgery (usually arthroplasty); 75 to 80% achieved good or excellent results at a mean of 5 years
- Controllable outcome factors: timing of surgery, surgical approach, quality of reduction, and local complications
Heterotopic ossification prophylaxis with indomethacin increases the risk of long-bone nonunion
- Randomised trial; 112 of 282 acetabular ORIF patients had a concomitant long-bone fracture
- Long-bone nonunion rate was 26% with indomethacin versus 7% without (p = 0.004)
- Single-dose radiotherapy did not carry the same nonunion penalty
- Indomethacin remains effective HO prophylaxis but is not biologically neutral for fracture healing
Fractures of the Acetabulum
- The foundational monograph that defined the Judet-Letournel classification of acetabular fractures and the surgical approaches and reduction techniques still used today
- Source of the anatomic concepts (elementary versus associated patterns) and the safe zones for posterior column screw placement
- The originating observation that addressing marginal impaction improves good outcomes from roughly 50% to 80%
Ectopic ossification following total hip replacement: incidence and a method of classification
- The original four-class description of periarticular heterotopic ossification (Classes I to IV) from soft-tissue islands through to complete bony ankylosis
- Remains the standard radiographic grading system used to report HO severity and to guide the decision to excise