Joint-preserving realignment for the varus knee with isolated medial compartment osteoarthritis
- Isolated medial compartment OA with constitutional varus alignment
- Young active patient (under 60-65) seeking to delay arthroplasty
- Target mechanical axis to 62% of tibial plateau (Fujisawa point)
- Biplanar osteotomy protects tibial tubercle and patellar tendon
- Preserve lateral hinge cortex — an unstable (Takeuchi Type II) hinge fracture raises delayed-union and loss-of-correction risk
When & Why
Indication. Symptomatic isolated medial compartment osteoarthritis (Ahlbäck Grade 1–3) with constitutional varus malalignment, in a young, active patient (under 60–65) whose lifestyle is incompatible with arthroplasty restrictions, who wants to delay joint replacement. The knee must have a good range of motion (at least 0–120 degrees), an intact lateral compartment, and an intact ACL (or a plan for concurrent reconstruction). Conservative care — activity modification, quadriceps physiotherapy, weight management, analgesia and injection therapy — should be optimised first. Assess the whole knee before offering an osteotomy. Confirm: - Intact lateral compartment (weight-bearing films, MRI) — bone-on-bone lateral disease is a contraindication.
- ACL status — instability must be addressed or concurrently reconstructed.
- Patellofemoral status — significant patellofemoral arthritis is a relative contraindication.
- A correctable, flexible deformity — a fixed flexion deformity greater than 15 degrees, inflammatory arthritis, or tricompartmental disease rules the procedure out.
- Patient factors — BMI greater than 35–40 and heavy manual labour raise failure risk; realistic expectations matter. The one decision that matters. Once a joint-preserving realignment is chosen, the real choice is between realignment (HTO) and arthroplasty (UKA/TKA). HTO preserves the joint and the activity level; arthroplasty commits to an implant pathway:
Joint-preserving realignment. Aimed at the young, active patient who wants to keep playing sport. 80–90% good or excellent results at 10 years; can delay arthroplasty by 10–15 years. Medial opening wedge avoids fibular osteotomy and peroneal nerve risk.
Excellent outcomes for isolated medial disease, but commits the patient to the arthroplasty pathway and its activity restrictions and finite lifespan.
Last resort in this age group. Reliable pain relief, but with activity restrictions; preferred when disease is tricompartmental or inflammatory.
Contraindications include lateral compartment bone-on-bone arthritis, significant patellofemoral arthritis, a fixed flexion deformity greater than 15 degrees, inflammatory arthritis, Grade 4 medial OA with bone loss, unaddressed ligamentous instability, BMI greater than 35–40 (relative), and heavy manual labour. Relative indications are medial meniscectomy with early OA, post-traumatic varus, and combination with cartilage procedures (microfracture, OATS, ACI). Consent. Counsel on expected outcomes — 80–90% good or excellent results at 10 years, pain relief and improved function, an average 10–15 year delay to arthroplasty, and a typical return to recreational sport. Set out the risks honestly: - Common — anteromedial knee numbness from the infrapatellar branch of the saphenous nerve (20–30%), hardware prominence requiring later removal (10–20%), under- or overcorrection requiring revision (5–10%), delayed union (2–5%), infection (1–2%).
- Rare but serious — DVT/PE (1–2%), lateral hinge fracture (5–20%, and it impacts healing), non-union (1–5%), compartment syndrome (less than 1%), common peroneal nerve palsy (less than 1%), and earlier-than-expected conversion to TKA. Pre-operative planning is the operation on paper. Essential imaging: - Weight-bearing long-leg films (standing AP, hip to ankle) to measure mechanical axis deviation and calculate the correction angle by the Miniaci method: draw the mechanical axis from femoral head centre to ankle centre; mark the Fujisawa point (62% across the tibial plateau from medial); draw the corrected axis through that point; measure the angle at the osteotomy level.
- Lateral radiograph for posterior tibial slope (normal 5–10 degrees). A medial opening wedge increases slope by 2–3 degrees — consider a closing wedge if slope is already greater than 12 degrees (relevant in the ACL-deficient knee).
- MRI to confirm lateral compartment integrity, assess the ACL, evaluate meniscal pathology and grade cartilage defects.
- Digital planning (PreOp, TraumaCad or similar) simulates the opening wedge and calculates the medial gap height. Rule of thumb: 1 mm of opening at the medial cortex gives approximately 1 degree of correction; a 10 mm gap gives approximately 10 degrees. Setup. Supine on a radiolucent table, knee flexed 20–30 degrees over a bolster to relax the posterior structures, optional thigh tourniquet. Ensure full C-arm access and test true AP and lateral views before draping. Instrumentation: an HTO-specific set (Tomofix, Arthrex or similar), an oscillating saw with a narrow blade, graduated osteotomes, 2.0 mm K-wires, a depth gauge and calibrated spreaders. Implants: a Tomofix medial locking plate with 4.5/5.0 mm locking screws, plus bone graft options (iliac crest autograft, allograft wedge, or synthetic beta-TCP/hydroxyapatite) for gaps greater than 10 mm. An alignment rod (Bovie cord or long metal rod) confirms correction on the table.
The Operation
The goal: through a medial exposure, create a biplanar opening-wedge osteotomy of the proximal tibia that preserves the lateral hinge, open it gradually to the calculated correction so the mechanical axis passes through the Fujisawa point, fix it with a rigid medial locking plate, and manage the lateral hinge if it fractures. The exposure is laid out in full as the first steps below — it is the heart of the procedure.
Operative sequence
- Supine, radiolucent table, knee flexed 20–30 degrees over a sandbag or bolster to relax the posterior structures.
- Optional thigh tourniquet (do not inflate unless necessary); C-arm from the opposite side with clear AP and lateral views of the proximal tibia.
- Mark the joint line, tibial tubercle and planned incision under fluoroscopy.
- Before draping, confirm the C-arm obtains a true AP (tibial spines equidistant from the tibial margins) and a true lateral — poor imaging wastes time and increases error.
- A 6–8 cm longitudinal incision starting at the joint line, centred between the tibial tubercle and the posteromedial tibial border, curving slightly posteriorly distally.
- Incise the fascia in line with the skin.
- Identify the pes anserinus (sartorius, gracilis, semitendinosus) — these lie superficial to the MCL.
- The infrapatellar branch of the saphenous nerve crosses this field; elevate full-thickness fasciocutaneous flaps to protect it, and warn the patient pre-operatively that anteromedial numbness occurs in 20–30%.
- Release the pes anserinus from its tibial insertion with electrocautery or sharply, and tag it with a suture for later repair.
- Identify the superficial MCL fibres running obliquely across the proximal tibia.
- Release the MCL subperiosteally from the tibia using an elevator or electrocautery — this allows the osteotomy to open without MCL strain. If it is not released, opening the wedge will stretch and potentially rupture the MCL, causing post-operative instability.
- Strip the periosteum from the anteromedial and posteromedial tibia from the joint line to about 5 cm below.
- Place a Hohmann retractor posteriorly directly on bone — this protects the popliteal vessels, which lie 5–10 mm behind the posterior tibial cortex at this level.
- Place an anterior retractor protecting the patellar tendon and tibial tubercle.
- Under fluoroscopy, insert the first guide wire from the medial cortex (below the planned osteotomy) directed toward the lateral hinge point.
- AP plane: aimed at the fibular head or tip; obliquity: ascending 10–15 degrees proximally; endpoint: 10 mm from the lateral cortex (leave a bone bridge for the hinge).
- Confirm on AP and lateral — the wire should lie 35–40 mm below the joint line medially.
- The guide wire defines the hinge: too proximal risks an intra-articular fracture; too distal limits correction. Aim for the wire to exit 10 mm below the joint line at the lateral cortex.
- Insert a second guide wire parallel to the first but directed anterosuperiorly toward the tibial tubercle.
- This ascending limb creates the biplanar osteotomy, which protects the tibial tubercle attachment, prevents patellar tendon impingement and increases construct stability.
- The two wires should diverge by 100–110 degrees anteriorly.
- Using the oscillating saw with a narrow blade, cut between the two guide wires.
- Start at the posteromedial cortex and progress anteriorly, staying parallel to the main wire.
- Stop 10 mm from the lateral cortex to preserve the hinge.
- Use copious irrigation during sawing to prevent thermal necrosis; complete the posterior cortex with an osteotome if needed.
- Do not penetrate the lateral cortex — the hinge provides stability and maintains blood supply.
- Complete the ascending limb from the main osteotomy toward the tibial tubercle.
- It runs at about 45 degrees from the horizontal cut, exits proximal to the tubercle insertion, and creates an L-shaped osteotomy that preserves the patellar tendon attachment.
- The biplanar technique adds rotational stability, an anterior buttress against sagittal tilt and a larger surface area for healing — it has become standard over a simple transverse cut.
- Using thin osteotomes, open the osteotomy gradually: insert a thin osteotome at the posteromedial corner and gently lever to initiate opening; insert a second osteotome anteriorly; stack progressively wider osteotomes.
- Advance slowly, feeling for the hinge maintaining its integrity.
- Open to the calculated distance, measured with a depth gauge.
- Open slowly and gradually — rapid, forced opening fractures the lateral hinge. If significant resistance is met, check for an incomplete posterior cut and extend it with an osteotome.
- With the osteotomy held open at the planned correction, verify alignment before fixation.
- Cable method: hold an alignment rod from the hip (ASIS as a proxy) to the ankle centre; check the rod passes through the Fujisawa point (62% of the tibial plateau) and adjust the opening until it does.
- Grid method: place an alignment grid on the tibial plateau under fluoroscopy and measure the mechanical axis position as a percentage.
- Target the mechanical axis through 62–66% of the tibial plateau from the medial side. It is better to slightly overcorrect (around 65%) than undercorrect — undercorrection is the commonest cause of early failure. The knee will look slightly valgus on the table, and this is correct.
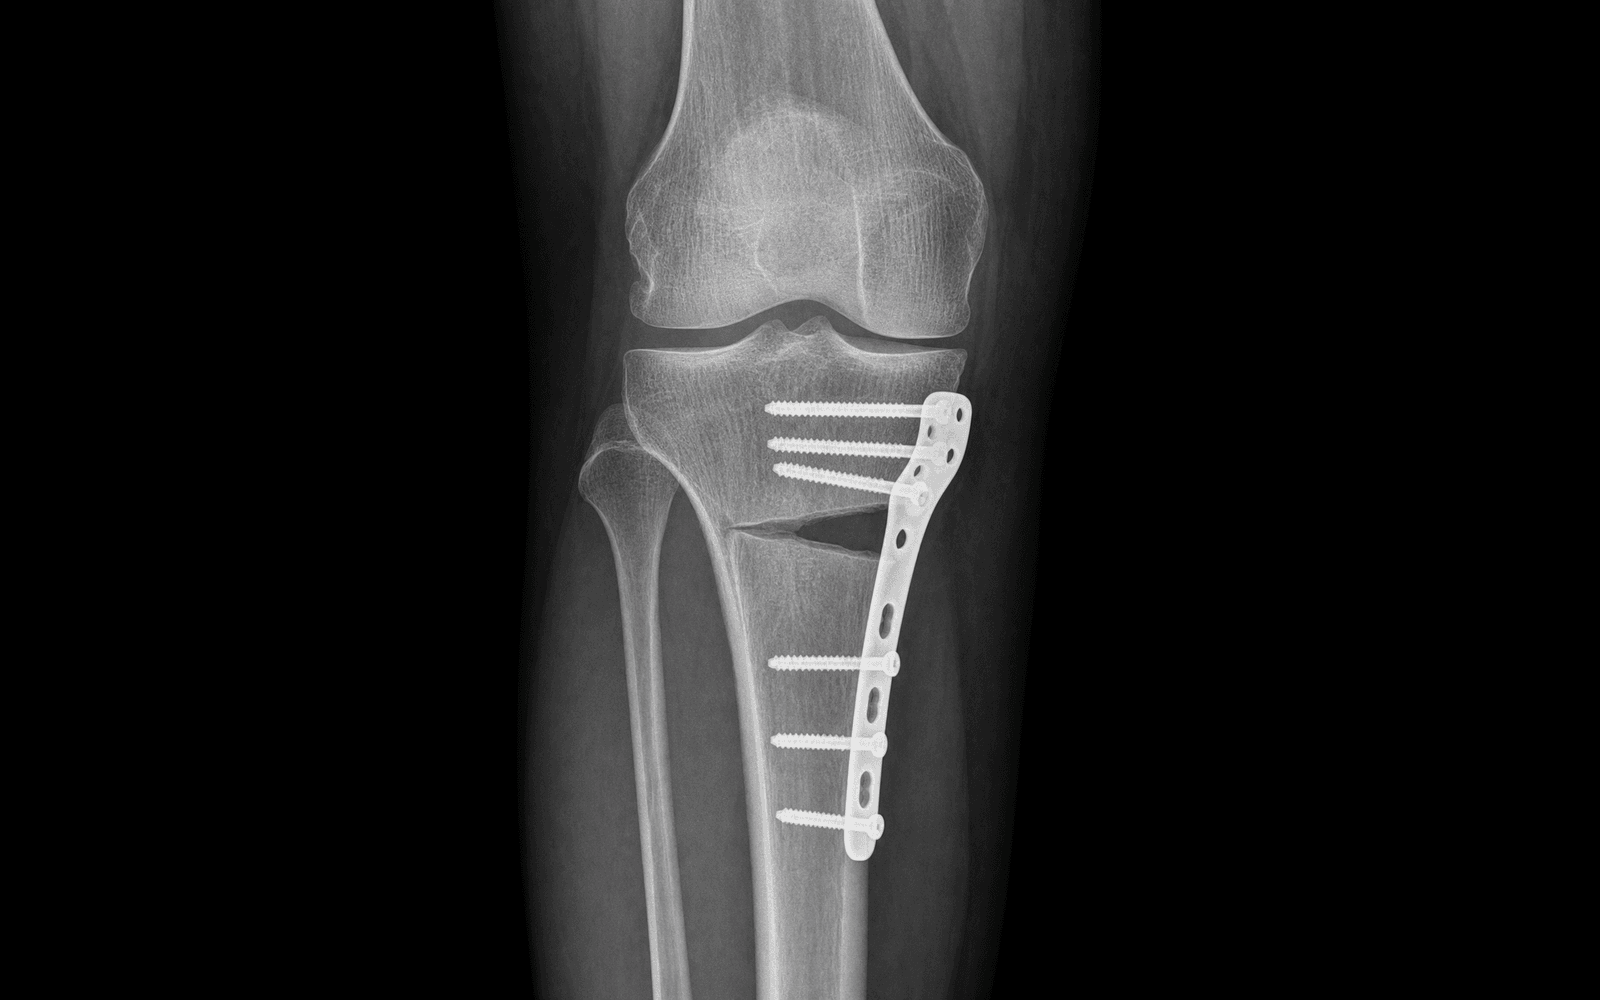
- Apply the medial locking plate (Tomofix or similar) on the anteromedial tibial surface.
- The proximal end should not impinge on the MCL; check plate position on AP and lateral fluoroscopy.
- Insert 2–4 proximal and 2–4 distal locking screws, bicortical where possible.
- The Tomofix plate has a spacer portion that maintains the correction angle (some systems use separate wedge inserts). Ensure screws do not penetrate the joint — check on the lateral view.
- Assess the osteotomy gap.
- Gap less than 7 mm: can be left empty — it heals with haematoma.
- Gap 7–10 mm: consider bone graft or a substitute.
- Gap greater than 10 mm: bone graft is strongly recommended — iliac crest autograft (gold standard), a structural allograft wedge, or a synthetic wedge (beta-TCP, hydroxyapatite).
- Pack the graft into the osteotomy gap, ensuring the posterior and lateral defect is filled.
- Run the checklist: alignment confirmed (Fujisawa point); plate position confirmed on AP and lateral; no screw penetration of the joint; osteotomy gap filled if indicated; lateral hinge intact or only a partial crack; tourniquet down and haemostasis achieved.
- Closure: repair the pes anserinus if released (2-0 absorbable); close the fascia over the plate; subcutaneous 2-0 absorbable; skin staples or subcuticular.
- Apply a dressing and wool/crepe or a knee immobiliser.
- Location and risk
- Wraps the fibular neck 10–20 mm distal to the fibular head; highest risk with a lateral closing wedge or fibular osteotomy, but posterolateral retractors can stretch it
- Protection
- Flex the knee to relax the nerve, avoid posterolateral retraction, palpate the fibular neck before any osteotomy
- Location and risk
- Lies 5–10 mm posterior to the proximal tibia at the osteotomy level; at risk from posterior saw penetration or an aggressive osteotome
- Protection
- Place a Hohmann retractor posteriorly on bone before any saw or osteotome, stop the saw short of the posterior cortex, maintain tactile awareness
- Location and risk
- Crosses the anteromedial tibia 10–30 mm below the joint line, directly in the surgical field; injury causes anteromedial knee numbness
- Protection
- Full-thickness fasciocutaneous flap elevation, protect with a retractor, warn the patient pre-operatively
- Location and risk
- MCL deep fibres attach to the proximal tibia at the osteotomy level; the pes anserinus lies superficially
- Protection
- Release the superficial MCL subperiosteally, identify the pes anserinus, preserve and repair it at closure
The popliteal artery lies directly behind the posterior tibial cortex at the osteotomy level. Always place a Hohmann retractor on bone posteriorly before any saw or osteotome use, stop the saw short of the posterior cortex, and never lever an osteotome blindly behind the tibia.
If a complete lateral hinge fracture occurs during opening, stop opening immediately and assess the pattern on fluoroscopy. Classify it with the Takeuchi system (Type I, II or III — see the classification table in Background and Evidence) and act accordingly: a Type I fracture is usually stable and proceeds with standard medial fixation; a Type II fracture is the least stable and needs protected weight-bearing or supplementary lateral fixation; a Type III fracture is intra-articular and the plateau component must be reduced and fixed before relying on the medial construct. The recognition sign is a sudden "give" during opening, instability on manipulation, or a fracture line on fluoroscopy.
Undercorrection is the commonest cause of early failure. Aim for the mechanical axis at around 65% of the tibial plateau — a slight valgus overcorrection into the lateral compartment is deliberate and correct. Confirm with the alignment rod before fixation, not after.
A medial opening wedge increases the posterior tibial slope by 2–3 degrees, which can be undesirable in the ACL-deficient knee (and conversely helpful when an increased slope is desired for chronic ACL laxity). If slope is already high, a closing-wedge osteotomy is preferable — confirm the slope on the pre-operative lateral and plan accordingly. Bone graft is indicated for gaps greater than 10 mm to prevent collapse and delayed union.
Aftercare & Complications
Rehabilitation | Phase | Timing | Weight-bearing and immobilisation | Therapy and review | |-------|--------|-----------------------------------|--------------------| | Immediate | 0–7 days | Knee immobiliser or hinged brace; touch weight-bearing with crutches | Gentle ROM 0–90 degrees; LMWH for 2–4 weeks; check X-ray before discharge | | Early | 2–6 weeks | Continue touch weight-bearing | Progress ROM to 0–120 degrees; quadriceps isometrics and straight-leg raises; stationary cycling when ROM allows; X-ray at 6 weeks | | Progressive loading | 6–12 weeks | If consolidating, progress to 50% weight-bearing at 6–8 weeks; full weight-bearing by 8–12 weeks | Proprioception and balance work; pool therapy; X-ray at 12 weeks | | Return to activity | 3–12 months | Full weight-bearing | Low-impact sport (swimming, cycling) from 4–6 months; running from 6 months if healed; contact or cutting sport from 9–12 months; hardware removal if symptomatic at 12–18 months | Follow-up schedule: 2 weeks (wound check), 6 weeks (X-ray, progress weight-bearing), 12 weeks (X-ray, typically full weight-bearing), 6 months (functional assessment), 12 months (final assessment and long-leg films), then annual review if symptoms recur. Complications
- Recognition
- Sudden give during opening, a fluoroscopic crack, construct instability
- Prevention
- Gradual opening, stop the saw 10 mm from the lateral cortex, drill weakening holes
- Management
- Supplementary lateral plate, extended immobilisation, consider conversion to a closing wedge
- Recognition
- Early symptom recurrence; mechanical axis still in the medial compartment on weight-bearing films
- Prevention
- Aim for the Fujisawa point at 62%, slight overcorrection preferred, intraoperative alignment rod check
- Management
- Early revision osteotomy if symptomatic; TKA if significant OA progression
- Recognition
- Lateral compartment pain, cosmetically unacceptable valgus, lateral OA development
- Prevention
- Careful pre-operative planning, do not exceed 66% Fujisawa point, check alignment before fixation
- Management
- Closing-wedge revision if severe and early; TKA if lateral OA has developed
- Recognition
- Persistent pain beyond 3 months, no radiographic consolidation at 6 months, hardware loosening
- Prevention
- Adequate fixation, bone graft for gaps greater than 10 mm, protect the lateral hinge, avoid smoking
- Management
- Revision with bone graft, compression plate, biologics (BMP), address smoking
- Recognition
- Wound erythema, discharge, fever, elevated CRP/ESR, exposed hardware
- Prevention
- Antibiotic prophylaxis, meticulous soft-tissue handling, haemostasis
- Management
- Superficial: oral antibiotics. Deep: washout and debridement, IV antibiotics, consider hardware retention if stable
- Recognition
- Calf pain, swelling, dyspnoea, tachycardia, chest pain
- Prevention
- Chemical prophylaxis (LMWH), early mobilisation, mechanical prophylaxis
- Management
- Anticoagulation; IVC filter if anticoagulation is contraindicated; supportive care
- Recognition
- Palpable painful plate (especially in thin patients), skin irritation
- Prevention
- Adequate soft-tissue coverage, a low-profile plate, proper plate positioning away from the MCL
- Management
- Plate removal after union (typically 12–18 months), usually a straightforward procedure
- Recognition
- Severe pain out of proportion, pain with passive stretch, tense compartments; late — paraesthesia, pallor, pulselessness
- Prevention
- Avoid tourniquet where possible, check compartments post-op, maintain a high index of suspicion
- Management
- Emergency four-compartment fasciotomy, ICU monitoring, possible secondary closure or skin grafting
Viva & Exam Focus
FUJISAWAFUJISAWA — the alignment target
HINGEHINGE — lateral cortex preservation
Clinical Decision Scenarios
Practise clinical reasoning and management decisions out loud
“A 48-year-old keen recreational cyclist presents with 2 years of medial knee pain, worse with activity. Examination shows mild varus alignment and medial joint line tenderness. X-rays show medial compartment osteoarthritis with joint space narrowing. He wants to avoid knee replacement as long as possible. What are your treatment options?”
“During a medial opening-wedge HTO on a 52-year-old patient, you are gradually opening the osteotomy when you feel a sudden give and see the lateral cortex has fractured completely on fluoroscopy. How do you manage this?”
“A 54-year-old woman had an HTO performed elsewhere 8 years ago. She now presents with increasing pain affecting both medial and lateral compartments, mechanical symptoms, and difficulty walking more than 500 metres. Examination shows 8 degrees of valgus alignment, a small effusion, and diffuse joint line tenderness. X-rays show tricompartmental arthritis. She asks about further surgery. What are the considerations?”
Indications and selection
- Isolated medial compartment OA with varus malalignment
- Age under 60–65, active, good ROM (at least 0–120 degrees)
- Intact lateral compartment and ACL (or reconstruct the ACL)
- BMI under 35–40, realistic expectations for joint preservation
Critical numbers
- Fujisawa point: 62% across the tibial plateau from medial (the alignment target)
- Correction: 1 mm opening = approximately 1 degree
- Bone graft: indicated for gaps greater than 10 mm
- Slope: increases 2–3 degrees with a medial opening wedge
Key technical steps
- Weight-bearing long-leg films for planning; MRI to confirm the lateral compartment
- Biplanar osteotomy (horizontal plus ascending limb) protecting the tibial tubercle
- Preserve the lateral hinge — stop the saw 10 mm from the lateral cortex
- Align with the cable method to the Fujisawa point before fixation
Danger zones
- Popliteal vessels — Hohmann retractor posteriorly on bone
- Common peroneal nerve — fibular neck; flex the knee, avoid lateral retraction
- Infrapatellar saphenous branch — full-thickness flaps, warn about numbness
Complications and management
- Lateral hinge fracture (5–20%): supplementary lateral plate if complete
- Undercorrection (the commonest failure cause): revise early or proceed to TKA
- Delayed or non-union: bone graft, compression, address smoking
Background & Evidence
Principle and biomechanics. High tibial osteotomy is a joint-preserving realignment procedure. By creating a valgus-producing correction through the proximal tibia, the mechanical axis is shifted from the overloaded medial compartment across to the Fujisawa point — 62% of the tibial plateau from medial to lateral — deliberately slight overcorrection so load is transferred onto the healthier lateral compartment. A medial opening wedge does this without fibular osteotomy, limb shortening or peroneal nerve dissection, and a biplanar cut adds rotational stability and protects the extensor mechanism. Rigid medial locking-plate fixation (Tomofix) holds the correction while the wedge heals.
- Fracture line
- Reaches just proximal to, or within, the proximal tibiofibular joint
- Stability and prognosis
- Commonest (about three-quarters) and most benign — intact tibiofibular ligaments confer relative stability
- Management
- Usually stable: standard medial Tomofix fixation, closer radiographic surveillance
- Fracture line
- Reaches the distal portion of the proximal tibiofibular joint
- Stability and prognosis
- Least stable — the highest risk of delayed union and loss of correction (the delayed unions in Takeuchi's series occurred almost exclusively here, 2 of 5)
- Management
- Protect with non-weight-bearing or add supplementary lateral fixation
- Fracture line
- Lateral tibial plateau fracture — intra-articular extension
- Stability and prognosis
- Worst prognosis — effectively converts the osteotomy into a plateau fracture
- Management
- Reduce and stabilise the lateral plateau component (lag screw or lateral plate) before relying on the medial construct; protected weight-bearing until callus
Guidelines, registries and global practice. HTO is endorsed across major societies as a joint-preserving option for symptomatic isolated medial-compartment osteoarthritis with varus malalignment in the younger, active patient who is not yet a candidate for arthroplasty. - NICE / BOA (UK): osteotomy is recognised for selected unicompartmental OA with malalignment as an alternative to arthroplasty, with emphasis on optimised non-operative care first.
- AAOS (US): osteotomy is considered for the young, active patient with unicompartmental disease and deformity when arthroplasty restrictions are undesirable.
- ESSKA / European consensus: supports medial open-wedge HTO with locking-plate fixation, a biplanar cut and hinge preservation as the contemporary standard; recommends digital alignment planning and the Fujisawa point as the correction target.
- Registry signal: arthroplasty registries show conversion-to-TKA after a prior HTO performs close to primary TKA in survivorship, though with modestly higher complexity — supporting HTO as a legitimate "first procedure" that does not preclude later arthroplasty. Global practice variation: open-wedge medial HTO predominates in Europe and much of Asia; lateral closing-wedge remains common where slope-neutral correction or larger corrections are favoured. Void filling (graft versus none) varies by gap size and surgeon preference rather than by region. Key evidence. Lobenhoffer and Agneskirchner (2003) defined the modern medial open-wedge technique — the biplanar cut, the 10 mm intact lateral hinge and rigid medial plate fixation — with no pseudarthrosis and no loss of correction in 112 consecutive patients. Takeuchi (2012) classified the lateral hinge fracture: in 104 knees, fractures occurred in 25% (26 knees: 19 Type I, 5 Type II, 2 Type III), and the delayed unions and loss of correction occurred only in Type II. Akizuki (2008) reported durable survivorship — 97.6% at 10 years and 90.4% at 15 years — with BMI greater than 27.5 and ROM under 100 degrees as independent risk factors for early failure. Darees (2018) showed a Tomofix locking plate maintains correction over a decade (loss under 1 degree between 2 and 10 years) with 88% survival at 10 years, even without void filling. The van Haeringen meta-analysis found open- and closing-wedge HTO comparable, with closing wedge producing less change in posterior tibial slope and locking plates showing the highest load to failure.
References
Improvements in surgical technique of valgus high tibial osteotomy
- Defined the four modern modifications of medial open-wedge HTO: medial open-wedge approach (avoids peroneal nerve, fibular osteotomy and limb shortening), biplanar osteotomy, incomplete osteotomy leaving a 10 mm intact lateral bone bridge, and rigid fixation with a medial plate-fixator
- In 112 consecutive patients no pseudarthrosis and no loss of correction occurred
- The biplanar ascending cut adds rotational stability and an anterior buttress against sagittal tilt
Fractures around the lateral cortical hinge after a medial opening-wedge high tibial osteotomy: a new classification of lateral hinge fracture
- 104 knees — lateral hinge fractures occurred in 26 (25%): 19 Type I, 5 Type II, 2 Type III
- Type I reaches just proximal to or within the proximal tibiofibular joint (commonest, benign); Type II reaches distal to it (least stable); Type III is a lateral plateau fracture (intra-articular)
- Delayed union and loss of correction (3 and 7 degrees) occurred only in Type II fractures — 2 of 5; Type I patients had no complications
The long-term outcome of high tibial osteotomy: a ten- to 20-year follow-up
- 159 knees, mean 16.4-year follow-up — Kaplan-Meier survival 97.6% at 10 years and 90.4% at 15 years (conversion to TKR as endpoint)
- Good or excellent HSS scores in 73.7% of knees
- Preoperative BMI greater than 27.5 and range of motion under 100 degrees were independent risk factors for early failure
Opening-wedge high tibial osteotomy with locking plate fixation (TomoFix) and early weight-bearing without filling the defect: 48 cases at 10 years
- 48 knees with a Tomofix locking plate and no void filling — 10-year HTO survival 88% (5 conversions to TKA)
- Loss of correction between 2 and 10 years was under 1 degree (0.71 degrees), confirming the locking construct maintains alignment
- Overall complication rate 8% (2 nonunions, infections); no bone grafting required and no complications during subsequent TKA
Opening- and closing-wedge high tibial osteotomy are comparable and early full weight bearing is safe with angular stable plate fixation: a meta-analysis
- Open-wedge and closing-wedge HTO gave comparable pain, function and conversion-to-TKA rates; closing wedge produced significantly less change in posterior tibial slope
- Locking plates (including TomoFix) showed the highest load to failure and are recommended for open-wedge HTO
- Early full weight-bearing was safe in patients with small corrections, no hinge fracture and non-smokers
Further reading 1. Fujisawa Y, Masuhara K, Shiomi S. The effect of high tibial osteotomy on osteoarthritis of the knee: an arthroscopic study of 54 knee joints. Orthop Clin North Am. 1979;10(3):585-608. 2. Spahn G, Kirschbaum S, Kahl E. Factors that influence high tibial osteotomy results in patients with medial gonarthritis: a score to predict the results. Osteoarthritis Cartilage. 2006;14(2):190-195. 3. Noyes FR, Barber-Westin SD, Hewett TE. High tibial osteotomy and ligament reconstruction for varus angulated anterior cruciate ligament-deficient knees. Am J Sports Med. 2000;28(3):282-296. 4. Amendola A, Panarella L. High tibial osteotomy for the treatment of unicompartmental arthritis of the knee. Orthop Clin North Am. 2005;36(4):497-504. 5. Staubli AE, De Simoni C, Babst R, Lobenhoffer P. TomoFix: a new LCP-concept for open wedge osteotomy of the medial proximal tibia — early results in 92 cases. Injury. 2003;34(Suppl 2):B55-B62. 6. Miller BS, Downie B, McDonough EB, Wojtys EM. Complications after medial opening wedge high tibial osteotomy. Arthroscopy. 2009;25(6):639-646. 7. Bonasia DE, Dettoni F, Sito G, et al. Medial opening wedge high tibial osteotomy for medial compartment overload/arthritis in the varus knee: prognostic factors. Am J Sports Med. 2014;42(3):690-698. 8. Woodacre T, Ricketts M, Evans JT, et al. Complications associated with opening wedge high tibial osteotomy — a review of the literature and of 15 years of experience. Knee. 2016;23(2):276-282.