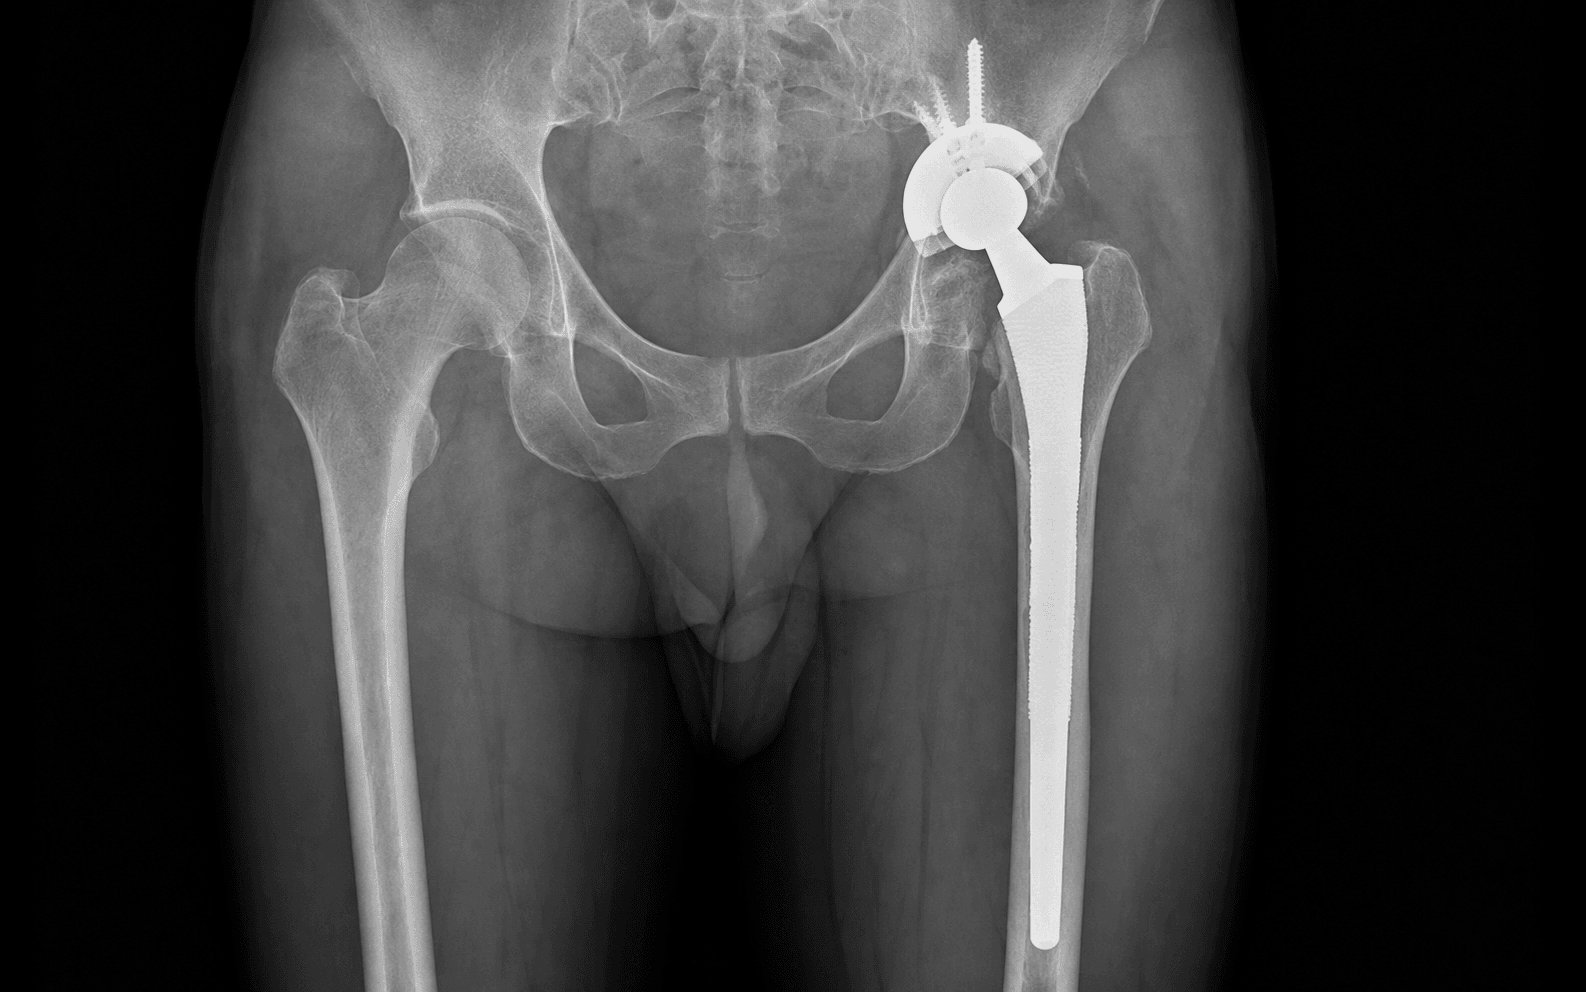
Revision of an aseptically loose stem · Paprosky I–IIIA · posterior/posterolateral approach with an extended trochanteric osteotomy
- PAPROSKY FEMORAL CLASSIFICATION (5 types): Type I (minimal metaphyseal loss, intact diaphysis), Type II (extensive metaphyseal loss, intact supportive diaphysis), Type IIIA (extensive metadiaphyseal loss but MORE than 4cm of intact diaphyseal isthmus for scratch fit), Type IIIB (LESS than 4cm of supportive isthmus), Type IV (extensive metadiaphyseal loss with a non-supportive, widened/ectatic isthmus). The femoral system has NO 'IIA/IIB/IIC' subtypes — the lettering only exists within Type III.
- EXTENSIVELY POROUS STEM: Bypasses the metaphyseal defect to achieve diaphyseal fixation — it needs a scratch fit over at least 4–5cm of intact cylindrical isthmus (ideal for Paprosky I–IIIA).
- EXTENDED TROCHANTERIC OSTEOTOMY (ETO): Used for a well-fixed stem, cement removal, or improved access — typically 12–14cm proximally, hinged on an anterolateral (Paprosky/lateral) or anterior (Wagner) fragment that carries the vastus lateralis and abductors as a single perfused sleeve.
- FIXATION PRINCIPLE: Diaphyseal scratch fit gives initial axial and rotational stability while the circumferential porous coating allows bone ingrowth for durable biological fixation.
When & Why
Indication. Revision of an aseptically loose femoral stem with a Paprosky I–IIIA defect — i.e. proximal bone loss but an intact, supportive diaphyseal isthmus (more than 4cm) available for scratch-fit fixation. The same implant is also used for a periprosthetic fracture (Vancouver B2/B3) with a loose stem, a failed prior revision that still has adequate isthmus, and at Stage 2 of a two-stage exchange for infection. Exclude infection before any aseptic revision — inflammatory markers (CRP, ESR) and hip aspiration if there is any suspicion, because a missed infection turns a single-stage reconstruction into a failure. The decision that drives the whole operation. Before scrubbing, you must type the femoral defect on AP and lateral radiographs (plus CT where the canal is unclear), because the defect type — not surgeon preference — dictates the implant. The extensively porous cylindrical stem is the answer only when there is enough supportive isthmus to scratch-fit into:
Diaphyseal scratch fit plus bone ingrowth. The right answer for Paprosky I–IIIA with more than 4cm of intact cylindrical isthmus — this operation.
Distal taper plus flutes for rotational control over a shorter segment. The modern workhorse for Paprosky IIIA–IIIB (under 4cm isthmus) and increasingly preferred for severe defects.
Cement mantle in the diaphysis. Reserved for the elderly, low-demand patient, irradiated bone, or as part of an impaction-grafting construct.
Prosthetic replacement of the proximal femur for Paprosky IV, oncologic resection, or massive non-reconstructable loss (GMRS, MUTARS).
Morselised allograft plus a cemented stem to restore bone stock — an alternative for Type IIIB/IV where the canal is widened.
Allograft plus a cemented stem for massive proximal bone loss that needs structural restoration.
Consent specifically for the higher revision risks versus a primary: sciatic nerve palsy (1–2%), dislocation (5–10%) from soft-tissue deficiency, periprosthetic joint infection (2–4%), leg-length discrepancy, and ETO fragment fracture or nonunion (roughly 2%). Counsel that a second revision is more likely than after a primary. Setup. Lateral decubitus with pelvic posts, wide draping so the incision can extend distally. Essential equipment: fluoroscopy, a revision stem set with extensively porous options, ETO instrumentation (oscillating/pencil-tip saw, osteotomes), a cable/wire system plus cable-grip plates, a high-speed burr, cement-removal and ultrasonic tools, flexible reamers, and back-up stems (modular tapered fluted, cemented, proximal femoral replacement) in case the intraoperative findings differ from the plan.
The Operation
The goal is to remove the failed stem and cement through a controlled extended trochanteric osteotomy, then bypass the metaphyseal defect with an extensively porous cylindrical stem that scratch-fits into 4–5cm of intact diaphyseal isthmus. The exposure — the posterior or posterolateral approach plus the ETO — is the heart of the operation (described in depth on the posterior (Moore/Southern) approach to the hip page).
Structures at risk during the exposure — identify these before any bone work:
Exits the pelvis through the greater sciatic foramen and passes 15–30mm posterior to the hip capsule. Most at risk during ETO hinging, posterior retractor placement, and limb over-lengthening. Keep the hip flexed and externally rotated, palpate the nerve before placing retractors, and avoid lengthening more than 4cm. A new post-operative foot drop demands immediate assessment.
The femoral artery lies 25–40mm medial to the anterior capsule at the psoas tendon, with the femoral nerve lateral to it; at risk with anterior retraction and anterior/lateral capsular release. The anterior retractor must rest ON BONE (the anterior acetabular wall) — never lever it anteriorly.
Exits above piriformis and runs between gluteus medius and minimus; the safe zone is about 5cm proximal to the greater trochanter tip. Injury causes a Trendelenburg gait. Stay within 5cm of the trochanter tip and do not extend the ETO too far proximally.
The lateral femoral cortex at the osteotomy fractures if the osteotome is misaligned, the cortex is osteolytic, or the ETO is uncontrolled. Mark it precisely (anterior third of the circumference), use an oscillating saw with bone protection, round the distal corner, and complete the cut in a controlled fashion before hinging.
The medial femoral circumflex artery supplies the femoral head remnant — less critical in revision but relevant in periprosthetic fracture. Avoid circumferential stripping of the proximal femur; if avascular necrosis develops, a proximal femoral replacement may be needed.
Operative sequence
- Lateral decubitus with pelvic posts; drape widely so the incision can extend distally for cement removal or fracture.
- Use the previous incision (posterior or posterolateral approach) wherever possible to reduce wound complications; develop the interval through scar.
- Position fluoroscopy to reach the entire femur; mark the greater trochanter, the shaft axis and the old incision.
- Identify and protect the sciatic nerve in scar tissue before deepening the dissection.
- Define the posterior capsule and short external rotators (often deficient from prior surgery) and assess the abductor mechanism — critical for function.
- Dislocate the hip (it may already be unstable) and remove the head if present.
- Decide now: a grossly loose stem extracts directly without an ETO; a well-fixed cementless or cemented stem requires an ETO for controlled removal without fracture. Make this call before any osteotomy.
- Indicated for a well-fixed stem, distal cement removal, or improved access.
- Length is about one-third of the femur — commonly 12–14cm from the greater trochanter tip — and must end at least 2cm proximal to the segment of host bone the new stem will engage.
- The fragment is lateral/anterolateral, roughly one-third of the circumference, carrying the greater trochanter, abductors and vastus lateralis as a single muscle–bone sleeve.
- Preserve that sleeve — stripping it devascularises the fragment (nonunion) and causes permanent abductor weakness; round the distal corner to avoid a stress riser.
- Make the longitudinal cut with an oscillating or pencil-tip saw along the lateral cortex; control depth to avoid cutting into the stem or cement.
- Round the distal transverse corner by drilling several holes and connecting them — this is the step that prevents an uncontrolled spiral fracture propagating distally.
- Lever the fragment forward on its anterior soft-tissue hinge with wide osteotomes; it opens like a book. Never strip the abductor–vastus sleeve off the fragment.
- With the ETO open, work directly at the stem–bone interface with stem-extraction tools and distal blows; disrupt the ingrowth interface of a well-fixed stem.
- Clear the cement mantle with a high-speed burr and ultrasonic tools where available; remove ALL cement — retained cement prevents ingrowth and compromises fixation.
- Curette the canal, remove granulation tissue, and use flexible reamers plus fluoroscopy to confirm a clean, patent canal.
- Begin with the smallest extensively porous broach and advance sequentially until cortical resistance is felt.
- Scratch fit = the broach scratches against diaphyseal cortex on insertion and removal. No resistance means it is undersized (and will subside); inability to advance means it is oversized or eccentric (fracture or perforation risk).
- Aim for 4–5cm of cortical contact in the intact isthmus; confirm position, length and alignment on fluoroscopy. Extensively porous stems rely on diaphyseal, not metaphyseal, fixation.
- Insert a trial matching the final broach and check stability (no rotation or subsidence under torsional and axial load), leg length against the contralateral side, offset (soft-tissue tension with trial heads) and alignment on fluoroscopy.
- An unstable trial demands a larger stem or a different fixation strategy before proceeding — a stem that rotates with hip rotation has inadequate scratch fit.
- Insert the final extensively porous stem at the same size or 0.5mm larger than the trial, advancing with controlled mallet blows.
- Confirm scratch fit, position, length and alignment on fluoroscopy; the stem must bypass the metaphyseal defect to engage the diaphysis.
- Select and impact the head for optimal offset and length; document the final head and combined offset.
- Reduce the fragment anatomically flush with the lateral cortex.
- Fix with two to three cerclage cables (proximal, mid-fragment, and over host diaphysis distal to the rounded corner); add a cable-grip plate for osteopenic, comminuted or migrating fragments.
- Tension to the manufacturer specification — do not overtighten (notch, fracture or cut-through) — and confirm the fragment is stable through a full range of motion. Large series report about 98% union and roughly 2% nonunion.
- Assess stability through a full range of motion, especially in flexion/adduction/internal rotation (the posterior dislocation position) and in extension/external rotation (anterior).
- Confirm final leg length clinically and on fluoroscopy.
- Repair the posterior capsule and short external rotators where tissue allows; close in layers over a drain if there is significant dead space. Consider a dual-mobility construct if instability risk is high.
The stem must engage 4–5cm of intact cylindrical isthmus. If the broach meets no cortical resistance it is undersized and the stem will subside; if it cannot advance it is oversized and risks fracture. Confirm the trial is stable in torsion and axial load before impacting the final stem — an unstable trial predicts failure.
Avoid lengthening the limb more than 4cm. Keep the hip flexed and externally rotated, identify the sciatic nerve in the scar, and place posterior retractors gently. A new foot drop post-operatively is a surgical emergency — assess for a haematoma or over-lengthening.
Drill several holes at the distal transverse corner and connect them rather than making a sharp transverse cut. This single detail prevents an uncontrolled spiral fracture propagating down into the stem-fixation zone.
The ETO fragment carries the abductors and vastus lateralis as one perfused sleeve and hinges forward like a book. Never strip that sleeve off: it is both the fragment's blood supply (for union) and the abductor attachment (for gait).
Aftercare & Complications
Rehabilitation | Phase | Timing | Weight bearing | Precautions and monitoring | |-------|--------|----------------|----------------------------| | 1 | 0–6 weeks | Touch-down to partial weight bearing | Protect ETO union; no active or resisted abduction | | 2 | 6–12 weeks | Progress toward full as the ETO unites | Begin gentle hip ROM and abductor activation | | 3 | 3–6 months | Full weight bearing | Strengthening; confirm ingrowth radiographically | | Surveillance | 6 wk, 3 mo, 6 mo, 1 yr | — | Serial X-rays to monitor ingrowth and subsidence | Protected weight bearing for about 6 weeks protects the ETO and early ingrowth; full activity resumes once the osteotomy is healed and ingrowth is confirmed. Complications
- Recognition
- Progressive thigh pain, shortening on serial X-rays, radiographic subsidence more than 5mm, loss of scratch fit
- Prevention
- Achieve scratch fit (4–5cm isthmus contact), confirm trial stability, correct stem sizing
- Management
- Stable subsidence under 10mm may settle — observe; progressive subsidence needs revision to a larger stem, a modular tapered wedge, or a proximal femoral replacement
- Recognition
- Persistent lateral hip pain, Trendelenburg gait, palpable motion at the ETO site, no healing beyond 6 months
- Prevention
- Two to three cerclage cables or a cable-grip plate, anatomic reduction over host bone, about 6 weeks protected weight bearing
- Management
- Asymptomatic nonunion may be observed; symptomatic cases need revision fixation with plate and cables ± bone graft
- Recognition
- Audible crack during broaching or insertion, sudden loss of resistance, cortical breach on fluoroscopy
- Prevention
- Sequential broaching, avoid eccentric technique, assess lytic lesions preoperatively, controlled ETO execution
- Management
- Proximal fracture: cable fixation; distal fracture: cable or plate fixation, possibly a longer stem to bypass
- Recognition
- Foot drop, sensory loss in the sciatic distribution, posterior thigh pain
- Prevention
- Keep the hip flexed/externally rotated, avoid lengthening more than 4cm, identify the nerve in scar, avoid traction
- Management
- Immediate: rule out haematoma (CT) and over-lengthening; late: EMG at 3 months, AFO for foot drop, explore if no recovery by 6 months
- Recognition
- Acute hip pain, deformity, shortening, inability to weight bear
- Prevention
- Restore offset and length, assess stability intraoperatively, repair posterior structures, consider dual-mobility or constrained liner
- Management
- Closed reduction if concentrically stable; recurrent: revise component position, dual-mobility, abduction bracing, soft-tissue repair
- Recognition
- Wound drainage, fever, raised CRP/ESR, persistent pain, positive aspiration
- Prevention
- Prophylactic antibiotics, laminar flow, meticulous haemostasis, limited operative time, careful soft-tissue handling
- Management
- DAIR if early (under 3 weeks); two-stage revision with an antibiotic spacer for chronic PJI plus long-term antibiotics
- Recognition
- Patient perception of a length difference, gait abnormality, back or knee pain
- Prevention
- Preoperative templating, intraoperative measurement and markers, fluoroscopic confirmation, trial-head optimisation
- Management
- Shoe lift if under 2cm and symptomatic; significant discrepancy with instability may need revision
Viva & Exam Focus
PAPROSKYPAPROSKY — femoral bone-loss classification
ETOETO — extended trochanteric osteotomy steps
Clinical Decision Scenarios
Practise clinical reasoning and management decisions out loud
“A 68-year-old woman presents with progressive right hip pain 12 years after a cemented THA. X-rays show femoral stem loosening with circumferential radiolucencies and proximal metaphyseal bone loss. CT shows the isthmus is intact with 6cm of diaphyseal bone available. How would you classify this and plan management?”
“During a femoral revision you are about to perform an extended trochanteric osteotomy. Describe your technique in detail — length, position, execution and repair.”
“A 72-year-old man undergoes revision THA with an extensively porous stem. At 6 weeks he reports progressive thigh pain and X-rays show 8mm of stem subsidence versus the immediate post-op films. How do you evaluate and manage this?”
Indication
- Aseptic loosening with a Paprosky I–IIIA defect (intact supportive isthmus, more than 4cm)
- Periprosthetic fracture (Vancouver B2/B3) with a loose stem
- Failed prior revision with adequate diaphyseal isthmus
- Stage 2 of a two-stage infection exchange
The defect that decides everything
- Paprosky IIIA (more than 4cm isthmus) — cylindrical extensively porous stem reliable
- Paprosky IIIB (under 4cm) — modular tapered fluted stem
- Paprosky IV (non-supportive, ectatic) — impaction grafting, APC or PFR
Exposure
- Lateral decubitus, previous posterior/posterolateral incision
- ETO for a well-fixed stem or distal cement
- At risk: sciatic nerve, femoral nerve/vessels, superior gluteal nerve (5cm safe zone)
Critical steps
- Loose stem extracts directly; a well-fixed stem needs an ETO
- ETO about one-third femoral length (12–14cm), lateral fragment, PRESERVE the abductor–vastus sleeve, round the distal corner
- Remove ALL cement with a high-speed burr and ultrasonic tools
- Broach to a SCRATCH FIT over 4–5cm of isthmus
- Repair the ETO with two to three cables or a cable-plate
Fixation principle
- Scratch fit gives initial axial and rotational stability
- No resistance on broaching = undersized = subsidence
- Cannot advance = oversized = fracture risk
- Circumferential porous coating then allows bone ingrowth
Complications
- Subsidence from inadequate scratch fit — more than 5mm in about 7% pooled
- ETO nonunion about 2%; fragment fracture, not nonunion, is the commonest ETO complication
- Sciatic palsy 1–2% — avoid lengthening more than 4cm
- Dislocation 5–10% in revision — consider dual-mobility
Post-op
- Partial weight bearing for about 6 weeks (protect ETO union)
- No active/resisted abduction for 6 weeks
- Serial X-rays at 6 weeks, 3, 6 and 12 months
Exam tips
- Know the 5 Paprosky types — IIIA versus IIIB versus IV decides the stem
- Scratch fit needs at least 4–5cm of intact cortical isthmus
- ETO details: about one-third femoral length (12–14cm), lateral fragment with the abductor–vastus sleeve, cable/cable-plate repair
- ETO union about 93–98%; fragment fracture is the commonest complication
- Global registries (NJR, AJRR, AOANJRR, Nordic) all show revision survival well below primary THA, with a trend toward modular tapered stems for severe defects
Background & Evidence
Epidemiology. Across every major national registry — the UK National Joint Registry (NJR), the American Joint Replacement Registry (AJRR), the Australian Orthopaedic Association National Joint Replacement Registry (AOANJRR) and the Swedish/Nordic registries — revision THA carries a markedly higher re-revision rate than primary THA, and survival falls further with greater bone loss and with each successive revision. Cementless diaphyseal-fixation stems perform well where adequate host bone remains, and contemporary registries show a shift away from cylindrical fully-coated stems toward modular tapered fluted titanium stems for severe femoral defects. Pathoanatomy. Aseptic loosening produces particle-induced osteolysis that erodes the proximal femur first, so the metaphysis — on which a primary stem depends — becomes non-supportive while the diaphysis often remains intact. The reconstructive principle is therefore to bypass the deficient metaphysis and gain fixation in the surviving diaphyseal isthmus. The extensively porous cylindrical stem does this with a scratch fit; the modular tapered fluted stem does it with distal taper and flutes over a shorter segment. Once the isthmus itself is lost or ectatic (Type IV), there is no host diaphysis to engage and the reconstruction must restore or replace bone. Paprosky femoral bone-loss classification — the framework that selects the implant:
- Metaphysis
- Minimal cancellous loss, intact
- Diaphysis / isthmus
- Fully intact, supportive
- Recommended reconstruction
- Primary-style or short cementless stem; cemented also feasible
- Metaphysis
- Extensive metaphyseal loss, non-supportive
- Diaphysis / isthmus
- Minimal diaphyseal loss, intact isthmus
- Recommended reconstruction
- Extensively porous cylindrical stem (or cemented); metaphysis not relied upon
- Metaphysis
- Extensive metadiaphyseal loss
- Diaphysis / isthmus
- MORE than 4cm of intact supportive isthmus
- Recommended reconstruction
- Cylindrical extensively porous stem; modular tapered fluted also reliable (ETO often required)
- Metaphysis
- Extensive metadiaphyseal loss
- Diaphysis / isthmus
- LESS than 4cm of supportive isthmus
- Recommended reconstruction
- Modular tapered fluted titanium stem preferred; impaction grafting an alternative
- Metaphysis
- Extensive metadiaphyseal loss
- Diaphysis / isthmus
- Non-supportive, widened/ectatic isthmus
- Recommended reconstruction
- Cylindrical stems fail — impaction grafting, allograft-prosthetic composite or proximal femoral replacement
Revision stem options by defect:
- Mechanism
- Diaphyseal scratch fit plus bone ingrowth
- Indication
- Paprosky I–IIIA with more than 4cm of intact isthmus
- Examples
- AML, Solution, Restoration HA
- Mechanism
- Distal taper plus flutes for rotational control; modularity for offset/length/version
- Indication
- Paprosky IIIA–IIIB (workhorse for under 4cm isthmus); increasingly preferred for severe defects
- Examples
- Wagner SL, Restoration Modular, ZMR, Revitan
- Mechanism
- Cement mantle in the diaphysis
- Indication
- Elderly, low-demand, irradiated bone; impaction-grafting constraint
- Examples
- Exeter revision, Lubinus SPII
- Mechanism
- Prosthetic replacement of the proximal femur
- Indication
- Paprosky IV, oncology, massive non-reconstructable loss
- Examples
- GMRS, MUTARS
- Mechanism
- Allograft plus a cemented stem
- Indication
- Massive bone loss needing structural restoration
- Examples
- Custom
ETO outcomes (large series and systematic review):
- Rate
- 98% (612 hips, Mayo); 93.1% pooled (1478 ETOs)
- Source
- Abdel 2021; Malahias 2020
- Rate
- About 2%
- Source
- Abdel 2021
- Rate
- About 4%
- Source
- Abdel 2021
- Rate
- About 7%
- Source
- Abdel 2021
- Rate
- About 7% pooled
- Source
- Malahias 2020
Extensively porous stem results — and the limits of cylindrical fixation:
- Cohort
- 170 femoral revisions
- Follow-up
- Mean 14.2 years
- Key result
- 82% bone-ingrown, 14% stable fibrous; overall mechanical failure 4.1%
- Cohort
- Fully-coated stems versus alternatives
- Follow-up
- Mean 4.2 years
- Key result
- 0% failure in Type IIIB canal under 19mm; up to 37.5% in Type IV — defines the limits of cylindrical stems
Key evidence points. Extensively porous cylindrical stems are reliable for Paprosky I–IIIA defects with an intact supportive isthmus, but become unreliable once the isthmus is under 4cm or the canal is wide/ectatic (Type IIIB/IV) — the Sporer "limits of fully-coated stems" data. The ETO facilitates stem and cement removal without compromising union (about 98% in the largest series); fragment fracture, not nonunion, is the commonest complication. Adequate scratch fit is essential — inadequate diaphyseal interference leads to subsidence.
References
Minimal 11-year follow-up of extensively porous-coated stems in femoral revision total hip arthroplasty
- 170 femoral revisions followed for a mean of 14.2 years (11–16 years)
- Radiographic bone ingrowth in 82% of hips, stable fibrous fixation in 14%, unstable in 4%
- Overall mechanical failure rate 4.1%; failure of fixation correlated strongly with the extent of preoperative bone loss
- Proximal osteolysis was confined to Gruen zones 1 and 7 with no diaphyseal osteolysis
Revision total hip arthroplasty: the limits of fully coated stems
- Mechanical failure of fully porous-coated stems was 0% in Type IIIB defects with a canal under 19mm
- Failure rose to 18% in Type IIIB defects with a canal over 19mm and to 37.5% in Type IV defects
- No mechanical failures occurred with modular tapered stems or impaction bone grafting in the comparison groups
- Provides a defect-based treatment algorithm for femoral deficiency
The femur in revision total hip arthroplasty: evaluation and classification
- Presents the contemporary Paprosky femoral bone-loss classification used to guide reconstruction
- Reconstruction is dictated chiefly by the amount and quality of remaining supportive diaphyseal isthmus
- Links each defect type to an appropriate fixation strategy for preoperative planning
Extended trochanteric osteotomy in revision total hip arthroplasty: contemporary outcomes of 612 hips
- 612 ETOs (Paprosky/lateral and Wagner/anterior techniques); radiographic and clinical union in 98% at a mean of 6 months
- ETO nonunion in only 2% (9 hips); the commonest complications were fragment fractures (intraoperative 4%, greater trochanter 7%)
- Mean Harris hip score improved from 57 to 77
- 10-year survivorship free of any reoperation 82%, free of any component removal 91%
Outcomes and risk factors of extended trochanteric osteotomy in aseptic revision total hip arthroplasty: a systematic review
- Systematic review of 19 studies and 1478 ETOs in aseptic revision THA
- Pooled ETO union rate 93.1%; radiographic stem subsidence over 5mm in 7.1%
- Prior femoral cementation and older age may reduce union rates
- Trochanteric plate with cables recommended as the first-choice fixation construct
Femoral revision hip arthroplasty with uncemented, porous-coated stems
Early series of uncemented porous-coated stems for femoral revision, helping establish the diaphyseal-fixation principles on which the extensively porous cylindrical stem depends. Level IV.
National joint registry evidence — revision THA survival
Read side by side, these registries report revision THA survival substantially below primary THA and an increasing use of modular tapered fluted stems for severe femoral defects. Registry evidence (no single PMID).