Kocher-Langenbeck posterior approach (most common transverse pattern) | Letournel classification | Roof arc assessment (45 degrees, all 3 arcs) | Anterior column screws from posterior
- Displaced transverse fracture with greater than 2mm articular step/gap, incongruous hip, or any roof arc (medial/anterior/posterior) less than 45 degrees indicating weight-bearing dome involvement
- Letournel: transverse fracture divides acetabulum into superior (iliac/dome) and inferior (ischiopubic) segments and is the only elementary pattern crossing BOTH columns
- Most transverse fractures can be fixed from a single posterior Kocher-Langenbeck approach using anterior column lag screws directed from posterior
- “Draw transverse fracture pattern showing superior and inferior segments and a single line crossing both columns
- “Roof arc concept (Matta 1986): medial arc (AP), anterior arc (obturator oblique), posterior arc (iliac oblique) — all greater than 45 degrees means dome spared
- “Transtectal vs juxtatectal vs infratectal — prognostic implications
- “Letournel's anterior column lag-screw technique from a posterior approach
When & Why
Indications. Operative fixation is offered for a transverse acetabular fracture when the weight-bearing dome is involved or the hip is incongruous. - Absolute indications: displaced transverse fracture with greater than 2mm articular step or gap involving the weight-bearing dome; an incongruous hip joint (femoral head not concentric with an intact dome); a roof arc angle less than 45 degrees on any view (medial, anterior or posterior) indicating dome involvement; an associated posterior wall fracture causing posterior instability; an open fracture; an irreducible fracture-dislocation or an intra-articular fragment blocking reduction.
- Relative indications: 2mm displacement in a young, active patient; quadrilateral plate medialization causing hip incongruity; an associated T-type or posterior-wall component; a failed or unacceptable closed reduction in a low transverse pattern; a progressive sciatic nerve palsy after closed reduction (suggests nerve entrapment). Contraindications. - Absolute contraindications: severe medical comorbidities precluding a 2-3 hour operation; active sepsis or a local skin infection; a moribund patient.
- Relative contraindications: severe osteoporosis (relative — may need buttress plating); a low-demand elderly patient with an infratectal fracture; a non-ambulatory patient; delayed presentation greater than 21 days (consider acute total hip arthroplasty); marginal soft tissues such as a Morel-Lavallée lesion (delay surgery). Deciding to operate — the roof arc rule (Matta 1986). On each of the three standard radiographs a roof arc is measured around the femoral-head centre, and the same threshold of 45 degrees applies to all three. If every arc exceeds 45 degrees (and the CT subchondral arc in the superior 10mm of the dome is intact) the weight-bearing dome is spared and non-operative treatment may be considered; if any arc is less than 45 degrees the dome is involved and operative fixation is indicated. The rule only applies to fracture lines that cross the articular surface (transverse, T-type, anterior/posterior column) — it does NOT apply to posterior-wall or both-column fractures.
- Best view
- AP pelvis
- Threshold for dome spared
- Greater than 45 degrees
- Best view
- Obturator oblique (Judet)
- Threshold for dome spared
- Greater than 45 degrees
- Best view
- Iliac oblique (Judet)
- Threshold for dome spared
- Greater than 45 degrees
Fracture level matters for prognosis. Where the transverse line crosses the dome predicts outcome and feeds into the decision: transtectal (through the weight-bearing dome — worst prognosis, usually operative), juxtatectal (at the dome edge — intermediate), and infratectal (below the dome — best prognosis; many are non-operative if the hip is congruent). Essential workup. - AP pelvis — overall alignment and the six Letournel lines (iliopectineal, ilioischial, teardrop, roof, anterior rim, posterior rim).
- Obturator oblique (45 degrees) — profiles the anterior column and the posterior wall.
- Iliac oblique (45 degrees) — profiles the posterior column and the anterior wall.
- CT with 3D reconstruction — the gold standard for pattern classification, marginal impaction, quadrilateral-plate displacement and intra-articular fragments. Timing. Operate within about 3-7 days of injury once the patient is resuscitated — reduction quality falls with delay. Beyond 21 days, anatomical reduction becomes much less likely; in older patients consider acute total hip arthroplasty. Setup & positioning. Lateral decubitus or prone on a radiolucent table, affected side up, secured with a beanbag or pelvic posts. The leg is draped free so it can be placed in hip extension with the knee flexed to protect the sciatic nerve during retraction. Test ALL fluoroscopy views (AP, obturator oblique, iliac oblique) before draping, and have a cell saver available. Equipment. 3.5mm reconstruction plates (pre-contoured pelvic), 4.5mm cortical screws for column fixation and 3.5mm cortical screws for wall fixation, a spring plate for posterior-wall fragments; pelvic reduction clamps (Farabeuf, Jungbluth, Matta), a ball-spike pusher, Schanz pins for joystick manipulation, Cobb and large Weber clamps; a radiolucent table, vessel loops for nerve protection, and intraoperative fluoroscopy.
The Operation
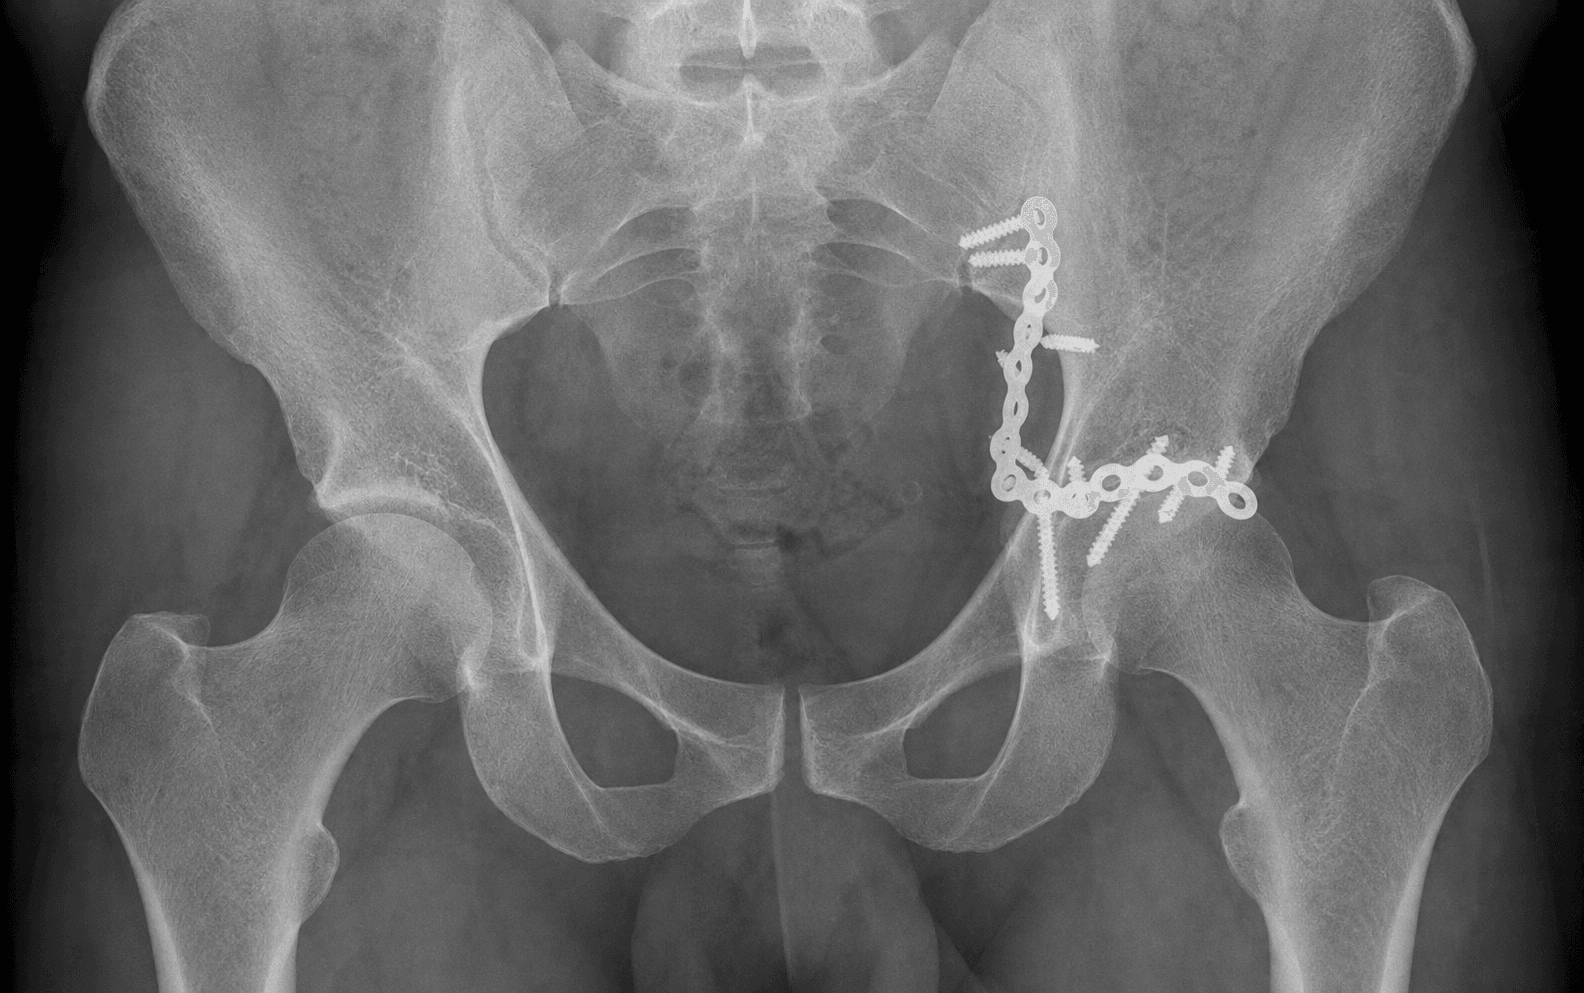
The goal is to restore a congruous hip under an intact, anatomically reduced weight-bearing dome. For roughly 70 percent of transverse fractures this is achieved through a single posterior Kocher-Langenbeck approach: expose and protect the sciatic nerve, reduce the unstable inferior ischiopubic fragment to the stable superior iliac segment, plate the posterior column, then drive anterior column lag screws forward from the posterior exposure — Letournel's key contribution that fixes both columns from one incision. The exposure is laid out in full as the first steps below (and in depth on the Kocher-Langenbeck approach to the hip page).
Operative sequence
- Lateral decubitus (or prone), affected side up; radiolucent table allowing AP, obturator oblique and iliac oblique views.
- Keep the hip EXTENDED and the knee FLEXED — this slackens the sciatic nerve throughout the case.
- Study the CT with 3D reconstruction first: classify the pattern (pure transverse vs transverse plus posterior wall, 30-40 percent; vs T-type), the fracture level (transtectal/juxtatectal/infratectal), the roof arc angles, quadrilateral-plate displacement and any marginal impaction requiring elevation.
- Test ALL fluoroscopy views before draping.
- Curved incision from the posterior superior iliac spine to the greater trochanter and into the lateral thigh (15-20cm). Adequate length prevents excessive retraction — a short incision forces retraction and is a classic cause of traction nerve injury.
- Divide subcutaneous tissue in line with the incision.
- Split gluteus maximus bluntly in the line of its fibres; limit the distal split to avoid the inferior gluteal neurovascular pedicle entering its deep surface.
- Identify the sciatic nerve on the posterior surface of quadratus femoris and the short external rotators, and protect it before any further dissection.
- Detach piriformis and obturator internus (with the gemelli) about 10-15mm from their trochanteric insertions, leaving a tendinous cuff for later repair, and tag them with heavy non-absorbable suture.
- PRESERVE quadratus femoris: the deep branch of the medial femoral circumflex artery (MFCA) — the dominant blood supply to the femoral head — runs just deep/superior to it, so leaving QF intact protects head perfusion.
- The obturator internus tendon is a key landmark: its bursa leads a finger safely to the greater and lesser sciatic notches and can cushion a retractor protecting the sciatic nerve.
- Open the capsule along the acetabular rim (not radially through the labral base) only as needed for joint inspection, preserving remaining capsular blood supply.
- Clear haematoma from the fracture site and joint. Identify the posterior column line (greater sciatic notch to ischial tuberosity), the transverse line across the dome, any associated posterior-wall fragments, and marginal impaction. Assess the anterior column indirectly through the greater sciatic notch.
- Recall the column principle: the superior iliac segment is STABLE (attached to sacrum); the inferior ischiopubic segment is UNSTABLE and displaces.
- The superior iliac segment is the fixed REFERENCE; the inferior ischiopubic segment must be REDUCED to it — always reduce unstable TO stable, never the reverse.
- Insert a ball-spike pusher through the greater sciatic notch to control the superior fragment, place a Schanz pin in the ischial tuberosity as a joystick for the inferior fragment, and apply pelvic reduction clamps (Farabeuf, Jungbluth) to compress the fracture.
- Confirm reduction on fluoroscopy before final clamping.
- Through the posterior capsulotomy, directly visualise the articular surface; gentle hip rotation reveals the anterior and superior dome. Accept only less than 1mm of articular step.
- Confirm on ALL Judet views: AP for overall alignment, obturator oblique for the anterior column and posterior wall, iliac oblique for the posterior column and anterior wall.
- Hold the reduction with 2.0mm K-wires or provisional lag screws.
- Re-check fluoroscopy; if reduction is lost with provisional fixation, reassess the reduction technique. Do NOT proceed to plating without confirmed anatomical reduction.
- Contour a 3.5mm reconstruction plate to the posterior column, from the greater sciatic notch posteriorly to the ischial tuberosity inferiorly. Pre-contour BEFORE final reduction, or tightening the plate will displace the fracture.
- At least 3 bicortical screws in the superior segment (ilium) and at least 3 in the inferior segment (ischium); screws directed anteriorly, away from the joint. A plate placed too anteriorly risks joint penetration.
- From the exposed posterior column, insert 3.5mm or 4.5mm cortical lag screws directed anteriorly and slightly superiorly toward the pelvic brim and anterior column.
- This achieves fixation of BOTH columns through the single posterior approach — Letournel's major contribution, which avoids combined-approach morbidity in most transverse fractures.
- Check length on ALL fluoroscopy views: AP to keep the screw within bone and away from the iliac vessels, obturator oblique for the anterior-column trajectory, iliac oblique for the posterior-column entry. The screw must NOT penetrate the anterior cortex.
- About 30-40 percent of transverse fractures have an associated posterior wall. Reduce the wall fragments AFTER the column is fixed, then apply a buttress (reconstruction or spring) plate with multiple screws into the now-stable posterior column.
- Assess hip stability through a full range of motion; posterior wall coverage greater than 60 percent is the threshold for stability.
- If significant medialization is visible on the obturator oblique, it may require a limited ilioinguinal medial window or a separate Stoppa approach with an infrapectineal buttress plate to prevent recurrent medialization and hip incongruity.
- This is additional morbidity, but quadrilateral-plate medialization causes incongruity and accelerates arthritis even when the columns are anatomically reduced.
- Obtain AP, obturator oblique, iliac oblique and lateral views.
- Checklist: articular reduction less than 1mm step; column alignment anatomic; NO intra-articular screws (sweep the arc intensifier through the joint); adequate screw purchase and length; quadrilateral-plate position acceptable. Screw malposition occurs in 3-8 percent despite careful technique — Judet views are mandatory because the fracture crosses both columns.
- Repair piriformis and obturator internus/gemelli (and the capsule) to the greater trochanter with heavy non-absorbable suture, through trans-osseous tunnels if the tendinous cuff is poor.
- Capsular repair restores a posterior soft-tissue restraint. Assess hip stability through a range of motion after repair and before closure.
- Meticulous haemostasis — the gluteal muscles bleed significantly.
- Copious irrigation with 3-6L saline; place a 14Fr drain deep to gluteus maximus.
- Close in layers: gluteal fascia (0 Vicryl), Scarpa's (2-0 Vicryl), skin (staples).
Identify the sciatic nerve BEFORE releasing the external rotators, on the posterior surface of quadratus femoris. Keep the hip extended and the knee flexed, relax retractors intermittently, and avoid monopolar cautery near the nerve. Continuous forceful retraction is the main driver of iatrogenic palsy — the peroneal (common fibular) division is the most vulnerable to traction.
Use fluoroscopy on ALL views to confirm screw trajectory and length. Screws directed too medially risk iliac vessel injury; screws that are too long penetrate the anterior cortex into soft tissues. Sweep the image intensifier through the joint to exclude any intra-articular penetration before closing.
Letournel's principle: because a transverse fracture crosses both columns, both must be fixed — but anterior column lag screws driven forward from the posterior Kocher-Langenbeck exposure achieve this in most transverse patterns, avoiding the morbidity of a combined ilioinguinal plus Kocher-Langenbeck approach. Reserve an extended iliofemoral or combined approach for complex T-types or when anterior visualisation is essential.
The sciatic nerve crosses both the hip and the knee, so it is tensioned by hip flexion and relaxed by hip extension plus knee flexion. That is the position of safety whenever the nerve is retracted. Prone positioning aids reduction of the posterior column and avoids posterior subluxation of the head; lateral decubitus is easier for imaging and limb manipulation.
The deep branch of the MFCA — the dominant blood supply to the femoral head — runs just deep to quadratus femoris. Leaving QF intact limits iatrogenic osteonecrosis, and anatomic short-rotator and capsular repair reduces postoperative posterior instability.
Aftercare & Complications
Postoperative protocol - Touch weight-bearing (10-20kg) for 6 weeks, progressing to full weight-bearing by 12 weeks.
- Range-of-motion exercises begin on day 1-2.
- Posterior precautions for 6-12 weeks if there is any concern about stability.
- VTE prophylaxis: LMWH or a DOAC for 35 days.
- Heterotopic ossification prophylaxis: indomethacin 75mg daily for 6 weeks.
- Radiographs at 6 weeks, 12 weeks, 6 months and 12 months. Complications
- Incidence
- ~2-10%
- Prevention
- Early identification; hip extension plus knee flexion to slacken the nerve; intermittent relaxation of retractors; avoid cautery near the nerve
- Management
- If hardware compression is suspected, explore or reposition urgently. Most are traction neuropraxia — observe, fit an AFO for foot drop, serial EMG. Partial-to-good recovery over 6-18 months in the majority
- Incidence
- 15-25%
- Prevention
- Direct articular visualisation; confirm on ALL fluoroscopy views; accept only less than 1mm step
- Management
- Intra-op: re-reduce. Early postop (less than 3 weeks): consider revision ORIF. Late: monitor, eventual THA when symptomatic
- Incidence
- 5-12%
- Prevention
- Careful length measurement; fluoroscopy on all views; arc through the joint; conservative length near the joint
- Management
- Remove ALL penetrating screws urgently — even 1-2mm damages cartilage. Document removal and residual damage
- Incidence
- 5-10%
- Prevention
- Adequate purchase (6+ cortices per fragment); bicortical screws; anatomic reduction; anterior column screws enhance fixation
- Management
- Early: revision fixation. Late with union: hardware removal if symptomatic. Nonunion: revision plus bone graft
- Incidence
- 30-50% at 10yr
- Prevention
- Anatomic reduction (less than 1mm) is THE critical factor; address the quadrilateral plate; stable fixation for early ROM
- Management
- Conservative: NSAIDs, activity modification, injections. THA when failed — technically demanding post-trauma
- Incidence
- 25-45% radiographic, 12-18% Brooker III-IV
- Prevention
- Indomethacin 75mg daily for 6 weeks OR single-dose radiation 7-8Gy within 72hr; meticulous soft-tissue handling
- Management
- NSAIDs, ROM exercises. If mature (12-18 months) and limiting ROM: surgical excision with repeat prophylaxis
- Incidence
- 3-8% (12-20% if dislocated)
- Prevention
- Injury determines most risk; protect the MFCA; urgent reduction if dislocated (within 6hr); gentle handling
- Management
- Protected weight-bearing; bisphosphonates and core decompression have limited efficacy. Most progress to THA
- Incidence
- 2-4%
- Prevention
- Adequate posterior wall reconstruction (greater than 60% coverage); meticulous rotator repair; assess stability intra-op
- Management
- Urgent closed reduction. If unstable: revision fixation or traction for 6 weeks. If stable: brace plus precautions for 12 weeks
- Incidence
- 2-4%
- Prevention
- Cefazolin 2g; minimise OR time; normothermia; glucose control; optimise nutrition
- Management
- Irrigation and debridement with hardware retention (provides stability), deep cultures, 6-12 weeks IV antibiotics, negative-pressure therapy
- Incidence
- 4-10% with prophylaxis
- Prevention
- LMWH 40mg daily or DOAC for 35 days; TEDS; SCDs; early mobilisation
- Management
- DVT: therapeutic anticoagulation 3-6 months. PE: anticoagulation, ICU if unstable, thrombolysis if massive
Viva & Exam Focus
ROOF
Roof arc angle thresholds (Matta 1986)
LETOURNEL
Transverse fracture management principles
Critical danger structures
Crosses the posterior column about 20-30mm medial to the posterior acetabular rim. Position of safety is hip EXTENSION with knee FLEXION (about 60-90 degrees) to slacken the nerve; gentle retraction, palpate intermittently, limit continuous retraction. Hip flexion tensions the nerve and should be avoided.
Exits ABOVE piriformis at the greater sciatic notch — the only structure above piriformis. At risk with the extended iliofemoral approach and with retraction through the greater sciatic notch.
About 30-40mm medial to the pelvic brim in the middle window. At risk if an anterior or combined approach is needed for a T-type or quadrilateral-plate fixation.
Lies lateral to the external iliac artery in the iliopsoas groove. At risk with anterior-approach retraction; protected by the iliopsoas during surgery.
Clinical Decision Scenarios
Practise clinical reasoning and management decisions out loud
“A 45-year-old man sustains a transverse acetabular fracture in a motorcycle accident. His AP pelvis shows a transverse line. How do you assess whether he needs surgery?”
“Describe Letournel's technique for anterior column screw placement from the posterior Kocher-Langenbeck approach.”
“A patient develops foot drop after transverse acetabular fracture ORIF. How do you manage this?”
Roof arc angles (Matta 1986)
- Medial roof arc (AP): greater than 45 degrees means dome spared
- Anterior roof arc (obturator oblique): greater than 45 degrees means dome spared
- Posterior roof arc (iliac oblique): greater than 45 degrees means dome spared
- If ANY arc is less than 45 degrees (or the CT subchondral arc is disrupted) the dome is involved and surgery is indicated
- Rule invalid for posterior-wall and both-column fractures
Letournel classification
- Transverse divides into superior (ilium) and inferior (ischiopubic) segments
- Transtectal: through the dome — worst prognosis
- Juxtatectal: at the dome edge — intermediate
- Infratectal: below the dome — best prognosis
Critical surgical principles
- Kocher-Langenbeck posterior approach for most transverse patterns
- Hip EXTENSION plus knee FLEXION slackens the sciatic nerve
- Reduce the UNSTABLE (inferior) fragment TO the STABLE (superior) segment
- Anterior column screws from posterior — Letournel's key technique
- Address the posterior wall (30-40 percent associated) and the quadrilateral plate
Danger zones
- Sciatic nerve: 20-30mm medial to the posterior acetabular rim
- Superior gluteal bundle: above piriformis at the greater sciatic notch
- External iliac vessels: if an anterior or combined approach is needed
- Femoral nerve: lateral to the external iliac artery
Exam tips
- Draw the transverse fracture showing superior and inferior segments crossing both columns
- Know the roof arc rule: 45-degree threshold for all three arcs
- Judet views: obturator shows anterior column and posterior wall; iliac shows posterior column and anterior wall
- Describe the anterior column screw technique from posterior
- HO prophylaxis: indomethacin 75mg for 6 weeks OR radiation 7-8Gy
Background & Evidence
Letournel's column concept. The acetabulum is formed by two columns: the anterior column (anterior ilium to anterior wall to superior pubic ramus) and the posterior column (posterior ilium to posterior wall to ischium), together forming an "inverted Y". A transverse fracture divides the acetabulum horizontally into a superior segment (iliac wing plus superior dome, attached to the sacrum — STABLE) and an inferior segment (the ischiopubic segment — UNSTABLE, and the fragment that displaces). The weight-bearing dome and the roof arc. The superior acetabular articular surface is the critical weight-bearing zone. Matta's roof arcs (1986) quantify how much intact dome remains around the femoral-head centre, and the CT subchondral arc (the superior roughly 10mm of subchondral bone on axial slices through the dome) corroborates a spared dome. Fractures crossing the dome (transtectal) carry the highest rates of post-traumatic arthritis. The roof-arc rule is valid only for fracture lines through the articular surface (transverse, T-type, anterior/posterior column); it does NOT apply to posterior-wall or both-column fractures. Sciatic nerve anatomy. The sciatic nerve exits the pelvis through the greater sciatic foramen, classically BELOW piriformis (Beaton-Anson type I in about 85-90 percent); variant anatomy (a split nerve, or a division above or through piriformis) occurs in 10-15 percent and must be anticipated. It lies about 20-30mm medial to the posterior acetabular rim as it crosses the posterior column. It is the most commonly injured nerve in acetabular surgery — iatrogenic injury is reported in roughly 2-10 percent, with the peroneal (common fibular) division most vulnerable to traction. Hip extension with knee flexion is the position that relaxes the nerve during retraction. The quadrilateral plate. The thin medial wall of the acetabulum separates the hip joint from the pelvis. It commonly displaces medially in transverse fractures, and that medialization causes hip-joint incongruity even when the columns are reduced. Guidelines, registries and global practice. - Specialist-centre referral (global consensus): displaced acetabular fractures are best managed in dedicated pelvic and acetabular units. UK BOA (BOAST) guidance on pelvic and acetabular fractures, AO Foundation principles and the OTA all advocate early transfer to a high-volume centre, reflecting the surgeon-volume effect seen in the outcome literature.
- Reduction quality as the universal benchmark: across AO, OTA and registry-derived series the operative target is anatomic reduction (ideally a step of 1mm or less, up to 2mm acceptable on the Matta grade), which remains the dominant modifiable determinant of outcome worldwide.
- Arthroplasty registries (NJR England and Wales, AOANJRR Australia, SHAR Sweden, AJRR USA) capture conversion of post-traumatic acetabular fractures to total hip arthroplasty; converted or post-trauma THA consistently shows higher complication and revision rates than primary THA, informing the threshold for acute THA in older patients.
- Resource-stratified practice: in lower-resource settings, late presentation, limited fluoroscopy and intensive-care access shift practice toward fewer extensile approaches and a lower threshold for acute arthroplasty in older patients; the underlying biomechanical and reduction principles are unchanged. Key evidence. Reduction quality is the single controllable predictor of outcome. Matta (1996) showed clinical outcome correlated closely with quality of reduction and that the rate of anatomical reduction fell with complexity, age and delay. The meta-analysis by Giannoudis (2005) pooled 3670 operatively treated fractures and found 75-80 percent excellent or good results at about 5 years, with post-traumatic arthritis the commonest late complication (about 20 percent). Briffa (2011) confirmed durable function at 10 years, and Tannast (2012) reported 79 percent native-hip survivorship at 20 years — anatomic reduction and avoiding extensile exposure protect the native hip, directly supporting single-approach fixation when it is adequate.
References
- Letournel E, Judet R. Fractures of the Acetabulum. 2nd ed. Springer-Verlag; 1993. The definitive text on acetabular fracture classification and surgical treatment. 2. Matta JM. Fractures of the acetabulum: accuracy of reduction and clinical results in patients managed operatively within three weeks after the injury. J Bone Joint Surg Am. 1996;78(11):1632-1645. PMID 8934477. 3. Giannoudis PV, Grotz MR, Papakostidis C, Dinopoulos H. Operative treatment of displaced fractures of the acetabulum: a meta-analysis. J Bone Joint Surg Br. 2005;87(1):2-9. PMID 15686228. 3b. Matta JM, Anderson LM, Epstein HC, Hendricks P. Fractures of the acetabulum: a retrospective analysis (roof arc concept). Clin Orthop Relat Res. 1986;(205):230-240. PMID 3698382. 4. Brooker AF, Bowerman JW, Robinson RA, Riley LH Jr. Ectopic ossification following total hip replacement: incidence and a method of classification. J Bone Joint Surg Am. 1973;55(8):1629-1632. 5. Briffa N, Pearce R, Hill AM, Bircher M. Outcomes of acetabular fracture fixation with ten years' follow-up. J Bone Joint Surg Br. 2011;93(2):229-236. PMID 21282764. doi:10.1302/0301-620X.93B2.24056 6. Tannast M, Najibi S, Matta JM. Two to twenty-year survivorship of the hip in 810 patients with operatively treated acetabular fractures. J Bone Joint Surg Am. 2012;94(17):1559-1567. PMID 22992846. doi:10.2106/JBJS.K.00444 7. Kaempffe FA, Bone LB, Border JR. Open reduction and internal fixation of acetabular fractures: heterotopic ossification and other complications of treatment. J Orthop Trauma. 1991;5(4):439-445. 8. Moed BR, Carr SE, Watson JT. Open reduction and internal fixation of posterior wall fractures of the acetabulum. Clin Orthop Relat Res. 2000;(377):57-67. PMID 10943185. doi:10.1097/00003086-200008000-00009 9. Routt ML Jr, Swiontkowski MF. Operative treatment of complex acetabular fractures: combined anterior and posterior exposures during the same procedure. J Bone Joint Surg Am. 1990;72(6):897-904. 10. Tile M, Helfet DL, Kellam JF. Fractures of the Pelvis and Acetabulum. 3rd ed. Lippincott Williams and Wilkins; 2003.
Fractures of the acetabulum: a retrospective analysis (origin of the roof arc concept)
- Analysed 204 acetabular fractures (64 displaced, 43 operated); introduced the medial, anterior and posterior roof arc measurements from standard AP and Judet oblique radiographs
- Showed that satisfactory outcome requires reduction to 3mm or less displacement plus congruent reduction of the femoral head under an intact weight-bearing dome
- Most displaced fractures involve the weight-bearing dome and warrant surgery; an intact dome supports non-operative treatment
Fractures of the acetabulum: accuracy of reduction and clinical results in patients managed operatively within three weeks after the injury
- 262 displaced acetabular fractures fixed within 21 days; anatomical reduction achieved in 71 percent and most through a single surgical approach
- Excellent or good clinical result in 76 percent (40 percent excellent, 36 percent good); clinical outcome correlated closely with quality of reduction
- Rate of anatomical reduction fell with greater fracture complexity, older age and longer injury-to-surgery interval; osteonecrosis 3 percent
Operative treatment of displaced fractures of the acetabulum: a meta-analysis
- Pooled 3670 operatively treated acetabular fractures; 75-80 percent achieved an excellent or good result at a mean of about 5 years
- Post-traumatic osteoarthritis was the commonest late complication (about 20 percent); heterotopic ossification and femoral-head osteonecrosis each occurred in less than 10 percent
- Only about 8 percent needed further surgery (usually arthroplasty); controllable factors were timing, approach, quality of reduction and local complications
Outcomes of acetabular fracture fixation with ten years' follow-up
- 161 surgically fixed acetabular fractures followed for a minimum of 10 years using modified Merle d'Aubigne and Matta radiological scores
- Excellent or good outcome in 72 percent (47 percent excellent, 25 percent good); poor in 20 percent
- Poor prognostic factors were increasing age, delay to surgery, quality of reduction and specific fracture patterns
Two to twenty-year survivorship of the hip in 810 patients with operatively treated acetabular fractures
- 816 hips analysed; cumulative native-hip survivorship (THA or arthrodesis as endpoint) was 79 percent at 20 years
- Independent negative predictors included non-anatomical reduction, age over 40, anterior dislocation, postoperative roof incongruence, posterior-wall involvement, acetabular impaction, femoral-head cartilage lesion, initial articular displacement of 20mm or more and use of the extended iliofemoral approach
- A validated nomogram predicts an individual's probability of needing early total hip arthroplasty