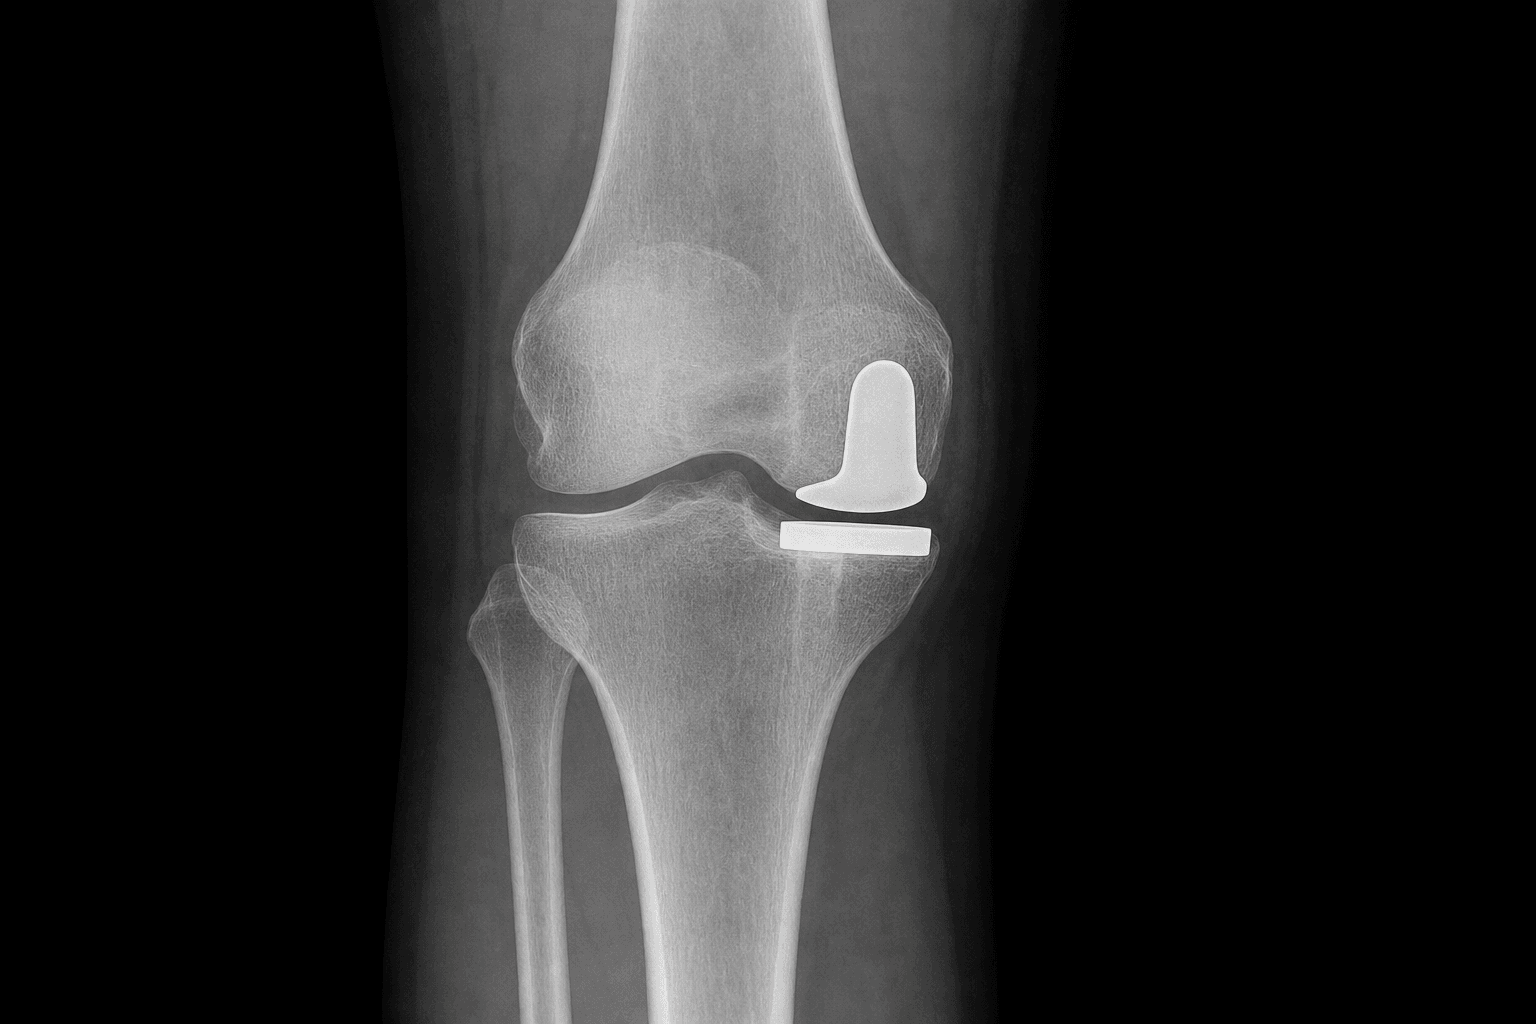
Minimally invasive medial or lateral compartment resurfacing for anteromedial osteoarthritis with an intact ACL
- A functionally intact ACL is an ABSOLUTE requirement for a medial mobile-bearing (Oxford) UKR — test with a Lachman intra-operatively and ABORT to a TKR if it is deficient.
- Resect the tibia minimally: a vertical sagittal cut hugging the medial side of the eminence to protect the ACL, then a transverse cut with a deliberate posterior slope of about 7 degrees referenced off the intact lateral plateau. The flat-on-flat Oxford bearing has NO built-in slope.
- Balance the gaps with trial bearings: too thick over-stuffs the medial side (pain, stiffness, lateral OA progression); too thin allows bearing dislocation.
- Pooled survival is about 93 to 94 percent at 10 years and 89 percent at 15 years for medial Oxford UKR; registries show roughly double the revision rate of TKR but LOWER mortality, complications and length of stay — counsel the trade-off.
When & Why
Indication. Symptomatic, single-compartment (almost always anteromedial) osteoarthritis with full-thickness, bone-on-bone cartilage loss in that compartment, a functionally intact ACL, a passively correctable intra-articular deformity, and preserved full-thickness cartilage in the opposite compartment — that has failed non-operative care. Partial-thickness cartilage loss is NOT an indication. Specific indications include anteromedial OA (the great majority of cases), isolated lateral compartment OA (use a domed/biconcave or fixed-bearing lateral design), spontaneous osteonecrosis of the knee (SONK) confined to one compartment, and selected post-traumatic or post-meniscectomy unicompartmental OA with an intact ACL. Two schools of selection — know both for the viva. The conventional Kozinn-Scott criteria (1989) have been challenged by modern Oxford evidence, which restricts the real requirements to an intact ACL and correctable bone-on-bone disease:
- Classic (Kozinn-Scott 1989)
- Over 60
- Modern Oxford (Pandit 2011)
- Not a contraindication
- Classic (Kozinn-Scott 1989)
- Under 82 kg
- Modern Oxford (Pandit 2011)
- Not a contraindication
- Classic (Kozinn-Scott 1989)
- Low demand
- Modern Oxford (Pandit 2011)
- Not a contraindication
- Classic (Kozinn-Scott 1989)
- No exposed bone
- Modern Oxford (Pandit 2011)
- Medial or anterior wear acceptable; severe lateral-facet eburnation with grooving is the caution
- Classic (Kozinn-Scott 1989)
- Exclude
- Modern Oxford (Pandit 2011)
- Relative only (unless florid inflammatory CPPD)
- Classic (Kozinn-Scott 1989)
- Conventional teaching
- Modern Oxford (Pandit 2011)
- Bone-on-bone medial OA, functionally intact ACL, correctable varus, intact lateral cartilage
Absolute contraindications (medial mobile-bearing Oxford UKR): - ACL deficiency — the unconstrained bearing relies on the ACL for anteroposterior control; deficiency causes anterior translation, edge-loading and dislocation. (Some fixed-bearing medial designs are used in selected ACL-deficient knees, but this is controversial — state it as a caveat, not the default.)
- Inflammatory arthritis (rheumatoid, psoriatic, gout) — polyarticular disease will progress in every compartment.
- Tricompartmental / generalised osteoarthritis.
- A fixed (non-correctable) deformity — varus or valgus that does not correct passively implies soft-tissue contracture.
- Full-thickness eburnated lateral patellofemoral facet with grooving, and partial-thickness medial cartilage loss only (not yet bone-on-bone) — a high failure and pain rate. Relative contraindications / cautions. Lateral-compartment OA treated with a flat mobile bearing (higher dislocation — use a domed/biconcave or fixed-bearing lateral design); severe obesity or very high-impact occupational/sporting demand; chondrocalcinosis (relative only — challenged by Pandit unless florid inflammatory CPPD); a prior high tibial osteotomy (altered anatomy and bone stock); and age less than 60 (registries show higher revision in the young, largely from greater activity and longer time at risk — relative, not absolute). The bearing decision (pre-operative planning). The other genuine choice is mobile versus fixed bearing:
Fully congruent spherical femur on flat-on-flat polyethylene — large contact area, low wear, self-centring through range. Needs the ACL. Pooled survival about 93 to 94 percent at 10 years. Failure mode unique to mobile designs: bearing dislocation (medial about 0.5 to 1 percent).
Polyethylene locked to the tibial baseplate — more forgiving technique, no dislocation risk, but less congruent so higher contact stress and potentially more wear. For MEDIAL UKR revision rates are similar to mobile; for LATERAL UKR fixed bearings clearly outperform flat mobile bearings.
Advantages over TKR. A minimally invasive approach (6 to 8 cm versus 15 to 20 cm), bone-stock preservation, faster recovery (often same-day discharge), better proprioception and kinematics, lower perioperative morbidity, and a more natural-feeling knee. Alternatives. Total knee replacement (more predictable, addresses all compartments, longer recovery, more bone resection); high tibial osteotomy (younger, higher-demand patients under 60, preserves the native joint); cartilage restoration for focal defects in young patients (limited evidence in OA); and non-operative care (weight loss, activity modification, physiotherapy and strengthening, intra-articular injections, bracing for varus thrust, NSAIDs and analgesia). Consent. Counsel specifically for the revision trade-off — UKR carries roughly double the reoperation/revision rate of TKR but lower mortality, complications and length of stay — for the possibility of converting to a TKR on the table if intra-operative findings are unsuitable, and (for a mobile bearing) for a small risk of bearing dislocation. If the diagnosis is uncertain pre-operatively, always consent for a possible TKR.
The classic Kozinn-Scott criteria (age over 60, weight under 82 kg, no PFJ exposed bone, no chondrocalcinosis) have been overturned by Pandit et al: the two things that actually matter are a functionally intact ACL and correctable bone-on-bone disease in one compartment. Cite both frameworks — examiners want to hear the modern view.
The Operation
The goal: through a minimally invasive medial arthrotomy, resurface only the worn compartment with a congruent mobile bearing, restoring a balanced and stable joint while preserving the ACL, the opposite compartment and the bone stock for any future TKR. The exposure and the go/no-go intra-operative assessment are laid out in full below.
Operative sequence
- Supine with the operative leg free to flex and extend (a leg holder or hanging off the side of the table); a lateral post at mid-thigh level allows valgus stress during tibial preparation.
- Tourniquet optional — many surgeons prefer a bloodless field for a minimally invasive approach (250 to 300 mmHg); keep tourniquet time under 90 minutes.
- Standard knee draping giving full access from mid-thigh to ankle.
- Dangers: a post that is too distal prevents adequate valgus stress; inadequate positioning prevents full range-of-motion assessment.
- A 6 to 8 cm medial parapatellar incision (contrast 15 to 20 cm for TKR), from the superior pole of the patella distally along the medial border to about 1 cm below the joint line.
- Approach options: medial parapatellar (standard, versatile) or subvastus (preserves the extensor mechanism and improves recovery, but limited in the obese).
- Capsular arthrotomy at the joint line with minimal or no patellar eversion; preserve the fat pad to protect patellar vascularity.
- Dangers: saphenous nerve injury (infrapatellar branch — warn the patient of numbness); excessive patellar mobilisation causing devascularisation; inadequate exposure compromising component position.
- Test the ACL with a Lachman — it is an ABSOLUTE requirement. If deficient, ABORT and convert to TKR.
- Assess the opposite compartment — Outerbridge grade 2 is acceptable; grade 3 to 4 is a relative contraindication.
- Assess the patellofemoral joint and tracking — significant disease suggests TKR is the better option.
- Confirm the deformity corrects to neutral with manual stress.
- Dangers: proceeding with ACL deficiency guarantees early failure and bearing dislocation; missing opposite-compartment or PFJ disease leads to early progression; overestimating correctability.
- Remove peripheral osteophytes systematically — anterior femoral (prevents extension impingement), posterior femoral (prevents flexion impingement), the tibial rim medially and laterally, and the tibial spine around the ACL attachments.
- This reveals the true joint space, allows assessment of correctable deformity, and prevents bearing impingement.
- Preserve the ACL tibial and femoral attachments — stay peripheral to the ligament insertions.
- Dangers: ACL injury during aggressive removal (use a rongeur, not a saw, near attachments); residual osteophytes causing impingement and stiffness.
- Minimal resection — remove only enough to seat the thinnest bearing, referencing off the intact lateral plateau, not the eroded medial surface.
- Two cuts: a vertical sagittal cut just medial to the ACL insertion and tibial spine (direct the reciprocating saw toward the head of the fibula and hip, hugging the medial side of the spine to protect the ACL), then a transverse cut set with a small posterior slope of about 7 degrees by the tibial guide, in the coronal plane perpendicular to the tibial axis.
- The flat-on-flat Oxford bearing is unconstrained and has NO built-in slope — the surgeon must deliberately reproduce native posterior slope with the guide.
- Preserve the tibial eminence and ACL footprint; retrieve the resected fragment as a single piece to confirm depth.
- Dangers: excessive resection (subsidence, bone loss complicating future TKR); violating the eminence (ACL injury, catastrophic failure); coronal malalignment; excessive posterior slope (over-resects posteriorly and endangers the ACL and posterior cortex); too little slope (tightens the flexion gap).
- Cover the entire tibial resection surface, sit on the strong cortical rim (avoid overhang), align vertically with the tibial shaft axis, and keep rotation neutral.
- Place the tibial trial on the resected surface, position it to cover the cut bone, check there is no overhang (MCL or soft-tissue irritation), verify vertical alignment with a rod down the shaft, and mark position with drill holes.
- In the Oxford technique a sizing spoon sets the optimal tibial size.
- Dangers: malposition (the primary cause of bearing dislocation, accounting for about 70 percent); overhang (MCL and soft-tissue irritation); inadequate coverage (subsidence into weak cancellous bone); rotation error.
- Match the native femoral condyle AP dimension — do NOT oversize.
- Oxford technique: the femoral drilling guide sits on the tibial resection surface, linking femoral position to the tibial cut and maintaining balanced flexion-extension gaps automatically; pin placement sets femoral rotation and AP position.
- Place the sizing guide, select the matching size, position the drilling guide on the tibial cut, insert guide pins, and prepare the condyle by milling or sawing.
- Check for and avoid anterior femoral notching (periprosthetic fracture risk).
- Dangers: femoral notching (about 2 to 3 percent fracture risk if notched); malalignment (instability, dislocation, accelerated wear); oversizing (overstuffing, pain, stiffness, early failure); undersizing (laxity).
- Insert trial femoral and tibial components, flex the knee to 90 degrees (measure in flexion, not extension), and use spacer blocks or feeler gauges to measure the gap.
- Select a bearing that fills the gap with slight tension: snug in 90 degrees flexion, with 1 to 2 mm of opening acceptable in extension (the mobile bearing self-centres). The Oxford feeler gauge targets about 1 mm of laxity through the arc.
- Dangers: bearing dislocation (0.5 to 2 percent, from undersizing or malposition); over-stuffing (persistent medial pain, stiffness, opposite-compartment degeneration); measuring the gap in the wrong knee position.
- Take the knee through full range (0 degrees extension to 135 degrees flexion), checking bearing stability, impingement (anterior in extension, posterior in flexion), patellar tracking, and gap opening.
- 1 to 2 mm of opening in extension is NORMAL and expected for a mobile bearing.
- Red flags: bearing dislocation on range (undersized or malpositioned); unable to achieve full extension (overstuffed or anterior impingement); tight in flexion (oversized bearing or posterior impingement); gross instability (undersized).
- Pulse-lavage the bone surfaces, dry them (cement bonds best to dry bone), and pack the wound while cement is mixed.
- Cement the tibial component FIRST — apply cement, pressurise into cancellous bone, seat in the marked position and hold until set.
- Cement the femoral component SECOND — pressurise, seat with no cement interposition, hold until cured.
- Remove ALL excess cement meticulously — anterior recess, posterior capsule, intercondylar notch and tibial cut margins.
- Dangers: cement debris (third-body wear, impingement, synovitis); malalignment during cementation (uncorrectable once set); cement interposition (prevents seating, creates a gap); inadequate pressurisation (early loosening).
- Once cement is fully cured, remove any debris, irrigate copiously, and insert the final polyethylene bearing (the size determined during trialing); it should click into position.
- Final assessment: full range 0 to 135 degrees, a stable bearing through the arc with no impingement, smooth patellar tracking, a self-centring bearing, and no clicking or catching.
- Dangers: early postoperative bearing dislocation (from undersizing or malposition); residual impingement (pain and stiffness); inserting the wrong bearing thickness — verify it matches the trial.
- Copious irrigation (3 L minimum), achieve haemostasis, repair the capsule and retinaculum carefully with absorbable sutures, close the skin (subcuticular or staples), infiltrate local anaesthetic, and apply a sterile dressing with wool-and-crepe.
- A drain is usually not required (minimally invasive, little dead space).
- Weight-bear as tolerated immediately, begin range-of-motion exercises the same day, and give DVT prophylaxis per protocol; often same-day or overnight discharge.
- Dangers: wound complications (uncommon with a small incision); bearing dislocation during early mobilisation; DVT or PE; inadequate pain control delaying mobilisation.
The structures at risk through these steps — the five danger zones:
The infrapatellar branch crosses 1 to 2 cm anterior to the medial parapatellar incision, 2 to 3 cm below the joint line. Keep the dissection at joint-line level and warn the patient about numbness (common).
Directly in the field medially, blending with the capsule at the joint line. Sharp dissection staying on bone; avoid extensive soft-tissue stripping — injury causes valgus instability and failure.
Posterior to the joint, 1 to 2 cm behind the posterior capsule. Keep the dissection anterior and avoid posterior capsular disruption; retract gently if posterior exposure is needed.
On the tibial eminence. Preserve the eminence during resection and keep guide wires posterior to it — ACL injury is a catastrophic failure.
The posterior cortical rim supports the back of the component. Set a controlled slope (about 7 degrees); excessive slope over-resects the posterior cortex and endangers the ACL. Minimal resection preserves cortical support.
The unconstrained Oxford mobile bearing relies entirely on the ACL for anteroposterior control. ACL deficiency produces anterior tibial translation, failure of self-centring, edge-loading and a failure rate above 90 percent within a few years. Test the ACL with a Lachman BEFORE any bone resection; if it is deficient, abort the UKR and convert to a posterior-stabilised TKR. The patient must be consented for this possibility pre-operatively.
A vertical sagittal cut hugging the medial side of the eminence to protect the ACL, then a minimal transverse cut with a deliberate posterior slope of about 7 degrees referenced off the intact lateral plateau. The Oxford bearing is flat-on-flat and unconstrained — it contains no slope of its own, so recreate native slope with the guide and resect as little as possible to preserve bone for any future TKR.
Too thick over-stuffs the medial side (persistent pain, stiffness, lateral OA progression); too thin allows bearing dislocation. The bearing should be captured but permit about 1 mm of distraction, measured in 90 degrees of flexion with the Oxford feeler gauge.
Aftercare & Complications
Rehabilitation | Phase | Timing | Mobilisation & ROM | Key milestones | |-------|--------|---------------------|----------------| | Immediate | Day 0 to 1 | WBAT immediately; active-assisted flexion/extension same day | Ice and elevation, multimodal analgesia, DVT prophylaxis; often same-day or overnight discharge | | Early | Week 1 to 6 | Progress to full weight-bearing; target 0 to 120 degrees | Quadriceps and proprioception work; driving at 2 to 3 weeks; wound check at 2 weeks | | Intermediate | Week 6 to 12 | Achieve 0 to 135 degrees (usually exceeds TKR) | Progressive resistance; standing AP and lateral films at 6 weeks | | Late | 3 to 12 months | Low-impact sport (golf, swimming, cycling) at 3 months | Avoid running and jumping; review at 3, 6 and 12 months, then annually | Most patients report a "normal" or "near-normal" knee that recovers faster and with better proprioception than after TKR. Pooled survival is about 93 to 94 percent at 10 years and 89 percent at 15 years for medial Oxford UKR (Mohammad 2018; Hamilton 2017); registries show roughly double the revision rate of TKR (Liddle 2014), most often for lateral OA progression, aseptic loosening or bearing dislocation — but conversion to TKR is generally straightforward when bone stock is preserved. Complications
- Recognition
- Mobile bearing dislocates anteriorly or posteriorly; early: sudden pain, loss of ROM, bearing palpable; late: clicking, instability, pain
- Prevention
- Precise component position, correct bearing sizing, avoid malrotation, thorough intra-operative balance
- Management
- Early (within 6 weeks): closed reduction under GA, brace and rehab if stable; Late: usually malposition — open revision, thicker bearing or convert to TKR
- Recognition
- Progressive pain in the opposite compartment or PFJ, joint-space narrowing, change from the initial pattern
- Prevention
- Patient selection — grade the opposite compartment and PFJ pre-operatively; exclude inflammatory arthritis
- Management
- Activity modification, injections, physiotherapy; progressive: conversion to TKR (straightforward, bone stock preserved)
- Recognition
- Activity-related and start-up pain, radiolucent lines, component migration on serial films
- Prevention
- Adequate cement technique with pressurisation, optimal bone preparation, correct sizing and position
- Management
- Revision — revised UKR if bone stock and other compartments are good, or conversion to TKR if bone loss or progression
- Recognition
- Femoral: anterior notching (most common); tibial: stress fracture from malalignment or trauma; sudden pain, unable to bear weight
- Prevention
- Avoid anterior femoral notching, check cut depth, ensure adequate bone stock, warn osteoporotic patients
- Management
- Undisplaced: protected weight-bearing; displaced: ORIF avoiding components, or revision to TKR for severe cases
- Recognition
- Lower rate than TKR; acute: wound issues, fever, raised markers; chronic: pain, swelling, sinus, raised CRP/ESR
- Prevention
- Patient optimisation, antibiotic prophylaxis, meticulous sterile technique, minimise tourniquet time, avoid haematoma
- Management
- Acute (within 3 weeks): irrigation and debridement, modular exchange, suppressive antibiotics; chronic: two-stage (or single-stage if low virulence)
- Recognition
- Persistent medial pain, no mechanical symptoms, negative investigations, often multifactorial
- Prevention
- Appropriate selection, realistic expectations, exclude inflammatory arthritis, assess psychological factors
- Management
- Exclude infection (aspiration, markers), assess components (CT for rotation), activity modification and physiotherapy; conversion to TKR if persistent and debilitating
- Recognition
- Valgus instability, increased lateral joint opening on stress films, lateral giving way
- Prevention
- Protect the MCL — sharp dissection on bone, stay at the joint line, avoid extensive stripping
- Management
- Mild (grade 1 to 2): protected weight-bearing, hinged brace, physiotherapy; severe (grade 3): MCL reconstruction or revision to a constrained/stemmed TKR
- Recognition
- Reduced ROM versus pre-op, difficulty with stairs, cannot reach 90 degrees for sitting
- Prevention
- Avoid over-stuffing, remove all impinging osteophytes, balance gaps, early aggressive ROM
- Management
- Physiotherapy and MUA within 12 weeks; arthroscopic adhesiolysis if persistent; revision if component malposition
Viva & Exam Focus
ACE INTACTACE INTACT — the ideal UKR candidate
MOBILEMOBILE — causes of bearing dislocation
Clinical Decision Scenarios
Practise clinical reasoning and management decisions out loud
“A 58-year-old active woman has isolated medial knee pain. X-rays show Ahlback grade 2 medial OA, 8 degrees varus, an intact lateral compartment, and she wants to return to tennis. Would you offer her a UKR?”
“Explain why ACL integrity is an absolute requirement for a UKR, particularly a mobile-bearing design.”
“Compare mobile-bearing (Oxford) and fixed-bearing UKR designs. Which do you prefer and why?”
Indications (ACE INTACT)
- Anteromedial OA: bone-on-bone medial disease with a functionally intact ACL
- Correctable varus under 15 degrees, intact lateral cartilage, useful flexion
- Age over 60 is the classic criterion but relative only (Pandit)
Absolute contraindications
- ACL deficiency — test with a Lachman intra-operatively before proceeding
- Inflammatory arthritis (RA, psoriatic, gout) — progresses in all compartments
- Tricompartmental disease — TKR is more appropriate
- Fixed deformity over 15 degrees that does not correct passively
Critical operative steps
- Confirm a functionally intact ACL intra-operatively — abort and convert to TKR if deficient
- Minimal tibial resection: vertical sagittal cut by the eminence plus transverse cut with a deliberate 7-degree posterior slope (bearing is flat-on-flat, NO built-in slope)
- Preserve the tibial eminence absolutely — the ACL attachment is critical
- Balance flexion and extension gaps with trial bearings — over-stuff causes pain and lateral OA, under-stuff causes dislocation
Danger zones (5 structures)
- Saphenous nerve (infrapatellar branch) — 1 to 2 cm anterior to the incision; warn of numbness
- MCL deep fibres — protect during dissection; injury causes valgus instability
- ACL tibial attachment — preserve the eminence during resection
- Popliteal vessels — stay anterior, avoid posterior capsular disruption
- Posterior tibial cortex — minimal resection with a controlled 7-degree slope
Mobile versus fixed bearing
- Mobile (Oxford): fully congruent, low wear, self-centring, needs the ACL; failure mode is bearing dislocation
- Fixed bearing: more forgiving, no dislocation, less congruent so potentially more wear
- Medial UKR — similar revision rates for the two (Abu Al-Rub 2020); choose by familiarity
- Lateral UKR — flat mobile bearings have about four times higher revision; use a domed/biconcave or fixed-bearing design
Key complications
- Bearing dislocation (0.5 to 2 percent) — malposition is the commonest cause; early closed reduction, late revision
- OA progression in other compartments (5 to 10 percent at 10 years) — convert to TKR
- Aseptic loosening (3 to 5 percent) — revise UKR or convert to TKR
- Periprosthetic fracture (2 to 3 percent) — avoid anterior femoral notching
Evidence and outcomes
- Medial Oxford UKR: about 93 to 94 percent survival at 10 years, 89 percent at 15 years (Mohammad 2018; Hamilton 2017)
- TOPKAT RCT: OKS equivalent to TKR at 5 years and better cost-effectiveness (Beard, Lancet 2019)
- NJR matched data: UKR has about double the revision rate of TKR but lower mortality, complications and length of stay (Liddle, Lancet 2014)
- Surgeon usage of at least 20 percent (not raw caseload) is the key modifiable driver of low revision (Hamilton 2017)
Viva talking points
- ACL integrity is absolute — test intra-operatively, abort if deficient
- Patient selection is the most important factor
- Consent for possible TKR conversion if findings are unsuitable
- Mobile bearing preferred when experienced — superior long-term survivorship
- Conversion to TKR is straightforward when bone stock is preserved
Background & Evidence
Epidemiology & survivorship. Anteromedial osteoarthritis is the commonest pattern of knee OA and the substrate for the great majority of UKRs. For the medial Oxford Phase 3 mobile-bearing UKR, pooled survival is about 93 to 94 percent at 10 years and 89 percent at 15 years (Mohammad 2018), reproducible outside the designer centres; the National Joint Registry reports Oxford mobile-bearing survival of about 95 percent at 10 years, while the AOANJRR records a cumulative revision rate of about 14 percent at 10 years (Oxford the commonest design). Crucially, outcomes depend on disciplined indications more than on volume — surgeons whose UKR usage is at least 20 percent of their knee arthroplasties (ideally over 30 percent) have low revision rates regardless of raw caseload (Hamilton 2017). The bearing biomechanics. The Oxford mobile bearing is fully congruent — a spherical femoral surface on flat-on-flat polyethylene gives a large contact area and low wear, and the bearing self-centres through range. It depends on the ACL for anteroposterior control, which is why ACL deficiency is an absolute contraindication and its characteristic failure mode is bearing dislocation. A fixed bearing locks the polyethylene to the tibial baseplate: more forgiving and no dislocation, but less congruent and so higher contact stress.
- Mobile bearing (Oxford)
- Fully congruent (spherical on flat-on-flat)
- Fixed bearing
- Less congruent (poly locked to baseplate)
- Mobile bearing (Oxford)
- Low — large contact area
- Fixed bearing
- Higher
- Mobile bearing (Oxford)
- Absolute — needs the ACL
- Fixed bearing
- More forgiving (intact ACL still preferred)
- Mobile bearing (Oxford)
- 0.5 to 2 percent (mobile-specific)
- Fixed bearing
- Does not occur
- Mobile bearing (Oxford)
- Similar to fixed
- Fixed bearing
- Similar to mobile (Abu Al-Rub 2020)
- Mobile bearing (Oxford)
- Flat mobile bearings have about four times higher revision
- Fixed bearing
- Fixed bearings outperform flat mobile laterally
- Mobile bearing (Oxford)
- Experience and disciplined balance
- Fixed bearing
- Familiarity, learning curve, patient factors
Why it works — the selection evidence. TOPKAT (Beard, Lancet 2019) showed no clinically important difference in Oxford Knee Score between partial and total replacement at 5 years, with PKR both more effective and less expensive. The NJR propensity-matched comparison (Liddle, Lancet 2014) found UKR had roughly double the revision rate of TKR but LOWER mortality, complications, readmissions and length of stay at every timepoint — the trade-off to frame in consent. Modern selection rests on Pandit et al (2011), who showed that weight, age, activity, PFJ status and chondrocalcinosis should not be considered contraindications for the Oxford UKR, leaving an intact ACL and correctable bone-on-bone disease as the true requirements.
References
TOPKAT RCT — partial versus total knee replacement (5-year outcomes)
- Multicentre pragmatic RCT, 528 patients across 27 UK sites randomised to PKR (UKR) or TKR for isolated medial-compartment OA
- No clinically important difference in Oxford Knee Score at 5 years (mean difference 1.04, 95 percent CI -0.42 to 2.50)
- PKR was both more effective (plus 0.240 QALYs) and less expensive (minus 910 GBP) over 5 years
- Re-operation and complication rates were similar; PKR should be considered the first choice for late-stage isolated medial OA
NJR matched comparison — adverse outcomes after UKR versus TKR (n=101,330)
- 25,334 UKRs propensity-matched to 75,996 TKRs from the National Joint Registry for England and Wales
- UKR had higher revision (subhazard ratio 2.12) and revision/reoperation (1.38) at 8 years
- Mortality was LOWER after UKR at every timepoint (8-year HR 0.85), with fewer complications, readmissions and shorter length of stay
- Converting 100 TKRs to UKRs would yield roughly one fewer death and about three more reoperations within 4 years
Mobile versus fixed bearing UKR — survivorship meta-analysis
- 70 cohorts (17,405 UKRs) plus registry data on 170,923 UKRs comparing mobile (MB) and fixed (FB) bearings
- For MEDIAL UKR the revision rate per 100 patient-years was similar (MB 0.96 vs FB 0.81, p=0.3)
- For LATERAL UKR mobile bearings had a roughly four-fold higher revision rate (MB 2.20 vs FB 0.72, p less than 0.01)
- Failure modes differ: polyethylene wear predominates in fixed bearings, bearing dislocation in mobile bearings
Oxford Phase 3 UKR — long-term survival (systematic review of 8,658 knees)
- 15 studies, 8,658 medial Oxford Phase 3 knees; annual revision rate 0.74 percent
- Corresponds to about 93 percent survival at 10 years and 89 percent at 15 years — achieved by designer and non-designer surgeons alike
- Commonest revision causes: lateral disease progression, aseptic loosening, bearing dislocation and pain
- PROMs, medical complication rate and non-revision reoperation rate were better than published TKA figures, though revision rate was higher
Caseload, usage and patient selection drive UKR outcomes
- 46 studies (12,520 cemented Phase 3 Oxford medial UKRs); mean revision rate 1.21 percent per year, long-term series averaging about 94 percent 10-year survival
- Usage (the proportion of a surgeon's knee arthroplasties that are UKR) mattered MORE than raw caseload
- High usage (at least 20 percent, ideally over 30 percent) gave low revision rates regardless of caseload; low usage (under 20 percent) gave high revision rates even at high caseload
- Adhering to correct indications — operating on enough appropriate patients — is the dominant modifiable factor
Classic versus modern selection criteria — Kozinn-Scott and the Pandit challenge
- Kozinn and Scott (1989) defined conventional contraindications: weight over 82 kg, age under 60, heavy labour, exposed patellofemoral bone, chondrocalcinosis
- Pandit et al (2011) tested these in 1,000 mobile-bearing Oxford UKRs: 68 percent had at least one 'contraindication'
- 10-year survival was 97.0 percent in those with potential contraindications versus 93.6 percent in 'ideal' patients
- Concluded that weight, age, activity, PFJ status and chondrocalcinosis should NOT be considered contraindications for the Oxford UKR
National Joint Registry (UK) — 2024 Annual Report
Comprehensive registry data reporting Oxford mobile-bearing UKR with about 95 percent implant survival at 10 years. Available at https://www.njrcentre.org.uk.
AOANJRR — Australian Orthopaedic Association National Joint Replacement Registry 2024 Annual Report
Australian-specific UKR data showing a cumulative revision rate of about 14 percent at 10 years, with the Oxford mobile bearing the most common design. Available at https://aoanjrr.sahmri.com.
The Oxford Meniscal Unicompartmental Knee — design principles and biomechanics
Foundational paper on the Oxford mobile-bearing design principles and biomechanics underlying the meniscal-bearing UKR.
Does patellofemoral joint status influence survival of unicompartmental knee arthroplasty?
Registry study examining the impact of patellofemoral joint arthritis on UKR outcomes.
Survival and functional outcome of the Oxford UKR up to 11 years at a District General Hospital
Real-world outcomes from a district general hospital demonstrating reproducibility of registry results out to 11 years of follow-up.