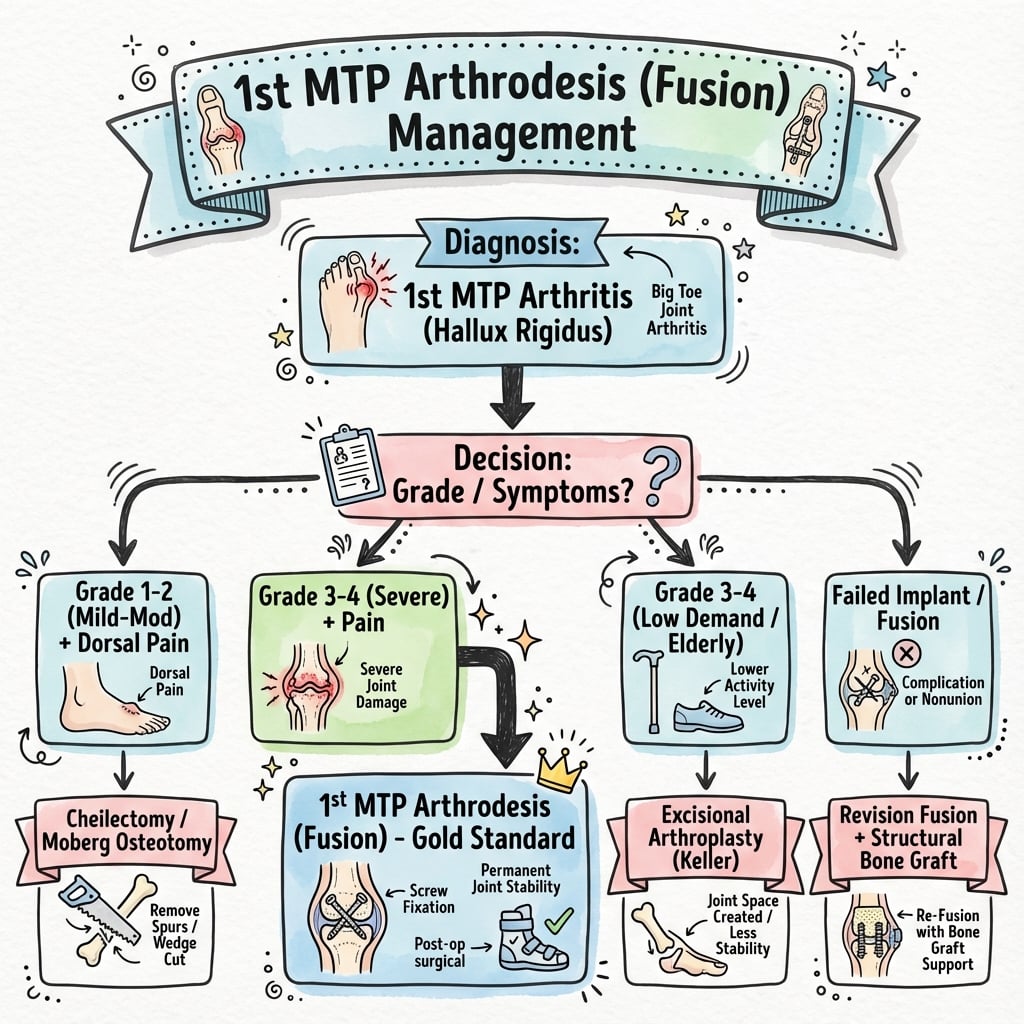
Gold Standard for End-Stage Hallux Rigidus | Optimal Fusion Position Critical | High Union Rate
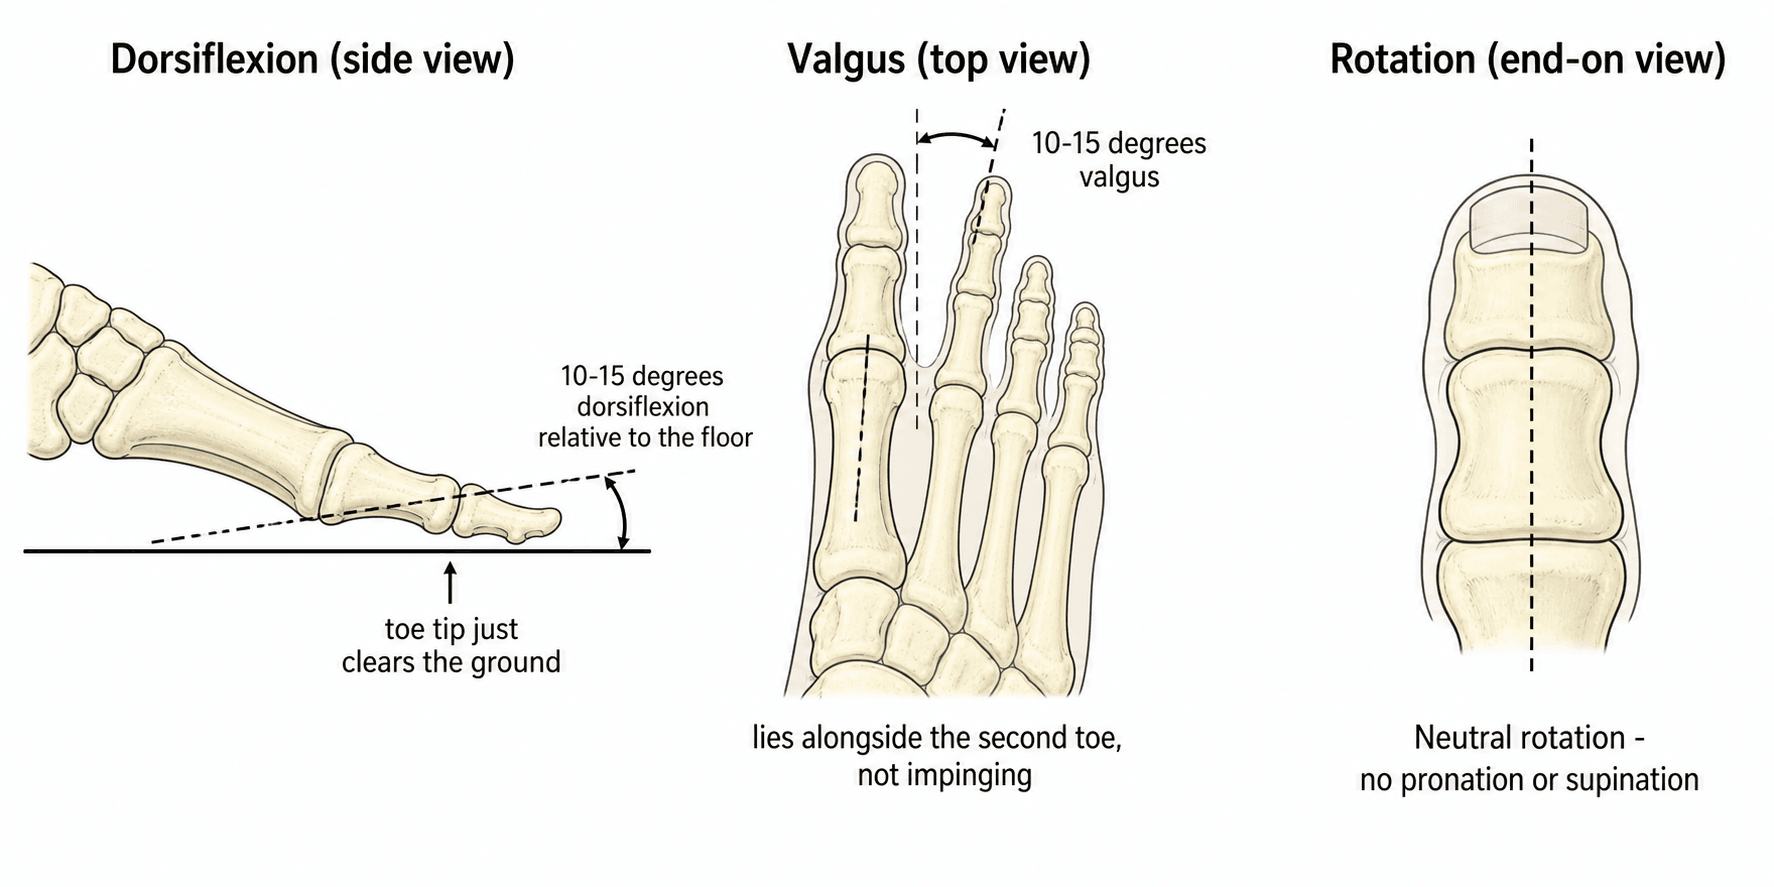
- Optimal position: 5-15° dorsiflexion relative to ground, 10-15° valgus, neutral rotation
- Position test: Toe should just clear ground when simulating toe-off in stance phase
- Fixation: Dorsal plate with interfragmentary lag screw provides highest biomechanical stability
- Sesamoid excision controversial: Increases transfer metatarsalgia risk but may be needed for positioning
- Nonunion rate: 5-10% overall, higher in smokers and inadequate fixation
- “Position is EVERYTHING - too much dorsiflexion causes transfer metatarsalgia, too little prevents toe-off
- “Prepare joint surfaces to bleeding subchondral bone - critical for union
- “Avoid IP joint hyperextension - suggests excessive first MTP dorsiflexion
- “Most common complication is transfer metatarsalgia from malposition or excessive shortening
5-15° dorsiflexion relative to ground (NOT to first metatarsal axis). Test by simulating stance phase - hallux should just clear floor at toe-off. Too much = transfer metatarsalgia. Too little = impaired push-off.
Flat-cut or cup-and-cone technique. Debride to bleeding subchondral bone. Maximum bone contact critical for union. Avoid excessive shortening (over 5mm increases transfer metatarsalgia).
Biomechanically superior to crossed screws or other configurations. Add interfragmentary lag screw for compression. Avoid plantar plate (prominence, irritation).
Removal increases transfer metatarsalgia. Only excise if preventing optimal position or severely arthritic. Preserve if possible. Lateral sesamoid preservation more critical than medial.
- Primary Option
- Cheilectomy
- Alternative
- Observation, activity modification
- Key Pearl
- 70% good results if under 50% joint involvement
- Primary Option
- First MTP arthrodesis
- Alternative
- Interpositional arthroplasty, hemiarthroplasty
- Key Pearl
- Arthrodesis most predictable for pain relief
- Primary Option
- First MTP arthrodesis (mandatory)
- Alternative
- None - other options fail
- Key Pearl
- IP arthritis is absolute indication for fusion
- Primary Option
- First MTP arthrodesis
- Alternative
- Revision arthroplasty
- Key Pearl
- Salvage option for failed previous surgery
FRESHSurface Preparation Steps: FRESH
Hook:Keep the joint surfaces FRESH - Fresh bleeding bone equals good union!
Overview and Epidemiology
Historical Context
First MTP arthrodesis was first described by Clutton in 1894 for treatment of tuberculous arthritis. The procedure evolved to become the gold standard for end-stage hallux rigidus in the mid-20th century. Modern fixation techniques have improved union rates from 70-80% with Kirschner wires to 90-95% with rigid plate-and-screw constructs.
Despite advances in arthroplasty implants, first MTP arthrodesis continues to be preferred for end-stage disease because: Predictable pain relief, Durable results (in the only long-term RCT, arthrodesis outperformed total joint replacement on pain and satisfaction with fewer revisions at 15 years), Maintains weightbearing (unlike resection arthroplasty), and No implant-related complications (loosening, wear, metallosis).
Primary Indications
- Grade 3-4: End-stage disease with severe pain
- Failed cheilectomy: Progressive symptoms
- IP joint involvement: Contraindication to arthroplasty
- Young, active patients: Most durable option
- Severe arthritis: Bunion with joint destruction
- Failed arthroplasty: Salvage procedure
- Inflammatory arthropathy: Rheumatoid, psoriatic
- Neuromuscular deformity: Spastic, recurrent deformity
- Post-traumatic arthritis: Intra-articular fracture sequelae
- Avascular necrosis: Sesamoid or metatarsal head
- Unstable fracture-dislocation: Acute salvage
- Rheumatoid arthritis: Severe erosive disease
- Psoriatic arthritis: Dactylitis with joint destruction
- Gout: Chronic tophaceous arthropathy
Pathophysiology and Mechanisms
First MTP Joint Anatomy
The first metatarsophalangeal joint is a condyloid joint permitting dorsiflexion, plantarflexion, and limited abduction-adduction. Normal dorsiflexion is 65-75° and plantarflexion 20-30°. The joint is stabilized by:
- Plantar plate: Fibrocartilaginous thickening of capsule
- Sesamoid complex: Medial and lateral sesamoids embedded in flexor hallucis brevis
- Intersesamoid ligament: Connects sesamoids across plantar surface
- Collateral ligaments: Medial stronger than lateral
- Medial digital nerve: Branch of medial plantar nerve (dorsomedial)
- Lateral digital nerve: Branch of deep peroneal nerve (dorsolateral)
- Blood supply: Dorsal metatarsal artery, plantar digital arteries
- At risk: Nerves during medial or dorsal approach
The sesamoids increase the mechanical advantage of the flexor hallucis brevis by displacing the tendon plantarward, creating a greater moment arm. Sesamoid excision reduces hallux plantarflexion strength by 50% and shifts weight laterally to lesser metatarsals. Preserve sesamoids whenever position permits to maintain biomechanical function.
Biomechanics of Fusion Position
Normal gait requires approximately 65° of first MTP dorsiflexion during terminal stance and toe-off. After arthrodesis, the IP joint must compensate, requiring:
- Normal ROM
- 65-75° dorsiflexion
- After MTP Fusion
- 0° (fused)
- Compensation Needed
- IP joint provides all motion
- Normal ROM
- 0-10° dorsiflexion
- After MTP Fusion
- 20-30° dorsiflexion
- Compensation Needed
- 2-3× normal excursion required
- Normal ROM
- 20° dorsiflexion
- After MTP Fusion
- Unchanged
- Compensation Needed
- Slight increase if MTP too plantarflexed
Position relative to ground is critical because patients stand and walk on the ground, not their metatarsal axis. The hallux must clear the ground during swing phase and load appropriately during stance.
The 5-15° of dorsiflexion relative to the weightbearing surface allows: (1) Hallux to clear ground during swing phase, (2) Progressive loading during stance without jamming into dorsiflexion, (3) IP joint to dorsiflex further without hyperextension, (4) Normal gait mechanics with minimal limp. Too much dorsiflexion (over 20°) causes transfer metatarsalgia by unloading the first ray. Too little (under 5°) causes impaired push-off and increased forefoot pressure.
Classification of Hallux Rigidus
Coughlin-Shurnas Classification (Most Common)
Based on radiographic and clinical findings. Guides treatment selection.
- Dorsiflexion ROM
- 40-60° (normal 65-75°)
- Radiographic Findings
- Normal, no osteophytes
- Treatment
- Observation, activity modification
- Dorsiflexion ROM
- 30-40°
- Radiographic Findings
- Minimal osteophytes, under 25% joint space narrowing
- Treatment
- Cheilectomy (70% success)
- Dorsiflexion ROM
- 10-30°
- Radiographic Findings
- Moderate osteophytes, 25-50% joint narrowing, subchondral sclerosis
- Treatment
- Cheilectomy or interpositional arthroplasty
- Dorsiflexion ROM
- Under 10° or painful
- Radiographic Findings
- Large osteophytes, over 50% joint narrowing, cysts, sesamoid enlargement
- Treatment
- Arthrodesis or arthroplasty
- Dorsiflexion ROM
- Same as Grade 3
- Radiographic Findings
- Plus IP joint arthritis
- Treatment
- Arthrodesis (arthroplasty contraindicated)
Grade 4 is an absolute indication for arthrodesis because IP joint arthritis prevents compensation after arthroplasty. The IP joint MUST dorsiflex 20-30° after MTP fusion to allow normal gait. If the IP joint is arthritic, this compensation is impossible and arthroplasty will fail. Always examine and radiograph the IP joint before offering arthroplasty.
Clinical Assessment
- Pain location: Dorsal (osteophyte impingement) or diffuse (arthritis)
- Functional limitation: Difficulty with toe-off, running, stairs
- Footwear issues: Cannot wear dress shoes, high heels
- Previous treatment: Orthotics, injections, cheilectomy
- Occupation: Manual labor, prolonged standing requirements
- Activity level: Recreational athletics, walking distance
- Look: Dorsal prominence, hallux valgus, toe clawing
- Feel: Tenderness over osteophytes, sesamoids
- Move: Dorsiflexion ROM (compare to contralateral)
- Grind test: Pain with axial compression and rotation
- IP joint: ROM and crepitus (rule out arthritis)
- Neurovascular: Sensation intact, capillary refill
- Antalgic pattern: Short stance phase on affected side
- Reduced push-off: Decreased terminal stance dorsiflexion
- Lateral weight shift: Offloading medial forefoot
- Compensatory ankle motion: Increased dorsiflexion
- Dorsal wear: From toe dragging or stiff-soled shoes
- Medial sole thinning: From lateral weight shift
- Shoe modifications: Patient-created stretches, pads
- Orthotic devices: Previous failed conservative treatment
Investigations
Imaging Protocol
AP, lateral, oblique views of the foot. Assess joint space, osteophytes, subchondral changes, sesamoid position. Lateral view critical for assessing dorsal osteophyte size and first metatarsal declination angle.
Evaluates sesamoid arthritis and position. Important if considering sesamoid preservation vs excision during arthrodesis. Severe sesamoid arthritis may necessitate excision.
Rarely needed but useful for: (1) Assessing subchondral cyst extent, (2) Evaluating sesamoid position and arthritis, (3) Planning bone graft needs, (4) Assessing lesser MTP joints if considering metatarsal osteotomy.
ESR, CRP: If infection suspected Uric acid: If acute presentation suggests gout Rheumatoid factor, anti-CCP: If polyarticular involvement
Pre-operative planning: Measure (1) First metatarsal declination angle (normal 15-25° below horizontal), (2) Contralateral hallux valgus angle (to match), (3) Amount of bone resection needed (limit to under 5mm), (4) Sesamoid position (excision needed if preventing neutral position). Post-operative check: Hallux should be 5-15° dorsiflexed relative to weightbearing surface on lateral radiograph with foot loaded.


Non-Operative Management
Conservative Treatment Options
Non-operative management is the first-line for grades 0-2 hallux rigidus. Success rates decline with advancing grade.
- Stiff-soled shoes: Rocker bottom to reduce MTP motion
- Wide toe box: Accommodates dorsal osteophytes
- Morton's extension: Carbon fiber or steel plate in sole
- Low heels: Reduces dorsiflexion demand
- Morton's extension in orthotic: Limits MTP motion
- First ray cutout: Offloads painful first MTP
- Metatarsal pad: Transfers load to lesser metatarsals
- Custom orthotics: Biomechanical correction
- Corticosteroid injection: Temporary relief (3-6 months)
- Hyaluronic acid: Limited evidence, FDA off-label
- PRP: Investigational, no proven benefit
- Limit to 2-3 injections: Cartilage damage risk
- Avoid high-impact activities: Running, jumping sports
- Swimming, cycling: Low-impact alternatives
- Shorter walking distances: Prevents pain exacerbation
- Gradual return: If symptoms improve
Success rates: Grade 1 (50-60% long-term success), Grade 2 (30-40%), Grade 3-4 (under 20%). Most patients with grade 3-4 disease progress to surgery within 2 years of symptom onset.
Management Algorithm
Early-Stage Disease Algorithm
Goal: Preserve motion while relieving impingement pain
Treatment Progression
Indications: Dorsal osteophyte impingement, preserved joint space (over 50%), dorsiflexion over 30°
Technique: Remove dorsal 30% of metatarsal head, dorsal and medial osteophytes. Preserve plantar 70% to maintain stability.
Expected outcomes: Pain relief in 70%, maintain or improve dorsiflexion by 10-20°
Options: Revision cheilectomy with Moberg osteotomy (for plantarflexed hallux), Interpositional arthroplasty, Arthrodesis
Consider arthrodesis if: Progressive arthritis on radiographs, Patient over 50 years, Lower functional demands
Predictors of poor cheilectomy outcome: (1) Under 50% joint space remaining, (2) Dorsiflexion under 20° pre-operatively, (3) Moderate to severe pain at rest (not just impingement pain), (4) Pan-articular disease on radiograph (not just dorsal). These patients should be offered arthrodesis or arthroplasty primarily.
Surgical Technique: First MTP Arthrodesis
Pre-operative Planning
- Nonunion: 5-10% (higher in smokers, diabetics)
- Malposition: 5-15% (most common complication)
- Transfer metatarsalgia: 10-20% (from position or shortening)
- Infection: 1-3% superficial, under 1% deep
- Nerve injury: Numbness medial or lateral hallux (5%)
- Hardware prominence: May require removal (5-10%)
- Shoe wear difficulty: Stiff toe requires modifications
- Implants: Dorsal locking plate (small or mini fragment)
- Screws: 3.5mm or 4.0mm cortical screws, 4.0mm lag screw
- Power tools: Sagittal saw, burr, drill
- Reduction aids: Pointed reduction forceps, K-wires
- Bone graft: Preparation if large cyst or nonunion risk
- Imaging: Mini C-arm for intra-operative positioning
Patient Positioning
Setup Checklist
Supine position on standard operating table. Bump under ipsilateral hip to internally rotate leg (easier medial approach access).
- Contralateral leg: Abducted to allow C-arm access
- Operating leg: Free draped from mid-calf distally
- Tourniquet: Thigh or ankle (surgeon preference)
Mini C-arm positioned from opposite side. Confirm adequate AP, lateral, and oblique views before draping. Critical for assessing fusion position intra-operatively.
- Prep: Ankle to toes circumferentially
- Draping: Free drape foot to allow manipulation
- Position test: Simulate weightbearing to check hallux position
The position test is performed BEFORE draping: Hold the foot in simulated weightbearing (ankle 90°, forefoot loaded), then simulate toe-off by lifting the heel. The hallux should just clear the table surface. Mark this position and reference it throughout the case. After draping, simulate stance phase repeatedly to confirm optimal fusion angle.
Dorsomedial Approach (Preferred)
Provides excellent exposure of MTP joint with minimal neurovascular risk.
Step-by-Step Approach
Landmarks: Start 1cm proximal to MTP joint crease over first metatarsal, extend distally over medial proximal phalanx for 4-5cm.
Orientation: Slightly curved, centered over dorsomedial joint line. Avoid directly dorsal (crosses extensor hallucis longus) or too medial (crosses medial digital nerve).
Identify and protect medial dorsal cutaneous nerve - branches across incision in proximal 1/3. Retract or divide small branches (patient will have numbness if divided).
Incise capsule longitudinally along dorsomedial border of metatarsal and phalanx. Develop full-thickness flaps medially and laterally to expose entire joint.
Medial digital nerve runs just plantar to incision. Avoid deep dissection on plantar-medial aspect. Use retractors gently. Nerve injury causes permanent medial hallux numbness and painful neuroma.
Elevate periosteum from dorsal metatarsal head and proximal phalanx base. Create subperiosteal flaps to protect soft tissues.
Extensor hallucis longus: Retract laterally (stays in sheath). Can divide if severely contracted but usually preserve.
Joint exposure: Complete capsulotomy, remove osteophytes with rongeur to improve visualization.
Decision point: Preserve vs excise sesamoids
If preserving: Leave sesamoid complex attached to plantar capsule. Position joint to avoid sesamoid impingement.
If excising: Subperiosteal dissection plantar to metatarsal head, deliver sesamoid dorsally through arthrotomy, excise with attached flexor hallucis brevis tendon slip. Risk: Weakens plantarflexion, increases transfer metatarsalgia.
Preserve sesamoids if possible - maintains mechanical advantage of flexor hallucis brevis. Indications for excision: (1) Preventing optimal hallux position (pulling into plantarflexion or varus), (2) Severe sesamoid arthritis on radiograph and axial view, (3) Large sesamoid osteophytes blocking joint preparation. Lateral sesamoid more critical to preserve than medial (provides lateral stability).
Technical Pearls and Pitfalls
- Test position before and during fixation: Simulate weightbearing repeatedly
- Preserve lateral sesamoid if possible: More important for stability than medial
- Use lag screw before plate: Compresses fusion site optimally
- Bicortical screws: Maximize pullout strength in osteoporotic bone
- Limit total resection to under 5mm: Prevents transfer metatarsalgia
- Don't fuse in excessive dorsiflexion: Over 20° causes transfer metatarsalgia
- Don't use plantar plate: Wound breakdown and prominence risk
- Don't rely on crossed screws alone: Higher nonunion rate
- Don't forget IP joint compensation: Check for IP hyperextension
- Don't overtighten in osteoporotic bone: Fracture risk
Bone-Block Arthrodesis: Salvage for Failed Arthroplasty and Bone Loss
Standard arthrodesis assumes adequate bone stock and length. When the first ray is short or deficient - the situation after a failed Keller resection or an explanted implant, or with segmental bone loss - simply fusing the residual bone leaves it short. A structural (bone-block) interposition arthrodesis instead re-establishes length and a plantigrade medial column. This is a distinct, higher-risk procedure: the much-quoted ~5% pooled nonunion rate (Roukis) explicitly excluded structural-graft cases.
- Detail
- Failed Keller resection arthroplasty (short, unstable, cock-up hallux with transfer metatarsalgia), failed or explanted implant arthroplasty, segmental bone loss (tumour, infection, osteonecrosis), revision of a fusion with a bone defect
- Detail
- Restore first-ray LENGTH and alignment to a stable plantigrade medial column - not merely to fuse the residual bone
- Detail
- Resect nonviable/sclerotic bone, interpose a structural tricortical autograft (iliac crest) or allograft to re-establish length, span with a long dorsal plate (with or without a lag screw), and protect with prolonged weight-bearing restriction
- Detail
- Higher nonunion and slower healing than primary fusion (graft incorporation across a longer construct - excluded from the Roukis pooled estimate); autograft donor-site morbidity; counsel accordingly
A failed Keller arthroplasty classically leaves a short, unstable, cock-up hallux with transfer metatarsalgia - and you cannot correct this by fusing the residual bone, because it stays short. A structural bone-block interposition arthrodesis re-establishes first-ray length and a stable medial column. Because it depends on graft incorporation across a longer construct, expect a higher nonunion rate than the roughly 5% quoted for primary fusion (which explicitly excludes bone-graft cases), and counsel about donor-site morbidity.
Rheumatoid Forefoot Reconstruction: Fusion as the Keystone
Rheumatoid arthritis is listed among the indications for first MTP arthrodesis, and in the rheumatoid forefoot the fusion is the cornerstone of the modern combined reconstruction - having largely replaced excision of the first MTP joint.
- Detail
- Hallux valgus, dorsal dislocation of the lesser metatarsophalangeal joints, distal migration of the plantar fat pad, and prominent plantar metatarsal heads with painful callosities
- Detail
- First MTP ARTHRODESIS stabilises the medial column and corrects the hallux, providing durable alignment and a stable post for push-off
- Detail
- Address the dislocated lesser MTPs - most commonly lesser metatarsal head resection (alternatives include Weil osteotomy or the Stainsby procedure)
- Detail
- Modern practice has superseded the historical excisional first-ray procedure (Keller/Fowler/Mayo-type): a fused first ray gives a more stable, durable medial column with less recurrence
The modern rheumatoid forefoot reconstruction combines a first MTP arthrodesis (the keystone - stabilising the medial column and correcting hallux valgus) with management of the dislocated lesser MTPs, most commonly lesser metatarsal head resection. This has largely replaced the older excision-of-the-first-ray (Keller/Fowler-type) approach because the fused first ray is more stable and durable with less recurrence. Apply the same fusion-position principles (5-15 degrees dorsiflexion, 10-15 degrees valgus).
DVD-VNOptimal Fusion Position: DVD-VN
Hook:DVD-VN: Watch the DVD on Valgus and Neutral position - the key to successful MTP fusion!
Complications
- Incidence
- 5-10%
- Risk Factors
- Smoking, diabetes, inadequate fixation, infection
- Management
- Revision fusion with bone graft and rigid fixation
- Incidence
- 5-15%
- Risk Factors
- Inadequate intra-op position check, loss of fixation
- Management
- Revision if symptomatic (transfer metatarsalgia, shoe wear issues)
- Incidence
- 10-20%
- Risk Factors
- Excessive dorsiflexion, over 5mm shortening, sesamoid excision
- Management
- Orthotic offloading, consider lesser metatarsal osteotomy
- Incidence
- 1-3%
- Risk Factors
- Diabetes, peripheral vascular disease, smoking
- Management
- Antibiotics, local wound care, debridement if needed
- Incidence
- Under 1%
- Risk Factors
- Immunosuppression, prolonged surgery, hematoma
- Management
- Hardware removal, debridement, antibiotics, possible staged revision
- Incidence
- 5-10%
- Risk Factors
- Medial or dorsal approach, aggressive retraction
- Management
- Observation (most improve), neuroma excision if painful
- Incidence
- 5-10%
- Risk Factors
- Thin soft tissues, dorsal plate, patient thin habitus
- Management
- Observation if asymptomatic, removal after union (12+ months)
- Incidence
- 5-15% long-term
- Risk Factors
- Increased demand on IP joint, pre-existing changes
- Management
- Activity modification, IP fusion if severe (rare)
Diagnosis: Persistent pain, motion at fusion site, lucency on radiograph at 3+ months. Treatment requires revision surgery - debride nonunion site to bleeding bone, add autograft or allograft, rigid fixation with plate. Success rate of revision 85-90%. Consider bone stimulator as adjunct in high-risk patients (smokers, diabetics) but NOT as primary treatment.
The two main preventable causes are malposition and excessive shortening. Prevention strategies: (1) Intra-operative position testing with simulated weightbearing, (2) Limit total bone resection to under 5mm, (3) Preserve sesamoids when possible, (4) Consider prophylactic lesser metatarsal osteotomy if first metatarsal already short, (5) Patient education pre-operatively about adaptive footwear. If it occurs: Orthotic with first ray cutout and metatarsal pad first-line. Persistent symptoms may need lesser metatarsal Weil osteotomy.
MINTSComplications to Counsel: MINTS
Hook:Offer patients MINTS after surgery counseling - they'll need the fresh breath after hearing the risks!
Postoperative Care and Rehabilitation
Rehabilitation Timeline
Protected weightbearing: Heel-touch only or non-weightbearing depending on bone quality and fixation stability
Immobilization: Posterior splint, foot elevated above heart level
DVT prophylaxis: Chemical (enoxaparin 40mg daily) and mechanical (foot pumps)
Pain management: Multimodal (acetaminophen, NSAIDs after 6 weeks, opioids limited)
Wound care: Keep splint dry and clean, no bathing (shower with leg out)
Suture removal at 2 weeks, transition to removable walking boot
Weightbearing: Advance to full weightbearing in boot as tolerated (usually by week 4)
Radiographs: At 2 weeks (baseline), 6 weeks (assess early healing)
DVT prophylaxis: Continue until fully mobile
Exercises: Ankle ROM, quad sets, no hallux motion
Clinical union assessment: No tenderness at fusion site, stable to stress
Radiographic union: Bridging callus on at least 3 cortices
Transition to stiff-soled shoe with wide toe box at 8-10 weeks if uniting well
Activity: Walking for exercise, stationary bike, swimming (avoid push-off)
Return to work: Sedentary at 2-4 weeks, standing at 6-8 weeks, manual labor at 10-12 weeks
Full union expected: Radiographs show solid bridging callus, no lucency
Unrestricted weightbearing: Full activities permitted when united
Return to impact sports: 4-6 months, when fully united and strength restored
Footwear modifications: Rocker-bottom sole helpful, avoid high heels, tight toe boxes
Hardware removal: Consider if prominent after 12+ months of solid union
Outcomes and Prognosis
Functional Outcomes
- Pre-operative
- 45-55 (poor)
- Post-operative (12 months)
- 85-95 (excellent)
- Clinical Significance
- 40-point improvement typical
- Pre-operative
- 7-8 out of 10
- Post-operative (12 months)
- 1-2 out of 10
- Clinical Significance
- Dramatic pain relief in 95%
- Pre-operative
- N/A
- Post-operative (12 months)
- 85-90% very satisfied
- Clinical Significance
- Would undergo surgery again
- Pre-operative
- Unable
- Post-operative (12 months)
- 70-80% return to activities
- Clinical Significance
- Low-impact better than high-impact
Predictors of Outcome
- Appropriate patient selection: End-stage disease, failed conservative treatment
- Optimal fusion position: 5-15° dorsiflexion, 10-15° valgus
- Rigid fixation: Plate and screw construct
- Adequate bone preparation: Bleeding subchondral bone
- Patient compliance: Protected weightbearing protocol
- Malposition: Too much or too little dorsiflexion
- Excessive shortening: Over 5mm bone resection
- Nonunion: Especially if painful
- Active smoking: Doubles nonunion risk
- Unrealistic expectations: Expecting normal foot function
First MTP arthrodesis has excellent long-term results. In the only randomised trial with long-term follow-up (Gibson-Thomson cohort at 15 years), arthrodesis patients had less pain, greater satisfaction and fewer revisions than those who had a total joint replacement, and a failed arthroplasty was a technically difficult salvage. Patient counseling point: Arthrodesis is a durable one-time procedure with predictable pain relief. Arthroplasty offers motion but carries a higher revision rate and a difficult salvage if it fails.
Guidelines, Registries & Global Practice
Global Epidemiology
Foot osteoarthritis affects roughly 17% of adults aged 50 and over, and about a quarter of those have radiographic first metatarsophalangeal joint arthritis (Bejarano-Pineda et al, J Foot Ankle Surg 2020, PMID 33160837), making hallux rigidus the most common arthritic condition of the foot. Prevalence rises with age and is higher still in populations with coexisting end-stage ankle arthritis, where radiographic hallux rigidus reached 72.9% in the same study. These figures are population-based and broadly applicable across regions; the burden is expected to grow with ageing demographics worldwide.
- Position on End-Stage Hallux Rigidus
- Arthrodesis is the reference standard for Grade 3-4 disease; cheilectomy for early grades
- Evidence Basis
- Underpinned by the Gibson-Thomson RCT (Level I) and large outcome series
- Position on End-Stage Hallux Rigidus
- Recommends rigid internal fixation; dorsal plate with an interfragmentary lag screw as the biomechanically preferred construct
- Evidence Basis
- Cadaveric biomechanics plus pooled clinical nonunion data
- Position on End-Stage Hallux Rigidus
- Endorse arthrodesis as durable and predictable; arthroplasty reserved for selected lower-demand patients without IP arthritis
- Evidence Basis
- RCT and long-term cohort evidence; consistent across regions
- National joint registries (NJR, AJRR, AOANJRR, SHAR, NZJR) focus on hip and knee and capture little first-MTP data, so the joint is not well represented in arthroplasty registries
- Systematic-review evidence is therefore the main pooled source: overall nonunion about 5% across 2,818 arthrodeses (Roukis, J Foot Ankle Surg 2011)
- RCT long-term data: arthrodesis had fewer revisions than arthroplasty at 15 years (Stone et al, Foot Ankle Int 2017)
- Implication: counsel from systematic-review and RCT figures, not arthroplasty registry survival
- Antibiotic prophylaxis: single weight-based dose of a first-generation cephalosporin within 60 minutes of incision, per international surgical-site-infection guidance
- VTE prophylaxis: risk-stratified; routine chemoprophylaxis is not mandated for isolated forefoot surgery and should follow local risk assessment
- Smoking cessation: strongly advised - smoking is a recognised risk factor for nonunion
- Glycaemic optimisation in diabetics before elective fusion
- Material risks: nonunion (about 5% pooled, mostly asymptomatic), transfer metatarsalgia (10-20%), malposition, infection (1-3% superficial)
- Alternative treatments: arthroplasty, cheilectomy, conservative management
- Expected outcomes: high union and satisfaction; durable pain relief
- Recovery: protected weightbearing then progressive loading; return to impact sport at 4-6 months
- High-resource settings: dorsal locking plate plus lag screw predominates; cup-and-cone reaming common
- Limited-resource settings: crossed screws, K-wires or staples remain widely used and give acceptable union when bone preparation and compression are adequate
- Footwear and lifestyle: in cultures relying on toe-post sandals or floor-sitting/squatting, counsel that a fused MTP limits these activities
- Implant access drives construct choice more than evidence in many regions
Common litigation areas: (1) Malposition causing transfer metatarsalgia - failure to achieve or maintain optimal position, (2) Nonunion - inadequate fixation or patient non-compliance with protected weightbearing, (3) Nerve injury - sensory loss from medial or dorsal nerve, (4) Informed consent failure - inadequate discussion of loss of motion and shoe wear changes. Documentation requirements: Pre-operative templating notes, intra-operative position testing and fluoroscopy images, post-operative radiographs showing maintenance of position, complications discussed during consent, and smoking cessation counselling documented.
MCQ Practice Points
Q: The sesamoid bones in the first MTP joint serve what primary biomechanical function? A: Increase the mechanical advantage of the flexor hallucis brevis by displacing the tendon plantarward, creating a greater moment arm for plantarflexion. Sesamoid excision reduces hallux plantarflexion strength by approximately 50% and increases load transfer to lesser metatarsals.
Q: What is the key distinguishing feature between Coughlin-Shurnas Grade 3 and Grade 4 hallux rigidus? A: Grade 4 includes IP joint arthritis in addition to severe MTP joint disease. This is critical because IP joint arthritis is an absolute contraindication to first MTP arthroplasty (the IP joint must compensate with increased motion after arthroplasty, which is impossible if arthritic). Grade 4 disease mandates arthrodesis.
Q: What is the optimal dorsiflexion angle for first MTP arthrodesis and relative to what reference point? A: 5-15° dorsiflexion relative to the weightbearing surface (ground), NOT relative to the first metatarsal axis. This is tested intra-operatively by simulating stance phase with the ankle at 90° and confirming the hallux just clears the floor during simulated toe-off. Excessive dorsiflexion (over 20°) causes transfer metatarsalgia.
Q: What fixation method provides the highest biomechanical stability for first MTP arthrodesis? A: Dorsal plate with interfragmentary lag screw. Matched-pair cadaveric testing (Buranosky 2001) shows this construct is significantly stiffer and fails at a significantly higher load than crossed lag screws alone. The lag screw provides compression while the plate provides rigid stabilisation. Pooled clinical data (Roukis systematic review) place the overall nonunion rate at about 5%, most of which are asymptomatic.
Q: What is the most common complication after first MTP arthrodesis and how is it prevented? A: Transfer metatarsalgia (10-20% incidence) from malposition or excessive shortening. Prevention strategies: (1) Limit total bone resection to under 5mm, (2) Achieve optimal position (5-15° dorsiflexion, 10-15° valgus), (3) Preserve sesamoids when possible, (4) Intra-operative position testing with simulated weightbearing.
Q: What is the long-term survivorship of first MTP arthrodesis compared to arthroplasty? A: In the only randomised trial with long-term data (Gibson-Thomson cohort, 15-year follow-up), arthrodesis gave less pain, greater satisfaction and fewer revisions than total joint arthroplasty, and salvage of a failed arthroplasty was technically difficult. This durability advantage makes arthrodesis the preferred option for young, active patients and end-stage disease (grades 3-4).
Exam Viva Scenarios
Practise clinical reasoning and management decisions out loud
“A 58-year-old active male presents with progressive first MTP pain over 2 years. Pain worse with activity, difficulty with golf. Examination shows 15° dorsiflexion (contralateral 70°), dorsal osteophytes, and positive grind test. Radiographs show large dorsal osteophyte, 60% joint space narrowing, and subchondral sclerosis. IP joint appears normal. What is your assessment and management?”
“You are performing a first MTP arthrodesis for Grade 3 hallux rigidus. Walk me through your optimal fusion position, how you achieve it, and your fixation method. What is your target dorsiflexion angle and why?”
“A 62-year-old patient underwent first MTP arthrodesis 4 months ago. She returns with persistent medial forefoot pain, particularly during push-off. Examination shows a well-healed incision, the fusion site is non-tender and stable, but she has significant tenderness under the second and third metatarsal heads. Weightbearing radiographs show solid fusion but the hallux appears very dorsiflexed. How do you assess and manage this patient?”
Key Anatomy
- Sesamoids = 50% plantarflexion strength, displace FHL tendon plantarward
- Medial digital nerve = dorsomedial approach risk, causes medial hallux numbness
- Normal MTP dorsiflexion = 65-75°, after fusion IP must compensate with 20-30°
- Plantar plate and sesamoid complex = primary plantar stabilizers
Classification (Coughlin-Shurnas)
- Grade 0 = Normal ROM, observation
- Grade 1 = 30-40° dorsiflexion, minimal osteophytes, cheilectomy 70% success
- Grade 2 = 10-30°, moderate changes, cheilectomy or arthroplasty
- Grade 3 = Under 10°, severe changes, arthrodesis or arthroplasty
- Grade 4 = Grade 3 + IP arthritis, arthrodesis mandatory (arthroplasty contraindicated)
Optimal Position
- Dorsiflexion = 5-15° relative to GROUND (not metatarsal axis)
- Valgus = 10-15° to match contralateral side
- Rotation = Neutral, toenail faces ceiling when supine
- Shortening = Limit to under 5mm total resection
- Position test = Hallux just clears floor at simulated toe-off in stance
Surgical Pearls
- Dorsomedial approach = preferred, protects medial digital nerve
- Joint prep = Bleeding subchondral bone essential, flat-cut or cup-and-cone
- Fixation = Dorsal plate + lag screw (stiffer and higher load to failure than crossed screws in cadaveric testing)
- Sesamoid preservation = If possible, reduces transfer metatarsalgia risk
- Avoid plantar plate = Wound breakdown and prominence risk
Complications
- Nonunion = 5-10%, higher with smoking, crossed screws, revision with bone graft
- Malposition = 5-15%, most common complication, revision if symptomatic
- Transfer metatarsalgia = 10-20%, from excessive dorsiflexion or shortening over 5mm
- Infection = 1-3% superficial, under 1% deep
- Hardware prominence = 5-10%, remove after union if symptomatic
Evidence Base and Key Trials
Gibson & Thomson: Arthrodesis vs Arthroplasty (RCT)
- Randomised controlled trial: 63 patients, 22 arthrodesis (38 toes) vs 27 arthroplasty (39 toes)
- At 24 months pain (VAS) improved in both groups but significantly more after arthrodesis (p=0.01)
- All 38 arthrodeses united at a mean dorsiflexion of 26°, few complications
- 6 of 39 implants required removal for phalangeal-component loosening
- Cost ratio 2:1 in favour of arthrodesis
Stone, Ray, Thomson & Gibson: 15-Year Follow-up of the RCT
- Long-term follow-up of the Gibson-Thomson RCT (52 patients, 66 toes available)
- At 15 years arthrodesis patients had less pain and greater satisfaction than arthroplasty
- No functional difference between the two groups
- More revisions occurred in the arthroplasty group
- Salvage of a failed arthroplasty was technically difficult with high complication potential
Coughlin & Shurnas: Hallux Rigidus Grading & Long-Term Results
- 110 of 114 patients reviewed; 93 cheilectomies and 34 arthrodeses (mean follow-up 9.6 and 6.7 years)
- Established the 5-grade clinical-radiographic classification (0-4) still in widest use
- 97% of patients had a good or excellent subjective result overall
- 92% of cheilectomies succeeded for Grade 1-2 and selected Grade 3 disease
- Grade 4, or Grade 3 with under 50% metatarsal-head cartilage remaining, should be treated with arthrodesis
Goucher & Coughlin: Dome-Reamer & Dorsal-Plate Arthrodesis
- Prospective series of 49 patients (53 feet) at mean 16-month follow-up
- Dome-shaped reamers plus a low-profile dorsal titanium plate with crossed lag screws
- AOFAS hallux score improved from a mean of 51 to 82; VAS pain fell from 6.3 to under 1
- Union rate 92% (four nonunions, 8%); revision rate 4%; 96% satisfaction
- Mean time off work 3 weeks; swelling persisted around 11 weeks