ACL-deficient varus knee — single-stage medial opening-wedge HTO with ACL reconstruction
- The indication: ACL deficiency with varus malalignment (greater than 3-5 degrees on the mechanical axis). Isolated ACL reconstruction fails in 20-40% of varus knees versus 5-10% in neutral, because varus thrust persists and keeps stressing the graft and the medial compartment.
- The target: correct to the Fujisawa point (62-65% across the tibial plateau = 3-5 degrees valgus), planned on full-length standing alignment films with the Miniaci method — typically a 7-12 mm opening.
- The sequence: diagnostic arthroscopy, hamstring harvest through a SEPARATE incision, HTO osteotomy and fixation, THEN the ACL tunnels drilled post-HTO. Valgus correction shifts the tibial tunnel, so tunnels drilled before the HTO end up malpositioned.
- The slope rule: PRESERVE the native posterior tibial slope. A medial opening wedge naturally increases slope, which shifts the tibia anteriorly and loads the ACL graft; keep the anterior (tubercle) gap about HALF the posteromedial gap (Noyes 3-triangle).
- The rehab: prolonged. Toe-touch weight-bearing for 6 weeks, full by 12 weeks only after radiographic union, return to sport at 9-12 months minimum (not the standard 6-9 months) — both the osteotomy and the graft must mature.
When & Why
Indication. Combined medial opening-wedge HTO with ACL reconstruction is for the symptomatic ACL-deficient knee with varus malalignment. The two problems are linked: varus alignment overloads the medial compartment and generates a varus thrust that repeatedly stresses the ACL graft. Correcting only one leaves the other to fail. Absolute indications - ACL deficiency with varus malalignment greater than 3-5 degrees on the mechanical axis — isolated ACL reconstruction fails in 20-40% of varus knees versus 5-10% in neutral, because varus thrust persists.
- ACL tear with early medial compartment OA (Outerbridge 2-3, Kellgren-Lawrence 1-2) in a young active patient (under 55-60 years) — HTO offloads the medial compartment while the ACL restores stability.
- ACL tear with medial meniscal deficiency (root tear, subtotal meniscectomy, irreparable tear) — HTO offloads the medial compartment and protects both the remaining meniscus and the graft.
- Revision ACL reconstruction in a varus knee — if the primary graft failed because of malalignment, the biomechanics must be corrected at the revision. Relative indications - ACL tear with borderline varus (2-3 degrees) AND medial symptoms in a young, high-demand patient.
- Prophylactic HTO with ACL in a varus 3-5 degree knee to prevent future medial OA progression and graft failure. Contraindications - Absolute: advanced medial OA (Outerbridge grade 4 / Kellgren-Lawrence 3-4, bone-on-bone — consider UKA or TKA instead); inflammatory arthropathy; active or recent septic arthritis; severe peripheral vascular disease; a patient unable to comply with protected weight-bearing.
- Relative: age over 60-65 years (biological age matters more than chronological); BMI over 35 (increased nonunion risk); smoking (3-4x nonunion risk — quit 6-8 weeks preop); osteoporosis; flexion contracture over 15 degrees; patellofemoral arthritis; ligamentous laxity.
The preferred option. Corrects alignment and restores stability in one recovery, protects the ACL graft from varus thrust from day one. Good-excellent outcomes in 80-90% at 5 years when indications are appropriate.
Consider for severe medial overload or complex tunnel concerns. Two recoveries, delayed stability, and higher cost — reserved for selected cases.
Not recommended in varus over 3-5 degrees. Failure rate of 20-40% because varus thrust persists and stresses the graft — the underlying biomechanics are uncorrected.
Preoperative planning — the alignment work that decides whether and how much. Full-length standing hip-knee-ankle films are mandatory. From them calculate the mechanical axis deviation, the mechanical axis angle, the medial proximal tibial angle, and the correction needed to reach the Fujisawa point; then use the Miniaci method (or digital templating) to convert that into a wedge opening.
- How it is measured
- Distance from the knee centre to the hip-to-ankle mechanical axis line on the full-length standing film
- Target / normal
- 0 (varus = medial deviation, valgus = lateral deviation)
- How it is measured
- Femoral mechanical axis versus tibial mechanical axis
- Target / normal
- 0 degrees plus or minus 3 degrees
- How it is measured
- Tibial plateau versus tibial shaft mechanical axis
- Target / normal
- 85-90 degrees
- How it is measured
- Where the corrected axis should cross the tibial plateau
- Target / normal
- 62-65% across the plateau = 3-5 degrees valgus
- How it is measured
- Angle between current and target mechanical axis, converted to a gap
- Target / normal
- Approximately 1mm per degree; typically 7-12mm for 3-5 degrees valgus
The Operation
The goal is to confirm the ACL tear and assess the compartments arthroscopically, harvest the hamstring graft through a separate incision, perform and fix the medial opening-wedge osteotomy, and only then reconstruct the ACL with tunnels drilled after the HTO. The anteromedial exposure is the heart of the procedure and is laid out in full as the first operative steps.
Operative sequence
- Supine on a radiolucent table, bump under the ipsilateral hip, thigh tourniquet, mini C-arm fluoroscopy, leg holder for the ACL portion.
- Three separate incisions to minimise wound complications: standard arthroscopy portals (anterolateral, anteromedial); a medial HTO incision; and a separate hamstring-harvest incision.
- Mark the anteromedial HTO incision (5-7cm oblique) 3-4cm distal to the joint line, starting just medial to the tibial tubercle and extending posteromedially, and the hamstring incision (3-4cm) over the pes anserinus.
- Systematic arthroscopy through AL and AM portals: confirm the ACL tear (complete vs partial, stump quality), assess both menisci (medial extrusion, root tear — repair vs debride), and grade the cartilage in every compartment.
- Confirm the medial OA is not advanced — Outerbridge grade 4 (bone-on-bone) means the patient is better served by a UKA than an HTO.
- Address concurrent pathology (meniscal repair/debridement, chondroplasty, loose bodies). Do not create the ACL tunnels — the HTO will shift their position once the wedge is opened.
- Oblique incision (3-4cm) over the pes anserinus, 3cm distal and 2cm medial to the tibial tubercle — kept separate from the HTO incision to reduce wound complications.
- Incise the sartorial fascia, identify gracilis (superior) and semitendinosus (inferior), and strip them with a closed tendon stripper to at least 24-26cm (longer than an isolated ACL, because the HTO opening lengthens the tibia).
- Prepare a 4-strand graft on the back table: whipstitch both ends, measure the diameter (target 8-10mm), pretension on the graft board, keep it moist. Alternatives: BTB or quadriceps autograft (some prefer bone-to-bone healing alongside the HTO bone work).
- 5-7cm oblique incision 3-4cm distal to the joint line, starting 1cm medial to the tibial tubercle and extending posteromedially over the pes anserinus.
- Incise the fascia and elevate the pes anserinus distally (preserve or release), protecting the superficial MCL fibres anteriorly; expose the medial surface of the proximal tibia and retract the pes muscles posteriorly.
- Place a Hohmann retractor posteriorly around the tibia (protects the popliteal vessels) and a second laterally (protects the lateral soft tissues and the peroneal nerve). Confirm the level with fluoroscopy and mark the osteotomy 3-4cm distal to the medial joint line, parallel to the joint.
- With an oscillating saw make anterior and posterior cuts from the medial cortex, parallel to the joint line and aimed toward the fibular head on the lateral side, stopping 5-10mm short of the lateral cortex. Multiple 4.5mm drill holes along the line (then completed with osteotomes) reduce heat and preserve biology.
- The lateral cortex must stay intact as a hinge — it gives stability during opening and healing. Check on fluoroscopy that the cuts stop short of the lateral cortex.
- If the hinge fractures (10-15% incidence) it is salvageable: proceed if stable, or add lateral fixation (plate or screws) if unstable (see the viva).
- Open the osteotomy gradually with graduated spreaders in 1-2mm increments, monitoring the gap on AP fluoroscopy and the slope on the lateral view.
- Use the cable method: an electrocautery cable from the femoral head centre to the ankle centre should pass through the Fujisawa point (62-65% across the plateau). Typical opening is 7-12mm at the anterior cortex for 3-5 degrees of valgus.
- Insert a trial then a definitive spacer (allograft, tricortical autograft, or synthetic wedge) to prevent collapse, or leave the gap for bone ingrowth.
- A medial opening wedge naturally increases the posterior tibial slope, which shifts the tibia anteriorly and strains the ACL graft — so slope must be controlled, not increased.
- Keep the anterior (tibial tubercle) gap approximately HALF the posteromedial gap to maintain neutral slope; every 1mm of anterior gap error changes slope by about 2 degrees.
- Confirm on lateral fluoroscopy that the anterior and posterior gaps are in the right ratio and that native slope is unchanged before fixation.
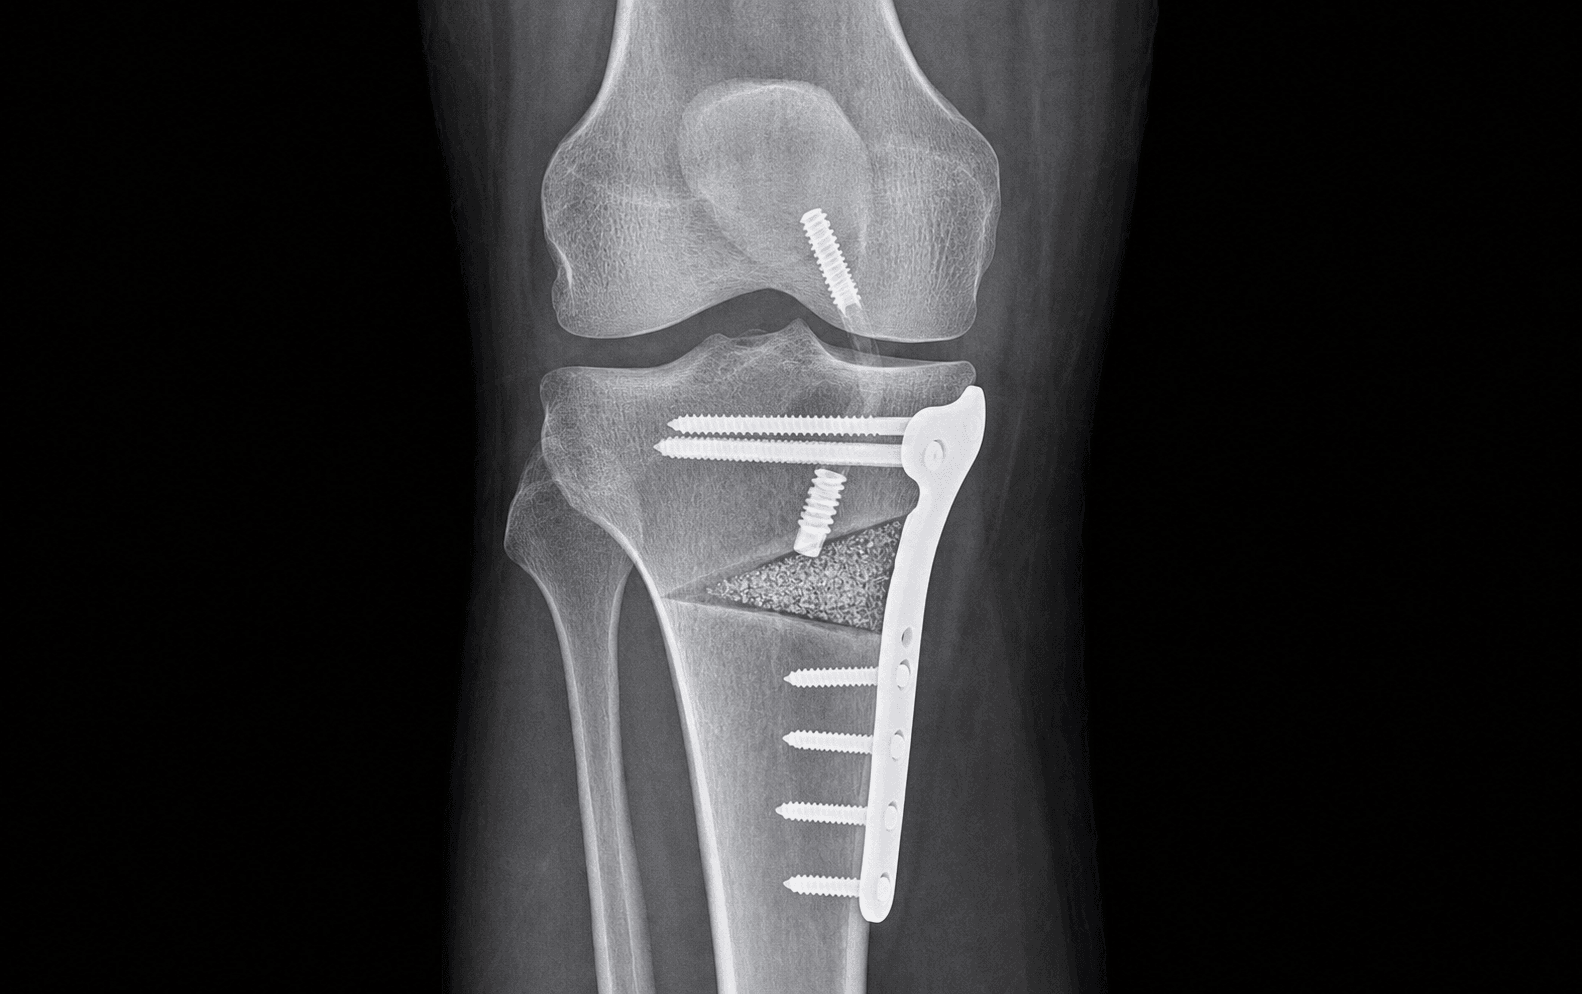
- Apply an HTO-specific medial locking plate (TomoFix, Puddu, Contour Lock, iBalance) spanning the osteotomy, centred on the medial tibia — proximal screws in the metaphysis supporting the opened gap, distal screws in the diaphysis.
- Hold reduction with K-wires, then insert 3-4 locking screws proximal and 3-4 distal (bicortical). Confirm on fluoroscopy that no screw penetrates the joint or over-penetrates the lateral cortex, and insert the spacer/graft before final fixation.
- Check final alignment with the cable/fluoroscopy (axis through the Fujisawa point) and confirm the construct is stable with no toggle; add a lateral plate only if the hinge is fractured and unstable.
- With the HTO completed and fixed, return to the arthroscopic portals and re-examine the knee to confirm the osteotomy did not violate the joint.
- Drill the femoral tunnel through the anteromedial portal at 110-120 degrees of flexion using an anatomic technique — centre of the footprint using the resident's ridge (lateral intercondylar ridge) and bifurcate ridge, 1-2mm anterior to over-the-top on the lateral notch wall.
- Over-drill with a cannulated reamer matching the graft diameter (8-10mm) to a depth of 25-30mm for suspensory fixation. The femoral tunnel is on the femur, so it does not conflict with the tibial HTO plate.
- The tibial tunnel is the technically demanding step: valgus correction shifts the tibial footprint laterally and anteriorly relative to the hardware, so the start point must be adjusted.
- Use a tibial guide aimed at the footprint centre (just anterior to the tibial spine), starting 2-3cm proximal to the HTO plate to provide clearance, and slightly more lateral than a standard ACL to angle around the plate.
- Confirm the guide wire on arthroscopy (footprint centre) and on AP and lateral fluoroscopy (avoids the plate, parallel to Blumensaat's line in extension) before over-drilling. Maintain a bone bridge of at least 10-15mm between tunnel and plate.
- Pass the sutures retrograde through the tibial tunnel, across the knee, and out the femoral tunnel; pull the graft through ensuring it is not twisted and sits at the aperture of both tunnels.
- Remember the HTO increased the tibial length slightly — the graft must be long enough for both fixations (hence the 24-26cm harvest).
- Fix femorally with a suspensory device (EndoButton, TightRope) that flips on the far cortex; pull tight and confirm the button is flipped. A hybrid (suspensory plus interference screw) is popular for the combined procedure for extra security.
- Cycle the graft 20-30 times through full range to pre-tension it and eliminate creep, then tension with the knee at 20-30 degrees flexion and a manual posterior drawer force.
- Fix tibially with an interference screw alongside the graft — the screw must be DIVERGENT from the graft (parallel lacerates it) and must avoid the HTO plate (typically 2-3cm separation). A suture post or button on the anterior tibia is the backup if a screw risks hardware conflict.
- Final check: full range especially extension, no impingement, negative Lachman and pivot shift, and HTO alignment maintained.
- Comprehensive check — alignment through the Fujisawa point on fluoroscopy, stable HTO with no intra-articular screws, stable ACL with full extension and negative Lachman/pivot, stable meniscal repairs, and full 0-130+ degree range with stable patellofemoral tracking.
- Deflate the tourniquet and achieve haemostasis; consider a drain at the HTO site (controversial). Close the HTO incision in layers (periosteum if possible, subcutaneous, skin), then the hamstring harvest site and the arthroscopy portals.
- Apply a compressive dressing and a knee brace in extension.
- Common peroneal nerve — wraps the fibular neck, 2-3cm distal to the fibular head. Protect it by preserving the lateral hinge (5-10mm of intact lateral cortex), avoiding lateral dissection beyond the hinge, and avoiding excessive valgus force during opening.
- Popliteal neurovascular bundle — lies 1-2cm posterior to the posterior tibial cortex at the osteotomy level. Protect it with a Hohmann retractor placed around the tibia posteriorly before the saw cuts, and avoid deep posterior penetration.
- Saphenous nerve and vein — medial, subcutaneous beneath the sartorial fascia near the harvest site. Protect them by using SEPARATE incisions for the HTO and the hamstring harvest (3-4cm apart) and by gentle medial dissection.
- Superficial MCL fibres — anterior to the pes insertion. Preserve them during pes elevation to maintain medial stability.
- ACL tunnel and HTO plate interface — keep the osteotomy 3-4cm distal to the joint, start the tibial tunnel 2-3cm proximal to the plate, and confirm no hardware conflict on fluoroscopy before reaming and before inserting the tibial screw.
The valgus correction shifts the tibial anatomy, so tunnels drilled before the osteotomy will be malpositioned once the wedge is opened. The sequence is always: arthroscopy, hamstring harvest, HTO and fixation, THEN the ACL tunnels. Examiners expect you to explain why.
A medial opening wedge naturally increases the posterior tibial slope, which shifts the tibia anteriorly and loads the ACL graft. Keep the anterior (tubercle) gap approximately HALF the posteromedial gap (Noyes 3-triangle) to preserve native slope — every 1mm of anterior gap error changes slope by about 2 degrees. In refractory graft failure with a pathologically high native slope (over 12 degrees), a slope-REDUCING (deflexion) osteotomy is what protects the graft.
The HTO opening lengthens the tibia by the wedge size (7-12mm), so harvest the hamstrings to at least 24-26cm (versus 22-24cm for an isolated ACL) and prepare a 4-strand, 8-10mm graft. A graft that is too short for the combined construct is a preventable intra-operative problem.
Valgus correction shifts the tibial footprint laterally and anteriorly relative to the hardware. Start the tibial tunnel 2-3cm proximal to the plate, possibly slightly lateral, and verify on AP and lateral fluoroscopy that it exits at the footprint centre, stays parallel to Blumensaat's line, and clears the plate — then ream, and check again before inserting the tibial interference screw.
Aftercare & Complications
Rehabilitation — a protective, prolonged protocol that balances HTO bone healing and ACL graft maturation. | Phase | Timing | Weight-bearing & brace | Therapy & goals | |-------|--------|------------------------|-----------------| | 1 | 0-6 weeks | Toe-touch only (10-20kg max); brace locked in extension for ambulation | ROM 0-90 degrees gentle; quadriceps sets, SLR, ankle pumps; DVT prophylaxis. Goal: protect the HTO, prevent stiffness | | 2 | 6-12 weeks | Progressive (25% at 6wk, 50% at 8wk, 75% at 10wk, WBAT by 12wk only after radiographic union); wean brace | ROM to full; stationary bike (light), pool, closed-chain. Goal: HTO union and graft incorporation | | 3 | 3-6 months | Full as tolerated | Strengthening (quadriceps, hamstrings, abductors), proprioception, functional training; no impact. Goal: restore strength and function | | 4 | 6-9 months | Full | Sport-specific drills, light jogging if asymptomatic and HTO healed. Goal: prepare for return to sport | | 5 | 9-12 months | Full | Gradual return to sport only if ALL criteria met. Goal: safe return | Return-to-sport criteria (all must be met): HTO healed on radiographs (cortical bridging); ACL stable on examination (negative Lachman and pivot shift, KT-1000); full ROM (0-135 degrees+); 90%+ quadriceps and hamstring strength versus the contralateral side; functional testing passed (hop tests, Y-balance, agility); and psychological readiness (ACL-RSI). The minimum timeline is 9-12 months, not the standard 6-9 months. Surveillance. Review at 2 weeks (wound check), 6 weeks (start weight-bearing progression), 12 weeks (confirm HTO union and progress rehab), then 6 months, 12 months, 24 months, and annually. Radiographs (AP, lateral) at each visit assess alignment maintenance, union (typically 12-16 weeks), tunnel widening, hardware position, compartment joint space and OA progression; MRI at 12-24 months if the graft or a meniscal repair is in question. Hardware removal is elective at 18-24 months once the bone is fully healed, in 30-50% of patients (plate prominence, soft-tissue irritation). Combined HTO-ACL gives 80-90% good-excellent outcomes at 5 years with appropriate selection — better than either procedure alone in the varus, ACL-deficient knee. Complications
- Recognition
- Persistent pain and instability at the osteotomy site beyond 16 weeks; radiographs show no callus, a persistent gap, or hardware loosening
- Prevention
- Smoking cessation 6-8 weeks preop; optimise nutrition (vitamin D, calcium); avoid NSAIDs for the first 6 weeks; protected weight-bearing 6-12 weeks; consider bone graft or spacer at the index procedure
- Management
- Under 6 months: continue protected weight-bearing, bone stimulator, optimise biology. Over 6 months or symptomatic: revision with bone grafting and revision plate fixation (consider BMP-2)
- Recognition
- Foot drop, inability to dorsiflex, numbness in the first web space; immediate or delayed (haematoma or stretch); EMG/NCS grades severity
- Prevention
- Avoid lateral dissection beyond the hinge; gradual opening without excessive valgus force; maintain hinge integrity; minimise tourniquet time
- Management
- Rule out compartment syndrome; remove compressive dressings; ankle-foot orthosis. Neuropraxia recovers in 6-12 weeks; if no recovery by 3 months, EMG and consider nerve exploration or decompression
- Recognition
- Recurrent instability, positive Lachman and pivot shift, giving way; MRI shows graft discontinuity; side-to-side difference over 5mm
- Prevention
- Adequate correction to the Fujisawa point (eliminate varus thrust); anatomic tunnels adjusted post-HTO; robust fixation; protected rehab; strict 9-12 month return-to-sport criteria
- Management
- Confirm failure (exam, MRI, KT-1000); check alignment is maintained (address the HTO first if correction is lost); revision ACL with anatomic technique, bone-graft widened tunnels, consider lateral extra-articular tenodesis for rotatory instability
- Recognition
- Under: persistent medial pain, varus on weight-bearing films, recurrent ACL instability. Over: lateral knee pain, valgus, patellofemoral symptoms. Measure the mechanical axis on full-length films
- Prevention
- Meticulous preop planning (Miniaci method, digital templating); intraop cable verification; spacer or bone graft to prevent collapse; stable plate fixation (3-4 screws each side); protected weight-bearing until union
- Management
- Symptomatic under-correction: revision HTO with additional opening to the Fujisawa point. Symptomatic over-correction: medial closing-wedge or distal femoral varus osteotomy. Both are complex revisions
- Recognition
- Superficial: erythema, warmth, drainage. Deep: fever, severe pain, effusion, raised inflammatory markers; aspirate shows raised WBC and positive culture; hardware loosening on radiographs
- Prevention
- Optimise patient factors (diabetes control, smoking cessation, weight loss); antibiotic prophylaxis (cefazolin within 1 hour); meticulous sterile technique; minimise surgical time; separate incisions for HTO and hamstring harvest
- Management
- Superficial: oral antibiotics and wound care. Deep early (under 4 weeks): irrigation and debridement, retain stable hardware, 6 weeks of organism-specific IV antibiotics. Deep late: staged revision
- Recognition
- Severe pain out of proportion, pain with passive stretch, tense compartments, paraesthesia; pulselessness is a very late sign — do not wait for it. High index of suspicion
- Prevention
- Minimise tourniquet time; deflate before closure for haemostasis; avoid overly tight dressings; elevate the leg but not above heart level; monitor high-risk patients (young males, prolonged surgery)
- Management
- Urgent four-compartment fasciotomy on clinical diagnosis — do not delay for pressure measurement; leave wounds open for delayed closure or skin grafting
- Recognition
- Loss of ROM especially extension (a flexion contracture over 10 degrees is catastrophic); pain with ROM; MRI may show a cyclops lesion
- Prevention
- Immediate postop ROM 0-90 degrees; brace unlock for ROM; avoid aggressive flexion for the first 6 weeks; ensure full extension intraoperatively
- Management
- Early (under 12 weeks): aggressive therapy, patellar mobilisation, serial extension splinting. Persistent (over 12 weeks): arthroscopic lysis of adhesions and cyclops debridement; MUA only after confirming HTO union (fracture risk)
Viva & Exam Focus
VARUSVARUS — indications for the combined HTO-ACL
FUJISAWAFUJISAWA — target correction and planning
Clinical Decision Scenarios
Practise clinical reasoning and management decisions out loud
“A 32-year-old amateur footballer has an ACL-deficient knee with 6 degrees of varus on the mechanical axis. Describe your management and justify a combined HTO-ACL reconstruction.”
“During the combined procedure you open the medial osteotomy and hear a crack — the lateral hinge has fractured. How do you manage this intraoperatively, and does it change your plan?”
“You are planning the ACL tibial tunnel after completing the HTO fixation. Describe how the HTO correction affects your tunnel placement and how you avoid collision with the plate.”
Indications
- ACL deficiency with varus over 3-5 degrees (isolated ACL fails 20-40% in varus vs 5-10% neutral)
- ACL + early medial OA (Outerbridge 2-3, KL 1-2) in a young active patient under 55-60 years
- ACL + medial meniscal deficiency (root tear, subtotal meniscectomy) needing offloading
- Revision ACL in a varus knee (primary failed from malalignment)
- Single-stage preferred over two-stage — one recovery, immediate correction
Key anatomy
- Common peroneal nerve: fibular neck, 2-3cm distal to the head — preserve the lateral hinge 5-10mm, avoid excessive valgus
- Popliteal bundle: 1-2cm posterior to the posterior cortex — protect with a posterior Hohmann retractor
- Saphenous nerve/vein: medial, near the harvest — protect with SEPARATE incisions
- Superficial MCL fibres: anterior to the pes — preserve during pes elevation
- ACL tunnel/HTO plate interface: HTO 3-4cm distal to joint, tunnel starts 2-3cm proximal to plate — plan to avoid collision
Critical steps
- SEQUENCE: arthroscopy, hamstring harvest (separate incision), HTO and fixation, ACL tunnels POST-HTO, ACL reconstruction
- PREOP: full-length films mandatory; Miniaci wedge 7-12mm for 3-5 degrees valgus
- HTO: osteotomy 3-4cm distal to joint aimed at the fibular head; preserve lateral hinge 5-10mm; gradual opening with cable method to the Fujisawa point (62-65%)
- ACL TUNNELS: femoral anatomic through AM portal; tibial adjusted post-HTO — start 2-3cm proximal to plate, fluoroscopy confirms no conflict
- FIXATION: medial locking plate (3-4 proximal, 3-4 distal); femoral suspensory device; tibial interference screw divergent and clear of the plate
Danger zones
- Common peroneal nerve at the fibular neck (1-2% palsy from valgus stretch or haematoma) — preserve hinge, open gradually
- Popliteal vessels posterior (Hohmann protects) — avoid deep posterior saw cuts
- Saphenous nerve/vein medial (separate incisions) — gentle medial dissection
- Lateral hinge fracture (10-15%) — add lateral stabilisation if unstable, outcomes still good
- ACL tunnel/HTO plate collision — plan trajectory, verify on fluoroscopy
Technique pearls
- Fujisawa point (62-65% across the plateau = 3-5 degrees valgus) is THE target — offloads medial, protects the graft
- NEVER drill ACL tunnels before the HTO — valgus correction shifts the tibial anatomy
- Need a LONGER hamstring graft (24-26cm minimum) — the HTO opening increases tibial length
- Cable method intraop — electrocautery cable from femoral head to ankle confirms the Fujisawa point
- Hinge fracture is not a disaster — add lateral stabilisation if unstable, proceed with the ACL, outcomes similar
Complications
- HTO nonunion (2-5%) — smoking cessation, protected toe-touch 6 weeks, bone graft/stimulator if needed
- Common peroneal nerve palsy (1-2%) — foot drop, AFO support, most recover if neuropraxia (6-12 weeks)
- ACL graft failure (5-15%, lower than isolated ACL in varus) — Fujisawa correction, anatomic tunnels, 9-12 month RTS
- Loss of correction — under (persistent varus, ACL stress) or over (lateral overload) — meticulous planning and fixation
- Infection (2-3%) — separate incisions, antibiotics, irrigation and debridement early, staged revision if late
- Compartment syndrome (under 1% but devastating) — high index of suspicion, urgent fasciotomy if clinical diagnosis
- Stiffness/loss of extension (5-10%) — immediate ROM, avoid aggressive flexion for 6 weeks, MUA only after HTO healed
Post-op protocol
- PHASE 1 (0-6 weeks): toe-touch only (10-20kg max), brace locked for ambulation, ROM 0-90 degrees, DVT prophylaxis
- PHASE 2 (6-12 weeks): progressive WB (25% at 6wk, 50% at 8wk, 75% at 10wk, WBAT at 12wk AFTER radiographic union), ROM to full
- PHASE 3 (3-6 months): strengthening, proprioception, functional training, no impact
- PHASE 4 (6-9 months): sport-specific training, light jogging if asymptomatic and HTO healed
- PHASE 5 (9-12 months): RTS only if ALL met — HTO healed, ACL stable, full ROM, 90%+ strength, functional testing passed
- Surveillance: 2wk, 6wk, 12wk (confirm union), 6mo, 12mo, 24mo, annually — radiographs each visit
Exam tips
- RATIONALE: varus thrust causes medial overload AND ACL stress — isolated ACL fails, need dual correction
- FUJISAWA POINT: 62-65% across the plateau = 3-5 degrees valgus — examiners expect the precise target
- SEQUENCE: arthroscopy, hamstring harvest, HTO, ACL tunnels post-HTO — explain WHY tunnels come after
- OUTCOMES: 80-90% good at 5 years, superior to isolated ACL in a varus knee
- HINGE FRACTURE: recognised 10-15%, manageable with lateral stabilisation, not a disaster — stay calm
- Return to sport 9-12 months MINIMUM, not the standard 6-9 months
Background & Evidence
Biomechanical rationale. Varus alignment loads the medial compartment disproportionately (roughly 60-80% medial versus 20-40% lateral) and generates a varus thrust during gait. In the ACL-deficient varus knee there is increased anterior tibial translation (the ACL's role), increased medial translation (the varus thrust), and accelerated medial OA from overload — which is why an isolated ACL reconstruction in a varus knee often fails: the thrust keeps loading both the graft and the medial compartment. A medial opening-wedge HTO corrects the alignment into valgus, shifting the load laterally, eliminating the varus thrust and offloading the medial compartment; the concurrent ACL reconstruction then restores stability. Together they protect both the graft and the cartilage, and a single-stage procedure is preferred because it delivers both corrections in one recovery and protects the graft from day one. Slope and the ACL graft. Posterior tibial slope matters in the ACL-deficient knee. Increasing slope shifts the tibial resting position anteriorly and increases ACL graft strain (Giffin, 2004), whereas reducing an excessive slope is protective in refractory graft failure (Dejour, 2015). Because a medial opening wedge naturally increases slope, the anterior gap must be deliberately controlled to keep slope neutral — the Noyes 3-triangle principle (Noyes, 2005). This is the inverse of the common misconception that slope should be increased to protect the ACL. Alignment is the determinant of durability. Hernigou's 10-13 year follow-up showed that the best HTO results sit in mild valgus overcorrection (a hip-knee-ankle angle of 183-186 degrees), with both under-correction (recurrent varus and medial OA progression) and over-correction (lateral degeneration) penalised — the evidence base for the Fujisawa target and for meticulous full-length alignment planning. Key evidence. Stride's systematic review of simultaneous HTO and ACL reconstruction (18 studies, 516 knees) found the combined surgery reliably corrected varus (postoperative mechanical alignment 0.3-7.7 degrees valgus) and improved functional scores, but counselled that ACL graft failure still occurred in 17.5% and revision HTO in 6.5%, and medial OA progressed in some patients despite correction — so it is a valid option with reproducible gains, not a guaranteed disease-modifying procedure. Overall, combined HTO-ACL reports 80-90% good-excellent outcomes at 5 years with appropriate selection, superior to either procedure alone in the varus, ACL-deficient knee.
References
Indications and outcomes of simultaneous high tibial osteotomy and ACL reconstruction (systematic review)
- Systematic review of 18 studies (516 knees) of simultaneous HTO and ACL reconstruction in ACL-deficient varus knees
- Combined surgery reliably corrected varus, with postoperative mechanical alignment ranging from 0.3 degrees to 7.7 degrees valgus, and improved subjective functional scores
- ACL graft failure occurred in 17.5% (across 4 studies) and revision HTO in 6.5% (across 6 studies); overall complication rate 0-23.5%
- Medial compartment OA continued to progress in some patients despite combined correction
Tibial slope correction combined with second revision ACL produces good knee stability and prevents graft rupture
- Nine patients undergoing second-revision ACL reconstruction combined with an anterior closing-wedge (deflexion) tibial osteotomy for excessive slope (over 12 degrees)
- Mean posterior tibial slope was REDUCED from 13.2 degrees to 4.4 degrees; all osteotomies united and all knees were stable with no graft re-ruptures at minimum 2-year follow-up
- Mean Lysholm 73.8 and IKDC-SKF 71.6 at final review
Effects of increasing tibial slope on the biomechanics of the knee (cadaveric robotic study)
- Robotic testing of 10 cadaveric knees before and after a 5mm anterior opening-wedge osteotomy that increased slope from 8.8 degrees to 13.2 degrees
- Increasing slope shifted the resting position of the tibia ANTERIORLY by up to 3.6mm, accentuated under axial load
- The authors concluded that increasing slope may help a PCL-deficient knee, whereas DECREASING slope may be protective in an ACL-deficient knee
Opening wedge tibial osteotomy: the 3-triangle method to correct axial alignment and tibial slope
- Three-dimensional geometric analysis of the proximal tibia defining how the opening-wedge angle on the anteromedial cortex governs both coronal valgus and sagittal slope
- To MAINTAIN native slope, the anterior gap at the tibial tubercle should be approximately HALF the posteromedial gap
- Every 1mm of gap error at the tubercle produces roughly 2 degrees of unintended slope change
Proximal tibial osteotomy for osteoarthritis with varus deformity: ten to thirteen-year follow-up
- 93 knees followed a mean 11.5 years; 90% had a good result at 5 years but only 45% remained good at 10+ years
- Postoperative alignment was the key determinant of durability — best results in knees with a hip-knee-ankle angle of 183-186 degrees (mild valgus overcorrection)
- Undercorrection (HKA under 183 degrees) led to recurrent varus and medial OA progression; overcorrection beyond 186 degrees caused lateral compartment degeneration
Further reading 1. Bonnin M, Chambat P. Current concepts in opening wedge high tibial osteotomy. Orthop Traumatol Surg Res. 2010;96(8):937-945. DOI: 10.1016/j.otsr.2010.08.004 2. Dejour H, Bonnin M. Tibial translation after anterior cruciate ligament rupture. Two radiological tests compared. J Bone Joint Surg Br. 1994;76(5):745-749. PMID: 8083263 3. Lattermann C, Jakob RP. High tibial osteotomy alone or combined with ligament reconstruction in anterior cruciate ligament-deficient knees. Knee Surg Sports Traumatol Arthrosc. 1996;4(1):32-38. DOI: 10.1007/BF01565995 4. Naudie DD, Amendola A, Fowler PJ. Opening wedge high tibial osteotomy for symptomatic hyperextension-varus thrust. Am J Sports Med. 2004;32(1):60-70. DOI: 10.1177/0363546503258907 5. Song EK, Seon JK, Park SJ, Jeong MS. The complications of high tibial osteotomy: closing- versus opening-wedge methods. J Bone Joint Surg Br. 2010;92(9):1245-1252. DOI: 10.1302/0301-620X.92B9.23660 6. Staubli AE, De Simoni C, Babst R, Lobenhoffer P. TomoFix: a new LCP-concept for open wedge osteotomy of the medial proximal tibia — early results in 92 cases. Injury. 2003;34 Suppl 2:B55-62. PMID: 14580986. DOI: 10.1016/j.injury.2003.09.025