Left-sided | Visceral-vascular interval | RLN protection | The ACDF workhorse
- The Smith-Robinson approach is the workhorse exposure for ACDF (the most common cervical spine operation). It develops the natural plane between the sternocleidomastoid laterally and the trachea/oesophagus medially, giving access from C3 to T1.
- Left-sided by convention: the left recurrent laryngeal nerve has a longer, consistent recurrent course in the tracheo-oesophageal groove, whereas a non-recurrent right RLN (0.3 to 0.8 percent, arteria lusoria) crosses the field at disc level.
- Retract the carotid sheath laterally as a unit and the trachea/oesophagus medially with a handheld retractor initially - never dissect into the carotid sheath.
- The longus colli muscles mark the midline and the lateral safe limit (15 to 20 mm from the midline); elevate them bilaterally and place retractors UNDER them to protect the sympathetic chain and oesophagus.
- The recurrent laryngeal nerve is the structure most often injured (symptomatic palsy 3.1 percent, Fountas 2007); the dominant mechanism is endotracheal-tube compression of the intralaryngeal nerve - release the ET cuff after retractor placement (Apfelbaum 2000, temporary palsy fell from 6.4 to 1.7 percent).
- Stay medial to the uncinate process to protect the vertebral artery (foramen transversarium, 15 to 20 mm lateral); confirm the level with a lateral X-ray and marker before any disc work - wrong-level surgery is a never event.
When & Why
What it exposes. The Smith-Robinson approach gives direct anterior access to the cervical vertebral bodies and disc spaces from C3 to T1 through the visceral-vascular interval — the avascular plane between the carotid sheath laterally and the trachea and oesophagus medially. It is the workhorse exposure for anterior cervical discectomy and fusion (ACDF), cervical corpectomy, cervical disc arthroplasty and, via a proximal extension, anterior odontoid screw fixation. Why anterior (and why left). An anterior route gives direct decompression of disc, osteophyte and vertebral-body pathology compressing the cord and roots from the front, and it places the interbody graft under compression — ideal for fusion. The approach is conventionally left-sided: the left RLN branches from the vagus in the mediastinum, loops under the aortic arch, and ascends in the tracheo-oesophageal groove to enter the larynx at the cricoid (C6) — a long, consistent course present in about 99.5 percent of patients. On the right the RLN loops under the subclavian artery and can be non-recurrent in 0.3 to 0.8 percent (associated with an aberrant right subclavian artery, arteria lusoria), crossing the surgical field at disc level. Note that the highest-quality evidence (Apfelbaum 2000) shows the dominant mechanism of RLN palsy is endotracheal-tube compression, not the side chosen — so technique and ET-cuff management matter at least as much as the side. Indications — the Big 5. 1. Cervical radiculopathy (about 60 percent). Dermatomal arm pain from disc herniation or foraminal (uncovertebral) stenosis, after 6 to 12 weeks of failed conservative care or with a progressive deficit. 2. Cervical myelopathy (about 20 percent). Cord compression with hand clumsiness, gait instability, hyperreflexia, Hoffman or Babinski signs. Progressive in about 75 percent; surgery is the only treatment that reliably halts progression. 3. Trauma (about 10 percent). Facet dislocation (disc removal before reduction prevents disc herniation into the canal), burst/teardrop vertebral-body fractures, and selected Type II odontoid fractures via an extended approach. 4. Tumour (about 5 percent). Vertebral-body metastasis with pathological fracture or cord compression — corpectomy and reconstruction for palliation and neurological preservation. 5. Infection (less than 5 percent). Discitis/osteomyelitis unresponsive to antibiotics or with neurological compromise — anterior debridement with autograft, instrumentation deferred until infection is controlled. Contraindications. Absolute: active infection at the surgical site; severe medical comorbidity precluding anaesthesia; pure posterior pathology (ligamentum flavum hypertrophy) needing a posterior approach. Relative: prior anterior neck surgery or neck radiation (scarred/poor-quality tissue, higher RLN and oesophageal risk), ankylosing spondylitis with a fused spine, severe COPD, morbid obesity, and multilevel (4 or more levels) disease where a posterior or combined approach may be safer.
- Anterior (Smith-Robinson)
- Anterior pathology - disc, vertebral body, anterior cord compression (about 80% of cases)
- Posterior (laminectomy/fusion)
- Posterior pathology - ligamentum flavum, facet, multilevel stenosis (about 15%)
- Combined (360)
- Severe instability - 3-column trauma, tumour reconstruction, revision (about 5%)
- Anterior (Smith-Robinson)
- Direct - from the front (disc, osteophytes, body)
- Posterior (laminectomy/fusion)
- Indirect - from the back (laminectomy, foraminotomy)
- Combined (360)
- Circumferential (360)
- Anterior (Smith-Robinson)
- Compression across the graft; restores disc height and lordosis
- Posterior (laminectomy/fusion)
- Tension band; needs an intact anterior column
- Combined (360)
- Maximum stability (compression and tension band)
- Anterior (Smith-Robinson)
- Best for 1 to 2 levels; dysphagia rises with more levels
- Posterior (laminectomy/fusion)
- Better for 3 or more levels; laminoplasty an option
- Combined (360)
- Extensive pathology (tumour, trauma)
- Anterior (Smith-Robinson)
- Low (1 to 2% with ACDF)
- Posterior (laminectomy/fusion)
- Higher (5 to 10%) from cord shift and root tethering
- Combined (360)
- Highest (10 to 15%)
- Anterior (Smith-Robinson)
- 30 to 50% transient, about 5% at 1 year
- Posterior (laminectomy/fusion)
- Minimal (no anterior dissection)
- Combined (360)
- As for the anterior stage
- Anterior (Smith-Robinson)
- 45-year-old office worker, C5-6 disc herniation with radiculopathy
- Posterior (laminectomy/fusion)
- 65-year-old, multilevel C3-6 stenosis with myelopathy
- Combined (360)
- 55-year-old, C5 vertebral body metastasis needing corpectomy
Position & landmarks. Supine on a radiolucent table with a small shoulder roll between the scapulae to extend the neck, a head ring or horseshoe headrest, arms tucked and padded, and tape across the forehead and pulling the shoulders caudally to clear the lower levels on fluoroscopy. Palpate the cricoid cartilage at C6 (the single most important landmark), the hyoid at C3, the thyroid cartilage at C4-5, and the carotid tubercle of Chassaignac (C6 transverse process). The C-arm stands on the opposite side; confirm a true lateral before starting. Global practice & counselling. NASS- and NICE-aligned pathways reserve ACDF for radiculopathy or myelopathy with imaging that correlates with the clinical level — radiculopathy after a documented trial of non-operative care, myelopathy treated more urgently. Return to work is roughly 2 to 6 weeks for sedentary work and 3 to 6 months for heavy manual labour. Smoking is the strongest modifiable predictor of pseudarthrosis after multilevel interbody fusion (Hilibrand 2001) — counsel cessation, signpost national quit services, and consider corpectomy strut-grafting (which fused in 93 percent of smokers and non-smokers alike) when multilevel fusion is unavoidable.
The Exposure
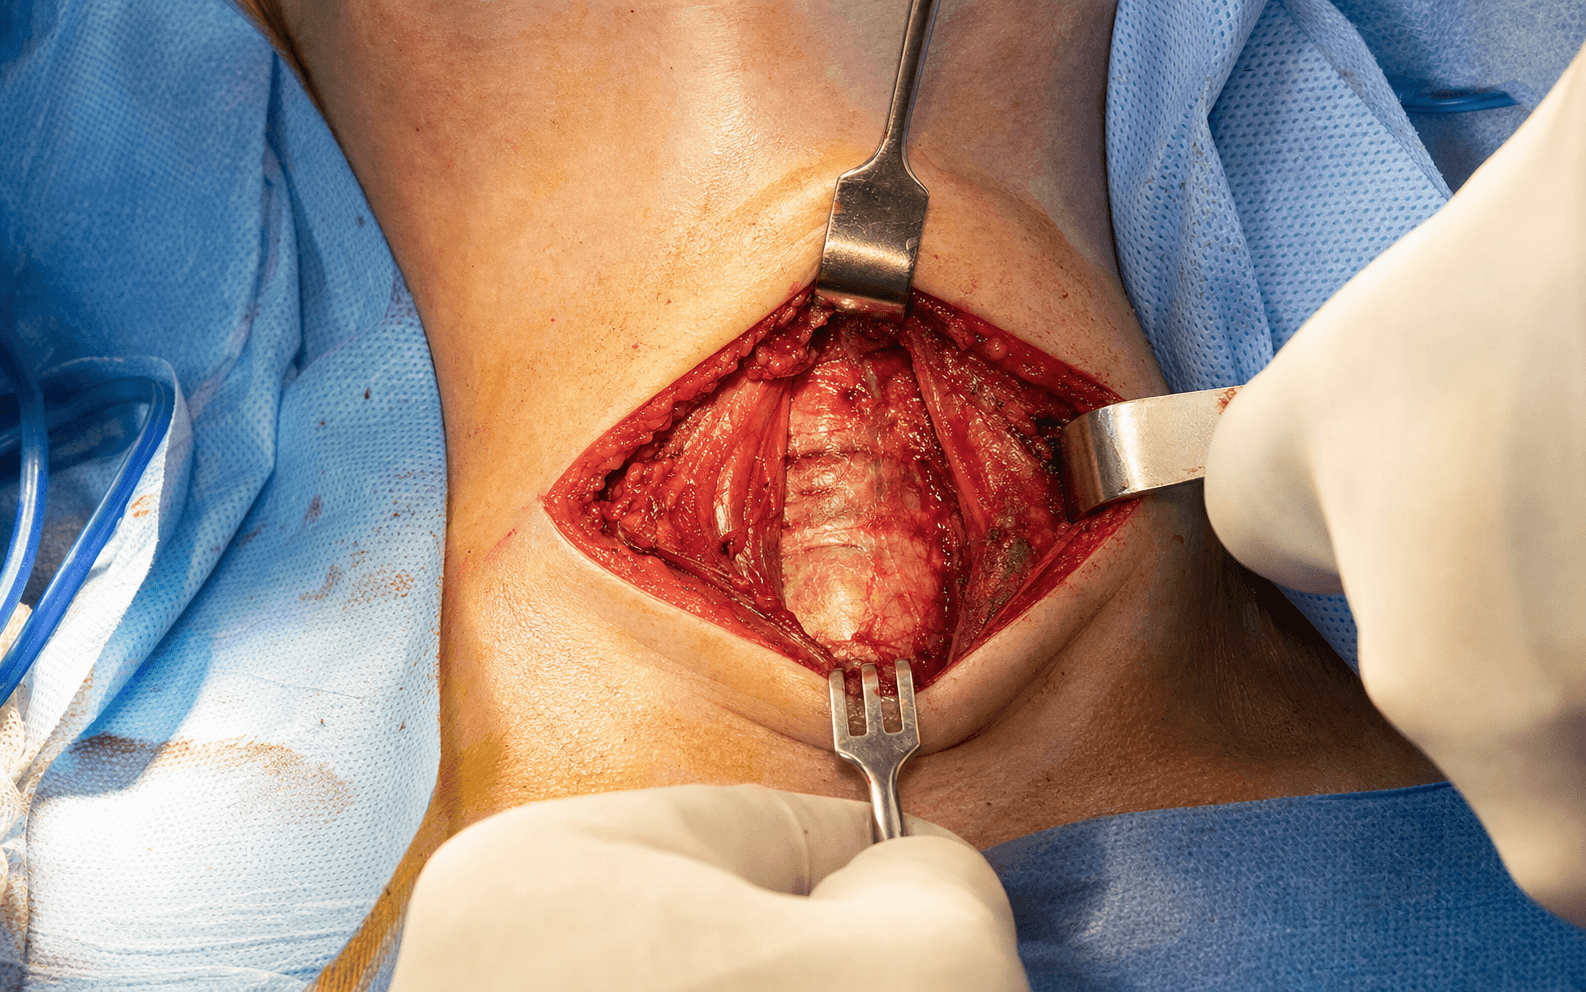
Work down through the neck in the visceral-vascular interval: skin and platysma, then open the plane medial to SCM, retract the carotid sheath laterally and the trachea/oesophagus medially, and finally incise the prevertebral fascia and elevate the longus colli to seat the self-retaining retractors. The dissection is entirely extracapsular and avascular until the disc is deliberately opened.
Exposure sequence
- Supine on a radiolucent table with a shoulder roll to extend the neck, head ring, arms tucked and padded, and tape pulling the shoulders caudally for lower-level fluoroscopy.
- Palpate landmarks: hyoid (C3), thyroid cartilage (C4-5), cricoid cartilage (C6) — the key landmark — and the carotid tubercle of Chassaignac (C6 transverse process). Mark the target level and the incision.
- Position the C-arm on the opposite side and confirm a true lateral before starting.
- Transverse incision along Langer's lines (a skin crease) at the target level — 3 to 4 cm for one level, 5 to 6 cm for two levels, slightly off the midline toward the operative side; a longitudinal incision along the medial SCM border is used for 3 or more levels.
- Inject local anaesthetic with epinephrine for haemostasis; incise skin and subcutaneous tissue to platysma.
- Incise platysma in line with the skin, develop subplatysmal flaps for 1 to 2 cm, and ligate or cauterise the anterior jugular veins if encountered.
- Palpate the medial border of SCM — the key landmark. Incise the superficial layer of deep cervical fascia along this border.
- This opens the natural avascular plane between the carotid sheath laterally and the trachea/oesophagus medially.
- Develop the plane bluntly with a finger or Kittner; it should open easily with minimal resistance — resistance means you are in the wrong plane (too lateral into the sheath, or too medial into the viscera).
- Palpate the carotid pulse to confirm the sheath, then retract the entire sheath laterally with a handheld Richardson or Deaver retractor.
- The sheath contains the internal jugular vein, common carotid artery and vagus nerve (VAN) — retract it as a unit and do NOT dissect into it.
- Avoid excessive lateral traction, which stimulates the vagus and causes bradycardia; release briefly if the heart rate drops.
- Palpate the firm, midline trachea; the thyroid gland overlies it at C5-7 and is mobilised as needed. The omohyoid can be retracted or divided.
- Identify the oesophagus posterior to the trachea — softer and collapsible (palpate an NGT if one is placed).
- Retract the trachea and oesophagus medially with a handheld retractor using gentle pressure — the RLN lies in the tracheo-oesophageal groove and is injured by excessive medial pressure.
- The thin, glistening prevertebral fascia now appears over the vertebral bodies and longus colli. The disc spaces are palpable as soft depressions between firm bodies; the anterior longitudinal ligament runs as a taut midline band.
- MANDATORY: place a radiopaque marker on the presumed disc and obtain a true lateral X-ray, counting from C2. Never proceed on palpation alone — wrong-level surgery is a never event.
- Incise the prevertebral fascia over the disc and adjacent bodies with cautery or scalpel.
- Identify the paired longus colli muscles (5 to 10 mm lateral to the midline). Cauterise the small anterior vertebral-body veins and maintain meticulous haemostasis.
- Elevate the longus colli subperiosteally with a Cobb or periosteal elevator, 15 to 20 mm lateral to the midline on each side, working from the midline outward.
- Stay medial to the uncinate process to protect the vertebral artery, and do not extend the elevation above or below the operated levels (preserves blood supply).
- Insert Caspar pins into the bodies above and below the disc (angled 15 to 20 degrees caudally to avoid endplate violation) and apply gentle distraction.
- Place the retractor blades UNDER the elevated longus colli bilaterally and attach them to the frame. Blades seated under the longus colli protect the sympathetic chain (which lies on the muscle) and the oesophagus, and prevent medial migration.
- Confirm the medial blade is at the midline and the lateral blade does not cross the uncinate. Release retraction every 30 minutes. The disc space is now exposed for discectomy.
The RLN is the most commonly injured structure in this approach (symptomatic palsy 3.1 percent in Fountas 2007). The dominant mechanism is endotracheal-tube compression of the intralaryngeal nerve against the retracted larynx (Apfelbaum 2000) — releasing and re-monitoring the ET cuff after the self-retaining retractor is placed cut temporary palsy from 6.4 to 1.7 percent. Use a handheld medial retractor initially, keep the ET cuff pressure at 20 to 25 cm H2O, avoid cautery in the tracheo-oesophageal groove, and release retraction every 30 minutes.
Place a radiopaque marker on the disc and obtain a true lateral X-ray, counting down from C2; C7 is the first vertebra with a large spinous process (vertebra prominens). Wrong-level surgery is a never event — never proceed on palpation alone. When the shoulders obscure C7-T1, pull the arms caudally, use a swimmer's view, or intra-operative CT/navigation; if the level cannot be confirmed, do not proceed.
Dangers & Extensions
- Course / location
- Tracheo-oesophageal groove; left consistent (loops under the aortic arch), right variable (0.3 to 0.8% non-recurrent)
- How to protect
- Handheld medial retractor; release the ET cuff after retractor placement; no cautery in the groove; release every 30 min
- Consequence of injury
- Hoarseness (2 to 5% transient, 0.2% permanent); bilateral palsy = airway obstruction
- Course / location
- Posterior to the trachea; a collapsed, serosa-less muscular tube (deviates left in 60%)
- How to protect
- Gentle retraction; identify before placing the retractor; no sharp dissection/cautery near it; inspect before closing
- Consequence of injury
- Perforation 0.3% — mediastinitis; the cause of the only death in Fountas 2007
- Course / location
- Foramen transversarium, 15 to 20 mm lateral to the midline; enters at C6
- How to protect
- Stay medial to the uncinate; limit lateral dissection to 15 mm; retractors under the longus colli
- Consequence of injury
- Sudden bleeding (0.3%) — pack, vascular consult, possible ligation
- Course / location
- On the longus colli beneath the prevertebral fascia
- How to protect
- Avoid excessive lateral dissection/retraction; seat retractors under the longus colli
- Consequence of injury
- Horner syndrome (miosis, ptosis, anhidrosis), usually temporary
- Course / location
- Descends on the inferior pharyngeal constrictor; at risk at C3-4
- How to protect
- Careful high-cervical dissection; protect near the superior thyroid artery
- Consequence of injury
- Loss of high-pitched voice / cannot sing (cricothyroid paralysis)
- Course / location
- Posterolateral to the disc; tethered after cord shift
- How to protect
- Gentle distraction; avoid aggressive foraminotomy at C4-5
- Consequence of injury
- Deltoid/biceps weakness (1 to 2%); most recover
Oesophageal perforation is catastrophic (about 0.3 percent, Fountas 2007) and was the cause of the only death in that 1015-case series. Brownish fluid (saliva, gastric contents) pooling in the wound during dissection means STOP — do not proceed with the discectomy. Irrigate copiously, call immediately for general surgery or ENT, and perform intra-operative oesophagoscopy. Early (within 24 hours) primary two-layer repair does well; a missed injury presenting at 3 to 7 days with fever, dysphagia and neck swelling carries 10 to 20 percent mortality. Never attempt repair without specialist help.
Extensile options. The approach is extensile along the medial border of SCM from C3 to T1. Extend proximally (longitudinal along the medial SCM) to reach C2-3 for anterior odontoid screw fixation or high-cervical pathology — the superior thyroid artery crosses C3-4 and may require ligation, and the external branch of the superior laryngeal nerve is at risk at this level. For very low levels (C7-T1), pull the shoulders caudally or use a more transverse low incision. Left versus right is guided by the RLN course (left by convention), but also by the side of pathology and any previous anterior neck surgery. Closure. Remove the retractors and Caspar pins, irrigate copiously (500 to 1000 mL), and achieve meticulous haemostasis with bipolar and bone wax for vertebral-body bleeding. Inspect the oesophagus before closing — any concern mandates immediate general-surgery/ENT review and oesophagoscopy. Close in layers: prevertebral fascia over the hardware (3-0 Vicryl), platysma (3-0 Vicryl), subcutaneous tissue (3-0 Vicryl), and skin (subcuticular 4-0 Monocryl with or without glue). Place a closed-suction drain superficial to the prevertebral fascia for multilevel, revision or actively bleeding cases (never deep to the fascia, where it could compress the oesophagus or trachea).
Procedures Through This Approach
- ACDF — single-level and cervical spinal fusion (ACDF) — the principal operations. Score and remove the annulus and nucleus, decorticate the endplates down to bleeding bone, and remove posterior osteophytes; excise the posterior longitudinal ligament to expose the dura centrally and the nerve roots laterally. Perform a foraminotomy (Kerrison on the uncovertebral joint) for foraminal stenosis. Trial and insert an interbody cage to restore native disc height without over-distraction (flush or 1 to 2 mm proud), packed with autograft, allograft or graft substitute. Apply an anterior plate with unicortical screws aimed toward the midline and cephalad (typically 14 to 15 mm), or a zero-profile device to reduce dysphagia.
- Corpectomy — vertebral-body tumour, burst or teardrop fracture, and multilevel spondylotic myelopathy; reconstruct with an expandable cage or strut graft. In smokers, autogenous strut-grafting after corpectomy fuses in 93 percent (equivalent to non-smokers, Hilibrand 2001) and is preferred when multilevel interbody fusion is unavoidable.
- Cervical disc arthroplasty — a motion-preserving alternative for selected one- or two-level soft-disc disease with preserved facets and alignment (durable relief at 10 years, Lombardi 2020).
- Anterior odontoid screw fixation — selected Type II odontoid fractures in young patients with favourable anatomy, via an extended approach to C2-3.
- Infection — discitis/osteomyelitis with neurological compromise: anterior debridement with autograft (rib or iliac crest), instrumentation deferred until infection is controlled.
Viva & Exam Focus
SMITHSMITH — the anterior cervical exposure
RLNRLN — recurrent laryngeal nerve protection
Clinical Decision Scenarios
Practise clinical reasoning and management decisions out loud
“You are planning an ACDF for a 55-year-old man with a left C5-6 disc herniation. Which side will you approach from and why, and what are the anatomical differences between left and right?”
“During a revision ACDF, brownish fluid pools in the wound as you develop a scarred plane with electrocautery. What has happened and what do you do immediately?”
“How do you CONFIRM you are at the correct level before making the discectomy, and what if the level is wrong?”
Indications (the Big 5)
- Cervical radiculopathy (about 60 percent): arm pain from disc herniation or foraminal stenosis after 6 to 12 weeks of failed conservative care
- Cervical myelopathy (about 20 percent): cord compression (hand clumsiness, gait instability, hyperreflexia) — surgery is the only treatment that halts progression
- Trauma (about 10 percent): facet dislocation (disc removal before reduction), burst/teardrop fracture, Type II odontoid via an extended approach
- Tumour (about 5 percent): vertebral body metastasis with cord compression — corpectomy and reconstruction (palliative)
- Infection (less than 5 percent): discitis/osteomyelitis with neurological compromise — debridement and autograft fusion
Approach (left side preferred)
- LEFT-sided approach by convention — the left RLN has a consistent recurrent course; the right can be non-recurrent (0.3 to 0.8 percent)
- Plane: between SCM laterally and the trachea/oesophagus medially (a natural avascular plane)
- Retract: carotid sheath laterally as a unit; trachea and oesophagus medially with gentle pressure
- Level ID: the cricoid cartilage marks C6; the carotid tubercle (Chassaignac) is the C6 transverse process
- Confirm level: lateral X-ray with a marker on the disc, counting from C2 — mandatory before any disc work
Critical structures — what NOT to injure
- Recurrent laryngeal nerve: tracheo-oesophageal groove; left consistent, right variable (0.3 to 0.8 percent non-recurrent). Injury equals hoarseness (2 to 5 percent transient, 0.2 percent permanent). Protect with gentle retraction, release every 30 min, no cautery in the groove, ET cuff pressure 20 to 25 cm H2O
- Oesophagus: retracted medially; a serosa-less muscular tube. Injury equals mediastinitis (0.3 percent; 10 percent mortality if delayed). Protect with gentle retraction, identify before placing the retractor, no sharp dissection; brown fluid means stop and call general surgery
- Vertebral artery: foramen transversarium, 15 to 20 mm lateral. Injury is a bleeding emergency (0.3 percent). Stay midline, elevate longus colli to 15 mm, retractors under longus colli
- Sympathetic chain: on the longus colli. Injury equals Horner syndrome (miosis, ptosis, anhidrosis), usually temporary
- Superior laryngeal nerve: at C3-4 (high cervical). Injury equals loss of high-pitched voice, cannot sing
Technical pearls
- Longus colli elevation: 15 to 20 mm lateral from the midline bilaterally; place retractors UNDER the longus colli (protects the sympathetic chain, prevents medial migration toward the oesophagus)
- Discectomy: remove annulus, nucleus and cartilaginous endplates down to bleeding bone; from uncinate to uncinate laterally and from the anterior body to the PLL
- Posterior decompression: excise the PLL to visualise the dura centrally and the roots laterally; foraminotomy with a Kerrison on the uncovertebral joint for foraminal stenosis
- Cage sizing: restore native disc height (do not over-distract); trial under fluoroscopy; cage flush or 1 to 2 mm proud
- Plate application: unicortical screws (typically 14 to 15 mm) aimed toward the midline and cephalad; zero-profile cages reduce dysphagia
Complications — know the rates and management
- RLN palsy (2 to 5 percent transient, 0.2 percent permanent): hoarseness; ENT laryngoscopy; most recover in 6 to 12 months, medialisation thyroplasty if not
- Dysphagia (about 50 percent at 1 month, about 5 percent at 1 year): usually soft-tissue oedema; soft diet, speech therapy, barium swallow if persistent
- Haematoma (1 to 2 percent): neck swelling, airway compromise — open the wound at the bedside, evacuate, return to theatre; an emergency if there is stridor
- C5 palsy (1 to 2 percent): deltoid/biceps weakness on day 1 to 2; observe and physiotherapy (most recover)
- Pseudarthrosis (5 percent single-level, 10 to 20 percent multilevel): smoking is the strongest predictor; revise if symptomatic
- Oesophageal injury (0.3 percent; 10 percent mortality if delayed): brown fluid intra-op means stop, call general surgery; post-op fever and dysphagia means CT with oral contrast
- Vertebral artery injury (0.3 percent): sudden bleeding — pack with thrombin-soaked gelfoam, vascular consult, possible ligation
Evidence — examiner favourites
- Fountas 2007 (Spine, 1015 cases): dysphagia 9.5 percent, haematoma 5.6 percent (surgical 2.4 percent), symptomatic RLN palsy 3.1 percent, oesophageal perforation 0.3 percent, mortality 0.1 percent (the death was an oesophageal perforation)
- Apfelbaum 2000 (Spine, 900 cases): the mechanism of RLN palsy is ET-tube compression of the intralaryngeal nerve; cuff release after retractor placement cut temporary palsy from 6.4 to 1.7 percent
- Hilibrand 2001 (JBJS, 190 patients): smoking impairs fusion after multilevel anterior cervical interbody grafting; corpectomy strut-graft fused in 93 percent regardless of smoking
- Bazaz 2002 (Spine, 249 patients): dysphagia 50 percent at 1 month, 12.5 percent at 12 months; source of the Bazaz grading system
- Lee 2007 (Spine J, 310 patients): about one in seven still report dysphagia at 2 years; female sex, revision and multilevel surgery predict persistence
- Lombardi 2020 (Clin Spine Surg, 10-year FDA-IDE RCT): both ACDF and disc arthroplasty give durable symptom relief at 10 years
Global practice and counselling
- Indications (NASS / NICE-aligned): ACDF for radiculopathy or myelopathy with imaging that correlates with the clinical level; radiculopathy after failed conservative care, myelopathy treated more urgently
- Return to work: about 2 to 6 weeks for sedentary work, 3 to 6 months for heavy manual labour (depends on levels and fusion)
- Smoking cessation: the strongest modifiable non-union risk (Hilibrand 2001); counsel cessation, signpost national quit services, consider cotinine testing; consider corpectomy strut-graft if multilevel fusion is needed in a smoker
- Driving: resume when off opioids and able to rotate the neck to check blind spots — typically 2 to 4 weeks (jurisdiction-specific rules apply)
- Collar use: trend toward no collar or a comfort soft collar only for single-level ACDF with a plate; not proven to improve fusion
Exam traps — do not fall for these
- 'Why the left side?' Left RLN loops under the aorta (consistent); the right can be non-recurrent (0.3 to 0.8 percent, arteria lusoria). Caveat: direct left-versus-right evidence is limited — ET-cuff release (Apfelbaum) is the key protective manoeuvre
- 'How to confirm the level?' Lateral X-ray with a marker, count from C2. Never proceed on palpation. Wrong-level is a never event
- 'Hoarse on day 1?' Likely RLN injury — check the airway, then ENT laryngoscopy; most recover in 6 to 12 months
- 'Brown fluid in the wound?' Oesophageal perforation — stop, call general surgery or ENT, oesophagoscopy
- 'Day 5 fever, dysphagia, neck pain?' Oesophageal perforation until proven otherwise — CT neck with oral contrast
- 'Need a collar?' Not routinely for single-level ACDF with a plate — not proven to improve fusion
- 'Smoker for ACDF?' Counsel cessation (strongest modifiable non-union risk); consider deferring and cotinine testing; corpectomy strut-graft if multilevel and unable to quit
References
ACDF Complications in 1015 Smith-Robinson Cases - Real-World Rates
- Retrospective review of 1015 first-time ACDFs, all via a standard Smith-Robinson approach (mean follow-up 26.4 months)
- Overall morbidity 19.3%; mortality 0.1% (the single death was due to oesophageal perforation)
- Isolated postoperative dysphagia was the most common complication at 9.5%
- Postoperative haematoma 5.6% (surgical evacuation required in 2.4%); symptomatic recurrent laryngeal nerve palsy 3.1%
- Dural penetration 0.5%, oesophageal perforation 0.3%, Horner syndrome 0.1%, instrumentation backout 0.1%
RLN Palsy Mechanism - ET Cuff Compression, Not Just Side
- 900 consecutive anterior cervical spine surgeries with plating over 12 years, supplemented by cadaver videofluoroscopy
- 30 vocal cord palsies consistent with RLN injury (27 temporary, 3 permanent)
- Temporary palsy fell from 6.4% to 1.69% (p = 0.0002) after introducing ET cuff pressure monitoring with cuff release after retractor placement
- Cadaver studies showed the cervical retractor displaces the larynx against the ET tube, compressing the vulnerable intralaryngeal segment of the RLN
Smoking Impairs Fusion After Multilevel Anterior Cervical Interbody Grafting
- 190 patients followed clinically and radiographically for at least 2 years (range 2-15) after multilevel anterior cervical decompression and autograft fusion; no internal fixation used
- Multilevel interbody grafting: solid fusion in only 20 of 40 smokers vs 69 of 91 non-smokers (p less than 0.02), with the difference most pronounced after two-level grafting
- Corpectomy with autogenous strut-grafting fused in 93% of BOTH smokers and non-smokers (no significant difference)
- Clinical outcomes were significantly worse in smokers (p less than 0.03)
Long-Term Dysphagia After ACDF - 2-Year Risk Factors
- Prospective cohort of 310 patients (of 348 operated via the anterior Smith-Robinson approach) followed to 2 years using the Bazaz dysphagia grading system
- Dysphagia prevalence 54.0%, 33.6%, 18.6%, 15.2% and 13.6% at 1, 2, 6, 12 and 24 months
- At 2 years, dysphagia was significantly more common in women (18.3%) than men (9.9%)
- Revision surgery (27.7% vs 11.3% primary) and more than two-level surgery (19.3% vs 9.7% for two or fewer levels) were independent risk factors
- Instrumentation, corpectomy vs discectomy, and higher cervical levels did NOT significantly increase 2-year dysphagia
Natural History of Dysphagia After Anterior Cervical Spine Surgery
- Prospective longitudinal study of 249 consecutive patients after anterior cervical spine surgery, assessed at 1, 2, 6 and 12 months
- Dysphagia incidence 50.2%, 32.2%, 17.8% and 12.5% at 1, 2, 6 and 12 months
- Only 4.8% had moderate or severe dysphagia at 6 months
- Female gender increased risk at 6 months; surgery at multiple disc levels increased risk at 1 and 2 months
- Vocal cord paresis was identified in 1.3% of patients at 12 months
ACDF vs Cervical Disc Arthroplasty - 10-Year FDA-IDE Randomized Data
- Prospective FDA-IDE randomized trial: 397 patients with two-level radiculopathy/myelopathy randomized to disc arthroplasty (209) or ACDF (188), followed to 10 years
- Preoperatively 86% reported headaches and 55.9% had frequent/severe headache (grades 3-5)
- By 6 weeks postoperatively only 12.5% had grade 3-5 headaches; both ACDF and arthroplasty gave durable symptom relief
- At 10 years 16.8% had grade 3-5 headaches (10.9% arthroplasty vs 24.3% ACDF)