Gold standard for distal radius ORIF · FCR interval · pronator quadratus preservation · watershed line critical
- The volar (Henry/FCR) approach is the workhorse exposure for distal radius fracture ORIF — about 90% of operative cases — using the FCR interval for direct volar access and low-profile locked plating.
- The FCR interval lies between the FCR tendon (medially, retracted ulnarward) and the radial artery (laterally) over pronator quadratus. It is a tendon-artery interval, NOT an internervous plane (the approach works through the floor of the FCR sheath and pronator quadratus) — a classic viva trap.
- The palmar cutaneous branch of the median nerve is the structure at highest anatomic risk — on average only 3.4mm from the FCR tendon at the watershed level (McCann cadaveric study), closer than the radial artery (7.8mm) or the main median trunk (8.9mm). Protect it by working through the FCR sheath and retracting FCR ulnarward.
- Pronator quadratus is raised as an L-shaped subperiosteal flap and commonly repaired over the plate for soft-tissue coverage — reasonable practice, though meta-analysis shows no proven functional benefit (Shi 2020).
- The watershed line (about 2cm proximal to the radiocarpal joint) is the proximal limit for plate placement: a plate prominent here rubs on FPL and risks rupture (Soong Grade 2 plates carry the highest risk).
- Screw length is checked for EVERY distal screw — a depth-gauge reading minus 2mm — and confirmed on the dorsal tangential (skyline) view, because a true lateral alone does not exclude dorsal penetration across the undulating dorsal cortex (Lister's tubercle).
When & Why
What it exposes. The volar approach gives direct access to the volar surface of the distal radius from the metaphysis to the radiocarpal joint, through the FCR interval (FCR tendon medially, radial artery laterally), deep to which lies pronator quadratus over the bone. It is the workhorse exposure for volar locked plating of distal radius fractures, and also serves malunion osteotomy, volar plate removal, and (extended distally into the palm) carpal tunnel release. Why volar (and the paradigm shift). Distal radius fractures are among the most common fractures in adults worldwide, with a bimodal distribution — high-energy injuries in young adults and low-energy fragility fractures in older adults, particularly post-menopausal women; they represent roughly one in six fractures presenting to emergency departments. Before the 2000s, dorsal plating was standard but carried high extensor-tendon rupture rates (10-15%) and prominent hardware. Volar locked plating (Orbay, Jupiter) shifted practice worldwide because (1) fixed-angle locked screws resist the dorsal collapse typical of Colles fractures, (2) the volar surface has pronator quadratus muscle cover acting as a biological barrier between plate and flexor tendons, and (3) stable fixation allows early mobilisation. The shift is reflected across major guidance (AAOS, BOA/BSSH, AO Foundation). Importantly, high-level evidence tempers this: in low-demand older patients the functional advantage of plating over non-operative care is modest and time-limited (Arora 2011), so approach and fixation choice should be patient-specific, not reflexive. Position and landmarks. Supine on the OR table, operative arm abducted onto a radiolucent hand table, shoulder abducted 80-90 degrees, elbow flexed 90 degrees and forearm supinated (volar surface up). An upper-arm pneumatic tourniquet inflated to about 250mmHg (exsanguinate with Esmarch first) gives a bloodless field; release before closure for haemostasis. Palpate and mark the radial styloid, the FCR tendon at the wrist crease (ask the patient to flex the wrist against resistance), the radial artery pulse lateral to FCR, and the distal wrist crease (approximating the radiocarpal joint). Plan a longitudinal incision along the FCR tendon, starting about 1cm proximal to the wrist crease (avoid the crease itself — hypertrophic scarring), 8-10cm long. Indications. Absolute triggers for ORIF: displaced intra-articular fracture with articular step-off greater than 2mm after reduction; unstable extra-articular fracture (dorsal tilt greater than 20 degrees, radial shortening greater than 5mm, ulnar variance more than 3mm positive, dorsal comminution); open fractures (Gustilo I-II); and bilateral fractures where the patient needs both hands for crutches/walker. Relative: failed closed reduction lost in cast at 7-10 days; high functional demand (athletes, manual labourers); young active patients. Patterns particularly suited to the volar approach: Colles (dorsally displaced — the plate buttresses against dorsal collapse), Smith's (volarly displaced — the plate directly buttresses the volar fragment), die-punch (lunate facet impaction), volar Barton (volar rim with radiocarpal subluxation), and chauffeur's (radial styloid). Non-fracture uses: symptomatic malunion correction, volar plate removal, and combined carpal tunnel release (acute CTS complicates roughly 5-10% of distal radius fractures). Contraindications. Absolute: active volar soft-tissue infection or osteomyelitis (stage the treatment). Relative: dorsal Barton fracture (may need a dorsal buttress plate), severe volar cortical comminution with no stable platform for the plate (consider bridging external fixation), severe volar soft-tissue injury or crush (wound-heaving concern), and the patient unable to comply with postoperative precautions.
The Exposure
Work down through the layers along the FCR tendon, protecting the palmar cutaneous nerve and radial artery, then raise pronator quadratus as an L-shaped flap to reach the volar distal radius, reduce the fracture, and apply the plate just proximal to the watershed line with every screw checked on lateral and skyline fluoroscopy.
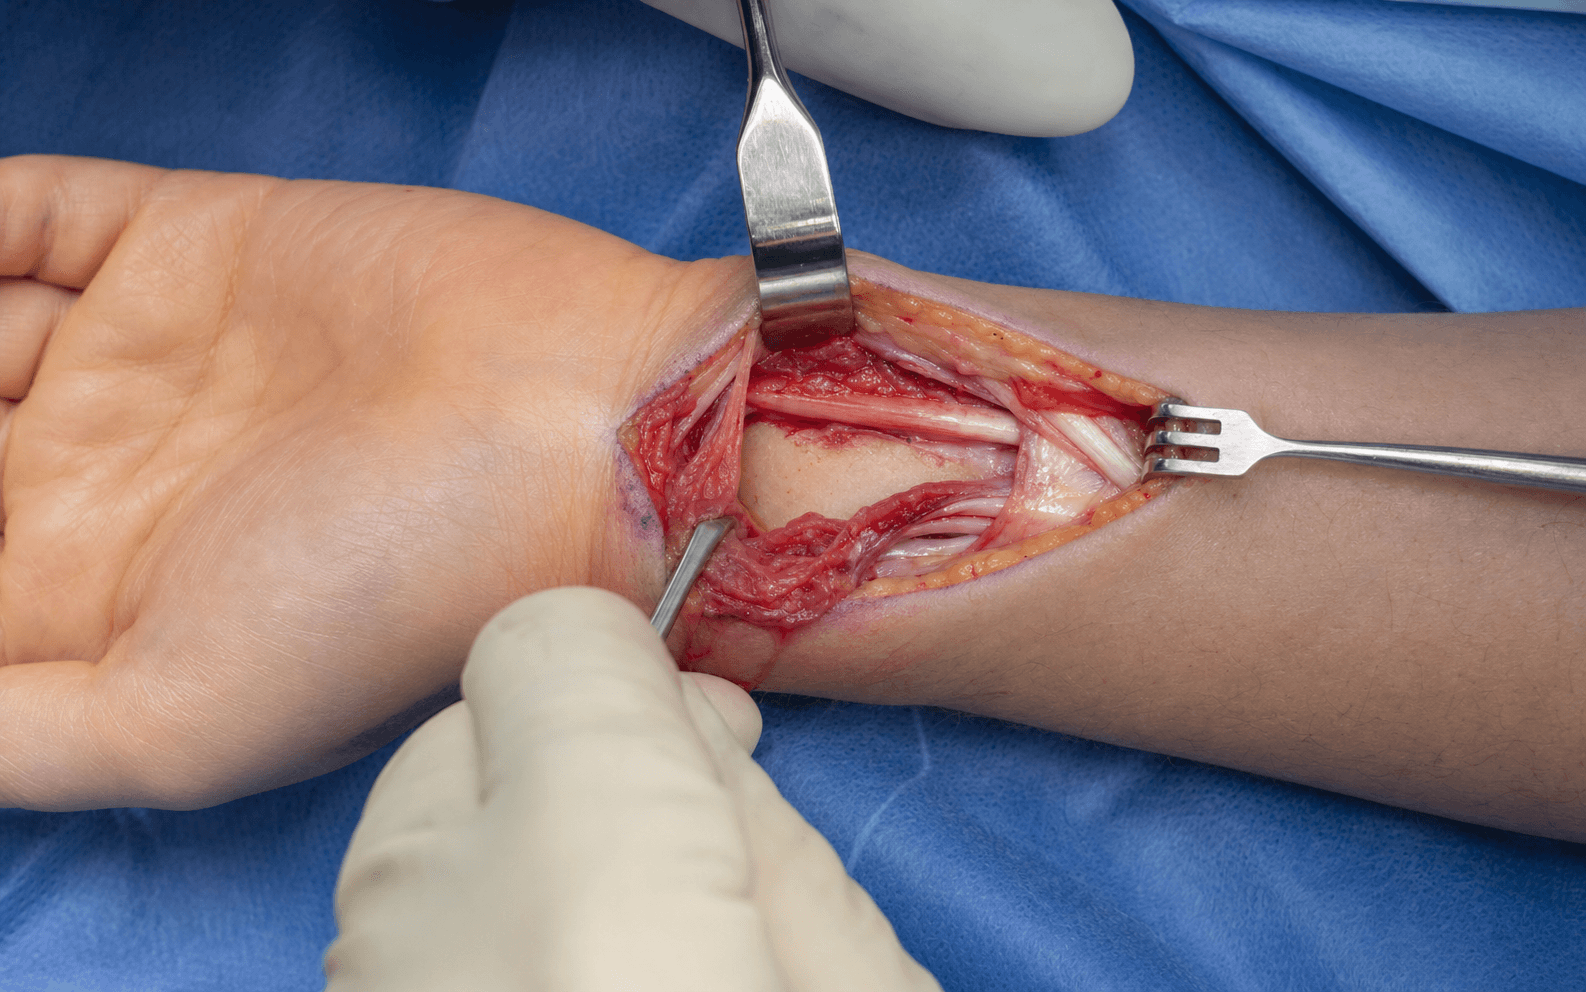
Exposure sequence
- A longitudinal incision over the FCR tendon, 8-10cm long, starting about 1cm proximal to the distal wrist crease (avoid the crease itself to prevent hypertrophic scarring), ending at the radial styloid level distally; it can be extended into the palm if a concurrent carpal tunnel release is needed.
- Incise the dermis with a 15 blade and deepen through subcutaneous fat, ligating or bipolaring superficial veins.
- The palmar cutaneous branch of the median nerve runs in the subcutaneous plane, on average only 3.4mm ulnar to the FCR tendon (McCann) — closer than the radial artery or the main median trunk. Rather than relying on seeing a 1-2mm nerve, protect it by technique.
- Keep the incision and deep dissection over or just radial to the FCR tendon; open the FCR sheath and work through its floor, retracting FCR ulnarward; avoid wide blunt subcutaneous undermining toward the ulnar/palmaris side. If the nerve is seen, protect it with a vessel loop and gentle retraction — never divide it.
- Identify the thin white FCR sheath over the tendon, incise it longitudinally, and open it from the wrist crease to about 8cm proximally, reflecting the sheath edges to expose the FCR tendon in the base of the wound.
- Palpate the radial artery lateral to FCR (between FCR and brachioradialis); place a retractor ulnar to FCR (retracting it medially) so the radial artery retracts laterally with brachioradialis. The interval is now defined: radial artery lateral, FCR tendon medial.
- Deep in the wound lies pronator quadratus — horizontal muscle fibres directly over the volar distal radius. Palpate the fracture through the muscle (dorsal step, impaction, fracture haematoma).
- Raise an L-shaped subperiosteal flap: a vertical limb along the radial insertion of the muscle (radial styloid distally, 6-8cm proximally) and a horizontal limb along the distal border turning 90 degrees ulnar for 2-3cm. Elevate the muscle off the radius radial-to-ulnar with a Freer/periosteal elevator, reflecting the flap ulnarward and preserving the ulnar insertion (keeps the muscle viable and preserves its blood supply). You now see the volar distal radius cortex and the fracture.
- For extra-articular (Colles) fractures: apply longitudinal traction to restore radial length, translate the distal fragment volarward to correct dorsal tilt, and hold with 1.2mm K-wires from the radial styloid into the proximal fragment (2-3 wires), confirming reduction on AP and lateral fluoroscopy.
- For intra-articular fractures: identify and elevate the die-punch fragment through the fracture site, reduce the radial styloid with pointed reduction forceps, fill any metaphyseal void with bone graft or calcium-phosphate substitute, and confirm an articular step less than 2mm on AP, lateral and oblique views.
- Select an anatomic volar locked plate sized to the patient and seat it just proximal to the watershed line (about 2cm proximal to the radiocarpal joint), centred on the volar radius without radial or ulnar overhang — a plate that is prominent here rubs on FPL and risks rupture.
- Provisionally fix with 1-2 proximal non-locking screws in oblong holes (allowing fine adjustment), then confirm plate position and distal screw trajectories on AP and lateral fluoroscopy before final fixation.
- Drill the distal locking holes aiming for subchondral purchase (within 3mm of the articular surface); measure with a depth gauge and subtract 2mm to allow for articular cartilage (for example, an 18mm reading becomes a 16mm screw).
- Insert 3-4 distal locking screws (fixed-angle, resisting dorsal collapse), then check every screw on lateral and dorsal tangential (skyline) views — the skyline view (forearm vertical, wrist flexed, beam tangential to the dorsal cortex) is the most sensitive for dorsal penetration across the undulating dorsal cortex (Lister's tubercle). If any screw breaches dorsally, replace it with a shorter one.
- Insert 3-4 proximal screws (locking or cortical) to secure the plate to the shaft, remove the provisional K-wires, and run a systematic final fluoroscopy: AP (radial height 11-13mm, inclination greater than 20 degrees, ulnar variance neutral to 2mm negative, no articular step); lateral (volar tilt 0-10 degrees, no dorsal screw penetration, plate proximal to the rim); oblique (styloid reduced, screws within bone).
- Repair pronator quadratus over the plate (side-to-side to the radial periosteum with 2-0 or 3-0 Vicryl — reasonable coverage, no proven functional benefit) where it reaches tension-free, approximate the deep fascia and subcutaneous layer with meticulous haemostasis (wrist haematomas are common), close skin with 4-0 Monocryl subcuticular, and apply a volar splint with the wrist neutral and fingers free to the PIP joints.
The palmar cutaneous branch of the median nerve lies on average only 3.4mm ulnar to the FCR tendon at the watershed level (McCann et al, Ann R Coll Surg Engl 2012) — closer than the radial artery (7.8mm) or the main median trunk (8.9mm). Division causes a painful thenar neuroma and scar hypersensitivity. Protect it by working through the FCR sheath and retracting FCR ulnarward, keeping deep dissection radial, and avoiding wide ulnar-side subcutaneous undermining.
A screw penetrating the dorsal cortex irritates or ruptures the extensor tendons (classically EPL at Lister's tubercle) and a proud volar screw or prominent plate threatens FPL. Measure every distal screw (depth gauge minus 2mm for cartilage), check each on lateral fluoroscopy, and add the dorsal tangential (skyline) view — a true lateral alone does not exclude dorsal prominence across the undulating dorsal cortex. If a screw breaches, replace it with a shorter one before moving on.
A favourite viva trap is calling this an internervous plane. It is not. The FCR (median nerve) and brachioradialis (radial nerve) are the muscles either side, but you are not dissecting between them — you are working between the FCR tendon and the radial artery, through the floor of the FCR sheath and pronator quadratus. State it as a tendon-artery interval, and name the palmar cutaneous branch (not just "the median nerve") as the closest structure at risk.
Dangers & Extensions
Structures at risk, by layer
- Structure at risk
- Palmar cutaneous branch of median nerve
- Distance from FCR
- ~3.4mm (McCann) — closest at-risk structure
- Protection
- Work through the FCR sheath; retract FCR ulnarward; keep dissection radial; vessel loop if seen
- Structure at risk
- Radial artery
- Distance from FCR
- ~7.8mm lateral to FCR
- Protection
- Palpate and identify before opening the sheath; retracts laterally with brachioradialis; repair if lacerated (less than 1%)
- Structure at risk
- Main median nerve trunk
- Distance from FCR
- ~8.9mm ulnar to FCR
- Protection
- Gentle medial retraction; stay on the radial side of pronator quadratus (less than 1% injured)
- Structure at risk
- Anterior interosseous nerve (motor to pronator quadratus)
- Distance from FCR
- On the deep surface of pronator quadratus
- Protection
- Stay subperiosteal during pronator elevation; avoid aggressive deep retraction
- Structure at risk
- FPL (and flexor tendons)
- Distance from FCR
- Crosses at the watershed line
- Protection
- Keep the plate proximal to the watershed line; repair pronator quadratus for coverage; check screw lengths
Extensile options. The incision can be extended distally into the palm along the thenar crease to perform a concurrent carpal tunnel release when acute median nerve compression accompanies the fracture. Proximal extension is limited by the hand table, but the approach comfortably exposes from the distal radial metaphysis to the radiocarpal joint. For severe volar comminution with no stable cortical buttress, the volar exposure can be supplemented by a bridging external fixator rather than extended further. Closure. Pronator quadratus is re-approximated to the radial periosteum (side-to-side or via transosseous drill holes) where it reaches tension-free — accept partial coverage if severe comminution prevents a tension-free repair. The FCR sheath is usually not repaired. Close the deep fascia loosely over pronator with 3-0 Vicryl, the subcutaneous layer with 3-0 Vicryl (meticulous haemostasis), and skin with 4-0 Monocryl subcuticular plus adhesive. Apply a forearm-based volar splint with the wrist neutral, fingers free to the PIP joints, and elevate the hand postoperatively. Complications.
- Complication
- Palmar cutaneous nerve injury (highest anatomic risk)
- Rate
- —
- Prevention and management
- Work through the FCR sheath, retract FCR ulnarward; established neuroma — excision and burial
- Complication
- Radial artery injury
- Rate
- less than 1%
- Prevention and management
- Identify before opening the sheath, palpate throughout; repair if lacerated (spasm — warm saline and papaverine)
- Complication
- Flexor pollicis longus injury (screw or drill)
- Rate
- —
- Prevention and management
- Lateral and skyline check of every screw before proceeding
- Complication
- Acute / worsening carpal tunnel syndrome
- Rate
- 5-10% acute; 10-15% transient
- Prevention and management
- Document median nerve preop; reduce in neutral; urgent carpal tunnel release if progressive
- Complication
- Infection
- Rate
- 1-2%
- Prevention and management
- Prophylactic antibiotic at induction, meticulous haemostasis; debride deep infection, retain stable plate, IV antibiotics
- Complication
- Compartment syndrome
- Rate
- rare (less than 1%)
- Prevention and management
- Loose (non-circumferential) splint, elevate, educate patient; emergency fasciotomy if it occurs
- Complication
- Flexor tendon irritation / FPL rupture
- Rate
- 2-5%
- Prevention and management
- Plate proximal to watershed (Soong 0-1), pronator repair, screw checks; rupture — plate removal and tendon reconstruction
- Complication
- Malunion
- Rate
- 5-10%
- Prevention and management
- Locked subchondral distal screws, bone graft/substitute for voids, splint compliance; symptomatic — corrective osteotomy
- Complication
- Stiffness
- Rate
- 10-20%
- Prevention and management
- Early digit and gentle wrist ROM, supervised hand therapy; static-progressive splinting if persistent
- Complication
- Complex regional pain syndrome
- Rate
- 5-10%
- Prevention and management
- Early mobilisation, adequate analgesia; desensitisation, graded motor imagery, neuropathic agents
Procedures Through This Approach
- Volar locked plating ORIF of distal radius fractures — the principal operation: Colles, Smith's, die-punch, volar Barton and chauffeur's patterns.
- Corrective osteotomy for distal radius malunion — the approach gives access for osteotomy, reduction and re-plating of a symptomatic malunion.
- Volar plate removal — symptomatic hardware (flexor tendon irritation, prominent plate) is explanted through the same approach.
- Carpal tunnel release — extended distally into the palm for acute median nerve compression accompanying the fracture.
- Supplement to external fixation for severe comminution without a stable volar cortical buttress.
Viva & Exam Focus
FCR INTERVALFCR INTERVAL — the volar approach, step by step
SCREWSSCREWS — the distal screw checklist
Clinical Decision Scenarios
Practise clinical reasoning and management decisions out loud
“What is the structure at highest anatomic risk in the volar (FCR) approach to the distal radius, and how do you protect it?”
“The examiner shows a lateral fluoroscopy with the volar plate prominent at the watershed line and asks: is this plate position acceptable, and what would you worry about?”
“During volar plating you have inserted the distal screws. How do you check screw length intraoperatively, and what is the risk if screws are too long?”
High-yield anatomy
- Palmar cutaneous branch is the closest at-risk structure — ~3.4mm from FCR (McCann); radial artery ~7.8mm, median trunk ~8.9mm
- FCR interval: FCR tendon medial (retracted ulnarward), radial artery lateral — NOT internervous (works through the floor of the FCR sheath and pronator quadratus)
- Watershed line: most volar prominence of the distal radius — a prominent plate here irritates FPL (Soong Grade 2 = on/distal to the rim = highest rupture risk)
- Anterior interosseous nerve on the deep surface of pronator quadratus — stay subperiosteal during elevation
Critical technique
- Screw length: err shorter for subchondral screws; a true lateral does NOT exclude dorsal prominence — use the dorsal tangential (skyline) view
- Plate position: proximal to the volar rim/watershed (Soong Grade 0-1), low-profile and flush
- Pronator quadratus: L-shaped subperiosteal flap; repair over the plate is optional coverage — no proven functional benefit (Shi 2020)
- Reduction goals: young = near-anatomic; elderly = acceptable parameters, anatomy does not guarantee better 1-year function (Arora 2011)
Intraoperative fluoroscopy
- AP: radial height 11-13mm, inclination greater than 20 degrees, ulnar variance neutral to 2mm negative, articular step less than 2mm
- Lateral: volar tilt 0-10 degrees, articular congruity, plate proximal to the rim — but lateral alone does not exclude dorsal screw prominence
- Dorsal tangential ('skyline'): most sensitive for dorsal screw penetration (undulating dorsal cortex, Lister's tubercle)
- Oblique: radial styloid reduced, screws within bone (not crossing the radiocarpal joint or DRUJ)
Complications — prevention
- Palmar cutaneous neuroma: work through the FCR sheath, retract FCR ulnarward, keep deep dissection radial
- FPL rupture: keep the plate proximal to the watershed line, low-profile plate, avoid prominent volar screw tips
- EPL irritation/rupture: classically at Lister's tubercle from dorsal screw prominence — confirm with the skyline view
- Loss of reduction: adequate provisional K-wires, subchondral locked distal screws, bone graft/substitute for a metaphyseal void
Evidence you must know
- Arora 2011 JBJS Am RCT (n=73, age 65+): plating vs cast — no pain/ROM/DASH difference at 1 year, better grip but MORE complications (PMID 22159849)
- Soong 2011 JBJS Am: plate-prominence classification (Grade 0-2) — prominent plates linked to flexor tendon rupture, 4% vs 0% (PMID 21239658)
- Shi 2020 OTSR meta-analysis: pronator quadratus repair shows no proven functional benefit (PMID 33189664)
- McCann 2012 Ann R Coll Surg Engl: PCB only ~3.4mm from FCR (closest at-risk structure) (PMID 22391383)
- Rozental 2006 JHS Am (n=41): volar fixed-angle plating — good function, more collapse but fewer hardware complications than dorsal plating (PMID 16516728)
Viva traps
- TRAP: 'internervous plane' — WRONG; the volar approach works through the FCR sheath/pronator quadratus, a tendon-artery interval
- TRAP: 'median nerve trunk is the main structure at risk' — INCOMPLETE; the palmar cutaneous branch is closer (~3.4mm vs ~8.9mm)
- TRAP: 'a true lateral confirms screw length' — WRONG; use the dorsal tangential (skyline) view
- TRAP: 'pronator repair is mandatory and halves complications' — OUTDATED; the meta-analysis shows no proven functional benefit (Shi 2020)
References
Volar Locked Plating vs Cast Treatment in Patients 65 and Older (RCT)
- Prospective RCT of 73 patients aged 65 or older with displaced, unstable distal radius fractures: volar locking plate (n=36) vs closed reduction and cast (n=37).
- DASH and PRWE favoured plating ONLY in the early postoperative period — no significant difference at 6 and 12 months.
- No significant difference in range of motion or pain at any time point; grip strength was significantly better with plating at all time points.
- Radiographic parameters were better with plating, but complications were significantly MORE frequent with plating (13 vs 5).
Is Pronator Quadratus Repair Necessary? Systematic Review and Meta-Analysis
- Systematic review and meta-analysis of 6 studies (4 RCTs, 2 retrospective): 203 patients with pronator repair vs 180 without.
- No statistically significant difference in DASH scores between repair and no-repair groups.
- No difference in grip strength, pronation strength, or postoperative range of motion.
- A separate 2020 meta-analysis (Lu et al, PMID 32938491) reached the same overall conclusion of no functional benefit on pooled analysis.
Cadaveric Anatomy of the FCR (Henry) Approach to the Distal Radius
- Dissection of 10 fresh-frozen cadaver limbs measuring neurovascular structures relative to the FCR tendon at the watershed level.
- Palmar cutaneous branch of the median nerve was the structure most at risk — on average only 3.4mm from the FCR tendon.
- Radial artery lay on average 7.8mm and the main median nerve trunk 8.9mm from the FCR tendon.
- Superficial branch of the radial nerve was 24.4mm from the FCR tendon (11.1mm from brachioradialis).
Volar Locking Plate Implant Prominence and Flexor Tendon Rupture (Soong Classification)
- Two parallel retrospective series of volar locked plating: Group 1 (73 radii, one plate design), Group 2 (95 radii, a lower-profile plate design).
- Introduced the Soong grading of plate prominence relative to the volar rim/critical line: Grade 0 (not volar to the line), Grade 1 (volar to the line but proximal to the volar rim), Grade 2 (on or distal to the volar rim).
- Group 1: 3 flexor tendon ruptures (4%), with Grade 2 prominence in 63% of plates.
- Group 2 (lower-profile plate): no flexor tendon ruptures and no Grade 2 plates.
Functional Outcome and Complications After Volar Plating (Dorsally Displaced DRF)
- Retrospective case series of 41 patients (mean age 53, mean follow-up 17 months) with dorsally displaced, unstable distal radius fractures treated by volar fixed-angle plating.
- Good or excellent results in all patients (mean DASH 14; all good/excellent on Gartland and Werley).
- Radiographic alignment largely maintained at union (mean radial height 11mm, inclination 21 degrees, volar tilt 5 degrees).
- Nine complications: 4 loss of reduction with collapse, 3 hardware removals for tendon irritation, 1 wound dehiscence, 1 MCPJ stiffness; compared with prior dorsal-plating reports, volar plates showed more collapse but fewer hardware-related complications.