Smith-Robinson / Cloward Approach for ACDF and Corpectomy
- Left-sided approach preferred - recurrent laryngeal nerve has longer, more lateral course from aortic arch
- Internervous plane: between carotid sheath (lateral) and tracheoesophageal complex (medial)
- Stay within 15-17mm of midline to avoid vertebral artery at uncinate processes
- Release retractors every 30 minutes to minimize RLN ischemic injury
- Cricoid cartilage = C6 level (most reliable surface landmark)
- “Examiners expect detailed knowledge of RLN anatomy differences between left and right sides
- “Must explain WHY left-sided preferred (not just that it is preferred)
- “Key danger structures: RLN (1-5%), VA (less than 0.5%), sympathetic chain (Horner), esophagus
- “C5 palsy mechanism is cord shift/tethering after decompression, not direct nerve injury
Anterior Approach to the Cervical Spine
Left side preferred: RLN has straight course in TE groove (safer). Right side risk: RLN enters obliquely at C4/5 (higher injury risk).
RLN: Retract TE complex gently. Vertebral Artery: Lateral to uncinates. Sympathetic Chain: On Longus Colli (Horner's). Esophagus: Medial, easily perforated.
Safe Zone: Stay within 17mm of midline to avoid Vertebral Artery injury at the uncinate process level.
Tethering effect: Posterior cord shift after decompression stretches the short C5 nerve root. Rarely direct injury.
Indications
Absolute Indications
- Cervical radiculopathy: Failed 6-12 weeks conservative management with MRI-confirmed nerve root compression correlating with clinical findings [11]
- Cervical myelopathy: Progressive or moderate-to-severe symptoms with cord compression on MRI, especially with cord signal changes [12]
- Unstable cervical fractures: Burst fractures, teardrop fractures, facet dislocations with disc herniation requiring anterior decompression and stabilization [13]
- Infection: Discitis/osteomyelitis requiring debridement, particularly with epidural abscess formation [14]
Relative Indications
- Axial neck pain: Isolated cervical spondylosis without radiculopathy/myelopathy - controversial, outcomes less predictable than radiculopathy [15]
- OPLL: Ossification posterior longitudinal ligament causing stenosis - anterior approach if OPLL less than 50% canal occupation and not ossification mass effect [16]
- Pseudoarthrosis: Failed posterior fusion requiring anterior revision and interbody support
- Tumor: Primary vertebral body tumor or metastatic disease requiring corpectomy and reconstruction
Contraindications
- Active infection overlying surgical site (not for septic indication)
- Severe cervical kyphotic deformity (greater than 40 degrees) requiring posterior approach for alignment correction
- Ankylosing spondylitis with fused spine (risk of catastrophic three-column fracture with anterior opening)
- Previous anterior neck surgery (increased adhesions, prior radiation increases complication risk)
- Severe OPLL (greater than 60% canal occupation or ossification mass) - posterior decompression safer
- Tracheostomy present (contamination risk, technical difficulty)
- Morbid obesity (increases retraction difficulty, visualization challenges)
- Short/thick neck anatomy (limited C7-T1 access, may require sternotomy)
- Carotid artery stenosis (manipulation risk, consider vascular surgery consultation)
Pre-operative Planning
Clinical Assessment
- Neurological examination: Document baseline motor strength (myotomal), sensation (dermatomal), reflexes, Hoffmann sign, clonus, gait (if myelopathy suspected)
- Identify level clinically: Correlate symptoms with imaging (C5-6 disc affects C6 nerve root causing biceps weakness; C6-7 affects C7 causing triceps weakness)
- Voice assessment: Document pre-operative hoarseness (if present, may influence side selection or require ENT evaluation)
- Swallowing assessment: Pre-existing dysphagia noted (ACDF can worsen transiently)
- Medical optimization: Smoking cessation (improves fusion rates from 60-70% to 90-95%), diabetic control (HbA1c less than 7%), anticoagulation management (hold warfarin 5 days pre-op, bridging protocol for high-risk patients)
Imaging Review
- Sagittal T2: Disc herniation, cord compression, cord signal changes (T2 hyperintensity = myelomalacia, poor prognosis)
- Axial T2: Lateral vs central herniation, foraminal stenosis
- Assess all levels (multi-level disease common - may influence surgical planning)
- Bone quality assessment (osteoporosis influences implant choice)
- Posterior osteophyte size (helps predict decompression extent needed)
- OPLL evaluation (thickness, levels involved, presence of dural ossification)
- Fracture pattern if trauma (assess posterior column integrity)
- Standing lateral and AP views
- Flexion-extension laterals: Assess instability (greater than 3.5mm translation or 11 degrees angulation at one level abnormal, indicates need for instrumentation)
- Assess global cervical alignment (lordosis, C2-C7 plumb line)
- CT angiography: If revision surgery, aberrant anatomy suspected, or older patient (vertebral artery anomaly screening)
- Dynamic flexion-extension MRI: If suspecting instability but plain films equivocal
- EMG/NCS: If diagnosis unclear or multiple potential levels (helps localize pathology)
Consent Discussion
Expected Outcomes:
- Radiculopathy: 90-95% significant improvement in arm pain, 80-85% return to pre-symptom function [11]
- Myelopathy: Halts progression in 80-90%, functional improvement in 50-70% (depends on severity and duration - chronic severe myelopathy has limited recovery potential) [12]
- Fusion rate: 95-98% single level, 90-95% two level, 85-90% three or more levels [17]
- Return to work: Light duty 4-6 weeks, full duty 8-12 weeks
Risks:
General (all surgery):
- Infection: Superficial 1-2%, deep 0.5-1% [18]
- Blood loss requiring transfusion: Less than 1%
- VTE: Less than 1% with prophylaxis
Specific to anterior cervical approach:
- Recurrent laryngeal nerve injury (1-5%): Temporary hoarseness most common (90% resolve by 6 months), permanent hoarseness less than 1% [19]
- Dysphagia (10-50% transient, 5-10% at 1 year): More common in women, multi-level surgery, revision cases [20]
- C5 nerve root palsy (1-10%): Deltoid/biceps weakness, typically neuropraxic and recovers in 6-12 months
- Esophageal injury (less than 0.5%): Rare but serious, can lead to mediastinitis if not recognized
- Vertebral artery injury (less than 0.5%): Typically with lateral dissection beyond 17mm from midline
- Horner syndrome (less than 0.5%): Sympathetic chain injury, usually temporary
- Dural tear/CSF leak (1-3%): Higher with OPLL, revision surgery
- Pseudoarthrosis (5-10%): Higher in smokers, multi-level fusions, stand-alone cages without plates
Long-term:
- Adjacent segment disease (2-3% per year): Degeneration at levels above/below fusion, may require revision (25% at 10 years)
- Hardware issues: Plate prominence (5-10%), screw loosening (5%), dysphagia from hardware
- Persistent symptoms: 10-20% continue to have neck pain despite solid fusion
Alternatives:
- Conservative management (physiotherapy, medications, epidural injections)
- Posterior cervical foraminotomy (for lateral soft disc without instability)
- Cervical disc arthroplasty (for appropriate candidates - single level, no facet arthropathy, age less than 60)
- Posterior laminectomy/laminoplasty (for multi-level stenosis without kyphosis)
Equipment and Setup
Implants
- ACDF: Interbody spacer (PEEK cage, allograft, autograft), anterior cervical plate (variable angle screws), screws (typically 14-16mm length for vertebral body purchase)
- Corpectomy: Expandable cage or fibular strut allograft, longer plate spanning corpectomy
- Sizing: Have multiple cage heights available (5mm, 6mm, 7mm typical range), trial before final implant
Instruments
- Standard anterior cervical spine set
- High-speed burr for discectomy/corpectomy
- Caspar distraction pins (for interspace distraction during discectomy)
- Curettes (straight and angled for disc removal)
- Kerrison rongeurs (for posterior osteophyte/PLL removal)
- Depth gauge (for screw length measurement)
- Handheld retractors (Army-Navy, Richardson)
- Self-retaining retractors (Cloward, Caspar variant with blade sets)
Adjuncts
- Image intensifier: Lateral fluoroscopy essential for level localization, assessment of decompression, hardware positioning
- Microscope or loupes: For decompression (especially OPLL or revision cases)
- Intraoperative neuromonitoring: SSEPs and MEPs recommended for myelopathy cases (alerts to cord injury) [21]
- Radiolucent table: Carbon fiber OR table for imaging
- Gardner-Wells tongs (optional): For intraoperative traction to open disc space
Anatomy
Fascial Layers (Superficial to Deep)
- Skin and subcutaneous tissue: Includes platysma muscle
- Superficial cervical fascia: Investing layer encloses SCM and trapezius
- Deep cervical fascia:
- Superficial layer (investing): Encloses SCM, omohyoid
- Middle layer (pretracheal): Encloses thyroid gland, trachea, esophagus
- Deep layer (prevertebral): Covers longus colli muscles and anterior vertebral bodies - THIS is incised to access spine
- Longus colli muscles: Bilateral muscles on anterior vertebral bodies - retracted laterally to expose midline
Key Anatomical Relationships
- Origins: Sternal head from manubrium, clavicular head from medial clavicle
- Insertion: Mastoid process
- Innervation: CN XI (spinal accessory nerve)
- Surgical relevance: Medial border of SCM is key landmark - incision medial to SCM, SCM retracted laterally
- Contains: Common carotid artery (medial), internal jugular vein (lateral), vagus nerve (posterior between artery and vein)
- Surgical relevance: Retracted laterally after identification, palpate carotid pulse throughout procedure
- Trachea (anterior), esophagus (posterior), thyroid gland (anterior, C5-T1 levels)
- Surgical relevance: Retracted medially, gentle retraction to avoid recurrent laryngeal nerve injury
- Right side: Branches from vagus at subclavian artery level, loops under artery, ascends obliquely in tracheoesophageal groove
- Left side: Branches from vagus at aortic arch level (in chest), ascends more vertically in tracheoesophageal groove
- Surgical relevance: DOES NOT need to be directly identified (runs in tracheoesophageal groove - protected by gentle medial retraction of complex). Direct dissection looking for nerve increases injury risk.
- Level variation: At C6-C7, nerve in groove; at C2-C3, nerve branches to larynx (external branch of superior laryngeal nerve crosses field from lateral to medial - injury causes voice fatigue)
- Branch of external carotid artery
- Crosses field at C4-C5 level laterally
- Surgical relevance: May require ligation for multi-level exposure C3-C6
- Branch of thyrocervical trunk (from subclavian artery)
- Crosses field at C6-C7 level laterally
- Surgical relevance: Recurrent laryngeal nerve has intimate relationship with artery (nerve posterior to artery on right, variable on left). Ligation sometimes needed for low cervical access, but increases RLN injury risk - ligate only if absolutely necessary.
- Lies on longus colli muscle, lateral to midline, medial to carotid sheath
- Cervical ganglia: Superior (C2-C3), middle (C6), inferior/stellate (C7-T1)
- Surgical relevance: Monopolar cautery lateral to midline on longus colli can cause thermal injury → Horner syndrome (ptosis, miosis, anhidrosis). Use bipolar cautery, stay midline.
- Enters foramen transversarium typically at C6 level
- Ascends through transverse processes C6-C2
- Emerges from C2, loops posteriorly to enter foramen magnum
- Surgical relevance: Safe zone is 17mm lateral from midline - dissection lateral to uncinate process (uncovertebral joint) risks vertebral artery injury. Aberrant anatomy (artery enters at C4 or C5) occurs in 5-10%.
- Ascends on left side of esophagus, arches laterally at C7-T1, drains into junction of left subclavian and internal jugular veins
- Surgical relevance: Left-sided C7-T1 approaches risk thoracic duct injury (chylothorax if injured). Some surgeons prefer right-sided approach at C7-T1 to avoid duct, but must balance against increased RLN risk.
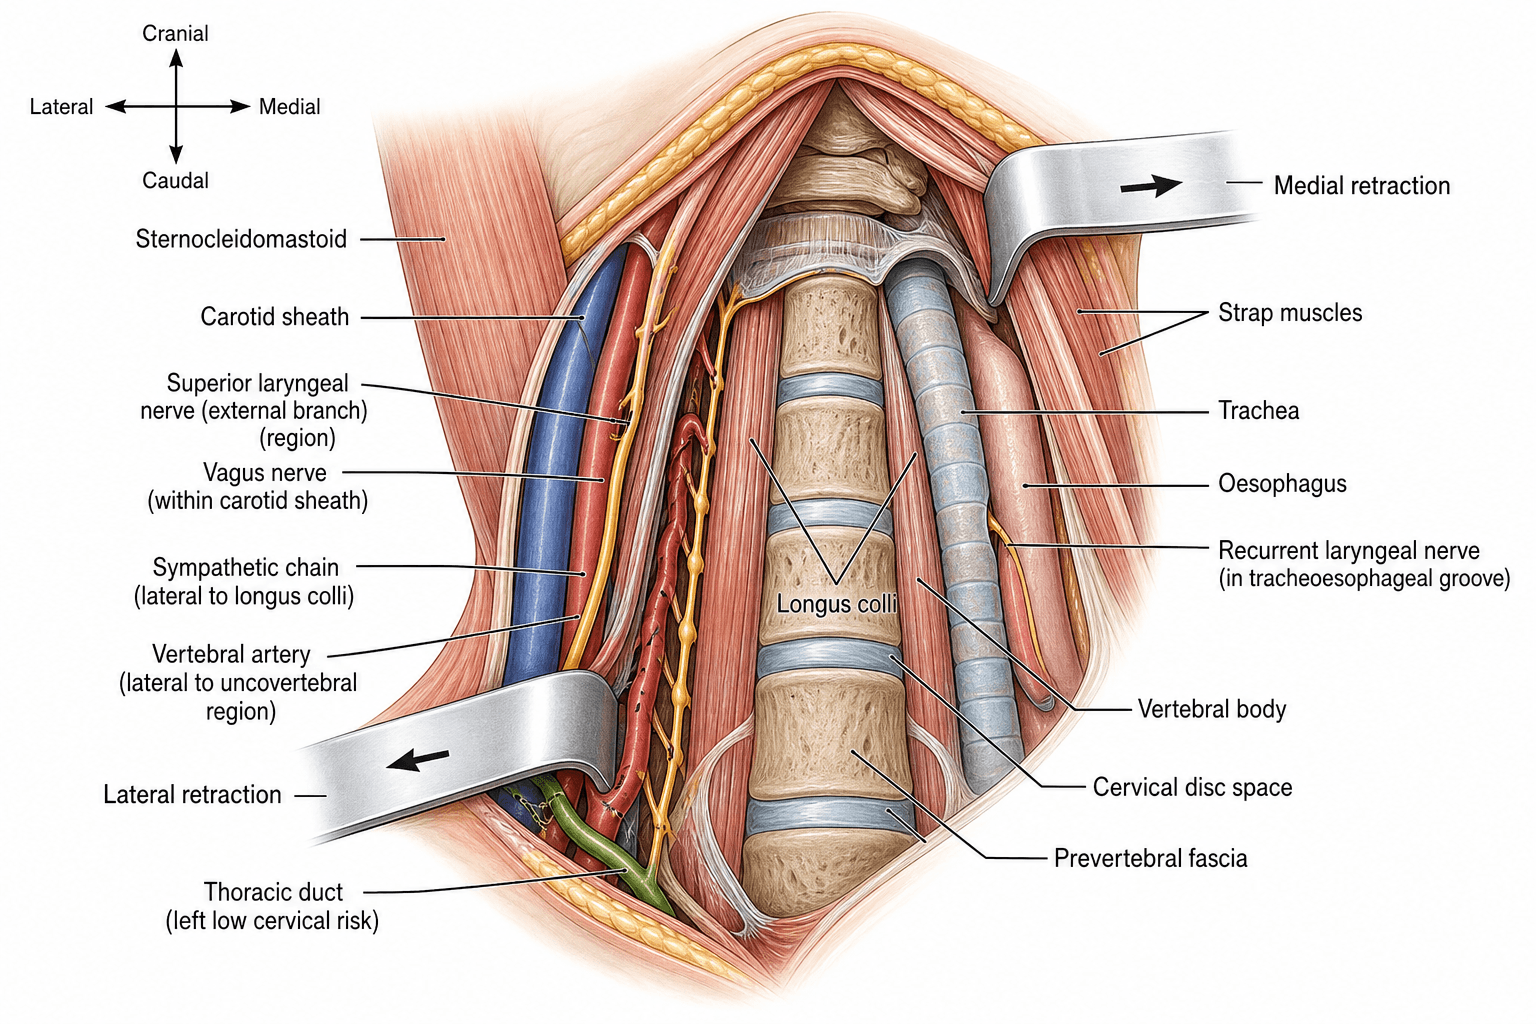
Internervous Plane
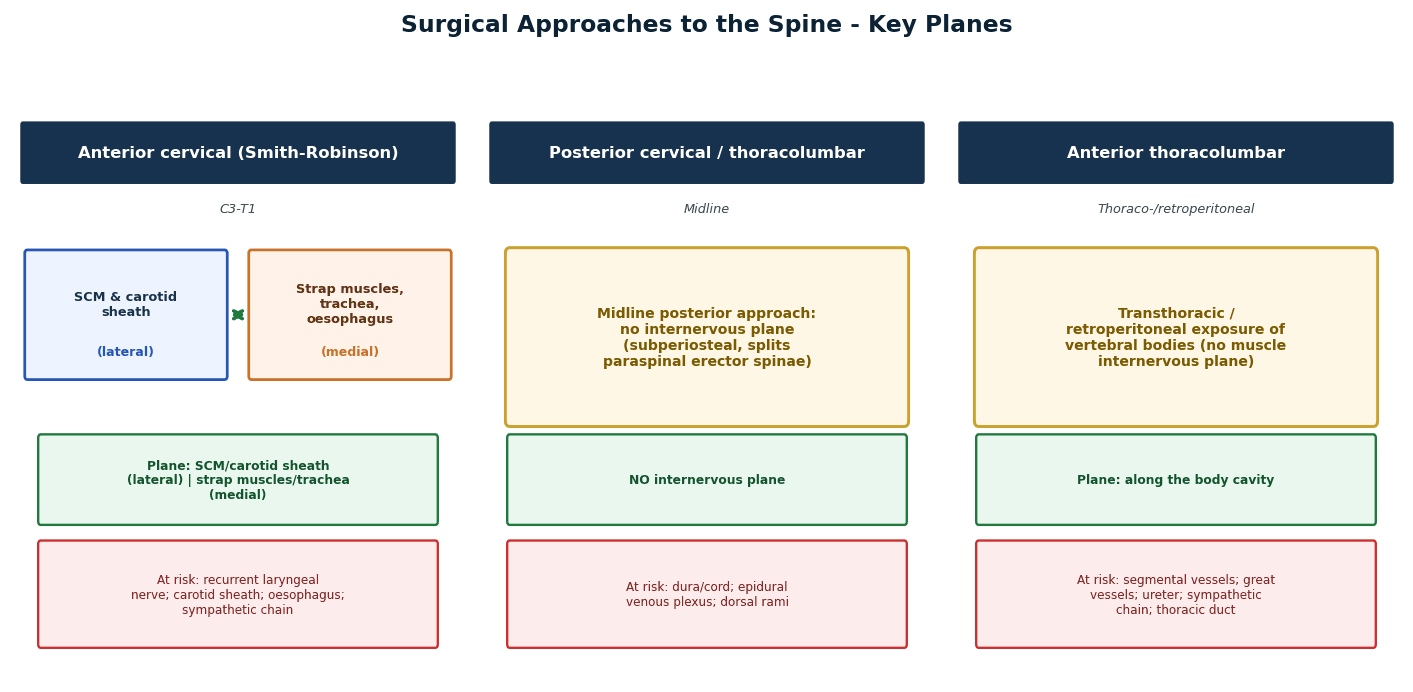
The anterior approach to the cervical spine utilizes an avascular internervous plane between the carotid sheath laterally (containing carotid artery, internal jugular vein, vagus nerve) and the tracheoesophageal complex medially (containing trachea, esophagus, and recurrent laryngeal nerve in the tracheoesophageal groove).
- The plane is developed by blunt finger dissection after incising the deep cervical fascia along the medial border of SCM
- The carotid pulse is palpated and retracted laterally with the carotid sheath
- The trachea and esophagus are retracted medially as a unit
- This plane is truly internervous as structures on either side have different nerve supplies
- Lateral: carotid sheath contents supplied by CN IX, X, XI, sympathetic chain
- Medial: tracheoesophageal complex supplied by recurrent laryngeal nerve (CN X) and external laryngeal nerve
- Stay within 15-17mm of midline laterally to avoid vertebral artery at uncinate processes
- The sympathetic chain lies on the lateral aspect of longus colli - monopolar cautery lateral to midline risks Horner syndrome
- Recurrent laryngeal nerve in tracheoesophageal groove - gentle medial retraction only
Differential Diagnosis
The decision to undertake an anterior cervical approach depends on correctly attributing arm and neck symptoms to compressive cervical pathology rather than peripheral or systemic mimics. The table below summarises the principal differentials for a patient presenting with apparent cervical radiculopathy or myelopathy.
- Distinguishing Features
- Dermatomal arm pain, positive Spurling test, myotomal weakness, relief with abduction
- Key Investigation
- MRI cervical spine correlated with level
- Distinguishing Features
- Gait disturbance, hand clumsiness, Hoffmann sign, hyperreflexia, clonus
- Key Investigation
- MRI showing cord compression / T2 signal change
- Distinguishing Features
- Nocturnal median paraesthesia, positive Phalen/Tinel, thenar wasting, no neck pain
- Key Investigation
- Nerve conduction studies
- Distinguishing Features
- Ulnar-sided paraesthesia, weak intrinsics, positive elbow flexion test
- Key Investigation
- Nerve conduction studies
- Distinguishing Features
- Acute severe shoulder pain then patchy weakness, often post-viral, non-dermatomal
- Key Investigation
- Clinical; EMG, MRI to exclude compression
- Distinguishing Features
- Pain with overhead activity, painful arc, normal neurology, positive impingement signs
- Key Investigation
- Shoulder examination and MRI/ultrasound
- Distinguishing Features
- Positional arm symptoms, vascular or lower-trunk findings, provoked by overhead posture
- Key Investigation
- Dynamic vascular studies, MRI/MRA, EMG
- Distinguishing Features
- Lower brachial plexus signs, Horner syndrome, weight loss, smoking history
- Key Investigation
- Chest imaging (CT/MRI apex)
- Distinguishing Features
- Progressive myelopathy without bony compression, sensory level, optic symptoms
- Key Investigation
- MRI whole spine and brain with contrast
- Distinguishing Features
- Mixed upper and lower motor neurone signs, no sensory loss, fasciculations
- Key Investigation
- EMG, neurology referral
A frequent trap is "double crush" - coexisting cervical radiculopathy and a distal entrapment (e.g. carpal tunnel). Always examine the whole limb and obtain nerve conduction studies when symptoms are not purely dermatomal, because operating on the cervical spine will not relieve a concurrent peripheral entrapment.
Patient Positioning
Standard Position
- Supine: Patient flat on radiolucent table
- Head: Head ring (donut) or horseshoe headrest, neutral to slight extension (10-15 degrees)
- Avoid excessive extension (narrows spinal canal, risks cord injury in myelopathy patients)
- Padding under occiput to prevent pressure sore
- Shoulders: Tape shoulders caudally (improves C6-T1 visualization on lateral fluoroscopy)
- Tape from acromion angled caudally toward foot of bed, secure to table
- Check lateral fluoro after taping - should see bottom of C7 vertebral body
- Shoulder roll: Rolled towel/bolster under shoulders at level of scapulae/T1-T2 to extend neck
- Arms: Tucked at sides, padded, secured with draw sheet
- Lower extremities: Padded, neutral position, sequential compression devices applied
Key Positioning Points
- Neck extension: Opens anterior disc space, flattens cervical lordosis for access
- Shoulder taping: Essential for lower cervical levels (C6-T1) to clear shoulders from fluoro
- Avoid hyperextension: Can worsen myelopathy by narrowing spinal canal
- Confirm visualization: Check lateral fluoroscopy after positioning - adjust if levels not visible
Anaesthesia and Positioning
Anaesthesia
- General anaesthesia with endotracheal intubation: Standard
- Intubation considerations:
- Small endotracheal tube (6.0-7.0mm) reduces tracheal pressure and dysphagia risk
- Avoid nasogastric tube (NGT) - increases dysphagia, esophageal injury risk
- Record which side tube cuff inflated (may influence side selection if difficult airway)
- Muscle relaxation: Complete paralysis for neuromonitoring (if MEPs used, discuss with anaesthesia regarding timing of relaxant doses)
- Antibiotics: Cefazolin 2g IV (or vancomycin 15mg/kg if MRSA risk/allergy) within 60 minutes of incision
Positioning
- Supine: Patient flat on radiolucent table
- Head: Head ring (donut) or horseshoe headrest, neutral to slight extension (10-15 degrees)
- Avoid excessive extension (narrows spinal canal, risks cord injury in myelopathy patients)
- Padding under occiput to prevent pressure sore
- Shoulders: Tape shoulders caudally (improves C6-T1 visualization on lateral fluoroscopy)
- Tape from acromion angled caudally toward foot of bed, secure to table
- Check lateral fluoro after taping - should see bottom of C7 vertebral body
- Shoulder roll: Rolled towel/bolster under shoulders to extend neck and flatten cervical spine
- Improves anterior access to vertebral bodies
- Position at level of scapulae/T1-T2 region
- Arms: Tucked at sides, padded, secured with draw sheet
- Lower extremities: Padded, neutral position, sequential compression devices applied
Preparation
- Hair removal: None typically needed (if beard impedes operative field, clipper trim only - no shave to reduce infection risk)
- Skin prep: Chlorhexidine-alcohol from mandible to nipples, laterally to table bilaterally (wide prep for potential sternotomy if needed for low levels)
- Draping: Head draped out of field superiorly, impervious drapes, expose neck from mandible to sternal notch
- Oral prep: Some surgeons swish chlorhexidine mouthwash pre-drape (reduce oral flora contamination risk)
Level Localization
- Palpate landmarks BEFORE draping:
- Hyoid bone (C3 level)
- Thyroid cartilage (C4-C5 level)
- Cricoid cartilage (C6 level - most reliable landmark)
- Carotid tubercle of C6 (anterior tubercle of transverse process - palpable laterally at C6 level)
- Mark skin incision based on target level and landmark
- Intraoperative fluoroscopy:
- Lateral C-arm view
- 22G spinal needle in disc space (confirms level - COUNT from C2 or T1 to ensure correct)
- All levels anterior to C7 visible without shoulder taping typically
- C7-T1 requires shoulder taping or retraction
Surgical Technique
Incision
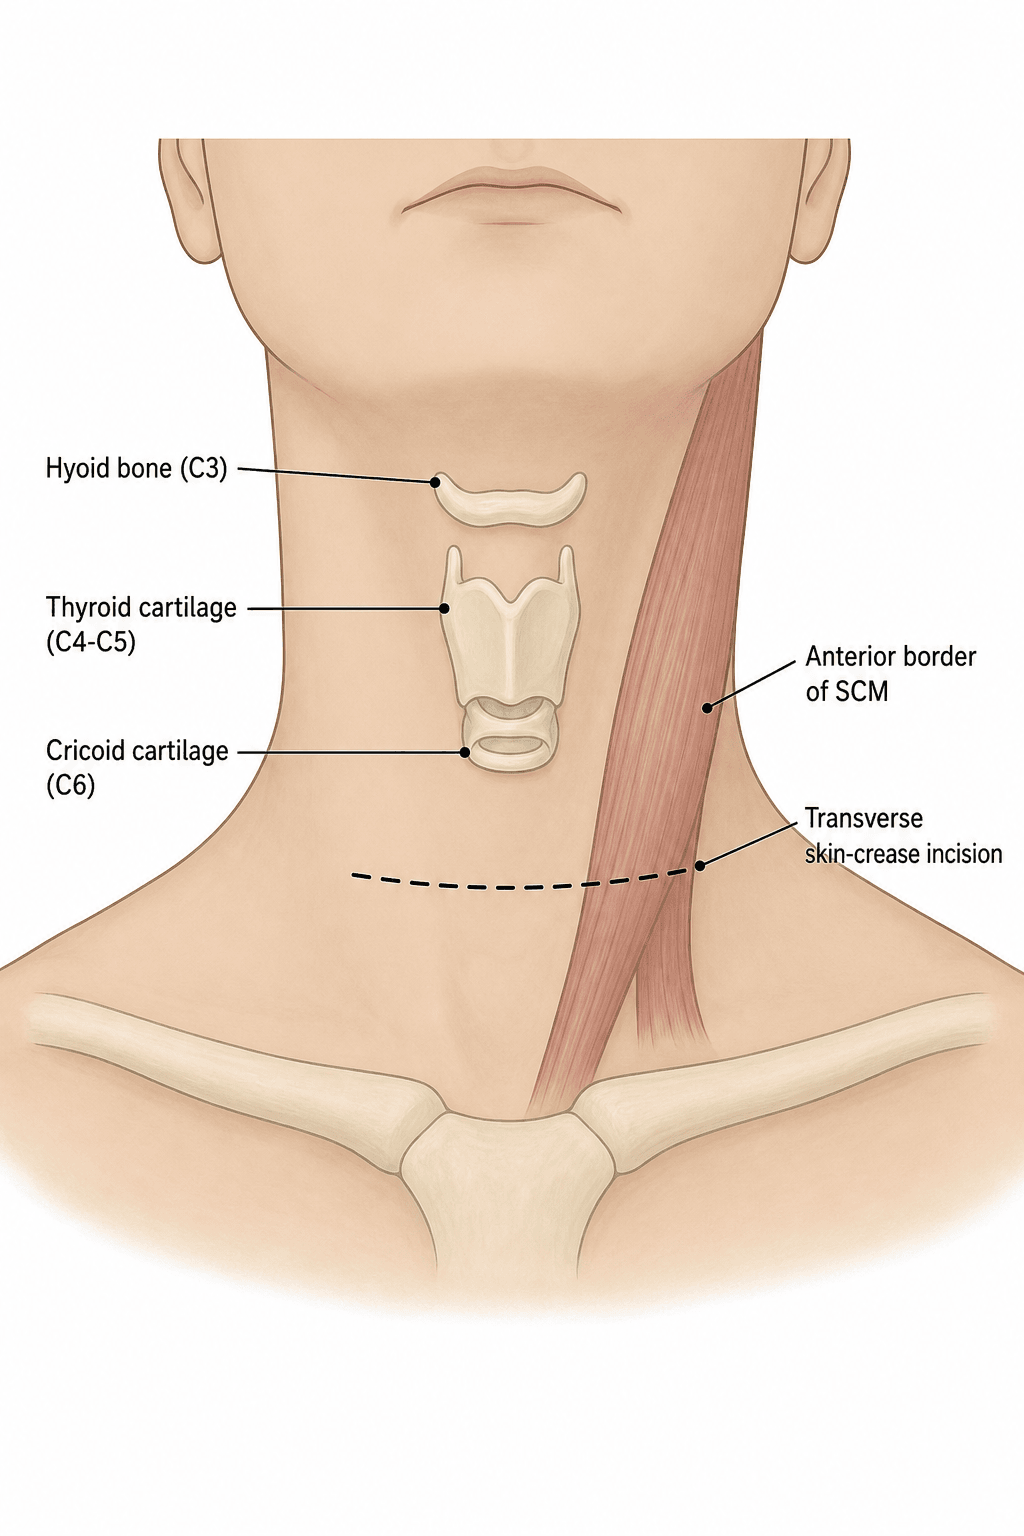
- Indications: Single or two-level ACDF (superior cosmesis)
- Location: Transverse skin crease at level of pathology
- C3-C4: Hyoid bone level (3cm above thyroid cartilage)
- C4-C5: Thyroid cartilage level
- C5-C6: Between thyroid and cricoid cartilage
- C6-C7: Cricoid cartilage level (most reliable landmark)
- C7-T1: 1-2cm above sternal notch
- Length: Typically 4-6cm, centered at medial border of SCM, extending medially toward midline
- Technique: Incise skin, subcutaneous tissue, and platysma in line with skin crease
- Indications: Multi-level ACDF (three or more levels), corpectomy, revision cases requiring extensile exposure
- Location: Along medial border of SCM
- Length: Varies with levels needed (extend proximally/distally as needed)
- Technique: Longitudinal incision along medial SCM border, incise platysma in line with skin
- Disadvantage: Inferior cosmesis, but superior exposure
Superficial Dissection
- Incise platysma: Thin muscle layer immediately deep to skin - incise in line with skin incision (transverse or longitudinal)
- Develop subplatysmal flaps: Use blunt dissection to elevate platysma superiorly and inferiorly, creating working space
- Identify medial border of SCM: Palpate with finger - SCM is thick muscular cord laterally
- Incise superficial layer of deep cervical fascia: Fascia along medial SCM border - incise longitudinally
- Develop plane between SCM and midline structures:
- Use finger or Kittner dissection
- Blunt dissection technique (avoids injury to small vessels/nerves)
- Plane develops easily if in correct layer (minimal resistance)
- Identify omohyoid muscle (if present in field): Thin muscle band crossing field obliquely - can retract or divide if needed for exposure
- Identify carotid sheath:
- Palpate carotid pulse
- Sheath is lateral structure - gently retract laterally
- DO NOT forcefully dissect - gentle retraction suffices
Superficial exposure establishes the working corridor for deeper dissection.
Eponymous Anterior Cervical Techniques: Smith-Robinson, Cloward, Bailey-Badgley
The eponyms used throughout this topic - Smith-Robinson and Cloward - classically denote distinct interbody graft / discectomy techniques, not simply the incision orientation. Knowing the true distinction (and the third, Bailey-Badgley) is a common exam point.
- Disc-space / graft method
- Discectomy then a horseshoe tricortical iliac-crest graft inserted with the cortical surface anterior
- Graft shape
- Tricortical horseshoe block
- Notes
- Basis of modern ACDF; preserves endplates, good fusion and lordosis; now usually a PEEK/allograft cage in its place
- Disc-space / graft method
- Circular drill removes the disc and adjacent endplate bone, a cylindrical dowel graft press-fit into the round hole
- Graft shape
- Cylindrical dowel
- Notes
- Drill-and-dowel; removes more endplate (subsidence/kyphosis risk); largely historical
- Disc-space / graft method
- A rectangular trough is cut across the vertebral bodies and a strut graft slotted in
- Graft shape
- Rectangular strut in a trough
- Notes
- Originally for multilevel/instability and tumour reconstruction; forerunner of strut-graft corpectomy reconstruction
Key points:
- The Smith-Robinson horseshoe tricortical graft (cortical surface anterior) is biomechanically the strongest, best preserves disc-space height and lordosis, and is the conceptual template for the modern ACDF cage.
- The Cloward dowel technique is quicker but sacrifices more endplate bone (subsidence/kyphosis) and is now rarely used.
- Bailey-Badgley strut-in-a-trough is the ancestor of today's corpectomy strut/cage reconstruction.
- Incision orientation (transverse skin-crease vs longitudinal along SCM) is a separate decision from graft technique - either incision can be used with any graft or cage.
A classic trap: Smith-Robinson, Cloward and Bailey-Badgley are interbody graft techniques, not incision types. Smith-Robinson = horseshoe tricortical iliac graft (cortical surface anterior) - the strongest and the template for the modern ACDF cage; Cloward = cylindrical drilled dowel; Bailey-Badgley = rectangular strut in a trough (forerunner of corpectomy strut reconstruction).
The High Anterior Cervical Approach (C2-C4): Superior Laryngeal and Hypoglossal Nerves
The standard danger structures (RLN, vertebral artery, sympathetic chain, oesophagus) dominate mid- and low-cervical exposures, but a high anterior approach (C2-C4) adds two specific nerves - named in the level-specific modifications and on the approach diagram but worth developing, because their injuries are distinct and high-yield.
Superior laryngeal nerve (SLN) - a branch of the vagus, at risk at C3-C4 as it runs with the superior thyroid vessels:
- External (motor) branch: supplies cricothyroid, which tenses the vocal cord. Injury causes loss of high-pitch phonation and vocal projection / voice fatigue (not frank hoarseness) - a particular concern for singers and professional voice users. It is endangered by ligating the superior thyroid pedicle without first isolating the nerve during a high (C3-C4) exposure.
- Internal (sensory) branch: pierces the thyrohyoid membrane to supply supraglottic sensation; injury blunts the protective cough reflex and predisposes to aspiration.
Hypoglossal nerve (CN XII) - at risk in very high (C2-C3) exposures as it crosses the field from lateral to medial above the carotid bifurcation:
- Injury causes tongue deviation toward the side of injury on protrusion, with dysarthria and difficulty manipulating the food bolus.
- Avoided by keeping dissection below the level where it crosses and using gentle superior retraction.
For the high (C2-C4) anterior approach, remember two extra nerves beyond the RLN: the superior laryngeal nerve (external branch to cricothyroid - loss of high pitch / voice projection, the "singer's nerve", endangered when ligating the superior thyroid artery) and the hypoglossal nerve (C2-C3 - tongue deviation toward the injured side). These, not the RLN, are the characteristic neural injuries of upper cervical exposure.
Complications
Airway Compromise from Hematoma
Less than 1% but potentially fatal [22]
Multi-level surgery, revision cases, anticoagulation, inadequate haemostasis
- Neck swelling, stridor, dyspnea, respiratory distress
- Usually occurs within first 24 hours (most in first 6 hours)
- IMMEDIATE: This is a surgical emergency
- If early signs (mild swelling, no respiratory distress): Close observation, consider neck CT to assess hematoma size
- If respiratory distress:
- Call for anaesthesia help immediately
- Remove dressing and open wound at bedside (remove skin closure, evacuate hematoma)
- DO NOT delay for OR - airway compromise can occur within minutes
- Prepare for difficult intubation (edema, hematoma distort anatomy)
- After airway secured, take to OR for formal washout and haemostasis
- Prevention: Meticulous haemostasis, drain use (controversial), blood pressure control post-op
Recurrent Laryngeal Nerve Injury
1-5% overall, higher right-sided approaches (3-7% vs 1-3% left) [19]
- Unilateral injury: Hoarseness, voice weakness/fatigue, aspiration risk (vocal cord paralysis prevents glottis closure)
- Bilateral injury: RARE but catastrophic - airway obstruction (both cords paramedian position), requires emergency tracheostomy
Right-sided approach, low cervical levels (C6-T1), prolonged retraction, multi-level surgery, revision cases
- Post-operative hoarseness (common and expected to some degree)
- Persistent hoarseness beyond 2 weeks should prompt ENT evaluation
- Laryngoscopy: Vocal cord paralysis (cord in paramedian or lateral position, does not move with phonation)
- Immediate post-op: Document hoarseness, voice therapy referral
- If persistent at 2-4 weeks: ENT consultation, laryngoscopy to confirm cord position
- Conservative (most cases): Voice therapy, observation - 80-90% neuropraxic injuries recover spontaneously in 6-12 months
- If no recovery by 6 months: Consider medialization procedures (vocal cord injection, thyroplasty)
- Prevention: Left-sided approach preferred, gentle retraction, release retractor every 30 minutes, avoid excessive extension
C5 Nerve Root Palsy
1-10% after ACDF, higher with multi-level decompression and myelopathy [23]
- Deltoid and/or biceps weakness (C5 myotome) appearing 1-3 days post-operatively
- Sensation typically intact or minimally affected
- Reflexes (biceps reflex) may be diminished
- NOT direct nerve injury (nerve not in operative field)
- Likely mechanism: Cord shift posteriorly after anterior decompression → tethered nerve roots stretched (C5 shortest, most horizontal nerve root → most susceptible)
- Alternative theory: Ischemic injury to nerve root from cord reperfusion after decompression
Myelopathy, multi-level decompression, significant cord compression pre-op, excessive distraction during procedure
- Recognition: Document weakness on post-op exam
- Imaging: MRI if severe or concerns for hematoma (usually shows cord posterior shift, no compressive pathology)
- Treatment: Conservative - most recover spontaneously in 3-12 months (80-90% full recovery)
- Physiotherapy for shoulder strengthening
- Sling for comfort if needed (avoid prolonged use - causes stiffness)
- EMG at 6-8 weeks if not improving (document neuropraxia vs axonotmesis)
- Reassurance to patient (recovery expected but slow)
- Prevention: Unclear (mechanism not fully understood) - avoid excessive distraction, consider decompression adequacy without over-aggressive technique
Dysphagia
10-50% transient (first month), 5-10% at 1 year [20]
Female sex, multi-level surgery, revision surgery, prolonged retraction, prominent hardware
- Difficulty swallowing solids more than liquids
- Globus sensation (lump in throat)
- Range from mild (requires liquid with meals) to severe (cannot tolerate solids, weight loss)
- Mild (most cases): Reassurance, soft diet, time (90% improve by 3 months)
- Moderate: Speech pathology referral for swallowing therapy, swallow study if aspiration concern
- Severe or persistent (greater than 6 months): Consider imaging (CT) to assess for hardware prominence, esophageal injury
- If hardware prominent: May require revision with plate removal or low-profile implant
- If esophageal stricture: GI consultation for dilation
- Prevention: Gentle retraction of tracheoesophagus, release retractor periodically, low-profile implants, avoid excessive anterior plate prominence
Esophageal Injury
Less than 0.5% but serious complication [24]
Revision surgery, severe OPLL, anterior osteophytes, excessive retraction, sharp retractors, long screws penetrating posterior vertebral body
- Intraoperative: Visualization of esophageal mucosa, air leak during ventilation, methylene blue test (inject methylene blue via NGT, observe for leak)
- Post-operative: Dysphagia, odynophagia, fever, subcutaneous emphysema, wound drainage (saliva, purulent material), mediastinitis (late - sepsis, shock)
- If recognized intraoperatively:
- Primary repair in two layers (mucosa with absorbable suture, muscle layer with absorbable or permanent)
- ENT or thoracic surgery consultation for repair
- NGT placement for feeding (bypass repair for 7-10 days)
- Broad-spectrum antibiotics (anaerobic coverage)
- Consider drain placement
- Remove hardware if contaminated OR leave if feels clean field and repair solid (controversial)
- If recognized post-operatively:
- NPO immediately
- Broad-spectrum antibiotics (including anaerobic coverage)
- CT neck/chest with oral contrast (assess leak extent, abscess formation)
- ENT/thoracic surgery consultation urgently
- May require surgical exploration, debridement, repair, hardware removal, feeding jejunostomy
- If delayed presentation with mediastinitis: High mortality (10-20%), requires aggressive management
- Prevention: Gentle tissue handling, avoid sharp retractors against esophagus, appropriate screw length (14-16mm typical, avoid bicortical purchase), careful multi-level dissection
Vertebral Artery Injury
Less than 0.5% [25]
Lateral dissection beyond uncovertebral joints (greater than 17mm from midline), aberrant artery anatomy (enters foramen transversarium at C4 or C5 rather than C6), lateral screw placement
- Intraoperative: Brisk arterial bleeding from lateral dissection or screw hole
- Post-operative: Posterior circulation stroke symptoms (ataxia, vertigo, diplopia, dysphagia, dysarthria)
- If recognized intraoperatively:
- Do NOT panic
- Obtain control: Pack wound with hemostatic agents (Gelfoam, Surgicel), direct pressure
- Expose proximal and distal control points if possible (difficult)
- Ligation acceptable if unilateral injury and contralateral vertebral artery patent (90% patients tolerate unilateral VA sacrifice)
- Vascular surgery consultation for repair vs ligation decision
- Post-op CT angiography to confirm contralateral VA patency
- Consider anti-platelet therapy (prevent thrombus propagation)
- If suspected post-operatively:
- Urgent CT angiography (confirm injury, assess flow in contralateral VA)
- Neurology consultation
- Interventional radiology - may require endovascular coiling or stenting
- Prevention: Limit lateral dissection to 15mm from midline, stay medial to uncinate process during decompression, pre-op CT angiography if revision or anomaly suspected
Dural Tear / CSF Leak
1-3%, higher with OPLL (up to 10%), revision cases [26]
- Intraoperative: Clear fluid from surgical field, visible dura defect
- Post-operative: Headache (worse with upright position, improves supine), nausea, wound drainage (clear fluid), pseudomeningocele (fluid collection), meningitis (if communication with skin)
- Small tear recognized intraoperatively:
- Attempt primary repair with 6-0 or 7-0 Prolene if accessible
- If not accessible (posterior tear): Pack with muscle graft or DuraSeal, position patient flat 24-48 hours post-op
- Drain wound (prevents CSF accumulation under wound → leak)
- Unrecognized tear with post-op leak:
- Confirm: Beta-2 transferrin test of fluid (specific for CSF)
- Conservative: Bed rest flat, acetazolamide (reduce CSF production), oversew wound if leaking
- If conservative fails (leak persists greater than 5-7 days): Surgical repair (re-explore, identify tear, repair or patch)
- Lumbar drain placement to reduce CSF pressure (controversial - may help healing)
- Prevention: Avoid aggressive PLL removal if not necessary, careful technique with OPLL (dura often adherent or ossified), use Kerrison rongeurs (not pituitary rongeurs) for decompression near dura
Approach Variations by Spinal Level
C2-C3 and Upper Cervical (C2-C4)
- Proximity to mandible limits access
- Hypoglossal nerve (CN XII) crosses field
- Superior laryngeal nerve at risk
- Higher skin incision: 2-3cm above thyroid cartilage, may need to angle toward angle of mandible
- Mandibular retraction: May require retractor to gently retract mandible superiorly
- Incision can be more oblique: Follow anterior SCM border superiorly
- Superior laryngeal nerve: Runs medially at C3-C4 level - injury causes voice fatigue, loss of high pitch
- Hypoglossal nerve: Crosses field at C1-C2 level (descends from above, crosses laterally to medially) - protect with gentle retraction
- More difficult exposure: Consider nasogastric tube removal for better tracheoesophageal mobilization
C3-C6 (Mid-Cervical) - Standard Approach
- Hyoid: C3
- Thyroid cartilage: C4-C5
- Cricoid cartilage: C6 (MOST RELIABLE)
- Standard transverse or longitudinal incision
- Straightforward anatomy
- Minimal special considerations
- Thyroid gland: May overlie C5-C7 - retract medially or divide isthmus if necessary (ligate both ends to prevent bleeding)
C6-C7 and Lower Cervical (C6-T1)
- Deeper exposure (shoulders, clavicle limit access)
- Inferior thyroid artery crosses field
- Thoracic duct at risk (C7-T1 left side)
- Difficult fluoroscopic visualization
- Incision lower: 1-2cm above sternal notch for C7-T1
- Aggressive shoulder taping: Tape shoulders caudally, check lateral fluoro intra-op to confirm C7-T1 visible
- Clavicle retraction: May require retractor on clavicle (pad to avoid fracture)
- Partial sternotomy (rare): If cannot visualize C7-T1 despite retraction, consider partial sternal split or manubriotomy for access
- Inferior thyroid artery: Typically requires ligation at C6-C7 level
- Ligate artery with 2-0 silk ties or clips
- Risk: Increases RLN injury (nerve runs with/near artery) - ligate carefully, identify artery first
- Thoracic duct: At C7-T1 on LEFT side
- Arches from left side of esophagus toward junction of left internal jugular and subclavian veins
- Injury causes chylothorax (milky fluid in chest)
- Some surgeons prefer RIGHT-sided approach at C7-T1 to avoid duct (must balance against increased RLN risk on right)
- Vertebral artery: Enters foramen transversarium at C6 in 90% of people, but 10% enters at C5 or even C4 - increases injury risk at these levels with lateral dissection
C7-T1 Specific Considerations
Approach decision: Left vs Right?
Arguments for RIGHT side at C7-T1:
- Avoids thoracic duct (left-sided structure)
- Some anatomical studies suggest RLN at C7-T1 more lateral, less at risk
Arguments for LEFT side at C7-T1:
- Consistency (same side for multi-level involving C5-T1)
- RLN still safer overall on left despite level
- Thoracic duct injury rare even on left if careful
Most surgeons: Individualize based on other factors (prior surgery, anatomy), slight preference LEFT unless specific reason for right
Corpectomy Levels
Single-level corpectomy (e.g., C5 vertebral body):
- Exposure of C4-C6 disc spaces
- Remove C4-C5 disc completely
- Remove C5 vertebral body (burr or rongeur)
- Remove C5-C6 disc completely
- Posterior decompression (remove posterior C5 body and PLL)
- Reconstruction: Expandable cage C4-C6 OR fibular strut allograft
- Plate spanning C4-C6 (longer plate, more screws for stability)
Multi-level corpectomy (e.g., C5-C6):
- Higher pseudoarthrosis risk
- Consider hybrid: Corpectomy + adjacent disc (e.g., C5 corpectomy + C6-C7 discectomy)
- Consider posterior supplementation (instrumented fusion) for stability
These modifications ensure optimal exposure and outcomes for different cervical levels.
Post-operative Care
Immediate (Recovery Room)
- Airway monitoring: CRITICAL - hematoma can expand and compromise airway
- Monitor for stridor, dyspnea, neck swelling
- If concern → immediate bedside drain removal and wound opening (do NOT wait for OR)
- Neurovascular check: Document motor/sensory in all extremities (compare to pre-op baseline)
- Voice check: Ask patient to speak - hoarseness expected but document
- Drain output: Monitor if drain placed (should be minimal, less than 50mL in first few hours)
- X-ray: Lateral cervical spine (confirm hardware position, alignment, no hematoma causing tracheal deviation)
Inpatient (Days 0-1)
- Mobilize: Out of bed day of surgery or POD1 (no movement restrictions needed for stable construct)
- Diet: Start clear liquids evening of surgery if no dysphagia, advance as tolerated
- Dysphagia common first 24-48 hours (improves with time)
- Soft diet or liquids for first few days if dysphagia prominent
- Pain management: Multimodal (acetaminophen, muscle relaxants, opioids as needed)
- Avoid NSAIDs (theoretical fusion inhibition concern - controversial)
- Drain removal: POD1 if output less than 30mL in 8 hours
- Collar: Soft collar for comfort (NOT for immobilization) - most surgeons do not routinely use
Discharge Criteria
- Pain controlled on oral medications
- Tolerating diet without significant dysphagia
- No airway concerns
- Neurologically stable or improved
- Mobilizing independently
- Understanding of warning signs (dyspnea, stridor, new weakness)
Follow-up
- Wound check
- Remove sutures if non-absorbable used
- Assess dysphagia (should be improving)
- Assess voice (hoarseness should be improving - if not, consider ENT referral for laryngoscopy at 4-6 weeks)
- Clinical assessment: Pain, function, neurological status
- X-rays: AP and lateral cervical spine (assess alignment, hardware position, early fusion signs)
- Activity: No restrictions typically - resume normal activities as pain allows
- Return to light work if sedentary job
- X-rays: Assess fusion progress (bridging bone across interspaces, no lucency around cage)
- Flexion-extension views: Assess for motion at operated levels (motion suggests pseudoarthrosis)
- If fusing well: Return to full activities including contact sports/heavy labor
- Final fusion assessment
- CT scan if X-ray equivocal or pseudoarthrosis suspected
- Discharge if solid fusion and clinically well
- If pseudoarthrosis: Revision surgery if symptomatic
- Annual X-rays for first 5 years (monitor adjacent segment degeneration)
- Re-refer if new radiculopathy or myelopathy symptoms develop
Guidelines, Registries & Global Practice
Global Burden and Epidemiology
Degenerative cervical myelopathy (DCM) is the commonest cause of non-traumatic spinal cord dysfunction in adults worldwide, and degenerative disc disease and spondylosis are near-universal with age. The AOSpine North America cohort that underpins modern myelopathy practice described DCM as the leading cause of spinal cord dysfunction globally (Fehlings et al. 2013, PMID 24048552). Cervical radiculopathy is common and largely self-limiting, with most patients improving on non-operative care (Carette and Fehlings 2005, PMID 16049211). Ossification of the posterior longitudinal ligament (OPLL) shows marked geographic variation, being substantially more prevalent in East Asian populations and an important driver of anterior versus posterior decision-making in those settings.
Guideline Comparison
The table contrasts major international guidance relevant to the anterior cervical approach. Recommendations converge on early surgery for moderate-to-severe myelopathy and clinico-radiological correlation before operating for radiculopathy.
- Core Recommendation
- Surgical decompression recommended for moderate and severe DCM; offer surgery or supervised rehabilitation for mild DCM with shared decision-making
- Evidence Strength
- Strong (moderate-severe); conditional (mild)
- Core Recommendation
- Refer suspected myelopathy urgently to spinal services; image with MRI; reserve surgery for confirmed compressive pathology with concordant symptoms
- Evidence Strength
- Consensus / good practice
- Core Recommendation
- Anterior decompression and fusion for anterior compressive radiculopathy/myelopathy; approach guided by compression site and alignment
- Evidence Strength
- Moderate
- Core Recommendation
- Non-operative trial for radiculopathy unless progressive deficit; surgery for refractory or progressive disease and for myelopathy
- Evidence Strength
- Consensus
Registry & Audit Evidence
Unlike arthroplasty, cervical fusion is not captured by a single dedicated national implant registry. Practice is instead monitored through prospective multicentre studies and spine-surgery quality registries.
- Scope
- Prospective multicentre myelopathy cohort (n=278)
- Relevance
- Benchmark functional outcomes and ~18.7% complication rate
- Scope
- National prospective spine-surgery outcome registry
- Relevance
- Real-world ACDF outcomes, PROMs and complication audit
- Scope
- National neurosurgical/spine registry
- Relevance
- Large-scale ACDF outcome and adverse-event tracking
Practice Variation
- Approach side: Left-sided approach predominates internationally for the evidence-based recurrent laryngeal nerve rationale, though many surgeons individualise (e.g. right-sided low cervical approach to avoid the thoracic duct).
- OPLL strategy: Anterior corpectomy/fusion is favoured for focal anterior OPLL, but posterior laminoplasty is more common in East Asian centres for multilevel OPLL with preserved lordosis, reflecting both disease pattern and regional expertise.
- Motion preservation: Cervical disc arthroplasty uptake varies widely by health system and reimbursement, being more established in North America and parts of Europe; ACDF remains the global default.
- Fusion adjuncts: Routine plating predominates in most high-income systems, whereas stand-alone cages are used more where cost constraints apply.
MCQ Practice Points
Q: Which side is preferred for the anterior approach to the cervical spine, and why?
A: The left side is traditionally preferred because the recurrent laryngeal nerve (RLN) has a more predictable course. On the left, the RLN loops around the aortic arch and ascends in the tracheoesophageal groove. On the right, the RLN loops around the subclavian artery with a more variable, oblique course making it more vulnerable to injury. However, for revision surgery, the contralateral side is often used.
Q: What are the anatomical boundaries of the anterior cervical approach (Smith-Robinson) during the superficial dissection?
A: The dissection proceeds through the platysma muscle, then between the carotid sheath laterally and the trachea/esophagus medially. The plane is developed between the sternohyoid/omohyoid muscles (strap muscles) medially and the sternocleidomastoid (SCM) laterally. The anterior longitudinal ligament and prevertebral fascia are exposed after retracting the longus colli muscles.
Q: What are the vertebral level landmarks used for skin incision in anterior cervical approach?
A: Key landmarks: C3 - hyoid bone; C4-5 - thyroid cartilage (superior border); C5-6 - cricoid cartilage; C6 - carotid tubercle (Chassaignac's tubercle). The incision is made in a transverse skin crease for cosmesis. Fluoroscopy confirms level intraoperatively. The carotid tubercle at C6 is the most reliable palpable landmark.
Q: Which structures are at risk during the anterior cervical approach, and how are they protected?
A: Recurrent laryngeal nerve: Protected by gentle retraction of trachea/esophagus, no sharp dissection near the tracheoesophageal groove. Esophagus: Protected by maintaining midline awareness, gentle retraction. Carotid artery/jugular vein: Protected by retractor placement under the carotid sheath. Superior laryngeal nerve: At risk with high exposures (C3-4), travels with superior thyroid vessels. Vertebral artery: Protected by staying within longus colli muscle boundaries.
Q: What is the significance of the longus colli muscles in the anterior cervical approach?
A: The longus colli muscles (paired, longitudinal muscles on anterior vertebral bodies) serve as critical landmarks and protection. They are elevated subperiosteally off the anterior spine to expose the disc space. Self-retaining retractors are placed under the medial edges of the longus colli to protect the vertebral arteries which lie lateral to these muscles. Excessive lateral dissection risks vertebral artery injury.
At a Glance
The anterior approach to the cervical spine (Robinson-Smith/Cloward) provides access to C3-T1 vertebral bodies for ACDF, corpectomy, and fusion procedures. The approach develops the interval between carotid sheath (lateral) and tracheoesophageal complex (medial). Left-sided approach is preferred because the recurrent laryngeal nerve has a longer, more lateral course on the left (ascending from aortic arch), making it less prone to traction injury during tracheoesophageal retraction—right-sided approaches have 2-3x higher RLN injury risk. Key structures at risk: recurrent laryngeal nerve (1-5% injury, causes hoarseness), sympathetic chain on longus colli (Horner syndrome from lateral monopolar cautery), superior and inferior thyroid vessels, and C5 nerve root (1-10% palsy, cord shift mechanism). Release retractors every 30 minutes to reduce nerve ischaemia.
SPOMPHAnterior Cervical Approach - Tissue Layers
Hook:Skin to Prevertebral, six layers deep - SPOMPH guides you through the neck
REVSStructures at Risk - Anterior Cervical Spine
Hook:REV up the engine carefully - four vital structures to protect
LEFTLeft vs Right Approach Decision
Hook:When in doubt, go LEFT first - safer for the nerve
Clinical Decision Scenarios
Practise clinical reasoning and management decisions out loud
“Describe your anterior approach to the cervical spine for ACDF at C5-C6.”
“Your ACDF patient develops sudden neck swelling and stridor 6 hours post-operatively. What do you do?”
“A 62-year-old with cervical myelopathy has MRI showing C4-C5-C6 stenosis with cord compression and T2 hyperintensity at C5. Discuss your surgical approach and prognostic counseling.”
Pre-operative Essentials
- Indications: Radiculopathy failed 6-12 weeks conservative, myelopathy with cord compression, fracture, infection
- MRI reviewed for cord compression, signal changes, herniation vs stenosis
- CT if OPLL or fracture for bone detail; Flex-ext X-rays for instability
- Consent: 90-95% radiculopathy success, 50-70% myelopathy improvement
- Risks: Dysphagia 10-50% transient, RLN 1-5%, C5 palsy 1-10%, infection 0.5-1%, pseudoarthrosis 5-10%
- Smoking cessation critical: Fusion rate 60-70% smokers vs 95% non-smokers
Setup & Positioning
- Supine, shoulder roll under scapulae (extends neck), head ring
- Tape shoulders caudally (improves C6-T1 visualization)
- Small ETT (6.0-7.0mm reduces tracheal pressure); No NGT (increases injury risk)
- Neuromonitoring: SSEPs/MEPs for myelopathy
- Antibiotics: Cefazolin 2g; Chlorhexidine prep mandible to nipples
- Localize level BEFORE incision: Cricoid = C6, thyroid cartilage = C4-C5, hyoid = C3
Surgical Approach Steps
- Incision: Transverse skin crease (single/two-level) OR longitudinal medial SCM (multi-level)
- Incise platysma; Identify medial SCM border, incise investing fascia
- Blunt finger dissection between carotid sheath (lateral) and tracheoesophagus (medial)
- Retract carotid laterally, tracheoesophagus medially; Localize level with needle + fluoroscopy
- Incise prevertebral fascia longitudinally; Elevate longus colli (stay under 15mm from midline)
- Place self-retaining retractor; Proceed with discectomy/corpectomy
Critical Structures & Protection
- RLN: In tracheoesophageal groove; Left-sided approach safer; Release retractor every 30 min
- Esophagus: Avoid sharp retractors; Screw length 14-16mm (avoid posterior cortex)
- Vertebral artery: Enters C6 foramen transversarium; Limit lateral dissection to under 17mm from midline
- Stay medial to uncinate process to avoid VA injury
- Sympathetic chain: On longus colli lateral to midline (Horner syndrome if injured)
- Superior thyroid artery (C4-C5), inferior thyroid artery (C6-C7): May need ligation for multi-level
Discectomy Technique
- Confirm level with needle + fluoroscopy; Incise annulus rectangular window
- Remove disc with pituitary rongeurs to PLL; Distract with Caspar pins if needed
- Remove cartilaginous endplates (curettes), preserve subchondral bone
- Decompress: Remove posterior osteophytes (2-3mm Kerrison), PLL if soft disc herniation
- Identify uncinate processes (lateral limit); Foraminal decompression if needed
- Insert cage (flush or 1-2mm recessed) with bone graft; Plate mid-body to mid-body
Closure & Post-op
- Irrigate 3-6L saline; Meticulous hemostasis (bipolar); Drain optional
- Close platysma (2-0 Vicryl), subcutaneous (3-0 Vicryl), skin (4-0 Monocryl subcuticular)
- Airway monitoring critical: If stridor/swelling, open wound at bedside immediately
- Lateral C-spine X-ray; Diet advance as tolerated (dysphagia common initially)
- Mobilize POD0-1; No restrictions (stable construct)
- Follow-up: 2 weeks wound, 6 weeks X-ray, 3 months fusion assessment
Complication Management
- Airway hematoma: Open wound at bedside immediately, call anaesthesia, formal OR after stabilization
- RLN injury (1-5%): Document hoarseness, ENT + laryngoscopy if persistent greater than 2 weeks
- C5 palsy (1-10%): Deltoid/biceps weakness POD1-3, neuropraxic, 80-90% recover 3-12 months
- Dysphagia (10-50% transient): Soft diet, speech pathology if severe, most improve by 3 months
- Esophageal injury: If intra-op repair two layers + consult; If post-op NPO + antibiotics + CT
- Pseudoarthrosis (5-10%): Higher in smokers/multi-level, revision if symptomatic
Evidence Base
Surgery for Cervical Radiculopathy/Myelopathy - Cochrane Review
- Two RCTs, 149 patients total (low to very-low quality evidence)
- Radiculopathy: surgery superior short-term, no difference at 1 year
- Mild myelopathy: no significant difference vs conservative at 3 years
- Surgery may give faster short-term relief but offers little long-term advantage
Surgical Decompression for Cervical Spondylotic Myelopathy - AOSpine North America
- 278 patients, 12 centres; significant mJOA, Nurick, NDI and SF-36v2 gains at 1 year
- Benefit seen across mild, moderate and severe baseline myelopathy
- Overall complication rate 18.7%, similar across severity groups
- Supports timely surgical decompression for symptomatic CSM
Recurrent Laryngeal Nerve Palsy - Mechanism and Prevention
- 900 patients: 30 RLN palsies (27 temporary, 3 permanent)
- ET cuff pressure release after retraction cut temporary palsy from 6.4% to 1.69%
- Mechanism is endolaryngeal RLN compression against the ET tube, not direct dissection injury
- Cadaver fluoroscopy confirmed retractor-induced laryngeal displacement
Adjacent-Segment Disease After Anterior Cervical Arthrodesis
- Adjacent-segment disease 2.9% per year; 25.6% cumulative at 10 years
- Highest risk at C5-C6 and C6-C7 interspaces
- Single-level arthrodesis had HIGHER adjacent-level risk than multilevel fusion
- Pre-existing adjacent-level degeneration is a key risk factor
Incidence and Natural History of Dysphagia After ACSS
- Dysphagia 50.2% at 1 month falling to 12.5% at 12 months
- Only 4.8% had moderate-to-severe dysphagia at 6 months
- Female sex (6 months) and multilevel surgery (early) were significant risk factors
- Defined the widely used Bazaz dysphagia grading scale
Cervical Radiculopathy - Clinical Practice Review (NEJM)
- Most cervical radiculopathy resolves with non-operative care within weeks to months
- MRI is the imaging of choice; must correlate with clinical level
- Surgery reserved for progressive deficit, refractory pain, or myelopathy
- Asymptomatic imaging abnormalities are common - match imaging to symptoms
References
-
Smith GW, Robinson RA. The treatment of certain cervical-spine disorders by anterior removal of the intervertebral disc and interbody fusion. J Bone Joint Surg Am. 1958;40-A(3):607-624.
-
Cloward RB. The anterior approach for removal of ruptured cervical disks. J Neurosurg. 1958;15(6):602-617. doi:10.3171/jns.1958.15.6.0602
-
Henry AK. Extensile Exposure. 2nd ed. Edinburgh: E & S Livingstone; 1957.
-
Hoppenfeld S, deBoer P. Surgical Exposures in Orthopaedics: The Anatomic Approach. 4th ed. Philadelphia: Lippincott Williams & Wilkins; 2009.
-
Southwick WO, Robinson RA. Surgical approaches to the vertebral bodies in the cervical and lumbar regions. J Bone Joint Surg Am. 1957;39-A(3):631-644.
-
Carette S, Fehlings MG. Clinical practice. Cervical radiculopathy. N Engl J Med. 2005;353(4):392-399. doi:10.1056/NEJMcp043887
-
Fehlings MG, Tetreault LA, Riew KD, et al. A clinical practice guideline for the management of patients with degenerative cervical myelopathy. Global Spine J. 2017;7(3 Suppl):6S-83S. doi:10.1177/2192568217701914
-
Matsunaga S, Sakou T. Ossification of the posterior longitudinal ligament of the cervical spine: etiology and natural history. Spine (Phila Pa 1976). 2012;37(5):E309-E314. doi:10.1097/BRS.0b013e318241ad33
-
Campbell WC, Canale ST, Beaty JH. Campbell's Operative Orthopaedics. 13th ed. Philadelphia: Elsevier; 2017.
-
Vaccaro AR, Fehlings MG, Dvorak MF, eds. Spine and Spinal Cord Trauma: Evidence-Based Management. New York: Thieme; 2011.
-
Nikolaidis I, Fouyas IP, Sandercock PA, Statham PF. Surgery for cervical radiculopathy or myelopathy. Cochrane Database Syst Rev. 2010;(1):CD001466. doi:10.1002/14651858.CD001466.pub3
-
Fehlings MG, Wilson JR, Kopjar B, et al. Efficacy and safety of surgical decompression in patients with cervical spondylotic myelopathy. J Bone Joint Surg Am. 2013;95(9):824-832. doi:10.2106/JBJS.L.00589
-
Anderson PA, Moore TA, Davis KW, et al. Cervical spine injury severity score: assessment of reliability. J Bone Joint Surg Am. 2007;89(5):1057-1065. doi:10.2106/JBJS.F.00650
-
Kehrer M, Pedersen C, Jensen TG, Lassen AT. Spondylodiscitis: a retrospective study of 83 cases. Scand J Infect Dis. 2014;46(3):161-166. doi:10.3109/00365548.2013.857043
-
Korinth MC. Treatment of cervical degenerative disc disease - current status and trends. Zentralbl Neurochir. 2008;69(3):113-124. doi:10.1055/s-2007-1022542
-
Epstein NE. Ossification of the posterior longitudinal ligament: diagnosis and surgical management. Neurosurg Q. 1992;2(4):223-241.
-
Fraser JF, Härtl R. Anterior approaches to fusion of the cervical spine: a metaanalysis of fusion rates. J Neurosurg Spine. 2007;6(4):298-303. doi:10.3171/spi.2007.6.4.2
-
Pull ter Gunne AF, Cohen DB. Incidence, prevalence, and analysis of risk factors for surgical site infection following adult spinal surgery. Spine (Phila Pa 1976). 2009;34(13):1422-1428. doi:10.1097/BRS.0b013e3181a03013
-
Apfelbaum RI, Kriskovich MD, Haller JR. On the incidence, cause, and prevention of recurrent laryngeal nerve palsies during anterior cervical spine surgery. Spine (Phila Pa 1976). 2000;25(22):2906-2912. doi:10.1097/00007632-200011150-00012
-
Bazaz R, Lee MJ, Yoo JU. Incidence of dysphagia after anterior cervical spine surgery: a prospective study. Spine (Phila Pa 1976). 2002;27(22):2453-2458. doi:10.1097/00007632-200211150-00007
-
Fehlings MG, Brodke DS, Norvell DC, Dettori JR. The evidence for intraoperative neurophysiological monitoring in spine surgery. Spine (Phila Pa 1976). 2010;35(9 Suppl):S37-S46. doi:10.1097/BRS.0b013e3181d8338e
-
Palumbo MA, Aidlen JP, Daniels AH, Thakur NA, Caiati J. Airway compromise due to wound hematoma following anterior cervical spine surgery. Open Orthop J. 2012;6:108-113. doi:10.2174/1874325001206010108
-
Sakaura H, Hosono N, Yonenobu K, Yoshikawa H. Outcome of C5 palsy after decompression surgery for cervical myelopathy: a review of the literature. Spine (Phila Pa 1976). 2003;28(21):2447-2451. doi:10.1097/01.BRS.0000090833.96168.3F
-
Newhouse KE, Lindsey RW, Clark CR, Lieponis J, Murphy MJ. Esophageal perforation following anterior cervical spine surgery. Spine (Phila Pa 1976). 1989;14(10):1051-1053.
-
Smith MD, Emery SE, Dudley A, Murray KJ, Leventhal M. Vertebral artery injury during anterior decompression of the cervical spine. J Bone Joint Surg Br. 1993;75(3):410-415.
-
Fountas KN, Kapsalaki EZ, Nikolakakos LG, et al. Anterior cervical discectomy and fusion associated complications. Spine (Phila Pa 1976). 2007;32(21):2310-2317. doi:10.1097/BRS.0b013e318154c57e