Fatigue Failure | Pseudarthrosis Association | Long Construct Risk
- Pseudarthrosis is the dominant cause - without solid fusion the rod bears the entire cyclic load and fails by fatigue
- Pedicle subtraction osteotomy (PSO) is the single highest-risk site (rod fracture up to ~40% in some series)
- Cobalt-chrome rods fracture less than titanium (meta-analysis), at the cost of higher proximal junctional kyphosis
- Accessory rods across an osteotomy reduce rod fracture/pseudarthrosis - but simply adding rods elsewhere is not reliably protective
- “Rod fracture = fatigue failure - the rod alone cannot sustain cyclic loading
- “CT is gold standard for fusion assessment - less than 50% bridging = pseudarthrosis
- “Symptomatic fracture with pseudarthrosis must revise - will progress without fusion augmentation
- “Address root cause: fusion, alignment, and biomechanics - not just bigger rods
Overview
Rod fracture is fatigue failure of spinal instrumentation under cyclic loading. It indicates construct failure, usually from an underlying pseudarthrosis, and it typically presents as recurrent pain after an initial pain-free interval following fusion. The two must be told apart, though they often coexist.
Incidence. Rates run from low single digits, roughly 2%, in short fusions of 1-3 levels to 18-26% in long adult deformity constructs incorporating a pedicle subtraction osteotomy. Incidence is directly related to construct length, three-column osteotomy and residual sagittal malalignment, and it is higher in revision than in primary surgery. Reported rates are consistent across international deformity series.
Where and when. Rod fracture most commonly occurs at rod-connector junctions or in the setting of pseudarthrosis. The pedicle subtraction osteotomy (PSO) is the highest-risk osteotomy, and where one has been performed the osteotomy site is the dominant fracture location. Occurrence typically peaks 12-36 months after surgery; the mean time to distal junctional failure is about 32 months.
Why it matters. A fracture may be an incidental finding or cause significant symptoms. Rod fracture with concurrent pseudarthrosis requires revision; an isolated fracture over a solid fusion may be observed if asymptomatic, but most symptomatic cases require revision.
Risk Factors
Stratify each patient on three independent axes: the construct, the alignment and the biology. The more boxes ticked, the more aggressive the preventive strategy.
Construct and technique. Long constructs over 5 levels carry an exponentially increased risk. The other construct factors:
- Long fusion to the pelvis
- Three-column osteotomy, especially a PSO
- Titanium rather than cobalt-chrome rods in a long construct (lower fatigue strength)
- Small-diameter rods (5.5mm versus 6.35mm)
- Single-rod (unilateral) constructs, or no supplemental rod across an osteotomy
- Inadequate sacropelvic fixation in lumbosacral constructs
- Offset connectors, which create bending moments
- Excessive contouring (cold working weakens the material) and sharp bends (stress concentrations)
Alignment. Residual PI-LL mismatch, a positive sagittal vertical axis (SVA greater than 50mm), undercorrection of sagittal imbalance and severe coronal decompensation all raise the risk. So, paradoxically, can a large acute correction that concentrates stress at one level.
Biology. Pseudarthrosis is the strongest predictor of rod fracture. The other biological and medical risk factors:
- Poor bone quality - osteoporosis, osteopenia, low Hounsfield units
- Smoking, which impairs fusion and increases pseudarthrosis risk
- Diabetes, chronic kidney disease and immunosuppression
- Malnutrition and nutritional deficiency (vitamin D, protein)
- Inadequate fusion mass from poor graft technique, or inadequate biological supplementation (BMP, autograft)
- Infection, which inhibits fusion
- Postoperative complications - wound problems, prolonged immobility
The patient and the history. High BMI (greater than 30 kg/m²) and advanced age with osteoporosis add risk. Revision surgery carries higher failure rates than primary surgery, and a prior pseudarthrosis adds risk too.
Putting it together. A patient loaded on all three axes, such as an osteoporotic smoker undergoing a lumbar PSO with single titanium rods and residual malalignment, sits at the extreme of risk. That patient warrants cobalt-chrome plus accessory rods, sacropelvic fixation, anterior column support and bone-health optimisation.
FRACTUREHigh-Risk FRACTURE Criteria
Hook:Three or more FRACTURE criteria = very high risk requiring aggressive preventive strategies
Pathophysiology
Fatigue failure. A rod under cyclic loading fails in three stages:
- Crack initiation - a microcrack forms at a stress concentration
- Crack propagation - cyclic loading extends the crack through the rod cross-section
- Final fracture - sudden failure when the remaining cross-section cannot sustain the load
Where stress concentrates. The stress concentration sites are:
- Rod-connector junctions, where offset connectors create bending moments
- The tulip-rod interface, a stress riser from the pedicle screw clamp
- Cross-link attachment points
- Rod bends and contouring sites, where cold working creates microcracks
- Transition zones between the fused and the mobile spine
The high-risk regions. Long constructs carry the risk in general: adult deformity surgery over 5 levels, thoracolumbar kyphosis correction and sacropelvic fixation constructs. Within them, the high-risk regions are:
- Lumbosacral junction - the highest stress zone, because of its moment arm and motion
- Thoracolumbar junction - the change from the stiff thoracic to the mobile lumbar spine
- Upper instrumented vertebra (UIV) in long constructs
- Three-column osteotomy sites - high mechanical demands
The loads. Long constructs are loaded by cantilever bending, and physiological motion supplies the cyclic load. Sagittal imbalance raises rod stress: a positive sagittal vertical axis (SVA) increases it, loss of lumbar lordosis increases flexion moments, and flatback deformity dramatically increases rod loading.
Pseudarthrosis. A solid fusion protects the rods by load-sharing. In pseudarthrosis the loads increase and the rod bears 100% of them, with no biological load-sharing. Rod fracture often indicates an underlying pseudarthrosis, and it may occur before the pseudarthrosis is visible radiographically.
Material and diameter. Cobalt-chromium alloys have higher strength but lower ductility than titanium; titanium alloys are more ductile but have lower fatigue strength. 5.5mm rods are more prone to fracture than 6.0mm or 6.35mm rods. Larger rods reduce stress but increase stiffness.
Classification
There is no universally adopted eponymous classification for rod fractures. In practice they are categorised by the status of the underlying fusion, alignment and neurology, because that is what decides between observation and revision. The descriptive framework below is widely used in exam answers.
- characteristics
- Single rod fracture, solid fusion, normal alignment
- biomechanics
- Low stress, likely manufacturing defect or trauma
- treatment
- Observation if asymptomatic, revision if symptomatic
- prognosis
- Approximately 60-70% remain asymptomatic; 30-40% progress to symptomatic requiring revision
- characteristics
- Rod fracture with radiographic pseudarthrosis
- biomechanics
- Fatigue failure from repetitive loading without biological support
- treatment
- Revision fusion with augmentation
- prognosis
- Good with revision, high recurrence if not revised
- characteristics
- Rod fracture with loss of correction (kyphosis, translation)
- biomechanics
- Construct failure with progressive deformity
- treatment
- Urgent revision with osteotomy if needed
- prognosis
- Moderate, depends on deformity magnitude
- characteristics
- Rod fracture with new or progressive neurological deficit
- biomechanics
- Instability causing neural compression
- treatment
- Urgent/emergent revision surgery
- prognosis
- Variable, depends on neural recovery
Clinical Presentation
History. The classic story is initial pain relief after the index operation, a pain-free interval of months to years, and then back pain that returns suddenly or gradually. The pain is mechanical, worse with activity and better with rest, and the patient may report an audible "snap" or a sudden sharp pain.
Red flags. Ask specifically about new radicular pain or weakness, progressive deformity (a visible trunk shift), loss of function or mobility, and constitutional symptoms such as fever or weight loss, which suggest infection.
Examination. Assess global sagittal alignment with a plumb line from C7 to the sacrum, look for coronal decompensation (trunk shift) and for a visible step-off or gibbus, and check the wound for healing problems or drainage. Palpate for tenderness over the fracture, a palpable step-off in subcutaneous patients, and a fluid collection or warmth. Motion is often restricted by pain, though there may be paradoxically increased motion at the fracture site; assess function through gait and sit-to-stand.
Neurological examination.
- Complete motor examination of the L2-S1 myotomes
- Sensory examination for dermatomal deficits
- Reflexes and pathological signs
- Sphincter tone if cauda equina is suspected
- keyFeatures
- Sudden onset after pain-free interval, mechanical pain
- imaging
- Radiographs show rod discontinuity
- management
- Revision if symptomatic with pseudarthrosis
- keyFeatures
- Persistent or recurrent pain, no specific onset
- imaging
- CT shows lack of bridging bone, intact rods
- management
- Revision fusion with biologics
- keyFeatures
- Pain at unfused levels, radicular symptoms
- imaging
- Degeneration at adjacent disc levels
- management
- Conservative vs extension of fusion
- keyFeatures
- Constitutional symptoms, elevated inflammatory markers
- imaging
- MRI shows fluid collections, bone destruction
- management
- Antibiotics, debridement, retention vs removal
- keyFeatures
- Mechanical pain, lucency around screws
- imaging
- Greater than 1mm radiolucency around screws
- management
- Revision with longer screws or cement augmentation
Investigations
Standing radiographs. Full-length standing AP and lateral films of the spine are essential. They identify the fracture and assess global alignment and the hardware:
- Sagittal parameters - SVA, PI-LL mismatch, pelvic tilt
- Coronal parameters - coronal vertical axis, Cobb angles
- Hardware - screw position, connector integrity
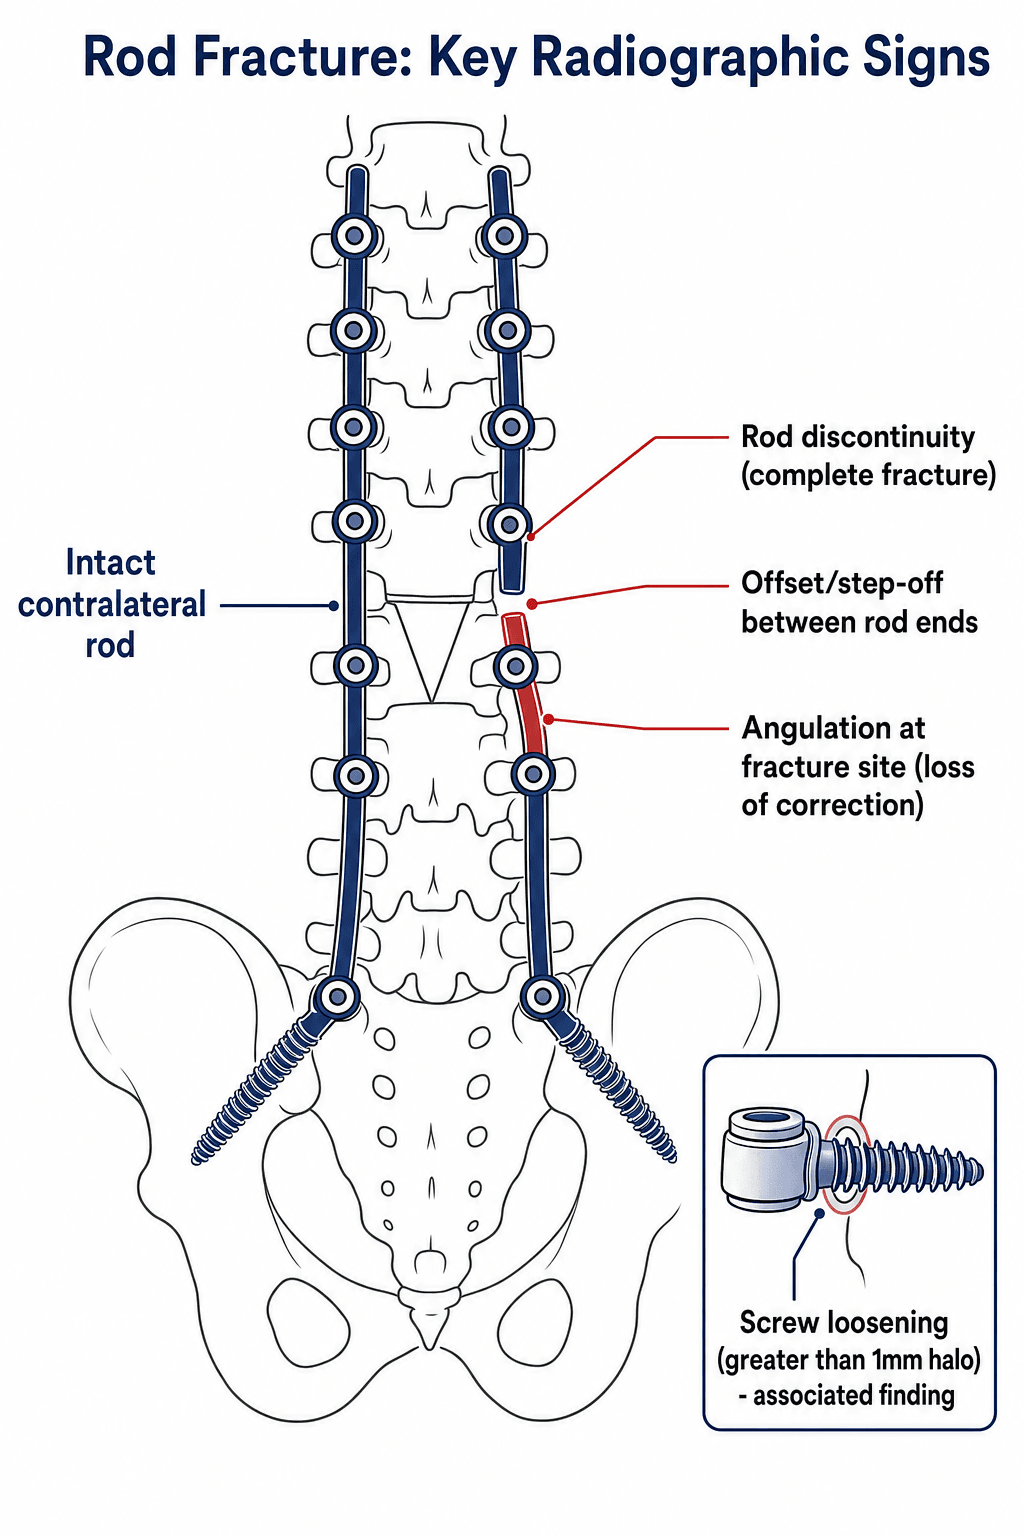
The signs. Look for rod discontinuity, offset or step-off, a radiolucent line through the rod (a complete fracture), angulation at the fracture site and loss of correction (increased kyphosis). Screw haloing greater than 1mm suggests loosening.
CT with metal artefact reduction is the gold standard for fusion assessment: less than 50% bridging fusion mass indicates non-union. The same scan assesses the integrity of every rod, connector and screw, shows whether the fracture is partial or complete, and measures bone quality in Hounsfield units to assess osteoporosis.
MRI is for selected cases: suspected infection, neural compression with a new radiculopathy, and epidural fluid collections. Metal artefact limits it, though newer sequences (MARS) are improving.
SPECT-CT gives a functional assessment of fusion, with hot spots indicating ongoing stress or non-union. It helps in equivocal cases and is not routinely required.
Laboratory tests.
- CRP and ESR - elevation suggests infection
- Full blood count - leucocytosis suggests infection
- Bone health - vitamin D, calcium, and PTH if osteoporotic
- Metabolic panel - for medical optimisation
If infection is suspected, take blood cultures if there is systemic sepsis, and aspirate for culture and sensitivity and a cell count with differential (greater than 3000 WBCs, greater than 80% PMNs). Consider biofilm-disrupting techniques.
Management
Non-Operative Management
Indications.
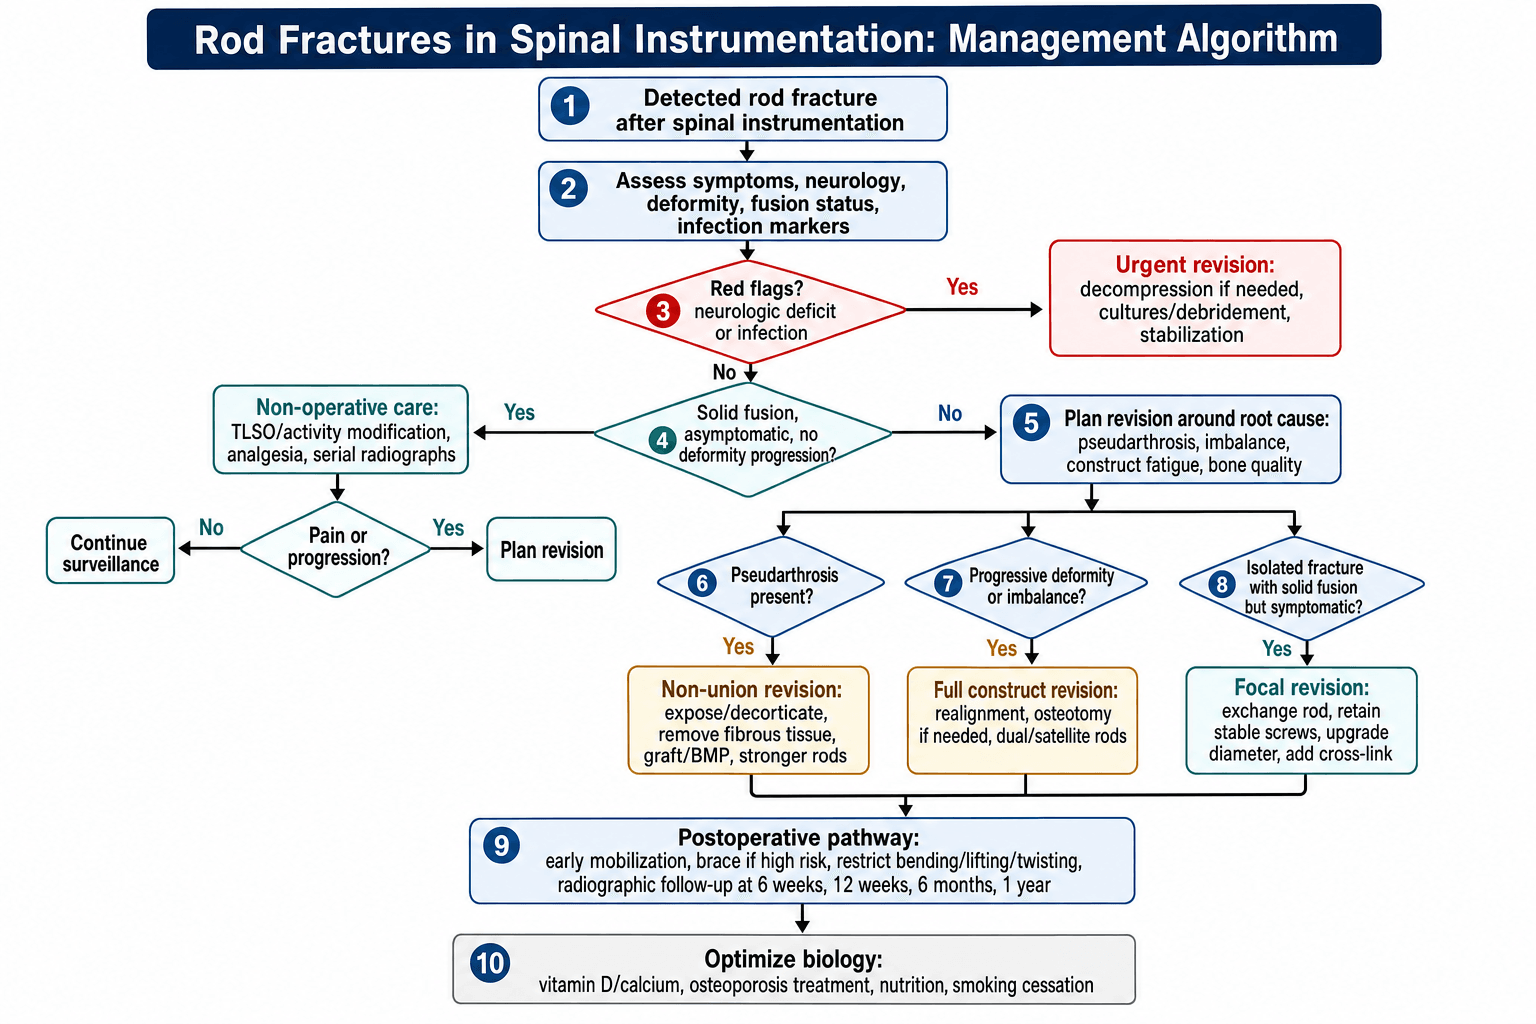
- Isolated rod fracture with solid fusion (Type I)
- Asymptomatic patient
- No deformity progression
- No neurological compromise
- Medical contraindication to surgery
The protocol. A TLSO brace for 12 weeks, with activity modification to avoid heavy lifting and high-impact activities. Analgesia is with NSAIDs, paracetamol and neuropathic agents, and physiotherapy for core strengthening starts once the acute pain resolves. Radiographs are repeated every 6 weeks for 3 months, then every 3 months, monitoring for loss of correction or the development of pseudarthrosis.
Operative Management
Indications for revision.
- Symptomatic rod fracture (persistent pain limiting function)
- Rod fracture with pseudarthrosis (Type II)
- Progressive deformity (Type III)
- Neurological compromise (Type IV)
- Multiple rod fractures
- Infection
Planning the revision. Every plan addresses the root cause, the construct and the biology.
The root cause. Achieve solid fusion if pseudarthrosis is present, correct sagittal and coronal imbalance, optimise bone quality, and treat infection if present.
The construct. Upgrade to larger-diameter rods, consider dual or satellite rods, add or optimise cross-links to reduce torsional stress, extend fixation if the failure is junctional, and add iliac screws in sacropelvic constructs.
The biology. Use osteobiologics (iliac crest autograft, BMP, allograft), optimise nutrition and bone health preoperatively, insist on smoking cessation for a minimum of 6 weeks beforehand, and treat osteoporosis (bisphosphonates, teriparatide).
REVISIONREVISION Success Factors
Hook:Address all eight factors systematically during preoperative planning
- approach
- Focal revision at fracture site
- technique
- Exchange fractured rod, retain well-fixed screws
- augmentation
- Upgrade rod diameter, add cross-link
- biologics
- Local bone graft if exposed
- expectedOutcome
- Excellent, greater than 90% success
- approach
- Comprehensive revision of non-union
- technique
- Expose pseudarthrosis, decorticate, remove fibrous tissue
- augmentation
- Larger rods, extend fixation 1 level each direction
- biologics
- Structural autograft + BMP
- expectedOutcome
- Good, 75-85% fusion rate
- approach
- Full construct revision with realignment
- technique
- Osteotomy if needed (PSO, VCR), complete revision
- augmentation
- Dual rods, satellite rods, iliac screws
- biologics
- Maximum biological supplementation
- expectedOutcome
- Moderate, 60-75% success, higher complication rate
- approach
- Urgent revision with decompression
- technique
- Neural decompression, stabilisation, realignment
- augmentation
- Robust fixation with dual rods
- biologics
- Autograft and BMP
- expectedOutcome
- Variable, neural recovery unpredictable
Technical Considerations
Rod selection. Cobalt-chromium for high-stress constructs, for its better fatigue resistance. The diameter should be a minimum of 6.0mm, preferably 6.35mm for long constructs. Dual or accessory rods unload the primary rods and add redundancy, and are most protective when placed across an osteotomy site. Pre-contoured rods are preferred because they minimise cold working.
Connectors. Side-to-side connectors are preferred over offset connectors, and they belong away from the points of maximum stress. In long constructs place cross-links every 3-4 levels, and make sure every connector is fully seated and tightened.
Sacropelvic fixation. Constructs extending to the sacrum take bilateral iliac screws, with S2 alar-iliac screws as the alternative to traditional iliac screws. Osteoporotic sacral bone can be augmented with cement. The four-rod technique, dual rods to S1 and dual rods to the ilium, gives maximum rigidity.
Bone graft. Iliac crest autograft is the gold standard for posterior fusion, supplemented by local bone from decompression or decortication and by allograft for structural bulk. BMP-2 is off-label for posterior fusion (1.5mg/mL concentration). The management of the anterior column in revision is discussed in its own section below.
Postoperative Management
Bracing and activity. A TLSO for 12 weeks in high-risk revisions; no brace if the construct is robust and fixation solid. Mobilise early with physiotherapy. No bending, lifting or twisting for 12 weeks, a gradual return to activities at 3-6 months, and no high-impact activities until fusion is confirmed.
Surveillance.
- 6 weeks - radiographs, wound check, pain assessment
- 12 weeks - radiographs, discontinue the brace if appropriate, advance physiotherapy
- 6 months - radiographs, CT if fusion is unclear
- 1 year - radiographs, CT to confirm fusion
Optimisation. Continue the bone-health and medical measures set out under Prevention, with calcium at 1200mg daily, osteoporosis treatment (bisphosphonates or teriparatide), permanent smoking cessation, and optimisation of BMI and nutrition.
Complications
Recurrent rod fracture follows 5-15% of revisions. The risk factors are persistent pseudarthrosis, inadequate construct augmentation, uncorrected sagittal imbalance, continued smoking and untreated osteoporosis. Re-revision uses maximum biological and mechanical augmentation: consider anterior column support (ALIF, LLIF), dual rods are mandatory, and immobilisation is extended.
Infection complicates 3-8% of revision spine surgery, higher than primary surgery, with diabetes, obesity, revision surgery and prolonged operating time the risk factors. Prevention:
- Preoperative optimisation (glycaemic control, nutrition)
- Antibiotic prophylaxis - cefazolin 2g, with vancomycin if there is MRSA risk
- Meticulous technique, minimising tissue trauma and dead space
- Closed suction drainage
- Prophylactic negative pressure wound therapy in high-risk patients
Early infection (less than 3 months) is treated by debridement, irrigation and retention of hardware; late infection (greater than 3 months) by staged revision with removal, antibiotics and reconstruction. Antibiotics active against biofilm are used, such as rifampicin for staphylococci.
Proximal junctional kyphosis (PJK) occurs in 20-40% of adult deformity surgery, and more often in revisions. The risk factors are overcorrection of lumbar lordosis, a UIV at the inflection point (T10-L1), osteoporosis, and a rod fracture creating cantilever stress. Prevention:
- Gradual lordosis transition at the UIV
- Prophylactic vertebroplasty at the UIV and UIV+1
- Tether augmentation at the UIV
- Avoid ending the fusion at T10 (extend to T9)
An asymptomatic PJK is observed; a symptomatic or progressive one (greater than 20 degrees) is revised with cranial extension.
Neurological injury complicates 1-3% of revision surgery: nerve root injury from screw misplacement, cauda equina injury from canal compromise, or epidural haematoma. Revision surgery, deformity correction and epidural scarring are the risk factors. Prevention relies on intraoperative neuromonitoring (SSEPs, MEPs), triggered EMG for pedicle screw placement, meticulous technique during decompression and postoperative drain management. A deficit needs immediate recognition and urgent exploration and decompression, with revision decompression if the hardware is responsible. Steroids are controversial, with no proven benefit and potential harm.
Medical complications occur in 10-20%. Age greater than 65, comorbidities and long operating time raise the risk; prevention is preoperative optimisation and DVT prophylaxis, and management is multidisciplinary.
Prognosis and Outcomes
After revision. Fusion rates of 75-90% are reported, depending on bone quality and technique. When fusion is achieved, 70-80% have significant improvement in VAS pain scores, 60-70% return to baseline or improved function, and 65-75% are satisfied or very satisfied.
When the revision fails. With persistent pseudarthrosis, rod fracture recurs in 15-20%, pain becomes chronic and needs ongoing management, re-revision may be needed, and fewer than 40% are satisfied.
Predictors of success. Solid fusion is the most important. The rest:
- Correction of sagittal imbalance (SVA less than 50mm)
- Adequate rod augmentation (larger diameter, dual rods)
- Excellent bone quality, or treated osteoporosis
- Non-smoker, or successful cessation
Predictors of failure.
- More than 2 prior revisions
- Uncorrected positive sagittal balance
- Active infection
- Continued smoking
- Severe osteoporosis (T-score less than -3.0)
- Medical comorbidities (diabetes, obesity, renal failure)
At 5 years. Fusion rates are 85-95% after a first revision and 70-80% after multiple revisions. Adjacent segment disease affects 15-25%, similar to primary fusion, 10-20% need further revision, and 50-60% of working-age patients return to work.
At 10 years. If the fusion is solid, 80-90% of constructs last without further issues. Adjacent segment degeneration reaches a cumulative 30-40%, and satisfaction is maintained in 60-70%.
Prevention Strategies
Bone health before surgery. Screen with a DEXA scan all patients over 50 or with risk factors. Supplement vitamin D to a target greater than 30 ng/mL and calcium at 1200-1500mg daily, and treat osteoporosis with bisphosphonates or teriparatide. Preoperative teriparatide for 3 months can be considered; it is off-label, and the strength of its evidence for rod fracture itself is discussed under Controversies.
Medical optimisation.
- Smoking cessation for a minimum of 6 weeks, ideally 3 months
- Glycaemic control (HbA1c less than 7.0%)
- Nutritional assessment (albumin greater than 3.5 g/dL)
- Weight optimisation (BMI less than 35 if elective)
In theatre. The construct follows the rod, connector and cross-link principles set out under Technical Considerations, with dual rods for redundancy in high-risk cases. In osteoporotic bone use bicortical screw purchase, and cement augmentation in severe osteoporosis (T-score less than -3.0). Lumbosacral constructs greater than 3 levels take iliac screws, or S2-alar-iliac screws as the alternative. For the biology, use generous autograft from the iliac crest or local bone, decorticate the fusion bed thoroughly, add allograft for structural support, and use BMP-2 for high-risk patients (off-label).
After surgery. A TLSO for 12 weeks in high-risk patients, no bending, lifting or twisting for 3 months, a gradual return to activities over 6 months, and permanent restrictions on heavy labour. Serial radiographs look for early pseudarthrosis, CT at 12 months confirms fusion, and concerning findings prompt early intervention. Osteoporosis treatment continues for a minimum of 2 years, smoking cessation is permanent, and weight and chronic conditions (diabetes, nutrition) are managed.
Multi-Rod Constructs: Accessory and Satellite Rods
The primary construct. The standard pair of bilateral rods connects the pedicle and pelvic screws. In a long deformity construct this pair carries the whole cyclic load, and at a three-column osteotomy the strain concentrates on it, which is why the osteotomy is the dominant fracture site.
Accessory (supplemental) rods are placed alongside the primary rods to span the highest-stress zone, classically across a PSO or the lumbosacral junction, and are linked to them with side-by-side or "domino" connectors. They share the cyclic load and cut the peak strain on the primary rods at the osteotomy. That is the mechanism behind Buell's large protective effect (multivariable OR 0.062 for rod fracture or pseudarthrosis, with a confidence interval too wide for the magnitude itself to be relied on) and Lee's rod-fracture rate of 6% with accessory rods against 32% with 2 rods.
Satellite rods are a specific form of accessory rod fixed to their own dedicated screws, a second point of fixation at the levels adjacent to the osteotomy, rather than clamped to the primary rod through a connector. The satellite rod therefore carries load largely independently across the osteotomy. The four-rod construct at the lumbosacral junction is the sacropelvic version of the same idea (construct detail in the sacropelvic-fixation topic).
The caveat. More rods reduce peak rod strain, but Bourghli's multicentre data showed that multiple rods around the PSO did not lower rod fracture or pseudarthrosis compared with 2 rods, though coronal alignment and quality of life were better. Rod redundancy is not a substitute for solid fusion and proportional alignment.
Anterior Column Support: Load-Sharing to Protect the Rods
Why it matters. The posterior rods act largely as a tension band. An unsupported anterior column, whether a mobile L5-S1 disc or the defect created by a three-column osteotomy, throws more load onto them. An interbody cage (ALIF, TLIF or LLIF) at the lumbosacral junction, or at or adjacent to the osteotomy, shares the compressive load, unloads the posterior rods and enlarges the fusion surface, reducing both rod strain and pseudarthrosis.
The evidence. Lee found a rod-fracture rate of 7% with LLIF and a posterior column osteotomy against 42% with PSO, partly because the anterior column is supported and a three-column osteotomy is avoided. Buell's interbody cage at the osteotomy improved focal lordosis, giving better correction and a load-sharing surface, although that small series did not show a change in fracture rate.
In revision. Anterior column support is sometimes avoided in revision to minimise morbidity. That caution concerns the morbidity of an open anterior approach, not load-sharing itself. Modern practice increasingly achieves the same support through lower-morbidity interbody techniques (TLIF, LLIF), so the balanced position is to support the anterior column, especially at L5-S1 and around an osteotomy, by the least-morbid route available.
Guidelines, Registries & Global Practice
Global Epidemiology
- Rod fracture is a mechanical complication of instrumented fusion worldwide, not a single-population phenomenon; reported rates cluster between roughly 2% (short fusions) and over 25% (long deformity constructs with three-column osteotomy)
- The pedicle subtraction osteotomy site is consistently the dominant location across North American, European, and Asian series
- Time to failure typically spans 1-3 years (mean to distal junctional failure ~32 months)
- Aging populations are increasing the volume of long-construct deformity surgery, so absolute numbers of rod fractures are rising even where rates are stable
Side-by-Side Guidance and Consensus
- Position relevant to rod fracture
- Emphasise restoring proportional sagittal alignment (PI-LL match) and protecting three-column osteotomies with supplemental rods to reduce mechanical failure
- Position relevant to rod fracture
- Optimise modifiable risk before elective fusion: smoking cessation, bone health, glycaemic control; treat symptomatic non-union with revision
- Position relevant to rod fracture
- Cobalt-chrome favoured for long high-stress constructs; routine sacropelvic (iliac / S2-alar-iliac) fixation for lumbosacral deformity
- Position relevant to rod fracture
- Multicentre data underpin alignment-based prediction (e.g. GAP score) while cautioning that no single score fully predicts mechanical failure
There is broad agreement that rod fracture is best prevented by simultaneously addressing biology (fusion, bone quality) and biomechanics (alignment, rod material, supplemental fixation) rather than by any single intervention.
Registry and Implant Surveillance
- National implant registries and device regulators (e.g. medical-device vigilance schemes in the EU, UK, US, Australia) conduct post-market surveillance; clusters of rod failure are reportable as adverse events
- Registry signals have reinforced material choice (cobalt-chrome lower fracture rate) and construct-design trends (supplemental rods across osteotomies)
High- versus Limited-Resource Practice Variation
- Well-resourced settings: routine standing full-length imaging, metal-artifact-reduction CT for fusion assessment, intraoperative navigation/neuromonitoring, cobalt-chrome and multi-rod constructs, and pharmacological bone-health optimisation (bisphosphonates, denosumab, anabolic agents)
- Limited-resource settings: rod material and supplemental implants may be constrained by cost and availability; emphasis shifts to meticulous alignment correction, generous autograft, rigorous smoking cessation, and clinical/plain-radiograph surveillance where CT access is limited
- Universal, low-cost levers applicable everywhere: smoking cessation, nutrition and vitamin D optimisation, achieving solid fusion, and correcting sagittal balance
Controversies & Areas of Uncertainty
Rod fracture prevention is not a solved problem, and several apparently obvious interventions have softer evidence than commonly assumed.
Does adding rods always help? Accessory rods across an osteotomy reduce fracture and pseudarthrosis (Buell 2019, Lee 2021), yet a multicentre European cohort found no reduction with multiple rods around the PSO (Bourghli 2021); the data are set out under Multi-Rod Constructs.
Cobalt-chrome or titanium? Pooled data favour cobalt-chrome for lower rod fracture and better kyphosis restoration, but at the price of higher proximal junctional kyphosis (Shega 2020). Material choice trades one failure mode for another.
Can alignment scores predict failure? The GAP score did not reliably predict mechanical complications on external validation in complex deformity (Kwan 2021). Alignment proportion matters, but it does not capture bone quality, material or construct redundancy.
Observe the incidental fracture, or revise? A genuinely asymptomatic fracture with CT-confirmed solid fusion can be observed. Distinguishing solid fusion from early pseudarthrosis is imperfect even with metal-artefact-reduction CT, so surveillance must be active.
Anabolic agents and BMP. Teriparatide, abaloparatide and BMP are biologically attractive for high-risk hosts, but high-quality randomised evidence specifically for rod-fracture endpoints is limited. Their use is extrapolated from fusion and bone-density data and remains off-label in many jurisdictions.
MCQ Practice Points
Q: What are the common causes of spinal rod fractures?
A: Patient factors: Pseudarthrosis/nonunion (the dominant association - without solid fusion the rod bears load and fatigues), positive sagittal imbalance (increased stress on rods), long fusions, osteoporosis, obesity, smoking. Surgical factors: Rod undersizing, inadequate rod contouring, stress risers (notching during contouring), short fusion segments, failure to extend fusion to sacrum/pelvis in long constructs. Mechanical factors: Fatigue failure from cyclic loading before solid fusion; single rod constructs higher risk than dual rods. Most failures occur at lumbosacral junction or at the apex of corrected deformity.
Q: What is the relationship between pseudarthrosis and rod fracture?
A: Pseudarthrosis precedes rod fracture in most cases - without solid fusion, rods bear all load, leading to fatigue failure. Sequence: Nonunion develops (inadequate bone healing), rods subjected to cyclic loading without load-sharing, metal fatigue develops at stress concentration points, eventual fracture. Clinical presentation: Progressive pain, loss of correction, palpable hardware prominence. Radiographic signs: Lucency around screws, loss of lordosis/correction, visible rod discontinuity. Treatment: Address pseudarthrosis with revision fusion, bone grafting, and new instrumentation.
Q: What factors help prevent rod fracture in spinal deformity surgery?
A: Surgical technique: Use dual rods (load sharing), proper rod contouring (avoid notching), adequate rod diameter for patient size, avoid sharp bends (stress risers), ensure solid fixation at both ends of construct. Fusion optimization: Adequate decortication, appropriate bone graft (autograft, BMP), optimize fusion environment (no smoking, proper nutrition). Construct design: Extend to appropriate endpoints, consider interbody support (ALIF, TLIF, XLIF) for anterior column load sharing, address sagittal balance. Rod material: Cobalt-chrome has higher fatigue resistance than titanium but less MRI compatible.
Q: How should symptomatic rod fractures be managed?
A: Workup: Full-length standing radiographs, CT for pseudarthrosis assessment, consider bone scan or SPECT-CT if uncertain. Treatment: Almost always requires revision surgery - rod fracture indicates failed fusion. Surgical strategy: 1) Remove broken rods; 2) Explore fusion mass, identify nonunion; 3) Decorticate and bone graft nonunion sites; 4) Consider interbody fusion for anterior support; 5) New instrumentation with attention to rod size and contour; 6) Consider extending fusion if short segment. Address sagittal balance - persistent malalignment leads to recurrent failure.
Q: What is the role of different rod materials in preventing rod fracture?
A: Titanium alloys: More flexible (lower modulus), better bone-implant interface, MRI compatible, but lower fatigue strength - higher fracture risk in long constructs. Cobalt-chrome (CoCr): Higher modulus (stiffer), superior fatigue resistance - preferred for long constructs, deformity surgery; less MRI compatible. Stainless steel: Rarely used now; intermediate properties. Practical application: Use CoCr for adult deformity, long fusions, high-stress reconstructions; titanium acceptable for shorter fusions. Larger diameter rods (5.5-6.0mm) have greater fatigue resistance than smaller rods. Dual rod constructs distribute load.
Clinical Decision Scenarios
Practise clinical reasoning and management decisions out loud
“A 62-year-old woman presents 18 months after T10-pelvis fusion for adult degenerative scoliosis. She reports excellent pain relief for the first 12 months, but now has severe lower back pain (VAS 8/10) worse with activity. She denies radicular symptoms or neurological changes. Standing radiographs show bilateral rod fractures at L4-L5 level with loss of lumbar lordosis.”
“A 58-year-old man undergoes L2-S1 PSF for degenerative scoliosis with stenosis. At his 3-month follow-up, he reports mild improvement in leg pain but persistent back pain (VAS 6/10). Radiographs show a unilateral rod fracture at L5-S1 on the right side. CT demonstrates less than 25% bridging bone at L5-S1 and normal appearance at other levels. He is an active smoker.”
“A 70-year-old man is seen at routine 2-year follow-up after a T10-pelvis fusion with an L3 pedicle subtraction osteotomy for fixed sagittal imbalance. He is delighted with his outcome, walks 5 km daily, and has no back pain. Routine standing radiographs incidentally show a unilateral rod fracture just below the osteotomy. He asks whether he needs another operation.”
Rod Fracture Essentials
- Rod fracture = biomechanical failure indicating construct overload
- Most common cause is pseudarthrosis (rod bears 100% load without biological support)
- Typically presents as recurrent pain after pain-free interval
- Diagnosis confirmed with standing radiographs; CT scan assesses fusion status
- Management depends on fusion status: solid fusion may observe if asymptomatic, pseudarthrosis requires revision
Classification Quick Reference
- Type I (isolated fracture, solid fusion) - observe if asymptomatic
- Type II (fracture with pseudarthrosis) - revision mandatory
- Type III (fracture with deformity progression) - urgent revision with realignment
- Type IV (fracture with neurological compromise) - emergent revision with decompression
- Location matters: proximal junction (extend cranially), mid-construct (connector issue), distal junction (add iliac screws)
Risk Factors - FRACTURE Mnemonic
- F - Fusion length greater than 5 levels
- R - Rod diameter reduced (5.5mm)
- A - Alignment not corrected (positive SVA)
- C - Connectors offset
- T - Titanium in long construct
- U - Under-fixed sacrum
- R - Revision surgery
- E - Elderly with osteoporosis
- Three or more factors = very high risk requiring preventive strategies
Revision Principles - REVISION Mnemonic
- R - Rod upgrade (6.0mm or 6.35mm, dual rods)
- E - Extend fixation proximally and distally
- V - Vitamin D optimized (greater than 30 ng/mL)
- I - Iliac screws for sacropelvic constructs
- S - Stop smoking (absolute)
- I - Infection ruled out
- O - Osteobiologics (autograft + BMP)
- N - No sagittal imbalance (SVA less than 50mm)
- Address all eight factors for success
Investigation Protocol
- Standing full-spine radiographs (assess global alignment, identify fracture location, measure SVA and coronal balance)
- CT with metal artifact reduction (gold standard for fusion assessment - less than 50% bridging = pseudarthrosis)
- Labs: CRP/ESR (infection screening), vitamin D, calcium, bone health markers
- MRI if infection suspected or new radiculopathy
- SPECT-CT for equivocal fusion assessment
Surgical Strategy by Type
- Type I: Focal revision, exchange rod, upgrade size, retain screws if well-fixed
- Type II: Comprehensive revision, decorticate pseudarthrosis, autograft + BMP, extend fixation 1 level each direction, larger rods
- Type III: Full revision with osteotomy if needed, dual rods, satellite rods, maximum biological augmentation
- Type IV: Urgent decompression, stabilization, robust fixation
- All types: address root cause (fusion, alignment, biomechanics)
Construct Enhancement Options
- Rod diameter: upgrade 5.5mm to 6.0mm minimum, 6.35mm for long constructs
- Dual/accessory rods: unload primary rods and add redundancy (most protective across osteotomy sites)
- Cross-links: every 3-4 levels, side-to-side preferred
- Iliac screws: mandatory for lumbosacral constructs greater than 3 levels
- Four-rod technique: dual rods to S1, dual rods to ilium (maximum rigidity)
- Material: cobalt-chrome for high stress (better fatigue resistance than titanium)
Complications and Rates
- Recurrent rod fracture: 5-15% (persistent pseudarthrosis main cause)
- Infection: 3-8% (higher in revision than primary)
- PJK: 20-40% (overcorrection, UIV at inflection point)
- Neurological injury: 1-3% (epidural scarring, deformity correction)
- Medical complications: 10-20% (age, comorbidities, long OR time)
- Prevention: preop optimization, meticulous technique, neuromonitoring
Expected Outcomes
- Successful revision (fusion achieved): 70-80% pain relief, 75-90% fusion rate, 65-75% patient satisfaction
- Failed revision: 15-20% recurrent fracture, chronic pain, need for re-revision
- Positive predictors: solid fusion, SVA less than 50mm, dual rods, non-smoker, good bone quality
- Negative predictors: multiple prior revisions, smoking, uncorrected imbalance, osteoporosis, infection
Examiner Expectations
- Demonstrate systematic approach: diagnosis with appropriate imaging, differentiate from pseudarthrosis (often coexist), identify root cause
- Comprehensive revision plan addressing biomechanics AND biology
- Discuss biomechanical principles (stress concentration, fatigue failure, load-sharing)
- Quote evidence (PSO is the highest-risk site; cobalt-chrome fractures less than titanium; accessory rods across an osteotomy reduce failure)
- Emphasize prevention strategies
- Show judgment in observation versus revision decisions
Evidence Base
Lee KY et al. (2021) - Retrospective cohort, 178 patients
- Overall rod fracture rate 26% after deformity correction for lumbar degenerative kyphosis
- Pedicle subtraction osteotomy (PSO) drove fracture (42%) versus LLIF with posterior column osteotomy (7%)
- Titanium rods fractured in 49% vs 18% for cobalt-chrome; accessory rod technique fractured in only 6% vs 32% for 2-rod constructs
- Greater preoperative PI-LL mismatch was the crucial independent risk factor
Buell TJ et al. (2019) - Retrospective cohort, 55 patients, minimum 2-year follow-up
- Rod fracture at the extended-PSO site occurred in 18.2% and pseudarthrosis in 14.5%
- Accessory supplemental rods across the osteotomy significantly reduced rod fracture or pseudarthrosis (multivariable OR 0.062, p=0.013)
- Interbody cage at the osteotomy improved focal lordosis without changing fracture rate
Bourghli A et al. (2021) - Comparative cohort (European Spine Study Group), 67 patients
- Multiple-rod constructs across the PSO did NOT lower rod fracture or pseudarthrosis versus 2-rod constructs (p=0.95)
- Multiple-rod groups showed better coronal alignment and health-related quality of life (SRS-22, SF-36, ODI)
- Tempers the assumption that simply adding rods guarantees mechanical durability
McDonnell JM et al. (2022) - Retrospective cohort, 102 long-construct ASD patients
- Distal junctional failure occurred in 40.2%, with rod fracture the most common sign (20.0%); mean time to failure 32.4 months
- PSO (OR 27.3), postoperative SVA, and degree of lumbar lordosis correction were independent risk factors on multivariable analysis
Kwan KYH et al. (2021) - Scoli-RISK-1 secondary analysis (external validation), 159 patients
- External validation of the Global Alignment and Proportion (GAP) score in complex deformity (76% had three-column osteotomy)
- A higher GAP score was NOT associated with mechanical complications including rod fracture (AUC 0.60) in this cohort
- More disproportioned alignment was associated with worse ODI/SRS-22/SF-36 outcomes
Shega FD et al. (2020) - Systematic review and meta-analysis, 11 studies
- Incidence of rod fracture was significantly higher with titanium than cobalt-chrome rods (p=0.0001)
- Cobalt-chrome better restored thoracic kyphosis (p=0.009) but was associated with more proximal junctional kyphosis (p=0.0009)
- No difference in correction rate, lumbar lordosis, fatigue life, or bending stiffness on pooled analysis