Lunate Facet Depression | Axial Load Mechanism | Articular Restoration Critical
- Lunate facet is the concave articular surface articulating with the lunate
- Axial load drives lunate into radius like a punch into a die
- CT scan essential - plain radiographs underestimate depression depth
- Step-off greater than 2mm predicts post-traumatic arthritis
- Fragment-specific fixation with subchondral support is treatment goal
- “Die-punch is the 'hidden fracture' - easily missed on plain films
- “Always get CT for any high-energy distal radius fracture
- “Volar approach may miss dorsal die-punch - consider dorsal access
- “Bone graft often needed for metaphyseal void after elevation
THE DIE ANALOGY: The lunate acts as the "punch" and the radius as the "die" - axial load drives the hard lunate bone into the softer cancellous bone of the lunate facet, creating a depressed articular fragment. This is most common in high-energy injuries.
Plain radiographs significantly underestimate the degree of articular depression. CT with sagittal reconstructions is essential for surgical planning. Look for associated scapholunate ligament injury on axial cuts.
Greater than 2mm step-off of the articular surface is the threshold for surgical intervention. Studies show this predicts post-traumatic arthritis. Aim for anatomic reduction with step-off under 1mm.
Dorsal approach often needed to visualize and elevate die-punch fragments. Standard volar plating may miss dorsal depression. Fragment-specific fixation with K-wires, screws, or dorsal plates provides subchondral support.
- Displacement
- Under 2mm step-off
- Management
- Non-operative with close monitoring
- Key Consideration
- CT follow-up at 2 weeks to assess
- Displacement
- Over 2mm step-off
- Management
- ORIF - elevation and fixation
- Key Consideration
- May need bone graft for void
- Displacement
- Any displacement
- Management
- Fragment-specific fixation
- Key Consideration
- Address both components
- Displacement
- Significant depression
- Management
- Complex reconstruction
- Key Consideration
- Consider external fixation plus ORIF
- Displacement
- Variable
- Management
- Address ligament after bony fixation
- Key Consideration
- Assess with arthroscopy if uncertain
DIEDIE-PUNCH - Key Fracture Features
Hook:DIE-PUNCH tells you exactly what it is - the lunate punches into the radial die
GRAFTGRAFT - When to Use Bone Graft
Hook:GRAFT reminds you when and why bone graft is needed after elevation
Overview and Epidemiology
Definition
Die-punch fractures are depressed articular fractures of the lunate facet of the distal radius. The name derives from metalworking terminology - the lunate bone acts as the "punch" and the radius as the "die" when axial force is applied.
Epidemiology
- Incidence: Occur in approximately 20-30% of intra-articular distal radius fractures
- Age distribution: Bimodal - young adults with high-energy trauma and elderly with osteoporotic bone
- Mechanism: High-energy axial loading (falls from height, motor vehicle accidents)
- Associated injuries: Often part of complex distal radius fracture patterns
Clinical Significance
The lunate facet transmits 60% of axial load across the wrist. Depression of this articular surface leads to:
- Altered radiocarpal biomechanics
- Concentrated stress at step-off margins
- Progressive cartilage degeneration
- Post-traumatic radiocarpal arthritis

Die-punch fractures represent a significant subset of distal radius fractures that require careful evaluation.
Anatomy/Biomechanics
Articular Anatomy
Lunate Facet
- Location: Ulnar half of distal radius articular surface
- Shape: Concave in both sagittal and coronal planes
- Articulation: Articulates with proximal pole of lunate
- Load transmission: Carries approximately 60% of wrist axial load
- Sigmoid notch: Forms medial border, articulates with ulnar head
Scaphoid Facet
- Location: Radial half of distal radius articular surface
- Shape: Triangular, slightly convex in sagittal plane
- Articulation: Articulates with proximal scaphoid pole
- Interfacet ridge: Separates scaphoid and lunate facets
Subchondral Architecture
The cancellous bone beneath the lunate facet is organized in specific patterns:
- Subchondral plate: Dense cortical layer supporting cartilage
- Trabecular network: Oriented to resist axial compression
- Metaphyseal zone: Transition area with less dense bone
- Watershed zone: Area of reduced vascularity prone to necrosis
Blood Supply
Arterial Supply
- Radial artery: Supplies volar and dorsal surfaces
- Ulnar artery: Contributes to ulnar aspect
- Anterior interosseous artery: Supplies palmar metaphysis
- Posterior interosseous artery: Dorsal metaphyseal supply
Periosteal Network
- Extensive anastomotic network around metaphysis
- Generally good healing potential
- Comminuted fragments may have compromised supply
Relevant Soft Tissue Anatomy
Volar Structures
- Volar radiocarpal ligaments: May be disrupted in severe injuries
- Pronator quadratus: Overlies volar surface
- Flexor tendons: FCR passes radially, FPL centrally
Dorsal Structures
- Extensor compartments: Pass dorsally over radius
- Dorsal radiocarpal ligaments: Provide carpal stability
- Lister's tubercle: Landmark for EPL tendon
Understanding the anatomy is essential for planning surgical approach and fixation strategy.
Classification Systems
Sander and Medoff Classification
This is the most commonly used classification specific to die-punch fractures:
Type I - Simple Depression
- Central articular depression without significant comminution
- Single depressed fragment
- Intact peripheral rim
- Treatment: Elevation with K-wire or screw fixation
Type II - Depression with Split
- Depressed fragment with associated split component
- Sagittal or coronal split extending from depression
- More unstable than Type I
- Treatment: Fragment-specific fixation addressing both components
Type III - Comminuted
- Multiple comminuted fragments
- Metaphyseal extension of fracture
- Associated dorsal or volar cortical disruption
- Treatment: Complex reconstruction, often requires bone graft
The classification guides surgical approach and fixation strategy.
- Type
- Type I
- Key Feature
- Simple central depression
- Stability
- Relatively stable
- Type
- Type II
- Key Feature
- Depression with split
- Stability
- Unstable
- Type
- Type III
- Key Feature
- Comminuted with extension
- Stability
- Very unstable
- Type
- Type II
- Key Feature
- Classic die-punch pattern
- Stability
- Variable - IIA stable, IIB unstable
- Type
- C2/C3
- Key Feature
- Complete articular fracture
- Stability
- Unstable
Classification guides surgical planning and helps predict outcomes.
Clinical Assessment
History
Mechanism of Injury
- High-energy trauma: Fall from height, motor vehicle accident, motorcycle crash
- Sports injuries: Wakeboarding, snowboarding, contact sports with axial load
- Direct axial load: Distinguishes from rotational mechanisms
Key History Points
- Energy of injury (height of fall, vehicle speed)
- Position of wrist at impact
- Associated injuries suggesting polytrauma
- Hand dominance and occupational demands
- Pre-existing wrist pathology
Physical Examination
Inspection
- Swelling over distal radius - often less dramatic than displaced fractures
- Minimal deformity compared to displaced fracture patterns
- Ecchymosis - may be delayed
Palpation
- Diffuse tenderness over distal radius
- Point tenderness over dorsal lunate facet
- Assess for associated DRUJ tenderness
Range of Motion
- Significantly limited by pain in acute setting
- Loss of forearm rotation suggests DRUJ involvement
Neurovascular Assessment
- Median nerve: Check sensation in radial 3.5 digits
- Carpal tunnel symptoms: May develop with swelling
- Radial pulse: Usually preserved
- Capillary refill: Assess digital perfusion
Any high-energy mechanism warrants thorough polytrauma evaluation:
- Cervical spine assessment
- Ipsilateral upper extremity examination (elbow, shoulder)
- Chest and abdominal examination
- Associated carpal injuries (scapholunate, TFCC)
Special Tests
Watson Test (Scaphoid Shift)
- Assess for scapholunate ligament injury
- Common association in high-energy wrist trauma
DRUJ Stability
- Piano key test for ulnar head stability
- Compare to contralateral side
Grip Strength
- Usually not assessable acutely due to pain
- Baseline for rehabilitation assessment
Clinical examination alone is insufficient for diagnosis - imaging is essential.
Differential Diagnosis
A die-punch fragment can be subtle and is easily confused with, or coexist with, other distal radius and carpal injuries. The key distinguishing features are summarised below.
- Distinguishing features
- Central articular depression of the lunate facet from axial load; minimal external deformity
- Best discriminating test
- CT with sagittal reconstruction (quantifies step-off)
- Distinguishing features
- Dorsal angulation and shortening without articular step-off; classic dinner-fork deformity
- Best discriminating test
- Lateral radiograph; CT shows intact joint surface
- Distinguishing features
- Small volar-ulnar marginal fragment, risk of volar carpal subluxation; distal to the watershed line
- Best discriminating test
- Lateral radiograph and sagittal CT (volar fragment, carpal translation)
- Distinguishing features
- Widened SL interval, DISI on lateral; positive Watson test; often coexists with die-punch
- Best discriminating test
- PA radiograph (SL gap), MRI or wrist arthroscopy
- Distinguishing features
- Disrupted Gilula arcs, lunate tilt on lateral; high-energy carpal disruption
- Best discriminating test
- Lateral radiograph (spilled-teacup sign), CT
- Distinguishing features
- Loss of forearm rotation, DRUJ tenderness; ulnar-sided injury without radial articular depression
- Best discriminating test
- Clinical DRUJ stability, CT in both rotations
FACETFACET - Lunate Facet Assessment
Hook:FACET reminds you to focus on the lunate FACET and CT assessment
Investigations
Plain Radiographs
Standard Views
- PA view: May show subtle articular irregularity
- Lateral view: Can reveal dorsal cortical comminution
- Oblique views: Additional perspective on fracture lines
Radiographic Signs
- Double cortical sign: Overlapping depressed and non-depressed articular surfaces
- Loss of normal concavity: Lunate facet appears flattened
- Associated fracture lines: Sagittal or coronal splits
Medoff defined specific lunate-facet radiographic parameters that let you detect and quantify a die-punch on the lateral view before accepting any reduction - examiners expect you to name and define them, not just say "CT is mandatory":
- Teardrop angle: on the true lateral, the volar rim of the lunate facet projects as a teardrop-shaped density; the angle between the central axis of the teardrop and the central axis of the radial shaft is normally about 70 degrees. A teardrop angle that falls (the teardrop rotating dorsally, toward the shaft axis) signals a dorsally-rotated or depressed lunate facet - i.e. a malreduced die-punch.
- AP distance: the distance between the centre of the radial-shaft axis and the centre of the lunate-facet (teardrop), normally roughly 20 mm; it shortens when the facet is impacted/translated, flagging loss of volar buttress.
- Articular gap/step: the height difference between the lunate-facet articular surface and the adjacent scaphoid facet across the interfacet ridge.
Why it matters: the teardrop is your lateral-radiograph early-warning for lunate-facet malposition; a restored teardrop angle of about 70 degrees and a normal AP distance are the targets that tell you the facet is anatomically reduced (confirmed on CT). A flattened teardrop on a post-fixation film should prompt CT before you accept the result.
Limitations
- Underestimates depression: Often by several millimeters
- Misses pure articular injuries: Depression without cortical break
- Cannot assess comminution: Overlapping fragments obscure detail
CT Scanning
Indications (MANDATORY for Die-Punch)
- Any suspected articular involvement
- High-energy mechanism
- Preoperative planning for all operative cases
- Assessment of reduction post-operatively
Protocol
- Slice thickness: 1mm or less
- Reconstructions: Sagittal, coronal, and 3D
- Compare contralateral: For subtle depressions
Key CT Findings
- Step-off measurement: Quantify articular incongruity
- Fragment size: Assess for fixation options
- Comminution degree: Plan for bone graft need
- Dorsal vs volar location: Determines surgical approach
MRI
Indications
- Suspected ligamentous injury
- Scapholunate assessment when arthroscopy unavailable
- TFCC evaluation
Findings
- Ligament disruption
- Bone marrow edema pattern
- Cartilage injury assessment
Arthroscopy
Diagnostic Role
- Gold standard for ligament assessment
- Assess articular surface reduction
- Evaluate TFCC and intercarpal ligaments
Therapeutic Role
- Assist reduction visualization
- Debridement of loose bodies
- Ligament repair or pinning
Investigations are summarized in the table below.
- Role
- Initial screening
- Advantages
- Quick, available, low cost
- Limitations
- Underestimates depression
- Role
- Definitive assessment
- Advantages
- Quantifies step-off, shows comminution
- Limitations
- Radiation, cost
- Role
- Soft tissue evaluation
- Advantages
- Ligament and cartilage assessment
- Limitations
- Time, cost, less for bone detail
- Role
- Gold standard
- Advantages
- Direct visualization, therapeutic
- Limitations
- Invasive, requires expertise
CT is mandatory for surgical planning in die-punch fractures.


Management Algorithm
This is the single most important conceptual point of the whole topic, and it is frequently the examiner's "why" question. Closed reduction and external fixation work by ligamentotaxis - traction tightens the capsule and the volar/dorsal radiocarpal ligaments, which pull their attached peripheral rim fragments back into place. The central, impacted die-punch fragment has NO capsular or ligamentous attachment - it has been punched down into the metaphyseal cancellous bone and is held there by impaction alone. Traction therefore cannot elevate it; the depressed fragment simply sits at the bottom of the joint while the rim reduces around it, giving a deceptively acceptable traction radiograph that still has a central step.
The consequences flow directly from this:
- The die-punch must be openly (or arthroscopically) disimpacted and levered up to the level of the surrounding cartilage - it will not come up with traction.
- Elevation leaves a metaphyseal void beneath the now-restored surface, so it must be structurally supported - cancellous bone graft/substitute plus subchondral fixation (a "raft" of subchondral screws or a buttress plate) to stop it dropping back down.
- External fixation or a spanning construct alone is inadequate for a true central die-punch - it relies on the very ligamentotaxis that does not reach this fragment.
Exam point: the central depressed die-punch fragment is not reducible by ligamentotaxis (no soft-tissue attachment) - it requires direct elevation, void grafting and subchondral support, which is precisely why an isolated traction/external-fixation strategy fails here.
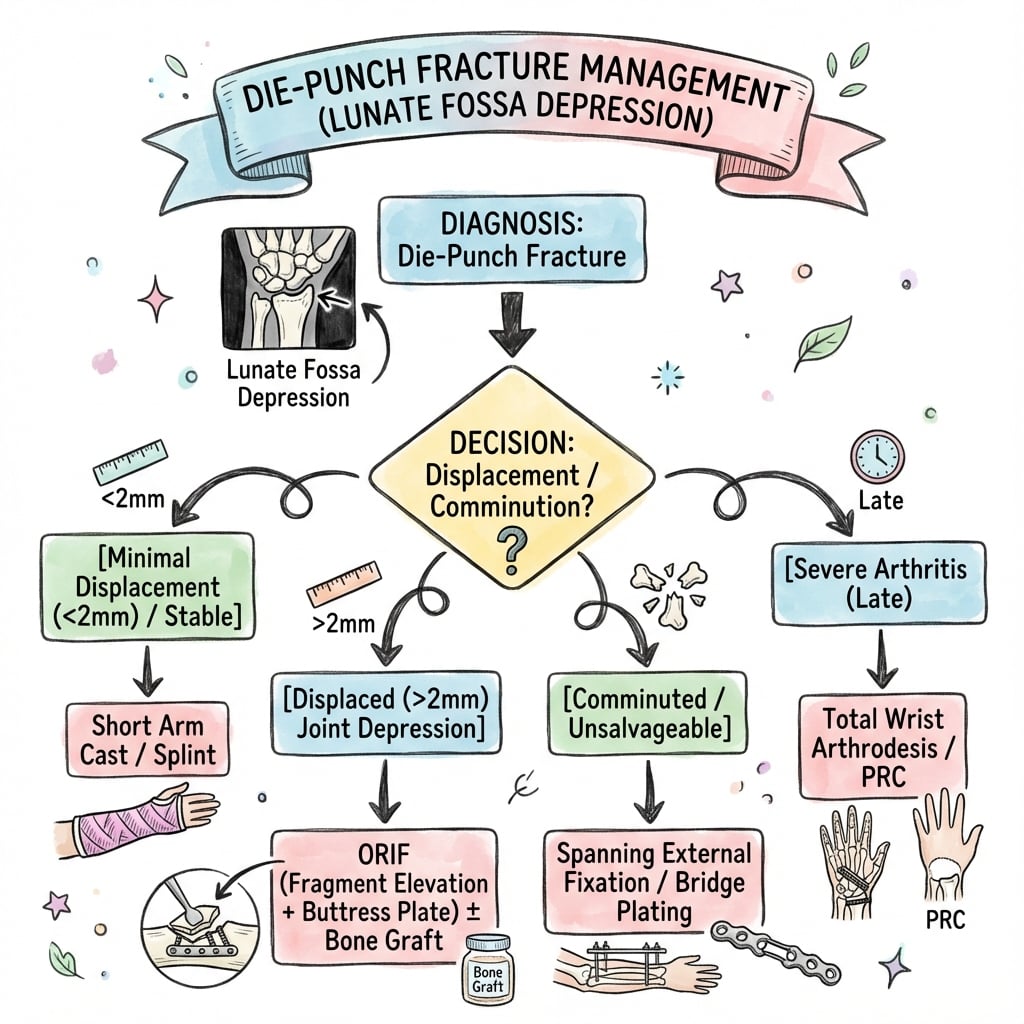
Non-Operative Management
Indications
- Articular step-off under 2mm on CT
- Minimal displacement of fragments
- Low functional demand patient
- Medical comorbidities precluding surgery
Protocol
Immobilization
- Short arm cast or splint
- Duration: 4-6 weeks
- Wrist in neutral position
Follow-Up
- Week 1-2: Clinical review, repeat radiographs
- Week 2-3: CT scan to assess for secondary displacement
- Week 4-6: Cast removal, begin ROM exercises
Red Flags for Secondary Surgery
- Increasing step-off on follow-up imaging
- Development of greater than 2mm displacement
- Persistent malposition despite casting
Expected Outcomes
- Good results if step-off maintained under 2mm
- 85% satisfactory outcomes in well-selected patients
- Monitor for late collapse requiring delayed intervention
Non-operative management requires vigilant follow-up to detect secondary displacement.
The management algorithm considers both fracture characteristics and patient factors.
Surgical Technique
Dorsal Approach for Die-Punch ORIF
Patient Positioning
- Supine with arm table
- Tourniquet on upper arm (250-300 mmHg)
- Consider tower for traction assistance
Incision and Exposure
Skin Incision
- Dorsal longitudinal incision over Lister's tubercle
- Approximately 5-6 cm centered on wrist
- Extend proximally as needed for fragment access
Deep Dissection
- Incise extensor retinaculum between 3rd and 4th compartments
- Identify and protect EPL tendon
- Retract EDC ulnarly, EPL radially
- Elevate capsule as L-shaped flap (ligament-sparing if possible)
Fracture Reduction
Visualization
- Direct view of lunate facet articular surface
- Assess depression depth and fragment size
- Identify any loose osteochondral fragments
Elevation Technique
- Use small periosteal elevator or dental pick
- Lever fragment through metaphyseal window if needed
- Reduce to level of adjacent cartilage
- Confirm reduction with direct vision and fluoroscopy
Bone Grafting
- Assess metaphyseal void after elevation
- Pack cancellous graft (autograft or substitute)
- Graft provides subchondral support to prevent collapse
Fixation
K-wire Fixation
- 1.1 or 1.25 mm K-wires
- Capture reduced fragment to metaphysis
- Use 2-3 wires for rotational control
Dorsal Plate Fixation
- Low-profile dorsal plate
- Subchondral screws support articular fragment
- Consider locking screws for osteoporotic bone
Closure
- Repair capsule
- Close retinaculum loosely to allow tendon glide
- Standard skin closure
- Splint in neutral position
The dorsal approach provides excellent visualization of the die-punch fragment.
Surgical approach should be tailored to the specific fracture pattern and associated injuries.
Complications
Intraoperative Complications
Iatrogenic Fracture
- Risk during fragment elevation
- Prevention: Gentle technique, use appropriate instruments
- Management: Additional fixation if occurs
Screw Penetration
- Joint penetration causes arthritis
- Prevention: Measure carefully, check with fluoroscopy
- Management: Remove and replace with shorter screw
Tendon Injury (Dorsal Approach)
- EPL most at risk
- Prevention: Careful retraction, protect with vessel loops
- Management: Primary repair if recognized
Early Complications
Wound Complications
- Infection: 1-3% - IV antibiotics, debridement if deep
- Dehiscence: More common dorsally - local wound care
- Hematoma: Evacuate if significant
Hardware Problems
- K-wire migration: Remove early if backing out
- Screw loosening: More common in osteoporotic bone
- Loss of reduction: May require revision surgery
Nerve Injury
- Median nerve: Carpal tunnel syndrome - decompress if needed
- Superficial radial nerve: Paresthesias - usually resolve
- PIN (posterior interosseous): Motor weakness - observe
Late Complications
Post-Traumatic Arthritis
- Most significant long-term complication
- Related to residual step-off greater than 2mm
- May require salvage procedures (fusion, arthroplasty)
Malunion
- Articular malunion causes arthritis
- Extra-articular component may cause functional limitation
- Consider corrective osteotomy if symptomatic
Hardware Irritation
- Dorsal plates often require removal
- Extensor tenosynovitis from prominent hardware
- Plan for potential second surgery
CRPS (Complex Regional Pain Syndrome)
- Incidence 5-10% after distal radius fractures
- Early recognition and treatment essential
- Multidisciplinary approach required
- Prevention
- Anatomic reduction, CT confirmation
- Management
- Consider revision if over 2mm
- Prevention
- Careful measurement, fluoroscopy
- Management
- Remove and replace screw
- Prevention
- Sterile technique, prophylactic antibiotics
- Management
- Antibiotics, debridement
- Prevention
- Low-profile implants, proper placement
- Management
- Hardware removal once healed
- Prevention
- Early mobilization, pain management
- Management
- Multidisciplinary team
The key to avoiding complications is anatomic reduction with stable fixation.
Postoperative Care
Immediate Postoperative Care (0-2 Weeks)
Immobilization
- Volar resting splint in neutral wrist position
- Include forearm in splint
- Allow immediate finger motion
Elevation
- Hand above heart level when resting
- Critical for first 72 hours to reduce swelling
- Use pillows or sling when sitting
Pain Management
- Multimodal analgesia approach
- Ice application for swelling
- Elevate extremity
Monitoring
- Neurovascular checks every 4 hours initially
- Watch for signs of compartment syndrome
- Early recognition of infection
Wound Care
Dressing Changes
- First change at 48-72 hours by surgeon
- Assess wound for healing
- K-wire sites need special attention if used
Suture/Staple Removal
- 10-14 days postoperatively
- Earlier if wound well-healed
- Apply steri-strips for additional support
Rehabilitation Phases
Phase 1: Protection (Weeks 0-2)
- Active finger motion (full fist, extension)
- Shoulder and elbow ROM
- Edema control
Phase 2: Early Motion (Weeks 2-6)
- Begin wrist flexion/extension
- Start forearm rotation
- Removable splint between exercises
- Continue edema management
Phase 3: Progressive Loading (Weeks 6-12)
- Progress to functional activities
- Light grip strengthening
- Discontinue splint (usually at week 6)
- Progress to normal ADLs
Phase 4: Return to Function (Weeks 12+)
- Progressive strengthening
- Sport-specific activities
- Work hardening if needed
- May take 6 months for full recovery
Follow-Up Schedule
- Assessment
- Wound check, suture removal
- Imaging
- Optional
- Assessment
- ROM assessment
- Imaging
- Radiographs
- Assessment
- Healing assessment, K-wire removal
- Imaging
- Radiographs
- Assessment
- Functional outcome
- Imaging
- Optional CT if concerns
- Assessment
- Final outcome
- Imaging
- As needed
- Assessment
- Long-term surveillance
- Imaging
- If symptomatic
Rehabilitation should be tailored to individual patient needs and fracture complexity.
Outcomes and Prognosis
Functional Outcomes
Range of Motion Recovery
- Wrist flexion: 80-90% of contralateral by 6 months
- Wrist extension: 85-95% of contralateral
- Forearm rotation: Usually full recovery
- Grip strength: 80% of contralateral by 12 months
Patient-Reported Outcomes
- DASH scores typically return to near-normal by 12 months
- Patient satisfaction correlates with articular reduction quality
- Return to previous activity level in 80-90% of well-treated cases
Prognostic Factors
Favorable Factors
- Step-off under 1mm achieved at surgery
- Younger patient
- Isolated injury
- Compliant with rehabilitation
- Good bone quality
Unfavorable Factors
- Residual step-off greater than 2mm
- Significant comminution
- Associated ligamentous injury
- Osteoporotic bone
- High-energy mechanism with soft tissue injury
Arthritis Risk
Development of Post-Traumatic Arthritis
The risk is directly related to residual articular incongruity:
- Arthritis Risk
- 10-15%
- Timeline
- 10+ years
- Arthritis Risk
- 30-40%
- Timeline
- 5-10 years
- Arthritis Risk
- 70-90%
- Timeline
- 2-5 years
Salvage Options for Arthritis
- Wrist arthroscopy: Debridement for early arthritis
- Partial wrist fusion: Four-corner fusion preserving some motion
- Total wrist fusion: Reliable pain relief, loss of motion
- Proximal row carpectomy: Motion-preserving salvage
- Total wrist arthroplasty: Selected patients
Return to Activity
Work
- Sedentary work: 2-4 weeks
- Light manual work: 6-8 weeks
- Heavy manual work: 12-16 weeks
Sports
- Non-contact sports: 8-12 weeks
- Contact sports: 4-6 months
- High-impact activities: 6+ months
The key predictor of outcome is the quality of articular reduction achieved.
Guidelines, Registries & Global Practice
Global Epidemiology
Distal radius fractures are among the most common fractures worldwide, with a bimodal distribution affecting children and the elderly while remaining significant in young adults. Reported population data over recent decades show an overall rising prevalence in both paediatric and elderly groups (Nellans, Kowalski and Chung, Hand Clin 2012, PMID 22554654). Die-punch (lunate-facet depression) patterns cluster in the high-energy, axial-load young-adult subgroup and within complete intra-articular (AO 23-C) fractures. Knirk and Jupiter studied 43 such intra-articular fractures in 40 young adults (mean age 27.6 years) and reported radiographic post-traumatic arthritis in 65% overall (PMID 3722221).
Major Guidelines, Side by Side
The single highest-quality message across guidelines is that for operatively treated distal radius fractures, fixation technique should follow the fracture pattern rather than any one implant, because randomised evidence shows no clinical or radiographic difference between techniques beyond 3 months.
- Key recommendation relevant to die-punch
- Fixation technique should be driven by fracture pattern (no difference between techniques after 3 months); age ~65 as a proxy for functional demand in the operative-vs-nonoperative decision
- Evidence level
- Strong / moderate
- Key recommendation relevant to die-punch
- CT for intra-articular fractures where it will change management; surgery for unacceptable displacement; early specialist input and hand therapy
- Evidence level
- Consensus / moderate
- Key recommendation relevant to die-punch
- Three-column / column-and-fragment concept; anatomic articular reduction with subchondral support; CT for articular planning
- Evidence level
- Expert consensus
- Key recommendation relevant to die-punch
- Restore articular congruity (target step-off under 2mm) and stable fixation enabling early motion; individualise by pattern and demand
- Evidence level
- Consensus
Registry & Outcome Evidence
There is no dedicated international registry for die-punch fractures specifically; high-level outcome data derive from intra-articular distal radius fracture cohorts and randomised trials feeding the guidelines above. The enduring registry-equivalent evidence remains the dose-response relationship between residual articular incongruity and arthritis first quantified by Knirk and Jupiter (91% arthritis with incongruity vs 11% with a congruous joint, PMID 3722221), reinforced by imaging studies showing CT changes the operative plan (Harness et al., JBJS Am 2006, PMID 16757766).
Practice Variation
- Imaging access: CT with sagittal/coronal and 3D reconstruction is routine in high-resource centres for any suspected articular involvement; in limited-resource settings reliance on plain films persists and risks underestimating depression.
- Implant availability: fragment-specific systems, low-profile dorsal plates and volar locking plates are widely available in high-income settings; elsewhere a single volar locking plate or K-wire constructs predominate, which may inadequately support an isolated dorsal die-punch.
- Rehabilitation: hand-therapy-led early mobilisation is standard where services exist; regional and rural patients may depend on telehealth or staged review.
- Surgical threshold: the under-2mm articular step-off threshold is near-universally cited, but the operative-versus-nonoperative decision is increasingly individualised by patient age and functional demand rather than radiographic parameters alone, consistent with the AAOS/ASSH 2020 CPG.
Viva Scenarios
Clinical Decision Scenarios
Practise clinical reasoning and management decisions out loud
“A 35-year-old man presents after falling 3 meters from a ladder onto an outstretched hand. Plain radiographs show a distal radius fracture with subtle articular involvement. How do you evaluate this injury?”
“CT confirms a Type II Sander-Medoff die-punch fracture with 4mm articular depression and a sagittal split component. How do you plan your surgical approach?”
“Six months after ORIF of a die-punch fracture, your patient complains of progressive wrist pain and stiffness. Radiographs show early degenerative changes at the radiocarpal joint. How do you manage this?”
MCQ Practice Points
Q: What is the most important imaging modality for assessing die-punch fractures? A: CT scanning with sagittal reconstructions is mandatory. Plain radiographs underestimate articular depression by 2-3mm on average and frequently miss die-punch components entirely.
Q: What articular step-off threshold is associated with post-traumatic arthritis development? A: Greater than 2mm step-off is the critical threshold. Knirk and Jupiter demonstrated 91% arthritis rate with step-off over 2mm versus 11% with step-off under 1mm.
Q: Which articular surface is affected in a die-punch fracture? A: The lunate facet of the distal radius. The lunate acts as the punch driving into the softer cancellous bone of the radial die during axial loading.
Q: What surgical approach best allows direct visualization of a dorsal die-punch fragment? A: The dorsal approach through the third and fourth extensor compartments. This provides direct visualization of the lunate facet, whereas volar approaches rely on fluoroscopic guidance for dorsal fragments.
Q: Why is bone grafting often required after die-punch fragment elevation? A: Elevation of the depressed fragment creates a metaphyseal void. Without bone graft or substitute to fill this void, the elevated fragment lacks subchondral support and may undergo secondary collapse.
Q: What percentage of wrist axial load is transmitted through the lunate facet? A: Approximately 60% of axial load crosses the wrist through the lunate facet. This high load-bearing function explains why articular incongruity leads to rapid degenerative changes.
Understanding these key concepts will help with exam success.
Definition & Mechanism
- Depression of lunate facet of distal radius
- Axial load mechanism - lunate punches into radius
- High-energy injury pattern
- Part of complex distal radius fracture spectrum
- Lunate facet carries 60% of wrist axial load
Imaging Pearls
- CT mandatory - radiographs underestimate by 2-3mm
- Sagittal reconstructions essential for step-off measurement
- Look for double cortical sign on plain films
- Assess for associated SL injury on CT
Treatment Algorithm
- Under 2mm step-off: consider non-operative
- Over 2mm step-off: ORIF indicated
- Dorsal approach for direct visualization
- Bone graft metaphyseal void after elevation
Classification (Sander-Medoff)
- Type I: Simple depression
- Type II: Depression with split
- Type III: Comminuted with extension
- Guides approach and fixation strategy
Surgical Pearls
- Direct visualization superior to fluoroscopy alone
- Subchondral screw support for fragment
- Fill metaphyseal void to prevent collapse
- Fragment-specific fixation for complex patterns
- Assess DRUJ and carpal ligaments
Complications & Outcomes
- Arthritis risk correlates with step-off
- Over 2mm: 70-90% arthritis at 5 years
- Under 1mm: 10-15% arthritis at 10 years
- CRPS 5-10% of distal radius fractures
Evidence Base
- Retrospective series of 43 fractures in 40 young adults (mean age 27.6 years)
- Arthritis developed in 91% of joints that healed with residual radiocarpal incongruity versus 11% of congruous joints
- Accurate articular restoration was the single most critical determinant of outcome
- The depressed die-punch fragment was responsible for residual incongruity in 75% of incongruous joints and was anatomically reduced by closed means in only 49%
- Defined the four-part articular fracture and the displacement of the medial complex
- Melone Type II describes the classic unstable die-punch pattern
- Subdivided into reducible (IIA) and irreducible rotated (IIB) medial complex
- Emphasised that precise reduction of the key medial fragments is essential
- Superficial assessment of standard PA and lateral films frequently misses the injury pattern and residual articular incongruity
- Defined teardrop angle, AP distance and articular separation as key radiographic parameters of the lunate facet
- Recognition of these landmarks is required to detect subtle articular disruption before accepting a reduction
- Accurate identification of the injury pattern has become essential as anatomic restoration techniques have advanced
- Four observers evaluated 30 intra-articular distal radius fractures
- Adding 3D CT to 2D CT improved both intra- and inter-observer agreement on articular comminution and fragment number
- Sensitivity and accuracy of identifying fracture characteristics (versus intra-operative findings) improved with 3D imaging
- 3D CT significantly increased decisions for an open approach (p less than 0.05) and combined dorsal-and-volar exposure (p less than 0.001)
- Articulated the three-column model of the distal radius as the basis for surgical planning
- Preoperative CT is particularly useful for clarifying complex articular fractures
- Complex articular patterns are heterogeneous and require an individualised, fragment-specific strategy
- Stable fixation with low-profile precontoured plates enables early functional rehabilitation
- Distal radius fractures are among the most common fractures, with a bimodal age distribution affecting children and the elderly while still significantly affecting young adults
- Data over the preceding 40 years show an overall rising prevalence in both paediatric and elderly populations
- High-energy axial-load mechanisms predominate in the young-adult subgroup that sustains die-punch patterns
- Understanding the epidemiology informs both treatment and prevention strategies
- Summarises the 2020 AAOS/ASSH Clinical Practice Guideline on distal radius fracture management
- Strong evidence shows no difference in clinical or radiographic outcome by fixation technique beyond 3 months, so technique should be driven by fracture pattern
- Age 65 serves as a proxy for functional activity guiding the surgical-versus-nonsurgical decision
- Supervised therapy, arthroscopic assistance and routine post-fixation radiographs should be used on a case-by-case basis
The evidence supports anatomic reduction with stable fixation and bone grafting as needed, with imaging and implant selection driven by the articular fracture pattern.