Rim vs Body | Bone Loss Assessment Critical | Fix If Unstable
- Bone loss over 20-25% of glenoid width causes recurrent instability
- Most glenoid fractures occur with anterior dislocation (bony Bankart)
- Ideberg classification describes fracture patterns through glenoid body
- CT with 3D essential for bone loss quantification and surgical planning
- Off-track lesion assessment combines glenoid bone loss with Hill-Sachs
- “25% glenoid bone loss = inverted pear glenoid on en-face view
- “Glenoid track concept: On-track Hill-Sachs engages in ROM, off-track does not
- “Bony Bankart larger than 20-25% needs bone augmentation
- “Posterior glenoid fractures associated with posterior instability
20-25% glenoid bone loss is the critical threshold. Below this, soft tissue repair may suffice. Above this, bone augmentation (Latarjet, bone graft) is needed as soft tissue alone will fail.
3D CT with subtraction of humeral head allows accurate measurement of glenoid bone loss. Use the best-fit circle method or measure against contralateral glenoid. AP X-ray underestimates bone loss.
85% occur with dislocation. Always assess for Hill-Sachs lesion (glenoid track concept), rotator cuff tear (especially older patients), and neurovascular injury (axillary nerve).
The goal of treatment is to restore stability, not just anatomic reduction. A well-reduced but unstable glenoid will fail. Address bone loss and soft tissue deficiency together.
- Pattern
- Small bony Bankart
- Treatment
- Arthroscopic Bankart repair
- Key Consideration
- May include fragment if reducible
- Pattern
- Moderate rim defect
- Treatment
- Arthroscopic with anchors vs open Bankart
- Key Consideration
- Consider bone block if contact sport
- Pattern
- Significant bone loss
- Treatment
- Latarjet or bone graft (Eden-Hybinette)
- Key Consideration
- Soft tissue alone will fail
- Pattern
- Severe bone loss
- Treatment
- Latarjet preferred
- Key Consideration
- Inverted pear glenoid configuration
- Pattern
- Glenoid body fracture
- Treatment
- ORIF (posterior approach usually)
- Key Consideration
- Goal is articular congruity
TRACKGlenoid Track Concept
Hook:Keep the shoulder on TRACK to prevent re-dislocation!
Overview and Epidemiology
Glenoid fractures represent a spectrum from small rim avulsions (bony Bankart) to complex body fractures (Ideberg types). Understanding the distinction between rim fractures causing instability and body fractures affecting articular congruity is essential.
- Rim fractures (bony Bankart): Associated with anterior instability, bone loss is the critical factor
- Body fractures (Ideberg): Articular fractures affecting joint congruity, require reduction and fixation
- Anterior dislocation: most common mechanism for rim fractures
- Direct trauma: high-energy impact to shoulder
- FOOSH: fall with axial loading through shoulder
- Sports injury: contact sports, rugby, American football
Bony Bankart is an avulsion of the anteroinferior glenoid rim with the labrum and capsule attached - the key issue is instability. Body fractures (Ideberg II-V) are articular fractures where joint congruity and stability both matter.
Anatomy and Biomechanics
Glenoid anatomy:
- Shallow, pear-shaped articular surface
- Inferior width: approximately 25mm
- Superior-inferior height: approximately 35mm
- Retroversion: 5-7° relative to scapular body
- Inferior tilt: varies but affects stability
The normal glenoid is pear-shaped (wider inferiorly). Loss of anterior bone changes this to an inverted pear - a sign of significant bone loss causing instability.
Stability mechanisms:
- Bony congruity: glenoid provides 50% of stability
- Labrum: deepens socket by 50%
- Capsule and ligaments: static restraints
- Rotator cuff: dynamic stabilizers
Bone loss effects:
- Stability Effect
- Minimal effect on stability
- Surgical Implication
- Soft tissue repair adequate
- Stability Effect
- Increased recurrence risk
- Surgical Implication
- Consider bone augmentation in athletes
- Stability Effect
- High recurrence with soft tissue repair
- Surgical Implication
- Bone augmentation required
Glenoid track concept:
- Glenoid track = 0.83 x inferior glenoid width - bone loss
- Hill-Sachs interval = medial to lateral width of Hill-Sachs
- If Hill-Sachs interval is greater than glenoid track, it is off-track (will engage)
- Off-track lesions need to be addressed (remplissage, bone graft, arthroplasty)
Classification Systems
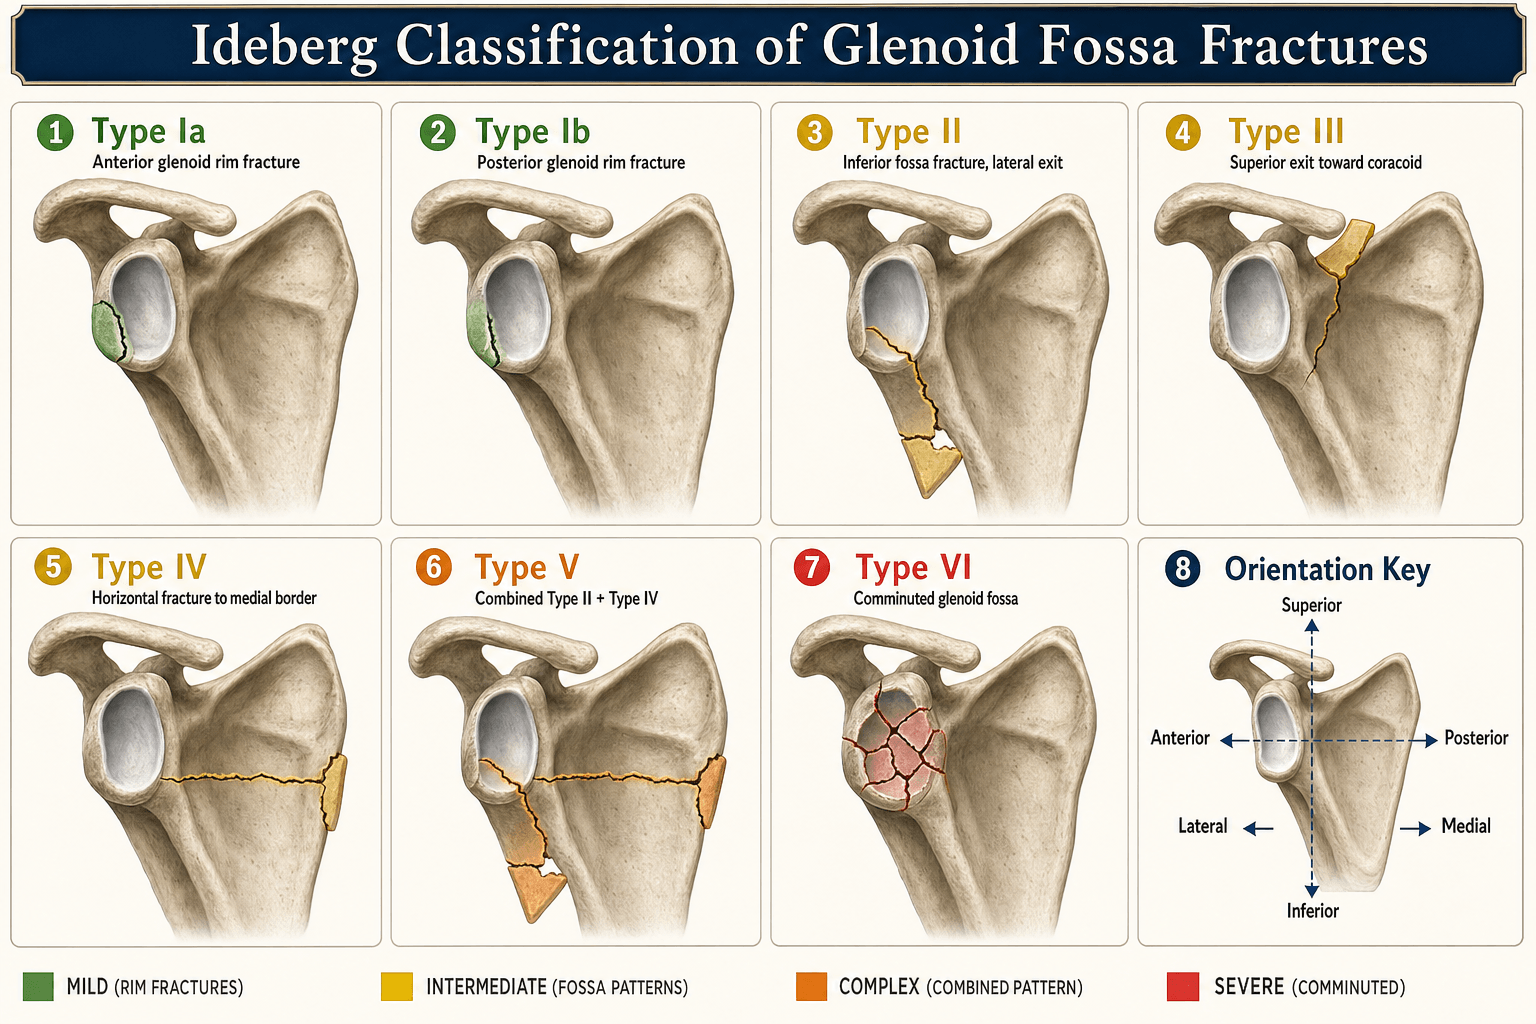
Ideberg Classification (1984) - Glenoid fossa fractures
- Description
- Anterior rim fracture
- Fracture Line
- Avulsion anteroinferior
- Description
- Posterior rim fracture
- Fracture Line
- Avulsion posterior
- Description
- Transverse through glenoid
- Fracture Line
- Exits lateral scapula border
- Description
- Oblique through superior glenoid
- Fracture Line
- Exits suprascapular notch area
- Description
- Horizontal through body
- Fracture Line
- Exits medial scapula border
- Description
- Combination Type I + Type IV
- Fracture Line
- Combined rim and body
- Description
- Comminuted (added later)
- Fracture Line
- Severe comminution
Type I (rim fractures) are fundamentally about instability - treat based on bone loss. Types II-V are about articular congruity - treat based on displacement and joint surface.
IDEALSIdeberg Classification
Hook:IDEALS classification helps you describe glenoid body fractures!
Clinical Assessment
- Mechanism: dislocation, direct trauma, sport
- Number of prior dislocations
- Hand dominance and sport level
- Prior shoulder surgery
- Occupation and functional demands
- Inspection: contour, swelling, bruising
- Palpation: bony landmarks
- ROM: usually limited acutely
- Instability tests: apprehension, load-and-shift
- Neurovascular: axillary nerve
The axillary nerve is at risk with anterior dislocations and glenoid fractures. Test:
- Sensation: regimental badge area (lateral shoulder)
- Motor: deltoid function (when pain allows) Document neurovascular status clearly before and after any manipulation.
Key examination findings:
- Apprehension test positive with anterior instability
- Load-and-shift test may demonstrate increased translation
- Palpable bony defect sometimes possible
- Associated rotator cuff weakness (especially over age 40)
CIRCLEGlenoid Bone Loss Assessment
Hook:Draw a CIRCLE on the glenoid to measure bone loss!
Investigations
Imaging Protocol
- AP in internal rotation: Hill-Sachs
- Axillary view: glenoid rim, anterior bone loss
- West Point view: anteroinferior glenoid
- Stryker notch view: Hill-Sachs
- 3D reconstruction: gold standard for bone loss
- En-face glenoid view: bone loss quantification
- Humeral subtraction: removes overlap
- Axial cuts: fracture pattern, displacement
- Labral pathology: Bankart lesion
- Rotator cuff: tears, especially older patients
- Capsular damage: HAGL, ALPSA lesions
- Bone marrow edema: confirms injury location
Plain X-rays underestimate glenoid bone loss by up to 50%. Always obtain CT with 3D reconstruction and humeral head subtraction for accurate bone loss measurement. This determines whether soft tissue repair or bone augmentation is needed.
Differential Diagnosis
- Distinguishing Features
- Anteroinferior rim defect, instability after dislocation
- Key Investigation
- 3D CT with humeral subtraction (quantify bone loss)
- Distinguishing Features
- Labral avulsion without bony fragment
- Key Investigation
- MR arthrogram
- Distinguishing Features
- High-energy, articular step, often scapular involvement
- Key Investigation
- CT (articular gap/step, fracture pattern)
- Distinguishing Features
- Humeral head impaction, may engage in abduction-ER
- Key Investigation
- CT (Hill-Sachs interval) + glenoid track
- Distinguishing Features
- Weakness, night pain, age over 40 after dislocation
- Key Investigation
- MRI / ultrasound
- Distinguishing Features
- Tuberosity tenderness, fracture line on plain film
- Key Investigation
- AP and axillary radiographs, CT if displaced
- Distinguishing Features
- Locked internal rotation, seizure/electrocution history
- Key Investigation
- Axillary view / CT
Management Algorithm
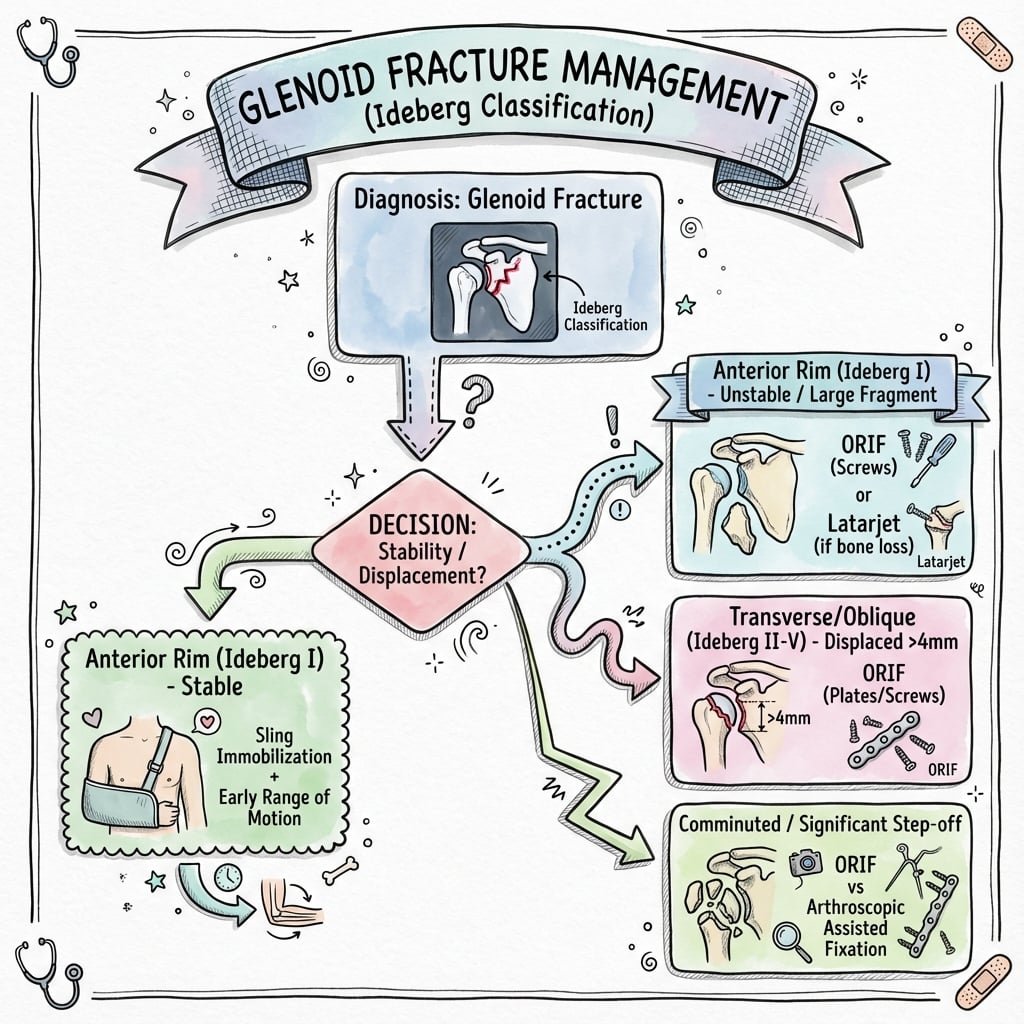
Management based on bone loss:
Algorithm by Bone Loss
- Arthroscopic Bankart repair
- May incorporate fragment with anchors
- Good outcomes with soft tissue repair
- Individualized decision
- Young contact athlete: consider bone augmentation
- Recreational: may try soft tissue repair first
- Counsel on recurrence risk
- Bone augmentation required
- Latarjet (coracoid transfer)
- Eden-Hybinette (iliac crest graft)
- Soft tissue alone will fail
Latarjet provides triple benefit: bone block effect, sling effect (conjoint tendon), and capsular repair. It extends the glenoid track by the width of the coracoid (approximately 10mm), converting many off-track lesions to on-track.
Surgical Technique
- First-time dislocation with bony Bankart under 15% bone loss
- Recurrent instability with minimal bone loss
- Beach chair or lateral decubitus
- Standard posterior and anterior portals
- May need accessory 5 o'clock portal
- Diagnostic arthroscopy - assess bone loss, labrum
- Prepare glenoid rim (decorticate)
- Place anchors at 5, 4, 3 o'clock positions
- Pass sutures through labrum
- Tie knots to restore labral bumper
- May incorporate small bony fragment
Anchors should be placed on the glenoid face, not the neck. This restores the labral bumper effect. At least 3 anchors typically needed for adequate repair.
Protecting the Suprascapular Nerve in the Posterior (Judet) Approach
The viva scenarios and surgical technique repeatedly demand that the suprascapular nerve be "protected" during the posterior approach to a glenoid body fracture, but the practical anatomy deserves to be spelled out, because a traction neurapraxia here is the classic avoidable complication of glenoid fossa ORIF.
- The suprascapular nerve arises from the upper trunk of the brachial plexus (C5-C6), passes deep to the trapezius and omohyoid, and enters the supraspinatus fossa through the suprascapular notch, beneath the superior transverse scapular ligament.
- It then curves around the base of the scapular spine through the spinoglenoid (great scapular) notch to reach the infraspinatus fossa, giving motor branches to supraspinatus and infraspinatus and sensory branches to the posterior capsule.
- At the spinoglenoid notch, the nerve lies only approximately 2 cm medial to the posterior glenoid rim — this is the point most at risk during exposure of the posterior glenoid neck and infraspinatus retraction.
- At the suprascapular notch, it lies approximately 2.5 to 3 cm medial to the superior glenoid rim — at risk with superior dissection and medial retraction toward the base of the coracoid.
- Keep subperiosteal dissection on the posterior scapular neck within roughly 1.5 to 2 cm of the glenoid rim; the nerve is tethered at both notches, so over-medial retraction, not laceration, is the usual mechanism of injury.
- Develop the infraspinatus-teres minor interval carefully and avoid forceful medial traction on the infraspinatus and on the medial (body) fragment.
- Watch plate and screw position along the lateral scapular pillar — an over-medially directed screw or a medially placed retractor at the spinoglenoid notch endangers the nerve.
- Document deltoid and infraspinatus/external-rotation function before and after surgery.
The suprascapular nerve is roughly 2 cm from the posterior glenoid rim at the spinoglenoid notch and roughly 2.5 to 3 cm from the superior rim at the suprascapular notch. Stay within these safe zones and avoid medial retraction — most iatrogenic injuries in glenoid fossa ORIF are traction neurapraxias, not transections.
Complications
- Incidence
- 5-25%
- Risk Factors
- Bone loss over 25%, soft tissue repair
- Management
- Revision with bone augmentation
- Incidence
- 10-30%
- Risk Factors
- Malreduction, excessive lateralization
- Management
- Activity modification, arthroplasty
- Incidence
- 5-15%
- Risk Factors
- Prolonged immobilization, capsular repair
- Management
- Physiotherapy, manipulation, arthroscopy
- Incidence
- Less than 5%
- Risk Factors
- Surgical approach, retraction
- Management
- Observation, exploration if no recovery
- Incidence
- 5-10%
- Risk Factors
- Poor technique, smoking
- Management
- Observation if stable, revision if unstable
- Incidence
- Less than 5%
- Risk Factors
- Poor bone quality, early motion
- Management
- Revision fixation
Factors increasing recurrence after instability surgery:
- Bone loss over 25% not addressed
- Off-track Hill-Sachs not addressed
- Young age (under 20)
- Contact sport athlete
- Connective tissue disorder
Postoperative Care
Rehabilitation Protocol - Instability Surgery
- Sling immobilization
- Pendulum exercises only
- No external rotation beyond neutral
- Elbow, wrist, hand ROM
- Passive to active-assisted ROM
- Begin external rotation to 30°
- Forward flexion to 120°
- Wean from sling
- Full ROM goal
- Isometric then isotonic strengthening
- Rotator cuff program
- Scapular stabilization
- Sport-specific training
- Plyometrics
- Contact sports at 6 months
- Full clearance after strength testing
ORIF-specific considerations:
- Weight-bearing restrictions until union
- ROM based on fixation stability
- Earlier motion if stable fixation
Outcomes and Prognosis
Outcome by procedure:
- Recurrence
- 5-15% (higher with bone loss)
- Return to Sport
- 85-95%
- Arthritis Risk
- Low
- Recurrence
- 5-10%
- Return to Sport
- 85-90%
- Arthritis Risk
- Low
- Recurrence
- 2-5%
- Return to Sport
- 90-95%
- Arthritis Risk
- 10-30% (long-term)
- Recurrence
- N/A
- Return to Sport
- 80-90%
- Arthritis Risk
- Depends on reduction
The Comminuted Fossa: Managing the Ideberg Type VI Fracture
The classification, the mnemonic and the cheat sheet all name Ideberg Type VI (comminution of the glenoid fossa), and the management tabs then jump straight from "II-V" — leaving the highest-energy, hardest-to-fix pattern undeveloped. This is the pattern most likely to appear in a senior viva.
- Multifragmentary comminution of the articular glenoid fossa, almost always the highest-energy injuries (motor vehicle trauma, falls from height), frequently with extension into the scapular neck and body and associated chest-wall, rib or clavicle injury.
- Rigid anatomic fixation of every articular fragment is often impossible — the surgical decision is different from the reconstructable II-V patterns.
- The key question is whether the humeral head remains concentric and stable beneath a reconstructable articular surface. A centred head under a congruent (even if imperfect) reconstruction predicts a good outcome.
- Assess the size and reducibility of the major peripheral fragments on CT with 3D reconstruction — these, not the small central pieces, dictate whether fixation is feasible.
- Reconstructable major fragments with a concentric head: ORIF aimed at restoring the articular arc and rim stability — small-fragment or reconstruction plates buttressing the lateral scapular pillar, with peripheral rim screws or suture anchors capturing the key articular fragments. The goal is a congruent, stable surface, not the reduction of every tiny fragment.
- Unreconstructable fossa, concentric head, low-demand patient: nonoperative treatment with early protected motion can give an acceptable result when the head stays centred.
- Unsalvageable articular surface with an incongruent or unstable head: delayed reconstruction or, rarely, arthroplasty may be required — a salvage rather than a primary decision.
- Even complex, displaced fossa fractures with scapular involvement unite reliably and function well when the reconstructable surface is restored, supporting an attempt at fixation of the major fragments where feasible.
In a comminuted (Type VI) glenoid fossa fracture you will rarely reduce every fragment. Aim for a concentric, stable, congruent articular surface — buttress the reconstructable rim and lateral pillar, accept the small central pieces, and reserve salvage/arthroplasty for the truly unreconstructable surface with a non-concentric head.
Guidelines, Registries & Global Practice
Global epidemiology:
- Anterior shoulder dislocation incidence is highest in young males (peak in the second to third decades) and in contact/collision athletes (rugby, American football, ice hockey).
- A bony Bankart (anteroinferior rim fracture) is present in a substantial minority of first-time dislocations; some degree of glenoid bone loss accumulates with recurrent dislocations.
- Isolated glenoid body (Ideberg II-VI) fractures are uncommon, usually high-energy, and frequently associated with scapular and chest-wall injury.
Side-by-side society/expert guidance:
- Bone Loss / Imaging
- 3D CT for bone loss; quantify before stabilisation
- Procedure Emphasis
- Individualised; bone augmentation for significant loss
- Bone Loss / Imaging
- Risk stratification (e.g. ISIS); CT if bone loss suspected
- Procedure Emphasis
- Arthroscopic Bankart for low-risk; Latarjet for bone loss/high-risk
- Bone Loss / Imaging
- CT mandatory for articular fractures; assess displacement/step
- Procedure Emphasis
- ORIF for displaced (4mm or more) body fractures, congruity-driven
- Bone Loss / Imaging
- Glenoid track and bipolar loss assessment routine
- Procedure Emphasis
- Track-based: remplissage vs Latarjet for off-track lesions
- Instability and stabilisation procedures are not as systematically captured as arthroplasty in joint registries; most evidence is from institutional series and meta-analyses (e.g. An 2016).
- Where shoulder instability registries exist (e.g. regional and national instability databases in Europe), they reinforce that recurrence rises with glenoid bone loss, younger age, and contact sport — mirroring the ISIS risk factors.
- Where 3D CT is readily available, bone loss is quantified preoperatively and the glenoid track guides surgery.
- In limited-resource settings, plain radiographs (West Point, Stryker notch) and intra-operative arthroscopic assessment of the bare-spot/inverted-pear may substitute, accepting that plain films underestimate bone loss.
- Open Bankart and open Latarjet remain reliable, equipment-light options where advanced arthroscopic capability is limited.
Controversies & Areas of Uncertainty
The classic 20-25% threshold is challenged by 'subcritical' data (Shaha 2015) showing functional decline above ~13.5%. The exact cut-off, and how it interacts with the glenoid track, remains debated.
For off-track lesions with subcritical glenoid loss, arthroscopic Bankart plus remplissage competes with Latarjet. Comparative trials are ongoing and the optimal indication boundary is unsettled.
Arthroscopic Latarjet offers visualisation advantages but a steep learning curve and graft-positioning concerns. Whether it matches open results in routine practice is not established.
For a bony Bankart, whether to incorporate and fix the fragment versus excise it and repair soft tissue (and the size threshold for doing so) varies by surgeon and remains an area of practice variation.
MCQ Practice Points
Q: What percentage of glenoid bone loss is the threshold above which bone augmentation is recommended?
- A) 10-15%
- B) 20-25%
- C) 30-35%
- D) 40-45%
A: B - 20-25% bone loss is the critical threshold. Above this, soft tissue repair alone has unacceptably high recurrence rates.
Q: An Ideberg Type III glenoid fracture is:
- A) Anterior rim avulsion
- B) Transverse fracture exiting lateral border
- C) Oblique fracture exiting superiorly
- D) Horizontal fracture exiting medially
A: C - Type III is an oblique fracture through the superior glenoid exiting near the suprascapular notch.
Q: The glenoid track is calculated as:
- A) 0.5 x glenoid width + bone loss
- B) 0.83 x glenoid width - bone loss
- C) 1.0 x glenoid width - bone loss
- D) 0.83 x glenoid width + Hill-Sachs interval
A: B - Glenoid track = 0.83 x inferior glenoid width - glenoid bone loss (d).
Q: What does Latarjet provide stability through all EXCEPT?
- A) Bone block effect
- B) Sling effect of conjoint tendon
- C) Capsular repair
- D) Rotator cuff augmentation
A: D - Latarjet provides bone block, sling effect (conjoint tendon), and capsular repair. It does not augment the rotator cuff.
Q: What does an inverted pear glenoid indicate? A: Significant anterior-inferior bone loss (greater than 25%). Normal glenoid is pear-shaped with wider inferior portion. An inverted pear indicates loss of inferior width, causing recurrent instability.
Q: Why is CT with 3D reconstruction essential for glenoid fractures? A: Plain X-rays underestimate bone loss by up to 50%. CT with humeral head subtraction and en-face glenoid view allows accurate quantification of bone loss for surgical planning.
Exam Viva Scenarios
Practise clinical reasoning and management decisions out loud
“A 24-year-old rugby player has had 5 anterior dislocations over 2 years. MRI shows Bankart lesion. CT shows 22% anteroinferior glenoid bone loss. How would you manage this patient?”
“A 45-year-old woman presents after motor vehicle accident with severe shoulder pain. X-rays show a glenoid fracture. CT reveals an Ideberg Type III fracture with 5mm articular step. How would you manage this?”
“A 28-year-old presents after first-time dislocation. CT shows 18% glenoid bone loss and a large Hill-Sachs lesion measuring 25mm (medial to lateral). How do you decide on treatment?”
Classification
- Type I = rim avulsion (bony Bankart)
- Type II = transverse (exits laterally)
- Type III = oblique (exits superiorly)
- Type IV = horizontal (exits medially)
- Type V = combined I + IV
- Type VI = comminuted
Bone Loss Thresholds
- Under 15% = soft tissue repair adequate
- 15-20% = individualize (consider bone block in athletes)
- Over 20-25% = bone augmentation required
- Over 25% = inverted pear glenoid appearance
Glenoid Track
- Track = 0.83 x glenoid width - bone loss
- Compare to Hill-Sachs interval (HSI)
- HSI greater than Track = off-track = will engage
- Off-track needs Hill-Sachs addressed or track increased
- Latarjet adds approximately 10mm to track
Surgical Options
- Arthroscopic Bankart: under 15% bone loss
- Latarjet: over 20-25% bone loss or off-track
- ORIF: displaced body fractures (Ideberg II-V)
- Remplissage: address Hill-Sachs arthroscopically
Complications
- Recurrence 5-15% (higher with bone loss)
- Arthritis 10-30% (especially post-Latarjet)
- Stiffness 5-15%
- Nerve injury under 5%
Evidence Base
Redefining Critical Bone Loss (Subcritical Loss)
- Cohort of 72 patients (73 shoulders) after isolated arthroscopic Bankart repair, mean follow-up 48 months
- WOSI and SANE scores worsened progressively with each quartile of increasing bone loss
- Bone loss above 13.5% led to clinically unacceptable WOSI scores even without recurrence
- Overall failure 12.3%; bone loss higher in failures (24.7% vs 12.8%, p less than 0.01)
Glenoid Track Concept (On-Track / Off-Track)
- Introduced on-track/off-track paradigm for bipolar (glenoid plus humeral) bone loss
- Off-track Hill-Sachs engages the anterior rim and risks recurrence
- For glenoid loss of 25% or more (inverted-pear), glenoid bone grafting is recommended
- Provided a quantitative treatment paradigm for all anterior instability patterns
3D CT Glenoid Index for Bone Loss
- 25 instability patients had bilateral 3D CT with humeral subtraction vs arthroscopic measurement
- Glenoid index = injured/uninjured inferior diameter; cut-off 0.75 (about 25% loss)
- 3D CT predicted the arthroscopic decision (Bankart vs open Latarjet) in 24/25 (96%)
- Glenoid index of 0.75 or less predicted need for bone grafting