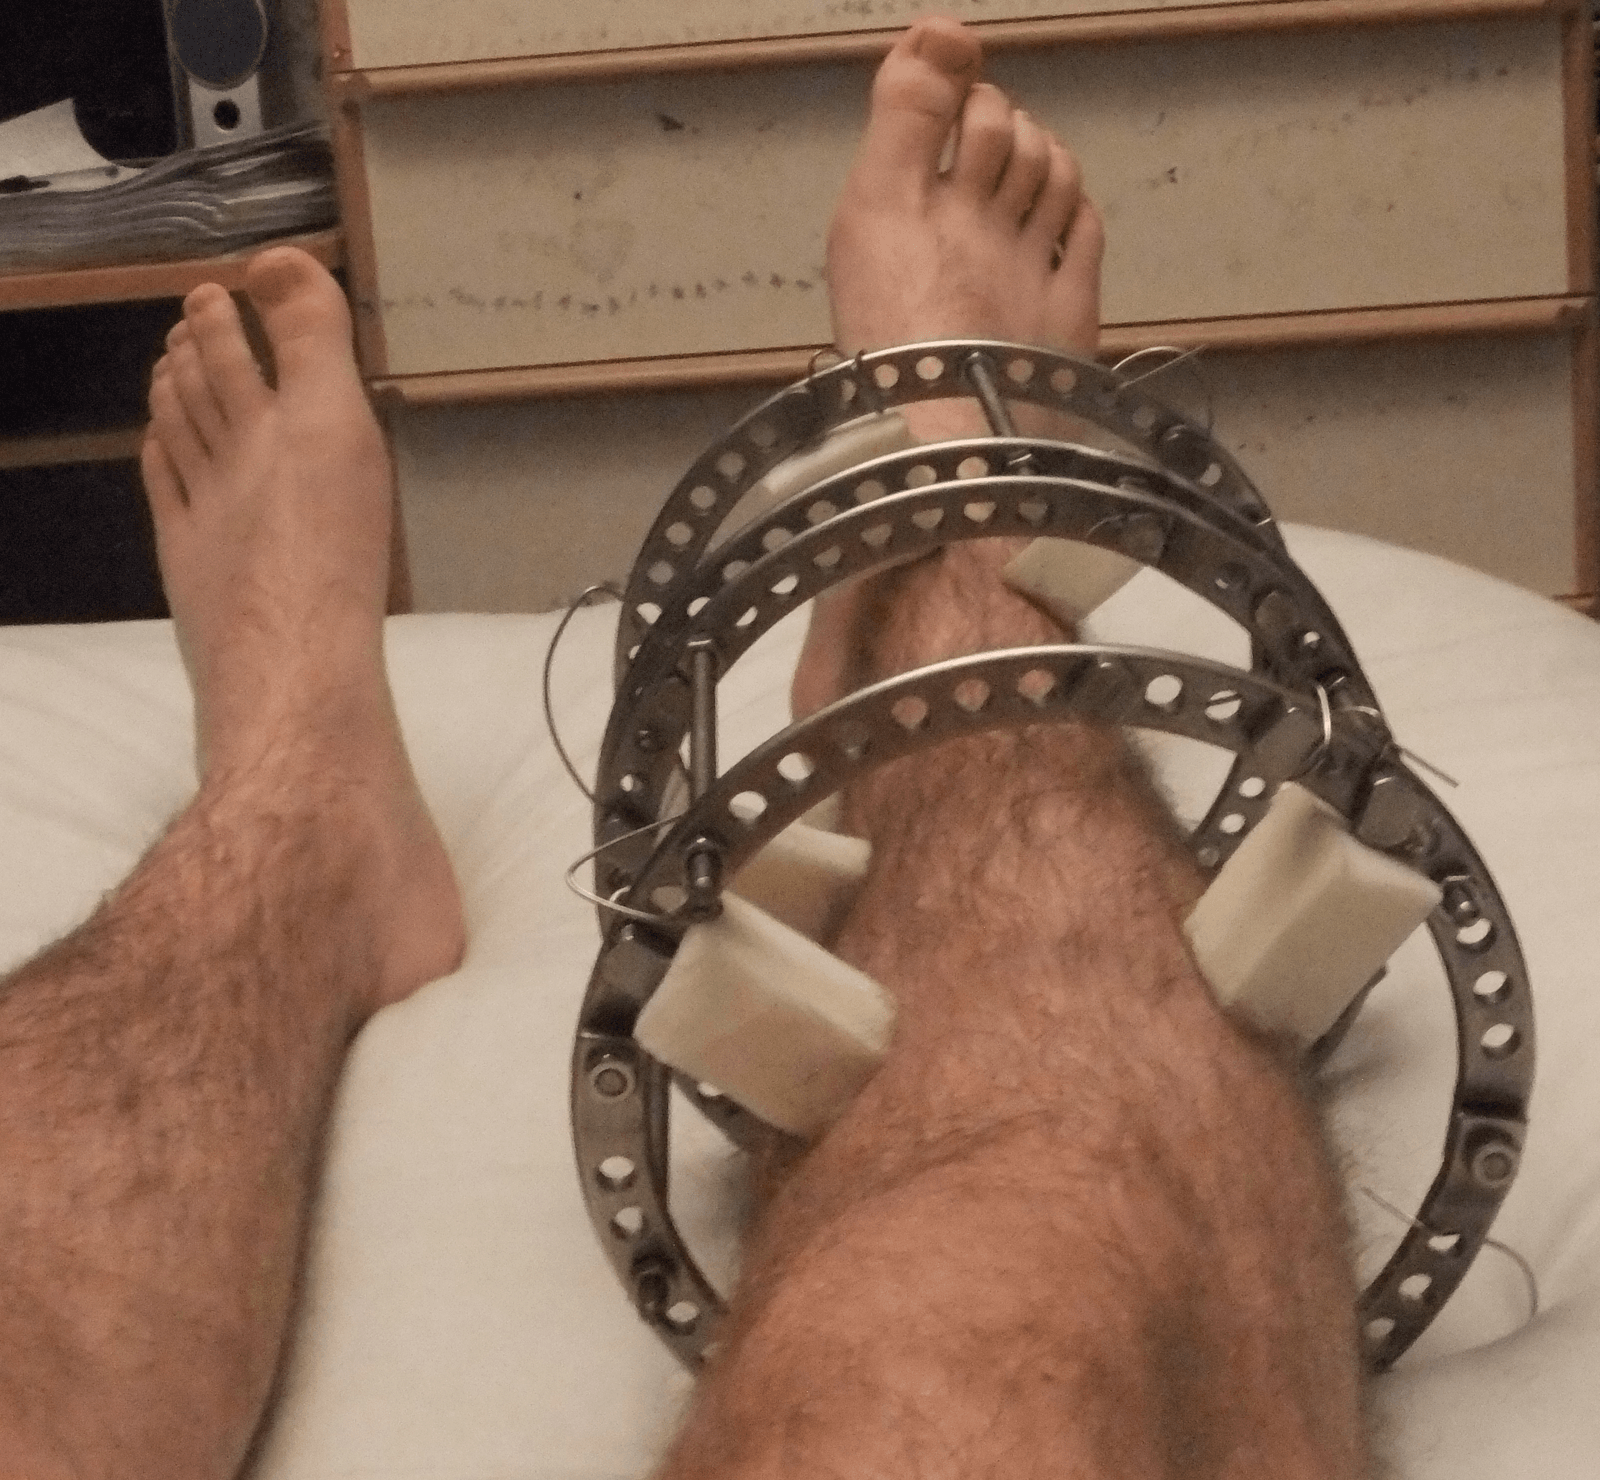
Circular Frame | Tensioned Wires | Ring Fixation
- Wire tension: 90-130kg (900-1300N) for stability
- Wire crossing angle: 90 degrees ideal, minimum 60 degrees
- Safe zones: Wire placement avoiding neurovascular structures
- Ring sizing: 2 finger breadths clearance from skin circumferentially
- Stability: 3-4 wires per ring minimum, half-pins add significant rigidity
- “Tensioned wires behave like guitar strings - deflection proportional to load
- “Olive wires provide compression/distraction and prevent translation
- “Half-pins cannot be tensioned but provide excellent rigidity
- “Ilizarov designed the apparatus in Kurgan, Siberia in 1950s
90-130kg tension is essential for frame stability. Under-tensioned wires allow excessive motion and poor healing. Over-tensioned wires can cut through bone. Use a tensioner device and check tension at follow-up as wires loosen over time.
90 degrees is ideal for stability. Minimum acceptable is 60 degrees. Wires crossing at acute angles provide less stability. Plan wire placement to achieve optimal crossing while respecting safe corridors.
Know the safe zones for each level of tibia and femur. Wires must avoid neurovascular structures. The tibia has relatively safe anteromedial surface. Femur requires careful planning - lateral approach to posterior structures.
Ring size: 2 finger breadths (3-4cm) clearance circumferentially. Rings perpendicular to mechanical axis. Consider soft tissue swelling. Too tight causes skin problems; too loose compromises stability.
- Tensioned Wires
- 1.5-1.8mm
- Half-Pins
- 5-6mm
- Tensioned Wires
- 90-130kg required
- Half-Pins
- Cannot be tensioned
- Tensioned Wires
- Moderate (beam on elastic foundation)
- Half-Pins
- High (cantilever beam)
- Tensioned Wires
- Through-and-through
- Half-Pins
- One cortex to opposite
- Tensioned Wires
- Less common
- Half-Pins
- More common (6mm vs 1.8mm hole)
- Tensioned Wires
- Metaphyseal bone
- Half-Pins
- Diaphyseal bone, hybrid constructs
Overview and Epidemiology
The Ilizarov external fixator is a circular frame system utilizing tensioned wires attached to rings for skeletal stabilization. Developed by Gavriil Ilizarov in Kurgan, Siberia, beginning in the 1950s, it revolutionized treatment of complex fractures, nonunions, deformities, and limb length discrepancy.
- Limb lengthening
- Deformity correction
- Complex fracture stabilization
- Nonunion treatment
- Bone transport for segmental defects
- Infected nonunion management
- Minimal soft tissue disruption
- Adjustability after application
- Weight-bearing stability
- Can address complex multiplanar deformities
- Allows bone transport and lengthening
- Technically demanding
- Pin site care burden
- Patient discomfort
- Prolonged treatment time
- Steep learning curve
Ilizarov developed his frame while treating WWII veterans with osteomyelitis and nonunions in remote Siberia with limited resources. His principles of distraction osteogenesis and the "tension-stress effect" were unknown in the West until the 1980s when Italian surgeons visited Kurgan.

Pathophysiology
Understanding frame biomechanics is essential for successful Ilizarov application.
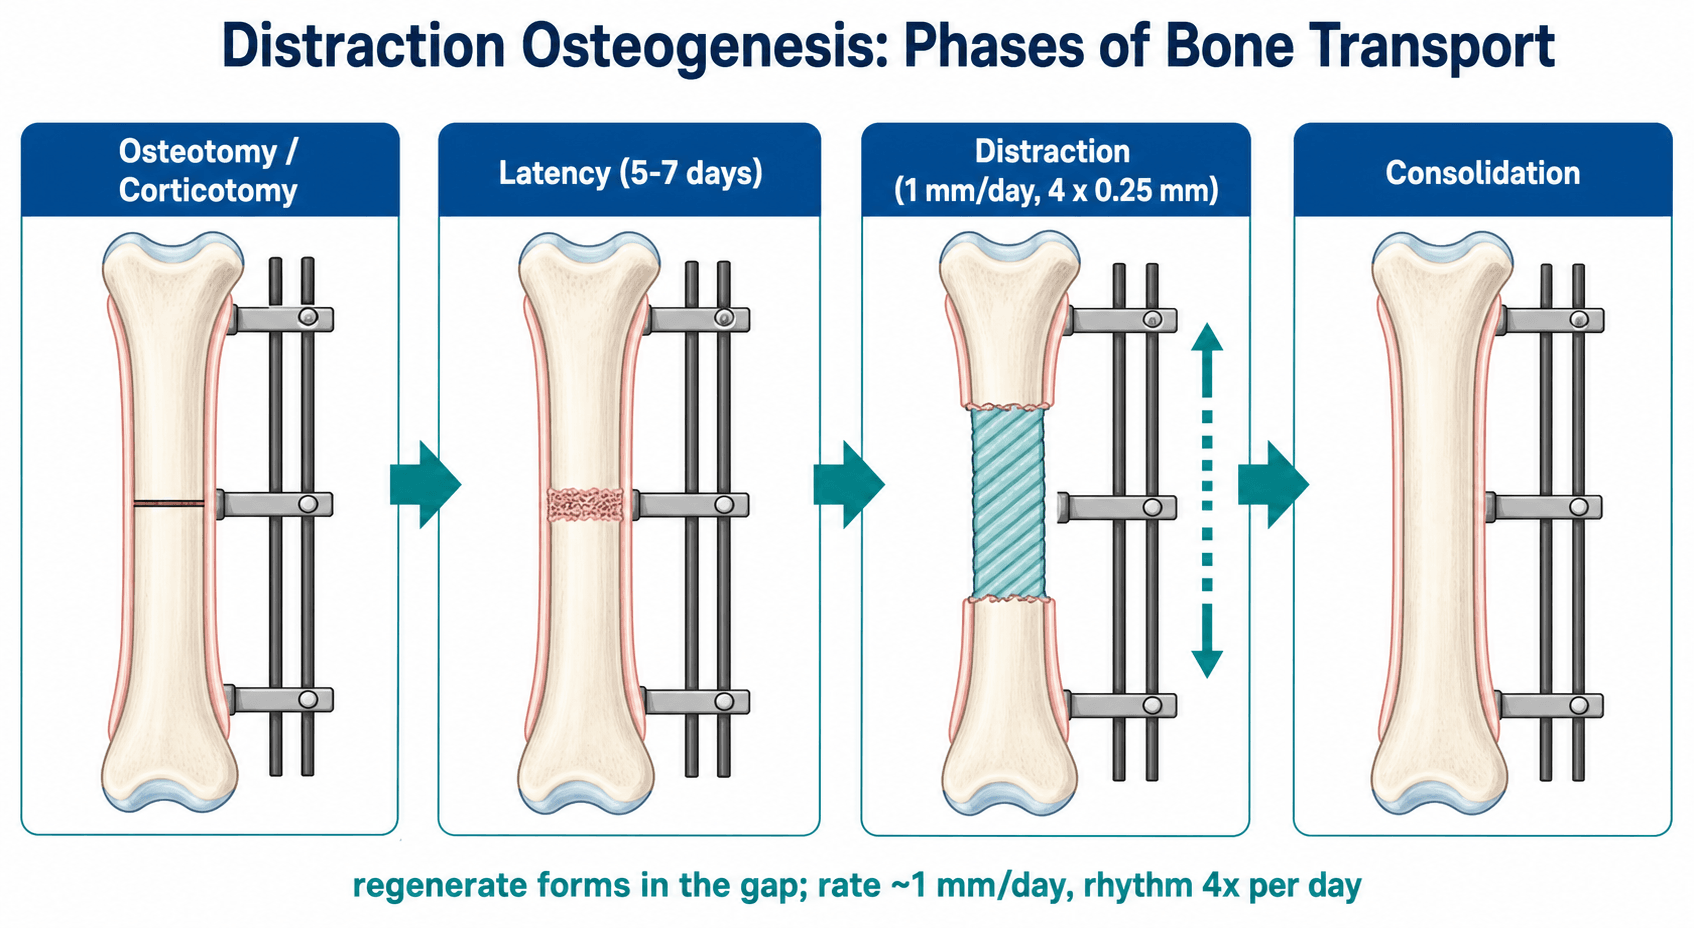
Distraction Osteogenesis: The Biological Engine
The Ilizarov frame is a delivery system for distraction osteogenesis - new bone formed under gradual tension across a low-energy corticotomy. The process runs in three phases:
- Latency - typically 5-7 days (shorter in children, longer in adults/poor biology). Allows the early reparative haematoma/callus to organise before distraction begins.
- Distraction - lengthening at approximately 1mm/day, divided into small frequent steps (classically 4 x 0.25mm). New bone forms in parallel columns extending from a central radiolucent growth zone, predominantly by intramembranous ossification.
- Consolidation (neutral fixation) - the regenerate mineralises and remodels; the frame is retained until corticalisation across the gap is seen on radiographs, usually roughly twice the distraction time. The external-fixation index (days in frame per cm gained) typically runs 30-45 days/cm.
The "tension-stress effect" describes how slow, steady traction on living tissue stimulates regeneration not only of bone but of vessels, nerve, muscle and skin (histogenesis), provided blood supply and stable fixation are preserved.
Wire Biomechanics
- Wires act as "beams on elastic foundation"
- Deflection under load inversely proportional to tension
- Higher tension = less deflection = more stability
- Wire stiffness proportional to wire diameter squared
- Optimal: 90-130kg (900-1300N)
- Below 70kg: Insufficient stability
- Above 150kg: Risk of wire breakage or bone cutout
Frame Stability Factors
- Wire tension (most important)
- Number of wires per ring (minimum 3)
- Wire crossing angle (90 degrees ideal)
- Wire diameter (1.8mm stiffer than 1.5mm)
- Ring diameter (closer fit = stiffer)
- Number of rings (more = stiffer)
- Ring material (steel vs aluminum vs carbon fiber)
- Ring connection (closer spacing near pathology)
- Length of construct
- Position relative to pathology
- Connecting rod configuration
- Addition of half-pins
Classic teaching: A well-tensioned 2-ring tibial frame with 4 wires per ring crossing at 90 degrees provides stability equivalent to a plated fracture. The frame allows axial micromotion (beneficial for healing) while preventing shear (detrimental).
Classification Systems
Two classifications dominate exam discussion of ring fixation - one for complications, one for pin-site infection.
Paley Classification of Difficulties
Used to report any adverse event during distraction osteogenesis:
- Problem - a difficulty resolved without operative intervention (e.g. pin-site infection settling on antibiotics, minor contracture managed by physiotherapy).
- Obstacle - a difficulty requiring operative intervention before the end of treatment but ultimately overcome (e.g. premature consolidation needing re-osteotomy).
- Complication - any intra-operative injury, or any problem not resolved by the end of treatment (subdivided into minor and major; major complications interfere with the original treatment goal).
This taxonomy is the standard language for reporting distraction-osteogenesis outcomes in the literature.
Clinical Presentation
Patient Selection
- Complex limb reconstruction needs
- Infected nonunion (can treat infection while stabilizing)
- Limb length discrepancy with deformity
- Segmental bone loss requiring transport
- Open fractures with soft tissue compromise
- Poor compliance
- Significant comorbidities affecting healing
- Morbid obesity (difficult frame fitting)
- Severe vascular disease
- Psychological unsuitability
Preoperative Assessment
- Mechanism and duration of problem
- Previous surgery and complications
- Infection history
- Medical comorbidities
- Social support and compliance assessment
- Limb alignment and length
- Soft tissue condition
- Neurovascular status
- Joint range of motion
- Muscle strength
Choosing the Right Reconstruction (Differential of Options)
The exam-relevant "differential" for the Ilizarov is the decision against competing strategies for the same clinical problem. Frame fixation is rarely the only option; the candidate must justify it.
- Best Indication
- Infected nonunion, segmental bone loss, multiplanar deformity, complex LLD
- Key Advantage
- Treats infection while reconstructing; gradual multiplanar correction; minimal implant in wound
- Key Limitation
- Long treatment, pin-site burden, demanding for patient and surgeon
- Best Indication
- Complex multiplanar deformity needing software-guided correction
- Key Advantage
- Six-axis correction with computer planning; accurate residual correction
- Key Limitation
- Cost, strut/programming complexity, same pin-site burden
- Best Indication
- Diaphyseal lengthening/nonunion with clean soft tissues, no active infection
- Key Advantage
- No external frame, better patient comfort and joint motion
- Key Limitation
- Contraindicated with active infection; limited deformity correction
- Best Indication
- Aseptic nonunion, periarticular fracture with good soft tissues
- Key Advantage
- Direct reduction, early stability
- Key Limitation
- Soft-tissue stripping; poor choice in infection or major bone loss
- Best Indication
- Segmental defect (often under 6cm) with adequate soft-tissue cover
- Key Advantage
- Single-stage transport avoided; quicker than long transport
- Key Limitation
- Two-stage, graft volume limited, less suited to very large defects
- Best Indication
- Unreconstructable limb, failed reconstruction, non-compliant patient
- Key Advantage
- Definitive, faster return to function with prosthesis
- Key Limitation
- Irreversible; psychological impact
Investigations
Imaging
- AP and lateral of entire bone
- Include joints above and below
- Weight-bearing if possible
- Contralateral limb for comparison
- Detailed bone anatomy
- Assess bone quality
- Plan wire trajectories
- Evaluate union/nonunion
- Mechanical axis assessment
- Deformity planning
- Full-length comparison
Infection Workup
For nonunion/infection cases:
- ESR and CRP baseline
- White cell count
- Deep tissue cultures at surgery
- Consider bone biopsy
Management
Preoperative Planning
- Measure limb diameter at each ring level
- Add 3-4cm (2 finger breadths) clearance
- Account for swelling
- Standard sizes: 100-240mm diameter
- Identify safe corridors at each level
- Plan crossing angles greater than 60 degrees
- Mark neurovascular structures
- Consider olive wire placement
- Identify CORA (center of rotation of angulation)
- Plan osteotomy level
- Determine hinge placement for correction
- Calculate required correction
- Minimum 2 rings per segment
- Rings closer near osteotomy/fracture
- Plan connecting rod configuration
- Consider hybrid with half-pins
This section covers preoperative planning.
Surgical Management
Safe Corridors
Tibial Wire Placement
- Anteromedial to posterolateral safest
- Avoid popliteal vessels posteriorly
- Anterior wire avoids anterior tibial artery origin
- Fibula head: Avoid common peroneal nerve
- Anteromedial surface subcutaneous
- Posterolateral wire safe
- Widest safe corridor in body
- Anteromedial to posterolateral
- Avoid anterior tibial artery and deep peroneal nerve anteriorly
- Posterior tibial artery and tibial nerve posteromedial
- Common peroneal nerve at fibular neck
- Anterior tibial vessels at ankle
- Saphenous nerve anteromedially
This section covers tibial safe zones.
Deformity Correction & Bone Transport Principles
The frame is only a tool — correct deformity correction depends on the CORA concept and Paley's osteotomy rules, and large defects are managed by bone transport with attention to the docking site.
CORA and the Osteotomy Rules
The CORA (Centre Of Rotation of Angulation) is the point at which the proximal and distal axis lines (mechanical or anatomical) intersect — it is the true apex of the deformity, and it does not always lie at the most obvious bend on the radiograph. Identifying the CORA is the first step in any correction.
Paley's osteotomy rules describe what happens depending on where the osteotomy and the hinge / axis of correction (ACA) are placed relative to the CORA:
- Rule 1 — osteotomy AND hinge both at the CORA → pure angular correction, with the bone ends realigning without any translation or secondary deformity. This is the goal.
- Rule 2 — osteotomy at the CORA but the hinge placed away from it → angular correction PLUS a translation at the osteotomy.
- Rule 3 — osteotomy placed away from the CORA → correction introduces a translational (secondary) deformity; sometimes used deliberately (a "translation osteotomy") to realign the mechanical axis when osteotomising at the true CORA is impractical.
The position of the hinge relative to the bone also dictates whether correction produces lengthening (hinge on the concavity/convexity) — a key planning decision in the frame.
Bone Transport and the Docking Site
For segmental bone loss (e.g. after resection of infected nonunion), a corticotomy is made away from the defect and a bone segment is transported across the gap, laying down regenerate behind it while the gap ahead closes:
- Monofocal — lengthening or compression at a single site.
- Bifocal — one corticotomy with transport: regenerate forms at the corticotomy and the transported segment docks against the far fragment.
- Trifocal — two corticotomies / two transport segments for very large defects, halving the transport distance and treatment time.
The docking site (where the transported segment meets the target fragment) is the classic trouble spot: interposed soft tissue, sclerotic/atrophic bone ends and a tapered transport segment frequently cause docking-site nonunion. Management therefore often includes freshening the bone ends, compression at docking, and autologous bone grafting (typically iliac crest) at the docking site. Acute docking (shortening to appose the ends, then re-lengthening at the corticotomy) is an alternative to long gradual transport.
Complications
Pin Site Complications
- Pin site infection: 30-100% incidence, most resolve with oral antibiotics
- Pin tract osteomyelitis: Rare, may require pin removal and debridement
- Pin loosening: Common, may require replacement
Frame Complications
- Wire breakage: From overtensioning or fatigue
- Ring loosening: Check and tighten connections
- Frame instability: Inadequate construct, revise
Treatment Complications
- Joint contracture: Aggressive physiotherapy essential
- Neurovascular injury: From wire placement
- Delayed union/nonunion: May need bone grafting
- Refracture: After frame removal
Pin site care protocols vary, but principles include: Keep sites clean and dry, daily inspection, crusts can be left (form seal), clean with saline if drainage, oral antibiotics for spreading cellulitis, pin removal for deep infection or osteomyelitis.
Postoperative Care
Early Phase (first 6 weeks)
- Weight-bearing - Encouraged early; the circular frame is designed to share load and full weight-bearing stimulates regenerate formation in lengthening cases.
- Pin-site care - Begin a standardised protocol once initial ooze settles; daily inspection, gentle saline cleaning of crusted/discharging sites, and patient/carer education.
- Distraction (lengthening cases) - Start after the latency period (about 5-7 days) at approximately 1mm/day in 4 small steps; the patient or carer is taught to turn the struts/nuts.
- Physiotherapy - Active and passive joint mobilisation from day one to prevent contractures (especially equinus in tibial lengthening and knee stiffness in femoral frames).
Ongoing Monitoring
- Radiographs - Serial AP and lateral films to assess regenerate quality, alignment and consolidation; adjust distraction rate if regenerate is poor (slow down) or premature consolidation threatens (speed up).
- Neurovascular checks - Vigilance for stretch neuropraxia (peroneal nerve in tibial lengthening) and joint subluxation.
- Frame integrity - Re-check wire tension and tighten connections at clinic visits.
Frame Removal
- Remove only once radiographic corticalisation of the regenerate or union is confirmed across the gap on orthogonal views.
- A period of protected weight-bearing or a cast/brace after removal reduces refracture risk, which is highest in the weeks immediately after frame removal.
Outcomes & Prognosis
- Union and goal achievement - In experienced units, distraction-osteogenesis goals are met in the large majority of segments (Paley reported original goals achieved in 57 of 60 segments with 94% patient satisfaction).
- Bone transport for infected nonunion - Union rates over 85-90% with eradication of infection are reported, at the cost of long treatment and frequent complications (around 1 minor and 1 major complication per patient).
- Treatment burden - The external-fixation index typically runs 30-45 days/cm; total time in frame for a multi-centimetre lengthening or transport is often 6-12 months.
- Functional recovery - Quality-of-life scores dip during treatment and recover toward normal after consolidation; counselling on this trajectory improves compliance.
- Adverse prognostic factors - Smoking, diabetes, large defects, previous infection, poor soft-tissue cover and non-compliance all worsen outcome.
Guidelines, Registries & Global Practice
Global Epidemiology and Use
Circular external fixation is concentrated in dedicated limb reconstruction units worldwide, reflecting a steep learning curve and the need for multidisciplinary support. Its case-mix differs sharply by setting: in high-resource health systems the dominant indications are congenital/developmental deformity, post-traumatic malunion, leg-length discrepancy and aseptic nonunion; in conflict zones and limited-resource settings the technique is a workhorse for high-energy open fractures, segmental bone loss and chronic osteomyelitis, where its low implant burden and tolerance of contaminated wounds are decisive advantages.
Side-by-Side Guidance
Unlike arthroplasty there is no single high-level guideline that dictates frame parameters; practice is governed by foundational biology (Ilizarov), complication taxonomy (Paley) and society/consensus statements on adjacent issues.
- Domain
- Frame principles & education
- Key Position
- Codified Ilizarov/distraction-osteogenesis teaching; corticotomy preserving periosteum, 1mm/day rhythm, structured pin-site care
- Domain
- Open fractures & osteomyelitis
- Key Position
- Ring fixation endorsed within combined ortho-plastic ('orthoplastic') pathways for severe open tibial injury and infected nonunion
- Domain
- Limb reconstruction
- Key Position
- Paley problems/obstacles/complications framework standard for reporting; hexapod frames accepted for complex multiplanar deformity
- Domain
- Pin-site care & DGOU/EBJIS-aligned infection
- Key Position
- No mandated regimen; emphasis on standardised, evidence-based pin-site protocols and antibiotic stewardship
Registry and Outcome Notes
External fixation is not captured by the major arthroplasty registries (NJR, AJRR, AOANJRR, SHAR), so the evidence base rests on single-centre and multicentre cohort series rather than registry data. Reported benchmarks across series include union rates over 85-90% for bone transport in infected nonunion, an external-fixation index commonly 40-45 days/cm, and pin-site infection in a large minority of pins (most minor and managed without hardware removal).
High- vs Limited-Resource Practice
- Equipment - High-resource units increasingly use computer-assisted hexapod frames (Taylor Spatial Frame, TL-HEX, Orthex) with web-based deformity software; classic Ilizarov ring-and-strut sets remain the global standard and dominate in cost-constrained settings.
- Imaging and planning - CT and long-leg alignment films and digital deformity analysis are routine in high-resource centres; limited-resource units rely on careful clinical and plain-radiograph CORA planning.
- Aftercare - Dedicated frame clinics, physiotherapy and patient self-management education improve compliance; where these are unavailable, pin-site complications and joint contractures rise.
Controversies & Areas of Uncertainty
A mature exam answer acknowledges that several aspects of ring fixation remain unsettled:
- Optimal pin-site care regimen - Despite the Checketts-Otterburn grading, the best cleaning solution (saline vs chlorhexidine vs alcohol), frequency (daily vs weekly), and dressing remain debated; high-quality randomised evidence is limited and protocols vary widely between units.
- Latency period and distraction rhythm - The classic 5-7 day latency and 1mm/day rate derive from canine experiments; the ideal values differ with age, biology and the use of adjuncts, and accelerated or "trifocal" strategies are used selectively.
- Hexapod vs classic Ilizarov - Computer-assisted frames give accurate multiplanar correction, but evidence that they improve hard outcomes (union, complications) over a well-executed classic frame is modest, and they add cost and programming complexity.
- Frame vs lengthening intramedullary nail - Magnetic lengthening nails offer comfort and avoid pin-site problems for clean diaphyseal lengthening, but cannot be used in infection and are far costlier; the boundary between the two continues to shift.
- "Frame fatigue" and patient burden - Treatment is long and psychologically demanding; patient selection, expectation-setting and support are as important as technique, yet are hard to standardise.
- Bone transport vs induced-membrane (Masquelet) for segmental loss - Both are valid; the threshold defect size, infection status and soft-tissue cover at which one is preferred is not firmly defined.
MCQ Practice Points
Q: What is the optimal distraction rate and rhythm? A: 1mm/day, divided into more frequent smaller steps (classically 4 x 0.25mm). Derived from Ilizarov's canine experiments - 0.5mm/day risks premature consolidation, 2mm/day risks ischaemia and a poor regenerate.
Q: By what mechanism does the regenerate form? A: Predominantly intramembranous ossification from a central radiolucent growth zone, with new bone laid down in parallel columns aligned to the tension vector. The latency period before distraction is typically 5-7 days (shorter in children).
Q: At what wire tension is a full circular frame stiffest? A: Around 1000N (frame stiffness vs tension follows a Gaussian curve in full-ring frames). Wire stiffness is also inversely proportional to wire length, favouring smaller rings and closely supported wires. Ideal wire crossing angle is 90 degrees (minimum 60 degrees).
Q: Which structure is classically at risk with proximal tibial wires? A: The common peroneal nerve at the fibular neck. Active infection is a contraindication to intramedullary lengthening, which is why the Ilizarov is favoured for infected nonunion and segmental loss. Refracture risk is highest immediately after frame removal - confirm radiographic corticalisation first.
At a Glance Table
- Value / Principle
- Tensioned-wire circular frame delivering distraction osteogenesis
- Value / Principle
- 1.5-1.8mm Kirschner wires, tensioned toward roughly 1000-1300N
- Value / Principle
- 90 degrees ideal, minimum 60 degrees
- Value / Principle
- 2 finger breadths (3-4cm) circumferential clearance
- Value / Principle
- Latency 5-7 days, then approximately 1mm/day in 4 steps
- Value / Principle
- Typically 30-45 days/cm
- Value / Principle
- Infected nonunion, segmental bone loss, deformity, complex LLD
- Value / Principle
- Pin-site infection (graded by Checketts-Otterburn)
SAFETibia Safe Zones
Hook:SAFE corridors keep neurovascular structures intact!
WRISTFrame Stability Factors
Hook:Check the WRIST for frame stability!
OLIVEOlive Wire Indications
Hook:OLIVE wires push and pull where you need them!
Exam Viva Scenarios
Practise clinical reasoning and management decisions out loud
“You are planning an Ilizarov frame for tibial lengthening. Describe your approach to wire placement at the proximal tibia.”
“A patient with an Ilizarov frame for tibial nonunion returns 4 weeks postoperatively. X-rays show the fracture is moving within the frame. How do you assess and address this?”
“A patient with an Ilizarov frame develops purulent discharge from a wire site with surrounding erythema extending 2cm. How do you manage this?”
“You plan to lengthen a tibia by 5cm in an adult. Take me through the biological principles and the phases of treatment, and tell me what determines how long the frame stays on.”
Wire Parameters
- Diameter: 1.5-1.8mm standard
- Tension: 90-130kg (900-1300N)
- Crossing angle: 90 degrees ideal, minimum 60 degrees
- Minimum 3-4 wires per ring
Ring Sizing
- 2 finger breadths (3-4cm) clearance
- Account for soft tissue swelling
- Rings perpendicular to mechanical axis
- Minimum 2 rings per bone segment
Safe Corridors - Tibia
- Proximal: Anteromedial to posterolateral
- Avoid peroneal nerve at fibular neck
- Mid: Widest safe zone - anteromedial surface
- Distal: Avoid anterior tibial vessels anteriorly
Olive Wire Uses
- Compression across fracture/osteotomy
- Bone transport pushing/pulling
- Prevent translation during correction
- Capture short periarticular segments
Pin Site Infection Grades
- Grade 1-3: Mild, respond to oral antibiotics
- Grade 4-5: Moderate, may need wire removal
- Grade 6: Osteomyelitis, wire removal + debridement
- Daily pin care reduces infection
Frame Stability Checklist
- Wire tension adequate (90-130kg)
- Crossing angle greater than 60 degrees
- All connections tight
- Sufficient wires per ring (minimum 3)
Evidence Base
Every card below has been verified against the primary PubMed record. The two foundational Ilizarov experimental papers and Paley's complication taxonomy are the most heavily cited references in limb reconstruction and remain core exam knowledge.
Tension-Stress Effect Part I: Stability and Soft-Tissue Preservation
- Increased fixator stability enhances osteogenesis
- Maximal preservation of periosseous/intraosseous soft tissue enhances bone formation
- Regenerate bone forms parallel to the distraction (tension) vector
- Marrow element preservation at osteotomy is critical
Tension-Stress Effect Part II: Rate and Frequency of Distraction
- 0.5mm/day risks premature consolidation
- 2.0mm/day risks ischaemia and poor regenerate
- 1.0mm/day is optimal; more frequent steps improve outcome
- Distraction regenerate is a unique physis-like structure