Shaft fractures of the Radius without DRUJ injury
- Galeazzi Equivalent?: Every isolated radius fracture is a Galeazzi until proven otherwise. You MUST check the DRUJ.
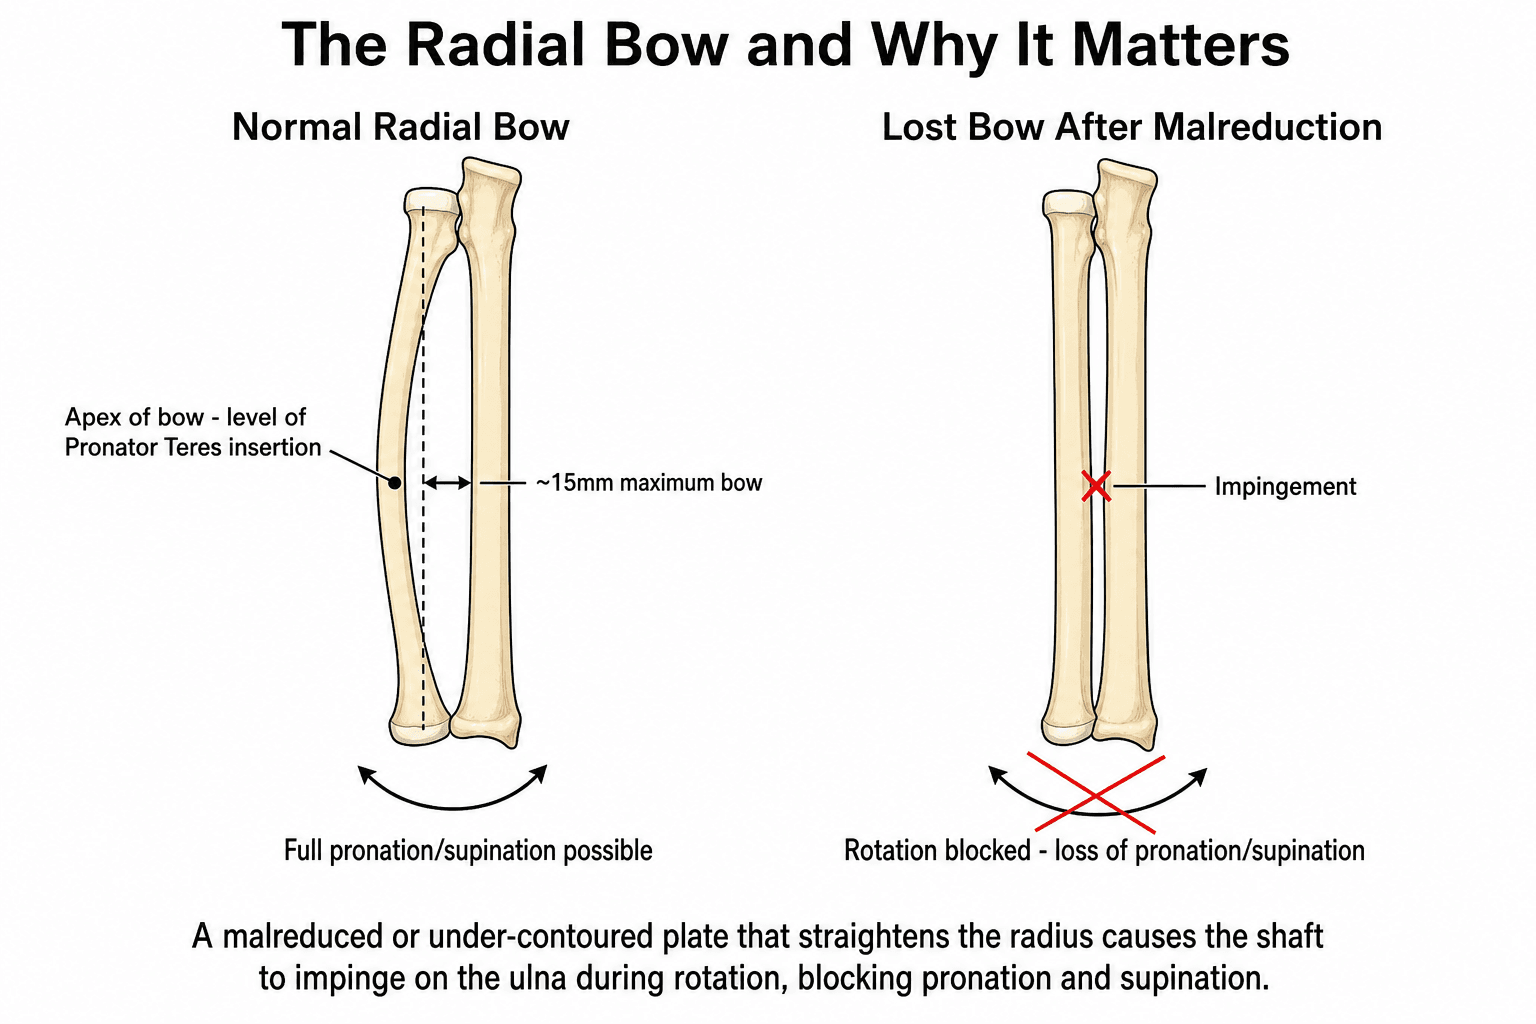
- Radial Bow: Restoring the anatomic bow (curve) of the radius is critical for full supination/pronation.
- Approaches: Henry (volar) is the universal approach and can access the whole radius. Thompson (dorsal) is reserved for the proximal third. Both put the PIN at risk proximally.
- Hardware: 3.5mm LCDCP or LCP plates are standard.
- “Rule of Two: Always x-ray the joint above and below (Elbow and Wrist).
- “Tuberosity: The bicipital tuberosity points Posteriorly in Pronation and Medially in Supination (reduces the gap).
- “Interosseous Nerve: PIN is at risk in proximal fractures (Henry or Thompson).
If there is greater than 5mm shortening of the radius, the DRUJ must be injured. An "isolated" radius fracture with significant shortening is a Galeazzi.
Forearm compartment syndrome is a surgical emergency. Pain with passive finger extension (Volkmann's Ischaemia).
Check PIN (Finger extension) and AIN (OK sign). AIN palsy is common with proximal third fractures.
Failure to restore the bow results in loss of rotation. The bow apex is at the level of the Pronator Teres insertion.
- Displacement
- Stable
- Treatment
- **Cast** (Long Arm)
- Rationale
- Monitoring required weekly. High risk of displacement.
- Displacement
- Unstable
- Treatment
- **ORIF (Compression)**
- Rationale
- Absolute stability for anatomic healing.
- Displacement
- Unstable
- Treatment
- **ORIF (Bridge)**
- Rationale
- Relative stability to preserve blood supply.
- Displacement
- Unstable
- Treatment
- **I&D + ORIF**
- Rationale
- Immediate urgent management.
Henry vs ThompsonApproaches
Hook:Henry = Volar (the workhorse). Thompson = Dorsal (proximal third).
B-P-PDeforming Forces
Hook:Muscles pull the pieces apart.
Rule of 5sReduction check
Hook:Keep it under 5.
SPINPIN Protection
Hook:SPIN the forearm to protect the PIN - supination saves the nerve!
Overview and Epidemiology
An isolated fracture of the radial shaft without involvement of the distal radioulnar joint (DRUJ) or proximal radioulnar joint (PRUJ).
- Less common than Both-Bone forearm fractures.
- Mechanism: Direct blow ("Nightstick fracture") or high energy trauma.
- Key Distinction: Must differentiate from Galeazzi (Distal 1/3 + DRUJ) and Monteggia (Proximal Ulna + Radial Head).
- Age: Common in young active males (trauma) and occasionally in elderly (falls).
- Energy: High energy injuries (MVA) have high association with Compartment Syndrome.
- Load Sharing: The radius creates a load-sharing ring with the ulna through the proximal and distal joints and the interosseous membrane (IOM).
- Axial Load: The radius transmits 80% of the axial load from the wrist.
- IOM Disruption: If the IOM is disrupted (Essex-Lopresti), the radius migrates proximally, causing ulnocarpal impaction and elbow dysfunction.
- Forearm Rotation: Pronation and Supination are complex movements where the radius rotates around the ulna. The "axis of rotation" passes through the radial head and the ulnar head.
- Significance: Any angulation of the radius acts as a "cam" effect, blocking this rotation. This is why anatomic reduction is critical. 10 degrees of angulation can block 50% of rotation.
- Muscle Balance: The Biceps (Supinator) and Pronator Teres (Pronator) pull the fragments into characteristic deformities based on fracture level.
- Nutrient Artery: Enters the radius in the proximal third from the anterior interosseous artery. Fractures distal to this may have slower healing (retrograde flow).
- Safe Zones: The "Safe Zone" for implant placement is the flat volar surface in the distal 2/3rds (Anterior) and the dorsal surface in the proximal 1/3rd.
- Triangular Shape: The radial shaft is triangular in cross-section (Anterior, Posterior, and Interosseous borders).
- Plating Surface: The volar surface is flat and ideal for plating (LCDCP plates sit well here).
- Dorsal Surface: Convex, covered by extensor muscles. Plating here is prominent.
Anatomy
Radial Bow:
- Geometry: The Radius rotates around the straight Ulna (like a bucket handle).
- Apex: It has a lateral bow with the apex at the level of the Pronator Teres insertion.
- Significance: Loss of bow = Loss of sweep = Impingement on Ulna = Loss of Pronation/Supination.
- Quantification: The maximum bow is typically 15mm from the straight line connecting the tuberosity to the styloid.
- Central Band: The primary stabilizer of the forearm longitudinally.
- Direction: Central band fibers run obliquely from the radius proximally to the ulna distally.
- Function: Transfers load from the radius (wrist) to the ulna (elbow). Fracture of the radius disrupts this load transfer.
- Proximal Third Fractures:
- Proximal Fragment: Supinated (by Biceps).
- Distal Fragment: Pronated (by Pronator Teres and Quadratus).
- Treatment: Plate in Supination to match the proximal fragment.
- Middle Third Fractures:
- Proximal Fragment: Neutral (Biceps cancels Pronator Teres).
- Distal Fragment: Pronated (by Pronator Quadratus).
- Treatment: Plate in Neutral.
- Distal Third Fractures:
- Proximal Fragment: Pronated (by Pronator Teres).
- Distal Fragment: Pronated (by Pronator Quadratus).
- Treatment: Plate in Pronation.
- Radial Nerve (Superficial): Under Brachioradialis. Risk in Henry approach.
- PIN (Posterior Interosseous): Pierces Supinator. Risk in proximal exposure (both Henry and Thompson).
- Median Nerve: Medial to FCR. Risk in Henry approach.
Classification Systems
AO/OTA Classification System
The AO/OTA classification for forearm fractures uses the code 22 (forearm bones):
- 22-A: Simple fractures (transverse or oblique)
- A1: Ulna alone
- A2: Radius alone (This topic)
- A3: Both bones
- 22-B: Wedge fractures (butterfly fragment)
- 22-C: Multifragmentary (comminuted) fractures
Understanding the AO classification helps guide treatment: Type A fractures can achieve absolute stability with compression plating, while Type C fractures require bridge plating techniques.
Clinical Assessment
- Mechanism of injury (Direct blow vs FOOSH).
- Defensive wound? (Nightstick).
- Deformity: Angulation, rotation.
- Soft Tissue: Open wounds? Tenting? Compartment tightness?
- Nerve Exam:
- PIN: Thumbs up (EPL), Finger extension (EDC). Wrist extension is preserved (ECRL).
- AIN: OK sign (FPL/FDP).
- Ulnar: Cross fingers (Interossei). Differential Diagnosis:
- Bony Lesion
- Radial shaft, ulna intact
- Joint Involved
- DRUJ and PRUJ both normal
- Discriminating Clue
- Less than 5mm shortening, congruent DRUJ on true lateral wrist film
- Bony Lesion
- Distal-third radius
- Joint Involved
- DRUJ disrupted
- Discriminating Clue
- Over 5mm shortening, widened DRUJ, ulnar styloid avulsion
- Bony Lesion
- Proximal ulna
- Joint Involved
- PRUJ (radial head dislocated)
- Discriminating Clue
- Radiocapitellar line does not bisect capitellum on any view
- Bony Lesion
- Radial head/neck
- Joint Involved
- DRUJ + entire IOM
- Discriminating Clue
- Wrist pain after radial head fracture, positive ulnar variance
- Bony Lesion
- Isolated ulnar shaft
- Joint Involved
- Both joints normal
- Discriminating Clue
- Direct defensive blow, radius and both joints intact
Soft Tissue Assessment:
- Tscherne Classification:
- Grade 0: Minimal soft tissue damage.
- Grade 1: Superficial abrasion or contusion.
- Grade 2: Deep contaminated abrasion with local skin or muscle contusion.
- Grade 3: Extensive skin contusion or crushing, muscle destruction, compartment syndrome.
Investigations
Plain X-rays:
- Forearm (AP/Lat): Must include Elbow and Wrist on ONE film if possible, or separate films.
- Wrist (AP/Lat): Essential to assess ulnar variance (Shortening) and DRUJ widening.
- Elbow (AP/Lat): Essential to assess Radial Head (Monteggia).

- Not routine for simple shaft fractures.
- Indications:
- Articular extension (Intra-articular fracture).
- Pathological fracture suspicion (Lytic lesion?).
- Complex comminution planning (Butterfly fragments).
- End-segment fractures (very proximal or very distal) to check for joint involvement.
- Protocol: 1mm slice thickness with 3D reconstructions.
- Indicated if DRUJ instability is suspected but X-rays are equivocal.
- TFCC Tear: MRI is sensitive for central or peripheral tears of the Triangular Fibrocartilage Complex.
- IOM Injury: Can visualize the Central Band of the IOM (Use FSE or STIR sequences).
- Useful for assessing PIN nerve continuity if palsy is present.
- Can assess interosseous membrane integrity dynamically.
Management Algorithm
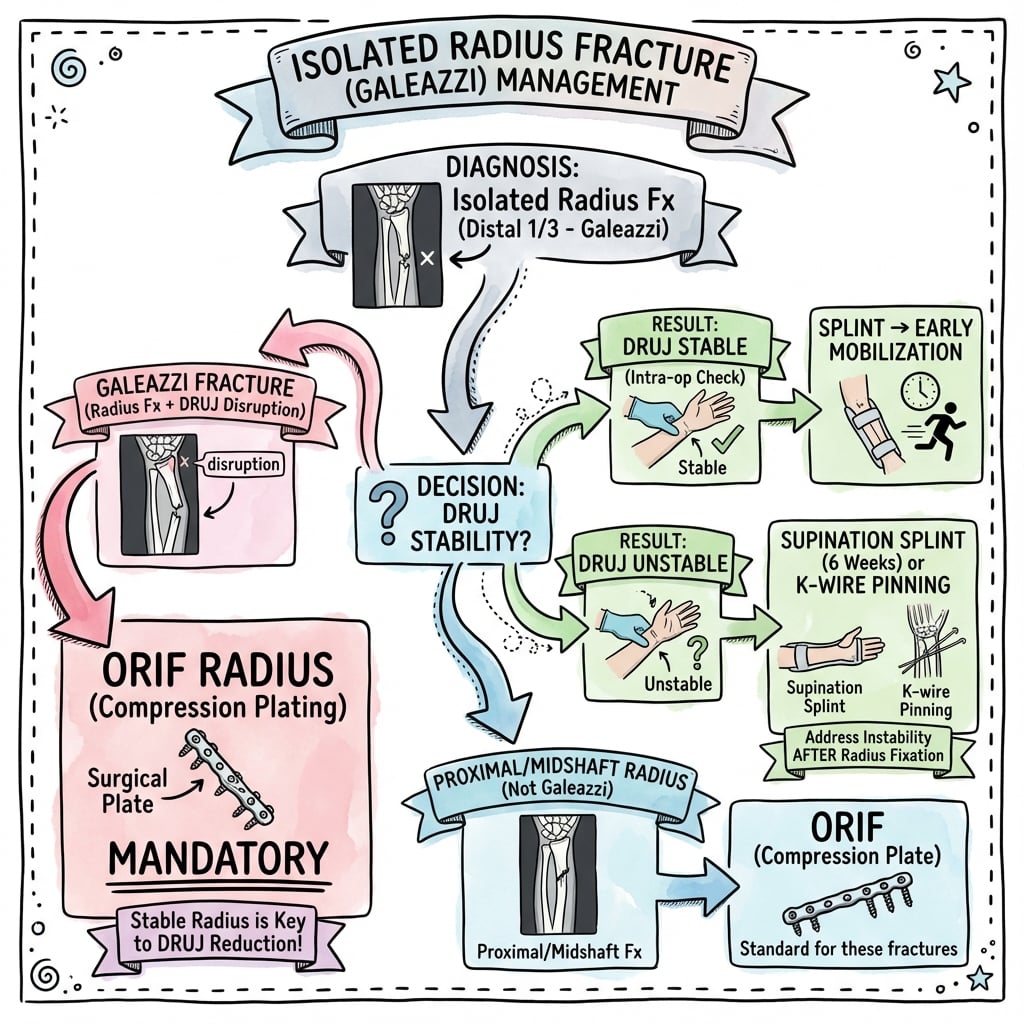
The key decision points are: displacement, fracture pattern, and associated injuries. Always rule out Galeazzi and Monteggia patterns before treating as isolated.
Decision Tree for Isolated Radius Fractures
Step 1: Assess Displacement
- Non-displaced (less than 2mm): Cast immobilization with weekly monitoring
- Displaced (greater than 2mm): Surgical fixation required
Step 2: Evaluate Fracture Pattern
- Simple (Transverse/Oblique): Compression plating for absolute stability
- Comminuted (Wedge/Multifragmentary): Bridge plating for relative stability
Step 3: Determine Surgical Approach
- Proximal 1/3: Dorsal (Thompson) or Volar (Henry) - both require PIN protection
- Middle/Distal 1/3: Volar (Henry) approach is preferred
Step 4: Address Special Considerations
- Open Fractures: Immediate antibiotics, I&D, and immediate plating if wound clean
- Segmental Fractures: High risk of compartment syndrome and nonunion - consider staged approach
- Bone Loss: Staged Masquelet technique may be required
- Pathological: Biopsy first, then fix - oncologic principles take precedence
The goal is anatomic reduction with stable fixation to allow early motion and prevent complications.
Surgical Technique
- Incision: Line from Biceps tendon to Radial Styloid.
- Superficial Interval: Between Brachioradialis (Radial N) and FCR (Median N). Deep Dissection (Step-by-Step):
- Radial Recurrent Vessels: aka "Leash of Henry". These are a fan of vessels (arteries and veins) crossing the field from medial to lateral just distal to the elbow. They must be individually ligated or cauterized.
- Supinator: Once the leash is cut, you can see the Supinator muscle fibers wrapping around the proximal radius.
- Supination: Supinate the forearm fully. This moves the PIN (which runs IN the Supinator) laterally and away from your incision.
- Incision: Incise the Supinator insertion on the anterior aspect of the radius down to bone.
- Elevation: Elevate the muscle laterally. Do NOT retract vigorously. The PIN is protecting within the muscle belly.
- Exposure: This reveals the proximal third of the radius.
- Contouring: The radius is not straight. It has a proximal bend and a distal bow.
- LCDCP vs LCP: Compression plating is preferred for simple transverse fractures. LCP (Locking) is reserved for osteoporotic bone or comminution (bridge mode).
- Screw Density: Aim for 3 bicortical screws on each side of the fracture.
- Torque: Do not over-torque screws in the forearm, the bone is hard but narrow.
- Plate: 3.5mm LCP (Locking Compression Plate) is standard.
- Screws:
- 3.5mm Cortical Screws (Gold): Use for compression or lagging. Drill bit 2.5mm.
- 3.5mm Locking Screws (Green): Use for osteopenic bone or bridge plating. Drill bit 2.8mm.
- Length: 7-hole or 8-hole plate typified.
- Material: Stainless Steel (316L) or Titanium (Ti-6Al-4V). Stainless steel is stiffer and cheaper.
- Toggle: Insert a screw into one fragment, but leave it loose. Use the plate as a lever to toggle the reduction.
- Traction: Assistant provides traction (finger traps unnecessary for shaft, manual is fine).
- Rotation: Match the rotation of the fragments. Look at the interosseous border - it should be a sharp line. If it is dull or jagged, you are rotated.
- Clamps: Pointed reduction clamps (Weber) are useful but hard to place deeply. Verbal reduction (Traction, Rotate) is safer than aggressive clamping in the deep wound.
- 1. Release the Brachioradialis tendon: If exposure is tight distally, partially releasing the BR tendon (distal release) allows much greater retraction.
- 2. Supinate for Proximal Exposure: You cannot see the proximal radius without full supination, which carries the PIN laterally to safety. If supination is blocked, look for an interposed fragment or incomplete soft-tissue release.
- 3. Plate the Tension Side: The volar surface is the tension side for the distal radius, but the radius is curved. The plate must be contoured to match the curve, otherwise tightening the screws will straighten the bone and lose the bow.
- 4. Use the correct screw length: Intra-articular screws in the DRUJ or PRUJ are disastrous. Shaft screws that are too long will irritate the dorsal tendons (EPL). Measure twice.
- 5. Don't strip the periosteum: Only strip what is under the plate. Preserve the soft tissue attachments elsewhere to maintain blood supply.
Always check the DRUJ one last time before leaving the theatre.
Complications
-
Synostosis (Radio-Ulnar):
- Bone bridge forms between radius and ulna.
- Causes total loss of rotation.
- Risk Factors: Single incision for both bones, breach of interosseous membrane, head injury, bone graft.
- Prevention: Separate incisions. Avoid dissecting deep into the IOM.
-
Refracture:
- After plate removal.
- The forearm is a load-sharing bone. Removing the plate leaves stress risers.
- Do not remove plates in forearm unless symptomatic (wait 18-24 months).
-
Nerve Palsy:
- PIN palsy (loss of finger extension). USUALLY neuropraxia from retraction. Observe for 3 months.
- See EMG at 6 weeks if no recovery.
- Tendon transfers (Jones transfer) if permanent.
-
Nonunion:
- Rate 5-10%.
- Infection.
- Atrophic nonunion requires bone graft and compression.
-
Elbow Instability:
- Missed Monteggia lesion. Always check the elbow.
-
Compartment Syndrome:
- Incidence: 5-10% of forearm fractures. The forearm is the second most common site for CS after the leg.
- Pathophysiology:
- Bleeding into the Volar (Flexor) or Dorsal (Extensor) compartments increases pressure.
- The Volar compartment is most critical as it contains the Median and Ulnar nerves and the Flexor muscles.
- Perfusion Pressure = Diastolic BP - Compartment Pressure. If less than 30mmHg, muscle ischaemia begins.
- Diagnosis (The 6 Ps):
- Pain: Out of proportion to injury. Breaking through analgesia.
- Pain with Passive Stretch: The earliest and most sensitive sign. (Extension of fingers stretches flexors).
- Paresthesia: Late sign.
- Paralysis: Late sign (Ischaemia).
- Pulselessness: Very late sign (Arterial shutoff).
- Pallor: Unreliable.
- Treatment: Urgent Fasciotomy.
- Volar: Henry approach extended from elbow to wrist (S-shape across crease). Release Lacertus Fibrosus, Carpal Tunnel, and Volar fascia.
- Dorsal: Straight dorsal incision.
- Sequelae: Volkmann's Ischaemic Contracture (Claw hand, sensory loss, useless limb).
-
Implant Irritation:
- Dorsal plates often irritate the extensor tendons (EPL/EDC).
- Volar plates can irritate FPL (check screw lengths!).
- Removal indicated if symptomatic after union.
-
CRPS (Complex Regional Pain Syndrome):
- Characterized by allodynia, swelling, color changes.
- Prevention: Vitamin C, early motion, pain control.
Postoperative Care and Rehabilitation
- Week 0-2 (Wound):
- Splint: Posterior slab or removable splint.
- Elevation: Critical to reduce swelling and compartment pressure.
- Motion: Immediate active finger motion to prevent tendon adhesions and edema.
- Week 2-6 (ROM):
- Sutures: Removal at 10-14 days.
- Active Motion: Start Active elbow flexion/extension.
- Rotation: Start Supination/Pronation. This is often the hardest to regain. Do it with elbow at 90 degrees (isolates forearm) and 0 degrees.
- Restrictions: No heavy lifting (cup of coffee only).
- Week 6-12 (Strength):
- X-ray: Check for radiographic signs of union (callus/bridging).
- Strengthening: Begin progressive resistance exercises if union is evident.
- Work: Return to light duties.
- Month 3-6 (Return):
- Sport: Contact sports allowed when cortical bridging is seen on 3 of 4 cortices.
- Full Duty: Manual labor allowed.
- Specific Milestones:
- Driving: allowed when out of splint and can grip wheel/turn comfortably (approx 6 weeks).
- Typing: allowed immediately (fingers free).
- Push-ups: Not allowed until 3 months (axial load).
Outcomes and Prognosis
- Compression Plating: Greater than 95% union rate with absolute stability
- Bridge Plating: Comparable union rates (90-95%) for comminuted fractures
- Nonunion Risk Factors: Infection, inadequate fixation, bone loss, smoking
- Range of Motion: Most patients lose 10-20 degrees of rotation compared to normal side, but functional loss is minimal
- Grip Strength: Usually returns to 90% of normal by 6-12 months
- Patient Satisfaction: High satisfaction rates with surgical treatment
- Return to Activity:
- Light duties: 6-8 weeks
- Manual labor: 3-4 months
- Contact sports: 3-6 months depending on contact level
- Plate Removal: Risk of refracture (10-20%) after plate removal - only remove if symptomatic
- Arthritis: Rare long-term complication, usually related to malunion or joint injury
- Stiffness: Persistent stiffness uncommon with proper rehabilitation
Good outcomes are associated with: anatomic reduction, restoration of radial bow, stable fixation allowing early motion, and absence of complications. Poor outcomes are associated with: malunion, nonunion, compartment syndrome, and nerve injury.
Anterior Interosseous Nerve (AIN) Injury
The topic's nerve examination relies on the "OK sign" and states that AIN palsy is common with proximal-third fractures, yet the AIN itself is never developed. It is a high-yield distinction because, unlike the PIN, an AIN lesion produces no sensory loss and is therefore easily missed.
- The AIN is the largest motor branch of the median nerve, arising in the proximal forearm (approximately 5-8 cm distal to the lateral epicondyle) as the median nerve passes between the two heads of pronator teres.
- It runs distally on the volar surface of the interosseous membrane, in the interval between flexor pollicis longus (FPL) laterally and flexor digitorum profundus (FDP) medially, ending in pronator quadratus (PQ).
- Innervates: FPL, FDP to the index (and often middle) finger, and PQ. It carries no cutaneous sensation - it supplies only deep proprioceptive/joint fibres.
- Proximal-third radial shaft fractures and the deep volar (Henry) dissection place the AIN at risk from the fracture fragment, haematoma, or retraction.
- Because the nerve lies on the interosseous membrane against the radius, it is vulnerable where the exposure is most proximal.
- Loss of thumb interphalangeal flexion (FPL) and index distal interphalangeal flexion (FDP) means the patient cannot form a round tip-to-tip "O"; instead the pinch collapses into a flat pulp-to-pulp or "square/triangle" pinch - the classic abnormal pinch-grip / OK-sign test.
- PQ weakness is unmasked by testing resisted pronation with the elbow fully flexed (this eliminates pronator teres).
- Crucially, sensation is entirely normal, which distinguishes it from a high (proximal) median nerve palsy.
- Most post-traumatic/post-operative AIN palsies are neuropraxia from traction or retraction and recover spontaneously, usually within about 3-6 months - observe with serial examination.
- First exclude a mechanical cause of a failed OK sign: FPL/FDP tendon rupture (check the tenodesis effect and the wrist for laceration) and attritional tendon injury from prominent volar hardware.
- If there is no recovery, obtain nerve conduction studies/EMG at about 6-12 weeks; explore only if the nerve is entrapped by a fragment or implant, or if it was potentially divided.
- Spontaneous (non-traumatic) AIN neuropathy is the Kiloh-Nevin syndrome eponym.
Q: After a proximal radial shaft fracture a patient cannot make a round "OK" sign but has completely normal sensation. What is the lesion? A: Anterior interosseous nerve (AIN) palsy - a pure motor loss of FPL and FDP to the index, so thumb-IP and index-DIP flexion fail and the pinch collapses to pulp-to-pulp, with no sensory deficit. Contrast with PIN palsy (lost finger/thumb extension, preserved wrist extension) and a high median palsy (adds sensory loss and thenar/other flexor involvement). Most AIN lesions are neuropraxia - observe about 3 months.
Segmental Fractures and Bone Loss: Nonunion Risk and Reconstruction
The management algorithm flags "Segmental Fractures" and "Bone Loss" and the Controversies section raises "Masquelet vs early grafting vs vascularised graft," but the pathway is never developed - even though the Nappo evidence card shows bone loss is one of the two strongest drivers of nonunion.
- Segmental patterns (two fracture lines isolating an intercalary segment) and any cortical/critical-sized defect follow a high-energy mechanism, with periosteal stripping and a devascularised middle segment.
- They carry the highest rates of compartment syndrome, delayed and nonunion. In Nappo et al's high-energy open forearm series, segmental bone loss carried a relative risk of nonunion of 6.2 and deep infection a relative risk of 9.9 - the two dominant nonunion drivers.
- Length and rotation are hard to judge when a segment is missing - template against the contralateral normal radius and reproduce the magnitude and location of the radial bow (Schemitsch).
- Use a long bridge plate spanning both fracture levels (relative stability), and deliberately preserve the soft-tissue attachments of the intercalary segment rather than stripping it bare.
- Keep dissection off the interosseous membrane to avoid radioulnar synostosis.
- Small contained defects: stable fixation plus primary autogenous cancellous graft (iliac crest) usually unites.
- Larger segmental defects (greater than a few centimetres): the induced-membrane (Masquelet) technique - stage one places an antibiotic cement spacer to form a vascular biomembrane and hold length/alignment; stage two (at about 6-8 weeks) removes the spacer and packs cancellous autograft into the preserved membrane.
- Very large or infected defects: a vascularised graft (free fibula) provides living bone that hypertrophies and tolerates a poor bed.
- Where deep infection is present, debride and stage (do not graft into contaminated tissue) - reflecting the relative risk of 9.9 for infection-associated nonunion.
Q: Which two factors most strongly predict nonunion of a high-energy radial shaft fracture, and how does that change your plan? A: Segmental/critical-sized bone loss and deep infection (Nappo et al: relative risk 6.2 and 9.9 respectively). Restore length off the contralateral radius, bridge-plate without stripping the intercalary segment, stage grafting via the induced-membrane (Masquelet) technique for larger defects (or a vascularised fibula for very large/infected defects), and never graft into an infected bed.
Guidelines, Registries & Global Practice
Global Epidemiology:
- Isolated radial shaft fractures are uncommon relative to both-bone forearm and distal radius fractures, occurring in a bimodal distribution: high-energy trauma in young men (road traffic and sporting injuries) and lower-energy falls in older adults.
- High-energy mechanisms carry a disproportionate burden of compartment syndrome, open injury, and associated DRUJ disruption (the "occult Galeazzi").
Side-by-Side Guideline Principles:
- Core Recommendation
- Anatomic ORIF: absolute stability (compression) for simple patterns, relative stability (bridge) for comminution
- Practical Emphasis
- Restore length, alignment, rotation and radial bow; 3.5mm LC-DCP/LCP
- Core Recommendation
- Diaphyseal forearm fractures in adults are surgical injuries; assess and document neurovascular status and compartments
- Practical Emphasis
- Open fractures follow BOAST open-fracture standards (early antibiotics, combined ortho-plastic care)
- Core Recommendation
- Displaced adult diaphyseal forearm fractures warrant operative fixation to preserve rotation
- Practical Emphasis
- Early mobilisation after stable fixation
- Core Recommendation
- Reproduce the radial bow and DRUJ congruity; reserve non-operative care for truly undisplaced fractures
- Practical Emphasis
- Hand-therapy-led rehabilitation of pronosupination
- Diaphyseal forearm fractures are not separately reported by arthroplasty registries (NJR, AJRR, AOANJRR), but national trauma and open-fracture audits (e.g. UK open-fracture standards) drive timing of debridement and soft-tissue cover, which influence synostosis and nonunion rates.
- Well-resourced settings: Anatomic ORIF with small-fragment locking systems, intraoperative DRUJ assessment, and protocolised hand therapy are standard.
- Limited-resource settings: Stainless-steel non-locking plates and elastic intramedullary nailing are cost-effective alternatives with good union when length and bow are restored; access to formal hand therapy is the main rehabilitation bottleneck.
- Referral logic everywhere: Simple isolated fractures are managed by general orthopaedic surgeons; comminuted, open, or Galeazzi-pattern injuries are best concentrated where DRUJ reconstruction and soft-tissue cover are available.
Controversies & Areas of Uncertainty
- Plate vs intramedullary nail: Anatomic plating is the established standard for the adult radial shaft, but newer locked forearm nails claim comparable union with less soft tissue stripping. High-quality comparative data restoring the radial bow with nails remain limited, so plating stays the default for displaced shaft fractures.
- MIPO for the radius: Minimally invasive plating preserves fracture biology and gives comparable early outcomes in small series, but reproducing the radial bow blind risks malrotation. Reserve it for surgeons experienced with the technique and simpler patterns.
- Routine implant removal: No consensus supports prophylactic plate removal. Refracture clusters at plate ends and most removals are unnecessary; remove only symptomatic hardware, and not before 18-24 months of solid union.
- DRUJ management in the borderline case: When the DRUJ is reduced but only "soft" intraoperatively, the choice between cast immobilisation in supination, K-wire transfixation, and TFCC repair is unsettled - meta-analysis shows persistent instability is rare whichever is chosen, favouring the least invasive stable option.
- Acceptable non-operative thresholds in adults: The displacement/angulation a load-sharing radius can tolerate without functional rotation loss is debated; most surgeons fix anything that is displaced, rotated, or shortened given the cam effect of even small malalignment.
- Bone grafting comminuted fractures: Primary grafting is generally unnecessary if length, alignment and stability are restored, but the role of biologic augmentation in segmental loss (Masquelet vs early grafting vs vascularised graft) is still individualised.
MCQ Practice Points
Q: Where is the apex of the radial bow located? A: At the level of the Pronator Teres insertion (Middle Third).
Q: Which interval is used for the Volar (Henry) approach? A: Between Brachioradialis and FCR.
Q: What is the primary risk of a single incision for BBFF? A: Radioulnar Synostosis.
Q: How many cortices of fixation are required proximal and distal to the fracture? A: Six cortices (3 bicortical screws) on each side.
Q: An isolated radius fracture with DRUJ tenderness is known as? A: Galeazzi Fracture.
Exam Viva Scenarios
Practise clinical reasoning and management decisions out loud
“A 25-year-old male presents with a mid-shaft radius fracture following a fall. X-rays show 10mm of shortening of the radius. The patient complains of wrist pain. What specific injury must you look for and how would you assess it?”
“You are performing a Henry approach for a proximal third radius fracture. As you dissect deep, you encounter bleeding from a leash of vessels crossing the field. What are these vessels, why are they a landmark, and how do you proceed safely?”
“A patient presents 6 weeks after ORIF of a radius fracture with inability to extend the fingers and thumb. Wrist extension is preserved. What is the diagnosis and management?”
Deforming Forces
- Proximal 1/3: Supinated (Biceps/Supinator)
- Middle 1/3: Neutral position
- Distal 1/3: Pronated (PQ)
- Biceps tuberosity = deformity pivot point
Surgical Goals
- Restore Length
- Restore Radial Bow
- Absolute Stability
- Active Motion
Approaches
- Henry (Volar) = Universal approach
- Thompson (Dorsal) = Proximal only
- Protect PIN (within 4cm of radial head)
- Internervous: FCR (Median)/BR (Radial)
Red Flags
- Shortening over 5mm = suspect Galeazzi
- Compartment Syndrome risk
- Associated Ulna fracture = Both Bone
- DRUJ instability must assess
Key Evidence
- Anderson 1975: Compression plating - 97.9% radius union
- Schemitsch 1992: Radial bow restoration critical for rotation
- Lindgren 2023: 5-11% refracture, mostly at plate ends
- Xiao 2022: Most reduced DRUJs stay stable after radius fixation
Evidence
Compression Plating - The Foundational Series
- 330 acute diaphyseal radius/ulna fractures (244 patients) treated with ASIF compression plates, followed 4 months to 9 years.
- Union rate 97.9% for the radius and 96.3% for the ulna.
- Established rigid compression plating as the standard of care for adult diaphyseal forearm fractures.
Radial Bow Restoration Drives Function
- 55 adults with both-bone forearm fractures, mean 6-year follow-up; malunion quantified against the contralateral normal radial bow.
- Restoring the normal magnitude AND location of the maximum radial bow correlated with good rotation (over 80% of normal) and grip recovery.
- Bone grafting did not affect union rate.
MIPO vs Open Plating for Radial Shaft
- Retrospective comparison of 49 diaphyseal radius fractures: MIPO (n=20) vs conventional ORIF (n=29), single surgeon.
- 100% union in both groups; union time and forearm rotation comparable (MIPO supination 87.3 deg / pronation 79.5 deg).
- No infection or neurovascular injury in either group.
Synostosis After High-Energy Forearm Fractures
- 73 high-energy open forearm fractures in combatants; final union 96%.
- Heterotopic ossification in 55% and radioulnar synostosis in 19%; synostosis (not HO alone) was the main driver of lost rotation.
- Nonunion was associated with segmental bone loss (RR 6.2) and deep infection (RR 9.9).
Refracture After Implant Removal
- 349 surgically fixed forearm fractures; subsequent fracture rate 10.9% after plating vs 5.1% after intramedullary nailing.
- 90% of plate refractures occurred at the proximal or distal plate edge (stress riser).
- 90% of plate refractures required revision surgery.
Managing Associated DRUJ Instability
- Systematic review and meta-analysis, 258 patients with DRUJ instability after distal radius fracture.
- Persistent DRUJ instability in only 4 patients (1.5%) overall, with no significant difference between cast immobilisation, K-wire stabilisation, and TFCC repair.
- DASH scores did not differ across treatment groups.