Axial Load | TAL Integrity Determines Stability | Rule of Spence Screening
- Rule of Spence: Combined lateral mass displacement over 6.9mm suggests TAL rupture
- MRI is gold standard for TAL integrity assessment - not just Rule of Spence
- 40-50% have associated C2 fractures - always assess entire cervical spine
- Steel's Rule of Thirds: Canal expansion explains low neurological injury rate
- Midsubstance TAL rupture (Dickman I) cannot heal - requires surgical stabilization
- “Jefferson expands the canal (low neuro injury) vs Hangman's translates (higher risk)
- “ADI over 3mm in adults indicates atlantoaxial instability
- “Goel-Harms technique is current gold standard for C1-C2 fusion
- “Original 6.9mm threshold has magnification limitations - use clinical judgment
Combined LMD over 6.9mm suggests TAL rupture. But remember: original threshold based on cadaveric studies with magnification. Use as screening tool, not definitive diagnosis.
MRI is gold standard for TAL integrity. Dickman Type I (midsubstance) cannot heal = surgery. Type II (bony avulsion) may heal with immobilization.
40-50% have C2 fractures. Always CT entire cervical spine. Check for odontoid and Hangman's fractures. Consider CTA if transverse foramen involved.
Steel's Rule of Thirds: Canal expands with Jefferson fracture. Only 10% neurological injury rate. Compare to translation injuries which compress the canal.
- Key Finding
- ADI under 3mm, isolated C1
- Stability
- Stable
- Treatment
- Rigid collar 8-12 weeks
- Key Finding
- Dickman Type II on MRI
- Stability
- Potentially stable
- Treatment
- Halo vest 8-12 weeks (may heal)
- Key Finding
- Dickman Type I on MRI
- Stability
- Unstable
- Treatment
- C1-C2 fusion (Goel-Harms)
- Key Finding
- Combined C1-C2 injury
- Stability
- Variable
- Treatment
- Manage as worst injury dictates
ATLAS
Hook:ATLAS helps you remember C1 (Atlas) fracture assessment - Axial load, TAL, Lateral mass, ADI, Six-nine rule
BURST
Hook:BURST fracture assessment - Bilateral, Understand TAL, Rule of Spence, Six-nine, Treatment
EXAMINE
Hook:EXAMINE the Jefferson fracture patient systematically
COLLAR
Hook:COLLAR reminds you of treatment for stable Jefferson fractures
Overview and Clinical Significance
The C1 Burst Fracture
Jefferson fracture, first described by Sir Geoffrey Jefferson in 1920, is a burst fracture of the atlas (C1) vertebra resulting from axial compression. The unique ring structure of C1, with its thin anterior and posterior arches, makes it susceptible to fracture when compressed between the skull and C2.
Atlas fractures account for approximately 11% of all cervical fractures (Lyons & Mian 2022). Contemporary populations are bimodal but increasingly geriatric (mean age ~71 years; majority over 70), with low-energy falls now the leading mechanism. A high-energy axial-load Jefferson burst remains the classic young-patient pattern. Associated injuries are common (over half are non-isolated); neurological injury is rare in pure Jefferson fractures.
Axial load to vertex, Diving into shallow water, Fall onto top of head, Head-first motor vehicle accident, Objects falling onto head
C1 ring: anterior arch, posterior arch, Lateral masses articulate with C0 and C2, No vertebral body or disc, TAL connects lateral masses posteriorly, Dens held against anterior arch by TAL
Why Neurological Injury is Rare
The classic Jefferson fracture causes lateral displacement of the lateral masses, which actually increases the space available for the spinal cord. This is in contrast to translational injuries where the canal is compromised. The rule "Jefferson expands, Hangman's translates" helps explain the low neurological injury rate.
"Steel's Rule of Thirds": At C1 level, the spinal canal is divided into thirds - 1/3 dens, 1/3 cord, 1/3 space. A pure Jefferson fracture with lateral expansion increases the space available for the cord, explaining low neurological injury rates.
Pathophysiology and Mechanisms
C1 Vertebral Anatomy
The atlas is unique among cervical vertebrae:
- Description
- Thin bone, articulates with dens via facet
- Clinical Relevance
- Fractures under axial load at weakest point
- Description
- Thin bone, vertebral artery groove
- Clinical Relevance
- Common fracture site, vertebral artery at risk
- Description
- Bear weight from skull, articulate C0 and C2
- Clinical Relevance
- Lateral displacement measured for stability
- Description
- Contains vertebral artery
- Clinical Relevance
- Artery injury possible with displaced fractures
- Description
- Ring structure only
- Clinical Relevance
- Unique biomechanics, no disc above or below
- Description
- Posterior tubercle only
- Clinical Relevance
- Palpation landmark (C1 not palpable)
Transverse Atlantal Ligament (TAL)
The TAL is the most important structure for C1-C2 stability:
Strong band connecting lateral masses, Passes posterior to dens, Holds dens against anterior arch, Primary restraint to anterior translation, Part of cruciform ligament complex
Prevents C1 anterior translation, Allows rotation (C1 pivots around dens), Normal ADI less than 3mm adults, Rupture allows ADI increase, Intact TAL = stable injury
Rule of Spence on radiograph, ADI on lateral view, MRI gold standard, Direct visualization of ligament, Bone avulsion vs midsubstance tear
Biomechanics of Injury
When axial load is applied to the vertex:
- Force transmitted through occipital condyles to C1 lateral masses
- Wedge-shaped lateral masses forced apart
- C1 ring fractures at weakest points (anterior and posterior arches)
- Lateral masses displace outward
- TAL may rupture or avulse if displacement severe
Classification Systems
Levine-Edwards Classification
Based on fracture location within C1 ring:
- Description
- Posterior arch fracture only
- Stability
- Stable
- Management
- Collar
- Description
- Lateral mass fracture
- Stability
- Variable
- Management
- Assess TAL
- Description
- Anterior arch fracture only
- Stability
- Stable
- Management
- Collar
- Description
- Bilateral anterior and posterior arch fractures
- Stability
- Depends on TAL
- Management
- Assess TAL integrity
Clinical Assessment
History
Key mechanism features:
- Diving injury: Shallow water, head-first impact
- Fall: Onto top of head (axial load)
- MVA: Head-first collision, vertex impact
- Falling object: Weight landing on head
Associated symptoms:
- Neck pain (occipital, suboccipital)
- Headache
- Limited range of motion
- Neurological symptoms (rare with isolated Jefferson)
Physical Examination
Maintain cervical spine immobilization until cleared. High association with other cervical fractures (40-50% have C2 injury). Complete ATLS primary survey before focused spine examination.
A high-yield principle: a C1 fracture is rarely isolated - around 40-50 percent have an associated C2 injury (most commonly a type II odontoid fracture, also hangman's/C2-body fractures), and there are recognised combined atlas-axis patterns. The examinable consequence is that the C2 (axis) component usually determines the construct, not the Jefferson fracture in isolation:
- A Jefferson (with whatever TAL status) plus a type II odontoid typically needs a C1-C2 fusion that addresses both - direct C1 osteosynthesis is off the table because the odontoid injury already mandates atlantoaxial stabilisation.
- A Jefferson plus a hangman's (C2 pars) may need a construct spanning the relevant levels (sometimes occipitocervical) - again driven by the C2 injury.
- Combined C1-C2 injuries are more unstable and have worse outcomes than either alone, and the more-unstable/less-healable component dictates operative versus halo/collar management.
So always scrutinise C2 (and the occipital condyles) on the CT before settling the plan: image the whole craniocervical junction, and let the dominant (usually C2) injury lead the decision.
Exam point: don't treat a Jefferson in isolation - 40-50 percent have a C2 injury (classically a type II odontoid), the combined pattern is more unstable, and the C2 component usually dictates the construct (commonly C1-C2 or occipitocervical fusion).
Examination findings:
- Inspection: Cervical collar in place, head position
- Palpation: Posterior midline tenderness (C1 not directly palpable)
- Neurological: Full motor/sensory exam, cranial nerves
- Vascular: Vertebral artery injury assessment if displaced fracture
Canadian C-Spine Rules Application
Jefferson fractures typically present with:
- Dangerous mechanism (diving, fall from height)
- Neck pain and tenderness
- Unable to actively rotate neck 45 degrees
- Therefore: imaging indicated
Investigations
Plain Radiographs
Open-Mouth (Odontoid) View:
- Essential for measuring lateral mass displacement
- Combined overhang of lateral masses measured
- Compare C1 lateral mass edges to C2 lateral masses
- Rule of Spence: greater than 6.9mm suggests TAL rupture
Lateral Cervical Radiograph:
- Atlanto-dental interval (ADI)
- Normal: less than 3mm in adults, less than 5mm in children
- Prevertebral soft tissue swelling
- C1-C2 alignment
CT Imaging
Gold standard for fracture delineation:

Fracture pattern (bilateral arch fractures), Number and location of fractures, Lateral mass displacement (more accurate than radiograph), Associated fractures (C2, occipital condyles), Bone avulsion from TAL insertion
Cannot directly visualize TAL, Ligamentous injury not assessed, Must correlate with clinical exam, May miss subtle instability, MRI needed for TAL assessment
MRI Assessment
Indications for MRI:
- Combined LMD approaching or exceeding 6.9mm
- ADI greater than 3mm
- Any concern for ligamentous instability
- Neurological deficit
- Planning for definitive management
- TAL Status
- Intact
- Implication
- Stable injury, collar treatment
- TAL Status
- Partial injury
- Implication
- Close monitoring, consider halo
- TAL Status
- Complete rupture (Type I)
- Implication
- Unstable, surgery likely
- TAL Status
- Avulsion (Type II)
- Implication
- May heal with immobilization
Rule of Spence - Detailed Application

The Rule of Spence (6.9mm) was derived from cadaveric studies using plain radiographs with inherent magnification. Modern CT measurements may be more accurate. Many centers use 7mm or consider any significant displacement as indication for MRI. The rule is a screening tool, not definitive for TAL rupture.
Measuring lateral mass displacement:
- On open-mouth or coronal CT
- Measure overhang of C1 lateral mass beyond C2 on each side
- Add both measurements = combined LMD
- Greater than 6.9mm (or 7mm): TAL likely incompetent
- Less than 6.9mm: does not exclude TAL injury, clinical correlation needed
Differential Diagnosis and Associated Injuries
C1 Fracture Types
Not all C1 fractures are Jefferson fractures. Understanding the spectrum is important:
- Mechanism
- Axial load
- Pattern
- Bilateral anterior and posterior arch
- Stability
- Depends on TAL
- Mechanism
- Extension
- Pattern
- Isolated posterior arch
- Stability
- Stable
- Mechanism
- Extension with rotation
- Pattern
- Isolated anterior arch
- Stability
- Usually stable
- Mechanism
- Axial with lateral bend
- Pattern
- Through lateral mass
- Stability
- Usually stable
- Mechanism
- Axial or rotation
- Pattern
- At craniocervical junction
- Stability
- Variable
Associated Cervical Injuries
Jefferson fractures commonly occur with other injuries - always evaluate the entire cervical spine:

Odontoid fractures (Type II most common), Hangman's fractures (C2 pars), Combined C1-C2 instability, May alter management significantly, CT entire cervical spine mandatory
Type I: Comminuted (stable), Type II: Basilar skull extension, Type III: Avulsion (unstable), CT skull base included, MRI for ligamentous injury
Risk with displaced fractures, Foramen transversarium involvement, CTA screening indicated, May be asymptomatic initially, Stroke risk if unrecognized
In polytrauma patients with Jefferson fracture, always assume there are associated injuries until proven otherwise. Complete cervical spine CT and thorough assessment of craniocervical junction are mandatory. Consider CTA if fractures involve the transverse foramen.
Management Algorithm
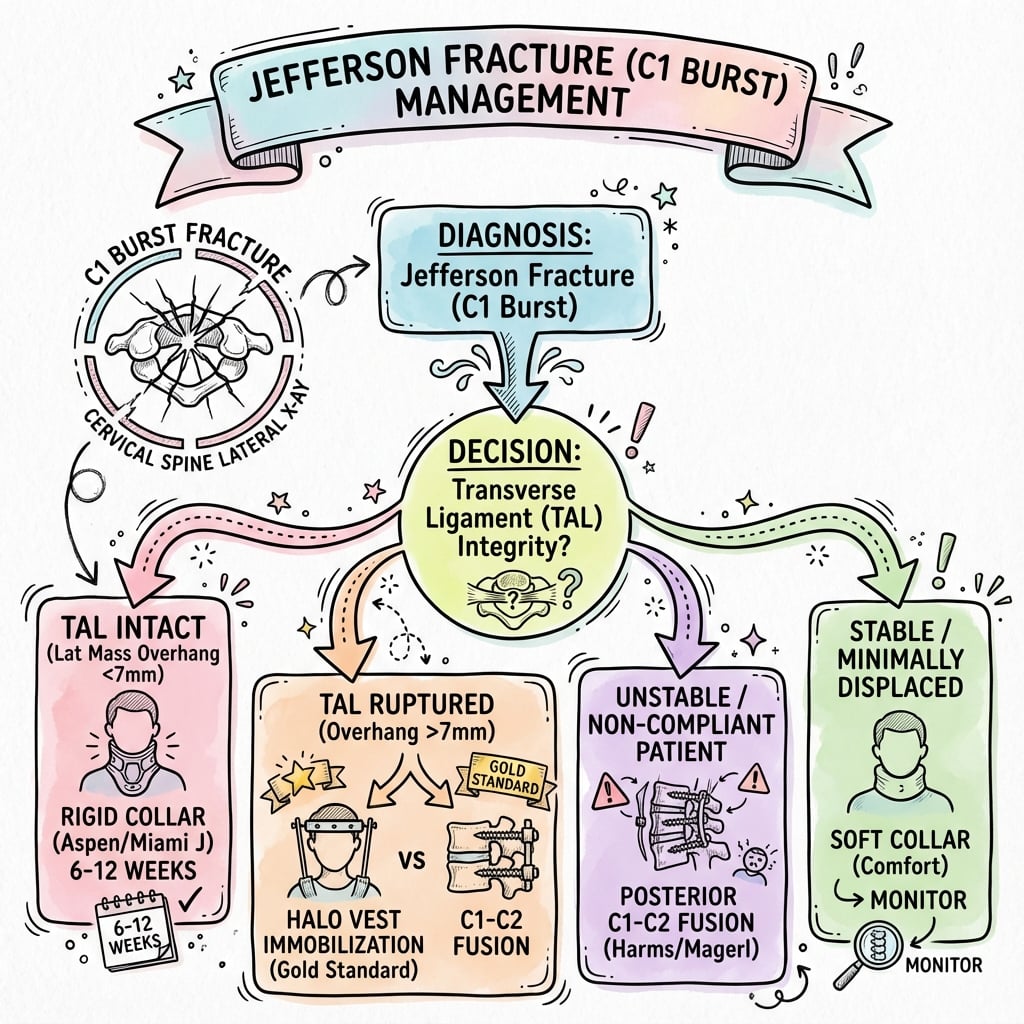
Management Algorithm
Jefferson Fracture Identified
          │
          ▼
    Assess Stability
          │
    ┌─────┴─────┐
    │           │
    ▼           ▼
 Stable      Unstable
(TAL intact) (TAL ruptured)
    │           │
    ▼           ▼
  Collar     Halo vest
8-12 weeks   OR Surgery
    │           │
    ▼           ▼
 Flexion-    C1-C2 fusion
extension   (if halo fails
 at 12wk    or not tolerated)
Surgical Technique
Preoperative Planning
CT with thin cuts through C1-C2, MRI to confirm TAL rupture, CTA to map vertebral artery course, Assess bone quality for screw placement, Plan trajectory to avoid vertebral artery
Supine with head in Mayfield pins, Gentle extension to open posterior space, Fluoroscopy available (AP and lateral), Neuromonitoring (SSEPs, MEPs), Ensure safe airway with cervical instability
Complications
- Incidence
- 5-10%
- Risk Factors
- Severe displacement, inadequate immobilization
- Management
- Extended immobilization or surgery
- Incidence
- Variable
- Risk Factors
- Missed TAL injury, insufficient treatment
- Management
- Late C1-C2 fusion
- Incidence
- Rare
- Risk Factors
- Displaced fracture through foramen
- Management
- CTA screening, observation or intervention
- Incidence
- Uncommon
- Risk Factors
- Malunion, chronic instability
- Management
- Usually asymptomatic, fusion if symptomatic
- Incidence
- With fusion
- Risk Factors
- C1-C2 fusion performed
- Management
- Expected, usually well-tolerated
Surgical Complications
Specific to C1-C2 fusion procedures:
2-4% risk with screw placement, Higher risk with C2 transarticular screws, Lower risk with Goel-Harms technique, Preoperative CTA essential, May require intraoperative vascular surgery
Shoulder abduction weakness, Typically transient, Mechanism unclear (traction vs cord shift), Physical therapy for recovery, Most recover by 6-12 months
1-3% deep wound infection, Higher risk in polytrauma, Prolonged antibiotics, May require hardware removal if chronic, Fusion can still occur
Screw loosening or breakage, Usually related to non-union, May require revision surgery, Prevention: ensure good bone quality, Augmentation options available
Vertebral artery injury during C1-C2 instrumentation can be catastrophic. Always obtain preoperative CTA to map vertebral artery anatomy. Consider navigation guidance for complex anatomy. Have vascular surgery backup available for high-risk cases.
Postoperative Care
Immediate Postoperative Management
ICU or step-down unit monitoring, Neurological checks every 2-4 hours, Maintain cervical collar (even after fusion), Drain management (remove at 24 hours), Early mobilization with PT/OT
Multimodal analgesia approach, Avoid NSAIDs first 6 weeks (fusion healing), Opioids as needed initially, Transition to non-opioid agents, Neuropathic pain medications if needed
Sequential compression devices, Early mobilization, Chemical prophylaxis per trauma protocol, Balance bleeding risk with DVT risk, Continue until fully ambulatory
Immobilization Protocol
After C1-C2 Fusion:
- Rigid cervical collar for 6-8 weeks
- Collar provides additional support during fusion
- Not primary immobilization (instrumentation provides stability)
- Patient comfort and protection from inadvertent movement
After Collar Treatment (Stable Fracture):
- Rigid collar for 8-12 weeks continuously
- 24/7 wear except for bathing (with supervision)
- Proper fit checked at each visit
- Skin care to prevent breakdown
- Compliance critical for healing
Follow-up Schedule
- Non-operative (Collar)
- Clinical exam, collar check
- Operative (Fusion)
- Wound check, remove sutures, clinical exam
- Non-operative (Collar)
- Radiographs (AP/lateral), assess healing
- Operative (Fusion)
- Radiographs, assess fusion, collar weaning
- Non-operative (Collar)
- CT to confirm union, flexion-extension XR
- Operative (Fusion)
- CT to assess fusion, begin gentle ROM
- Non-operative (Collar)
- Final stability check, return to activity clearance
- Operative (Fusion)
- Confirm solid fusion, full activity clearance
- Non-operative (Collar)
- Discharge if stable and healed
- Operative (Fusion)
- Final fusion assessment, long-term follow-up
Rehabilitation Phases
Phase 1 (0-6 weeks): Immobilization
- Maintain collar continuously
- Avoid neck movement
- Upper extremity ROM exercises
- Gentle walking as tolerated
- No lifting, bending, twisting
Phase 2 (6-12 weeks): Protected Mobilization
- Continue collar if non-operative
- Wean collar if operative and fusion progressing
- Begin gentle isometric neck exercises
- Gradual increase in daily activities
- No contact sports or high-risk activities
Phase 3 (3-6 months): Active Rehabilitation
- Full ROM exercises once stability confirmed
- Strengthening program for neck/shoulder girdle
- Proprioception training
- Gradual return to work/sport
- Supervised progression
Return to Activity Guidelines
Can work while in collar (non-operative), 2-4 weeks after surgery (operative), Ergonomic workstation setup, Frequent position changes, Avoid prolonged neck flexion
Not while in collar (neck rotation limited), After collar weaned and ROM restored, Must be able to check blind spots safely, Off narcotic pain medications, Typically 3-4 months post-injury
Minimum 6 months post-injury, Confirmed solid fusion or healed fracture, Full ROM and strength restored, Individual risk assessment, Consider long-term risk with fusion (50% rotation loss)
Patients with C1-C2 fusion lose approximately 50% of cervical rotation. This has implications for driving, sports, and occupational activities. Counsel patients preoperatively about these functional limitations.
Complications to Monitor
During follow-up, watch for:
- Non-union or malunion: Persistent pain, motion on flexion-extension
- Hardware failure: Screw loosening or breakage (if operative)
- Infection: Wound issues, fever, elevated inflammatory markers
- C5 nerve root palsy: Shoulder weakness (rare but recognized complication)
- Chronic pain: May require pain management referral
- Adjacent segment degeneration: Long-term concern after fusion
Outcomes and Prognosis
Non-Operative Management Outcomes
Stable Jefferson Fractures (TAL Intact):
90-95% union with rigid collar, Healing typically complete by 12 weeks, Rare non-union if compliant with immobilization, Most achieve solid bony healing, Minimal long-term complications
90-95% good to excellent outcomes, Return to full activity in most cases, Minimal residual neck pain, Preservation of full cervical ROM, High patient satisfaction
Sedentary work: 2-4 weeks (in collar), Physical work: 3-6 months, Recreational sports: 3-6 months, Contact sports: 6-12 months (after confirmed healing), Driving: after collar removal and ROM restored
Surgical Management Outcomes
C1-C2 Fusion for Unstable Injuries:
- Fusion Rate
- 95-98%
- Functional Outcome
- Excellent stability, good function
- Motion Loss
- 50% cervical rotation
- Fusion Rate
- 90-95%
- Functional Outcome
- High fusion rate, technically demanding
- Motion Loss
- 50% cervical rotation
- Fusion Rate
- 80-90%
- Functional Outcome
- Often requires supplemental halo
- Motion Loss
- 50% cervical rotation
- Fusion Rate
- 95%+
- Functional Outcome
- Very stable, greater motion loss
- Motion Loss
- All C1-C2 rotation + flexion-extension
Long-Term Prognosis
Factors Predicting Good Outcome:
- Early diagnosis and appropriate treatment
- Isolated Jefferson fracture (no associated injuries)
- Compliant with immobilization protocol
- Young age and good bone quality
- No neurological injury at presentation
Factors Predicting Poorer Outcome:
- Associated C2 fractures or craniocervical injuries
- Delayed diagnosis or treatment
- Severe displacement requiring surgery
- Polytrauma with multiple comorbidities
- Pre-existing cervical pathology
Quality of Life After Treatment
Most return to baseline function, No significant motion restriction, Can participate in all activities, Minimal impact on quality of life, Rare chronic pain
50% loss of cervical rotation, Most adapt well over 6-12 months, May need to turn whole body for blind spots, Can still participate in most activities, Generally high satisfaction (better than instability)
Natural History if Untreated
Understanding untreated Jefferson fractures:
- Stable fractures: May heal with fibrous union, chronic instability possible
- Unstable fractures: High risk of progressive C1-C2 instability
- TAL rupture: Does not heal (Type I), progressive atlantoaxial subluxation
- Chronic pain: Common with untreated instability
- Late myelopathy: Rare but serious complication of chronic instability
The key to good outcomes in Jefferson fractures is accurate assessment of TAL integrity. Stable fractures do extremely well with collar treatment alone (greater than 90% good outcomes). Unstable fractures require appropriate immobilization or surgery but still achieve high fusion rates and functional outcomes.
Prognostic Scores and Predictors
While no specific prognostic scoring system exists for Jefferson fractures, general factors include:
- Fracture displacement: More displacement = higher instability risk
- TAL integrity: Intact TAL = excellent prognosis with collar
- Associated injuries: Multiple injuries = more complex management
- Patient age: Younger patients typically better outcomes
- Comorbidities: Polytrauma impacts overall recovery
Guidelines, Registries & Global Practice
Global Epidemiology
The epidemiology of atlas (C1) fractures has shifted internationally from a young, high-energy pattern toward a predominantly geriatric, low-energy-fall pattern as populations age. The key PubMed-verified figures below frame how Jefferson and other atlas fractures present in modern practice.
- Figure
- ~11.1%
- Implication
- Common upper-cervical injury
- Figure
- ~71 years
- Implication
- Now predominantly geriatric
- Figure
- ~64% of cases
- Implication
- Aging-population driven
- Figure
- Low-energy fall (~74%)
- Implication
- Classic axial-load Jefferson is the minority
- Figure
- Only ~42%
- Implication
- Whole-spine CT mandatory
- Figure
- Rose ~700%
- Implication
- Increasing clinical burden
Guideline Comparison
There is no high-level (Level I) randomised evidence in Jefferson fracture management; international guidance is consensus- and observational-evidence based, but converges on a single principle: treatment is stratified by transverse atlantal ligament (TAL) integrity, not by the bony pattern alone.
- Core Recommendation
- TAL intact: external immobilisation alone; TAL disrupted: immobilisation or surgical fixation/fusion (isolated atlas fracture guideline, 2002 and 2013 update)
- Evidence Level
- Level III
- Core Recommendation
- Upper-cervical injury classification incorporates morphology and ligamentous status; TAL-incompetent atlas injuries favour stabilisation
- Evidence Level
- Consensus
- Core Recommendation
- Spinal column injury managed within major-trauma networks; CT first-line, MRI for ligamentous assessment; stable patterns collar-managed
- Evidence Level
- Consensus / Standards
- Core Recommendation
- Concordant TAL-based stratification; rising geriatric incidence drives interest in primary fixation vs prolonged orthosis in the elderly
- Evidence Level
- Consensus
The chief area of international practice variation is the elderly TAL-disrupted or displaced atlas fracture: halo-vest immobilisation is poorly tolerated and carries significant morbidity in older patients, so some units favour early posterior C1-C2 fixation (Goel-Harms) while others accept fibrous union or non-rigid collar with anticipated chronic stability. There is no Level I evidence to mandate either path.
Registry and Outcomes Evidence
Unlike arthroplasty, there is no dedicated international Jefferson-fracture implant registry; outcome data derive from national trauma datasets and institutional series. National major-trauma registries (for example the Trauma Audit and Research Network in the UK, and the Australia & New Zealand Trauma Registry) capture cervical spine injuries and support benchmarking of process and outcome across trauma systems. Large administrative databases (such as the US National Electronic Injury Surveillance System used by Lyons & Mian 2022) provide the most robust incidence and demographic data.
Imaging and Access Considerations
CT is the global first-line investigation and is near-universally available at trauma centres; the practical bottleneck worldwide is timely MRI for TAL assessment, which is often unavailable out-of-hours or in regional and lower-resource settings. Where MRI is required for borderline Rule of Spence measurements, interfacility transfer or teleradiology-guided triage is commonly used. Driving is restricted while a rigid collar is worn because cervical rotation and blind-spot checking are impaired; return-to-work and return-to-sport timelines are individualised to confirmed healing or fusion.
MCQ Practice Points
Q: What is the Rule of Spence threshold for TAL incompetence in Jefferson fractures?
A: 6.9mm combined lateral mass displacement. This is the sum of overhang on both sides measured on open-mouth radiograph or coronal CT. Important caveat: this is a screening tool, not diagnostic. MRI is the gold standard for TAL integrity assessment. The original threshold came from cadaveric studies with radiographic magnification, so clinical judgment is essential.
Q: A Jefferson fracture patient has MRI showing midsubstance TAL rupture. What is the treatment?
A: Surgical stabilization with C1-C2 fusion (Goel-Harms technique is current gold standard). This is Dickman Type I - midsubstance ruptures cannot heal as ligament-to-ligament healing is poor. In contrast, Dickman Type II (bony avulsion) may heal with halo immobilization as bone-to-bone healing is possible.
Q: What percentage of Jefferson fractures have associated C2 injuries?
A: 40-50%. This is why complete cervical spine CT is mandatory in all Jefferson fractures. Look specifically for odontoid fractures (Type II most common) and Hangman's fractures. Combined C1-C2 injuries may significantly alter management, with treatment dictated by the most unstable injury.
Q: Why is neurological injury rare in isolated Jefferson fractures despite upper cervical instability?
A: Steel's Rule of Thirds explains the low neuro injury rate. At C1, the spinal canal is divided into thirds: 1/3 dens, 1/3 cord, 1/3 space. Jefferson fractures cause lateral expansion of the ring, which increases space available for the cord rather than compressing it. This contrasts with translation injuries (like Hangman's) which compress the canal. Only 10% neurological injury rate in pure Jefferson fractures.
Q: What functional deficit occurs after C1-C2 fusion for unstable Jefferson fracture?
A: Loss of approximately 50% of cervical rotation. The atlantoaxial joint (C1-C2) accounts for half of total cervical rotation. This has important implications for driving (difficulty checking blind spots), sports, and occupational activities. Most patients adapt well over 6-12 months, but preoperative counseling is essential.
Q: What is the normal atlanto-dental interval (ADI) in adults vs children?
A: Under 3mm in adults, under 5mm in children. Measured on lateral radiograph from the posterior cortex of the anterior C1 arch to the anterior cortex of the dens. ADI greater than 3mm in adults suggests TAL insufficiency and atlantoaxial instability. Children have physiologic ligamentous laxity accounting for the higher normal value.
Exam Cheat Sheet
Key Anatomy
- C1 ring vertebra = no vertebral body
- TAL = primary restraint to anterior translation
- Steel's Rule of Thirds: 1/3 dens, 1/3 cord, 1/3 space
- Vertebral artery in transverse foramen at risk
Classification
- Stable = TAL intact (LMD under 6.9mm)
- Unstable = TAL ruptured (LMD over 6.9mm)
- Dickman I = midsubstance tear (surgery)
- Dickman II = bony avulsion (may heal)
Treatment Algorithm
- Stable (TAL intact): rigid collar 8-12 weeks
- Dickman II (avulsion): halo vest 8-12 weeks
- Dickman I (rupture): C1-C2 fusion (Goel-Harms)
- Associated C2: manage as worst injury dictates
Surgical Pearls
- Goel-Harms = current gold standard technique
- C1 lateral mass + C2 pedicle/pars screws
- Avoids vertebral artery with C2 screws
- Allows intraoperative reduction
Complications
- Non-union: 5-10% if inadequate immobilization
- Chronic instability: missed TAL injury
- Vertebral artery injury: rare but serious
- Loss of 50% cervical rotation with fusion
Clinical Decision Scenarios
Practise clinical reasoning and management decisions out loud
“A 25-year-old male dove into shallow water and presents with neck pain. Radiographs show a Jefferson fracture with combined lateral mass displacement of 8mm. How would you manage this patient?”
“Explain the biomechanics of Jefferson fracture and why neurological injury is rare despite being an unstable upper cervical fracture.”
“A 45-year-old female has a Jefferson fracture with lateral mass displacement of 5mm. MRI shows an intact TAL. How would you manage this, and what is your follow-up protocol?”
Evidence Base
Rule of Spence - Original Cadaveric Study
- In cadaveric atlas specimens, combined lateral mass displacement of approximately 6.9mm (sum of bilateral overhang) was the point beyond which the transverse atlantal ligament failed. This threshold has been adopted clinically as a screening rule despite the magnification inherent in plain radiographs.
Dickman Classification of TAL Injuries
- TAL injuries classified into Type I (midsubstance disruption, n=16) and Type II (bony avulsion of the C1 lateral mass tubercle, n=23). Type I injuries did not heal without internal fixation and were treated with early surgery. Type II injuries had a 74% success rate with rigid orthosis (26% failure requiring delayed surgery).
Evaluation & Treatment of Jefferson Fractures
- In 17 Jefferson fractures, stable patterns were managed successfully with rigid collar or Minerva immobilisation, while all 4 unstable fractures had an associated Type II odontoid fracture and underwent occiput-C2 fusion. Diagnosis was delayed in 3 patients owing to inadequate open-mouth radiographs.
Isolated Atlas Fractures - Guideline (Original 2002)
- Recommends isolated atlas fractures with an intact TAL be treated with cervical immobilisation alone, and fractures with TAL disruption be treated with either immobilisation or surgical fixation and fusion. Evidence was insufficient to support treatment standards.
Management of Isolated Atlas Fractures - Updated Guideline
- The 2013 update of the AANS/CNS guideline reaffirms management of isolated atlas fractures by TAL status, recommending external immobilisation for TAL-intact patterns and considering surgical fixation/fusion for TAL-disrupted patterns.
Goel-Harms C1-C2 Polyaxial Screw-Rod Fixation
- Described C1 lateral mass plus C2 pars/pedicle polyaxial screws connected by rods. In 37 patients there was no neural or vascular injury and solid fusion in all cases on early follow-up. The technique permits intraoperative reduction of fixed subluxation and avoids the vertebral-artery risk of transarticular screws.
Epidemiology of Atlas Fractures (20-Year Analysis)
- Across an estimated 38,092 US atlas fractures (2001-2020), atlas fractures represented 11.1% of all cervical fractures, mean age was 71 years, 64% occurred in patients over 70, and 74% resulted from low-energy falls. Only 42% were isolated injuries (58% had a concomitant injury). Incidence rose markedly with age (over 70 per million at 80+ years) and increased nearly 700% over two decades.