Comprehensive analysis of hip joint biomechanics including joint reaction forces, muscle moment arms, gait mechanics, stability mechanisms, and clinical applications in total hip arthroplasty and hip pathology.
- Take moments about the hip centre to eliminate the joint reaction force and solve for abductor force
- Abductor moment arm (~5 cm) is half the body weight lever arm (~10 cm), so abductors must pull ~2× BW
- Hip joint reaction force is the vector sum of body weight and abductor force (~2.5-3× BW walking)
- Reduced femoral offset shortens the abductor moment arm, increasing required force and risking weakness/instability
- Contact stress = joint reaction force / contact area; reduced area (dysplasia, AVN, malunion) drives early arthritis
- “Cane in the CONTRALATERAL hand reduces the body-weight moment, cutting abductor and joint force by ~20-30%
- “Trendelenburg lurch shifts the trunk over the affected hip, halving the body-weight moment arm
- “Lewinnek safe zone is a guide only - spinopelvic/functional positioning matters in stiff or hypermobile spines
- “Combined anteversion (acetabular + femoral) target ~35-45° (Ranawat)
High-yield basic science topic for vivas and MCQs. Examiners frequently ask about joint reaction forces during single-leg stance, mechanical advantage of hip abductors, and biomechanical principles in total hip arthroplasty (femoral offset, leg length, cup position). Know the free body diagram and force calculations.

Joint Reaction Forces
The hip joint reaction force is the resultant compressive force transmitted across the articular surface. It is dominated not by body weight directly but by the muscle forces required for equilibrium - principally the abductors during single-leg stance. The sections below derive this force from the free body diagram and then translate it into the contact stresses that determine joint health.
Single-Leg Stance Analysis
Free Body Diagram
Understanding hip joint biomechanics begins with analyzing the forces acting on the pelvis during single-leg stance. This is the most commonly examined scenario because it represents the peak loading condition during normal walking and reveals the fundamental mechanical relationships at the hip.
During single-leg stance on the right leg, three major forces act on the pelvis:
-
Body weight (minus stance leg) acting downward through the center of mass of the head, arms, trunk, and swing leg. For a 70 kg person, this is approximately 55 kg (539 N).
-
Hip abductor muscle force acting upward and laterally, pulling on the ilium where the gluteus medius and minimus insert. The resultant force vector is directed approximately 30 degrees from vertical.
-
Hip joint reaction force acting upward and medially on the femoral head from the acetabulum.
For the pelvis to be in equilibrium (not rotating or accelerating), the sum of vertical forces must equal zero, the sum of horizontal forces must equal zero, and the sum of moments about any point must equal zero.
Moment Analysis About Hip Joint Center
Taking moments about the hip joint center eliminates the hip joint reaction force from the calculation (since its moment arm is zero) and allows calculation of the required abductor force.
Clockwise moment (tending to drop the left side of the pelvis):
- Body weight × Horizontal distance from hip center to body center of mass
- For typical anatomy: 539 N × 0.10 m = 53.9 N·m
Counterclockwise moment (preventing pelvic drop):
- Abductor force × Perpendicular distance from abductor resultant to hip center
- Abductor moment arm is approximately 5 to 6 cm (0.05-0.06 m)
Setting clockwise moment equal to counterclockwise moment: Abductor force = 53.9 N·m / 0.05 m = 1078 N (approximately 110 kg)
The hip abductors must generate approximately 2 times the body weight of the stance leg (or approximately 1.5 times total body weight) to maintain pelvic level during single-leg stance.
Mechanical Advantage
The mechanical advantage of the hip abductor system is:
MA = Abductor moment arm / Body weight lever arm = 5 cm / 10 cm = 0.5
This represents a third-class lever system with mechanical advantage less than 1, requiring the abductors to generate force twice as large as the body weight load. While this seems mechanically inefficient, it allows the hip to achieve the range of motion and speed of movement required for normal gait and function.
Hip Joint Reaction Force Calculation
The hip joint reaction force is found by vector summation of the body weight and abductor force. Because these forces act in different directions (body weight is vertical, abductor force is approximately 30 degrees from vertical), vector addition is required.
Breaking the abductor force into components:
- Vertical component: 1078 N × cos(30°) = 933 N (upward)
- Horizontal component: 1078 N × sin(30°) = 539 N (medial)
Vertical equilibrium: JRF vertical = Body weight + Abductor vertical = 539 + 933 = 1472 N
Horizontal equilibrium: JRF horizontal = Abductor horizontal = 539 N
Resultant hip joint reaction force: JRF = √(1472² + 539²) = 1567 N (approximately 160 kg or 2.3× total body weight)
More detailed analyses accounting for other muscle forces, ligamentous tension, and inertial effects during walking typically yield peak joint reaction forces of 2.5 to 3 times body weight during the stance phase of gait.
Overview/Introduction
The hip is a ball-and-socket (spheroidal) synovial joint that must combine a wide range of motion with the stability and load capacity required for bipedal gait. Because the body's centre of mass sits medial to the supporting hip during single-leg stance, the joint is loaded far in excess of body weight: in vivo telemetric implant studies record hip contact forces around 238% of body weight during level walking, rising further with stair climbing and stumbling. Understanding why these forces are so high - and how anatomy, pathology and surgery modulate them - is the foundation of hip-preservation and arthroplasty surgery and a perennial basic-science exam topic.
This topic builds from first principles (the single-leg-stance free body diagram) to contact mechanics, stability mechanisms, and the biomechanics of total hip arthroplasty, linking each concept to the clinical decisions and landmark evidence that flow from it.
Concepts and Principles
Five linked principles underpin everything that follows:
- Lever mechanics: The hip abductors operate as a third-class lever with a short moment arm (~5 cm) against a long body-weight lever arm (~10 cm), giving a mechanical advantage of ~0.5. They must therefore generate roughly twice body weight to keep the pelvis level.
- Joint reaction force: The hip joint reaction force is the vector sum of body weight and the (much larger) muscle forces compressing the head into the socket, reaching ~2.5-3× body weight in walking and far more in running and jumping.
- Contact stress: Stress equals force divided by contact area. The labrum and a congruent, well-covered acetabulum maximise contact area; any reduction (dysplasia, AVN collapse, fracture malunion, FAI damage) concentrates stress and drives cartilage failure.
- Stability: Stability is layered - bony coverage and version, the labral seal, the capsuloligamentous complex (strongest: iliofemoral ligament), and dynamic muscular compression.
- Surgical restoration: THA aims to reproduce native offset, leg length and version so that abductor mechanics and stability are restored while wear-generating forces stay controlled.
Forces During Gait Cycle
Stance Phase Loading
During normal walking, the hip experiences cyclic loading corresponding to the gait cycle phases. The stance phase (when the foot is in contact with the ground) generates the highest forces.
Forces are moderate, approximately 1.5 to 2 times body weight. The hip is extended, and the ground reaction force vector passes posterior to the hip joint center, creating a flexion moment that must be resisted by hip extensors (primarily gluteus maximus and hamstrings).
This is the peak loading phase as analyzed above, with joint reaction forces reaching 2.5 to 3 times body weight. The entire body weight (minus stance leg) is supported on one hip, and the abductors work maximally to stabilize the pelvis.
Forces begin to decrease as the contralateral leg prepares to contact the ground. The ground reaction force vector moves anteriorly, creating an extension moment. Hip flexors begin to activate in preparation for swing phase.
Forces decrease rapidly as weight transfers to the contralateral limb. The hip flexors accelerate the limb forward into swing phase.
Swing Phase
During swing phase, the limb is non-weight-bearing and hip joint reaction forces are minimal (typically less than body weight). The primary biomechanical requirements are:
- Hip flexion to advance the limb (iliopsoas, rectus femoris)
- Knee flexion for toe clearance
- Hip abduction to prevent foot contacting the ground (subtle abductor activation)
Swing phase accounts for approximately 40 percent of the gait cycle, while stance phase accounts for approximately 60 percent during normal walking.
Effects of Walking Speed
Faster walking increases peak hip joint reaction forces due to increased ground reaction forces from greater accelerations. Running generates forces up to 4 to 5 times body weight. Impact activities like jumping can produce forces exceeding 8 to 10 times body weight.
Slower walking decreases peak forces modestly, but the benefit is limited because the quasi-static single-leg stance force (2.5-3× body weight) still occurs. Complete unloading requires non-weight-bearing status or aquatic therapy where buoyancy supports body weight.
Differential Diagnosis of Mechanical Hip Pain
The biomechanical abnormalities described above present clinically as hip or groin pain in the young-to-middle-aged adult. Distinguishing the underlying mechanical lesion is essential because management diverges sharply (joint preservation versus arthroplasty versus extra-articular treatment).
- normalAnatomy
- Undercoverage: CE angle less than 20°, increased Tönnis angle
- stabilityMechanism
- Reduced contact area raises contact stress; anterolateral instability
- pathologicalStates
- Activity-related groin pain, sense of instability, fatigue
- clinicalSignificance
- PAO if young with congruent joint and minimal arthritis; THA if arthritic
- measurementTechnique
- AP pelvis (CE angle, Tönnis angle), false-profile view, MR arthrogram
- normalAnatomy
- Cam: reduced head-neck offset (high alpha angle); Pincer: overcoverage/retroversion
- stabilityMechanism
- Motion-driven abutment with labrochondral shear damage
- pathologicalStates
- Groin pain with flexion/internal rotation; positive FADIR/impingement test
- clinicalSignificance
- Arthroscopic/open osteochondroplasty and labral repair if pre-arthritic
- measurementTechnique
- Alpha angle, crossover/posterior-wall signs, Dunn view, MR arthrogram
- normalAnatomy
- Discontinuity of labral seal (usually anterosuperior)
- stabilityMechanism
- Loss of suction seal and contact-area contribution
- pathologicalStates
- Mechanical clicking/catching, groin pain, positive impingement test
- clinicalSignificance
- Repair/refixation usually combined with correction of underlying FAI/dysplasia
- measurementTechnique
- MR arthrogram (gold standard for labral morphology)
- normalAnatomy
- Subchondral collapse with loss of spherical congruity
- stabilityMechanism
- Stress concentration at collapse margin; reduced contact area
- pathologicalStates
- Insidious groin/buttock pain; risk factors (steroids, alcohol, trauma)
- clinicalSignificance
- Core decompression pre-collapse; THA after collapse
- measurementTechnique
- MRI (most sensitive, double-line sign), radiograph (crescent sign)
- normalAnatomy
- Gluteus medius/minimus tendinopathy or tear; trochanteric bursitis
- stabilityMechanism
- Abductor dysfunction reduces effective abductor force/moment arm
- pathologicalStates
- Lateral hip pain, tenderness over trochanter, Trendelenburg if torn
- clinicalSignificance
- Mostly non-operative; tendon repair for symptomatic full-thickness tears
- measurementTechnique
- Clinical exam, single-leg-stance test, ultrasound/MRI
Total Hip Arthroplasty Biomechanics
Femoral Offset and Leg Length
Femoral Offset
Femoral offset is the perpendicular distance from the center of the femoral head to the long axis of the femoral shaft. It has profound biomechanical effects:
- Decreased hip abductor moment arm → Increased abductor force requirement → Weakness, fatigue, Trendelenburg gait
- Increased hip joint reaction force (the larger abductor force raises the resultant) → increased polyethylene wear
- Instability from reduced soft-tissue (abductor and capsular) tension
- Impingement risk if femoral neck contacts pelvis/cup at extremes of motion
- Subjective sense of leg shortening even with preserved leg length (medial shift of greater trochanter)
- Increased abductor moment arm → Reduced abductor force for given task → Improved strength and endurance
- Decreased hip joint reaction force → reduced polyethylene wear (the principal wear benefit of restoring/increasing offset)
- Greater range of motion before impingement
- Increased trochanteric bursitis risk from iliotibial band tension
- Increased torsional stress on the femoral component/fixation interface (the main trade-off of higher offset)
Restore native femoral offset (measured preoperatively on AP pelvis radiograph). Deviations of 5 millimeters or more correlate with inferior functional outcomes and patient satisfaction.
Leg Length
Leg length discrepancy after THA is a common source of patient dissatisfaction and litigation. Biomechanical considerations include:
- Increases abductor tension (initially beneficial but excessive tension causes pain)
- May cause sciatic nerve stretch (particularly if lengthening exceeds 3-4 cm acutely)
- Patient perceives as subjectively long, affecting gait and balance
- Can partially compensate for reduced femoral offset
- Reduces abductor tension and moment arm
- May cause instability (laxity allowing dislocation)
- Perceived as leg length discrepancy affecting gait
- Difficult to fully compensate with shoe lift if greater than 2 cm
Restore native leg length or slight lengthening (up to 5-8 mm) acceptable. Discrepancies greater than 10 to 15 millimeters are typically symptomatic.
Combined Offset and Leg Length
Offset and leg length interact: increasing leg length while reducing offset may create functional leg length equality but biomechanical inferiority (weak abductors, potential instability). Increasing both offset and leg length proportionally maintains abductor tension and moment arm closer to native anatomy.
Templating and intraoperative measurement techniques (caliper measurement from fixed landmarks, calibrated radiographs) help achieve restoration of native biomechanics.
Acetabular Component Position
Inclination and Anteversion
Acetabular cup position profoundly affects range of motion, stability, and wear:
Traditional safe zone: 30 to 50 degrees from horizontal (Lewinnek safe zone). Modern concepts favor 35 to 45 degrees.
- Excessive inclination (vertical cup): Increased superior edge loading → accelerated wear, reduced stability
- Insufficient inclination (horizontal cup): Reduced range of motion, impingement, potential for squeaking in ceramic bearings
Traditional safe zone: 10 to 30 degrees. Modern concepts favor 15 to 25 degrees.
- Excessive anteversion: Posterior instability risk, anterior impingement in extension/external rotation
- Insufficient anteversion (retroversion): Anterior instability risk, posterior impingement in flexion/internal rotation
Combined Anteversion Concept
The sum of acetabular anteversion and femoral anteversion determines functional arc of motion and impingement risk. The Ranawat safe zone suggests combined anteversion of 35 to 45 degrees.
For a retroverted femur (femoral anteversion 5 degrees), the acetabular component may require more anteversion (25-30 degrees) to achieve combined anteversion of 30 to 35 degrees. Conversely, excessive femoral anteversion (20 degrees) may require reduced acetabular anteversion (15-20 degrees).
Modern Concepts: Spinopelvic Relationship
Recent research emphasizes the importance of spinopelvic mechanics and positional acetabular changes with sitting and standing. Some patients demonstrate significant pelvic tilt changes between positions, affecting functional cup orientation.
Pelvis cannot posteriorly tilt with sitting, maintaining standing orientation. Cup should be positioned based on standing position, potentially with reduced anteversion to prevent anterior dislocation when sitting.
Excessive posterior pelvic tilt with sitting increases functional cup anteversion. May require reduced cup anteversion in standing position to prevent instability when sitting.
Lateral spinopelvic radiographs in standing and sitting positions help identify at-risk patients requiring non-standard cup positioning.
- Reduced femoral offset decreases abductor moment arm, requiring greater muscle force
- Offset restoration within 5 mm of native anatomy optimizes abductor function
- Leg length discrepancy greater than 10 mm associated with patient dissatisfaction
- Combined offset and leg length restoration improves outcomes vs. either alone
- Safe zone: cup anteversion 15 ± 10° and inclination 40 ± 10°
- Dislocation 1.5% inside the safe zone versus 6.1% outside
- Increased anteversion associated with anterior dislocation
- Greatest dislocation risk in the first 30 days and in revision/previously-operated hips
Single-Leg Stance Free Body Diagram
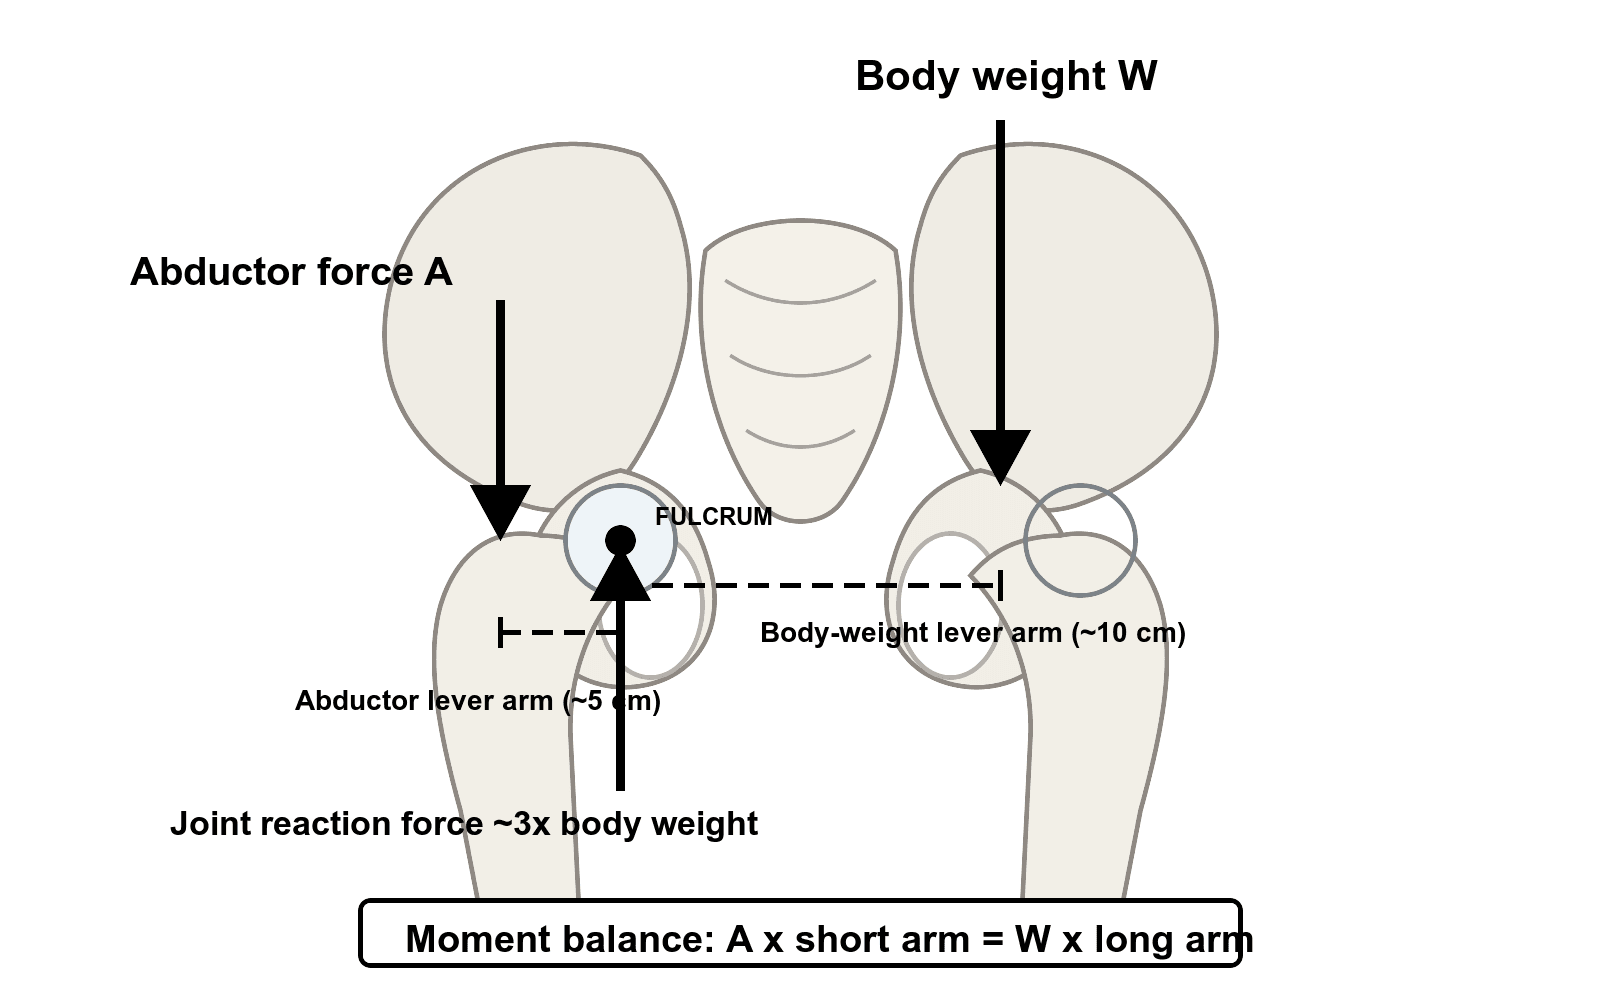
Pelvis in equilibrium during right single-leg stance
- Body weight (W): 70 kg person → Stance leg excluded → Effective weight ~55 kg (539 N) downward
- Hip abductor force (A): Unknown magnitude, ~30° from vertical, acting upward and laterally
- Hip joint reaction force (J): Unknown magnitude and direction, acting from acetabulum on femoral head
- Body weight lever arm: ~10 cm from hip joint center to body center of mass
- Abductor moment arm: ~5 cm from hip joint center to abductor resultant force line
ΣM = 0
Clockwise moment: W × 10 cm = 539 N × 0.10 m = 53.9 N·m
Counterclockwise moment: A × 5 cm
Solving for abductor force: A = 53.9 N·m / 0.05 m = 1078 N (110 kg, or 2× body weight)
Force Equilibrium - Vertical Direction:
ΣFy = 0
J_vertical + A_vertical - W = 0
A_vertical = A × cos(30°) = 1078 × 0.866 = 933 N
J_vertical = W - A_vertical = 539 + 933 = 1472 N (upward on pelvis = downward on femoral head)
Force Equilibrium - Horizontal Direction:
ΣFx = 0
J_horizontal - A_horizontal = 0
A_horizontal = A × sin(30°) = 1078 × 0.5 = 539 N (lateral)
J_horizontal = 539 N (medial on pelvis = lateral on femoral head)
Resultant Hip Joint Reaction Force:
J = √(J_vertical² + J_horizontal²) = √(1472² + 539²) = 1567 N
Expressed as body weight multiple: 1567 N / (70 kg × 9.81 m/s²) = 1567 / 686 = 2.3× total body weight
More sophisticated analyses accounting for other muscles, ligaments, and dynamic effects during walking typically yield peak forces of 2.5 to 3× body weight.
Key Takeaways from Force Analysis
0.5 (abductor moment arm half of body weight lever arm)
Abductors must generate 2× body weight; joint reaction force 2.3-3× body weight
- Abductor weakness → Insufficient force → Trendelenburg gait
- Cane in contralateral hand → Reduces body weight moment arm → Reduces required abductor force by 30-40%
- Reduced femoral offset in THA → Reduced abductor moment arm → Increased required force → Weakness
- High joint forces → Cartilage stress → Arthritis development and progression
This analysis is the foundation for understanding hip biomechanics and is frequently examined in vivas. Being able to sketch the free body diagram and explain the force calculations demonstrates mastery of basic science fundamentals.
Clinical Relevance
These biomechanical principles translate directly into bedside and operative decisions. Hip abductor mechanics explain Trendelenburg gait and the rationale for a contralateral cane; the force-area relationship explains why dysplasia, avascular necrosis and acetabular malunion cause premature arthritis; and offset, leg-length, version and cup-position targets in total hip arthroplasty are all attempts to reproduce native loading and stability. Each subsequent clinical section (THA biomechanics, dysplasia, FAI, assistive devices) applies one of these core principles.
- In vivo level-walking hip contact force averaged 238% body weight
- Stair ascent 251% and stair descent 260% body weight
- Implant inward torsion (critical for stem fixation) ~23% higher on stair ascent than level walking
- Implants should be tested mainly under walking and stair-climbing loads (plus stumbling peaks)
Muscle Moment Arms and Function

Hip Abductors
Anatomy and Moment Arm
The primary hip abductors are the gluteus medius and gluteus minimus, inserting on the greater trochanter of the femur. The resultant force vector of these muscles acts approximately 5 to 6 centimeters lateral to the hip joint center in the coronal plane.
The gluteus medius has three functionally distinct regions:
- Anterior fibers: Contribute to abduction and internal rotation
- Middle fibers: Pure abductors with largest cross-sectional area
- Posterior fibers: Contribute to abduction and external rotation
The gluteus minimus lies deep to the medius and has similar fiber architecture and function. Together, these muscles account for the majority of hip abduction strength.
The tensor fasciae latae also contributes to hip abduction, particularly in early range, and assists with internal rotation and flexion. Its moment arm for abduction is smaller than the glutei, approximately 3 to 4 centimeters.
Functional Importance
The hip abductors serve critical functions beyond simple abduction:
During single-leg stance, the abductors prevent contralateral pelvic drop (Trendelenburg sign). This is essential for normal gait, allowing the swing leg to clear the ground.
The abductors control frontal plane motion during walking, preventing excessive lateral trunk sway and maintaining efficient forward progression.
Eccentric abductor contraction during initial loading helps attenuate impact forces and protects articular cartilage.
Clinical Significance
Abductor weakness (from superior gluteal nerve injury, L5 radiculopathy, muscle atrophy, or pain inhibition) causes the pelvis to drop on the contralateral swing side. Patients compensate by lurching the trunk over the affected hip (abductor lurch), reducing the body weight moment arm and decreasing required abductor force.
The lateral surgical approach (direct lateral, hardinge) splits or detaches the abductor mechanism, risking denervation or muscular damage. Abductor dysfunction after THA causes Trendelenburg gait, instability, and reduced functional outcomes. The anterior and posterior approaches spare the abductors, potentially improving functional recovery.
In total hip arthroplasty, femoral offset (horizontal distance from femoral canal axis to center of femoral head) directly affects the abductor moment arm. Reduced offset decreases the moment arm, requiring greater abductor force and potentially causing weakness, fatigue, and instability. Excessive offset increases joint reaction force and may cause impingement. Restoration of native offset is a key THA surgical principle.
Hip Flexors and Extensors
Hip Flexors
The primary hip flexors are the iliopsoas (iliacus and psoas major) and rectus femoris. Secondary flexors include tensor fasciae latae and sartorius.
- Strongest hip flexor with moment arm approximately 5 to 6 centimeters anterior to the hip joint center
- Essential for stair climbing, running, and activities requiring forceful hip flexion
- Passes anterior to the hip capsule; contracture can cause anterior hip pain and limited extension
- Can be impinged by anterior THA components or retractors, causing postoperative pain
- Biarticular muscle crossing hip and knee
- Contributes to hip flexion and knee extension
- Moment arm approximately 4 to 5 centimeters at the hip
- Vulnerable to strain injuries during sprinting (rapid hip flexion with simultaneous knee extension)
Hip Extensors
The primary hip extensors are the gluteus maximus and hamstrings (semimembranosus, semitendinosus, biceps femoris long head).
- Largest and strongest hip extensor
- Moment arm approximately 5 to 7 centimeters posterior to hip joint center
- Essential for rising from sitting, stair climbing, running, and jumping
- Upper fibers insert on iliotibial band; lower fibers on gluteal tuberosity of femur
- Denervation (inferior gluteal nerve) causes difficulty with stair climbing and rising from chairs
- Biarticular muscles crossing hip and knee
- Hip extension moment arm approximately 6 to 8 centimeters
- Contribute significantly to hip extension during gait
- Vulnerable to proximal strain injuries in sprinting athletes
Sagittal Plane Moment Arms
Hip flexor and extensor moment arms vary with hip position. At neutral position (standing), moment arms are near maximum. With hip flexion, extensor moment arms increase while flexor moment arms may decrease. This explains why hip extensors generate maximum torque from a flexed position (beneficial for activities like rising from a chair or sprinting).
Hip Rotators
External Rotators
The deep external rotators (piriformis, obturator internus and externus, superior and inferior gemellus, quadratus femoris) form a muscular cuff posterior to the hip joint. These muscles have small moment arms (2-4 cm) for external rotation but collectively generate substantial torque.
Functional roles include:
- External rotation during gait and stance
- Dynamic posterior joint stability
- Proprioceptive feedback from dense mechanoreceptor population
The gluteus maximus and posterior fibers of gluteus medius also contribute to external rotation with larger moment arms.
Internal Rotators
The primary internal rotators are the anterior fibers of gluteus medius and minimus, with contribution from tensor fasciae latae and adductor longus.
Internal rotation moment arms are generally smaller than external rotation moment arms, explaining why external rotation strength typically exceeds internal rotation strength in most individuals. This asymmetry contributes to common rotational alignment patterns and may influence injury mechanisms.
Contact Mechanics and Stress Distribution
Acetabular Coverage and Contact Area
Normal Anatomy
The acetabulum covers approximately 170 to 180 degrees of the femoral head circumference, providing inherent bony stability. The weight-bearing dome (superior and anterior acetabulum) experiences the highest contact stresses during stance.
The center-edge (CE) angle of Wiberg measures lateral acetabular coverage in the coronal plane, normally 25 to 40 degrees. CE angle less than 20 degrees indicates acetabular dysplasia with inadequate coverage, predisposing to instability and early arthritis. CE angle greater than 40 degrees may indicate overcoverage or pincer-type femoroacetabular impingement.
The acetabular labrum is a fibrocartilaginous rim that deepens the acetabulum by approximately 5 millimeters and increases contact area by approximately 20 to 30 percent. The labrum also seals the joint, maintaining negative intra-articular pressure and contributing to joint stability through fluid film lubrication and suction effects.
Contact Stress Calculation
Contact stress (pressure) is force divided by contact area:
Contact stress = Joint reaction force / Contact area
For a 70 kg person during single-leg stance with hip joint reaction force of 1600 N (approximately 2.3× body weight) and normal contact area of approximately 1200 mm²:
Contact stress = 1600 N / 1200 mm² = 1.33 MPa
This is within the physiological range that articular cartilage can tolerate chronically (approximately 1-3 MPa).
Pathological States
Acetabular Dysplasia: Inadequate acetabular coverage reduces contact area, increasing contact stress. If contact area is reduced to 600 mm² (50% of normal):
Contact stress = 1600 N / 600 mm² = 2.67 MPa
This elevated stress predisposes to cartilage degeneration and early osteoarthritis, typically presenting in the third to fifth decade of life.
Avascular Necrosis: Loss of spherical femoral head congruity reduces contact area and creates stress concentrations. Even with 20 percent contact area reduction (to 960 mm²):
Contact stress = 1600 N / 960 mm² = 1.67 MPa
Combined with compromised cartilage nutrition and subchondral bone weakness, this accelerates joint degeneration.
Post-Traumatic Arthritis: Acetabular fracture malunion creates incongruity, drastically reducing contact area. Contact area reductions of 50 to 70 percent are possible, creating contact stresses of 3 to 5 MPa or higher, leading to rapidly progressive arthritis.
NDAFF
Hook:Stress Goes Up when Area Goes Down - SGUA for hip arthritis
- FAI proposed as a leading mechanism for non-dysplastic early hip osteoarthritis
- Cam (aspherical head-neck offset) and pincer (acetabular overcoverage/retroversion) morphologies
- Damage is motion-driven (abutment) rather than purely axial-load driven
- Rationale for joint-preserving osteochondroplasty/rim trimming to halt degeneration in young patients
Lubrication Mechanisms
Synovial Fluid Lubrication
The hip joint employs multiple lubrication mechanisms to minimize friction and wear:
Lubricin (PRG4) and other boundary lubricants adsorb to cartilage surfaces, creating a low-friction interface even under high loads when fluid film thickness is minimal. This is critical during high-load, low-velocity conditions.
During motion, synovial fluid is entrained between cartilage surfaces, creating a load-bearing fluid film that separates the surfaces. This is most effective during moderate loads and higher velocities.
Under load, fluid is expressed from the porous cartilage matrix, creating a fluid layer at the contact interface. This mechanism operates even under very high loads where fluid film lubrication would otherwise fail.
Hyaluronic acid and other large molecules are excluded from the contact zone, concentrating in low-pressure regions while smaller molecules and water form the lubricating layer in the loaded contact zone.
Clinical Relevance
Loss of normal lubrication contributes to osteoarthritis progression:
- Inflammatory arthritis degrades hyaluronic acid and lubricin
- Cartilage injury exposes collagen fibers with higher friction coefficients
- Synovial inflammation alters fluid composition and viscosity
Viscosupplementation (intra-articular hyaluronic acid injection) attempts to restore fluid film lubrication, though clinical efficacy remains controversial. The effect size is generally modest and temporary.
Stability Mechanisms
Bony Architecture
Femoral Head Coverage
The acetabulum covers the femoral head anteriorly, superiorly, and posteriorly, providing inherent bony stability. The depth and orientation of the acetabulum determine the magnitude of force required to dislocate the hip.
Normal acetabular anteversion is approximately 15 to 25 degrees (anterior opening). Excessive anteversion predisposes to anterior instability, while retroversion predisposes to posterior instability.
Normal inclination (abduction angle) is approximately 35 to 45 degrees from horizontal. Excessive inclination reduces superior coverage and predisposes to superior migration and dysplastic arthritis. Insufficient inclination (excessive horizontal orientation) may cause impingement and reduced range of motion.
Femoral Head-Neck Relationship
Larger femoral heads (relative to neck diameter) increase the arc of motion before impingement but also increase frictional torque and dislocation resistance (jump distance).
Adequate offset allows greater range of motion before neck contacts the acetabular rim. Reduced offset (pistol grip deformity in cam-type FAI) causes early impingement and labral damage.
Normal femoral anteversion is approximately 10 to 15 degrees in adults. Excessive anteversion (common in cerebral palsy) predisposes to anterior instability and in-toeing gait. Retroversion predisposes to posterior impingement and out-toeing.
Neck-Shaft Angle and Femoral Geometry: The Determinant of Offset
The femoral offset, the abductor moment arm and ultimately the joint reaction force are all set by the geometry of the femoral neck — yet the variable that controls them, the neck-shaft angle, is easy to overlook. The neck-shaft (caput-collum-diaphyseal, CCD) angle is the angle between the femoral neck axis and the femoral shaft axis, normally about 125 to 130 degrees in the adult. It is more valgus in infancy (around 150 degrees) and declines toward the adult value with weight-bearing.
Offset is the perpendicular distance from the centre of the femoral head to the shaft axis, and it is a direct function of both neck length and neck-shaft angle. A more horizontal (varus) neck carries the head further lateral to the shaft, increasing offset; a more vertical (valgus) neck brings the head closer to the shaft axis, reducing offset. Because the required abductor force is inversely proportional to its moment arm — and the joint reaction force tracks the abductor force — neck geometry directly scales the loads derived earlier in this topic.
- Neck-shaft angle
- Decreased (e.g. less than ~120°)
- Femoral offset
- Increased
- Abductor moment arm
- Lengthened
- Abductor force / JRF
- Decreased (mechanically efficient)
- Principal trade-off
- Limb shortening; a more vertical neck loaded in shear/bending → stress fracture and nonunion risk; severe varus limits abduction and causes impingement
- Neck-shaft angle
- ~125-130°
- Femoral offset
- Normal
- Abductor moment arm
- Normal
- Abductor force / JRF
- Normal
- Principal trade-off
- Balanced range of motion and abductor efficiency
- Neck-shaft angle
- Increased (e.g. greater than ~135°)
- Femoral offset
- Decreased
- Abductor moment arm
- Shortened
- Abductor force / JRF
- Increased (abductors work harder; JRF and contact stress rise)
- Principal trade-off
- Reduced abductor efficiency and higher contact stress; associated with dysplasia, instability and superior femoral migration
Surgical relevance. Reproducing the neck-shaft angle and neck length is how total hip arthroplasty restores native offset (see the THA section below). Deliberate alteration of the angle is also therapeutic: a valgus intertrochanteric osteotomy rotates a vertical (high-shear) femoral neck nonunion line toward the horizontal so that compressive forces aid union (the Pauwels principle), while a varus osteotomy can improve head coverage and containment in selected paediatric and dysplastic hips. The clinical deformity entity of developmental or acquired coxa vara is covered in its own topic; the point here is the underlying geometry — neck-shaft angle and neck length are the levers that set offset, abductor mechanics and joint load.
Offset, and therefore the abductor lever arm, is governed by neck length and the neck-shaft angle. Coxa vara increases offset and abductor efficiency (lower JRF) but loads the neck in shear and shortens the limb; coxa valga decreases offset, forcing the abductors to work harder and raising the joint reaction force. This is the anatomical basis of the offset-restoration principle in arthroplasty.
Trabecular Architecture and Load Transmission in the Proximal Femur
The high forces derived above (roughly 2.5 to 3 times body weight in walking, far more in running) are transmitted through the proximal femur along internal cancellous bone organised according to Wolff's law — trabeculae align along the lines of principal stress. Recognising these trabecular systems is a classic basic-science viva and explains both fragility-fracture patterns and radiographic osteoporosis grading.
Two principal trabecular groups carry the load:
- Principal compressive group: dense vertical trabeculae sweeping from the medial cortex of the femoral neck (the calcar region) up into the weight-bearing superomedial femoral head, resisting the compressive component of the joint reaction force.
- Principal tensile group: trabeculae arching from the lateral cortex (below the greater trochanter) across the neck to the inferomedial head, resisting the tensile and bending forces generated because the load is applied eccentrically through the offset neck.
Secondary compressive and tensile groups and the greater-trochanteric group complete the pattern. Where the principal groups diverge in the femoral neck lies Ward's triangle, a relatively trabecula-poor zone that is mechanically weak and a common site of fragility fracture. Reinforcing the inferomedial neck is the calcar femorale, a dense vertical plate of bone extending from the posteromedial cortex toward the greater trochanter; it is the key internal strut transmitting load to the neck and a critical buttress for fracture fixation and stem support.
Singh index. Because these trabecular groups resorb in a predictable order with osteoporosis (the secondary groups and then the principal tensile group disappear before the principal compressive group), the Singh index grades proximal-femoral bone quality on a plain radiograph from the visible trabecular pattern — a quick, if observer-dependent, marker of osteoporotic bone stock relevant to implant choice and fracture risk.
Load reaches the femoral neck through Wolff's-law trabeculae: a principal compressive group (medial calcar to superior head) and a principal tensile group (lateral cortex arching to inferior head), with Ward's triangle the weak zone between them and the calcar femorale the dense inferomedial strut. The Singh index uses the order in which these groups disappear to grade osteoporosis. The eccentric (offset) loading of the head is exactly why a tensile system is needed at all.
Soft Tissue Stabilizers
Acetabular Labrum
The labrum provides multiple stabilizing functions:
Increases effective depth by approximately 5 millimeters, increasing coverage and resistance to dislocation.
Contributes 20 to 30 percent of contact area, reducing cartilage stress.
Creates a seal maintaining negative intra-articular pressure (approximately -3 to -7 mm Hg), generating suction effect resisting distraction.
Dense mechanoreceptor and free nerve ending population provides feedback for neuromuscular control.
Labral tears (common in FAI, trauma, or dysplasia) compromise these functions, contributing to instability, increased cartilage stress, and progression to arthritis.
Hip Capsule and Ligaments
The hip capsule is the strongest joint capsule in the body, reinforced by three major ligaments:
- Strongest ligament in body (resists forces up to 350 kg)
- Spans from AIIS to intertrochanteric line
- Prevents hyperextension and external rotation in extension
- Critical for upright posture with minimal muscle activation
- Inferior capsular reinforcement
- Prevents hyperabduction and external rotation
- May be released during anterior THA approach
- Posterior capsular reinforcement
- Prevents hyperextension and internal rotation
- Important restraint to anterior translation in flexion
- Intracapsular ligament from fovea of femoral head to acetabular notch
- Contains blood vessels (variable importance to femoral head vascularity)
- Minimal mechanical contribution to stability in adults
- May provide proprioceptive feedback
Neuromuscular Control
Muscles surrounding the hip actively stabilize the joint through:
Muscle forces increase joint reaction force, pressing the femoral head into the acetabulum and resisting dislocation.
Proprioceptive feedback from capsule, labrum, and muscles triggers reflexive muscle activation to prevent excessive motion or instability.
Balanced muscle activation patterns maintain the femoral head centered in the acetabulum throughout the range of motion, preventing subluxation or impingement.
- normalAnatomy
- Acetabular coverage 170-180°, CE angle 25-40°, version 15-25°
- stabilityMechanism
- Physical barrier to dislocation, inherent constraint
- pathologicalStates
- Dysplasia (CE less than 20°) → instability; Retroversion → posterior impingement
- clinicalSignificance
- Primary determinant of stability; dysplasia requires surgical correction (PAO)
- measurementTechnique
- AP pelvis radiograph: CE angle, acetabular index, Shenton's line
- normalAnatomy
- Fibrocartilaginous rim, deepens acetabulum 5 mm, seals joint
- stabilityMechanism
- Increases coverage, negative pressure seal (~-5 mm Hg), proprioception
- pathologicalStates
- Labral tears (FAI, trauma) → pain, instability, cartilage stress
- clinicalSignificance
- Tears accelerate arthritis; repair preserves joint but requires FAI correction
- measurementTechnique
- MR arthrogram: labral morphology, tears, cartilage damage
- normalAnatomy
- Iliofemoral (strongest, 350 kg), pubofemoral, ischiofemoral ligaments
- stabilityMechanism
- Resists hyperextension, excessive rotation, allows upright posture
- pathologicalStates
- Capsular laxity (Ehlers-Danlos) → instability; excessive tightness → impingement
- clinicalSignificance
- Surgical capsulotomy reduces stability; requires repair in high-risk patients
- measurementTechnique
- Clinical exam: range of motion, ligamentous laxity tests (Beighton score)
- normalAnatomy
- Hip abductors, short external rotators, flexors/extensors
- stabilityMechanism
- Dynamic compression, reflexive stabilization, coordinated motion control
- pathologicalStates
- Abductor weakness → Trendelenburg, instability; rotator weakness → microinstability
- clinicalSignificance
- Rehabilitation essential post-injury/surgery; weakness predisposes to dislocation
- measurementTechnique
- Manual muscle testing, Trendelenburg test, single-leg stance time
- Labrum maintains pressurised intra-articular fluid film for lubrication and load distribution
- Labral seal creates suction effect that resists femoral head distraction (stability)
- Labrum increases contact area and reduces peak cartilage contact stress
- Preserving/restoring labral function is an explicit goal of modern hip-preservation surgery
Guidelines, Registries & Global Practice
Global Burden and Epidemiology
Hip osteoarthritis is among the leading global causes of years lived with disability, and total hip arthroplasty (THA) is one of the most successful and cost-effective elective operations performed worldwide, with several million procedures performed each year across high-volume registries. Hip biomechanical principles (joint reaction force, abductor mechanics, contact stress, component positioning) underpin the surgical decisions captured by these registries.
Registry Evidence
Large national joint replacement registries provide the strongest real-world evidence on how biomechanical restoration translates into implant survival. Although registries differ in detail, several findings are consistent internationally:
- AOANJRR (Australia): Larger femoral head sizes (36 mm and dual-mobility constructs) are associated with lower revision for dislocation; restoration of offset and leg length correlates with better patient-reported outcomes.
- NJR (England, Wales, Northern Ireland, Isle of Man) and the Swedish Hip Arthroplasty Register (SHAR): Both report that malpositioned acetabular components and reduced offset are associated with higher rates of dislocation and revision, reinforcing the importance of biomechanical restoration.
- Across registries, the leading early failure mode is instability/dislocation, which is directly governed by component orientation, offset, head size and soft-tissue tension — the biomechanical levers discussed in this topic.
Guideline and Standards Comparison
- normalAnatomy
- Evidence-based clinical practice guidelines on hip OA management and THA
- stabilityMechanism
- Recommends restoration of hip mechanics (offset, length) and appropriate component positioning to reduce instability
- pathologicalStates
- Acknowledges Lewinnek safe zone as a guide while recognising its limitations
- clinicalSignificance
- Moderate-to-strong evidence supports THA for end-stage hip OA
- measurementTechnique
- Preoperative templating; AP pelvis radiograph
- normalAnatomy
- NG157 (osteoarthritis) and joint replacement guidance
- stabilityMechanism
- Supports THA for disabling hip OA refractory to non-operative care; emphasises implants with strong registry survivorship (ODEP ratings)
- pathologicalStates
- Directs implant selection toward components meeting benchmark revision thresholds
- clinicalSignificance
- Cost-effectiveness and registry-validated implant survival central to recommendations
- measurementTechnique
- NJR-linked outcome benchmarking (ODEP/Beyond Compliance)
- normalAnatomy
- British Orthopaedic Association / British Hip Society standards
- stabilityMechanism
- Promote offset and leg-length restoration, accurate cup orientation, and spinopelvic assessment in at-risk patients
- pathologicalStates
- Hip-preservation pathways (PAO, FAI surgery) for dysplasia and impingement in young adults
- clinicalSignificance
- Standards drive surgeon-level and unit-level outcome monitoring
- measurementTechnique
- Templating, intraoperative measurement, standing/sitting lateral radiographs
- normalAnatomy
- Pan-European consensus and instructional content
- stabilityMechanism
- Endorse combined-anteversion and functional/spinopelvic cup-positioning concepts beyond the static Lewinnek zone
- pathologicalStates
- Recognise stiff-spine and hypermobile-pelvis phenotypes as dislocation risks
- clinicalSignificance
- Shift toward patient-specific functional targets
- measurementTechnique
- Functional radiographs; navigation/robotics where available
- normalAnatomy
- ISO 7206 series (hip-implant mechanical testing); ISO 14242 (wear simulation)
- stabilityMechanism
- Standardise endurance, fatigue and wear testing reflecting in vivo loading (informed by Bergmann-type force data)
- pathologicalStates
- Define test loads approximating walking/stair-climbing forces
- clinicalSignificance
- Regulatory prerequisite for implant market approval
- measurementTechnique
- Bench testing under physiological load profiles
Practice Variation and Modern Trends
- Cup positioning philosophy: International practice is moving from the static Lewinnek safe zone toward functional/spinopelvic targets and combined anteversion, particularly for patients with prior lumbar fusion or a stiff spine.
- Bearing and head size: Larger heads and dual-mobility constructs are increasingly used for instability-risk patients, with regional variation in adoption.
- Fixation: Cemented fixation predominates for elderly osteoporotic bone in several European/registry settings, whereas uncemented fixation is favoured in younger patients; practice varies markedly between countries.
- Hip preservation: PAO for dysplasia and arthroscopic/open FAI correction are concentrated in specialist centres, with referral thresholds differing internationally.
Exam Relevance (FRACS / FRCS Tr & Orth)
Hip biomechanics is a core basic-science viva and MCQ topic. Candidates are expected to draw the single-leg-stance free body diagram, derive the abductor and joint reaction forces, and link the mechanics to clinical decisions: Trendelenburg gait, contralateral cane use, offset and leg-length restoration, cup safe zones and combined/functional anteversion, and the contact-stress basis of dysplastic, post-traumatic and avascular-necrosis arthritis.
MCQ Practice Points
Q: What is the hip joint reaction force during single-leg stance and how is it calculated?
A: Approximately 2.5-3× body weight. Calculated by moment equilibrium: Body weight (minus stance leg, ~55kg for 70kg person) acts 10cm from hip center. Hip abductors must generate ~2× BW force through their 5cm moment arm to balance. Joint reaction force is vector sum of body weight and abductor force, directed superolaterally into the acetabulum.
Q: How does using a walking stick in the contralateral hand reduce hip joint force?
A: A walking stick creates an additional moment arm on the contralateral side. Using just 10-15% body weight through the stick significantly reduces the moment that abductors must counter. This can reduce hip joint reaction force by 20-30%. The stick works by reducing the effective body weight lever arm, not by directly offloading weight.
Q: What is the effect of reducing femoral offset in THA on hip biomechanics?
A: Reducing femoral offset decreases the abductor moment arm, requiring the abductors to generate greater force to maintain pelvic stability. This increases hip joint reaction force, accelerates polyethylene wear, and causes abductor weakness and Trendelenburg gait. Offset restoration is critical - every 1 mm reduction increases abductor force required.
Q: Explain the biomechanical basis of the Trendelenburg gait compensation (abductor lurch).
A: When abductors are weak, the patient lurches the trunk over the affected hip during stance phase. This shifts the body's center of gravity closer to the hip center, reducing the body weight moment arm by approximately 50%. With a shorter lever arm, less abductor force is needed for balance, compensating for weakness.
Q: How does hip dysplasia affect contact stress in the hip joint?
A: Hip dysplasia causes reduced acetabular coverage and decreased contact area. Since Stress = Force/Area, the same joint reaction force is distributed over a smaller area, causing increased contact stress. This leads to accelerated cartilage degeneration and early osteoarthritis. Center-edge angle less than 20° indicates insufficient coverage. Periacetabular osteotomy improves coverage.
At a Glance
Hip joint reaction forces reach 2.5-3x body weight during normal walking, peaking at mid-stance when hip abductors must generate approximately 2x body weight to prevent pelvic drop. This occurs because the abductor moment arm (~5cm) is half the body weight lever arm (~10cm), representing a third-class lever with mechanical advantage of 0.5. Clinical implications include understanding Trendelenburg gait (abductor weakness cannot balance body weight moment), the benefit of contralateral cane use (reduces body weight moment arm), and the importance of restoring femoral offset in THA to maintain abductor mechanics and minimise wear from excessive joint reaction forces.
BTAHM
Hook:Abductors work 2× body weight to prevent pelvic drop - Remember the 2:1 ratio
Summary
Hip joint biomechanics are dominated by high forces resulting from the mechanical disadvantage of the hip abductor system. During single-leg stance, the abductors must generate approximately 2 times body weight to balance the body weight moment, resulting in hip joint reaction forces of 2.5 to 3 times body weight during normal walking.
The mechanical advantage of approximately 0.5 reflects a third-class lever system optimized for range of motion and speed rather than force amplification. While this creates high muscle and joint forces, it enables the hip to achieve the functional demands of human bipedal locomotion.
Contact stress is the ratio of joint reaction force to contact area. Normal anatomy provides sufficient contact area to keep stress within the physiological tolerance of articular cartilage (1-3 MPa). Pathological conditions that reduce contact area (dysplasia, avascular necrosis, fracture malunion) increase stress, leading to early osteoarthritis.
Total hip arthroplasty biomechanics depend critically on restoration of femoral offset and leg length to maintain abductor moment arm and muscle efficiency. Acetabular component position must balance stability (avoiding dislocation) with range of motion (avoiding impingement) while considering individual patient factors including spinopelvic mobility.
For examination purposes, master the single-leg stance force analysis with free body diagram and calculations, understand the relationship between contact area and stress in pathological conditions, and know the biomechanical principles guiding THA component positioning (offset restoration, safe zone for cup position, combined anteversion concept). These topics are consistently emphasized in basic science vivas and MCQs.
Clinical Decision Scenarios
Practise clinical reasoning and management decisions out loud
“An examiner asks you to analyze the forces acting on the hip during single-leg stance. You are expected to draw a free body diagram, identify all forces and moment arms, calculate the required hip abductor force, and explain the clinical significance of this biomechanical relationship.”
Single-Leg Stance Forces - Most Examined Topic
- Body weight (minus stance leg): 55 kg (539 N) for 70 kg person, acting ~10 cm from hip center
- Hip abductor force: ~1078 N (110 kg, 2× body weight), moment arm ~5 cm
- Hip joint reaction force: ~1600 N (2.3× body weight), vector sum of BW + abductor force
- Mechanical advantage: 0.5 (abductor moment arm / BW lever arm = 5/10)
- Moment equilibrium: BW × 10 cm = Abductor force × 5 cm
- Clinical: During walking, peak force reaches 2.5-3× BW at midstance
Hip Abductor Biomechanics
- Primary muscles: Gluteus medius (largest), gluteus minimus, tensor fasciae latae
- Moment arm: 5-6 cm from hip center to muscle resultant
- Function: Pelvic stabilization (prevent Trendelenburg), frontal plane balance
- Weakness causes: Superior gluteal nerve injury (L5 root, surgical), muscle damage, pain inhibition
- Trendelenburg test: Pelvis drops on contralateral side during single-leg stance
- Compensation: Abductor lurch (trunk shift over affected hip reduces BW moment arm by 50%)
Contact Stress - Key Concept
- Contact stress = Joint reaction force / Contact area
- Normal hip: ~1600 N / 1200 mm² = 1.33 MPa (within cartilage tolerance 1-3 MPa)
- Dysplasia: Area reduced to 600 mm² → Stress = 2.67 MPa (doubled) → Early arthritis
- AVN/Fracture: Area reduced to 400 mm² → Stress = 4.0 MPa (tripled) → Rapid arthritis
- CE angle: Normal 25-40°, dysplasia less than 20° (inadequate coverage)
- Labrum: Increases contact area by 20-30%, seals joint (negative pressure ~-5 mm Hg)
Gait Cycle Forces
- Stance phase (60% of cycle): Weight-bearing, peak forces at midstance (2.5-3× BW)
- Initial contact: 1.5-2× BW, hip extended, extensors active (glut max, hamstrings)
- Midstance: 2.5-3× BW, single-leg support, abductors maximally active
- Toe-off: Forces decrease, hip flexors activate for swing
- Swing phase (40% of cycle): Non-weight-bearing, minimal joint force (less than BW)
- Faster walking/running: Forces increase to 4-5× BW; Jumping: 8-10× BW
THA Femoral Offset - Critical for Function
- Definition: Perpendicular distance from femoral canal axis to center of head (normal 40-50 mm)
- Reduced offset: Decreased abductor moment arm → Increased force requirement → Weakness, Trendelenburg
- Increased offset: Increased moment arm → Improved strength but higher joint force, trochanteric pain
- Target: Restore native offset ± 5 mm (deviations greater than 5 mm = inferior outcomes)
- Measurement: AP pelvis radiograph, compare to contralateral side
- Clinical: Combined with leg length restoration optimizes biomechanics and satisfaction
THA Acetabular Position - Lewinnek Safe Zone
- Inclination: 30-50° from horizontal (40° ± 10°), modern target 35-45°
- Anteversion: 10-30° (20° ± 10°), modern target 15-25°
- Too vertical (high inclination): Edge loading, accelerated wear, instability
- Too horizontal (low inclination): Impingement, reduced ROM
- Excessive anteversion: Posterior instability; Insufficient: Anterior instability
- Combined anteversion: Acetabular + femoral version = 35-45° (Ranawat safe zone)
Spinopelvic Considerations - Modern Concept
- Pelvic tilt changes between standing and sitting affect functional cup orientation
- Normal: Posterior pelvic tilt ~20° when sitting (increases functional anteversion)
- Stiff spine: Minimal tilt change → Risk anterior dislocation sitting → Reduce cup anteversion to 10-15°
- Hypermobile: Excessive tilt (greater than 30°) → Posterior dislocation risk standing → Increase anteversion to 25-30°
- Assessment: Lateral spinopelvic radiographs standing and sitting
- High-risk: Prior lumbar fusion, flat-back syndrome, severe spinal deformity
Assistive Device Biomechanics
- Cane in CONTRALATERAL hand: Reduces BW moment arm, decreases abductor force 20-30%
- Example: 15% BW cane support → Abductor force drops from 1078 N to 784 N (27% reduction)
- Hip joint reaction force reduces proportionally (less pain, improved function)
- Common error: Ipsilateral cane (same side as painful hip) provides minimal benefit
- Bilateral support (walker, crutches): Symmetric loading, reduces single-leg phase forces
- Weight loss: Directly proportional force reduction (10 kg loss = 7-8% force reduction)
Stability Mechanisms - Four Components
- Bony: Acetabular coverage 170-180°, CE angle 25-40°, version 15-25° (primary stability)
- Labral: Deepens socket 5 mm, increases contact area 20-30%, creates negative pressure seal
- Capsular: Iliofemoral (strongest, 350 kg), pubofemoral, ischiofemoral ligaments
- Muscular: Dynamic compression, reflexive stabilization, coordinated motion control
- Pathology: Dysplasia (inadequate bone), labral tear (loss of seal), capsular laxity, abductor weakness
High-Yield Numbers for MCQs
- Hip abductor moment arm: 5-6 cm; Body weight lever arm: 10-12 cm; MA = 0.5
- Single-leg stance forces: Abductor 2× BW (~110 kg), Joint reaction 2.3-3× BW (~160-210 kg)
- Walking peak force: 2.5-3× BW; Running: 4-5× BW; Jumping: 8-10× BW
- Normal contact area: 1000-1400 mm²; Normal stress: 1-2 MPa (tolerance up to 3 MPa)
- CE angle: Normal 25-40°, dysplasia less than 20°, overcoverage greater than 40°
- THA safe zone: Inclination 35-45°, Anteversion 15-25°, Combined version 35-45°
Evidence Base
The biomechanical claims in this topic rest on a small number of landmark sources: in vivo telemetric force measurement (Bergmann), the femoral-offset clinical correlation (McGrory), the acetabular safe-zone description (Lewinnek), labral function reviews (Bsat), the FAI disease concept (Ganz) and long-term joint-preservation outcomes (Bernese PAO). The verified EvidenceCards below summarise these, and each quantitative figure in the text is anchored to one of them or to standard radiographic reference ranges.