Secondary Valgus Stabilizer | Mason Classification | Rule of 3
- Secondary valgus stabilizer - critical if MCL is torn
- Mechanical block needs aspiration to confirm (remove pain)
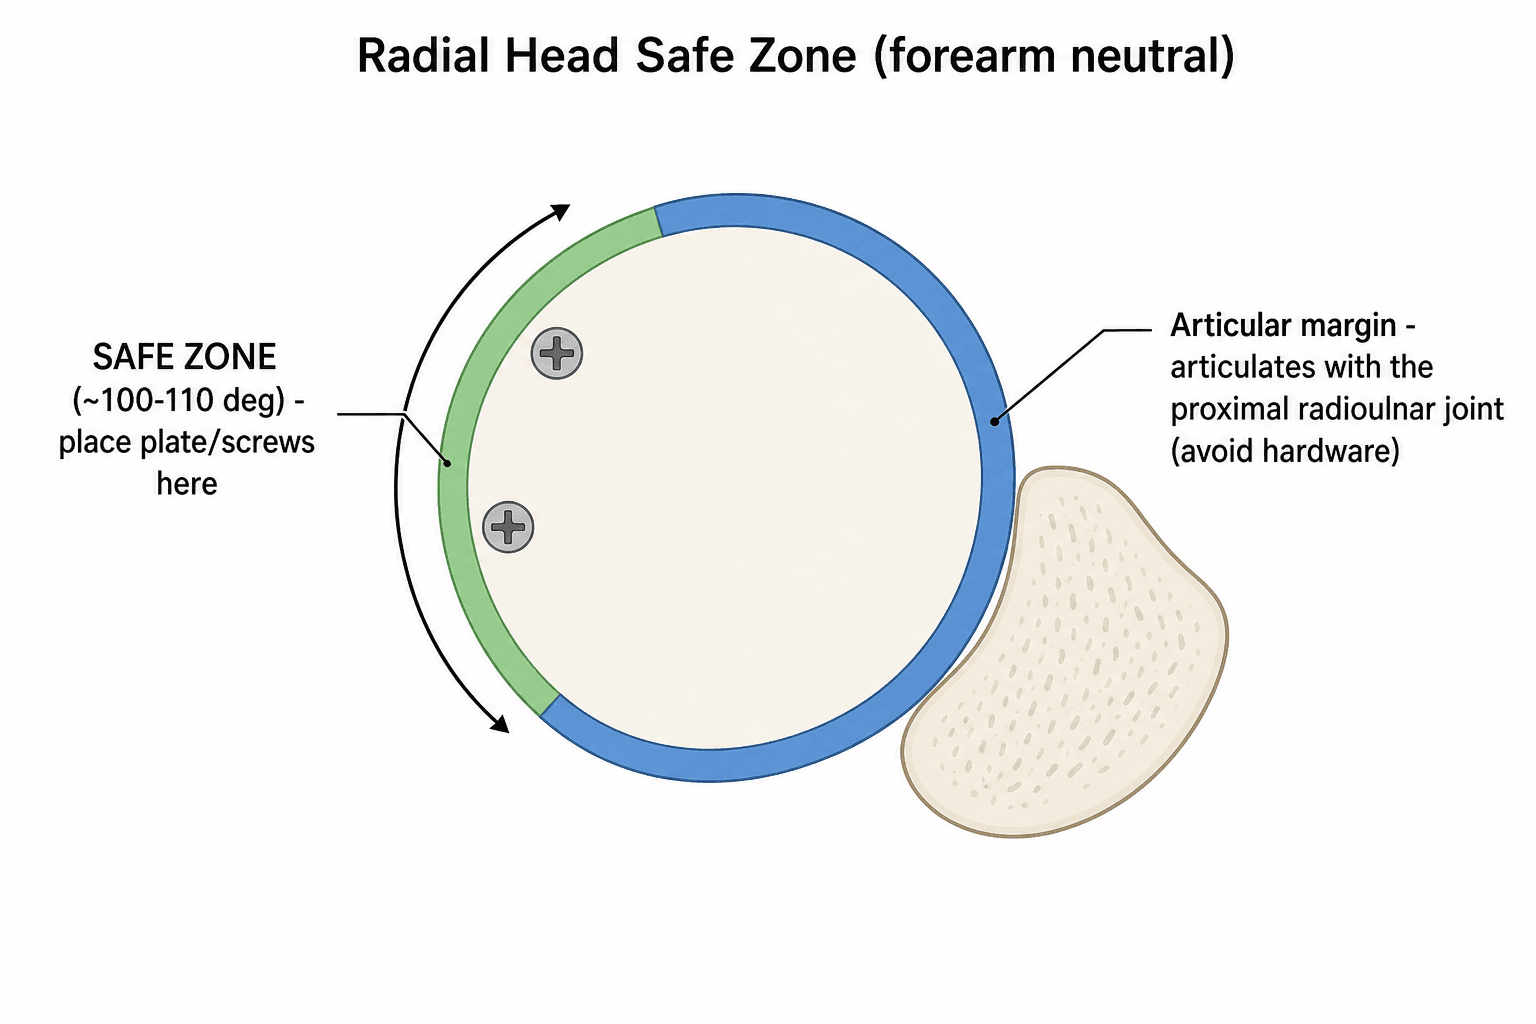
- Safe Zone (90-110 degrees) for hardware placement to avoid impingement
- Essex-Lopresti - always check DRUJ/wrist for tenderness
- Terrible Triad = Radial Head + Coronoid + Dislocation
- “Aspirate hemarthrosis + inject L.A. to assess true ROM
- “Fat pad sign may be the only radiological sign
- “Excision contraindicated if forearm instability (check wrist!)
- “Use bare metal stems for replacement (cemented or press-fit)

Fractures often come in threes (Terrible Triad):
- Radial Head Fracture
- Coronoid Fracture
- Elbow Dislocation (LCL injury) Always look for the other two!
90-110 degree arc of the radial head that does not articulate with the proximal radioulnar joint.
- Safe for plate/screw prominent heads
- Determine intra-operatively using reference marks
Longitudinal Radioulnar Dissociation.
- Radial Head Fracture
- Interosseous Membrane (IOM) tear
- DRUJ Dislocation Exam Trap: Always document "Non-tender DRUJ" or get wrist X-rays.
Mechanical Block is the primary indication for Type II.
- Must aspirate hematoma and inject local anaesthetic first
- If block resolves then Non-operative
- If block persists then Surgery
- Key Feature
- Non-displaced (less than 2mm)
- Stability
- Stable
- Treatment
- Sling for comfort, Early ROM (start within 1 week)
- Key Feature
- Displaced greater than 2mm
- Stability
- Usually Stable
- Treatment
- ORIF if mechanical block, otherwise conservative
- Key Feature
- Comminuted
- Stability
- Variable
- Treatment
- ORIF (if less than 3 fragments) OR Replacement (if more than 3 fragments)
- Key Feature
- + Dislocation
- Stability
- Unstable
- Treatment
- Reduce, Fix/Replace Head, Repair LCL, Fix Coronoid
BLOCKIndications for Surgery
Hook:If there's a BLOCK, you need to unlocking it (Surgery).
RCDTerrible Triad Components
Hook:RCD - Reality Check Required (It's worse than it looks)
MCEAssociated Injuries
Hook:MCE - Must Check Everything (Wrist, Medial side, CT)
Overview and Epidemiology
FOOSH (Fall on Outstretched Hand):
- Axial load + Valgus force leads to Radial Head impacting Capitellum.
- Pronation: Anterolateral fragment (most common).
- Extension: Posterior dislocation.
- Most common adult elbow fracture (around 33% of elbow fractures, around 4% of all fractures)
- Median age around 43 years; no consistent sex predominance in population data
- Female fractures tend to be lower-energy (falls); male fractures younger and higher-energy
- Consider osteoporosis assessment in older patients with low-energy injury
- Primary stabilizer: Radiocapitellar contact (60% load transfer)
- Secondary valgus stabilizer: Resists valgus if MCL is incompetent. Contributes 30% to valgus stability.
- Longitudinal stability: Prevents proximal migration of radius
The radial head is a secondary stabilizer to valgus stress. If the MCL (primary stabilizer) is intact, the radial head is less critical for stability. If the MCL is torn (e.g., Mason IV), the radial head becomes critical to prevent valgus instability. Thus, excision is contraindicated in Mason IV or Essex-Lopresti.
Anatomy and Pathophysiology
- Significance
- 90-110° non-articulating arc
- Surgical Relevance
- Place plates/screws here to avoid PRUJ impingement
- Significance
- Lateral stabilizers
- Surgical Relevance
- Often torn in Type IV - repair after head fixation
- Significance
- Motor nerve to extensors
- Surgical Relevance
- At risk during Kocher approach (pronate to protect)
- Significance
- Radial recurrent artery
- Surgical Relevance
- Retrograde flow - risk of AVN/Non-union in neck fractures
Intra-operatively, the Safe Zone can be identified by using reference marks:
- Radial Styloid (Lateral) corresponds to midpoint of safe zone in some citations, but unreliable.
- Lister's Tubercle alignment? Best Method: Mark the radial head in full pronation and supination relative to the sigmoid notch. The area that does not articulate with the lesser sigmoid notch of the ulna is the safe zone. Roughly corresponds to the lateral aspect of the head when forearm is in neutral.

- The interval is between Anconeus (Radial N) and ECU (PIN).
- It is safe distally but the PIN crosses the radial neck proximally within the supinator.
- Pronation moves the PIN anteriorly, away from the surgical field, making the dissection safer.
- Between ECU and EDC.
- Better access to anterolateral coronoid and anterior capsule.
- Higher risk to PIN and LCL if extended proximally.
- Often preferred for Terrible Triad injuries to access coronoid.
Classification Systems

Mason Classification (Modified by Broberg & Morrey)
- Description
- Non-displaced (less than 2mm), no block
- Stability
- Stable
- Treatment
- Conservative
- Description
- Displaced greater than 2mm, partial head
- Stability
- Usually Stable
- Treatment
- ORIF if block/large fragment
- Description
- Comminuted entire head
- Stability
- Variable
- Treatment
- Replacement (or ORIF if simple)
- Description
- Fracture + Ulnohumeral Dislocation (Terrible Triad likely)
- Stability
- Unstable
- Treatment
- Surgery (usually Replacement + LCL repair)
This classification is simple but guides surgical decision making effectively.
Coronoid Fracture Classification
The coronoid is one of the three terrible-triad components, and the topic refers to "Regan-Morrey" without defining it. Two complementary systems are examinable.
- Fragment
- Tip avulsion
- Note
- Smallest; the usual terrible-triad coronoid
- Fragment
- Up to 50% of coronoid height
- Note
- Intermediate
- Fragment
- More than 50% of coronoid height
- Note
- Large; markedly destabilising
Each Regan-Morrey type is subdivided A (no dislocation) or B (with dislocation).
The O'Driscoll classification is anatomic and more useful for instability:
- Tip fractures - the terrible-triad pattern.
- Anteromedial facet fractures - the high-yield trap: even a small anteromedial-facet fragment destabilises the elbow into varus posteromedial rotatory instability (VPMRI), is easily missed on plain films (needs CT), and usually requires a buttress plate or fixation rather than non-operative care.
- Basal fractures - large body or base fragments, often with olecranon or proximal-ulna injury.
By Regan-Morrey, coronoid fractures are tip (I), up to 50% (II) or over 50% (III), each subdivided A/B by dislocation. The O'Driscoll anteromedial-facet fracture is the examiner's trap: a small fragment that causes varus posteromedial rotatory instability, is often radiographically subtle (get a CT), and needs a buttress plate - unlike the tip fracture of the terrible triad, which is often managed through the radial-head and LCL repair.
Clinical Assessment
- Mechanism: Fall on outstretched hand.
- Pain: Lateral elbow pain, worse with pronation/supination.
- Mechanical Sx: Locking or clicking (loose bodies).
- Wrist pain: Ask specifically! (Essex-Lopresti).
- Tenderness: Radial head, LCL origin, DRUJ (wrist).
- ROM: Assess flexion/extension and pro/supination.
- Mechanical Block: Hard stop vs pain inhibition.
- Stability: Valgus stress (MCL), Pivot shift (LCL).
Pain inhibition can mimic a mechanical block.
- Aseptically aspirate hematoma from the 'soft spot'.
- Inject 5-10ml of Local Anaesthetic (Lignocaine/Marcaine).
- Re-examine ROM. Result: If full ROM returns = Type I (No block). If block persists = Type II (Mechanical Block) leads to Surgery.
- Discriminating Features
- Lateral tenderness, painful/blocked rotation, positive fat pad sign
- Key Investigation
- AP/lateral + radiocapitellar view; CT if complex
- Discriminating Features
- Anterior pain, double-arc sign on lateral, block to flexion
- Key Investigation
- CT (often radiographically subtle)
- Discriminating Features
- Apprehension, positive pivot-shift, recurrent giving way
- Key Investigation
- Examination under anaesthesia; MRI
- Discriminating Features
- Radial head fracture PLUS wrist/DRUJ pain, proximal radial migration
- Key Investigation
- Wrist radiographs, DRUJ stress, compare ulnar variance
- Discriminating Features
- Gross swelling, prior deformity, concentric reduction on film
- Key Investigation
- Post-reduction radiographs; assess for fracture
- Discriminating Features
- Effusion (fat pad sign) without visible fracture line
- Key Investigation
- Repeat film at 7-10 days or CT/MRI
Investigations
Imaging Protocol
AP, Lateral, Radiocapitellar (Greenspan) views.
- Look for: Cortical disruption, step-off, fat pad sign (sail sign).
- Check DRUJ context.
Indicated for:
- Comminuted fractures (Type III)
- Associated coronoid fractures
- Dislocation/Subluxation
- Surgical planning (ORIF vs Replacement)
Only for subtle ligamentous injury or occult fractures if CT equivocal. Mostly clinical diagnosis for ligaments.
The Radiocapitellar (Greenspan) View is taken with the beam angled 45 degrees to the shoulder. It profiles the radial head without overlap from the coronoid/ulna, making it excellent for detecting subtle fractures.
Management Algorithm

Indication: Type I, Type II without block
- Sling for comfort (max 3-5 days).
- Early Active ROM immediately as pain allows.
- Resolution of hematoma allows movement.
- X-ray at 1 week to check displacement.
Excellent (90-95%). Stiffness is main risk if immobilized too long.
Surgical Technique


ORIF Principles
- Approach: Kocher (between Anconeus and ECU) or Kaplan (between ECU and EDC).
- Protection: Pronate forearm to protect PIN (moves it medially away from field).
- Reduction: K-wires for temporary hold.
- Fixation: Mini-fragment screws (2.0/2.4mm) or Headless Compression Screws.
- Plate Position: Must be in Safe Zone (lateral aspect in neutral rotation).
- Check: Range of motion intra-op. Impingement?
Ensure anatomic reduction to prevent arthritis.
The Kocher Interval is between the Anconeus (Radial n.) and ECU (PIN). It is the true internervous plane? Actually, both are supplied by Radial nerve branches, but the plane is safe distally. Pronation moves the PIN anteriorly and away from the radial neck, increasing the safe zone for dissection.
Detecting an Overstuffed Radial Head Replacement
The topic warns against "overstuffing" but the examiner will ask how you actually recognise it. Overstuffing means a prosthesis that is too long (or too large); it causes capitellar cartilage wear, loss of terminal extension, pain and early arthritis.
- The prosthetic articular surface should sit at, or about 1-2 mm distal to, the proximal edge of the lesser sigmoid notch and the lateral edge of the coronoid - the native radial head does not project proximal to the coronoid.
- Asymmetric widening of the MEDIAL ulnohumeral joint space - the over-long implant tilts and levers the ulna so the medial joint gaps open. The medial and lateral ulnohumeral spaces should be symmetric, so medial widening is the classic sign.
- The radial head sitting proximal to the coronoid reference level.
- Ulnohumeral incongruity and, over time, capitellar erosion.
A correctly-sized radial head prosthesis sits level with (or just distal to) the lateral edge of the coronoid, with a congruent, symmetric ulnohumeral joint. The cardinal radiographic sign of overstuffing is asymmetric widening of the MEDIAL ulnohumeral joint on a true AP (the over-long implant tilts the ulna), leading to capitellar wear and lost extension. Judging the implant against the contralateral radius is unreliable - judge it against the coronoid and ulnohumeral congruity.
Complications
- Incidence
- 15-20%
- Prevention/Management
- Early ROM! Avoid prolonged immobilization (greater than 1 week).
- Incidence
- 5-10%
- Prevention/Management
- Gentle tissue handling. Indomethacin/Radiation if high risk.
- Incidence
- 1-3%
- Prevention/Management
- Pronate during exposure. Retract gently anteriorly.
- Incidence
- 5%
- Prevention/Management
- Safe zone placement. Avoid overstuffing replacement.
- Incidence
- Variable
- Prevention/Management
- Occurs after Excision if IOM incompetent (Essex-Lopresti).
Postoperative Care
Rehab Protocol
Splint/Sling for comfort. Elevate. Start active ROM as soon as block/pain allows (usually Day 3-5). If LCL repaired: Elbow hinge brace needed.
Active Flexion/Extension, Pro/Supination. Avoid passive stretching (HO risk). Wean sling.
Start strengthening once union evident (ORIF) or soft tissue healed (Arthroplasty).
Full activity. Contact sports depend on fracture healing.
Outcomes
- Impact
- High
- Explanation
- Type I/II do better than Type III/IV
- Impact
- Critical
- Explanation
- Dislocation or Coronoid fracture worsens prognosis significantly
- Impact
- High
- Explanation
- Early mobilization is key to preventing stiffness
- Impact
- Moderate
- Explanation
- Poorer subjective outcomes reported
In a stable elbow with an intact MCL and interosseous membrane, pooled meta-analysis data show excision and replacement give similar Mayo Elbow Performance Scores and complication rates, with a slightly better arc after excision. Replacement is favoured where stability is needed (terrible triad, Essex-Lopresti) and in younger patients (long-term arthritis concern). Excision is reserved for low-demand, stable elbows.
Guidelines, Registries & Global Practice
- Around 33% of elbow fractures; around 1.7-5.4 per 10,000 per year in population studies.
- Median age around 43 years with no consistent sex predominance (Duckworth/Court-Brown cohort).
- Bimodal pattern: younger high-energy injuries vs older low-energy falls (osteoporosis subset).
- Roughly one third have associated injuries (coronoid, LCL, MCL, capitellum, DRUJ).
- AO Foundation / AOTrauma: Mason-Johnston framework; ORIF for reconstructable, arthroplasty for unreconstructable, preserve the head when the elbow/forearm is unstable.
- BOA / BSSH (UK): Early mobilization for stable fractures; CT for complex patterns; specialist referral for instability.
- AAOS (US): No isolated radial-head-specific clinical practice guideline; management follows fracture-pattern and stability principles.
- EFORT / European consensus: Endorses safe-zone fixation and avoidance of over-stuffing in arthroplasty.
- High-Resource Setting
- CT routine for Mason III/IV and associated injuries
- Limited-Resource Setting
- Plain films +/- radiocapitellar view; CT selectively
- High-Resource Setting
- Modular metal radial head arthroplasty
- Limited-Resource Setting
- Radial head excision if elbow/forearm stable (cost/availability)
- High-Resource Setting
- Implant-based fixation + LCL anchors +/- hinged ex-fix
- Limited-Resource Setting
- Suture/transosseous LCL repair; longer cast if implants scarce
- High-Resource Setting
- Early supervised therapy
- Limited-Resource Setting
- Self-directed early active motion programmes
Unlike hip and knee arthroplasty, radial head replacement is not robustly captured by national joint registries (NJR, AJRR, AOANJRR, SHAR), so the evidence base rests on institutional series and meta-analyses rather than registry survivorship. Quote this if asked why implant-survival data for radial head prostheses are weaker than for hip/knee.
Controversies & Areas of Uncertainty
Traditional teaching mandates arthroplasty once a head has more than 3 fragments. Recent series (Walsh 2022) show selected comminuted heads fixed by experienced surgeons achieve comparable QuickDASH/Broberg-Morrey scores. The fragment count is a guide, not an absolute.
Despite widespread enthusiasm for arthroplasty, meta-analysis shows no clear superiority over excision in a stable, isolated Mason III elbow. Cost, implant availability and patient age drive the decision more than functional score.
The historical 2 mm step-off as a surgical trigger is not evidence-based; a true mechanical block (confirmed after aspiration/local anaesthetic) is the more reliable indication. Many displaced Mason II fractures do well non-operatively.
Whether to repair the MCL after LCL repair and bony fixation is debated. Most protocols achieve stability with LCL repair alone; MCL repair or a hinged external fixator is reserved for residual instability tested intra-operatively.
MCQ Practice Points
Q: What describes the 'Safe Zone' for radial head fixation? A: A 90-110 degree arc on the lateral aspect (in neutral) that does not articulate with the ulna. Hardware here avoids impingement.
Q: Which nerve is most at risk during the Kocher approach to the radial head? A: Posterior Interosseous Nerve (PIN). It winds around the radial neck within the supinator. Pronation moves it anteriorly and safely away.
Q: The radial head is the secondary stabilizer against which force? A: Valgus force. The MCL is primary. Radial head is critical only if MCL is deficient.
Q: What is the treatment for a Mason IV fracture (Dislocation + Fracture)? A: Surgery. Requires reduction, stabilization of the head (Fix or Replace), and usually LCL repair. Excision is contraindicated due to instability.
Q: What is the purpose of aspirating a radial head fracture hematoma? A: To relieve pain and mechanical block caused by fluid pressure, allowing assessment of true mechanical block vs pain inhibition. Distinguishes surgical vs non-surgical Type II.
Exam Viva Scenarios
Practise clinical reasoning and management decisions out loud
“A 35-year-old carpenter presents with a radial head fracture after a fall. X-ray shows a Type II fracture with 3mm displacement. He has limited pronation. Talk me through your management.”
“You are called to ED for a 40-year-old female with an unstable elbow after reduction of a dislocation. X-ray shows a comminuted radial head fracture and a coronoid tip fracture. How do you manage this?”
“A patient with a comminuted radial head fracture also complains of severe wrist pain. X-rays of the wrist show ulnar positive variance. What is the diagnosis and management implication?”
Classification (Mason)
- Type I: Non-displaced (less than 2mm)
- Type II: Displaced partial head
- Type III: Comminuted
- Type IV: Associated Dislocation
Key Concepts
- Secondary Valgus Stabilizer
- Safe Zone (110° arc)
- Aspiration Test for Block
- Terrible Triad (Head + Coronoid + D/L)
Surgery Indications
- Mechanical Block (Type II)
- Open Fracture
- Type III/IV (Instability)
- Essex-Lopresti Association
Treatment Options
- Type I: Early ROM (less than 1 wk)
- Type II: ORIF (Headless screws)
- Type III: Replacement (Metal)
- Excison: ONLY if stable (Rare)
Complications
- Stiffness (Most common)
- PIN Nerve Palsy
- HO (Heterotopic Ossification)
- Implant Loosening
Evidence Base
Standard Surgical Protocol for the Terrible Triad
- 36 consecutive elbow dislocations with radial head AND coronoid fractures treated with a sequential protocol (fix/replace radial head, fix coronoid, repair LCL +/- MCL +/- hinged external fixator).
- At mean 34 months: flexion-extension arc averaged 112 degrees, forearm rotation 136 degrees; mean Mayo Elbow Performance Score 88.
- Concentric stability restored in 34 of 36 elbows; 8 patients required reoperation.
Safe Zone Anatomy for Internal Fixation
- Cadaveric dissection defined an approximately 110-degree non-articulating arc of the radial head/neck safe for hardware.
- Provided reproducible intra-operative reference marks (neutral, full supination, full pronation) to localise the zone from a lateral approach.
- Hardware outside this zone risks impingement on the lesser sigmoid notch and loss of forearm rotation.
Early Mobilization in Simple Radial Head Fractures
- 180 patients with simple radial head fractures randomised to immediate mobilization, sling for 2 days then mobilization, or cast for 7 days.
- Both early-mobilization groups had better range of motion, strength and function than 7-day immobilization; benefit greatest in displaced fractures.
- A 48-hour delay before mobilization reduced early pain without compromising outcome; over 4 mm displacement or over 30 degrees angulation predicted worse results.
Failure Mechanisms of Metal Radial Head Replacement
- 44 patients (47 elbows) undergoing removal of a failed metallic radial head implant analysed.
- Most common indication for revision was painful loosening (31 elbows); revision was also performed for stiffness (18), instability (9) and deep infection (2), with radiographic over-lengthening in 11 elbows.
- Degenerative change was present in all but one elbow; instability was not seen with any bipolar implant.