Aseptic Loosening | Infection | Instability | Bone Loss Management
- Infection is the most common indication for revision shoulder arthroplasty (40-50% of cases)
- Glenoid bone loss requires classification (Sirveaux E0-E4) and often augmentation or bone grafting
- Reverse shoulder arthroplasty is the preferred option for most revisions due to bone loss and rotator cuff deficiency
- Two-stage revision is mandatory for confirmed infection with 6-week antibiotic spacer interval
- Reverse shoulder arthroplasty is the dominant revision construct across major registries due to its tolerance of cuff deficiency and bone loss
- “Failed hemiarthroplasty with intact rotator cuff can be converted to anatomic TSA
- “Sirveaux E3-E4 glenoid bone loss requires augmented baseplate or bone grafting
- “Humeral bone loss managed with longer stems, impaction grafting, or structural allografts
- “Subscapularis failure predisposes to instability - consider lesser tuberosity osteotomy for repair
Infection first. Always exclude infection with aspiration, CRP, ESR before revision. Two-stage mandatory if infected.
Sirveaux classification for glenoid (E0-E4). E3-E4 needs augmentation. Humeral side uses Morrey bone stock grading.
Default to RSA for most revisions. Only convert to anatomic TSA if intact rotator cuff and adequate bone stock. RSA more forgiving.
Subscapularis management critical. Lesser tuberosity osteotomy if previous repair failed. Extended deltopectoral with careful neurovascular protection.
- Key Features
- Intact rotator cuff, good bone stock, no infection
- Revision Strategy
- Convert to anatomic TSA
- Key Pearl
- Glenoid bone must be adequate - check for medialization
- Key Features
- Aseptic loosening, glenoid erosion, cuff intact
- Revision Strategy
- Revise to RSA or anatomic depending on bone/cuff
- Key Pearl
- Assess glenoid bone loss with CT - Sirveaux grade
- Key Features
- Aseptic loosening, instability, or fracture
- Revision Strategy
- Revise to RSA with longer stem and augments
- Key Pearl
- Manage bone loss - allograft, augmented baseplate, BIO-RSA
- Key Features
- Positive aspiration, elevated inflammatory markers
- Revision Strategy
- Two-stage revision with antibiotic spacer
- Key Pearl
- Minimum 6 weeks antibiotics, normalize CRP before reimplantation
FAILSIndications for Revision Shoulder Arthroplasty
Hook:The shoulder arthroplasty FAILS when these complications occur - each requires careful preoperative planning and often conversion to reverse!
Overview and Epidemiology
Revision shoulder arthroplasty is a challenging surgical problem of increasing frequency as primary shoulder replacement (particularly reverse arthroplasty) expands worldwide. The leading indications are infection, aseptic loosening, instability and periprosthetic fracture, with infection a proportionally larger driver in the shoulder than in the hip or knee because of indolent Cutibacterium acnes. Reverse shoulder arthroplasty has emerged as the preferred revision construct across the major joint registries because it compensates for rotator cuff deficiency and accommodates glenoid and humeral bone loss; registry data consistently show that revision arthroplasty is less durable than the primary procedure.
- Age: Mean 65-75 years at revision (older than primary)
- Gender: Female predominance (60-65%) mirrors primary arthroplasty
- Time to revision: Mean 5-8 years from index procedure
- Multiple revisions: 10-15% require re-revision within 5 years
- Worse outcomes: Compared to primary arthroplasty (lower function, higher complications)
- Bone loss progression: Glenoid bone loss worsens with each revision
- Higher cost: 2-3 times cost of primary procedure
- Infection risk: 5-10% infection rate in aseptic revisions, up to 20% in septic
Anatomy and Biomechanical Considerations
The revision shoulder arthroplasty field presents increased risk to neurovascular structures due to scar tissue, altered anatomy, and bone loss. The axillary nerve is at particular risk during inferior capsular release and glenoid exposure (average 5-7mm from inferior glenoid rim). The musculocutaneous nerve enters the coracobrachialis 5-8cm distal to the coracoid and can be injured with vigorous inferior retraction. Cephalic vein is often scarred to deltopectoral interval - careful dissection prevents avulsion and hematoma. The brachial plexus is at risk with superior-medial glenoid exposure for bone grafting.
- Location/Relevance
- Exits quadrilateral space, 5-7mm from inferior glenoid
- Risk During Revision
- Capsular release, inferior retraction
- Protection Strategy
- Blunt dissection, limit inferior retraction, palpate nerve
- Location/Relevance
- Enters coracobrachialis 5-8cm from coracoid
- Risk During Revision
- Excessive inferior/medial retraction
- Protection Strategy
- Place retractors carefully, avoid prolonged tension
- Location/Relevance
- Runs in deltopectoral interval
- Risk During Revision
- Scar tissue can cause avulsion
- Protection Strategy
- Identify early, ligate if necessary, control bleeding
- Location/Relevance
- Medial to glenoid, superior to subscapularis
- Risk During Revision
- Medial glenoid exposure for bone grafting
- Protection Strategy
- Subperiosteal dissection, avoid medial drilling
Biomechanics of Revision Shoulder Arthroplasty
- Medialization: Each 1mm medial shift reduces deltoid lever arm by 2-3%
- Retroversion: Increased retroversion causes posterior subluxation and eccentric loading
- Superior tilt: Superior tilt greater than 10 degrees increases shear forces and failure risk
- Baseplate fixation: Minimum 4 screws required for stable fixation in revision setting
- Stem stability: Longer stems required for fixation past bone loss zone (150-200mm)
- Cement use: Cemented stems recommended for poor bone quality or cortical thinning
- Impaction grafting: Restores bone stock for potential future revision
- Stress shielding: Minimize with modular stems and anatomic reaming
Classification Systems
Sirveaux Classification (Glenoid Bone Loss in Failed RSA)
- Description
- No bone loss - intact glenoid surface
- Bone Loss
- 0%
- Management
- Standard glenoid baseplate, no augmentation
- Description
- Round erosion - central defect less than 50% width
- Bone Loss
- Under 25%
- Management
- Standard baseplate with central screw or BIO-RSA
- Description
- Oblique erosion - eccentric biconcave pattern
- Bone Loss
- 25-40%
- Management
- Eccentric reaming or small augmented baseplate
- Description
- Deep central erosion greater than 50% width
- Bone Loss
- 40-60%
- Management
- Augmented baseplate or structural bone graft required
- Description
- Extensive superior and medial bone loss
- Bone Loss
- Over 60%
- Management
- Structural allograft, BIO-RSA, or custom implants
E3 has deep central erosion but intact superior and medial glenoid cortex - can be managed with augmented baseplate or bone graft impaction. E4 has extensive superior and medial bone loss with loss of structural integrity - requires structural allograft (scapular spine bone graft, iliac crest strut graft) or BIO-RSA (bony-increased offset RSA with large bone graft). The distinction is critical because E4 has significantly higher failure rates without structural grafting.
ERODESirveaux Glenoid Bone Loss Classification
Hook:Glenoid bone ERODES progressively from E0 to E4 - E3 and E4 need augmentation or grafting at revision!
Clinical Assessment
- Onset of symptoms: Acute vs gradual onset (infection vs aseptic loosening)
- Pain character: Rest pain suggests loosening/infection; activity pain suggests instability
- Prior surgeries: Number of revisions, previous infections, complications
- Functional loss: What patient can no longer do (overhead activities, lifting)
- Systemic symptoms: Fevers, night sweats, weight loss (infection red flags)
- Current antibiotics: Recent antibiotic use may mask infection
- Look: Scars, drainage, erythema, muscle atrophy (deltoid, supraspinatus)
- Feel: Warmth, effusion, component prominence, crepitus
- Move: Active and passive ROM - distinguish true ROM from scapulothoracic compensation
- Strength: Deltoid, rotator cuff testing (external rotation, belly press for subscapularis)
- Stability: Anterior/posterior load-shift test, sulcus sign for inferior laxity
- Neurovascular: Axillary nerve (deltoid), musculocutaneous (biceps), radial pulse
Infection can present insidiously in revision shoulder arthroplasty. Red flags include: progressive pain without mechanical symptoms, persistent drainage beyond 3 weeks postoperatively, elevated inflammatory markers (CRP greater than 10 mg/L, ESR greater than 30 mm/hr after 3 months), persistent shoulder effusion, or radiographic signs (periosteal reaction, progressive osteolysis). Low-grade infections with Cutibacterium acnes may present with only pain and stiffness without systemic symptoms. Always aspirate suspicious shoulders before revision surgery - cultures must be held for 14 days for Cutibacterium detection.
Differential Diagnosis
- Clinical Features
- Gradual onset pain, mechanical symptoms, normal inflammatory markers
- Key Investigations
- Serial radiographs showing progressive radiolucency
- Treatment
- Revision to RSA in most cases
- Clinical Features
- Pain, stiffness, elevated CRP/ESR, possible drainage
- Key Investigations
- Aspiration with extended 14-day cultures, CRP greater than 10
- Treatment
- Two-stage revision with spacer
- Clinical Features
- Clunking, apprehension, recurrent dislocation
- Key Investigations
- CT showing component malposition or glenoid bone loss
- Treatment
- Revision to RSA with increased offset
- Clinical Features
- Acute onset pain and loss of function after fall or minor trauma
- Key Investigations
- Radiographs or CT showing fracture around components
- Treatment
- Revision with fracture fixation if unstable
Investigations
Imaging and Laboratory Protocol
Views required: True AP (Grashey), axillary lateral, scapular Y. What to look for:
- Component position (version, height, tilt)
- Radiolucency greater than 2mm (glenoid or humeral loosening)
- Periprosthetic fracture
- Heterotopic ossification
- Baseplate screw breakage or hardware migration
- Glenoid notching (Sirveaux grades in RSA)
- Humeral stem subsidence or loosening lines
Key measurements: Glenoid version (normal 5 degrees retroversion), superior tilt (less than 10 degrees acceptable), humeral offset.
Gold standard for bone stock assessment. Obtain 3D reconstructions. Critical information:
- Quantify glenoid bone loss (Sirveaux classification)
- Glenoid version, inclination, medialization
- Humeral bone stock and canal dimensions
- Baseplate fixation and screw trajectories
- Plan bone graft needs and augmented implants
- Identify occult fractures
Sensitivity: 95% for glenoid loosening detection, 90% for bone loss quantification.
Mandatory infection screening before revision:
- CRP: Greater than 10 mg/L after 3 months suggests infection (sensitivity 85%)
- ESR: Greater than 30 mm/hr after 3 months (sensitivity 70%, less specific than CRP)
- Shoulder aspiration: Pre-operative aspiration off antibiotics for 2 weeks
- Extended cultures: Hold for 14 days minimum for Cutibacterium acnes detection
- Synovial fluid analysis: WBC greater than 3000, PMN greater than 70% suggests infection
- Frozen section: Greater than 5 PMN per high-power field (intraoperative confirmation)
Pearl: Standard 5-day cultures miss 20-30% of shoulder infections. Extended 14-day cultures are non-negotiable.
Indications for MRI:
- Assess rotator cuff status if considering conversion to anatomic TSA
- Evaluate soft tissue masses (infection, tumor)
- Assess subscapularis integrity for surgical planning
- Metal artifact reduction sequences (MARS) protocols for better visualization
Limitations: Metal artifact from prosthesis limits resolution. CT usually more helpful for bone assessment.
Imaging Atlas
IMAGESPreoperative Workup for Revision Shoulder
Hook:Get complete IMAGES before revision surgery - infection exclusion and bone stock assessment are non-negotiable!
Management Algorithm

Aseptic Revision Shoulder Arthroplasty Algorithm
Goal: Restore shoulder function with durable fixation despite bone loss and soft tissue compromise.
Decision Making and Surgical Steps
- CRP, ESR, shoulder aspiration with 14-day extended cultures
- Hold antibiotics for 2 weeks before aspiration
- If positive cultures or high clinical suspicion → proceed to two-stage revision
- If negative → proceed with aseptic revision planning
- CT scan with 3D reconstruction (mandatory for revision planning)
- Classify glenoid bone loss: Sirveaux E0-E4
- Assess humeral bone stock: Morrey classification
- Plan for augmented baseplate (E3-E4) or bone grafting
- Determine stem length for humeral revision
Failed Hemiarthroplasty:
- If intact rotator cuff and good glenoid bone → convert to anatomic TSA
- If cuff deficiency or moderate bone loss → convert to RSA
Failed Anatomic TSA:
- Default to RSA for most cases (more forgiving of bone loss and cuff issues)
- Consider anatomic revision only if intact cuff, minimal bone loss, and young active patient
Failed RSA:
- Revise to RSA with longer stem, augmented baseplate, or bone grafting
- Manage instability with increased lateralization and offset
- Extended deltopectoral approach with subscapularis management
- Careful component extraction minimizing bone loss
- Address bone defects with augmented implants or structural grafting
- Secure baseplate fixation (minimum 4 screws)
- Subscapularis repair or lesser tuberosity osteotomy
Default to reverse shoulder arthroplasty for most revision cases. RSA compensates for rotator cuff deficiency (common after failed TSA), accommodates glenoid bone loss better than anatomic TSA (medialization is less detrimental), and is the dominant revision construct across the major joint registries. Only convert failed hemiarthroplasty to anatomic TSA if: (1) intact rotator cuff confirmed on MRI or intraoperatively, (2) adequate glenoid bone stock (E0-E1 Sirveaux), (3) no component malposition requiring excessive bone removal. If in doubt, choose RSA.
Surgical Technique
Preoperative Planning and Consent
- Infection: 5-10% risk in aseptic revision, up to 20% if septic two-stage
- Nerve injury: 5% risk (axillary nerve most common)
- Instability: 10-15% recurrent dislocation risk
- Need for bone grafting: May need iliac crest or allograft if severe bone loss
- Need for re-revision: 10-15% require further surgery within 5 years
- Stiffness/pain: 20% have persistent pain despite revision
- Medical risks: DVT/PE (1-2%), anesthesia complications
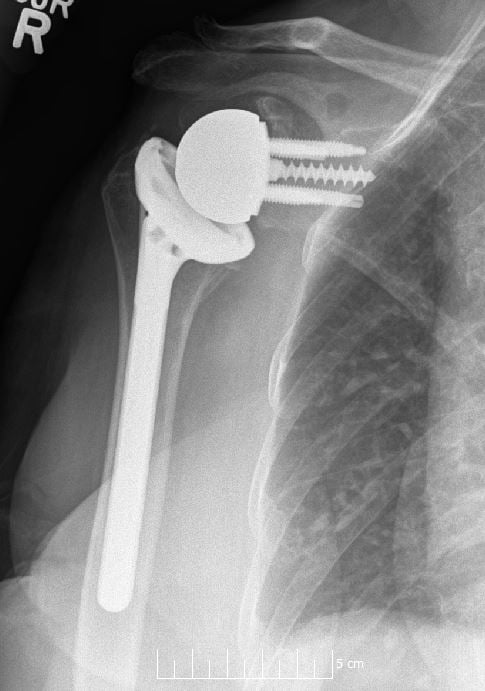
- Implants: Revision RSA system with augmented baseplates, long humeral stems (150-200mm), bone graft options
- Power tools: High-speed burr, reciprocating saw, flexible osteotomes
- Component extraction tools: Explantation instruments, thin flexible osteotomes, gigli saw
- Imaging: C-arm positioned for AP and axillary views
- Bone graft: Iliac crest instruments on standby, allograft femoral head available
- Cultures: Culture bottles and specimen containers for tissue samples
Revision shoulder arthroplasty often encounters unexpected intraoperative findings. Always have available: (1) multiple glenoid baseplate sizes and augmented options, (2) range of humeral stem lengths (standard, long, extra-long), (3) structural allograft (femoral head, distal femur), (4) bone graft substitutes (cancellous chips, demineralized bone matrix), (5) antibiotic-laden cement for humeral fixation. Confirm all implants are in the OR before incision - intraoperative delays for missing components increase infection risk and operative time.
REPAIRSurgical Steps for Revision RSA
Hook:REPAIR the failed shoulder - systematic component removal, bone augmentation, and soft tissue reconstruction are key!
Complications
- Incidence
- 5-10% in aseptic revision, 10-20% in septic two-stage
- Risk Factors
- Previous infection, multiple revisions, immunosuppression, diabetes
- Management
- Two-stage revision with antibiotic spacer, 6 weeks IV antibiotics
- Incidence
- 10-15% recurrent dislocation
- Risk Factors
- Subscapularis failure, component malposition, inadequate soft tissue tension
- Management
- Revise to RSA with increased offset, thicker polyethylene, subscapularis repair
- Incidence
- 5-10% at 5 years
- Risk Factors
- Poor bone stock, inadequate fixation, infection
- Management
- Re-revision with bone grafting, augmented baseplate, or structural allograft
- Incidence
- 3-5% intraoperative, 2-3% postoperative
- Risk Factors
- Osteoporosis, aggressive component extraction, cortical perforation
- Management
- Intraop: cerclage wiring, longer stem. Postop: ORIF vs revision depending on fracture pattern and implant stability
- Incidence
- 3-5% (axillary most common)
- Risk Factors
- Excessive retraction, prolonged operative time, traction injury
- Management
- Observation (most recover spontaneously), EMG at 3 months, nerve exploration if no recovery at 6 months
- Incidence
- 15-20% significant ROM limitation
- Risk Factors
- Overtensioned soft tissues, capsular scarring, heterotopic ossification
- Management
- Intensive PT, consider manipulation under anesthesia if severe and early (within 3 months)
- Incidence
- 20-30% in RSA
- Risk Factors
- Inferior glenosphere position, small glenosphere size, medialized center of rotation
- Management
- Usually asymptomatic. If symptomatic loosening, revise with lateralized glenosphere
Early infection (within 4 weeks) may be salvageable with DAIR (debridement, antibiotics, and implant retention) if recognized immediately. Red flags: persistent drainage beyond 72 hours, fever, purulent drainage, elevated WBC. Protocol: (1) Return to OR immediately (within 24-48 hours of symptom onset). (2) Aggressive debridement and synovectomy. (3) Polyethylene exchange. (4) Obtain cultures before antibiotics. (5) 6 weeks IV antibiotics based on cultures. Success rate: 40-60% for acute infections caught early. Delayed recognition (beyond 4 weeks) requires two-stage revision - DAIR will fail in chronic infections (success rate under 20%).
Complication Prevention Strategies
- Preoperative optimization: Control diabetes (HbA1c under 7%), discontinue immunosuppression if possible
- Antibiotic prophylaxis: Cefazolin 2g (3g if over 120kg) within 1 hour of incision
- Extended prophylaxis: Continue 24 hours postoperatively for revision cases
- Operative time: Minimize time (longer surgeries = higher infection risk)
- Meticulous hemostasis: Hematoma is infection risk
- Wound closure: Multiple layer closure, avoid tension
- Component positioning: Correct glenoid version (0-10 degrees retroversion), avoid excessive humeral retroversion
- Soft tissue balancing: Adequate polyethylene thickness, subscapularis repair
- Intraoperative stability testing: Test through full ROM before closure
- Lateralization: Consider lateralized glenosphere for increased stability (36mm or 42mm vs 32mm)
- Postoperative protection: Abduction sling for 6 weeks protects subscapularis
Postoperative Care and Rehabilitation
Rehabilitation Timeline
Hospital management:
- Abduction sling with pillow (30 degrees abduction)
- Drain management if placed (remove when output under 30mL per 8 hours)
- Pain control: Regional block (interscalene catheter for 2-3 days), oral narcotics
- DVT prophylaxis: Mechanical (sequential compression devices), chemical (enoxaparin 40mg daily) if low bleeding risk
- Antibiotics: Continue prophylaxis for 24 hours (cefazolin 1g every 8 hours)
- Early mobilization: Out of bed to chair on postoperative day 0-1
Discharge: Usually postoperative day 1-2 for uncomplicated cases.
Protection phase:
- Abduction sling full-time (remove for exercises and hygiene only)
- No active internal rotation (protects subscapularis repair)
- Passive ROM only: Therapist-assisted forward elevation to 120 degrees, abduction to 90 degrees, external rotation to 30 degrees
- Pendulum exercises 3 times daily
- Grip strengthening
- Elbow, wrist, hand ROM to prevent stiffness
Goals: Protect subscapularis while preventing stiffness. ROM goals at 6 weeks: Forward elevation 120 degrees passive, external rotation 30 degrees.
Follow-up: Week 2 (wound check, remove staples), Week 6 (radiographs to assess healing, progress PT).
Active motion phase:
- Wean from abduction sling at 6 weeks if radiographs satisfactory and clinical exam reassuring
- Progress to active-assisted ROM (pulley exercises, cane-assisted elevation)
- Begin active ROM at week 8 (deltoid-driven forward elevation and abduction)
- Light internal rotation at week 8-10 (hand to belly, hand to opposite shoulder)
- Continue to avoid forceful internal rotation (subscapularis still healing)
Goals: Active forward elevation to 140 degrees, active abduction to 100 degrees, external rotation to 45 degrees by week 12.
Follow-up: Week 12 radiographs and clinical assessment.
Progressive strengthening:
- Resistance band exercises for deltoid, rotator cuff (avoid heavy internal rotation)
- Scapular stabilization exercises (rows, scapular squeezes)
- Functional activities (reaching, lifting light objects)
- Gradual return to activities of daily living
- Continue home exercise program indefinitely
Goals: Functional ROM and strength for daily activities. Forward elevation 150-160 degrees, abduction 120-140 degrees, functional internal rotation.
Follow-up: 6 months, 1 year, then yearly radiographs to monitor for loosening or complications.
Annual follow-up:
- Clinical assessment: Pain, function, ROM, strength
- Radiographs: AP and axillary views to assess component position, lucencies, scapular notching
- Monitor for late complications: Infection, loosening, instability, scapular notching progression
Patient education:
- Avoid heavy overhead lifting (over 10kg)
- No contact sports or high-impact activities
- Report new pain, clicking, or instability immediately
- Maintain shoulder ROM with home exercises
The first 6 weeks are critical for subscapularis healing and determine long-term stability. Patients must understand: (1) No active internal rotation means no reaching behind back, no pulling shirt on, no forceful activities. (2) Sling compliance is non-negotiable - remove only for exercises and hygiene. (3) Passive motion is safe and necessary - stiffness is preventable but subscapularis failure is catastrophic. (4) At 6-week visit, assess subscapularis integrity with belly press test - if strong, progress to active motion; if weak, continue protection and repeat at 8 weeks. (5) Early return to internal rotation (before 6 weeks) results in 60-80% subscapularis failure rate with permanent anterior instability.
Outcomes and Prognosis
- Survivorship at 5 Years
- 85-90%
- Typical Outcomes
- Good pain relief, functional ROM (140 degrees FE average), return to light ADLs
- Notes
- Outcomes inferior to primary RSA but acceptable for most patients
- Survivorship at 5 Years
- 75-85%
- Typical Outcomes
- Good outcomes if intact cuff and good bone stock, but higher revision rate than RSA
- Notes
- Only recommended for select cases with excellent bone and cuff
- Survivorship at 5 Years
- 70-80%
- Typical Outcomes
- Infection eradication 85-90%, but 15-20% reinfection. Function similar to aseptic if successful
- Notes
- Reinfection requires prolonged antibiotics or resection arthroplasty
- Survivorship at 5 Years
- 70-75%
- Typical Outcomes
- 50-60% achieve stable shoulder, but 15-20% recurrent instability despite revision
- Notes
- Multiple revisions for instability have poor outcomes
- Survivorship at 5 Years
- 60-70%
- Typical Outcomes
- Diminishing returns with each revision. Consider resection arthroplasty if multiple failures
- Notes
- Patient selection critical - counsel realistic expectations
Poor prognostic factors for revision shoulder arthroplasty: (1) Multiple prior revisions (each revision decreases success rate by 15-20%). (2) Severe glenoid bone loss (Sirveaux E4 has 2-3 times higher failure rate than E0-E2). (3) Infection as indication (septic revisions have 15-20% reinfection rate vs 5-10% infection rate in aseptic revisions). (4) Neurological injury (axillary nerve injury results in poor functional outcomes despite stable implant). (5) Poor soft tissue envelope (deltoid insufficiency, subscapularis irreparable). (6) Patient factors (diabetes, smoking, immunosuppression, age over 80). Best outcomes: Single aseptic revision to RSA with intact soft tissues and moderate bone loss (E1-E2).
Salvage: Resection Arthroplasty and Chronic Suppression
When reconstruction is impossible or has repeatedly failed - uneradicable infection, catastrophic bone loss, an irreparable soft-tissue envelope, or a very poor host - the topic repeatedly falls back on "resection arthroplasty" and "chronic suppressive antibiotics" without explaining them.
- Resection (excision) arthroplasty: removal of all prosthetic components and cement with no reimplantation, leaving a flail but pain-relieved shoulder. Indications: persistent/uneradicable prosthetic infection, multiple failed two-stage attempts, massive bone loss precluding fixation, or a patient unfit for further reconstruction. It delivers reliable pain relief and infection control at the cost of a weak, largely non-functional shoulder (active elevation typically only to a flail/girdle level; the limb is used for assist and trunk-level tasks). It is a definitive endpoint, not a bridge.
- Chronic suppressive antibiotics: long-term oral antibiotics to suppress, not cure, infection around a retained implant in a patient who cannot undergo or declines further surgery. It requires a susceptible organism, a tolerable agent and ongoing monitoring, and accepts persistent low-grade infection.
- Other salvage: glenohumeral arthrodesis is rarely chosen but can give a stable, pain-free shoulder driven by scapulothoracic motion in a younger high-demand patient with deltoid loss (developed in the shoulder-arthrodesis topic); permanent retention of an antibiotic spacer is an occasional compromise.
When reverse-arthroplasty reconstruction is impossible or repeatedly fails (uneradicable infection, massive bone loss, deltoid/soft-tissue failure), the salvage endpoints are resection arthroplasty (remove everything; accept a flail but pain-free shoulder for reliable infection control) or chronic suppressive antibiotics (suppress, not cure, around a retained implant in the unfit patient); arthrodesis is the rare alternative when the deltoid is gone. Each trades function for pain relief or infection control - counsel accordingly.
Guidelines, Registries & Global Practice
Global Epidemiology
- Rising volume: As primary shoulder arthroplasty (especially reverse) expands worldwide, the absolute number of revisions is increasing across all registry nations
- Construct shift: Reverse shoulder arthroplasty is now the dominant primary and revision construct in high-income registries (AOANJRR, NJR, AJRR)
- Leading diagnoses: Infection, instability and aseptic loosening dominate revision indications; periprosthetic fracture is less common
- Shoulder-specific feature: Indolent Cutibacterium acnes makes infection a proportionally larger driver of revision than in hip or knee arthroplasty
- Second time is harder: Across registries, revision arthroplasty carries a higher re-revision rate than primary arthroplasty
- Bone loss accrues: Glenoid and humeral bone stock diminish with each revision, narrowing reconstructive options
- Volume effect: Outcomes are generally better in higher-volume shoulder units, supporting referral of complex revisions
- Use registry figures as directional evidence; exact percentages vary by report year and country
Major Guidelines and Consensus, Side by Side
- Relevant Position
- Shoulder PJI defined by major/minor criteria; extended cultures (held 14-21 days) for Cutibacterium; multiple deep tissue samples; two-stage favoured for virulent organisms
- Evidence Basis
- Delphi consensus, expert + literature based
- Relevant Position
- Appropriate-use and clinical guidance support reverse arthroplasty for cuff-deficient and bone-deficient shoulders; emphasise infection workup before aseptic revision
- Evidence Basis
- Guideline / appropriate-use criteria
- Relevant Position
- Recommend pre-revision infection screening and management of complex revisions in specialist shoulder units with appropriate implant inventory
- Evidence Basis
- Society guidance / standards of care
- Relevant Position
- Endorse staged management of established PJI and reverse arthroplasty as the workhorse revision construct for bone loss and cuff failure
- Evidence Basis
- Consensus / narrative guidance
- Relevant Position
- Principles-based guidance for periprosthetic fracture and component extraction (bypass defects, cerclage, stable fixation)
- Evidence Basis
- Educational consensus
The clearest area of genuine divergence is single-stage versus two-stage revision for infection. European centres (notably the ENDO-Klinik single-stage tradition) report excellent results with single-stage exchange for sensitive, low-virulence organisms, whereas many North American and Australasian units default to two-stage for established chronic infection. The Belay 2020 meta-analysis (PMID 32565412) found comparable reinfection rates, reframing this as an organism- and host-driven decision rather than a fixed doctrine.
Key documentation requirements for revision cases:
Preoperative Counseling (document in medical record):
- Realistic outcome expectations (outcomes inferior to primary by 30-40%)
- Infection risk specific to revision setting (5-10% aseptic, 10-20% septic two-stage)
- Need for bone grafting if severe bone loss discovered intraoperatively
- Possibility of re-revision (10-15% at 5 years)
- Alternative treatment options (non-operative management, arthrodesis, resection arthroplasty)
- Two-stage process for infected cases with prolonged treatment timeline
Intraoperative Documentation:
- Indication for revision (aseptic loosening, infection, instability, fracture)
- Infection workup results (cultures, inflammatory markers, aspiration)
- Bone stock assessment and classification (Sirveaux grade for glenoid)
- Implant choices and rationale (RSA vs anatomic TSA, augmented components, bone grafting)
- Tissue samples sent for culture and pathology
- Subscapularis management technique
- Complications encountered (fracture, nerve injury, bleeding)
Postoperative Care:
- Clear rehabilitation protocol with subscapularis protection guidelines
- Antibiotic regimen for infection cases with infectious disease consultation
- Follow-up plan with inflammatory marker monitoring
- Radiographic surveillance for loosening or complications
Common Litigation Issues:
- Failure to exclude infection before aseptic revision (results in persistent infection)
- Inadequate bone stock assessment leading to early failure
- Subscapularis repair failure from inadequate protection or technique
- Nerve injury from excessive retraction or direct trauma
- Inadequate informed consent regarding realistic outcomes
Risk Management: Document detailed preoperative discussion, obtain infectious disease consultation for septic cases, ensure adequate radiographic assessment (CT for bone stock), clear postoperative instructions, and close follow-up with inflammatory marker monitoring.
Service Organisation (Globally Applicable)
- Triage by urgency: Symptomatic infection should be expedited, whereas elective aseptic revision can follow standard waiting pathways
- Multidisciplinary working: Complex revisions benefit from combined orthopaedic, infectious-disease and musculoskeletal-radiology input
- Resource planning: Revision cases need longer theatre time and a full inventory of augments, long stems and graft - confirm availability before listing
- Rehabilitation: Subscapularis-protective physiotherapy for 6 weeks then progressive strengthening is the common thread across health systems
- Realistic expectations: Outcomes are inferior to primary arthroplasty and re-revision risk is higher
- Procedure-specific risk: Infection, instability, nerve injury, periprosthetic fracture and the possibility of intraoperative graft requirement
- Two-stage timeline: For infection, counsel on the prolonged staged pathway and need for suppressive antibiotics
- Salvage options: Resection arthroplasty or chronic suppression where reconstruction fails or is not feasible
MCQ Practice Points
Q: What is the Sirveaux classification for glenoid bone loss in failed reverse shoulder arthroplasty, and what is the threshold for requiring augmented baseplate or bone grafting? A: The Sirveaux classification grades glenoid bone loss from E0 (no loss) to E4 (extensive superior and medial loss). E0-E2 can be managed with standard glenoid baseplate or eccentric reaming. E3 (deep central erosion greater than 50% width) and E4 (extensive bone loss) require augmented baseplate or structural bone grafting. E3 can often be managed with augmented baseplate alone, while E4 typically requires structural allograft (scapular spine bone graft or BIO-RSA technique).
Q: Why are extended 14-day cultures required for suspected shoulder prosthetic joint infection, and what is the most common organism? A: Cutibacterium acnes (formerly Propionibacterium) is the most common organism in shoulder prosthetic joint infection (30-40% of cases) and is a slow-growing anaerobe requiring 14 days of culture incubation for detection. Standard 5-day cultures miss 20-30% of shoulder infections. Cutibacterium is low-virulence and can cause indolent infection with minimal systemic symptoms, making extended cultures essential even when clinical suspicion is low.
Q: What factors favor conversion to reverse shoulder arthroplasty vs anatomic total shoulder arthroplasty when revising a failed hemiarthroplasty? A: Favor reverse shoulder arthroplasty (most common choice): (1) Rotator cuff deficiency or massive cuff tear, (2) Moderate to severe glenoid bone loss (Sirveaux E2-E4), (3) Patient age over 70 years, (4) Low functional demands, (5) Deltoid function intact. Favor anatomic TSA (uncommon): (1) Intact rotator cuff confirmed on MRI or intraoperatively, (2) Minimal glenoid bone loss (E0-E1), (3) Younger patient (under 60 years), (4) High functional demands, (5) Adequate glenoid bone stock after component removal. Default to RSA if uncertain - more forgiving of bone loss and cuff deficiency.
Q: What are the key steps and success rates for two-stage revision of infected shoulder arthroplasty? A: Two-stage revision protocol: (1) Stage 1 - Complete removal of all components and cement, synovectomy, debridement of infected tissue, minimum 5 tissue cultures (14-day hold), antibiotic-impregnated cement spacer (vancomycin 4g and tobramycin 2.4g per 40g cement), followed by 6 weeks IV antibiotics. (2) Antibiotic holiday - Hold antibiotics for minimum 2 weeks, repeat CRP and ESR (goal: CRP less than 10 mg/L, ESR less than 30 mm/hr). (3) Stage 2 - Reimplantation if inflammatory markers normalized, obtain fresh tissue cultures and frozen section (less than 5 PMN per HPF required to proceed), followed by 3-6 months oral suppressive antibiotics. Success rate: 85-90% infection eradication, but 10-15% reinfection risk. Functional outcomes similar to aseptic revision if infection cleared.
Q: What are the options for subscapularis management in revision shoulder arthroplasty, and which has the best healing rate? A: Subscapularis options: (1) Direct tendon repair - If subscapularis intact and good tissue quality, repair with transosseous sutures or suture anchors (success rate 50-60% in revision). (2) Lesser tuberosity osteotomy - If poor tissue quality or previous repair failed, perform 10-15mm thick osteotomy with two screw fixation (success rate 80-90% with bone-to-bone healing). (3) Accept insufficiency - If subscapularis irreparable, proceed without repair and compensate with increased component constraint or glenosphere lateralization (higher anterior instability risk). Lesser tuberosity osteotomy is preferred in revision setting due to superior healing and allows bone-to-bone contact. Protection for 6 weeks with no active internal rotation is mandatory for either repair technique.
Q: What do the major arthroplasty registries (AOANJRR, NJR, AJRR) tell us about revision shoulder arthroplasty? A: Consistent themes across registries are: (1) Reverse shoulder arthroplasty is now the dominant construct for both primary and revision shoulder replacement, reflecting its tolerance of cuff deficiency and glenoid bone loss. (2) Revision arthroplasty carries a higher re-revision rate than primary arthroplasty - the second procedure is less durable than the first. (3) Infection, instability and aseptic loosening are the leading revision diagnoses, with infection disproportionately important in the shoulder compared with the hip or knee because of indolent Cutibacterium acnes. Use registries as directional evidence rather than memorising single-year percentages, which vary by report and country.
Exam Viva Scenarios
Practise clinical reasoning and management decisions out loud
“A 62-year-old woman presents with progressive shoulder pain 5 years after hemiarthroplasty for fracture sequelae. She has painful limited ROM. Radiographs show glenoid erosion with medialization. CRP 5 mg/L, ESR 15 mm/hr. Aspiration shows no growth on 5-day cultures. What is your assessment and management?”
“A 68-year-old man had reverse shoulder arthroplasty 2 years ago for cuff tear arthropathy. He now has recurrent anterior dislocations (3 episodes in 6 months). Radiographs show well-fixed components with 32mm glenosphere, standard polyethylene insert, and neutral glenoid version. Belly press test is weak. Walk me through your revision planning and surgical technique.”
“A 71-year-old diabetic woman presents 8 months after reverse shoulder arthroplasty with persistent pain, no improvement in function, and occasional drainage from the incision. CRP 25 mg/L, ESR 45 mm/hr. Aspiration grows Staphylococcus epidermidis (2 of 3 bottles). She is devastated and asks if you can just give antibiotics. How do you manage this case and what is your counseling?”
Key Indications
- Infection = most common indication (40-50% of revisions) - requires two-stage with 6-week antibiotics
- Aseptic loosening = 20-30% - progressive pain and radiolucency, revise to RSA
- Instability = 15-20% - subscapularis failure or malposition, increase offset and repair
- Periprosthetic fracture = 10-15% - revise if unstable, ORIF if stable implant
Glenoid Bone Loss Classification
- Sirveaux E0 = no bone loss - standard baseplate
- Sirveaux E1 = round erosion under 50% - standard or BIO-RSA
- Sirveaux E2 = oblique erosion - eccentric reaming or small augment
- Sirveaux E3 = deep central erosion over 50% - augmented baseplate required
- Sirveaux E4 = extensive superior/medial loss - structural bone graft + BIO-RSA
Surgical Pearls
- Extended 14-day cultures mandatory for Cutibacterium acnes (30-40% of infections)
- Default to RSA for most revisions - more forgiving of bone loss and cuff deficiency
- Lesser tuberosity osteotomy for failed subscapularis (80-90% healing vs 50-60% for tendon repair)
- Cemented humeral stems preferred in revision (better fixation in compromised bone)
- Minimum 4 screws for glenoid baseplate fixation (preferably 6 for revision)
- Bypass bone loss by 2 cortical diameters with humeral stem (8-10cm minimum)
Two-Stage Infection Protocol
- Stage 1 = explantation, debridement, antibiotic spacer (vancomycin 4g + tobramycin 2.4g per 40g cement)
- 6 weeks IV antibiotics based on cultures, then 2-week antibiotic holiday
- Stage 2 = reimplant if CRP less than 10 mg/L and ESR less than 30 mm/hr off antibiotics
- Frozen section less than 5 PMN per HPF required to proceed with reimplantation
- 85-90% infection eradication rate, 10-15% reinfection risk despite protocol
Complications
- Infection = 5-10% in aseptic revision, 10-20% in septic two-stage
- Instability = 10-15% recurrent dislocation - manage with larger glenosphere, thicker poly, subscap repair
- Re-revision risk is higher than after primary arthroplasty across registries - counsel patients that the second procedure is less durable
- Nerve injury = 3-5% (axillary most common) - observation, most recover spontaneously
- Periprosthetic fracture = 3-5% intraop - cerclage wiring and longer stem
Key Evidence and Registry Data
- Sirveaux 2004 (JBJS Br): landmark Grammont RSA series, Constant 22.6 to 65.6, origin of the notching grade applied to glenoid bone loss
- Boileau 2009 (JSES): RSA after failed cuff surgery, active elevation 56 to 123 degrees but inferior to primary RSA, 12% complications
- Belay 2020 (JSES): single- and two-stage shoulder PJI revision have comparable reinfection (6.3% vs 10.1%); single-stage effective for low-virulence C acnes
- Hernandez/Wagner 2017 (CORR): revision to RSA for instability, dislocation-free survival 87% and 79% at 2 and 5 years
- Wagner 2015 (CORR): intraoperative humeral fracture in 16% of revision RSA, higher in women, prior instability or prior hemiarthroplasty
- Registries (AOANJRR, NJR, AJRR): RSA is the dominant revision construct and revision arthroplasty carries higher re-revision rates than primary
Evidence Base and Key Trials
Reverse Shoulder Arthroplasty After Failed Rotator Cuff Surgery
- Retrospective multicentre study of 42 reverse shoulder arthroplasties in 40 patients with cuff-deficient shoulders after failed prior cuff surgery (mean age 71 years, mean follow-up 50 months)
- In pseudoparalytic shoulders, active anterior elevation improved from 56 to 123 degrees with only 7% dissatisfied
- In painful shoulders that retained active elevation of 90 degrees or more, elevation fell from 146 to 122 degrees and 27% were dissatisfied
- Five complications (12%) occurred and 2 patients (5%) underwent re-operation
- Authors conclude results are inferior to primary RSA and caution against RSA when good active elevation is preserved
Single-Stage Versus Two-Stage Revision for Shoulder Periprosthetic Joint Infection: Systematic Review and Meta-analysis
- Systematic review and meta-analysis of 43 studies (13 single-stage, 30 two-stage) for shoulder periprosthetic joint infection
- Cutibacterium acnes was the most common organism, isolated in 48.7% of single-stage and 33.7% of two-stage cases
- Methicillin-resistant Staphylococcus aureus was less common in single-stage (2.5%) than two-stage (9.7%), reflecting case-mix bias toward more virulent organisms in two-stage cohorts
- Pooled reinfection incidence was 5% overall (6.3% single-stage versus 10.1% two-stage; difference not statistically significant)
- Authors conclude single-stage revision is effective for low-virulence, sensitive organisms such as C acnes, with low recurrence