Supracondylar Femur | Tibial Plateau | Patella | Lewis and Rorabeck Classification
- Lewis & Rorabeck classification determines treatment based on displacement and prosthetic stability
- Anterior femoral notching is an implicated (though debated) supracondylar stress riser - assess on lateral radiographs
- Type III fractures require revision arthroplasty with long cemented stems, NOT simple ORIF
- Retrograde IM nailing requires open intercondylar box in femoral component for nail passage
- Bone quality and fixation are paramount - osteoporotic bone requires locked plating or cemented stems
- “In viva, examiners test ability to classify fracture AND assess prosthetic stability independently
- “Type II vs Type III distinction: Examine AP and lateral radiographs for lucency, subsidence, alignment
- “Surgical approach selection depends on implant compatibility (open box vs closed box femoral component)
- “Registry data (AOANJRR) reports increasing revision burden from periprosthetic fractures with aging population
Type II vs Type III error. A displaced fracture with a loose prosthesis is Type III, NOT Type II. Check for lucency, subsidence, and alignment on radiographs before committing to ORIF.
Implicated stress riser. Notching greater than 3mm of the anterior femoral cortex during TKA has been implicated as a supracondylar stress riser, although a large clinical series (Ritter, JBJS Am 2005) found no measurable increase in fracture rate. Avoid it on biomechanical principle and check lateral radiographs.
Retrograde nail requires open box. Closed-box femoral components do not allow passage of a retrograde IM nail. Must use lateral locked plating or revision arthroplasty instead.
Osteoporosis changes everything. Severe osteoporosis (T-score below -2.5) often necessitates revision arthroplasty with cemented stems rather than ORIF, especially in Type II fractures.
- Prosthesis Status
- Stable, no lucency
- Bone Quality
- Good
- Treatment
- ORIF with locked lateral plate
- Key Pearl
- Can trial non-operative if minimal comorbidities
- Prosthesis Status
- Stable, well-fixed
- Bone Quality
- Good, open box
- Treatment
- Retrograde IM nail
- Key Pearl
- Check femoral component - must have open box
- Prosthesis Status
- Stable, well-fixed
- Bone Quality
- Good, closed box
- Treatment
- Lateral locked plate (LISS/NCB)
- Key Pearl
- Biological plating with indirect reduction
- Prosthesis Status
- Stable
- Bone Quality
- Osteoporotic
- Treatment
- Consider revision with stems
- Key Pearl
- ORIF has high failure rate in poor bone
- Prosthesis Status
- Loose or failing
- Bone Quality
- Any
- Treatment
- Revision TKA with long stems
- Key Pearl
- ORIF will fail - must address prosthetic loosening
FORNOWFracture Risk Factors Post-TKA
Hook:FORNOW these patients are at risk - optimize bone health and fall prevention before TKA!
Overview and Epidemiology
Periprosthetic fractures around TKA are increasing with the aging population and higher activity levels in arthroplasty patients. These fractures represent a major source of morbidity, healthcare cost, and revision burden. The Australian Orthopaedic Association National Joint Replacement Registry (AOANJRR) reports that periprosthetic fractures account for 10-15% of all TKA revisions (AOANJRR).
- Incidence: 2.5% of primary TKA, 5-10% after revision TKA
- Age: Mean 70-75 years, predominantly elderly females
- Timing: Bimodal - early (intraoperative, first 2 years) or late (greater than 5 years post-op)
- Mechanism: Low-energy falls in 80%, high-energy trauma 10%, spontaneous 10%
- Mortality: 30% at 1 year, comparable to hip fractures
- Functional loss: Only 50% return to pre-fracture mobility
- Healthcare burden: Average cost greater than $50,000 AUD per case
- Revision rate: 20% require further surgery within 2 years
Anatomy and Biomechanics
Distal Femur After TKA
Anterior cortical notching greater than 3mm during femoral component preparation has traditionally been implicated as a supracondylar stress riser, theoretically concentrating the bending moments that are highest in this region during gait. Note that the largest clinical series (Ritter, JBJS Am 2005, 1089 knees) found no significant increase in fracture rate with notching. It should therefore be presented as a plausible but unproven risk factor and avoided where possible; always assess lateral radiographs when evaluating periprosthetic fractures.
- Stress shielding: Stiff femoral component alters load distribution
- Stress concentration: At tip of femoral component and anterior notch
- Reduced bone density: Stress shielding causes proximal femur bone loss
- Alignment changes: Valgus alignment shifts medial-lateral forces
- Supracondylar femur: 80% of all periprosthetic fractures
- Tibial plateau: 10-15% (often metaphyseal collapse)
- Patellar: 5% (typically in cementless patella or over-resection)
- Polyethylene post: Rare, posterior-stabilized designs
- Mechanism
- Bending moment, stress concentration
- Risk Factors
- Anterior notching, osteoporosis
- Treatment Complexity
- High - requires plate or revision
- Mechanism
- Subsidence, metaphyseal collapse
- Risk Factors
- Cementless stems, poor bone quality
- Treatment Complexity
- Moderate - often requires stems
- Mechanism
- Trauma, over-resection
- Risk Factors
- Cementless fixation, thin patella
- Treatment Complexity
- Low to moderate - excision vs ORIF
Classification Systems
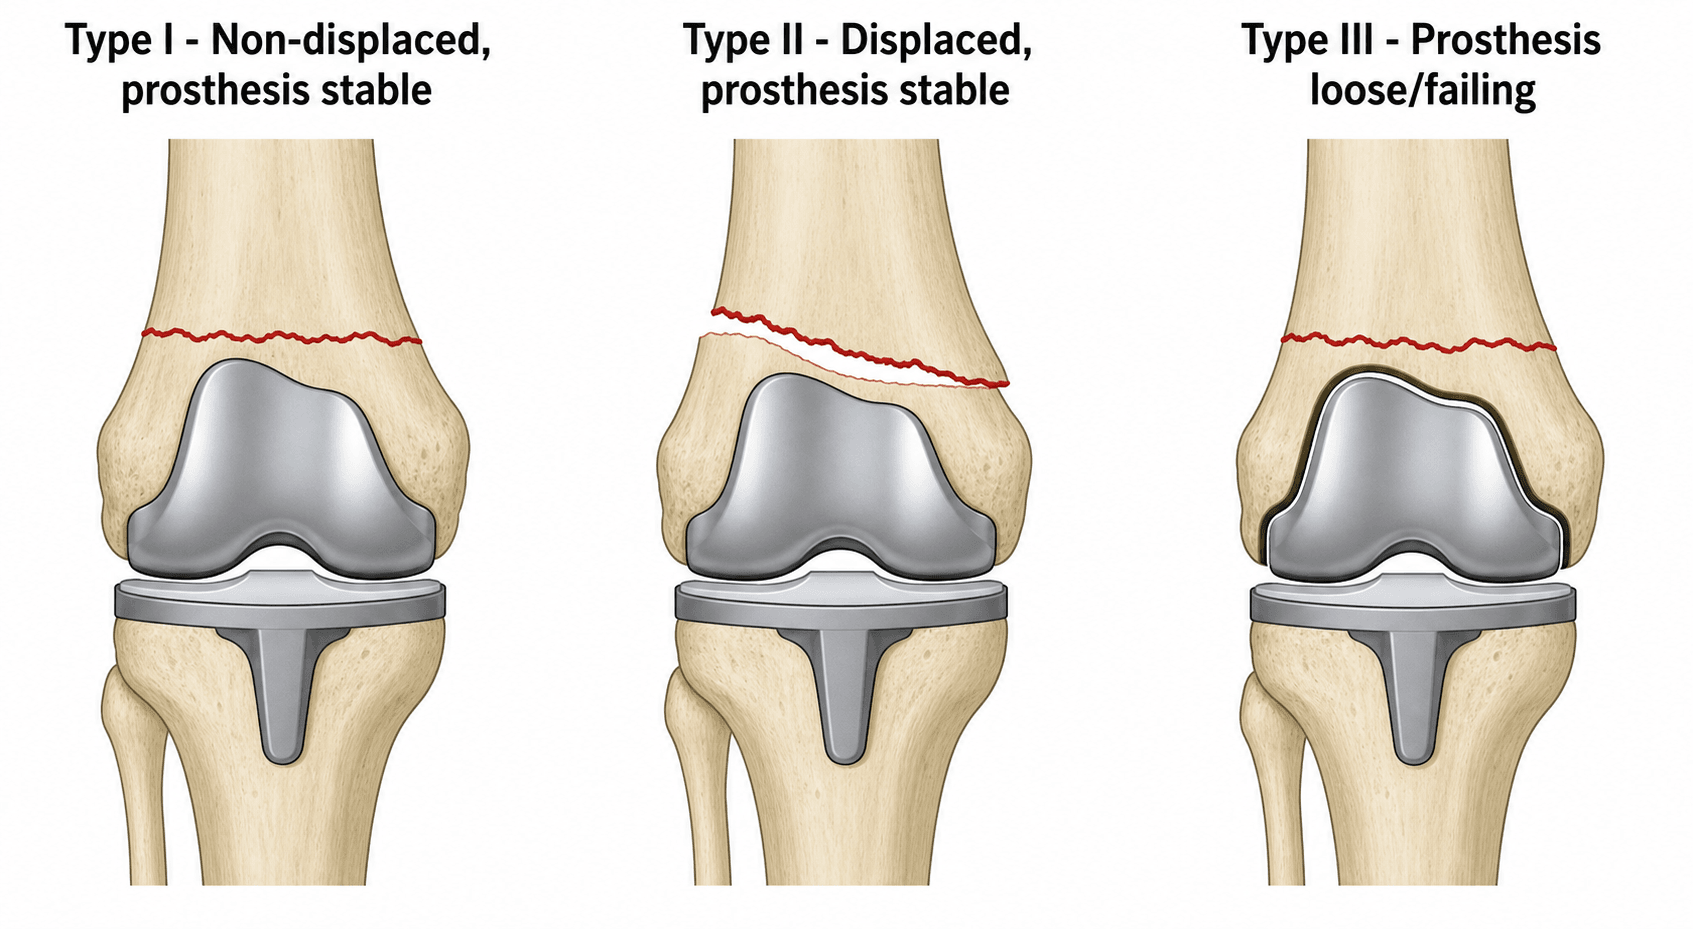
Lewis & Rorabeck Classification (Distal Femur)
- Fracture Displacement
- Non-displaced (under 5mm shift, under 5° angulation)
- Prosthesis Stability
- Stable, well-fixed
- Treatment
- ORIF with locked plate OR conservative (elderly, low demand)
- Outcomes
- Union rate over 85%, good function
- Fracture Displacement
- Displaced (over 5mm shift OR over 5° angulation)
- Prosthesis Stability
- Stable, no lucency, no subsidence
- Treatment
- ORIF (plate or IM nail) based on implant design and bone quality
- Outcomes
- Union rate 75-85%, 15-20% require revision
- Fracture Displacement
- Any displacement
- Prosthesis Stability
- Loose (lucency, subsidence, malalignment)
- Treatment
- Revision TKA with long cemented stems (greater than 100mm beyond fracture)
- Outcomes
- Union rate 60-75%, high complication rate 30-40%
The KEY decision is assessing prosthetic stability on radiographs:
- Stable (Type I/II): No lucency at bone-cement or cement-implant interface, no subsidence, maintained alignment
- Loose (Type III): Progressive radiolucent lines (over 2mm), subsidence (over 2mm component migration), malalignment (over 3° from neutral)
If in doubt, obtain contralateral TKA radiographs for comparison OR stress fluoroscopy in operating room before committing to ORIF.
SDFLewis and Rorabeck Classification
Hook:SDF = Stability Determines Fixation - assess prosthetic stability FIRST to guide treatment!
Clinical Assessment
- Mechanism: Fall from standing height (most common), trauma, spontaneous
- Pain: Acute onset, inability to weight-bear, above or below knee
- Function: Loss of ambulation, inability to perform straight leg raise (if patellar)
- Red flags: Neurovascular compromise, open fracture, compartment syndrome
- Index surgery: Date of TKA, indication, implant type, any complications
- Medical history: Osteoporosis, steroid use, rheumatoid arthritis, neurological disorders
- Look: Deformity, swelling, ecchymosis, skin integrity, alignment
- Feel: Point tenderness, crepitus, warmth (infection vs acute fracture)
- Move: Range of motion at knee (compare to contralateral), extensor lag
- Special tests: Straight leg raise (patellar fracture), neurovascular examination
- Implant assessment: Palpate for warmth, effusion suggesting loosening or infection
- Gait: Inability to weight-bear, antalgic gait, Trendelenburg if tibial fracture
Periprosthetic joint infection (PJI) can present with acute pain, swelling, and inability to weight-bear, mimicking fracture presentation. If clinical suspicion for infection exists (wound drainage, fevers, elevated inflammatory markers), aspirate the joint before surgical fixation to rule out PJI. CRP over 100 mg/L or ESR over 60 mm/hr in the absence of other inflammatory conditions should raise suspicion.
Differential Diagnosis
- Distinguishing Features
- Trauma/fall, deformity, fracture line on radiograph
- Key Investigation
- AP and lateral full-length femur/tibia radiographs
- Pitfall if Missed
- Misclassifying stable vs loose implant alters whole plan
- Distinguishing Features
- Rest pain, effusion, warmth, raised CRP/ESR, sinus
- Key Investigation
- Joint aspiration (cell count, culture), CRP/ESR
- Pitfall if Missed
- Fixing over an undiagnosed infection guarantees failure
- Distinguishing Features
- Insidious start-up pain, progressive lucency/subsidence, no acute injury
- Key Investigation
- Serial radiographs +/- nuclear imaging
- Pitfall if Missed
- Plating a loose implant (treat as Rorabeck III)
- Distinguishing Features
- Loss of active extension, palpable gap, high-riding or low patella
- Key Investigation
- Lateral radiograph, ultrasound/MRI, straight-leg-raise test
- Pitfall if Missed
- Conservative care of a true extensor disruption
- Distinguishing Features
- Osteoporosis/steroids, no clear trauma, subtle radiograph
- Key Investigation
- MRI or CT, bone-health assessment
- Pitfall if Missed
- Repeated falls or progression to displaced fracture
- Distinguishing Features
- Mechanical symptoms, recurrent effusion, no fracture line
- Key Investigation
- Weight-bearing radiographs, examination under stress
- Pitfall if Missed
- Unnecessary fixation when isolated bearing exchange suffices
Investigations
Imaging Protocol
Views: AP and lateral knee, AP and lateral femur (full length), contralateral knee for comparison
Assess for:
- Fracture displacement (under or over 5mm, under or over 5° angulation)
- Prosthetic stability: Lucency at bone-cement interface (over 2mm progressive), subsidence (component migration), alignment
- Anterior femoral notching on lateral view (stress riser)
- Bone quality: Osteopenia, cortical thickness, canal diameter
Indications: Complex fracture patterns, assess prosthetic fixation, pre-operative planning for revision
Benefits:
- Better delineation of fracture pattern (comminution, extension into joint)
- Assessment of bone stock for revision (metaphyseal defects, cortical thickness)
- Templating for stem length and diameter
Blood tests: ESR, CRP, WCC (baseline and compare to 6-week post-TKA values)
Joint aspiration: If CRP over 100 or clinical suspicion of infection
- Synovial fluid WCC (over 3000 cells/microL suspicious)
- Polymorphonuclear percentage (over 80% concerning)
- Culture and sensitivities (hold antibiotics if possible)
Alpha-defensin: Point-of-care test (90% sensitivity, 95% specificity for PJI)
DEXA scan: If not done recently, assess T-score (below -2.5 indicates severe osteoporosis)
Implications:
- Severe osteoporosis favors revision arthroplasty over ORIF
- Consider medical optimization (vitamin D, calcium, bisphosphonates, teriparatide)
Management Algorithm
Type I Management: Non-Displaced Fracture, Stable Prosthesis
Treatment Options:
Decision Pathway
Indications:
- Elderly, low-demand patient (limited community ambulator)
- Significant medical comorbidities (high anaesthetic risk)
- Minimal displacement (under 2mm shift, under 3° angulation)
- Good bone quality
Protocol:
- Hinged knee brace locked in extension for 6 weeks
- Touch weight-bearing with crutches for 8-12 weeks
- Serial radiographs at 2, 6, 12 weeks to assess for displacement
- Progress to full weight-bearing at 12 weeks if union evident
Risks: 15-20% loss of reduction requiring delayed ORIF, knee stiffness, nonunion (5-10% in elderly)
Indications:
- Younger, higher-demand patient
- Any concern about compliance with non-weight-bearing
- Minimal comorbidities
Technique:
- Lateral locking plate (LISS, NCB, or similar periarticular plate)
- 3-4 screws proximal to fracture, 3-4 distal screws (locking)
- Bridge plating technique (no stripping of periosteum)
- Early range of motion, progressive weight-bearing
Outcomes: Union rate over 85%, return to function 75-80%
In exam scenarios, examiners often present an 85-year-old with Type I fracture and ask for management. Safe answer is ORIF with locked plate in most cases UNLESS patient is bedbound or high anaesthetic risk. Conservative treatment should be reserved for very select cases with shared decision-making about risks of loss of reduction.
Surgical Technique
Lateral Locked Plate Fixation (LISS/NCB)
Pre-operative Planning
- Infection: 2-5% superficial, 1-2% deep
- Nonunion: 15-20% in osteoporotic bone
- Malunion: 5-10% varus/valgus deformity
- Hardware prominence: 10-15%, may require removal
- Neurovascular injury: Peroneal nerve 1-2%
- Need for revision: 15-20% within 2 years
- Implants: LISS or NCB periarticular plate, appropriate length (9-13 holes typical)
- Screws: 4.8-5.0mm locking screws (at least 8-10 screws)
- Reduction aids: Pointed reduction clamps, K-wires, Schanz pins
- Imaging: C-arm with lateral and AP views, ensure can visualize full plate length
- Backup plan: Revision TKA set on standby if prosthesis found loose intraoperatively
Patient Positioning
Setup Checklist
Supine on radiolucent table (Jackson or standard OR table with radiolucent extension).
- Bump under ipsilateral hip for neutral rotation
- Contralateral leg in well-leg holder or leg holder
- Affected leg free-draped from hip to ankle
- C-arm from contralateral side for lateral views (beam parallel to floor)
- Confirm adequate AP and lateral imaging of entire femur before draping
- Have radiology technician practice obtaining femoral component views
- Prep entire leg from hip to ankle
- Include contralateral knee if templating required intraoperatively
- Impervious stockinette to foot, isolate foot at ankle level
Surgical Approach: Lateral Submuscular
Step-by-Step Approach
Landmarks: Lateral femoral epicondyle to proximal lateral femur Length: 8-12cm depending on fracture extent and plate length Orientation: Straight lateral, centered over lateral intermuscular septum
Keep incision posterior enough to allow submuscular plate passage but anterior enough to avoid sciatic nerve (greater than 2cm from posterior femoral cortex on lateral view). Use fluoroscopy to mark ideal trajectory if uncertain.
Layer: Incise fascia lata along lateral intermuscular septum Identify: Vastus lateralis muscle (anterior) and lateral intermuscular septum Elevate: Lift vastus lateralis off lateral intermuscular septum, creating submuscular space Protect: Perforating vessels - ligate or cauterize
DO NOT open fracture site - this is bridge plating! Palpate: Confirm fracture location by feeling step-off or gap Reduction: Use traction, manipulation, and K-wires or Schanz pins for provisional alignment Imaging: Confirm reduction on AP and lateral fluoroscopy (acceptable: under 5° varus/valgus, under 5mm translation)
Submuscular tunnel: Use McDonald clamp or plate insertion guide to create epiperiosteal tunnel deep to vastus lateralis Plate passage: Slide plate proximally under muscle (keep plate on bone surface!) Positioning:
- Plate centered on lateral femoral cortex
- Distal end 1-2cm above femoral component (no impingement!)
- Confirm on fluoroscopy before fixation
The distal extent of the plate MUST NOT impinge on the femoral component. Leave at least 1cm gap. If fracture is very distal (within 5cm of component), consider revision arthroplasty instead of plating.
Sequence:
- Distal locking screws first (3-4 screws, bicortical locking)
- Check reduction with fluoroscopy - adjust if needed before proximal fixation
- Proximal locking screws (4-6 screws, bicortical)
- Fill all available holes in osteoporotic bone for maximal stability
Technique:
- Drill through locking guide sleeve
- Measure depth with depth gauge (both cortices + 5mm for safety)
- Insert locking screw, tighten until head seats in plate (do NOT overtighten!)
- Confirm screw threads engage far cortex on fluoroscopy
Screw working length: At least 4-6 screws proximal and 3-4 screws distal to fracture for adequate fixation.
Fluoroscopy: AP and lateral views confirming:
- Fracture reduction maintained
- All screws bicortical
- No screw penetration into knee joint
- No plate impingement on femoral component
Stability: Manually stress fracture under fluoroscopy - should be stable with minimal motion
Closure
Closure Steps
- Irrigate submuscular space with 3L normal saline
- Cauterize perforating vessels
- Consider drain if significant oozing (remove at 24-48 hours)
- Close fascia lata with 0 Vicryl interrupted sutures
- Ensure closure is watertight to prevent muscle herniation
- 2-0 Vicryl subcuticular for subcutaneous layer
- 3-0 Monocryl or staples for skin
- Sterile dressing, compressive wrap
- Hinged knee brace locked in extension for comfort and protection
- Touch weight-bearing with walker for 6 weeks
- Early range of motion exercises (0-90°) starting day 1

Complications
- Incidence
- 20-30% (ORIF in osteoporotic bone)
- Risk Factors
- Osteoporosis, smoking, diabetes, infection
- Prevention
- Optimize bone health pre-op, rigid fixation, avoid soft tissue stripping
- Management
- Revision ORIF with bone graft OR conversion to revision TKA with stems
- Incidence
- 10-15%
- Risk Factors
- Inadequate reduction, loss of fixation, patient non-compliance
- Prevention
- Intraoperative fluoroscopy, locked fixation, early weight-bearing restriction
- Management
- If symptomatic: Corrective osteotomy OR revision TKA if severe (over 10° deformity)
- Incidence
- 10-15% (plate), 5% (nail)
- Risk Factors
- Screw pullout in osteoporotic bone, premature weight-bearing
- Prevention
- Locked screws, fill all plate holes in poor bone, weight-bearing restrictions
- Management
- Revision ORIF with longer plate or conversion to revision TKA
- Incidence
- 3-5%
- Risk Factors
- Diabetes, immunosuppression, prior infection, hematoma
- Prevention
- Antibiotic prophylaxis, meticulous sterility, drain if needed
- Management
- Acute: Debridement and component retention OR single-stage revision. Chronic: Two-stage revision
- Incidence
- 15-20%
- Risk Factors
- Prolonged immobilization, heterotopic ossification, infection
- Prevention
- Early ROM, CPM machine, aggressive physical therapy
- Management
- Manipulation under anesthesia at 6-12 weeks OR open arthrolysis if severe
- Incidence
- 1-2%
- Risk Factors
- Peroneal nerve stretch, vascular injury during reduction or fixation
- Prevention
- Gentle reduction, avoid forceful manipulation, check pulses intraoperatively
- Management
- Nerve injury: Observation, AFO if foot drop. Vascular: Immediate repair by vascular surgery
- Incidence
- 30% at 1 year
- Risk Factors
- Age over 80, multiple comorbidities, low baseline function, delay to surgery
- Prevention
- Optimize medical comorbidities, early surgery (within 48 hours if possible), multidisciplinary care
- Management
- Palliative care involvement if appropriate, maximize function even if fracture healing suboptimal
30% mortality at 1 year for elderly patients with periprosthetic supracondylar fractures, similar to neck of femur fractures. Medical optimization, early surgery, and multidisciplinary orthogeriatric care are essential to improve outcomes. In very frail patients, non-operative management with pain control and palliative care may be appropriate after shared decision-making.
NUMBComplications of ORIF for Periprosthetic Fractures
Hook:NUMB outcomes from ORIF in poor bone - consider revision arthroplasty upfront if severe osteoporosis!
Postoperative Care and Rehabilitation
Rehabilitation Timeline After ORIF
Immobilization: Hinged knee brace locked in extension for ambulation
Weight-bearing: Touch weight-bearing with walker (10-15kg max on affected limb)
DVT prophylaxis:
- Enoxaparin 40mg SC daily OR rivaroxaban 10mg daily for 6 weeks
- TED stockings and sequential compression devices
Pain management: Multimodal analgesia (paracetamol, NSAIDs if not contraindicated, opioids PRN)
Mobilization: Out of bed to chair day 1, transfer training with physiotherapy
Weight-bearing: Touch weight-bearing with walker, progress to 25% body weight at 4 weeks if radiographs stable
ROM exercises:
- Passive ROM 0-60° with physiotherapy (brace unlocked for exercises)
- Active-assisted ROM with physio
- Quadriceps sets, straight leg raises
Precautions: No active knee flexion against resistance, no squatting
Radiographs: At 2 weeks and 6 weeks to assess alignment, hardware position, early healing
Weight-bearing: Progress from 50% to full weight-bearing as tolerated based on:
- Radiographic evidence of callus formation
- Patient pain level
- Stability on examination
ROM: Goal 0-100° by 12 weeks, progress passive to active ROM
Strengthening: Progressive resistance exercises (quadriceps, hamstrings, hip abductors)
Radiographs: At 12 weeks - should see bridging callus on at least 3 of 4 cortices
Weight-bearing: Full weight-bearing without aids if radiographic union (bridging callus on 3/4 cortices)
Functional goals:
- Independent ambulation
- Stairs (step-over-step pattern)
- Return to activities of daily living
Radiographs: At 6 months final assessment of union, alignment, hardware integrity
Criteria for union: Bridging callus on 3/4 cortices, pain-free weight-bearing, no tenderness at fracture site
Surveillance: Annual radiographs to assess for hardware failure, loss of reduction, late prosthetic loosening
Return to activities: Low-impact activities (walking, swimming, cycling) encouraged. Avoid high-impact sports (running, jumping).
Hardware removal: Consider at 18-24 months if prominent and symptomatic AFTER confirmed radiographic union
Touch weight-bearing for first 6 weeks allows soft tissue healing and early callus formation while preventing catastrophic hardware failure. Progress to partial weight-bearing at 6 weeks stimulates further bone healing via controlled mechanical stress (Wolff's law). Full weight-bearing at 12 weeks assumes radiographic union is progressing - if not, delay full weight-bearing until 16-20 weeks.
Periprosthetic fractures have slower healing than native bone fractures due to osteoporosis, age, and altered biomechanics. Average time to union is 5-7 months for ORIF cases. If no radiographic progression of healing at 4-6 months, consider bone stimulation (ultrasound or pulsed electromagnetic fields) or revision surgery with bone grafting.
Outcomes and Prognosis
- Union Rate
- 75-85% (good bone), 60-70% (osteoporotic)
- Functional Outcome
- Good to excellent in 70%, return to pre-fracture function 50%
- Revision Rate
- 15-20% require revision within 2 years
- Notes
- Best for Type II with good bone quality and closed-box implants
- Union Rate
- 80-90%
- Functional Outcome
- Good to excellent in 75-80%, faster mobilization than plate
- Revision Rate
- 10-15% require revision
- Notes
- Requires open-box design, good for bilateral fractures
- Union Rate
- 65-80% (fracture union)
- Functional Outcome
- Fair to good in 60%, limited by age and comorbidities
- Revision Rate
- 20-25% require further revision
- Notes
- Necessary for Type III, higher complication rate but addresses prosthetic loosening
- Union Rate
- 70-80% (selected cases)
- Functional Outcome
- Fair in 50%, high rate of stiffness and functional loss
- Revision Rate
- 15-20% loss of reduction requiring delayed ORIF
- Notes
- Reserved for very elderly, high-risk patients with minimal displacement
Poor prognostic factors:
- Age over 80 years (mortality risk, poor healing)
- Severe osteoporosis (T-score below -2.5) - high nonunion rate with ORIF
- Type III fractures with prosthetic loosening (complex reconstruction, longer recovery)
- Medical comorbidities (diabetes, renal failure, immunosuppression)
- Smoking (2-3 times higher nonunion rate)
- Delay to surgery (over 7 days associated with worse outcomes)
Best outcomes: Type II fractures in patients under 75 with good bone quality, stable prosthesis, treated with ORIF within 48 hours.
Guidelines, Registries & Global Practice
Global Epidemiology
- Figure
- 13.2%
- Source
- Lützner 2023, EPRD registry (PMID 37498352)
- Figure
- 32.7%
- Source
- Lützner 2023 (PMID 37498352)
- Figure
- 22% vs 10%
- Source
- Hoellwarth 2017 (PMID 29208310)
- Figure
- 13%
- Source
- Ross 2021, BJJ (PMID 33789473)
- Figure
- 5.9 vs 6.8 months
- Source
- Wall 2022 (PMID 36442809)
- Figure
- Decreasing share in some registries
- Source
- Dyrhovden 2017, Norwegian register (PMID 28299718)
Reported one-year mortality varies widely (around 10-22%) between cohorts because case mix differs: distal-femoral-replacement series enrol older, lower-bone-stock patients. The consistent message across the German EPRD, Australian AOANJRR and UK series is that periprosthetic distal femoral fracture carries hip-fracture-level mortality and should be managed with the same orthogeriatric urgency.
Side-by-Side Guidance and Registry Evidence
- Region
- International
- Position on PDFF Management
- Classify by prosthetic stability and bone stock; locked bridge plating or retrograde nail for stable implants, revision/megaprosthesis for loose or unreconstructable distal bone
- Evidence Basis
- Expert consensus + cohort data (Level III-IV)
- Region
- UK
- Position on PDFF Management
- Treat as fragility fractures: prompt surgery allowing early weight-bearing, orthogeriatric co-management, bone-health assessment
- Evidence Basis
- Consensus standard informed by NHFD-style pathways
- Region
- UK
- Position on PDFF Management
- Multidisciplinary fragility-fracture care, falls and bone-health optimisation; no construct-specific mandate
- Evidence Basis
- Guideline (consensus + economic modelling)
- Region
- USA
- Position on PDFF Management
- No single mandated construct; surgeon-directed fixation vs distal femoral replacement guided by bone stock and patient demand
- Evidence Basis
- Evidence map / appropriate-use criteria
- Region
- Australia
- Position on PDFF Management
- Tracks periprosthetic fracture as a revision indication; registry signal favouring stemmed/cemented revision in the loosening setting
- Evidence Basis
- National registry (Level III)
- Region
- Germany
- Position on PDFF Management
- Documents high revision (19.7% at 4y) and PJI (12.8%) after distal femoral replacement for PDFF
- Evidence Basis
- National registry (PMID 37498352)
There is no high-level (RCT) guideline mandating one construct for periprosthetic distal femoral fractures. Two meta-analyses (Quinzi 2021, PMID 33743062; Wall 2022, PMID 36442809) show equivalent union, infection and reoperation rates for ORIF, retrograde nail and distal femoral replacement. Guidance is therefore principle-based: classify by implant stability and bone stock, allow early mobilisation, and co-manage medically.
Practice Variation
- Primary distal femoral replacement: more common in North America and Germany for very low or comminuted fractures in low-demand elderly patients; used more selectively in the UK/Australia given late aseptic loosening (Ross 2021)
- Retrograde nail uptake: limited by closed-box prevalence of the local implant market
- Weight-bearing protocols: increasingly liberalised internationally; meta-analysis shows no complication penalty for early weight-bearing in the elderly (Wardle 2024, PMID 38777887)
- Bone-health pathways: routine fragility/bone-health referral is embedded in UK and Australian systems, more variable elsewhere
- Assess prosthetic stability FIRST (drives ORIF vs revision)
- Confirm open- vs closed-box femoral component before planning a retrograde nail
- Bridge/biological plating and locking fixation in osteoporotic bone
- Orthogeriatric co-management and early mobilisation (hip-fracture model)
- Pre-operative infection screen (CRP/ESR, aspiration if indicated) before fixation
- Informed consent: Document discussion of treatment options (ORIF vs revision TKA), expected outcomes, complications (nonunion 20-30%, infection 3-5%, mortality 30% at 1 year in elderly), and alternative approaches
- Prosthetic stability assessment: Document radiographic criteria used to classify fracture (Type I vs II vs III), including assessment for lucency, subsidence, and alignment on AP and lateral views
- Implant compatibility: Document verification of femoral component design (open vs closed box) before planning retrograde nail - attempting to nail closed-box component is indefensible
- Medical optimization: Document pre-operative assessment of bone health (DEXA if available), medical comorbidities, and optimization of cardiopulmonary status
- Early surgery: Document rationale for timing of surgery - delay beyond 48 hours should have clear medical justification
- Postoperative complications: Document management of complications (nonunion, infection, hardware failure) and shared decision-making about revision surgery
- Anterior femoral notching during index TKA leading to subsequent fracture (claims of substandard surgical technique)
- Wrong fixation method (attempting retrograde nail through closed-box component, or ORIF in Type III fracture)
- Delayed surgery (beyond 7 days) without medical justification, associated with worse outcomes
- Failure to diagnose prosthetic loosening pre-operatively (Type III misclassified as Type II, leading to ORIF failure)
MCQ Practice Points
Q: A 78-year-old woman sustains a periprosthetic supracondylar fracture 6 years after TKA. Radiographs show 8mm of fracture displacement with the femoral component appearing well-fixed with no lucency. What Lewis & Rorabeck type is this?
A: Type II - Displaced fracture (over 5mm) with stable, well-fixed prosthesis. Type I would be non-displaced (under 5mm, under 5° angulation). Type III would have evidence of prosthetic loosening (lucency, subsidence, or malalignment). The key is assessing prosthetic stability independently from fracture displacement.
Q: What is the critical pre-operative assessment required before planning retrograde intramedullary nailing for a Type II periprosthetic supracondylar fracture?
A: Assessment of femoral component intercondylar box design on lateral radiograph. An open-box design with adequate height (over 10mm) and width (over 12mm) is REQUIRED to allow passage of a retrograde nail (typically 9-10mm diameter). Closed-box designs do NOT allow nail passage and require lateral locked plate fixation instead. Attempting to nail through a closed box will cause catastrophic implant damage.
Q: Is anterior femoral cortical notching during TKA a proven risk factor for periprosthetic supracondylar fracture?
A: It is implicated but not proven. Notching greater than 3mm has traditionally been described as a supracondylar stress riser, but the largest clinical series (Ritter et al, JBJS Am 2005, 1089 knees) found no significant increase in fracture rate. A safe exam answer acknowledges notching as a biomechanically plausible, technique-dependent factor to be avoided, while noting that high-quality evidence for a clinically meaningful effect is lacking. The dominant, well-established risk factors are osteoporosis, female sex, age and inflammatory arthropathy.
Q: An 85-year-old patient with severe medical comorbidities sustains a Type II periprosthetic supracondylar fracture. CT shows severe osteoporosis with thin cortices. What factors would make you consider revision TKA with stems instead of ORIF?
A: Severe osteoporosis (T-score below -2.5), very thin cortices (under 4mm), and poor bone quality are relative indications for revision TKA over ORIF in Type II fractures. ORIF in severe osteoporosis has nonunion rates of 30-40% and high risk of screw pullout. Revision with long cemented stems provides immediate stability and load-sharing fixation. Other factors: very distal fracture location (within 5cm of component), closed-box implant precluding nail, or patient factors suggesting ORIF will fail.
Q: What is the 1-year mortality rate for elderly patients with periprosthetic supracondylar fractures after TKA, and how does it compare to hip fractures?
A: Approximately 30% mortality at 1 year, which is comparable to neck of femur fractures in the elderly. This high mortality reflects the patient population (elderly, multiple comorbidities, osteoporosis) and the physiological stress of fracture and surgery. These fractures should be treated with the same urgency as hip fractures, with early surgery (within 48 hours if possible), multidisciplinary orthogeriatric care, and medical optimization to reduce mortality.
Q: What is the expected union rate for Type II periprosthetic fractures treated with ORIF in patients with good bone quality vs severe osteoporosis?
A: Good bone quality: 75-85% union rate. Severe osteoporosis: 60-70% union rate. The 15-25% difference reflects the impact of bone quality on fracture healing and fixation stability. In osteoporotic bone, locking screws can pull out, plates can fail, and biological healing is impaired. This is why severe osteoporosis is a relative indication for revision TKA with cemented stems rather than ORIF, especially in Type II fractures.
Exam Viva Scenarios
Practise clinical reasoning and management decisions out loud
“An 82-year-old woman presents to ED after a fall at home. She has a right TKA performed 5 years ago for osteoarthritis. Radiographs show a supracondylar femur fracture 8cm above the femoral component with 10mm of lateral translation. The femoral component appears well-fixed with no lucency. How would you assess and manage this patient?”
“You are planning surgery for the patient in Scenario 1. On reviewing the lateral radiograph more carefully, you note the femoral component has a closed-box design. The patient's bone quality appears osteoporotic with thin cortices. Walk me through your surgical plan.”
“A 74-year-old man with a TKA performed 8 years ago falls and sustains a supracondylar femur fracture. Radiographs show the fracture is displaced with 5° of valgus angulation. You also note progressive radiolucent lines around the femoral component and 3mm of component subsidence compared to prior radiographs. How would you manage this?”
Key Classification
- Lewis & Rorabeck Type I = Non-displaced (under 5mm, under 5°), stable prosthesis = ORIF or conservative
- Type II = Displaced (over 5mm OR over 5°), stable prosthesis = ORIF (plate or nail based on implant design)
- Type III = Any displacement + prosthesis loose (lucency, subsidence, malalignment) = Revision TKA with stems
- Felix tibial: Type I (plateau) = revision, Type II (adjacent to stem) = plate ± stem extension, Type III/IV = standard fixation
- Patellar: Intact extensor = conservative, disrupted extensor = surgical repair or patellectomy
Surgical Decision Algorithm
- Type II + open-box component + good bone = Retrograde IM nail (85-90% union)
- Type II + closed-box component OR osteoporotic bone = Lateral locked plate (75-85% union)
- Type III (loose prosthesis) = Revision TKA with long stems (over 100mm beyond fracture) + cerclage cables
- Severe osteoporosis in Type II = Consider revision TKA upfront (ORIF has 30-40% nonunion rate)
- Open-box verification is MANDATORY before planning retrograde nail - catastrophic if attempted with closed box
Surgical Pearls
- Lateral locked plate: Submuscular bridge plating, fill all holes in osteoporotic bone, leave 1cm gap from femoral component
- Retrograde nail: Entry point center of intercondylar notch, bury nail 5mm below articular surface, confirm clearance from polyethylene
- Revision TKA: Cemented stems preferred (immediate stability), cerclage cables for provisional fracture fixation, stem length = fracture + 100mm or 2 cortical diameters
- Anterior femoral notching over 3mm = implicated (but unproven; Ritter JBJS 2005 negative) stress riser, avoid and assess on lateral radiographs
- Weight-bearing: Touch for 6 weeks, progress to full by 12 weeks if radiographic healing evident
Risk Factors
- FORNOW = Female, Osteoporosis, Rheumatoid, Neurological, Old age, Warfarin/steroids
- Anterior femoral notching over 3mm = implicated but unproven stress riser (Ritter JBJS 2005 found no association) - avoid, but not a dominant risk factor
- Osteoporosis (T-score below -2.5) increases nonunion risk with ORIF to 30-40%
- Revision TKA has 5-10% periprosthetic fracture rate (vs 2.5% for primary TKA)
Complications
- Nonunion 20-30% with ORIF in osteoporotic bone, 10-15% in good bone, managed with revision ORIF or conversion to stemmed TKA
- Hardware failure 10-15% (plate) or 5% (nail), due to screw pullout in poor bone or premature weight-bearing
- Infection (PJI) 3-5%, requires debridement or two-stage revision based on chronicity
- Mortality 30% at 1 year in elderly - comparable to hip fracture, treat with same urgency
- Stiffness 15-20%, managed with early ROM, manipulation under anesthesia at 6-12 weeks if severe
Evidence Base and Key Trials
ORIF vs Retrograde Nail vs Distal Femoral Replacement (Quinzi 2021)
- Systematic review and meta-analysis of 52 studies (ORIF n=1205, retrograde IM nail n=272, distal femoral replacement n=353)
- No significant difference in major complication rates (p=0.55) or reoperation rates (p=0.20) between the three treatment strategies
- Deep infection was higher with distal femoral replacement than with internal fixation (p=0.03)
- Malunion was more common with intramedullary nail than ORIF (p=0.02)
- Periprosthetic fracture rates were higher with distal femoral replacement and IM nail than with ORIF
Retrograde Nail vs Distal Femoral Plating (Wall 2022)
- Systematic review and meta-analysis of 8 comparative studies (407 cases: 252 plating, 155 retrograde IM nailing)
- Mean time to union equivalent: 5.88 months for nail vs 6.75 months for plating (standardised mean difference 0.28, 95% CI -0.02 to 0.58)
- No significant difference in deep infection (OR 1.41, 95% CI 0.40-5.00)
- No significant difference in revision surgery (OR 0.74, 95% CI 0.39-1.41)
- Marked heterogeneity in fracture classification limited pooled functional analysis
AOANJRR Periprosthetic Fracture Revision Data
- Periprosthetic fractures account for 12% of all TKA revisions in Australia
- Incidence increasing with aging population (2.1% to 2.8% over 10 years)
- Revision for periprosthetic fracture has 20% re-revision rate at 5 years
- Cemented stems associated with lower revision rate than uncemented in fracture setting (15% vs 25%)
- Mortality at 1 year post-revision for fracture: 28% (comparable to hip fracture mortality)
Lateral Locked Plate vs Distal Femoral Arthroplasty for Low PDFFs (Ross 2021)
- Retrospective cohort of 60 unilateral low (Su type II/III) periprosthetic distal femoral fractures in patients aged 60 years or over (33 lateral locked plate ORIF, 27 distal femoral arthroplasty)
- One-year mortality 13% (8/60) across the whole cohort
- Reoperation more common after locked plating: 7/33 vs 0/27 (p=0.008); 5-year reoperation-free survival 70.8% plate vs 100% arthroplasty (p=0.006)
- Medial comminution independently predicted reoperation after plating (HR 10.7, 95% CI 1.45-79.5); anatomical reduction was protective (HR 0.11)
- When well-reduced plates were analysed, there was no survival difference versus distal femoral arthroplasty