Ankle Arthrodesis | Syndesmotic Fixation | TA-EDL Internervous Plane | SPN at Risk
- Internervous plane: Between tibialis anterior (deep peroneal nerve) medially and extensor digitorum longus (superficial peroneal nerve) laterally - a TRUE internervous plane, but the superficial peroneal nerve itself is at risk because its cutaneous branches cross the field.
- SPN anatomy CRITICAL: The superficial peroneal nerve pierces deep fascia roughly 10-12cm proximal to the ankle (variable) and its branches frequently lie within the anterolateral working zone (lateral to EDL in ~32%, between EHL and EDL in ~24% - Solomon 2006). MUST identify during subcutaneous dissection and protect with a vessel loop; a divided cutaneous branch causes a painful dorsal-foot neuroma.
- Dorsalis pedis artery + deep peroneal nerve: Run together BETWEEN TA and EHL tendons (medial to surgical field) - protected if you stay lateral to TA tendon and work in the TA-EDL interval. NEVER dissect medial to TA.
- Primary indication: Ankle arthrodesis for end-stage ankle arthritis (post-traumatic 50-60%, inflammatory arthropathy, failed ankle replacement). Also syndesmotic ORIF, talar osteochondral lesions (anterolateral dome), anterior impingement debridement.
- Optimal fusion position: Neutral flexion (0-5 degrees DF, sagittal), slight 0-5 degrees hindfoot valgus (coronal), 5-10 degrees external rotation (axial), with the talus slightly posteriorly translated - MATCH the contralateral normal foot (Buck, JBJS Am 1987). Varus and excessive plantarflexion are the malpositions to avoid (varus = lateral column overload; plantarflexion = knee hyperextension).
- Non-union: Most common major late complication. Smoking is the dominant MODIFIABLE risk factor (relative risk ~5.8 in foot/ankle fusion - Allport 2020); risk normalises in ex-smokers, so cessation is central to optimisation. Talar AVN, diabetes, PAD and revision surgery also raise risk; consider supplementary bone graft in high-risk cases.
When & Why
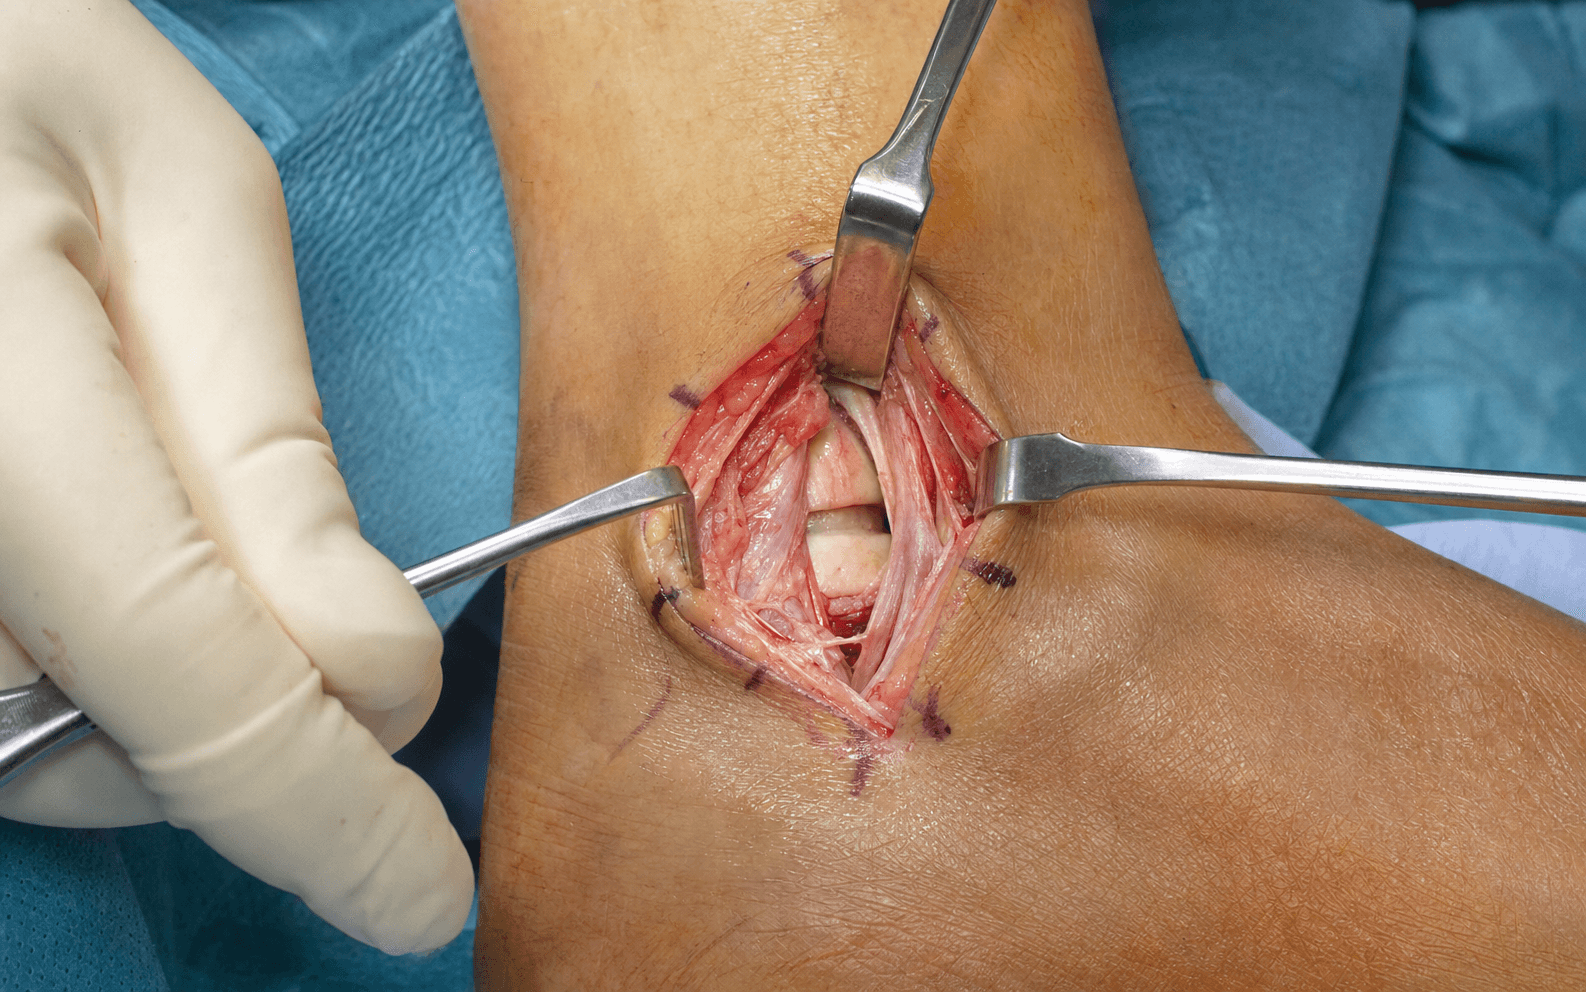
What it exposes. The anterolateral approach is the gold-standard open exposure for ankle arthrodesis and the most versatile route to the anterior tibiotalar joint. It gives direct, 360-degree access to the plafond, talar dome and the medial and lateral gutters for joint preparation, alignment correction and anterior-to-posterior screw fixation, while keeping the major neurovascular bundle safely medial.
Why it dominates anterior ankle surgery. Three advantages make it the workhorse:
- A true internervous plane. It exploits the interval between tibialis anterior (deep peroneal nerve) medially and extensor digitorum longus (superficial peroneal nerve) laterally — different nerve supplies, so there is no motor denervation.
- Safe neurovascular anatomy. The dorsalis pedis artery and deep peroneal nerve run between TA and EHL, medial to the field, shielded by the intact TA tendon as long as you stay lateral to it.
- Extensile without consequence. It extends proximally to the syndesmosis and distal tibia, and distally to the talar neck and subtalar joint, without crossing new neurovascular territory.
The one catch — and the recurring exam point — is that the superficial peroneal nerve itself crosses the field, so this is the highest-risk of the anterior intervals for an SPN injury (Solomon, ANZ J Surg 2006).
Indications
Ankle arthrodesis (the commonest use) — for end-stage ankle arthritis:
- Post-traumatic (pilon fracture sequelae, talar fracture malunion or AVN) — about 50-60 percent of all ankle fusions.
- Inflammatory arthropathy — rheumatoid, psoriatic, ankylosing spondylitis.
- Primary osteoarthritis — rare (less than 5 percent, unlike hip and knee).
- Neuropathic (Charcot) — relative indication; non-union risk approaches 50 percent, consider bone graft.
- Failed ankle replacement — aseptic loosening, instability, infection (staged explant then fusion), massive bone loss (structural allograft plus fusion).
Syndesmotic pathology — acute disruption with a Weber C ankle fracture (posterior malleolus fixation through this approach), and isolated high-ankle-sprain diastasis needing ORIF (suture-button versus screws); also chronic instability and revision.
Intra-articular pathology — anterolateral talar osteochondral lesions (lesions over 15 mm diameter, or failed arthroscopic treatment — debridement, microfracture, OATS, allograft) and anterior ankle impingement ("footballer's ankle" — anterior tibial and talar osteophytes, debrided through the approach).
Fracture fixation — the anterolateral plafond fragment in pilon fractures (buttress plate, often combined with an anteromedial incision), and the large posterior malleolus (over 25 percent of the joint surface), an alternative to a posterior approach with a lower wound-complication rate.
Contraindications
Absolute:
- Active infection — deep ankle infection or osteomyelitis (stage it: debridement, antibiotics, delayed fusion).
- Severe peripheral arterial disease — ankle-brachial index under 0.5 means critical limb ischaemia; revascularise first or explicitly accept a high non-union and wound risk.
Relative:
- Young active patients — ankle replacement is an emerging alternative in selected patients under 60 with a moderate activity level.
- Neuropathic arthropathy — 50 percent non-union risk; consider extending the fusion to the midfoot.
- Smoking — roughly triples non-union risk; counsel cessation six weeks pre-op and through healing.
- Diabetes — poor control (HbA1c over 8 percent): optimise first.
- Obesity — BMI over 40 raises wound complications about threefold.
- Adjacent-joint arthritis — subtalar or midfoot arthritis may progress after fusion; counsel the patient.
Pre-operative assessment
Clinical. Document the aetiology (prior pilon, ankle or talar fracture; inflammatory disease), functional limitation and failed conservative management (AFO bracing, NSAIDs, injections). Examine gait and hindfoot alignment from behind, range of motion, and the subtalar and midfoot joints (they compensate, and may already be arthritic).
Neurovascular examination is mandatory. Palpate the dorsalis pedis and posterior tibial pulses; test deep peroneal nerve function (EHL, first-web-space sensation), superficial peroneal nerve sensation (dorsum of the foot) and tibial nerve function (FHL, plantar sensation).
Ankle arthrodesis carries a baseline non-union rate of about 5-10 percent that rises sharply with impaired perfusion. Palpate the dorsalis pedis and posterior tibial pulses pre-operatively; if either is absent, obtain an ankle-brachial index and consider a vascular opinion. A markedly low ABI (under 0.5) means revascularise first, or explicitly accept a high non-union and wound-healing risk. Perfusion and smoking are the key modifiable determinants of fusion (Allport, FAI 2020).
Imaging. Weight-bearing AP, lateral and mortise ankle radiographs (joint space, tibiotalar angle — normal 90 plus or minus 5 degrees, osteophytes, talar tilt), a Saltzman hindfoot alignment view for coronal deformity, and a full-length leg-alignment film if there is proximal tibial deformity. CT assesses bone stock, cysts, talar AVN and sclerosis and plans screw trajectory; MRI is reserved for suspected talar AVN and soft-tissue (deltoid, spring ligament) insufficiency.
Arthrodesis versus total ankle replacement
The choice is driven by patient selection rather than a single threshold. The two largest sources of evidence:
- TARVA RCT (Goldberg et al, Ann Intern Med 2022): in 303 patients aged 50-85, TAR and fusion gave broadly equivalent patient-reported outcomes (MOXFQ) at one year, with different complication profiles — TAR more wound and nerve problems, fusion more VTE and non-union (symptomatic non-union about 7 percent).
- Pooled outcome data (Haddad et al, JBJS Am 2007): intermediate AOFAS scores were similar between procedures; second-generation implant survival was about 78 percent at 5 years and 77 percent at 10 years.
- Ankle arthrodesis
- Younger active patients under 60, manual labourers, post-traumatic arthritis, talar AVN, salvage of failed replacement
- Total ankle replacement
- Older, lower-demand patients over 60, bilateral arthritis, sedentary, inflammatory arthropathy
- Ankle arthrodesis
- Durable once united (no implant to wear); main long-term issue is adjacent-joint arthritis
- Total ankle replacement
- Second-generation implant survival ~78% at 5 yr and ~77% at 10 yr (Haddad 2007); fails by loosening or subsidence
- Ankle arthrodesis
- No ankle motion (subtalar and midfoot compensate); stiffer gait
- Total ankle replacement
- Preserves 15-20 degrees of dorsiflexion-plantarflexion; more normal gait
- Ankle arthrodesis
- High - subtalar and midfoot arthritis in about 30% at 10 years
- Total ankle replacement
- Lower, because ankle motion is preserved
- Ankle arthrodesis
- Non-union (~7% symptomatic in TARVA; higher with risk factors), malunion (especially varus), more VTE
- Total ankle replacement
- More wound-healing and nerve problems; loosening, subsidence, instability, periprosthetic fracture
- Ankle arthrodesis
- Broadly equivalent MOXFQ to TAR at 1 year in patients 50-85
- Total ankle replacement
- Broadly equivalent to fusion at 1 year; post-hoc signal favouring fixed-bearing TAR (hypothesis-generating)
- Ankle arthrodesis
- Static use; preferred for young, high-demand, post-traumatic, talar AVN and salvage cases
- Total ankle replacement
- Rising use over two decades; preferred for older, lower-demand patients
Position and landmarks
Supine on a radiolucent table, with a small bump (about 10 cm) under the ipsilateral hip to bring the ankle into neutral and the knee flexed 20-30 degrees to relax the gastrocnemius. An upper-thigh pneumatic tourniquet (about 300 mmHg, exsanguinate with Esmarch) gives a bloodless field that makes nerve identification easier; release it before closure for haemostasis (safe time about two hours; most fusions are under 90 minutes). Lateral decubitus is reserved for simultaneous lateral/anterior work such as a concomitant fibular osteotomy.
Mark the landmarks before incising: the tibialis anterior tendon (the most medial dorsal tendon — ask the patient to dorsiflex), the EHL (the dorsalis pedis pulse lies just medial to it), the lateral malleolus, and the ankle joint line (about 1 cm proximal to the talar neck). Plan the incision 2 cm lateral to the TA tendon, starting 8-10 cm proximal to the joint and running to the talar neck — staying lateral to TA keeps the dorsalis pedis safe.
The Exposure
The exposure works down through the layers in the TA-EDL internervous interval, identifying and protecting the superficial peroneal nerve in the subcutaneous fat before any fascial incision, then dividing the inferior extensor retinaculum to reach and open the anterior capsule.
Critical neurovascular anatomy
The internervous plane. Medial is tibialis anterior (deep peroneal nerve); lateral is EDL (superficial peroneal nerve). The dorsalis pedis artery and deep peroneal nerve run together between TA and EHL — medial to the field — so working in the TA-EDL interval and staying lateral to the TA tendon keeps them protected. The deep peroneal nerve supplies EHL, EDL and TA proximal to the ankle, so the approach endangers no motor branch.
Superficial peroneal nerve (the structure at risk). The SPN runs in the lateral compartment (supplying peroneus longus and brevis), then pierces the deep fascia about 10-12 cm proximal to the ankle to become subcutaneous, splitting into the medial dorsal cutaneous nerve (medial dorsum) and the intermediate dorsal cutaneous nerve (lateral dorsum, fourth web space). Its branches frequently lie within the anterolateral working zone — lateral to EDL in about 32 percent and between EHL and EDL in about 24 percent (Solomon, ANZ J Surg 2006) — which is why the anterolateral interval is the highest-risk anterior interval for this nerve. Division causes a painful dorsal-foot neuroma, sensory loss over the dorsum, and risk of CRPS.
The SPN pierces the deep fascia about 10-12 cm proximal to the ankle (variable) and its cutaneous branches frequently lie within the anterolateral working zone - lateral to EDL in about 32% and between EHL and EDL in about 24% (Solomon, ANZ J Surg 2006). Identify it during subcutaneous dissection, before the fascial incision, and protect it with a vessel loop throughout the case. A divided cutaneous branch produces a painful dorsal-foot neuroma that may need excision and burial.
Inferior extensor retinaculum. A Y-shaped band at the ankle that forms compartments for TA (medial), EHL plus the neurovascular bundle (middle), and EDL (lateral). It must be divided longitudinally between the TA and EDL compartments to expose the joint capsule. The thin fibrous anterior capsule is then incised longitudinally to expose the tibiotalar joint.
Exposure sequence
- Mark the TA tendon and draw the line 2 cm lateral to it — never medial to TA (that risks the dorsalis pedis).
- An 8-10 cm longitudinal incision, gently curved to the anterior tibial contour, starting about 10 cm proximal to the joint and running to the talar neck.
- Incise the dermis with a 15 blade and dissect through subcutaneous fat (3-5 mm) to the deep fascia.
- Before any fascial incision, search the subcutaneous fat for the SPN — a small white nerve 2-3 mm across, emerging proximally and crossing obliquely.
- Its anatomy is variable (it can surface anywhere from 8-15 cm proximal), so any small nerve crossing the proximal half of the field should be assumed to be the SPN.
- Loop it with a vessel loop and retract gently throughout the case; never clamp a self-retaining retractor onto it.
- Incise the glistening deep fascia longitudinally along the full length of the wound; if the SPN pierces here, loop it immediately.
- Identify tibialis anterior (the firm white cord, most medial) and EDL (thinner, lateral, four tendons).
- Find the fat stripe of the TA-EDL interval and develop it bluntly.
- Retract the TA tendon medially (this protects the dorsalis pedis artery and deep peroneal nerve) and the EDL laterally.
- You should now see the thin anterior ankle joint capsule deep in the interval — and you should not see the dorsalis pedis (it lies medial to TA, protected).
- Incise the Y-shaped inferior extensor retinaculum longitudinally between the TA and EDL compartments, releasing both limbs.
- Take down any anterior tibial or talar osteophytes with a rongeur to improve visualisation, and debride hypervascular synovium with bipolar cautery.
- Make a longitudinal capsulotomy over the anterior tibiotalar joint, extending it proximally onto the tibia and distally onto the talar neck.
- Elevate the medial and lateral capsular flaps to expose the joint through 360 degrees.
- Open the joint with a lamina spreader or small Hohmann retractors (lever the tibia up, the talus down).
- Inspect the tibial plafond and talar dome (eburnation, sclerosis, cysts, cartilage loss), and the medial gutter; the lateral gutter is less accessible from this approach.
Do not incise the deep fascia until you have thoroughly inspected the subcutaneous fat for the superficial peroneal nerve. Its emergence is variable (8-15 cm proximal), so a small nerve crossing the proximal half of the wound must be assumed to be the SPN and protected.
The dorsalis pedis artery and deep peroneal nerve run between TA and EHL, medial to the field. Working strictly lateral to the TA tendon — and never dissecting medial to it — keeps this bundle safe; injury is under 1 percent in the correct interval and would otherwise cause foot ischaemia and foot drop.
Dangers & Extensions
Structures at risk
- What is at risk
- Cutaneous branches cross the field (lateral to EDL in about a third of feet, between EHL and EDL in about a quarter - Solomon 2006); division causes a painful dorsal-foot neuroma (10-15% neurological complication rate)
- Protection
- Identify during subcutaneous dissection before the fascial incision; loop and protect; no self-retaining retractors on the nerve
- What is at risk
- Runs between TA and EHL, medial to the field; division causes foot ischaemia (under 1% in the correct interval)
- Protection
- Stay lateral to the TA tendon; never dissect medial to TA; palpate the pulse after tourniquet release
- What is at risk
- Travels with the dorsalis pedis; injury gives EHL/EDL weakness and first-web-space numbness
- Protection
- Respect the TA tendon boundary; do not cross medially
- What is at risk
- Thin soft-tissue envelope; wound breakdown in 10-15% (higher with smoking, diabetes, PAD)
- Protection
- Meticulous tissue handling, tension-free closure, postoperative elevation, smoking cessation
Extensile options
The approach is genuinely extensile. Extend proximally along the anterior tibial contour to reach the distal tibial plafond, the syndesmosis and the anterolateral pilon fragment. Extend distally over the talar neck to reach the talar dome and body, and on to the subtalar joint for a pantalar or tibiotalocalcaneal fusion. Neither extension crosses a new neurovascular territory.
Closure
Achieve haemostasis after tourniquet release and confirm the dorsalis pedis pulse. Close in layers: re-approximate the capsule (2-0 Vicryl) if possible, the extensor retinaculum and deep fascia (2-0 Vicryl) to take tension off the thin anterior skin, the subcutaneous layer with inverted 3-0 Vicryl, and the skin with 4-0 nylon vertical-mattress sutures (which allow individual suture removal if a wound problem develops). Apply a well-padded posterior short-leg splint with the ankle neutral and elevate the leg.
Complications
Intra-operative
- Superficial peroneal nerve injury (10-15%) — the commonest neurological complication; from failure to identify the nerve, division during fascial incision, or stretch. If recognised cut intra-operatively, repair primarily (8-0 nylon); if recognised post-operatively, observe 3-6 months (many are neuropraxia) then consider neuroma excision and burial if painful.
- Dorsalis pedis artery injury (under 1%) — only with dissection medial to TA; emergency vascular repair.
- Deep peroneal nerve injury (under 1%) — same mechanism; usually neuropraxia.
- Malposition (5-10%) — from inadequate fluoroscopy; corrects only by revision.
Early (0-6 weeks)
- Wound complications (10-15%) — edge necrosis, dehiscence, exposed hardware; risk factors smoking (about threefold), diabetes, PAD, obesity. Manage with local care or VAC; deep dehiscence with exposed hardware needs flap cover (reverse sural or free flap).
- Infection (5-10%) — usually 7-21 days; staph aureus in about 70 percent. Superficial: oral anti-staphylococcal antibiotics. Deep: debridement with hardware retention if stable plus a prolonged IV/oral course (about 6 weeks for implant-associated infection); loose or exposed hardware may need removal and external fixation.
- Compartment syndrome (under 1%) — from haematoma or a tight splint; emergency fasciotomy of all four compartments.
Late (over 6 weeks)
- Non-union (5-15%) — persistent pain at 3-6 months with no bridging bone (confirm on CT). Asymptomatic non-unions can be observed; symptomatic ones need revision fusion (freshen surfaces, bone graft, re-fix). Smoking is the dominant modifiable factor.
- Malunion (5-10%) — varus overloads the lateral column (fifth-metatarsal stress fracture, lateral midfoot arthritis); plantarflexion causes knee hyperextension gait. Severe (over 10 degrees varus) or symptomatic malunion needs a corrective osteotomy through the fusion mass.
- Adjacent-joint arthritis (about 30% at 10 years) — inevitable increased stress on the subtalar and midfoot joints after tibiotalar fusion; counsel pre-operatively.
- Hardware problems — prominent screw heads (remove over 12 months if symptomatic); screw breakage suggests non-union.
Procedures Through This Approach
- Ankle arthrodesis — the principal operation through this exposure.
- Syndesmotic ORIF — acute Weber C disruption (posterior malleolus and syndesmosis) and chronic diastasis.
- Anterolateral talar osteochondral lesions — debridement, microfracture, OATS or allograft for lesions over 15 mm or after failed arthroscopy.
- Anterior ankle impingement ("footballer's ankle") — excision of anterior tibial and talar osteophytes and synovectomy.
- Pilon fractures — ORIF of the anterolateral plafond fragment (buttress plate), often as the lateral half of a two-incision technique.
- Posterior malleolus fractures — fixation of fragments over 25 percent of the joint surface, an alternative to a posterior approach.
Ankle arthrodesis through this approach
Joint preparation. Remove all articular cartilage and the sclerotic subchondral plate down to bleeding cancellous bone. Curette the plafond and talar dome (straight and curved curettes), clear both gutters, and use flat osteotomes to take 2-3 mm of hard sclerotic bone until punctate bleeding appears — the "paprika sign". Where deformity must be corrected, resect wedges with a sagittal saw: a lateral tibial wedge for varus, a medial wedge for valgus, and an anterior wedge to bring a plantarflexed ankle into neutral. Pack bone graft (iliac-crest autograft or allograft chips) into gutters and defects in high-risk cases (AVN, cysts, revision).
Optimal fusion position (Buck, JBJS Am 1987). Position is more important than simply achieving fusion — a solid fusion in a bad position is a failed operation:
Neutral dorsiflexion (0-5 degrees), with the talus translated slightly posteriorly under the tibia. Allows toe clearance in swing and prevents knee hyperextension; plantarflexion malunion causes genu recurvatum.
Slight hindfoot valgus (0-5 degrees). Mimics normal alignment and avoids lateral-column overload. Varus is the malposition to avoid — it drives fifth-metatarsal stress fractures and lateral midfoot arthritis.
5-10 degrees external rotation, matching the contralateral foot-progression angle. Match the contralateral normal foot in all three planes and confirm on fluoroscopy before final fixation.
Hold the position with 2.0 mm provisional K-wires and check AP, lateral and mortise fluoroscopy: neutral dorsiflexion and 5 degrees valgus on AP/lateral, joint surfaces apposed with no gap, and wires clear of the posterior neurovascular structures.
Fixation. The workhorse is rigid crossed compression screws:
- Three-screw technique (gold standard): two anterolateral tibiotalar screws (6.5 or 7.0 mm partially threaded cannulated) plus a medial malleolar "home-run" screw into the talar body; the screws cross distal to the joint inside the talus to form a triangular construct.
- Two-screw technique: two crossing screws (anterolateral tibia to posteromedial talus, anteromedial tibia to posterolateral talus) — slightly less rigid.
- Anterior plate (low-profile, crossing the joint) or a retrograde nail is reserved for poor bone stock, revision, talar AVN, or tibiotalocalcaneal fusion where greater stiffness is needed (Berend, FAI 1997); plating carries a higher wound-breakdown rate.
Confirm on fluoroscopy: screws within bone, crossing at the fusion site, no posterior talar penetration (which would injure FHL and the posterior tibial neurovascular bundle).
Post-operative management
Immediate (days 0-2). Neurovascular check (dorsalis pedis pulse; EHL/EDL cannot be tested reliably through pain and swelling), popliteal block plus oral analgesia, post-operative radiographs, elevation above heart level for 24-48 hours, DVT prophylaxis (e.g. enoxaparin 40 mg SC daily or rivaroxaban 10 mg daily until mobile), and a well-padded posterior short-leg splint. Discharge when pain is controlled, the limb is neurovascularly intact, and the patient is safe non-weight-bearing on crutches.
Outpatient milestones.
- Week 2 — wound check and suture management, AP/lateral radiographs, splint change or CAM boot if the wound is healthy; continue non-weight-bearing.
- Week 6 — radiographs for early trabecular bridging; transition to a CAM boot; begin toe-touch weight-bearing (10-20 kg) if healing is evident.
- Week 12 — weight-bearing AP/lateral/mortise (expect 50-70 percent bridging; CT if equivocal); advance to partial then full weight-bearing in the boot as fusion progresses.
- Month 6 — confirm solid fusion (3-4 cortices bridged); full weight-bearing in regular shoes.
- Month 12 and beyond — assess adjacent joints; consider hardware removal for prominent screws only after the fusion is mature.
Physiotherapy progresses from protection and DVT prevention (weeks 0-6, non-weight-bearing, knee and upper-body work) through gait re-education in the boot (weeks 6-12) to full activity and adjacent-joint (subtalar) conditioning from three months. Supervised rehabilitation improves gait re-education and adjacent-joint conditioning; access and funding vary by health system, so engage the local pathway early.
Return to activity. Sedentary work at 3-6 months, light manual at 6-9 months, heavy manual at 12 months or more (some patients do not return to heavy labour). Driving returns at roughly 6-12 months when the pedal foot is the operated side (reliable emergency braking is the limiting factor), and earlier for the non-pedal foot — confirm with the licensing authority and insurer. Counsel patients pre-operatively that ankle fusion is a permanent loss of tibiotalar motion with attendant occupational and functional implications.
Viva & Exam Focus
ANTEROLATERALANTEROLATERAL - the ankle exposure, step by step
VALGUSVALGUS - the optimal ankle fusion position
Clinical Decision Scenarios
Practise clinical reasoning and management decisions out loud
“What is the internervous plane of the anterolateral ankle approach, which nerves supply the muscles you work between, and what crosses the field superficially?”
“You have completed an ankle arthrodesis. The postoperative radiographs show the ankle fused in 10 degrees of varus. What are the consequences of this malposition, and how would you have prevented it?”
“A 55-year-old male smoker with post-traumatic ankle arthritis is being considered for ankle arthrodesis. What factors increase his non-union risk, and how would you counsel him?”
High-yield anatomy
- Internervous plane: TA (deep peroneal nerve) vs EDL (superficial peroneal nerve) - TRUE internervous
- Superficial peroneal nerve: pierces deep fascia ~10-12 cm proximal (variable); branches frequently lie within the anterolateral field - the highest-risk anterior interval for the SPN (Solomon, ANZ J Surg 2006)
- Dorsalis pedis artery: between TA and EHL - medial to the field (protected if you stay lateral to TA)
- Deep peroneal nerve: runs with the dorsalis pedis - safe if you respect the TA tendon boundary
- Inferior extensor retinaculum: Y-shaped at the ankle - divide longitudinally to expose the capsule
Critical technique
- SPN identification MANDATORY: vessel-loop protection during subcutaneous dissection BEFORE the fascial incision (avoids a painful dorsal-foot neuroma)
- Cartilage removal: curette to bleeding subchondral bone ('paprika sign'), remove the sclerotic plate ~2-3 mm
- Fixation: multiple crossed compression screws (e.g. 2 anterolateral 6.5/7.0 mm + a medial malleolar home-run); anterior plate or retrograde nail for poor bone or TTC fusion
- Fluoroscopy systematic: AP (valgus), lateral (neutral DF, no posterior penetration), mortise (apposition) - BEFORE final fixation
Fusion position
- Sagittal: neutral to 5 degrees dorsiflexion, talus translated slightly posteriorly
- Coronal: slight 0-5 degrees VALGUS (varus is the malposition to avoid - lateral-column overload)
- Axial: 5-10 degrees external rotation (match the contralateral foot)
- Varus malunion: lateral-column overload, 5th MT stress fracture, lateral midfoot arthritis, abnormal gait
- Confirm in all three planes and match the contralateral foot
Non-union risk
- Baseline symptomatic non-union ~5-10% (7% in TARVA); much higher with multiple risk factors
- Smoking: dominant modifiable factor - RR ~5.8 (Allport, FAI 2020); risk normalises in ex-smokers
- Talar AVN: impaired vascularity - consider structural bone graft
- Diabetes: optimise HbA1c toward under 7% preop
- PAD: palpate pulses, check ABI, revascularise if critically low or accept high risk
- Protective measures: supplementary bone graft and rigid compressive fixation; revision has a higher non-union rate
Complications - prevention
- SPN injury: identify early, vessel-loop protection, avoid stretch/division (commonest neurological complication)
- DP artery injury (rare): stay lateral to TA, never dissect medial to TA, palpate the pulse after tourniquet release
- Varus/malunion: systematic fluoroscopy (AP/lateral/mortise), match the contralateral foot, correct deformity intraop
- Non-union (~5-10%): smoking cessation, bone graft if high-risk, optimise diabetes/perfusion, rigid fixation
- Wound complications (10-15%): meticulous tissue handling, postop elevation, smoking cessation, tension-free closure
Evidence you must know
- Goldberg 2022 (TARVA RCT, Ann Intern Med): TAR vs fusion in patients 50-85 - equivalent MOXFQ at 1 year; symptomatic non-union 7% for fusion; TAR more wound/nerve, fusion more VTE
- Haddad 2007 (JBJS Am, systematic review): intermediate AOFAS similar; second-generation implant survival ~78% at 5 yr, ~77% at 10 yr
- Solomon 2006 (ANZ J Surg): anterolateral interval is the highest-risk anterior interval for the SPN (branches lateral to EDL in ~32%, between EHL/EDL in ~24%; 68 cadaver feet)
- Allport 2020 (FAI): smoking is the dominant modifiable non-union risk factor in foot/ankle fusion - RR ~5.8; ex-smokers return to baseline
- Buck 1987 (JBJS Am): optimal fusion position - neutral flexion, slight 0-5 degrees valgus, 5-10 degrees ER, talus slightly posterior
- Berend 1997 (FAI): retrograde nail is stiffer than crossed screws in all bending and rotational directions (cadaveric)
Viva traps
- TRAP: 'Not an internervous plane' - WRONG, it IS internervous (TA vs EDL, different nerves)
- TRAP: 'SPN not important' - WRONG, its branches frequently lie within the field (highest-risk anterior interval, Solomon 2006)
- TRAP: 'Fusion position does not matter much' - WRONG, varus malunion causes lateral-column pain and gait abnormality (Buck 1987)
- TRAP: 'Smoking is not a real concern' - WRONG, RR of non-union ~5.8 (Allport 2020); enforce cessation or reconsider surgery
- TRAP: 'Fusion is simply better than replacement' - OVERSIMPLIFIED; TARVA showed equivalent 1-year outcomes in patients 50-85 with different complication profiles (Goldberg 2022)
Global practice notes
- TAR use has risen over two decades while fusion rates remain static; fusion stays preferred for younger/high-demand, post-traumatic, talar AVN and salvage cases
- Major named-society and registry sources (AAOS, BOA/BOAST, AOANJRR, NJR, SHAR) broadly agree that patient selection - not a single threshold - drives the choice
- Refer smokers to a recognised cessation service preoperatively (the single most effective modifiable step to reduce non-union)
- Rehabilitation access and funding vary by health system/insurance - engage the local pathway early
- Return to work: sedentary 3-6 months, light manual 6-9 months, heavy manual 12+ months (some do not return to heavy labour)
- Driving: pedal-foot fusion ~6-12 months (needs safe emergency braking); confirm with the licensing authority and insurer
References
Total Ankle Replacement vs Arthrodesis (TARVA RCT)
- Multicentre open-label RCT, 17 UK NHS trusts: 303 patients aged 50-85 with end-stage ankle osteoarthritis randomised to TAR or ankle fusion (AF)
- Primary outcome (change in MOXFQ walking/standing at 52 weeks): adjusted difference -5.6 (95% CI -12.5 to 1.4) favouring TAR but NOT clinically or statistically significant
- Similar total adverse events (109 TAR vs 104 AF) - but more wound-healing and nerve-injury problems with TAR, more thromboembolism and non-union with AF
- Symptomatic non-union rate after ankle fusion was 7%
- Post-hoc analysis suggested superiority of fixed-bearing TAR over AF (-11.1; 95% CI -19.3 to -2.9) - hypothesis-generating only
Construct Stiffness in Tibiotalar/Hindfoot Fusion - Cadaveric Biomechanics
- Seven matched cadaver lower-limb pairs - retrograde interlocked intramedullary nail vs two crossed 6.5 mm cannulated lag screws across ankle (and subtalar) joints
- Nail construct significantly stiffer than crossed lag screws in ALL four bending directions and both rotational directions (all p less than 0.05)
- Dorsiflexion stiffness: nail 43.0 N/mm vs crossed screws 10.3 N/mm; plantarflexion 42.8 vs 16.4 N/mm
- Greater construct stiffness is proposed to maintain hindfoot alignment during union and may improve fusion rate
- Crossed compression lag screws remain a standard, adequate construct for isolated tibiotalar fusion in good bone
Anterior Ankle Neurovascular Anatomy and the Anterolateral Portal/Approach
- Cadaveric dissection of 68 feet mapping tendons, vessels and nerves relative to the four anterior ankle portals/intervals
- Superficial peroneal nerve branches lay LATERAL to the EDL/peroneus tertius tendon in 32.4% and between EHL and EDL in 23.5% - i.e. directly within the anterolateral working zone in a substantial proportion
- The anteromedial and medial-midline intervals were the safest; the anterolateral interval carries the highest risk to the SPN AND to peroneal/anterior tibial vascular branches
- Deep peroneal nerve lay between EHL and EDL in 58.8%; an SPN branch lay between TA and EHL in only 2.9% (so staying lateral to TA protects the main bundle)
- Tendon intervals were narrow (mean ~4 mm) and TA/EHL/EDL were apposed or overlapped in 10-20% of specimens
Smoking and Non-Union in Hind- and Midfoot Arthrodesis
- Retrospective cohort of 381 consecutive primary hind/midfoot arthrodeses (single surgeon), analysed per joint by self-reported smoking status
- Non-union risk in current smokers was markedly higher: relative risk 5.81 (95% CI 2.54-13.29, p less than 0.001) versus non-smokers
- Ex-smokers had NO statistically significant increase in non-union compared with non-smokers - risk normalises after cessation
- Smokers also had higher infection rates (p=0.05) and greater bone-stimulator use (p less than 0.001), with a trend to slower union in heavier smokers
- Conclusion: smoking is the most readily modifiable risk factor and arthrodesis should be undertaken with extreme caution in active smokers
Optimum Position of Ankle Arthrodesis - Gait Study of Knee and Ankle
- Gait/biomechanical analysis of 19 patients after ankle fusion, mean follow-up 10.4 years (range 4-17)
- Optimum position defined as: NEUTRAL flexion, slight valgus (0-5 degrees) of the hindfoot, and 5-10 degrees external rotation
- Plantarflexion malposition was associated with genu recurvatum (knee hyperextension) during gait
- A valgus (rather than varus) position gave more normal gait, especially on uneven ground
- Posterior translation of the talus under the tibia produced a more normal gait pattern and reduced stress at the knee