Medial malleolar fractures | Deltoid ligament repair | Saphenous nerve at risk
- Saphenous nerve — protect it. The saphenous nerve is the terminal sensory branch of the femoral nerve and runs with the long saphenous vein in the subcutaneous fat just anterior to the medial malleolus (course is variable). A branch consistently crosses the anterior border of the malleolus within the incision (Peng, PLoS One 2024). Identify it in the subcutaneous step and protect it with a vessel loop — injury causes a painful neuroma and medial-foot numbness.
- Posterior tibial neurovascular bundle. It lies 1 to 2 cm posterior to the medial malleolus, between the malleolus and the Achilles tendon, and is safe when the incision stays anterior and dissection is limited to the malleolus (injury rate less than 1 percent).
- Medial clear space. Normal is less than 4 mm on the mortise view (medial malleolus to medial talus). Widening to greater than 4 mm means lateral talar shift — either the medial malleolus is not reduced or the deep deltoid is ruptured. The deep deltoid is the primary restraint to lateral talar shift.
- Primary indications. Isolated medial malleolar fractures (about 20 percent of ankle fractures), bimalleolar fractures (about 30 percent), trimalleolar fractures (about 10 percent), and deltoid ligament repair for bimalleolar-equivalent injuries. Around 60 percent of operatively treated ankle fractures involve the medial malleolus.
- Match fixation to fracture pattern. Transverse fractures (Lauge-Hansen supination–external rotation / pronation–external rotation, about 70 percent) are fixed with two partially threaded 4.0 mm cannulated lag screws or a tension band. Vertical fractures (supination–adduction, about 15 percent) are shear injuries — screws alone fail and an antiglide plate on the medial surface is required.
- Deltoid repair. In a bimalleolar-equivalent injury (lateral malleolus fracture plus deep deltoid rupture, no medial malleolar fracture), the deep deltoid must be repaired with suture anchors into the talus. When a medial malleolar fracture is anatomically reduced, deltoid tension is restored and no separate repair is needed unless the deltoid has avulsed from the talus.
When & Why
What it exposes. The medial approach gives direct access to the medial malleolus, the deltoid ligament complex, and the medial plafond and talar dome. It is the workhorse exposure for medial malleolar fracture fixation and for deltoid repair, and it can be extended to a medial malleolar osteotomy to reach medial talar dome osteochondral lesions. Why the medial approach matters. The medial malleolus is involved in about 60 percent of all operatively treated ankle fractures (isolated 20 percent, bimalleolar 30 percent, trimalleolar 10 percent). The medial malleolus provides 30 to 40 percent of ankle joint stability (lateral malleolus 40 percent, syndesmosis 20 percent), so anatomic reduction is critical for mortise congruity and prevention of post-traumatic arthritis. The deep deltoid ligament is the primary restraint to lateral talar shift, so a deep deltoid rupture with a lateral malleolar fracture (a bimalleolar-equivalent injury) is unstable and needs surgical treatment even without a medial malleolar fracture. Fracture indications. - Isolated medial malleolus fracture — displaced (greater than 2 mm displacement or greater than 2 mm articular step), unstable (medial clear space greater than 4 mm on the mortise view, indicating deltoid or syndesmotic injury), or a large fragment (greater than 30 percent of the tibial plafond on the AP view).
- Bimalleolar fractures (about 30 percent) — medial plus lateral malleolus; fix the lateral malleolus first to restore fibular length, then the medial to restore mortise congruity.
- Trimalleolar fractures (about 10 percent) — add the posterior malleolus; the medial approach also lets you assess the medial plafond for impacted intra-articular fragments.
- Bimalleolar-equivalent injury — lateral malleolus fracture plus deep deltoid rupture with no medial malleolar fracture; medial tenderness, medial ecchymosis and a widened medial clear space greater than 4 mm; treat with lateral ORIF plus deltoid repair. The Lauge-Hansen mechanism predicts the medial malleolar pattern: supination–external rotation (SER) IV gives a transverse fracture (the most common pattern, about 60 percent); supination–adduction (SAD) I gives a vertical fracture (needs an antiglide plate); pronation–external rotation (PER) IV gives a high-energy transverse fracture with syndesmotic injury; pronation–abduction (PAB) II gives an oblique or comminuted fracture with deltoid avulsion. Non-fracture indications. Acute deltoid rupture (bimalleolar equivalent, or pure deltoid avulsion from the talus) and chronic deltoid insufficiency (stage IV posterior tibial tendon dysfunction, chronic lateral talar shift) for reconstruction; medial talar dome osteochondral lesions (via a medial malleolar osteotomy); anteromedial impingement debridement; and tibialis posterior tenosynovectomy or debridement for early PTTD. Contraindications. Absolute — active soft-tissue infection or osteomyelitis (stage with antibiotics first, delayed ORIF). Relative — severe open fracture (Gustilo IIIB/IIIC) with medial soft-tissue loss (temporise with external fixation), critical limb ischaemia (ABI under 0.5 — vascular review first), neuropathic (Charcot) arthropathy, and some non-displaced fractures in the elderly managed non-operatively in a CAM boot. Diabetes roughly doubles infection risk (optimise glucose, target HbA1c under 7 percent) and smoking triples non-union risk (counsel cessation). Position & landmarks. Supine on the OR table with a small bump (5 to 10 cm) under the ipsilateral hip to internally rotate the leg, and the leg externally rotated 20 to 30 degrees so the medial malleolus faces the surgeon. Use an upper-thigh pneumatic tourniquet inflated to about 300 mmHg after exsanguination (safe time 2 hours; release before closure for haemostasis). Palpate and mark the medial malleolus, the tibialis posterior tendon at the posterior border, the posterior tibial pulse (1 to 2 cm posterior to the malleolus), and the medial joint line 5 mm distal to the malleolar tip. Plan a vertical or gently curved incision 6 to 8 cm long, directly over or 0.5 to 1 cm anterior to the malleolus, so it stays anterior to the posterior tibial neurovascular bundle.
If the ankle is dislocated (talar displacement from the mortise), perform an emergent closed reduction with sedation in the emergency department — longitudinal traction and manipulation. Document the neurovascular status (dorsalis pedis and posterior tibial pulses) before and after reduction, and do not delay reduction for imaging. Skin necrosis and neurovascular injury develop within 4 to 6 hours (Tejwani et al, JAAOS 2012 — ankle dislocation with vascular compromise requires reduction within 6 hours).
Pre-operative assessment. The mechanism predicts the pattern: inversion gives a lateral malleolus plus vertical medial malleolar fracture (SAD); eversion gives a transverse medial malleolar fracture (SER, PER); axial load plus rotation suggests a pilon pattern. Examine for deformity (varus in SAD, valgus in PER), swelling and the wrinkle sign (operate once wrinkles return — fracture blisters appear at 12 to 36 hours), skin integrity, and proximal fibula tenderness (Maisonneuve). A mandatory neurovascular examination includes the dorsalis pedis and posterior tibial pulses, the deep and superficial peroneal nerves, the tibial nerve (FHL function, plantar sensation) and the saphenous nerve. Imaging essentials. AP, lateral and mortise views are mandatory. The mortise view is the most important for the medial malleolus: the medial clear space (medial malleolus to medial talus) is normal at less than 4 mm and should equal the superior clear space (the symmetry principle — asymmetry means talar shift); a medial clear space greater than 4 mm means deltoid injury or fracture displacement. Use gravity or external-rotation stress views when a bimalleolar-equivalent injury is suspected (isolated lateral fracture with medial tenderness but no visible medial malleolar fracture). CT is reserved for intra-articular extension, pilon involvement or occult fractures; MRI assesses the deep deltoid (about 90 percent sensitive), osteochondral lesions and tendon pathology. Fixation strategy — match the method to the pattern.
- Lag screws (cannulated)
- Transverse / short oblique (about 70 percent)
- Tension band wiring
- Comminuted or osteoporotic fragments
- Antiglide plate
- Vertical / supination–adduction (about 15 percent)
- Lag screws (cannulated)
- Compression across the fracture (lag effect)
- Tension band wiring
- Converts distraction to compression (AO principle)
- Antiglide plate
- Resists shear (buttress on the tension side)
- Lag screws (cannulated)
- Two 4.0 mm partially threaded screws, perpendicular to the fracture
- Tension band wiring
- Two parallel K-wires plus a figure-of-8 wire (18 or 20 gauge)
- Antiglide plate
- One-third tubular or mini-fragment plate on the medial surface
- Lag screws (cannulated)
- Low profile, strong compression
- Tension band wiring
- Good for comminution, minimal hardware
- Antiglide plate
- Only option that resists shear in vertical fractures
- Lag screws (cannulated)
- Inadequate for vertical fractures
- Tension band wiring
- Wire knots prominent, wire breakage
- Antiglide plate
- Bulkiest construct, technically demanding
- Lag screws (cannulated)
- Lowest — buried heads
- Tension band wiring
- Higher — knots lie subcutaneously
- Antiglide plate
- Highest — most superficial construct
The decision in one line. Transverse or short oblique (about 70 percent) — two 4.0 mm partially threaded cannulated lag screws. Vertical / SAD (about 15 percent) — an antiglide plate on the medial surface (screws alone fail). Comminuted (about 15 percent) — a tension band or a plate. Union rates are over 95 percent across all three techniques; the practical differentiator is symptomatic hardware prominence, which is highest for the most superficial constructs and lowest for buried screws. Biomechanically, cortical purchase dominates construct strength — two 3.5 mm bicortical screws resist pullout far better than 4.0 mm partially threaded unicortical cancellous screws (327.6 N versus 116.2 N, Pollard 2010), which matters in osteoporotic bone.
The Exposure
Work down through the layers anterior to the posterior tibial bundle, protecting the saphenous nerve, then expose and reduce the fracture and fix it according to its pattern.
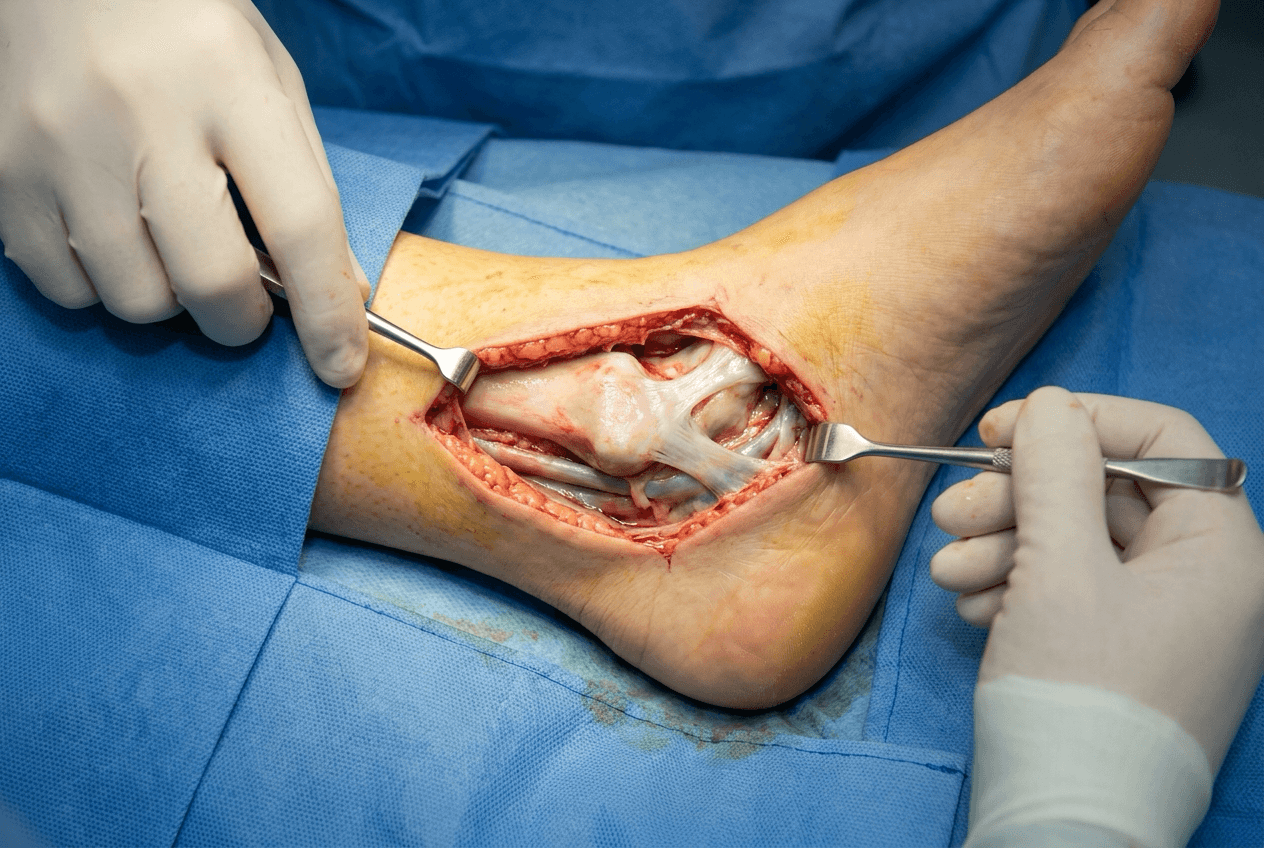
Exposure and fixation sequence
- Make a vertical or gently curved incision 6 to 8 cm long, directly over the medial malleolus or 0.5 to 1 cm anterior to it, from 3 cm proximal on the distal tibial metaphysis to the talar neck. Staying anterior keeps you away from the posterior tibial neurovascular bundle.
- Incise the skin with a 15 blade through the dermis and dissect the subcutaneous fat (2 to 3 mm to the deep fascia). Preserve the great saphenous vein where possible; ligate it only if necessary.
- Actively look for the saphenous nerve — a small white nerve 1 to 2 mm in diameter running with or near the great saphenous vein. A branch reliably crosses the anterior border of the malleolus within the incision (Peng 2024). If found, place a vessel loop and retract it gently throughout the case; if not seen, handle the subcutaneous tissue gently and avoid blind cautery.
- Incise the deep fascia longitudinally along the full length of the skin incision and elevate its edges to expose the periosteum over the malleolus.
- Incise the periosteum along the anterior border of the medial malleolus and elevate it subperiosteally with a Freer elevator, placing small Hohmann retractors to retract soft tissue anteriorly and posteriorly.
- Preserve the deltoid ligament posteriorly if it is intact — do not strip it from the malleolus unless you are deliberately assessing a deltoid injury.
- Evacuate the fracture haematoma and curette the fracture edges; assess the pattern (transverse, vertical, oblique or comminuted) because it dictates fixation.
- For transverse or short oblique fractures, clean the fracture surfaces, push the malleolar fragment into place (it is usually displaced distally and rotated) and align the articular surface of the medial plafond flush with the tibia. Hold with a provisional 1.6 or 2.0 mm K-wire from the malleolar tip into the tibia.
- For vertical (SAD) fractures, disimpact the fragment (often driven proximally) with a small osteotome or elevator, restore malleolar length, and place a provisional K-wire perpendicular to the fracture line to resist shear during definitive fixation.
- Check fluoroscopy on the mortise view: the medial clear space should be less than 4 mm and equal the superior clear space. Aim for anatomic reduction — a residual articular step greater than 2 mm raises the risk of post-traumatic arthritis (about 60 percent at 10 years).
- Place two 1.6 mm guidewires from the distal tibia 2 to 3 cm proximal to the fracture, slightly anterior on the malleolus, directed perpendicular to the fracture line and parallel to each other, 10 to 15 mm apart, crossing the fracture into the proximal fragment.
- Measure over each guidewire, drill the near cortex only with a 3.2 mm cannulated drill (leave the far cortex for the thread to generate the lag effect), and insert two 4.0 mm partially threaded cannulated screws (16 to 32 mm thread length) so the threads cross the fracture.
- Remove the provisional K-wires and check fluoroscopy: screws not intra-articular, good purchase, heads buried, and the medial clear space less than 4 mm on the mortise.
- Insert two parallel 1.6 mm K-wires from the malleolar fragment into the tibia, 10 to 15 mm apart and perpendicular to the fracture; cut them 5 mm proud.
- Pass an 18 or 20 gauge stainless steel wire deep to the K-wires at both ends and lay it in a figure-of-8; tighten it to compress the fracture, cut the excess and bend the wire ends flat beneath the soft tissue.
- Bend the K-wire tips 90 degrees toward bone to reduce prominence, and confirm on fluoroscopy that the fracture is compressed and no hardware enters the joint.
- A vertical fracture is a shear injury — screws alone are inadequate because the fracture would toggle. Apply an antiglide plate on the medial (tension-side) surface of the medial malleolus (one-third tubular or mini-fragment), contoured to the malleolar anatomy.
- Insert two to three bicortical screws into the tibia proximal to the fracture and one to two screws into the malleolar fragment distal to it; an optional lag screw through the plate across the fracture adds compression.
- Confirm on fluoroscopy that the fracture is reduced and the plate buttresses the fragment without violating the joint.
- If the medial clear space is still greater than 4 mm after lateral fixation, or there is medial tenderness and ecchymosis with no medial malleolar fracture, extend the incision distally to the deltoid insertion on the talus.
- The deep deltoid is the primary restraint to lateral talar shift and is usually avulsed from its talar insertion (less often from the tibia); the superficial deltoid can usually be left if torn.
- Repair the deep deltoid with a 3.5 mm suture anchor into the medial talus at the deltoid insertion, passing heavy suture through the deltoid as mattress sutures and tying down to restore tension. Recheck the mortise — the medial clear space should now reduce to less than 4 mm.
- Remove all provisional K-wires, confirm stability on manual stress (no medial opening) and assess passive range of motion, then check final fluoroscopy on mortise, AP and lateral views (medial clear space less than 4 mm, fracture reduced, no intra-articular hardware, no posterior over-penetration).
- Irrigate copiously, release the tourniquet and achieve haemostasis with bipolar cautery, and confirm the posterior tibial pulse.
- Close in layers: periosteum and deep fascia with 2-0 Vicryl, subcutaneous with 3-0 Vicryl (invert the skin edges, meticulous haemostasis), and skin with 4-0 nylon vertical mattress or 4-0 Monocryl subcuticular. Apply a well-padded posterior short-leg splint with the ankle neutral and elevate the leg.
Saphenous nerve disturbance is one of the commonest iatrogenic complications of this approach. A branch consistently crosses the anterior border of the medial malleolus within the incision (Peng 2024), while the wider course (and a posterior branch present in only about 60 percent of limbs) is variable. Actively search for the nerve with the long saphenous vein during the subcutaneous step, loop and protect it if found, and handle the subcutaneous tissue gently throughout. Division causes a painful neuroma and medial-foot numbness.
Keep every step anterior to the posterior tibial bundle (1 to 2 cm posterior to the malleolus) and the bundle is safe. Then let the Lauge-Hansen pattern dictate fixation: transverse (supination–external rotation) takes lag screws, vertical (supination–adduction) takes an antiglide plate, and comminution takes a tension band. Screws alone for a vertical fracture is a technical error that will fail.
Dangers & Extensions
Structures at risk, by layer
- Structure at risk
- Saphenous nerve — a branch crosses the anterior border of the malleolus within the incision
- Protection
- Incise anterior to the malleolus; identify and loop the nerve with the long saphenous vein; gentle handling, no blind cautery
- Structure at risk
- Posterior tibial artery and tibial nerve (1 to 2 cm posterior to the malleolus)
- Protection
- Stay anterior during dissection; check drill depth on lateral fluoroscopy; confirm the posterior tibial pulse after tourniquet release
- Structure at risk
- Deltoid ligament (the deep component is the primary lateral-shift restraint)
- Protection
- Preserve the deltoid attachment during periosteal elevation; repair the deep deltoid if ruptured
- Structure at risk
- Medial plafond and talar dome (30 to 40 percent of the weight-bearing surface)
- Protection
- Aim for anatomic reduction with minimal articular step; confirm no hardware is intra-articular on fluoroscopy
Intra-operative complications. Saphenous nerve injury (the commonest iatrogenic complication — not identified, divided or stretched) presents post-operatively as sensory loss or a painful neuroma; if recognised intra-operatively, repair it primarily (8-0 nylon), and if recognised late, observe for 3 to 6 months before excision and burial of the proximal stump for a refractory neuroma. Posterior tibial nerve or artery injury is rare (less than 1 percent) and follows dissection too far posterior or posterior drill penetration — stay anterior and check the pulse after tourniquet release. Inadequate reduction (5 to 10 percent) shows as a medial clear space greater than 4 mm or an articular step greater than 2 mm on fluoroscopy — remove and re-fix, using a plate if screws are inadequate. Early post-operative complications (0 to 6 weeks). Wound complications (5 to 10 percent — edge necrosis, dehiscence, drainage) are driven by the subcutaneous position, diabetes (doubles risk), smoking (triples), obesity and operating through fracture blisters; avoid operating until the wrinkle sign appears, handle tissue gently and close without tension. Infection (2 to 5 percent, usually Staphylococcus aureus) ranges from superficial cellulitis (oral anti-staphylococcal antibiotics, guided by local antibiogram) to deep infection around stable hardware (debridement, antibiotics and implant retention with culture-directed antibiotics) to severe osteomyelitis with an unstable fracture (hardware removal, external fixation, delayed re-fixation). Single-dose cefazolin at induction (WHO/SIGN/ASHP), with glycopeptide cover where MRSA is endemic, is standard prophylaxis. Loss of reduction (2 to 5 percent) from inadequate fixation, osteoporotic bone or premature weight-bearing needs revision ORIF if early (under 4 weeks) or acceptance of malunion if late in a low-demand patient. Late complications (over 6 weeks). Hardware prominence (30 to 40 percent — the malleolus is subcutaneous) is the most frequent late issue; counsel patients pre-operatively that about a third will request removal, and defer it until union (12 to 18 months). Malunion (5 to 10 percent) presents as valgus ankle deformity and a widened medial clear space; because quality of reduction is the most consistent long-term predictor of arthritis (Stufkens 2011), residual mortise incongruity should not be accepted — options are corrective osteotomy or arthrodesis if arthritis is established. Non-union is rare (less than 2 percent; the medial malleolus has a good blood supply) and is managed by revision ORIF with freshening of the surfaces, bone graft and re-fixation. Post-traumatic arthritis (10 to 30 percent at 10 years) follows cartilage damage at injury and residual incongruity; treat conservatively (NSAIDs, bracing, injections) or surgically (arthrodesis for the young and active, total ankle replacement for the low-demand elderly). Extensile options and closure. Extend distally to the deltoid insertion on the talus for deltoid assessment and repair, or convert to a medial malleolar osteotomy (cut the malleolus, reflect it distally on the deltoid, access the medial talar dome, then re-fix) for medial osteochondral lesions. The closure is layered (periosteum and deep fascia 2-0 Vicryl, subcutaneous 3-0 Vicryl, skin 4-0 nylon mattress or subcuticular) over a posterior short-leg splint, non-weight-bearing for 6 weeks. Post-operative care and return to function. Splint and non-weight-bearing for 2 weeks, then a CAM boot; begin weight-bearing as tolerated at 6 weeks once callus appears, with ankle range-of-motion and gait physiotherapy; full weight-bearing in shoes by 12 weeks once bridging callus is confirmed, progressing to strengthening and proprioception. Return to work runs from 6 to 8 weeks (sedentary) to about 3 months (light manual) to about 6 months (heavy manual). Driving resumes once the patient can perform a safe emergency stop (operative pedal side about 6 to 9 weeks; non-pedal side with automatic transmission about 2 to 4 weeks) — advise patients to confirm with their insurer or licensing authority, as medico-legal rules differ by jurisdiction. Counsel pre-operatively that about 10 to 30 percent request hardware removal for symptomatic prominence once union is confirmed.
Procedures Through This Approach
- Open reduction and internal fixation of ankle fracture — the overarching procedure; the medial approach is the medial component of bimalleolar and trimalleolar fixation.
- Trimalleolar ankle fracture ORIF and Weber B/C fibula with medial malleolus ORIF — the medial side is exposed and fixed through this approach after the lateral and posterior columns are restored.
- Paediatric ankle fracture ORIF (Salter-Harris) — the same medial exposure is used for displaced paediatric medial malleolar and Salter-Harris injuries.
- Deltoid ligament repair for bimalleolar-equivalent injuries (suture anchors into the talus) and chronic deltoid reconstruction for stage IV posterior tibial tendon dysfunction.
- Medial malleolar osteotomy for medial talar dome osteochondral lesions, and anteromedial impingement debridement.
- Tibialis posterior tenosynovectomy or debridement for early posterior tibial tendon dysfunction.
Viva & Exam Focus
MEDIAL ANKLEMEDIAL ANKLE — approach key steps
Hook:Two steps are safety-critical: (1) identify and protect the saphenous nerve — one of the commonest iatrogenic injuries of this approach; and (2) confirm the medial clear space is less than 4 mm on the mortise view (over 4 mm means inadequate reduction or a deep deltoid rupture).
SCREW PLATESCREW PLATE — medial malleolar fixation choice
Hook:Fixation choice follows the Lauge-Hansen pattern: transverse (supination–external rotation, about 70 percent) takes lag screws; vertical (supination–adduction, about 15 percent) takes an antiglide plate (screws fail in shear); comminuted (about 15 percent) takes a tension band or plate.
Clinical Decision Scenarios
Practise clinical reasoning and management decisions out loud
“You have completed lateral malleolus ORIF for a bimalleolar fracture. Intra-operative fluoroscopy shows the medial clear space is 6 mm. What does this mean and what do you do?”
“An ankle X-ray shows a VERTICAL medial malleolar fracture (Lauge-Hansen supination–adduction). How would you fix it — can you use lag screws?”
“What nerve is most at risk during the medial approach to the ankle, and how do you protect it?”
High-yield anatomy
- Saphenous nerve: a branch consistently crosses the anterior border of the medial malleolus within the incision (Peng 2024) — one of the commonest iatrogenic complications, so identify and protect it
- Posterior tibial neurovascular bundle: 1 to 2 cm posterior to the medial malleolus (safe if dissection stays anterior)
- Deltoid ligament: the deep deltoid (cord-like, posterior colliculus to medial talus) is the primary restraint to lateral talar shift; the superficial deltoid (fan-shaped) is secondary
- Medial malleolus: 30 to 40 percent of the tibiotalar weight-bearing surface — anatomic reduction is critical
- Lauge-Hansen: supination–external / pronation–external rotation equals transverse (about 70 percent); supination–adduction equals vertical (about 15 percent); pronation–abduction equals oblique or comminuted (about 15 percent)
Critical radiographic parameters
- Medial clear space: normal is less than 4 mm on the mortise view (medial malleolus to medial talus)
- A medial clear space over 4 mm means lateral talar shift (inadequate reduction or a deep deltoid rupture)
- Aim for anatomic reduction with minimal articular step — quality of reduction is the most consistent predictor of long-term arthritis (Stufkens, Injury 2011)
- Symmetry principle: the medial clear space should equal the superior clear space (asymmetry means talar shift)
- The mortise view is the most important view for medial malleolar fractures
Fixation strategy
- Transverse fractures (about 70 percent): two cannulated lag screws (4.0 mm partially threaded, perpendicular to the fracture, parallel to each other)
- Vertical fractures (about 15 percent): an antiglide plate on the medial surface (screws alone fail — shear forces)
- Comminuted fractures (about 15 percent): a tension band (two K-wires plus a figure-of-8 wire) or a plate
- Biomechanics: cortical purchase matters — 3.5 mm bicortical screws out-pull 4.0 mm unicortical cancellous screws (327.6 N versus 116.2 N, Pollard 2010)
- Hardware prominence: most symptomatic with superficial constructs (plate or tension-band wire), least with buried screws — counsel patients pre-op (about 10 to 30 percent request removal)
Bimalleolar equivalent
- Definition: a lateral malleolar fracture plus a deep deltoid rupture (no medial malleolar fracture)
- Clinical: medial ankle tenderness and a widened medial clear space over 4 mm on the mortise despite no visible medial malleolar fracture
- Treatment: lateral malleolus ORIF plus deltoid repair (suture anchors into the talus)
- Evidence: deltoid repair versus trans-syndesmotic screws (Sogard 2024 meta-analysis) — repair gives less malreduction and far less hardware removal with equivalent function
- If a medial malleolar fracture is present: anatomic fracture reduction restores deltoid tension (no separate repair unless the deltoid has avulsed from the talus)
Complications — prevention
- Saphenous nerve injury (common iatrogenic complication): active identification during subcutaneous dissection (keep with the long saphenous vein), a vessel loop if seen, gentle handling
- Inadequate reduction (5 to 10 percent): systematic fluoroscopy (mortise view — medial clear space less than 4 mm, minimal articular step)
- Hardware prominence (30 to 40 percent): counsel patients pre-op (about a third request removal at 12 to 18 months — expected)
- Post-traumatic arthritis (10 to 30 percent at 10 years): anatomic reduction is the key modifiable factor (Stufkens, Injury 2011)
- Wound complications (5 to 10 percent): avoid operating through fracture blisters (wait for the wrinkle sign), gentle tissue handling
Evidence you must know
- Stufkens 2011, Injury (systematic review, 1822 fractures): quality of articular reduction is the most consistent long-term predictor of arthritis and function
- Peng 2024, PLoS One: a saphenous nerve branch consistently crosses the anterior border of the medial malleolus (within the incision); the course is otherwise variable
- Pollard 2010, J Foot Ankle Surg: 3.5 mm bicortical screws far out-perform 4.0 mm unicortical cancellous screws on pullout (327.6 N versus 116.2 N) — matters in osteoporotic bone
- Sogard 2024, Foot Ankle Surg (meta-analysis): deltoid repair versus syndesmotic screws — less malreduction (6.5 percent versus 27 percent), far less hardware removal (2.6 percent versus 54.5 percent), equivalent function
- Suarez 2026, Cureus (RCT meta-analysis): deltoid repair versus non-repair — no functional difference but fewer post-operative complications with repair (RR 0.43)
Viva traps
- TRAP: all medial malleolar fractures are fixed with screws — wrong; vertical fractures need an antiglide plate (screws fail)
- TRAP: a 5 mm medial clear space is acceptable — wrong; this is lateral talar shift and drives post-traumatic arthritis (Stufkens) — not acceptable
- TRAP: the saphenous nerve is deep and safe — wrong; it is subcutaneous and a branch crosses the anterior border of the malleolus
- TRAP: deltoid repair is never needed once the medial malleolus is fixed — usually true, but if the deltoid has avulsed from the talus it still needs repair
- TRAP: bimalleolar equivalent is the same as a bimalleolar fracture — wrong; equivalent equals a lateral fracture plus a deltoid rupture (no medial fracture)
Global practice and counselling
- Ankle fracture incidence is about 100 to 180 per 100,000 per year worldwide; bimodal (young men high-energy, older women low-energy) — the medial malleolus is involved in most operative patterns
- Hardware prominence: counsel that about 10 to 30 percent request removal for symptomatic prominence; defer until union (after about 12 months)
- Return to work: sedentary 6 to 8 weeks, light manual about 3 months, heavy manual about 6 months
- Driving: resume once able to perform a safe emergency stop (operative pedal side about 6 to 9 weeks; non-pedal side with automatic about 2 to 4 weeks); confirm with local insurer or licensing rules
- Antibiotic prophylaxis: single-dose cefazolin at induction (per WHO, SIGN and ASHP), add glycopeptide cover where MRSA is endemic — never quote country-specific billing codes in an exam
References
Long-Term Outcome After 1822 Operatively Treated Ankle Fractures
- Systematic review of the literature pooling 1822 operatively treated ankle fractures with long-term follow-up
- Quality of reduction was the most consistent predictor of post-traumatic osteoarthritis and functional outcome
- Articular (intra-operative cartilage) damage, increasing fracture severity (Weber C, trimalleolar) and residual incongruity were associated with worse long-term results
- Age, fracture type and the presence of medial or posterior malleolar involvement also influenced outcome
Pullout Strength of 3.5mm Bicortical vs 4.0mm Partially Threaded Cancellous Screws in Medial Malleolar Fixation
- Cadaveric biomechanical study (10 fresh-frozen limbs, mean age 79 years) using an Instron testing system
- Two 3.5 mm fully threaded bicortical screws: median pullout force 327.6 N at 2 mm distraction
- Two 4.0 mm partially threaded cancellous (unicortical) screws: median pullout force 116.2 N
- Unicortical cancellous fixation reached only about 65 percent of bicortical strength (p equals 0.04)
- Bicortical purchase confers significantly greater pullout resistance — relevant in osteoporotic bone
Distribution, Course and Spatial Relationships of the Saphenous Nerve
- Detailed 3D cadaveric neuroanatomical mapping of the saphenous nerve in 10 lower limbs
- The anterior branch is consistently localised to the mid-point of the anterior border of the medial malleolus — directly within a medial ankle incision
- A posterior branch was present in 60 percent of limbs and absent in 40 percent (variable anatomy)
- The saphenous nerve travels in close, variable relationship with the great saphenous vein
- Confirms the superficial, variable course that explains why the nerve is at risk during the medial approach
Deltoid Ligament Repair vs Trans-Syndesmotic Fixation for Medial Clear Space Widening
- Systematic review and meta-analysis of 5 studies, 280 unstable ankle fractures with medial clear space widening
- Anatomic deltoid repair versus trans-syndesmotic screw fixation
- Deltoid repair: lower syndesmotic malreduction (6.5 percent versus 27 percent, RR 0.26)
- Deltoid repair: far lower hardware removal (2.6 percent versus 54.5 percent, RR 0.06)
- No significant difference in wound complications, reoperation, AOFAS or VAS pain scores
Necessity of Deltoid Ligament Repair in Ankle Fractures — Meta-Analysis of RCTs
- Systematic review and meta-analysis restricted to prospective randomised controlled trials (5 studies)
- No significant difference in functional outcome between deltoid repair and non-repair (MD 4.57, 95 percent confidence interval minus 3.03 to 12.17)
- No difference in return-to-work time (RR 1.02)
- Post-operative complication rate significantly lower with deltoid repair (RR 0.43, 95 percent confidence interval 0.24 to 0.77, p equals 0.004)
- Authors conclude repair may benefit selected patients; larger RCTs are still needed