Use the interval, protect the nerve, preserve tendon glide
- In the upper limb, a small cutaneous nerve or tendon pulley can determine the result.
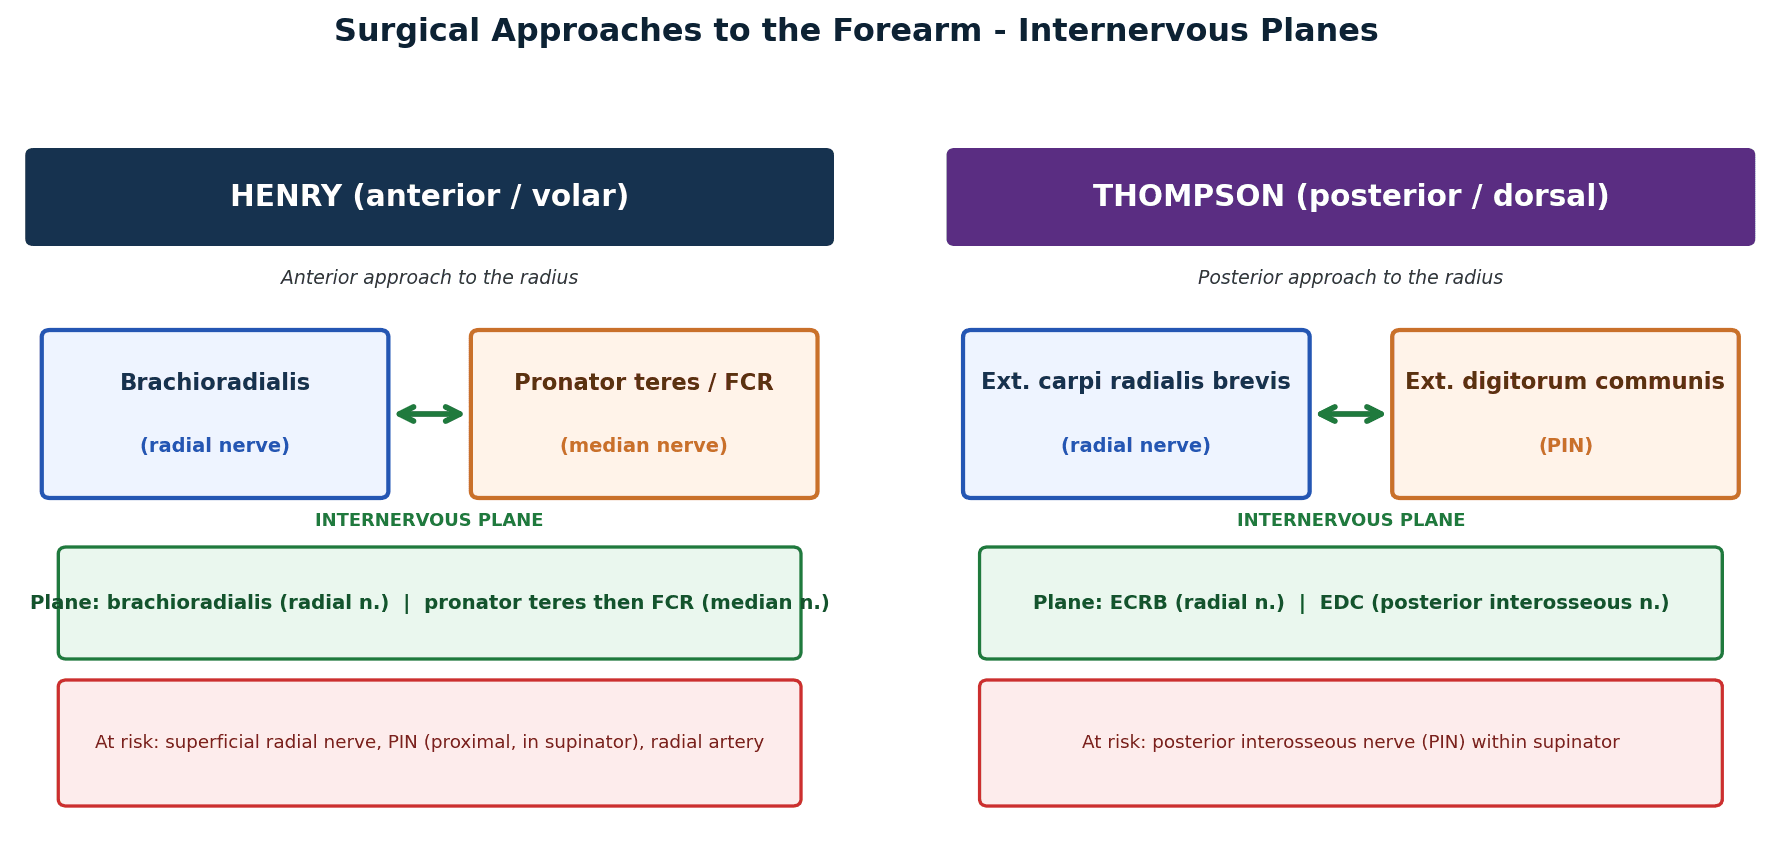
- The Henry approach is safe only when the radial artery, superficial radial nerve, FCR plane and pronator handling are deliberate.
- The Thompson approach risks the posterior interosseous nerve; pronation moves the nerve away during proximal radius exposure.
- Hand incisions should respect creases, skin flaps, neurovascular bundles and tendon glide.
- Closure and rehabilitation are part of the approach because stiffness, adhesions and scar sensitivity can dominate outcome.
- “For forearm fractures, approach choice follows the bone surface that needs reduction and plate placement.
- “For flexor tendon surgery, exposure must allow repair while preserving pulleys and digital neurovascular bundles.
- “For dorsal wrist work, protect extensor compartments and repair the retinaculum when needed to prevent bowstringing or tendon irritation.
- “A carpal tunnel incision should avoid the palmar cutaneous branch and recurrent motor branch territory.
Surgical Approaches to the Forearm, Wrist and Hand
Upper-limb approaches fail when the surgeon treats the exposure as a skin incision. Nerve branches, vessels, pulleys, extensor compartments and tendon sheaths must be protected from the start.
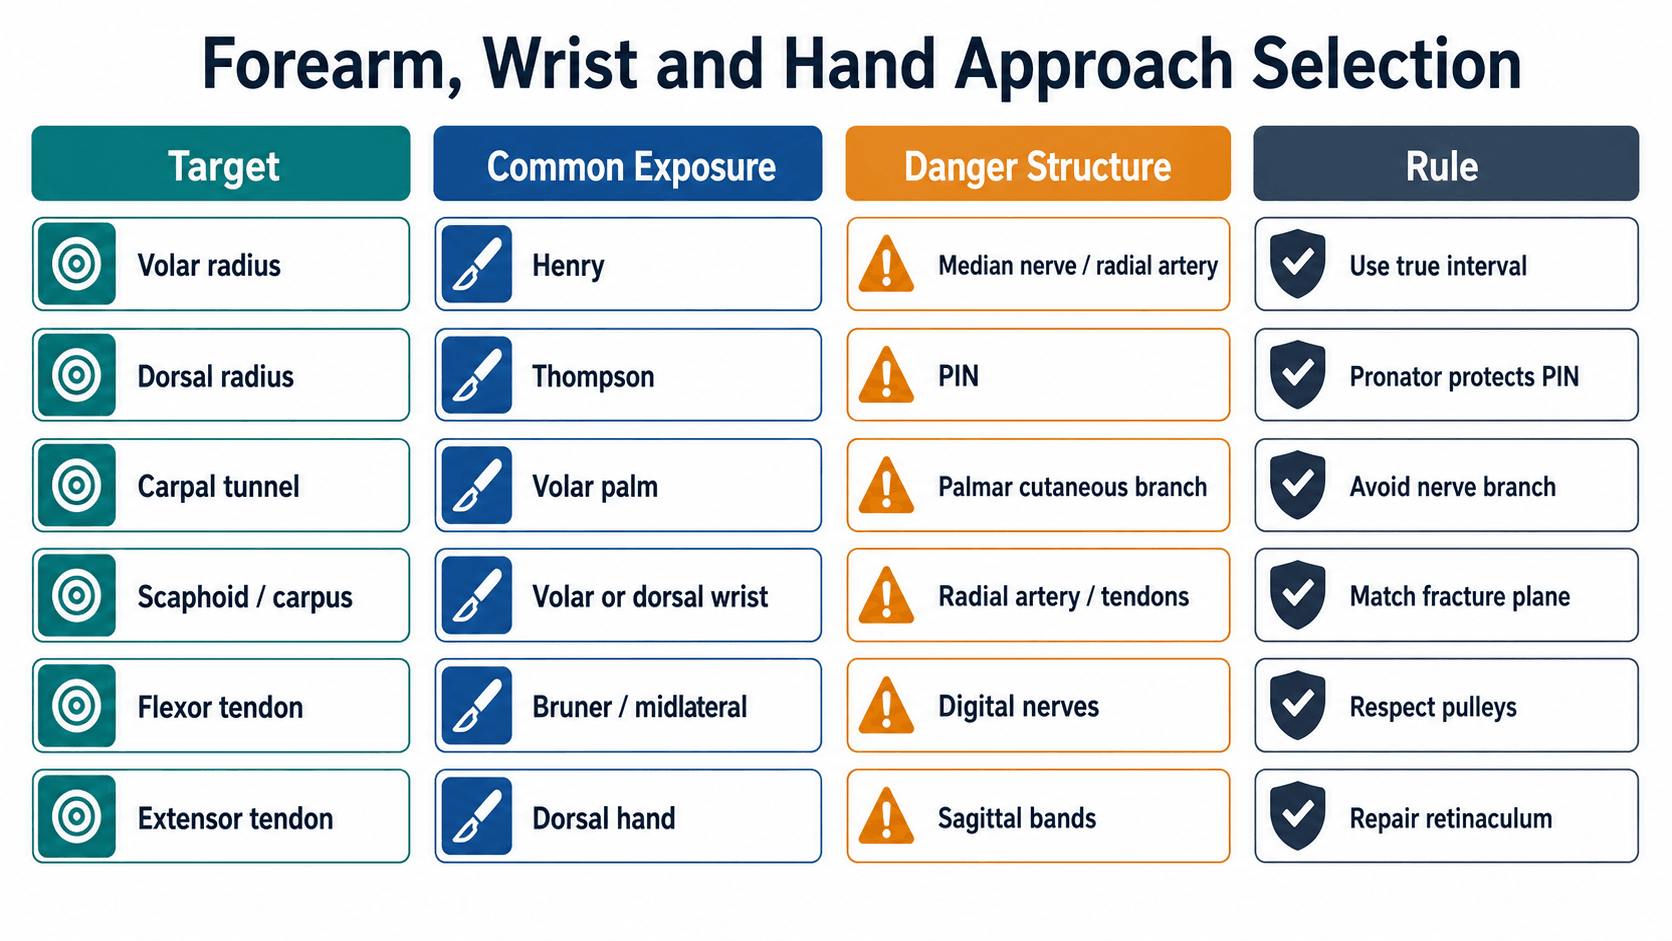
- Common Exposure
- Henry approach
- Main Danger
- Radial artery, median nerve, superficial radial nerve
- Rule
- Use FCR interval and protect pronator quadratus.
- Common Exposure
- Thompson approach
- Main Danger
- Posterior interosseous nerve
- Rule
- Pronating the forearm helps move PIN away.
- Common Exposure
- Subcutaneous border
- Main Danger
- Dorsal sensory ulnar nerve distally
- Rule
- Stay on safe border and preserve soft tissue.
- Common Exposure
- Volar palm
- Main Danger
- Palmar cutaneous branch and recurrent motor branch
- Rule
- Incision ulnar to thenar crease and controlled release.
- Common Exposure
- Bruner or midlateral
- Main Danger
- Digital nerves and pulleys
- Rule
- Expose enough to repair but preserve pulley system.
- Common Exposure
- Dorsal hand/wrist
- Main Danger
- Sagittal bands and extensor retinaculum
- Rule
- Repair stabilising structures and preserve tendon glide.
MAPUpper-Limb Approach
Hook:Map the limb before opening it.
GLIDEHand Exposure
Hook:The hand outcome depends on glide.
Overview and Indications
Forearm, wrist and hand approaches are selected by the target structure and by the functional tissue that must survive the exposure. In the forearm, the question is usually which bone surface needs reduction and fixation. In the wrist, the question is whether the target is volar, dorsal, radial, ulnar, intra-articular or ligamentous. In the hand, the question is how to reach tendon, nerve, bone or joint without creating stiffness, scar sensitivity or tendon adhesion.
Prioritise safe intervals, plate position, radial artery and PIN safety. The radius has different safe windows depending on level.
Prioritise carpal target, extensor compartments, palmar cutaneous branch, radial artery and DRUJ exposure.
Prioritise neurovascular bundles, pulleys, tendon glide, skin creases and rehabilitation-friendly closure.
For forearm fixation, the approach should match the reduction surface and intended plate position. A technically easy incision that places the plate poorly is the wrong approach.
Relevant Anatomy
Upper-limb approach anatomy is dominated by named nerves, vessels, tendon compartments and gliding surfaces.
- Key Structures
- Radial artery, FCR, FPL, median nerve, pronator quadratus
- Why It Matters
- Henry approach uses the FCR region and pronator quadratus for distal radius protection.
- Key Structures
- PIN, supinator, EDC/ECRB interval
- Why It Matters
- PIN injury is the feared complication; forearm rotation changes nerve position.
- Key Structures
- Subcutaneous ulna, ECU/FCU interval, dorsal sensory ulnar nerve distally
- Why It Matters
- Ulna is accessible but soft-tissue stripping still compromises healing.
- Key Structures
- Median nerve, palmar cutaneous branch, recurrent motor branch, superficial palmar arch
- Why It Matters
- Carpal tunnel release requires controlled distal and proximal release.
- Key Structures
- Extensor compartments, EPL, dorsal sensory branches
- Why It Matters
- Retinacular handling affects tendon irritation and bowstringing.
- Key Structures
- Digital nerves and arteries, flexor sheath, A2/A4 pulleys
- Why It Matters
- Poor exposure can cause neuroma, tendon adhesion or bowstringing.
For this region, exact nerve and vessel anatomy is too important to infer from a decorative diagram. Use verified anatomy sources and identify structures directly in theatre.
Internervous Plane and Intervals
- Interval or Window
- Between brachioradialis and FCR region; develop volar radial interval
- Target
- Volar radius and distal radius
- Main Risk
- Radial artery, superficial radial nerve, median nerve if too ulnar.
- Interval or Window
- Between EDC and ECRB proximally; dorsal radial exposure
- Target
- Proximal/middle radius
- Main Risk
- PIN in supinator.
- Interval or Window
- Between ECU and FCU along ulnar border
- Target
- Ulna shaft
- Main Risk
- Dorsal sensory ulnar branch distally, soft-tissue stripping.
- Interval or Window
- Volar palm incision ulnar to thenar crease
- Target
- Transverse carpal ligament
- Main Risk
- Palmar cutaneous branch, recurrent motor branch, superficial arch.
- Interval or Window
- Between extensor compartments depending target
- Target
- Carpus, distal radius, DRUJ, scaphoid
- Main Risk
- EPL, extensor retinaculum, dorsal sensory branches.
- Interval or Window
- Zig-zag volar or midlateral finger incision
- Target
- Flexor tendon, phalanx, digital nerve
- Main Risk
- Digital neurovascular bundle and pulleys.
In dorsal proximal radius exposure, pronating the forearm helps move the posterior interosseous nerve away from the operative field. Still, do not rely on rotation alone if the dissection is unsafe.
The Six Dorsal Wrist Extensor Compartments
"Protect the extensor compartments" only means something if you can name them. The standard dorsal wrist approach develops the interval between the third and fourth compartments: the EPL is released from its compartment around Lister's tubercle and transposed radially, and the fourth compartment is elevated subperiosteally to expose the dorsal carpus and distal radius. The terminal posterior interosseous nerve lies on the floor of the fourth compartment and can be resected here for a partial wrist denervation.

- Contents
- Abductor pollicis longus, extensor pollicis brevis
- Surgical relevance
- De Quervain release; watch for a separate EPB subsheath and the superficial radial nerve.
- Contents
- Extensor carpi radialis longus and brevis
- Surgical relevance
- Radial wrist; the radial artery lies deep in the anatomical snuffbox just beyond it.
- Contents
- Extensor pollicis longus
- Surgical relevance
- EPL hooks around Lister's tubercle (its watershed rupture site after distal radius fracture); transposed in the dorsal approach.
- Contents
- Extensor digitorum communis, extensor indicis proprius
- Surgical relevance
- The dorsal approach window; the terminal PIN sits on its floor for denervation.
- Contents
- Extensor digiti minimi
- Surgical relevance
- Overlies the distal radioulnar joint - the landmark window to the DRUJ.
- Contents
- Extensor carpi ulnaris
- Surgical relevance
- ECU subsheath stability matters; at risk in ulnar-sided and DRUJ work.
A reliable memory hook is the 2-2-1-1 tendon count of the first four compartments (APL+EPB, ECRL+ECRB, EPL, EDC+EIP).
Differential of Approach Choice
When the target is decided, the remaining decision is which window minimises the structure at greatest risk. The table below compares the competing approaches surgeons actually weigh against each other in the exam and in theatre.
- Option A
- Volar (Henry-type, FCR) plate
- Option B
- Dorsal plate
- Deciding Factor
- Volar fixation lowers tendon-irritation risk but carries higher median-nerve/CTS risk; dorsal lowers neuropathy but irritates extensors (Wei 2013).
- Option A
- Thompson (dorsal)
- Option B
- Henry extended proximally
- Deciding Factor
- Both expose the PIN in supinator; Thompson splits supinator over the nerve, Henry's distal volar exposure is safer but proximal radius access is limited.
- Option A
- Open release
- Option B
- Endoscopic release
- Deciding Factor
- Endoscopic gives faster return to work and less scar pain but higher transient nerve injury; equivalent permanent injury and symptom relief (Li 2020, Koong 2022).
- Option A
- Single incision per bone
- Option B
- Reduce/plate to restore radial bow
- Deciding Factor
- Outcome tracks restoration of radial bow magnitude and location, not the skin incision (Schemitsch 1992).
- Option A
- Bruner zig-zag
- Option B
- Mid-lateral
- Deciding Factor
- Bruner gives wide central exposure; mid-lateral keeps the scar off the volar pad and crease but limits dorsal-to-bundle access. Both must vent A2/A4 judiciously (Douwes 2025).
Patient Positioning
- Best Use
- Most forearm, wrist and hand surgery
- Practical Checks
- Tourniquet, hand table, image intensifier, shoulder abduction comfortable.
- Best Use
- Wrist arthroscopy, carpal work
- Practical Checks
- Finger traps, traction tower, portals, nerve protection.
- Best Use
- Dorsal radius, Thompson, ulna access
- Practical Checks
- Confirm C-arm views before prepping.
- Best Use
- Tendon, nerve, revision, infection or trauma
- Practical Checks
- Allows proximal/distal extension and graft harvest if needed.
Surgical Technique
volar radius, distal radius fixation, radial shaft exposure.
- Supine position with arm on hand table.
- Mark radial styloid, FCR tendon, radial artery course and planned plate position.
- Incise along FCR for distal radius or extend proximally as needed.
- Develop the interval carefully; protect radial artery and superficial radial nerve.
- Mobilise FPL and expose pronator quadratus distally.
- Elevate pronator quadratus in a controlled manner and repair if possible.
- Confirm reduction, plate position and screw length.
radial artery injury, median nerve traction, superficial radial nerve irritation, excessive pronator stripping and flexor tendon irritation from prominent plate.
Scaphoid Approaches: Volar (Russe) vs Dorsal
The scaphoid is within this region's scope but needs its own approach logic, driven by the fracture pole and by the bone's retrograde blood supply - the dorsal ridge vessels (from the radial artery) enter distally, so the proximal pole is a watershed zone prone to non-union and avascular necrosis:
Best for waist and distal-pole fractures. A curved incision over the FCR / scaphoid tubercle, developing the plane between the FCR and the radial artery (the radial artery is the key structure to protect). It allows correction of the humpback (flexion) deformity and volar wedge bone grafting, and it avoids the dorsal blood supply. The cost is release of the volar radioscaphocapitate / radiocarpal ligaments, which must be repaired.
Best for proximal-pole fractures and percutaneous or retrograde screw placement down the central scaphoid axis. It gives the ideal screw trajectory for the proximal pole, but it risks the dorsal ridge vessels that are the scaphoid's dominant blood supply, plus the superficial radial nerve and extensor tendons - so dissection is kept minimal (often percutaneous).
The principle: match the approach to the fracture pole - volar for the waist/distal pole and deformity correction, dorsal for the proximal pole - while respecting the scaphoid's dorsally-entering, retrograde, watershed blood supply.
Structures at Risk and Complications
- Where
- Thompson/proximal radius
- Prevention
- Pronate forearm, respect supinator, avoid blind proximal dissection.
- Where
- Henry and radial wrist
- Prevention
- Identify and mobilise deliberately; avoid blind retraction.
- Where
- Carpal tunnel and volar wrist
- Prevention
- Know palmar cutaneous and recurrent motor branch anatomy.
- Where
- Finger exposures
- Prevention
- Use full-thickness flaps and identify bundles early.
- Where
- Hand tendon surgery
- Prevention
- Gentle handling, pulley preservation, repair quality and early therapy.
- Where
- Palm and digits
- Prevention
- Plan incisions away from high-pressure zones when possible.
Extend when reduction, tendon retrieval, nerve identification or implant safety cannot be achieved through the current window.
Stop when the nerve is not found, tendon glide is compromised, skin viability is doubtful or image intensifier views are inadequate.
Guidelines, Registries and Global Practice
These approaches are performed worldwide and the underlying principles are universal, but emphasis and resource access differ by setting.
- Region
- International (Davos)
- Position on Approach Selection
- Henry (anterior) for radial shaft and distal radius; Thompson (dorsal) for proximal/dorsal radius with PIN identification; minimal-stripping ulnar exposure; restore radial bow.
- Region
- United States
- Position on Approach Selection
- Evidence-based clinical practice guidance on carpal tunnel syndrome and distal radius fractures; supports both open and endoscopic carpal tunnel release as effective options.
- Region
- United Kingdom
- Position on Approach Selection
- Standards for trauma and hand surgery emphasise complete carpal tunnel release, early protected motion after flexor tendon repair and specialist hand-therapy input.
- Region
- Europe
- Position on Approach Selection
- Consensus and instructional content supporting interval-based exposure, multi-strand flexor repair and structured rehabilitation.
Distal radius fractures are among the most common fractures worldwide, with a bimodal distribution (young high-energy and elderly fragility). Carpal tunnel syndrome is the most common compressive neuropathy, affecting roughly 1 to 5 percent of the general adult population. Flexor tendon and digital injuries cluster in working-age men through occupational and machinery trauma.
Hand and wrist procedures are less consistently captured in national arthroplasty registries than hip and knee, but distal radius fracture management is tracked in trauma audits (for example UK trauma audit datasets), which consistently show wide variation in operative versus non-operative management of the elderly distal radius fracture.
Routine access to mini C-arm imaging, locking-plate systems, hand-therapy services, wrist arthroscopy and endoscopic carpal tunnel equipment. Wide-awake (WALANT) surgery is increasingly used to allow intraoperative tendon-glide testing.
Reliance on open release, conventional plating or non-operative management, with fewer dedicated hand-therapy services. The core principles, interval-based exposure, nerve protection and pulley preservation, remain unchanged and matter even more when revision and therapy are scarce.
Controversies and Areas of Uncertainty
Endoscopic release returns patients to work sooner with less scar pain, but randomised evidence shows a higher transient nerve-injury rate and no advantage in permanent injury or symptom relief. The debate is about morbidity and cost, not cure.
Volar locked plating dominates practice, yet meta-analysis shows it trades lower tendon-irritation risk for higher median-nerve and carpal-tunnel risk versus dorsal plating. Overall outcomes are similar, so fragment pattern and surgeon experience decide.
Historic teaching protected A2 and A4 absolutely. Contemporary evidence supports judicious venting of part of A2 or A4 to allow a bulky repair to glide, provided enough pulley is preserved to prevent bowstringing.
Wide-awake local anaesthesia no tourniquet allows intraoperative testing of tendon glide and gapping, but the zone II review found it is not superior in outcome. Its role is pragmatic rather than evidence-mandated.
Examiners reward candidates who frame a controversy as a balanced trade-off backed by evidence (for example, endoscopic carpal tunnel release: faster recovery versus higher transient nerve injury) rather than dogmatically declaring one option correct.
Viva Scenarios
Practise clinical reasoning and management decisions out loud
“An adult has a displaced radial shaft fracture requiring plate fixation.”
“A patient has a zone II flexor tendon laceration requiring repair.”
“A patient with electrodiagnostically confirmed carpal tunnel syndrome asks whether you will use an open or endoscopic release.”
Forearm
- Henry: volar radius, radial artery and superficial radial nerve awareness.
- Thompson: dorsal/proximal radius, PIN risk.
- Ulna: subcutaneous border, preserve soft tissue.
Wrist
- Carpal tunnel: avoid palmar cutaneous and recurrent motor branches.
- Dorsal wrist: respect extensor compartments and retinaculum.
- Scaphoid/carpus: approach follows fracture plane and fixation goal.
Hand
- Use Bruner or midlateral incisions for digital exposure.
- Identify digital neurovascular bundles.
- Preserve pulleys and tendon glide.
Must not miss
- PIN palsy in dorsal proximal radius exposure.
- Radial artery injury in volar radial exposure.
- Incomplete carpal tunnel release.
- Digital nerve injury and tendon adhesions.
Evidence Base
Radial bow restoration drives forearm function
- Restoration of the normal magnitude AND location of the radial bow correlated with a good functional result (over 80 percent of normal rotation, p less than 0.05).
- Recovery of grip strength was associated with restoring the location of the radial bow toward normal (p less than 0.005).
- 84 percent achieved excellent, good or acceptable function by Grace and Eversmann criteria.
PIN landmark in the proximal radius
- On a ventral approach the PIN runs about 10 mm proximal to the radial tuberosity in supination and about 5 mm distal to it in pronation.
- Laterally, pronation increases the PIN-to-tuberosity distance to roughly 3 cm.
- The radial tuberosity is a reliable intraoperative landmark for orientation to the nerve.
PIN position shifts with rotation and trauma
- In neutral the PIN crossed the radius a mean of 4.2 cm distal to the radiocapitellar joint; pronation increased this to 5.6 cm and supination decreased it to 3.2 cm.
- After a simulated diaphyseal fracture the protective effect of pronation was largely lost (shift fell from 2.13 cm to 0.24 cm).
- Following a simulated Essex-Lopresti injury the nerve migrated proximally toward the capitellum in all positions.
Endoscopic versus open carpal tunnel release
- Endoscopic release gave higher satisfaction, greater key pinch strength and earlier return to work (mean 7.25 days sooner) with fewer scar-related complications.
- Endoscopic release carried a higher transient nerve injury rate (OR 4.87, 95 percent CI 1.37-17.25).
- Permanent nerve injury did not differ significantly between techniques (OR 1.93, 95 percent CI 0.58-6.40).
Open versus single- or dual-portal endoscopic release
- Endoscopic release showed a higher incidence of transient postoperative nerve injury regardless of portal number, but equivalent overall complication and re-operation rates.
- Dual-portal release reduced scar tenderness compared with single-portal and open methods.
- Pillar pain, symptom relief and patient-reported satisfaction did not differ significantly between groups.
Zone II flexor tendon repair: evidence-based principles
- Repair should use a four-strand or multi-strand core suture, with or without an epitendinous suture.
- Judicious pulley venting (including parts of A2/A4) is safe and effective when needed for glide.
- Early controlled mobilisation, passive or active, is the cornerstone of management and reduces adhesion formation.
Dorsal versus volar plating complication profile
- Overall complication rates did not differ between volar and dorsal fixation.
- Volar fixation increased neuropathy (RR 2.19) and carpal tunnel syndrome (RR 4.56) but reduced tendon irritation (RR 0.38).
- Dorsal fixation lowered neuropathy at the cost of higher tendon-irritation risk.
AO Foundation / AO Surgery Reference — forearm and wrist exposures
- Anterior (Henry) approach is the workhorse for the radial shaft and distal radius; the dorsal (Thompson) approach is reserved for proximal/dorsal radius with deliberate PIN identification.
- Restore length, axial and rotational alignment and the radial bow for diaphyseal forearm fractures.
- The subcutaneous border of the ulna is exposed with minimal periosteal stripping to protect blood supply.