The internervous-plane workhorse for anterior shoulder access — the dominant exposure for shoulder arthroplasty worldwide
- Definition: classic internervous-plane approach between deltoid (axillary nerve, C5-C6) and pectoralis major (medial and lateral pectoral nerves, C5-T1) — the workhorse for the majority of shoulder arthroplasties and most surgically-managed proximal humerus fractures.
- Cephalic vein — the key landmark: runs in the deltopectoral fat stripe; classically retracted laterally with the deltoid because most tributaries are deltoid-side. Either direction is defensible if justified on tributary anatomy; avulsion causes deltopectoral haematoma.
- Axillary nerve protection: crosses the humerus about 5cm distal to the greater tuberosity (about 6.9cm below the lateral acromion, and only about 9mm below the lower border of pectoralis major — Moatshe 2017) at the teres major region. Do not dissect into this zone without direct visualisation.
- Internervous-plane nuance (viva trap): YES it is internervous between deltoid and pectoralis major, but NO at the clavipectoral fascia level (lateral pectoral nerve branches to pectoralis minor are divided there). Denervating pectoralis minor has no functional consequence.
- Subscapularis management: tag 1cm from the lesser tuberosity before release for anatomic repair. Tenotomy, lesser-tuberosity osteotomy and peel show broadly equivalent clinical outcomes, though osteotomy/peel trend toward higher healing/union rates (Ahmed 2022, Choate 2017).
- Critical landmarks: coracoid process (confluence of subscapularis, conjoint tendon, coracoacromial ligament), long head of biceps tendon (marks the bicipital groove and anterior humeral reference), clavipectoral fascia (divide lateral to the conjoint tendon).
When & Why
What it exposes. The deltopectoral approach is the gold-standard anterior exposure of the shoulder, giving direct access to the anterior glenohumeral joint, the proximal humerus, the subscapularis and rotator interval, and the glenoid. It is the first approach most orthopaedic surgeons learn and the last they use in practice — the internervous workhorse for the majority of shoulder arthroplasties, around 80 percent of surgically-managed proximal humerus fractures, and virtually all open anterior stabilisation procedures. Why it dominates shoulder surgery. Three reasons: 1. A true internervous plane (at muscle level) — deltoid (axillary nerve, C5-C6) versus pectoralis major (medial and lateral pectoral nerves, C5-T1), so no major muscle is denervated. 2. Extensile without consequence — it can be extended from the clavicle to the mid-humerus without crossing a new nerve territory. 3. Subscapularis preservation — direct visualisation allows an anatomic subscapularis repair, which is critical for postoperative stability and function. Indications. The approach serves four broad groups of pathology: - Shoulder arthroplasty (most common) — anatomic total shoulder arthroplasty (glenohumeral arthritis with an intact rotator cuff); reverse total shoulder arthroplasty (cuff-tear arthropathy, massive irreparable cuff tears, proximal humerus fracture sequelae); hemiarthroplasty (4-part and head-split fractures, avascular necrosis in younger patients, glenoid bone loss); and revision arthroplasty (loosening, instability, staged infection).
- Proximal humerus fractures — 3-part (displaced greater tuberosity plus surgical neck with the deltoid origin intact), 4-part (AVN risk 20 to 75 percent), head-split, and fracture-dislocation.
- Anterior shoulder instability — Latarjet coracoid transfer (recurrent instability with significant glenoid bone loss greater than 20 percent), open Bankart repair (failed arthroscopic stabilisation, revision), and capsulorrhaphy.
- Other pathology — isolated subscapularis repair, biceps tenodesis, proximal humeral tumour resection, and debridement of glenohumeral sepsis or hardware infection (staged). Contraindications. Absolute: active infection (unless debridement is the goal) and an inadequate soft-tissue envelope. Relative: pre-existing axillary-nerve palsy or brachial plexus injury (document the deficit preoperatively — retraction may worsen it), previous surgery (scarred planes, higher infection risk), and posterior pathology (the wrong approach — use a posterior exposure).
- Beach chair (most common)
- Supine, head of bed elevated 30 to 40 degrees, torso rotated 20 to 30 degrees toward the operative side; arm free-draped for full motion
- Lateral decubitus (alternative)
- Lateral, operative side up on a beanbag with kidney rests; arm suspended from an overhead boom in 30 degrees flexion and abduction
- Beach chair (most common)
- Familiar anatomic orientation; easy extensile conversion; full airway access; symmetrical view for teaching
- Lateral decubitus (alternative)
- Normal cerebral perfusion (no gravitational gradient); gravity distracts the humeral head from the glenoid; arm fixed in space
- Beach chair (most common)
- Beach-chair hypotension risk; rare venous air embolism (0.1 to 1 percent)
- Lateral decubitus (alternative)
- Surgeon disorientation; difficult medial/clavicular extension; 10 minutes longer to set up
In the beach-chair position the brain sits well above the heart, so cerebral perfusion pressure is lower than the arm-cuff reading suggests (the non-invasive pressure overestimates pressure at the Circle of Willis). Maintain a mean arterial pressure at or above 70 mmHg, measured at the level of the external auditory meatus. Consider invasive arterial monitoring zeroed at the tragus for patients over 70 years, those with cardiac history, or prolonged cases, and use cerebral oximetry (NIRS) where available. Cerebral-desaturation events during beach-chair shoulder surgery are well described; vigilant blood-pressure management mitigates the risk.
Anaesthesia — interscalene block. An interscalene block (C5-C6-C7 roots) provides superior early postoperative pain control and is standard of care for shoulder arthroplasty in most centres. It causes 100 percent ipsilateral hemidiaphragm paralysis (phrenic nerve, C3-C4-C5), so it is relatively contraindicated in severe COPD (FEV1 less than 40 percent) or contralateral phrenic palsy — use liposomal bupivacaine field infiltration instead. Pre-operative assessment. Document axillary-nerve function (deltoid power and lateral-arm sensation) and rotator-cuff status (belly-press, bear-hug, lift-off; external-rotation lag) preoperatively. Mandatory imaging is a true AP, scapular-Y lateral and axillary lateral (Velpeau axillary if the patient cannot abduct); CT with 3D reconstruction for fracture pattern, glenoid bone loss and Hill-Sachs impaction; MRI for cuff integrity, labral pathology and Goutallier fatty infiltration.
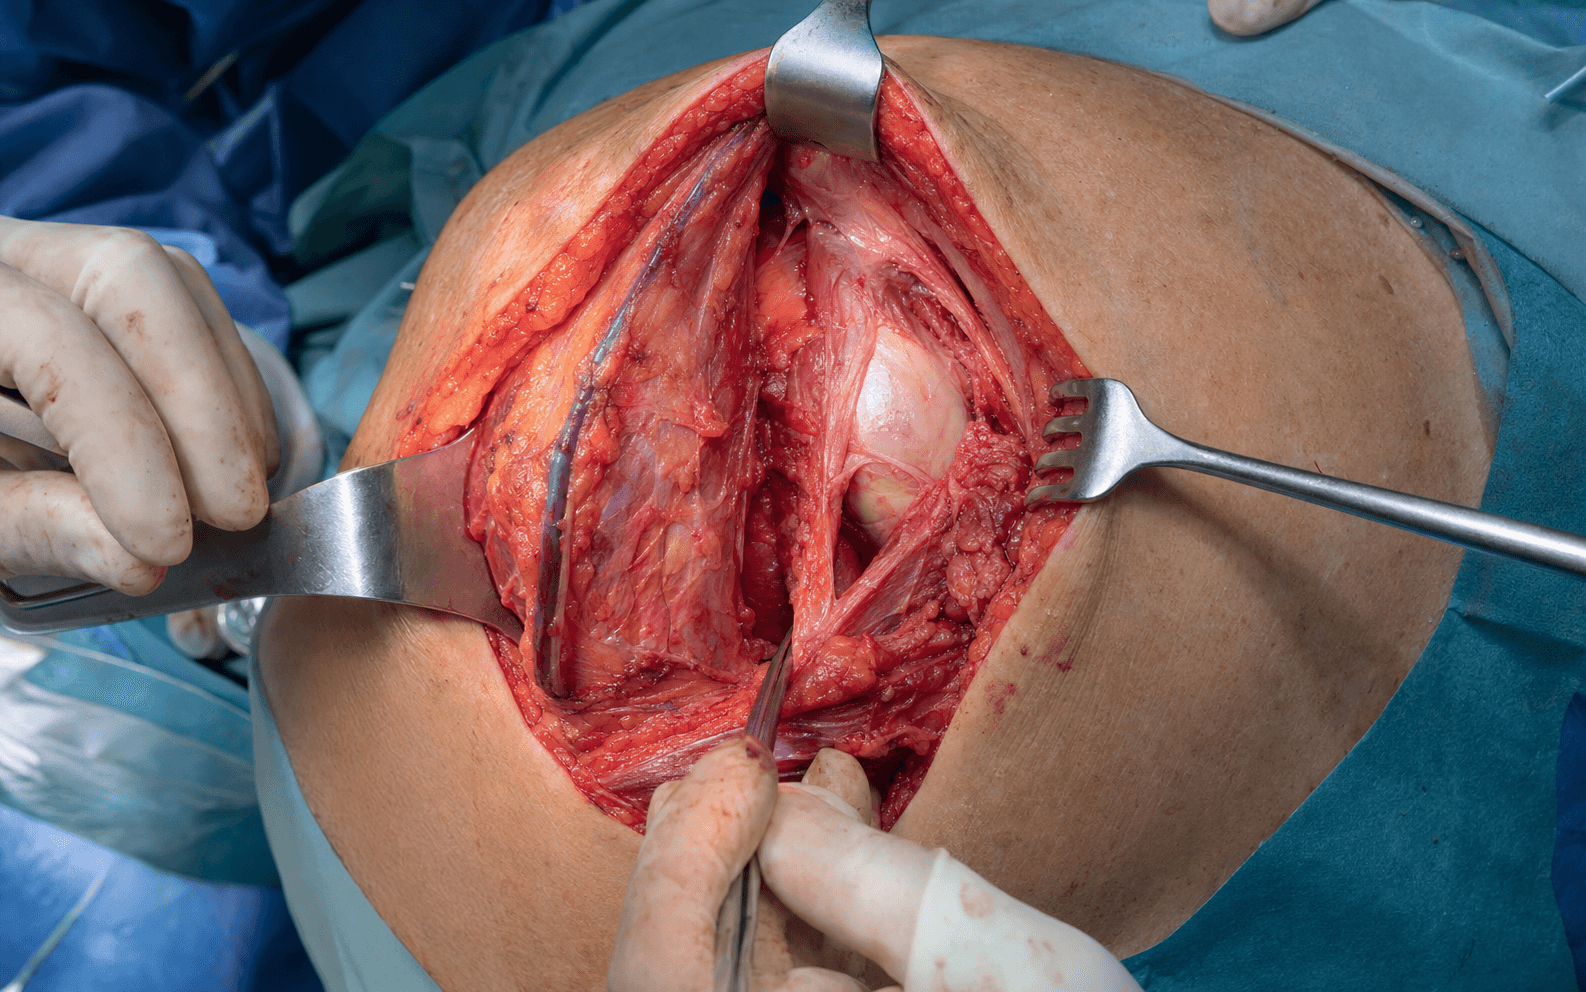
The Exposure
Work down through the deltopectoral interval, protecting the cephalic vein, then divide the clavipectoral fascia lateral to the conjoint tendon to reach the subscapularis, which is taken down to enter the joint. The axillary nerve is the dominant danger throughout — keep all inferior dissection out of its zone.
Exposure sequence
- Start at the coracoid tip (2cm inferior and 2cm medial to the clavicle — palpate it through the skin) and extend the incision distally toward the deltoid insertion, following the deltopectoral groove.
- Length is 10 to 12cm for arthroplasty, 12 to 15cm for an extensile fracture exposure; stop about 5cm above the deltoid insertion to preserve the axillary-nerve safety margin.
- Sharp dissection through dermis and subcutaneous tissue to the clavipectoral fascia (3 to 5mm), with electrocautery haemostasis of skin edges.
- Identify the cephalic vein — a blue vessel running in the deltopectoral fat stripe, with tributaries to both muscles.
- Ligate or cauterise the crossing tributaries individually with 3-0 ties or bipolar, then retract the cephalic vein laterally with the deltoid (classic teaching — most tributaries are deltoid-side, so fewer vessels are divided).
- Either direction is defensible if justified on tributary anatomy; the core principle is to divide tributaries deliberately rather than tear them.
- Retract the deltoid laterally with a self-retaining retractor (Kolbel) and a blunt Hohmann on the lateral humerus; keep inferior dissection out of the axillary-nerve zone.
- Retract pectoralis major medially with an Army-Navy (gentle — protect the brachial plexus); release the superior 2cm of its insertion if exposure is tight.
- Palpate the coracoid process through the thin white fascia deep to the cephalic vein.
- Incise the fascia lateral to the conjoint tendon (short head of biceps plus coracobrachialis), starting 0.5cm lateral to the coracoid tip and extending superiorly toward the clavicle and inferiorly 5 to 8cm.
- Preserve the conjoint tendon — do not divide it.
- After division you see deltoid laterally, the conjoint tendon medially, and the subscapularis deep, covering the anterior capsule. Branches of the lateral pectoral nerve to pectoralis minor are divided here with no functional consequence.
- The musculocutaneous nerve enters coracobrachialis 3 to 8cm below the coracoid tip (variable); aggressive medial retraction can stretch the brachial plexus or directly injure a proximally entering nerve.
- Palpate the conjoint tendon medially — you may feel the nerve as a firm white cord.
- If the nerve enters proximally (less than 3cm below the coracoid), tag the coracoid and release the conjoint tendon from the coracoid tip (Gerber technique) to mobilise and protect it.
- Use gentle medial retraction only (never reef on the conjoint tendon) and blunt retractors medially — never sharp.
- Externally rotate the arm 20 to 30 degrees to bring the subscapularis and its lesser-tuberosity insertion anterior.
- Divide the biceps sheath longitudinally and identify the long head of biceps (LHB) in the bicipital groove — the anterior humeral reference and rotator-cuff landmark.
- Decide on biceps management: tenotomy (fast, but Popeye deformity in 30 percent and cramping in 10 percent — for age over 65, sedentary, arthroplasty) versus tenodesis (no Popeye but adds 10 minutes and 5 percent failure — for age under 65, active, cosmesis important).
- Identify the subscapularis insertion on the lesser tuberosity (five distinct bands); the musculotendinous junction is 3 to 4cm medial to the insertion.
- Tag first: place heavy non-absorbable suture (#2 Ethibond, Krackow or mattress) 1cm from the lesser tuberosity before any release, to preserve tissue quality for repair.
- Tenotomy (most common): release the tendon 1cm from the lesser tuberosity with electrocautery — open the rotator interval (coracohumeral ligament) superiorly, stay above the axillary nerve inferiorly, and release the anterior capsule together with the tendon (they are fused).
- Lesser-tuberosity osteotomy: take a 5mm bone wafer with the tendon insertion attached using an oscillating saw or osteotome; keep the fragment moist in a lap sponge for later screw fixation.
- Peel: elevate the tendon subperiosteally off the lesser tuberosity, keeping the insertion intact.
- Mobilise the tendon medially with blunt dissection, preserving the upper and lower subscapular nerve branches that enter the muscle belly.
- With the subscapularis reflected medially, incise the anterior capsule longitudinally parallel to the LHB; extend the capsulotomy superiorly into the rotator interval and inferiorly toward 6 o'clock.
- Release the rotator interval (coracohumeral ligament — the thickest part of the capsule) to improve external rotation.
- If mobilisation is tight, perform an inferior capsular release with a blunt Hohmann below the humeral head, staying on the anatomic neck — the axillary nerve lies 1 to 2cm below at 6 o'clock.
- Deliver the humeral head by extending and externally rotating the arm and placing a Fukuda or Darrach retractor posterior to the head, elevating it into the wound.
- Position the arm in maximal extension (45 degrees), 30 to 45 degrees external rotation and slight abduction to open the joint.
- Place an anterior Hohmann on the glenoid rim (retracts the head posteriorly), a posterior Hohmann (stabilises the scapula) and a blunt inferior Hohmann (protects the axillary nerve and improves inferior exposure).
- Excise the labrum circumferentially with a rongeur to expose subchondral bone, then ream to bleeding bone: anatomic TSA takes a cemented polyethylene glenoid; reverse TSA takes a screwed baseplate and glenosphere.
- For arthroplasty: cut the humeral head at the anatomic neck in 20 to 30 degrees retroversion referenced from the bicipital groove; ream and broach the canal; trial the stem and head for stability, range of motion and soft-tissue tension; then insert the final cemented or press-fit stem with a modular head.
- For fracture ORIF: reduce the tuberosities to the head first (recreate the "lollipop"), then reduce the head-tuberosity unit to the shaft. Fix with a locking plate (PHILOS pattern with 3.5mm locking screws), suture anchors (greater tuberosity 0.5cm lateral to the groove), and heavy #5 FiberWire figure-of-8 sutures tuberosity-to-tuberosity and tuberosity-to-shaft.
- Confirm reduction and hardware position with fluoroscopy (AP, axillary, scapular Y).
- Repair the subscapularis with the arm in neutral rotation (overtightening limits postoperative external rotation).
- For tenotomy: pass the tag sutures through 3 to 4 drill holes (3.2mm) in the lesser tuberosity and tie over a bone bridge, or use 5.5mm suture anchors with mattress sutures. The repair should cover less than 50 percent of the head component.
- For osteotomy: reposition the bone wafer and fix with 2 to 3 screws (3.5mm cortical or 4.0mm cancellous), lag technique if bone quality allows.
- Close the rotator interval (subscapularis superior border to supraspinatus) with 0 Vicryl mattress sutures to restore anterior stability. Repair the conjoint tendon only if it was released.
- The deltopectoral interval and clavipectoral fascia usually need no formal repair (loose 2-0 Vicryl approximation for cosmesis in a thin patient). Close subcutaneous tissue with 2-0 Vicryl and skin with a 3-0 Monocryl subcuticular run plus adhesive strips. No drain unless blood loss exceeds 200mL.
The axillary nerve exits the quadrangular space with the posterior circumflex humeral artery, wraps around the surgical neck and lies on the deep surface of deltoid about 5cm below the greater tuberosity (about 6.9cm below the lateral acromion, and only about 9mm below the lower border of pectoralis major — Moatshe 2017). Keep all inferior dissection out of this zone, use blunt retractors only below the teres-major level, and never dissect below teres major without directly visualising the nerve. During inferior capsular release, place a blunt Hohmann below the head to shield the nerve. Warning sign: if you see deltoid muscle fibres during inferior dissection you are at the nerve — stop and reorient more superficially.
Have a clear, reasoned answer for which way you take the cephalic vein. Classic Hoppenfeld teaching is to retract it laterally with the deltoid because most tributaries are deltoid-side (so fewer vessels are divided). Either direction is defensible — examiners test your reasoning on tributary anatomy, not a memorised percentage. Handle the vein gently: it avulses if mobilised aggressively (a common cause of deltopectoral haematoma). If it tears, apply direct pressure, ligate both ends and proceed — there is no functional consequence thanks to collateral venous drainage.
Dangers & Extensions
Structures at risk, by layer.
- Structure at risk
- Cephalic vein
- Why it matters
- Avulses if mobilised aggressively — deltopectoral haematoma
- Protection
- Retract laterally with deltoid; ligate tributaries; control both ends if it tears
- Structure at risk
- Lateral pectoral nerve branches to pectoralis minor
- Why it matters
- Divided with the fascia — no functional loss (pectoralis major stays innervated)
- Protection
- No protection needed
- Structure at risk
- Musculocutaneous nerve (3 to 8cm below coracoid) and brachial plexus
- Why it matters
- Traction injury from aggressive medial retraction — elbow-flexion weakness, lateral-forearm numbness
- Protection
- Gentle medial retraction; release conjoint tendon if tight; blunt retractors only; never sharp medially
- Structure at risk
- Axillary nerve (about 5cm below the greater tuberosity)
- Why it matters
- The dominant danger — deltoid paralysis and loss of lateral-arm sensation
- Protection
- Blunt retractors only inferiorly; never dissect below teres major without seeing the nerve; palpate before placing an inferior retractor
- Structure at risk
- Anterior circumflex humeral artery
- Why it matters
- Crosses subscapularis at the musculotendinous junction — bleeding
- Protection
- Control and ligate precisely if divided (collateral flow via the posterior circumflex)
- Structure at risk
- Upper and lower subscapular nerve branches
- Why it matters
- Enter the muscle belly medially during mobilisation
- Protection
- Stay on the tendon during medial mobilisation; avoid aggressive deep retraction
The internervous plane — and the fascial trap. The true internervous plane is between deltoid (axillary nerve, posterior cord) and pectoralis major (medial and lateral pectoral nerves). The subtlety: dividing the clavipectoral fascia lateral to the conjoint tendon sacrifices branches of the lateral pectoral nerve to pectoralis minor — so it is not an internervous plane at the fascial level, only at the muscle level. This matters only as a viva point, because denervating pectoralis minor has no functional consequence. Subscapularis management — the examinable debate.
- Lesser-tuberosity osteotomy
- 5mm bone wafer with the tendon insertion
- Subscapularis tenotomy
- 1cm from tuberosity — tag for repair
- Subscapularis peel
- Peel tendon from lesser tuberosity, keep insertion intact
- Lesser-tuberosity osteotomy
- Bone-to-bone (fastest)
- Subscapularis tenotomy
- Tendon-to-bone (6 to 12 weeks)
- Subscapularis peel
- Tendon intact — no healing required
- Lesser-tuberosity osteotomy
- Strongest (screw fixation)
- Subscapularis tenotomy
- Moderate (suture anchors)
- Subscapularis peel
- Preserved (no disruption)
- Lesser-tuberosity osteotomy
- High — osteotomy must not fracture
- Subscapularis tenotomy
- Moderate — preserve 1cm cuff
- Subscapularis peel
- Low — subperiosteal elevation
- Lesser-tuberosity osteotomy
- Union about 93 percent (highest)
- Subscapularis tenotomy
- Tendon healing 75 to 80 percent
- Subscapularis peel
- Healing 84 to 87 percent (intermediate)
- Lesser-tuberosity osteotomy
- Broadly equivalent across all three (Choate 2017, Ahmed 2022)
- Subscapularis tenotomy
- Broadly equivalent
- Subscapularis peel
- Broadly equivalent
- Lesser-tuberosity osteotomy
- Younger patients, revision, good bone
- Subscapularis tenotomy
- Standard, most common; osteoporotic bone
- Subscapularis peel
- Elderly, poor tissue quality
- Complication
- Cephalic-vein injury
- Rate
- Common
- Key point
- Direct pressure, ligate both ends, continue — no functional consequence
- Complication
- Axillary-nerve injury
- Rate
- Less than 1 percent primary; 5 percent revision
- Key point
- Blunt retractors only inferiorly; neuropraxia often recovers 3 to 6 months; transection needs repair
- Complication
- Musculocutaneous-nerve or plexus injury
- Rate
- Less than 1 percent
- Key point
- Gentle medial retraction; most recover 3 to 6 months
- Complication
- Tuberosity or shaft fracture (arthroplasty)
- Rate
- GT 5 percent; shaft 2 percent
- Key point
- Avoid excessive external rotation on head delivery; use a longer stem to bypass a shaft fracture
- Complication
- Subscapularis failure (reverse TSA)
- Rate
- 10 to 20 percent
- Key point
- Anterior pain, positive belly-press; repair if early with good tissue, else pectoralis-major transfer (Resch)
- Complication
- Infection
- Rate
- 1 to 2 percent
- Key point
- Cutibacterium acnes (50 percent), Staph aureus (30 percent); DAIR if acute, 2-stage revision if chronic
- Complication
- Instability
- Rate
- 2 to 5 percent
- Key point
- Anterior — subscapularis failure; posterior — reverse-TSA glenosphere version; revise version if recurrent
- Complication
- Haematoma
- Rate
- 3 to 5 percent
- Key point
- Observe if small; evacuate if large or expanding (infection risk)
- Complication
- Stiffness
- Rate
- 5 to 10 percent
- Key point
- Intensive physiotherapy; MUA with arthroscopic release if over 6 months refractory
- Complication
- Heterotopic ossification
- Rate
- 1 to 3 percent
- Key point
- Male, DISH, neurotrauma at risk; indomethacin 75mg daily for 6 weeks if high risk; excise if mature and limiting
- Complication
- Periprosthetic fracture
- Rate
- 1 to 2 percent
- Key point
- Wright-Cofield (A proximal, B at tip, C distal); ORIF or revise to longer stem
- Complication
- Aseptic loosening
- Rate
- 5 to 10 percent at 10 years
- Key point
- Radiolucent lines over 2mm or migration; revision arthroplasty with bone graft as needed
Postoperative management. Protect the subscapularis repair in a sling for 6 weeks with pendulums and distal-joint ROM only (Phase 1). Progress to passive and active-assisted ROM at 6 to 12 weeks (Phase 2), active ROM and light strengthening at 12 to 24 weeks (Phase 3), and unrestricted function by 6 to 12 months (Phase 4). Return to work: sedentary 6 to 8 weeks, light duty about 3 months, heavy or overhead labour 6 to 12 months. Avoid driving until out of the sling and safely in control (commonly 6 to 12 weeks for dominant-side surgery). Outcomes depend strongly on supervised, protocol-driven rehabilitation and patient compliance.
Procedures Through This Approach
- Anatomic total shoulder arthroplasty and reverse shoulder arthroplasty — the principal operations; reverse TSA now outnumbers anatomic TSA in most major registries (AOANJRR, NJR England/Wales, AJRR, Nordic).
- Shoulder hemiarthroplasty for proximal humerus fractures (4-part, head-split) and avascular necrosis.
- Revision shoulder arthroplasty — loosening, instability, staged infection.
- ORIF of proximal humerus fractures — 3-part and 4-part patterns in younger patients with good bone (PHILOS locking plate plus heavy suture and anchors).
- Latarjet coracoid transfer and open Bankart repair for recurrent anterior instability with glenoid bone loss greater than 20 percent or failed arthroscopic stabilisation.
- Biceps tenodesis for long-head-biceps pathology and SLAP tears in patients over 40.
- Pectoralis major tendon repair and isolated subscapularis repair.
- Proximal humeral tumour resection and glenohumeral debridement for sepsis (staged).
Viva & Exam Focus
CEPHALICCEPHALIC — deltopectoral approach key steps
SUBSCAPSUBSCAP — subscapularis repair principles
Clinical Decision Scenarios
Practise clinical reasoning and management decisions out loud
“Is the deltopectoral approach a true internervous plane?”
“A 72-year-old with cuff-tear arthropathy is having a reverse shoulder arthroplasty. How will you manage the subscapularis — tenotomy or lesser-tuberosity osteotomy? Justify your choice.”
“A 68-year-old has a 4-part proximal humerus fracture with 5mm displacement at the surgical neck. Would you fix it or replace it, and why?”
High-yield anatomy
- Cephalic vein: classically retracted laterally with the deltoid (most tributaries are deltoid-side)
- Axillary nerve: about 5cm below the greater tuberosity, about 6.9cm below the lateral acromion, only about 9mm below the lower border of pectoralis major (Moatshe 2017)
- Musculocutaneous nerve: enters coracobrachialis 3 to 8cm below the coracoid (variable)
- Anterior circumflex humeral artery: crosses subscapularis at the musculotendinous junction
- Internervous plane: YES between deltoid and pectoralis major, NO at the clavipectoral fascia (lateral pectoral nerve branches to pectoralis minor divided)
Critical decision points
- Cephalic vein: retract laterally with the deltoid; ligate tributaries; if it avulses, control and continue (no functional consequence)
- Subscapularis: tenotomy versus osteotomy versus peel are clinically equivalent; osteotomy and peel heal better structurally (Choate 2018, Ahmed 2022)
- Biceps: tenotomy (age over 65, sedentary) versus tenodesis (age under 65, active, cosmesis)
- Fracture versus arthroplasty: assess head viability (metaphyseal extension), tuberosity quality, and patient age and activity
Safety checklist
- Mark the axillary-nerve zone (about 5cm below the greater tuberosity) — do not dissect below it without visualisation
- Protect the musculocutaneous nerve with gentle medial retraction; release the conjoint tendon if it enters less than 3cm below the coracoid
- Beach-chair hypotension — target MAP referenced to the brain (tragus); consider cerebral oximetry if high risk
- Subscapularis repair — tag suture before release (1cm from the tuberosity), repair in neutral rotation (not overtight)
Viva traps
- TRAP: 'Deltopectoral is not internervous' — wrong, it is internervous between deltoid and pectoralis major
- TRAP: 'Osteotomy is definitively better than tenotomy' — clinical outcomes are equivalent; osteotomy only heals better structurally (Choate 2018, Ahmed 2022)
- TRAP: 'All 4-part fractures need arthroplasty' — wrong, some are fixable (assess head viability and tuberosity quality)
- TRAP: 'Hemiarthroplasty for elderly fractures' — wrong, reverse TSA has better outcomes (deltoid-dependent function)
Guidelines, registries and global practice
- Reverse TSA now outnumbers anatomic TSA in most major registries (AOANJRR, NJR England/Wales, AJRR, Nordic) — driven by cuff-tear arthropathy and complex fractures
- The deltopectoral approach is the dominant exposure for anatomic TSA, reverse TSA, hemiarthroplasty and fracture ORIF across all registries
- Reverse TSA outperforms hemiarthroplasty for complex fractures in the elderly (Level I RCT, Sebastia-Forcada 2014)
- Return to work: sedentary 6 to 8 weeks, light duty about 3 months, heavy or overhead labour 6 to 12 months
- Driving: restricted until out of the sling and safely in control (commonly 6 to 12 weeks for dominant-side surgery)
References
Quantitative Anatomy of the Proximal Humerus Muscle Attachments and the Axillary Nerve
- Ten fresh-frozen cadaveric shoulders mapped with a coordinate-measuring device
- Axillary nerve crossed the humerus 50.3mm (95 percent CI 47.0 to 53.5mm) below the tip of the greater tuberosity
- Axillary nerve was 69.3mm (95 percent CI 64.1 to 74.5mm) below the lateral acromion
- Distance from the lower border of pectoralis major to the axillary nerve was 9.4mm
- The deltoid had 4 to 5 distinct tendinous insertions on the acromion
Subscapularis Management in Anatomic Total Shoulder Arthroplasty: Network Meta-Analysis
- Systematic review and network meta-analysis of 23 studies
- Lesser-tuberosity osteotomy and subscapularis peel had higher WOOS scores than tenotomy; no difference in ASES scores
- Bony union for osteotomy averaged 93.6 percent; tendon healing 87 percent for peel and 79.4 percent for tenotomy
- External rotation favoured peel over osteotomy; otherwise techniques were comparable
Outcomes for Subscapularis Management Techniques in Shoulder Arthroplasty: Systematic Review
- Systematic review of 14 studies of subscapularis takedown and repair
- Healing rates: lesser-tuberosity osteotomy 93.1 percent, peel 84.1 percent, tenotomy 75.7 percent (not statistically different)
- No significant differences in postoperative range of motion or strength between techniques
- Belly-press and lift-off normal rates trended higher for osteotomy, but functional testing correlated poorly with musculotendinous integrity
Reverse Shoulder Arthroplasty versus Hemiarthroplasty for Acute Proximal Humeral Fractures (RCT)
- Blinded, randomised, prospective trial of 62 patients over 70 years with complex proximal humeral fractures
- Reverse TSA gave higher UCLA (29.1 versus 21.1) and Constant (56.1 versus 40.0) scores than hemiarthroplasty
- Reverse TSA gave greater forward elevation (120.3 versus 79.8 degrees) and lower DASH disability
- Six hemiarthroplasty patients needed revision to reverse TSA; revision did not improve outcomes
Beach-Chair Positioning and Cerebral Perfusion
- In the beach-chair position the brain sits well above the heart, so cerebral perfusion pressure is lower than the arm-cuff reading suggests
- Blood pressure should be measured and targeted at the level of the brain (external auditory meatus or tragus)
- Avoid prolonged relative hypotension; consider invasive arterial monitoring and cerebral oximetry in high-risk patients
- Cerebral-desaturation events are well described during beach-chair shoulder surgery