Group them by job: cut, hold, retract, handle bone, power | Each shape follows a function | Drilling and sawing generate heat | Decontamination and sharps safety matter
- Form follows function: every instrument's shape is designed for one job. Learn the group (cutting, holding, retracting, bone-handling, power) and you can name and use any instrument you have never seen before
- Sharp instruments stay sharp and are treated as sharps: a blunt osteotome or scissor crushes rather than cuts; a sharp left in the field is the classic cause of a sharps injury and bloodborne-virus exposure
- Power tools generate heat: drilling and sawing bone produces friction heat that can kill bone cells (thermal osteonecrosis), loosening screws and impairing healing - use sharp bits, low pressure, and irrigation
- Retractors protect by exposing: good exposure with the right retractor lets you operate safely, but over-zealous retraction crushes skin, muscle and nerves - place levers on bone, not on neurovascular structures
- Instruments carry infection risk: they must be correctly decontaminated and sterilised between cases, and complex power tools are the hardest to clean - the weak link in the cycle
- “If handed an unknown instrument, describe it by GROUP and FUNCTION ('this is a self-retaining retractor - it holds the wound open hands-free') rather than guessing a brand name
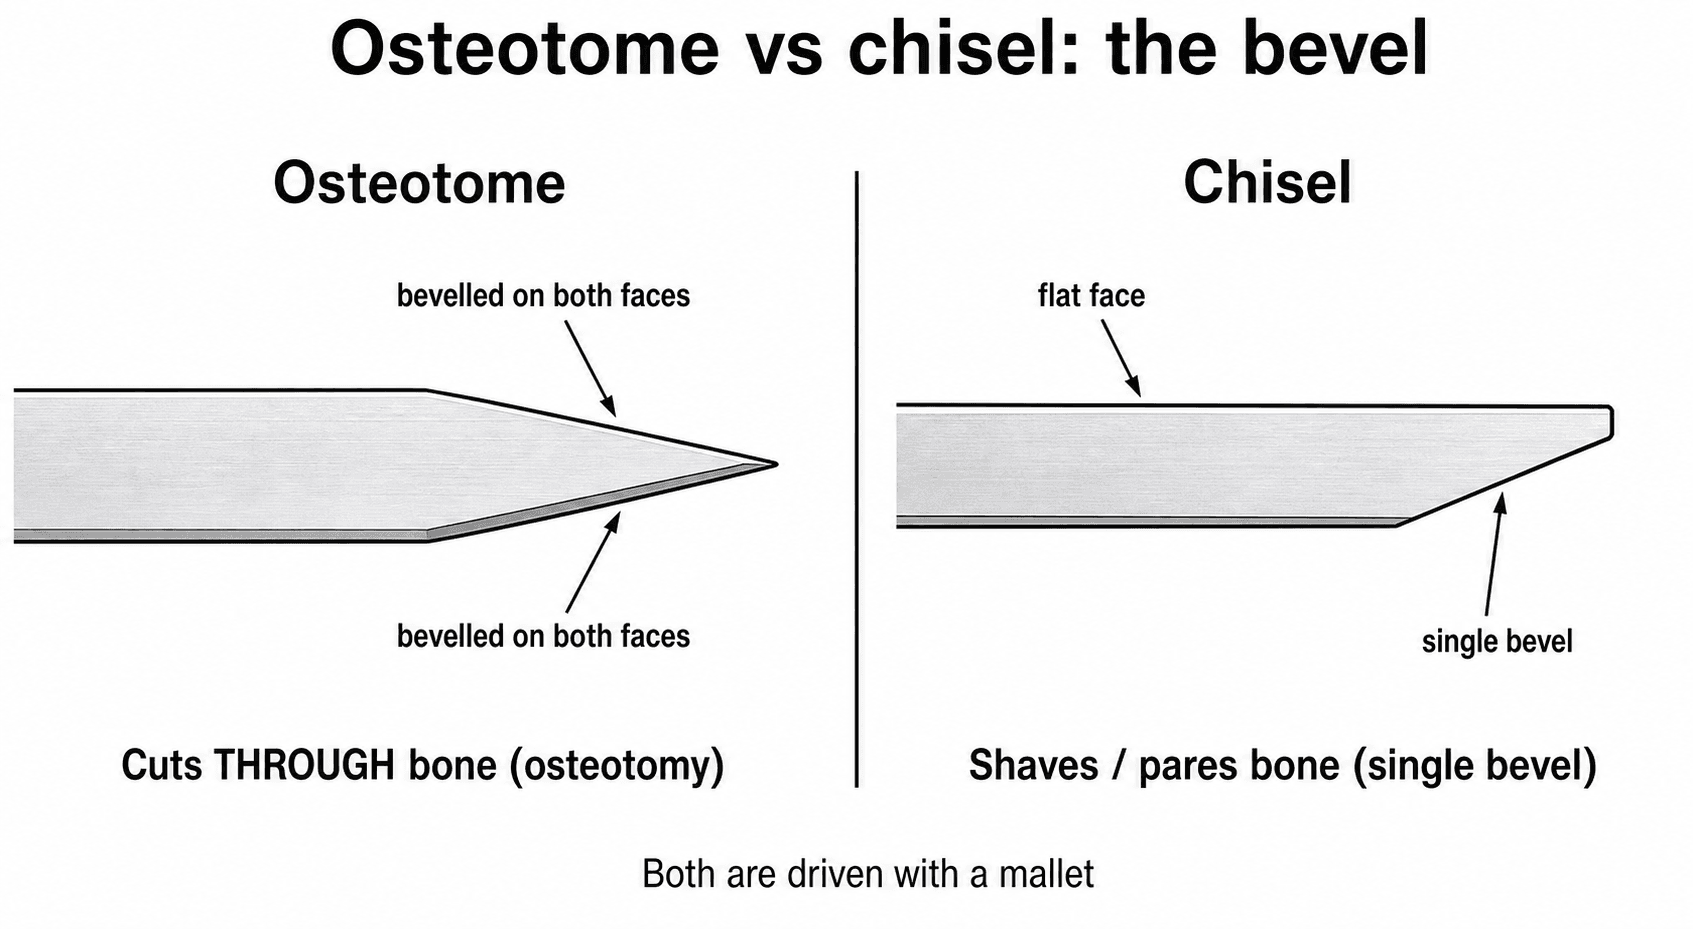
- “An osteotome is bevelled on BOTH sides (cuts bone); a chisel is bevelled on ONE side (shaves bone) - a classic viva distinction
- “Always irrigate while drilling or sawing to limit thermal necrosis, and use a SHARP drill bit - blunt bits generate far more heat
- “Double gloving and a 'hands-free' (neutral zone) passing technique are the core sharps-safety measures in orthopaedic theatre
A favourite viva distinction. An osteotome is bevelled (sharpened) on both faces and is used to cut through bone (for example an osteotomy). A chisel is bevelled on one face only and is used to shave or pare bone and cartilage. Both are driven with a mallet. Confusing the two is a classic basic-science slip.
Drilling and sawing generate friction heat. Sustained bone temperature above roughly 47C for about one minute kills bone cells. Dead bone around a screw resorbs, the screw loosens, and healing is impaired. Prevent it with a sharp drill bit, low feed pressure, intermittent drilling, and continuous irrigation.
Retractors expose the field but can injure what they hold back. Place bone levers (Hohmann) on bone, never directly over a nerve or vessel. Beware of pressure on the skin edge (necrosis) and traction on nerves (for example the femoral nerve under an anterior acetabular retractor). Good exposure is gentle and deliberate.
Orthopaedic surgery handles sharp instruments, wires and bone spikes around bone. Use double gloving and a neutral-zone (hands-free) passing technique to cut sharps injuries. Between cases every instrument must be decontaminated and sterilised - complex power tools and cannulated instruments are the hardest to clean.
Overview
Walk into any orthopaedic theatre and the instrument trolley can look overwhelming - dozens of shining metal tools laid out in rows. The trick the exam tests is simple: you do not memorise hundreds of named instruments, you learn the handful of groups they fall into and the principle behind each shape. Once you can say "this is a cutting instrument", "this is a self-retaining retractor", or "this is a bone-handling tool", you can pick up an instrument you have never seen and use it sensibly.
The guiding idea is form follows function. A scissor has crossing sharp blades because it cuts; an artery forceps has a ratchet and serrated jaws because it must grip and stay clamped; a Hohmann lever has a curved spike because it hooks over bone to lever soft tissue away. Understanding why an instrument is shaped the way it is lets you reason about how to hold it, what it can damage, and when to choose something else.
Three exam threads run through the whole topic. First, classification and design - knowing the groups and the design distinctions (osteotome versus chisel, hand-held versus self-retaining retractor). Second, the physics of power tools - drilling and sawing generate heat that can kill bone (thermal necrosis), which links instruments to bone biology. Third, safety - protecting the patient from injury and infection and protecting the surgeon from sharps. This is a practical, high-yield basic-science and operative-viva topic.
Core Concepts: The Instrument Groups
Every orthopaedic instrument can be sorted into one of five working groups. Learn the group, the example, and the one design point that defines it.
Job: divide soft tissue or bone with a sharp edge.
- Scalpel - a blade in a handle for clean skin and soft-tissue incision. A sharp blade cuts with the least crush injury.
- Scissors - crossing sharp blades; curved (for example Mayo, McIndoe) for dissecting, straight for cutting suture. Never use tissue scissors to cut suture or wire (it blunts them).
- Osteotome - a bevelled bar sharpened on both faces, driven with a mallet to cut through bone (osteotomy).
- Chisel - bevelled on one face only, to shave or pare bone and cartilage.
- Gouge - a curved, trough-shaped blade for scooping out a channel of bone (for example harvesting bone graft).
- Rongeur (bone nibbler) - sprung jaws that bite off small pieces of bone (for example trimming bone edges, laminectomy).
- Curette - a sharp spoon to scrape out soft tumour, infected tissue, or cartilage from a cavity.
The single rule for this group: sharp tools must stay sharp and be handled as sharps. A blunt edge crushes rather than cuts, generating heat and devitalised tissue.
- Typical examples
- Scalpel, scissors, osteotome, rongeur, curette
- Defining design feature
- A sharp edge - must stay sharp; handle as a sharp
- Typical examples
- Artery forceps, toothed/atraumatic forceps, needle holder, bone clamp
- Defining design feature
- Ratchet to stay clamped; jaw pattern matched to tissue
- Typical examples
- Langenbeck (hand-held), Gelpi (self-retaining), Hohmann (bone lever)
- Defining design feature
- Holds tissue open; lever on bone, not nerves
- Typical examples
- Mallet, elevator, bone hook, depth gauge, tap
- Defining design feature
- Shaped for one step of expose-reduce-hold-fix
- Typical examples
- Drill, saw, burr, reamer
- Defining design feature
- Fast but generate heat and aerosol; hardest to clean
Principles: Design, Heat and Mechanics
Beyond naming instruments, the exam wants you to reason about why they work and how they can harm. Three principles cover most of it.
The whole point of a cutting instrument is to divide tissue cleanly. A blunt scalpel, scissor or osteotome tears and crushes instead, leaving devitalised tissue that heals worse and is more prone to infection. A blunt drill bit generates far more heat. This is why sharp instruments are protected, replaced when worn, and never misused (for example cutting wire with tissue scissors).
Drilling, sawing, burring and reaming all rub metal against bone, and friction produces heat. Bone cells (osteocytes) die when held above roughly 47C for about a minute. Dead bone around a screw or implant resorbs, the implant loosens, and fracture healing is impaired. The defences are a sharp tool, light intermittent pressure, and continuous saline irrigation to carry heat away.
Retractors and reduction tools work by mechanical advantage. A Hohmann lever hooks over bone and uses that bony edge as a fulcrum so a small hand force moves a large block of muscle. The same physics means a misplaced lever can crush a nerve or vessel - so the bony purchase is deliberate and the soft-tissue side is checked.
Most instruments are surgical stainless steel - strong, corrosion-resistant, and able to survive repeated steam sterilisation (autoclaving). The trade-off is that every instrument is reused, so each must be cleaned and sterilised between patients. Intricate, cannulated and powered instruments have hidden internal surfaces that are the weak link in this cycle.
The 47C / one-minute figure for bone-cell death is the classic number to quote when asked about thermal necrosis. Tie it straight to the consequence (screw loosening, impaired healing) and to the prevention (sharp bit, light pressure, irrigation) - examiners want the principle, not just the number.
A drill bit or saw that plunges through the far cortex can injure the structures on the other side of the bone. Use the depth gauge and a drill stop, advance carefully through the far cortex, and protect the deep soft tissues with a retractor. The combination of a sharp bit and controlled feed both limits heat and limits over-penetration.
Decontamination, Sterilisation and Sharps Safety
Instruments touch tissue and blood, so between every case they must be made safe to reuse, and the team must avoid hurting themselves on sharps. This is a high-yield safe-surgery theme.
The decontamination cycle
Reusable instruments pass through a defined cycle, and skipping a step is what allows transmission of infection:
- Cleaning - mechanical removal of blood, tissue and debris (the most important step; nothing can be sterilised if it is still dirty). Done by washer-disinfector and manual cleaning.
- Disinfection - reduces the number of viable organisms (for example thermal disinfection in the washer).
- Inspection and packing - check the instrument is clean, complete and functioning, then pack.
- Sterilisation - usually steam under pressure (autoclave); heat-sensitive items use low-temperature methods.
- Storage and transport - kept sterile until used.
- Contact
- Enters sterile tissue or bone
- Requirement
- Sterilisation
- Orthopaedic example
- Osteotome, drill bit, retractor, implant
- Contact
- Contacts mucous membrane / non-intact skin
- Requirement
- High-level disinfection
- Orthopaedic example
- Some flexible scopes
- Contact
- Contacts intact skin only
- Requirement
- Cleaning / low-level disinfection
- Orthopaedic example
- Tourniquet cuff, BP cuff, table
Almost everything that touches the operative field in orthopaedics is critical - it enters sterile bone and tissue - so it must be sterile, not merely clean.
Sterilisation methods in detail
Sterilisation is the step that destroys all microorganisms, including bacterial spores. The method is chosen by whether the instrument tolerates heat and moisture, and the result is verified rather than assumed:
Saturated steam under pressure denatures microbial proteins. Standard porous-load (vacuum) cycles run at 134C for about 3 minutes or 121C for about 15 minutes (the higher temperature needs the shorter hold). Almost all metal orthopaedic instruments are autoclaved - it is fast, cheap, non-toxic and reliable.
A rapid, usually unwrapped steam cycle for a single urgent item (for example a dropped essential instrument). It is discouraged as a routine because the item is not packaged or stored sterile and drying and monitoring are limited - reserve it for genuine emergencies.
For heat- or moisture-sensitive items (some powered or electronic devices, flexible scopes): ethylene oxide gas (effective but slow and toxic, needs aeration) or hydrogen peroxide gas plasma (faster, no toxic residue, but limited by long narrow lumens). Used when autoclaving would damage the instrument.
Sterility is checked with physical monitors (the cycle printout), chemical indicators (autoclave tape and the Bowie-Dick test for steam penetration in a vacuum autoclave) and biological indicators (heat-resistant Geobacillus stearothermophilus spores for steam) - all confirming the load was actually sterilised.
Prions and CJD - the exception to normal sterilisation
Prions, the infectious agent of Creutzfeldt-Jakob disease, are abnormally folded proteins that are highly resistant to standard steam sterilisation and chemical disinfection - a routine autoclave cycle does not reliably destroy them. This matters wherever instruments contact high-infectivity tissue: the central nervous system and posterior eye, and in spinal surgery the dura and neural tissue.
- Single-use instruments for high-risk procedures in known or at-risk patients avoid reprocessing the hazard altogether - the safest answer for high-risk CNS tissue.
- Quarantine and tracking - instruments used on a suspected case are quarantined pending the diagnosis, and every set is traced to each patient so an exposed set can be recalled.
- Enhanced decontamination where reuse is unavoidable: meticulous cleaning (never let tissue dry on the instrument) followed by extended or elevated steam cycles or chemical treatment (for example sodium hydroxide or sodium hypochlorite) per national guidance.
The exam point: prions break the usual rule that "autoclaving sterilises everything," which is why prion-risk CNS work drives the move to single-use instruments.
Sharps safety
Orthopaedic surgery is full of sharp hazards: blades, needles, K-wires, drill bits, sharp bone spikes, and the cut edges of bone. Two measures dominate:
- Double gloving - wearing two pairs of gloves. The outer glove takes most perforations; the inner glove far more often stays intact, protecting the surgeon from blood contact.
- Neutral-zone (hands-free) passing - sharps are placed in a kidney dish or designated zone rather than passed hand-to-hand, so two people are never holding the same sharp at once.
Add eye/face protection against bone and irrigation splash, and a formal count of sharps and instruments in and out of every case to avoid a retained item.
Clinical Relevance
Instruments sit at the centre of every operation, which is why this topic appears so often in basic-science and operative vivas. An examiner may simply hand you an instrument and ask you to name it, classify it, and say how you would use it - the group-and-function approach answers this every time. In operative surgery the choice of retractor, the placement of bone levers, the way you drill and tap, and your sharps technique are everyday skills that betray how much real theatre experience you have. In bone biology the link between power-tool heat and thermal necrosis connects instruments to fracture healing and implant loosening. And in infection control and occupational health, decontamination, double gloving and neutral-zone passing are standard answers to "how do you keep the patient and yourself safe in theatre?" Knowing the instruments well makes you look safe, organised, and ready to operate - exactly the impression the exam is designed to test.
Two theatre adjuncts complete the equipment picture and are commonly asked alongside the hand instruments: the energy/haemostasis devices (monopolar vs bipolar diathermy, with their own burn, dispersion-pad and pacemaker considerations) and the pneumatic tourniquet (cuff pressure, safe duration, exsanguination and contraindications). Both have dedicated coverage - see Electrosurgery, Diathermy and Energy Devices and Tourniquet Use - and a strong candidate links the mechanical instrument set to these as the full kit of safe orthopaedic theatre.
Common Instrument Pitfalls
- Why it harms
- Thermal osteonecrosis - screw loosening, poor healing
- How to avoid it
- Sharp bit, light intermittent pressure, continuous saline cooling
- Why it harms
- Crush or traction injury (for example femoral nerve)
- How to avoid it
- Hook levers onto bone; check the soft-tissue side
- Why it harms
- Blunts the blades; crushes future tissue
- How to avoid it
- Keep separate suture/wire scissors
- Why it harms
- Higher sharps injury and bloodborne-virus risk
- How to avoid it
- Double glove; neutral-zone passing
- Why it harms
- Debris shields organisms - item not truly sterile
- How to avoid it
- Clean first (most important step), then sterilise
- Why it harms
- Retained foreign body
- How to avoid it
- Formal count in and out of every case
Guidelines, Registries and Global Practice
- Decontamination is regulated worldwide with the same logic: reusable instruments are cleaned, disinfected, inspected, sterilised and stored under a validated cycle (for example UK national decontamination standards, US AAMI/AORN guidance, and equivalent national bodies). The order is universal - cleaning comes before sterilisation, because debris shields organisms.
- The Spaulding classification (critical / semi-critical / non-critical) is used internationally to decide how clean an item must be. Almost all orthopaedic operative instruments are critical and must be sterile.
- Surgical power tools are recognised across guidance as the hardest items to reprocess; manufacturers' validated reprocessing instructions should be followed and power-tool cleaning included in infection surveillance.
- Sharps safety measures (double gloving and hands-free / neutral-zone passing) are recommended by perioperative bodies (for example AORN, and national surgical and occupational-health guidance) and supported by evidence of reduced inner-glove perforation in orthopaedic surgery.
- Thermal injury during drilling is addressed by surgical-education and AO-style technique teaching everywhere: sharp bits, controlled feed, intermittent drilling and irrigation are taught as standard to protect bone.
- Global practice variation is mainly in resource setting - the same principles apply, but reliable sterile-supply, single-use sharps, and modern power tools are less consistently available in low-resource settings, where careful cleaning and reuse protocols become even more important.
Memory aids
CHRBPThe Five Instrument Groups
Hook:CHaRP BP - a CHaRP surgeon knows the five groups: Cutting, Holding, Retracting, Bone-handling, Power.
COOLStop Thermal Necrosis When Drilling
Hook:Keep the bone COOL: a Cutting bit, Only light pressure, On-and-off drilling, and Lavage.
SAFESharps Safety in Theatre
Hook:Stay SAFE around sharps: Second glove, Announce, Find/count, Eye protection.

Exam Viva Scenarios
Practise clinical reasoning and management decisions out loud
“The examiner hands you an osteotome and a Hohmann retractor and asks you to identify each, classify it, and explain how you would use it safely.”
“A plate-and-screw fixation has failed early with loosening of the screws and no infection. The examiner asks how the way the bone was prepared could have contributed.”
The Five Groups (CHRBP)
- Cutting: scalpel, scissors, osteotome, rongeur, curette
- Holding: artery/dissecting forceps, needle holder, bone clamp
- Retracting: Langenbeck (hand-held), Gelpi (self-retaining), Hohmann (bone lever)
- Bone-handling: mallet, elevator, bone hook, depth gauge, tap; Power: drill, saw, burr, reamer
Key Design Distinctions
- Osteotome = bevelled both sides, cuts bone; chisel = one side, shaves bone
- Toothed forceps = tough tissue; atraumatic = vessel/nerve
- Ratchet lets a holding instrument stay clamped
- Bone lever uses bone as a fulcrum - place on bone, not nerves
Power Tools and Heat (COOL)
- Bone cells die above ~47C for ~1 minute
- Dead bone resorbs - screws loosen, healing impaired
- Cutting (sharp) bit, Only light pressure, On-and-off drilling, Lavage
- Use depth gauge / drill stop to avoid over-penetration
Safety: Patient and Surgeon
- Clean FIRST (most important), then sterilise (autoclave); critical items must be sterile
- Power tools are hardest to clean - the weak link
- Double glove + neutral-zone (hands-free) sharps passing
- Count sharps and instruments in and out every case
Evidence: Heat, Decontamination and Sharps
According to PubMed, the instrument-related risks examiners care about are backed by a real literature.
Thermal Necrosis During Bone Drilling - An Overview
- Drilling bone generates heat from friction between the bit and the bone, and a high level of heat kills bone cells
- Bone cell death leads to resorption of bone around bone screws - the mechanism behind screw loosening
- Despite growing evidence, simple real-time monitoring and cooling methods are still not in widespread use
- Future directions include sharper optimised bits, irrigation, robotics and computer simulation to reduce thermal injury
Biofouling of Surgical Power Tools During Routine Use
- Surgical power tools have complex designs that restrict access to cleaning and sterilising agents
- They frequently become contaminated with microbial and tissue residues after use - the weak link in the decontamination cycle
- Directly linked iatrogenic infections appear rare, but this likely reflects incomplete reporting and lack of surveillance rather than true safety
- Teams should follow manufacturers' reprocessing instructions and include power-tool decontamination in surgical-site-infection surveillance
Glove Punctures with Double Gloving in Orthopaedic Surgery
- 1528 gloves from 200 orthopaedic procedures examined; overall perforation rate 15.8%
- Perforation was far commoner in major (21.6%) than minor (3.6%) procedures, and commonest for the operating surgeon
- With double gloving the inner-glove perforation rate was only 3.7% versus 22.7% for the outer glove
- Routine double gloving is recommended because it significantly reduces perforation of the inner (protective) glove