S2-Alar-Iliac & Iliac Screws
- When a spinal fusion is long and ends at the sacrum, the S1 pedicle screws and the LUMBOSACRAL JUNCTION bear enormous cantilever loads, and this is a high-stress zone with a high rate of S1-screw loosening and pseudarthrosis; SACROPELVIC FIXATION extends the construct into the PELVIS to PROTECT the S1 screws, share the load and improve the chance of fusion across the lumbosacral junction.
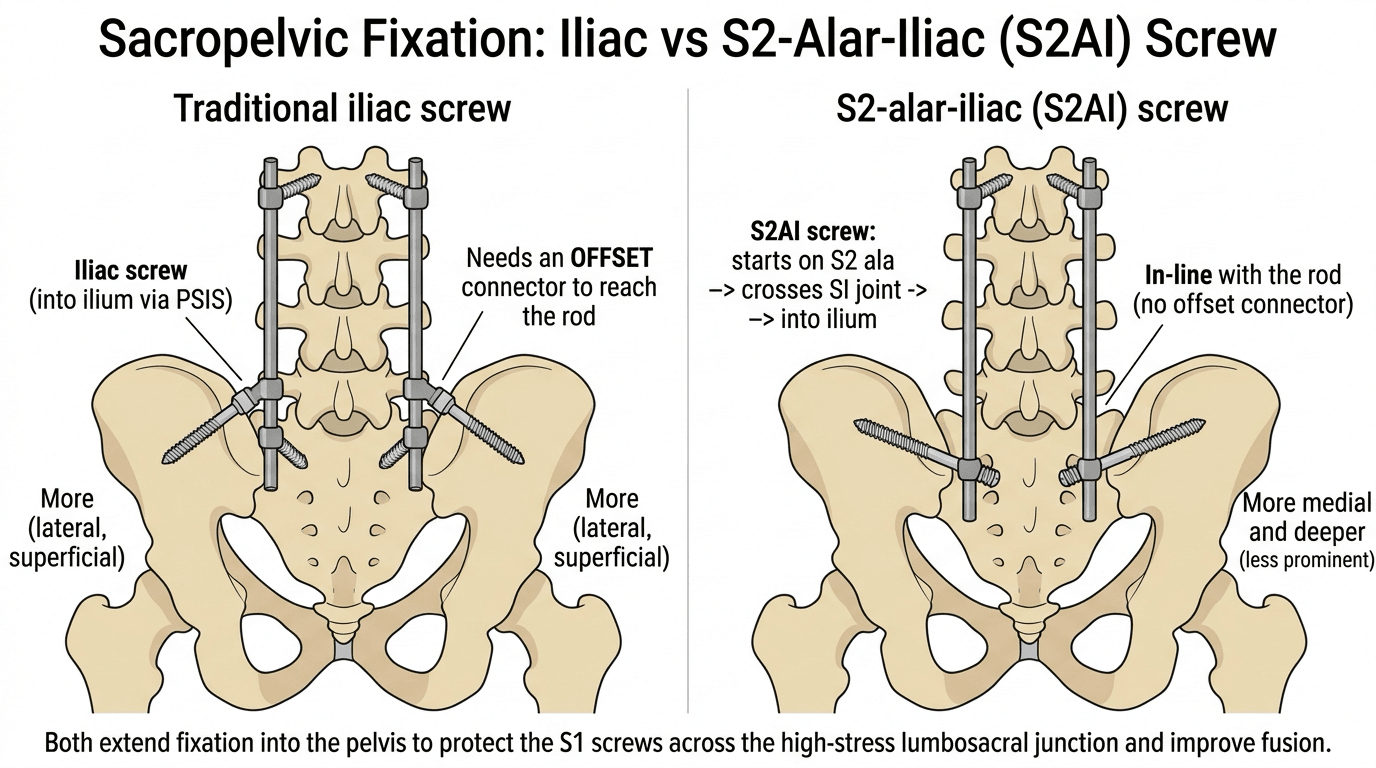
- The traditional ILIAC SCREW is placed into the ilium (between the inner and outer tables, aiming towards the anterior inferior iliac spine) and gives strong fixation, but it usually requires an OFFSET CONNECTOR to join the laterally placed, off-axis screw to the main rod, and the screw head can be PROMINENT and symptomatic.
- The S2-ALAR-ILIAC (S2AI) screw addresses these drawbacks: its trajectory starts on the S2 ala, crosses the SACROILIAC JOINT and enters the ilium, so it lies more MEDIAL and DEEPER (less prominent) and is roughly IN-LINE with the proximal pedicle screws, which avoids the need for offset connectors; biomechanically it is strong because it crosses the cortical surfaces of the SI joint.
- The S2AI trajectory was introduced specifically to DECREASE STRAIN on the S1 screws and improve fixation across the lumbosacral junction, and it is effective with generally low complication rates - but its path is INTIMATELY ASSOCIATED with major NEURAL and VASCULAR structures and the SI joint, so accurate placement matters; ROBOTIC/navigated guidance achieves the correct trajectory with high accuracy (over 95% reported).
- Recognised COMPLICATIONS of S2AI fixation include SACROILIAC JOINT pain/irritation (because the screw crosses the SI joint - reported in a few percent, often responsive to an SI joint block), SCREW FRACTURE (commonly at the neck) and SET-SCREW DISLODGEMENT, PERISCREW LUCENCY, and the need for revision in a small proportion; distal construct failure can also occur around the lumbopelvic region.
- The prominence advantage of S2AI is MEASURED, not merely asserted: pooling 18 studies and 1,462 patients, symptomatic screw prominence was 1.9% (12 of 648) with S2AI against 6.3% (51 of 814) with iliac screws, and of those symptomatic screws NONE of the S2AI (0 of 12) versus 27.5% of the iliac (14 of 51) were removed - so iliac prominence is both commoner and more often needs a second operation.
- PELVIC FIXATION USUALLY FAILS AROUND THE SCREW, NOT AT IT. In 253 adult deformity patients followed 2 years the failure rate was 4.3% (11 patients), and SEVEN of those eleven were ROD FRACTURE (4) or PSEUDARTHROSIS (3) across the LUMBOSACRAL JUNCTION - only two were a broken or loose pelvic screw. Adding a pelvic anchor protects S1, but the junction it protects then becomes the highest-strain point and the rod crossing it is what breaks.
- PROTECT THE JUNCTION with construct design: more RODS CROSSING the lumbopelvic junction (non-failures averaged 3.8 rods versus 2.9 in failures; OR 0.15, p = 0.002) and an ACCESSORY ROD taken down to S2 OR THE ILIUM rather than stopping at S1 (OR 0.2, p = 0.004) were both protective. The one modifiable intra-operative risk factor was residual CORONAL malalignment - a worse post-operative C7 coronal vertical axis carried OR 1.5 (p = 0.028) - so correct the coronal plane, not only the sagittal.
- In summary, sacropelvic fixation is indicated for long deformity constructs reaching the sacrum (and for sacral/pelvic instability or high-grade spondylolisthesis), with the S2AI screw now widely favoured over the traditional iliac screw for its in-line trajectory, lower prominence and avoidance of offset connectors - while being aware of SI-joint symptoms and screw failure as the main trade-offs.
- “Sacropelvic fixation extends long fusions to the PELVIS to PROTECT S1 screws and the lumbosacral junction (high pseudarthrosis zone).
- “Iliac screw = strong but needs OFFSET CONNECTORS and can be prominent; S2AI screw = in-line with pedicle screws, more medial/deeper, crosses the SI joint - generally favoured.
- “S2AI path is near neurovascular structures (robotic/navigation over 95% accuracy reported - from a technical review, not a comparative trial); complications = SI joint pain 3.2%, screw fracture 1.9%, set-screw dislodgement 2.2%, revision 1.6% (312 screws).
- “Prominence, quantified: S2AI 1.9% (12/648) vs iliac 6.3% (51/814); removed for prominence 0/12 vs 14/51. That is the evidence behind 'S2AI is less prominent'.
- “Failure is usually NOT the anchor: 7 of 11 pelvic fixation failures were rod fracture or pseudarthrosis at the lumbosacral junction. More rods across the junction (OR 0.15) and accessory rod to S2/ilium not S1 (OR 0.2) protect it; residual coronal malalignment (OR 1.5) is the modifiable risk.
Long fusions to the sacrum overload the S1 screws / lumbosacral junction (high pseudarthrosis). Pelvic fixation protects S1 and shares the load.
S2AI screw (in-line, crosses the SI joint, less prominent, no offset connector) is favoured over the traditional iliac screw. Watch the SI joint and neurovascular structures.
Rationale & the Two Screws
Long fusions ending at the sacrum overload the S1 pedicle screws and the lumbosacral junction - a high-stress zone with a high rate of S1-screw loosening and pseudarthrosis - so sacropelvic fixation extends the construct into the pelvis to protect S1, share the load and improve fusion. The traditional iliac screw gives strong purchase in the ilium but usually needs an offset connector to reach the rod and can be prominent. The S2-alar-iliac (S2AI) screw starts on the S2 ala, crosses the sacroiliac joint and enters the ilium, lying more medial and deeper (less prominent) and roughly in-line with the proximal pedicle screws (avoiding offset connectors), with strong biomechanics from crossing the SI joint cortices. The S2AI path is close to major neural and vascular structures, so accurate placement (often with robotic/ navigated guidance, over 95% accuracy) matters.
The Lumbosacral Junction: Pivot Point and Anterior Column Support
Long sacral constructs place cantilever loads on the S1 screws, and pelvic fixation protects S1. The biomechanics behind that is what gets asked - the lever arm about the lumbosacral pivot point, and the complementary role of anterior column support.
McCord and colleagues defined a lumbosacral pivot point around the middle column at the L5-S1 disc. The bending moment a distal anchor must resist depends on how far anterior to this pivot point it reaches. S1 screws end at/behind the pivot point, so they see a huge cantilever load and loosen; iliac and S2AI screws extend the construct ANTERIOR to the pivot point, giving a long lever arm and far greater resistance to flexion - the biomechanical reason pelvic fixation protects S1.
Load-sharing is also improved by adding anterior column support at L5-S1 (an interbody cage / ALIF), which offloads the posterior screws, reduces S1 strain and lowers lumbosacral pseudarthrosis. Pelvic fixation and anterior column support are complementary solutions to the same high-stress junction.
S1 screws sit near the lumbosacral pivot point, so they fail under the long lever arm; iliac/S2AI fixation reaches anterior to the pivot point (long lever arm, load shared), and an L5-S1 interbody adds anterior column support - together they protect S1 and the fusion.
Technique Considerations & Complications
- Indications: long deformity constructs reaching the sacrum, and sacral/pelvic instability or high-grade spondylolisthesis - to protect S1 and the lumbosacral junction.
- S2AI vs iliac: S2AI is widely favoured (in-line trajectory, less prominent, no offset connector, crosses the SI joint); the iliac screw remains a strong alternative.
- Accuracy matters: the trajectory lies near neural and vascular structures - robotic/navigated guidance achieves correct placement with high accuracy (over 95% reported).
- Complications to counsel/monitor: SACROILIAC JOINT pain/irritation (the screw crosses the joint; often responds to an SI joint block), SCREW FRACTURE (often at the neck), SET-SCREW DISLODGEMENT, periscrew lucency, and occasional revision; distal construct failure can occur around the lumbopelvic region.
Sacropelvic fixation is what makes a long fusion to the sacrum durable - by protecting the S1 screws and the lumbosacral junction it reduces S1 loosening and pseudarthrosis - but the very feature that makes the S2AI screw strong, crossing the sacroiliac joint, is also the source of its commonest specific complication: SI joint pain or irritation, which is reported in a few percent and often responds to an SI joint block. The trajectory also lies close to major neural and vascular structures, so accurate placement, increasingly with robotic or navigated guidance, is important, and patients should be counselled about SI-joint symptoms, screw fracture and set-screw problems. Choose pelvic fixation deliberately for long sacral constructs and place it precisely.
Placement Landmarks and What to Avoid
Accurate placement near neurovascular structures depends on the entry and corridor landmarks - and on knowing exactly what a malpositioned screw endangers.
- S2AI: entry just inferior and lateral to the S1 dorsal foramen (on the S2 ala); aim caudally, laterally and anteriorly to cross the SI joint into the ilium between the inner and outer tables, directed above the sciatic notch toward the AIIS.
- Iliac screw: entry at/just below the PSIS, aiming toward the AIIS between the tables (entry often recessed, or an offset connector used).
- The bony corridor is seen as the "teardrop" on an obturator-outlet ("teardrop") fluoroscopic view, confirming a safe path between the tables.
- The sciatic notch (sciatic nerve, superior gluteal vessels) - stay above it.
- The hip joint / acetabulum (too caudal or anterior).
- The anterior iliac cortex near the iliac vessels. Confirm containment with intra-operative imaging or navigation (detailed robotic/navigation technique is covered in Navigation & Robotics in Spine Surgery).
Keep the screw in the iliac corridor between the inner and outer tables, above the sciatic notch and out of the hip and the anterior cortex - the teardrop view (or navigation) confirms it.
How Pelvic Fixation Actually Fails - and What Protects It
The Failure Modes, in Proportion
Pelvic fixation failure is usually discussed as "screw problems", but in practice the construct more often fails around the screws than at them. In 253 adult-deformity patients instrumented over at least six levels and followed for two years, pelvic fixation failure occurred in 11 (4.3%), and the mechanisms were:
- n
- 4
- What it tells you
- The commonest single mechanism - the rod, not the screw, is the weak link
- n
- 3
- What it tells you
- The biological failure the whole construct exists to prevent
- n
- 1
- What it tells you
- Implant failure at the anchor itself is comparatively uncommon
- n
- 1
- What it tells you
- As above - fixation loss is not the dominant mode
- n
- 1
- What it tells you
- Bone fails around a well-fixed anchor, particularly in poor bone stock
- n
- 1
- What it tells you
- The prominence problem that drives the S2AI-versus-iliac choice
Seven of the eleven failures were therefore rod fracture or pseudarthrosis at the lumbosacral junction, not a failure of the pelvic anchor. That reframes the problem: adding a pelvic screw protects S1, but the junction it protects then becomes the highest-strain point in the construct, and it is the rod crossing that junction that breaks.
What Was Protective
In the same cohort, two construct choices were protective and one alignment variable was a risk factor:
- More rods crossing the lumbopelvic junction. Patients who did not fail had a mean of 3.8 rods crossing the junction against 2.9 in those who did (p = 0.009), and on multivariate analysis the number of rods crossing was protective with an OR of 0.15 (p = 0.002).
- Taking the accessory rod all the way down. An accessory rod whose lowest instrumented vertebra was S2 or the ilium rather than S1 was protective (OR 0.2, p = 0.004) - 54.2% of the non-failures had this against 18.2% of the failures. Stopping the accessory rod at S1 leaves the very junction that fails without any buttress.
- Residual coronal malalignment was an independent risk factor. A worse post-operative C7 coronal vertical axis carried an OR of 1.5 (p = 0.028). This is the one genuinely modifiable intra-operative variable in the list: correcting coronal balance protects the lumbopelvic construct, and leaving the patient coronally off-centre loads it eccentrically until something breaks.
For context on that cohort: mean pelvic screw diameter and length were 8.6 mm and 87 mm, an L5-S1 interbody was used in 74.7%, all rods crossing the lumbosacral junction were cobalt-chrome, and all pelvic screws were closed-headed tulips.
The Multirod Vocabulary
"Add another rod" is imprecise, and the supplementary rods have distinct definitions worth using correctly:
- Definition
- The longest rod, running from the bottom of the construct to the upper instrumented vertebra
- Where it is used
- Every construct
- Definition
- Shorter than the primary and connected directly to pedicle screws (fewer of them), joined to the primary by lateral connectors or cross-links
- Where it is used
- Adds overall stiffness
- Definition
- A four-rod technique in which two rods span only the osteotomy site via the screws above and below, NOT connected to the primary rod
- Where it is used
- Three-column osteotomy sites
- Definition
- Connected to the primary rod by side connectors, buttressing it where rod strain is highest
- Where it is used
- Three-column osteotomies AND the lumbosacral junction - the relevant one here
- Definition
- Spans an osteotomy and is deliberately NOT contoured to the restored lordosis, buttressing the primary rod above and below
- Where it is used
- Pedicle subtraction osteotomy
- Definition
- Secured to a separate iliac screw on the side of truncal shift and connected to the primary rod; distracted against to correct a coronal curve
- Where it is used
- Coronal malalignment correction
The pelvic anchor is rarely what fails - 7 of 11 failures were rod fracture or pseudarthrosis at the lumbosacral junction. Protect it by increasing the number of rods crossing the lumbopelvic junction (OR 0.15) and by carrying the accessory rod down to S2 or the ilium rather than stopping at S1 (OR 0.2). The modifiable risk factor is residual coronal malalignment (OR 1.5) - correct the coronal plane, not just the sagittal.
Mnemonics & Memory Aids
PELVIS
Hook:PELVIS: Protect S1, Extend to pelvis, Lumbopelvic load shared, Vessels/nerves near, Iliac vs S2AI, SI joint crossed (watch pain).
Clinical Decision Scenarios
Practise clinical reasoning and management decisions out loud
“Why and when would you extend a long spinal construct to the pelvis, and how?”
“What complications are specific to S2-alar-iliac fixation?”
“You have taken a fourteen-level fusion down to the pelvis with bilateral S2AI screws. Eighteen months later the patient has new back pain and a broken rod at L5-S1. What went wrong, and what would you have done differently?”
Why & when
- Long fusions to the sacrum overload S1 / the lumbosacral junction (pseudarthrosis zone)
- Pelvic fixation protects S1, shares load, improves fusion
- Also: sacropelvic instability, high-grade spondylolisthesis
Iliac screw
- Into the ilium (between tables, towards AIIS) - strong purchase
- Usually needs an offset connector to reach the rod
- Screw head can be prominent/symptomatic
S2-alar-iliac (S2AI)
- From S2 ala across the SI joint into the ilium
- In-line with pedicle screws (no offset connector), more medial/deeper (less prominent)
- Strong (crosses SI joint cortices); path near neurovascular structures (robotic/navigation over 95%)
Complications (312 S2AI screws)
- SI joint pain/irritation 3.2% (most settle after an SI joint block)
- Periscrew lucency 2.2%; set-screw dislodgement 2.2%
- Screw fracture 1.9% (usually at the neck); revision for screw failure 1.6%
- Prominence: S2AI 1.9% vs iliac 6.3%; removed 0/12 vs 14/51
Failure & how to prevent it
- 2-yr pelvic fixation failure 4.3% (11/253) in long ASD constructs
- 7 of 11 = ROD FRACTURE or PSEUDARTHROSIS at the lumbosacral junction, not the anchor
- Protective: more rods across the lumbopelvic junction (OR 0.15)
- Protective: accessory rod down to S2/ilium rather than S1 (OR 0.2)
- Risk: residual coronal malalignment, worse C7 CVA (OR 1.5) - modifiable
- Typical pelvic screw 8.6 mm x 87 mm; cobalt-chrome rods; L5-S1 interbody in ~75%
Evidence & Key Studies
Durability and failure types of S2-alar-iliac screws: 312 consecutive screws
- S2AI screws improve stability across the lumbosacral junction by crossing the cortical surfaces of the sacroiliac joint, and clinical outcomes (back pain, ambulation, ODI) improved significantly.
- SI joint pain occurred in 3.2% (most improved after an SI joint block); periscrew lucency in 2.2%, set-screw dislodgement in 2.2%, and screw fracture in 1.9% (mostly neck fractures).
- Revision for S2AI screw failure was needed in 1.6%; SI-joint irritation occurred with considerable frequency.
S2AI versus iliac screw prominence and removal: systematic review and meta-analysis
- Eighteen studies and 1,462 patients (648 S2AI, 814 iliac) were pooled to compare symptomatic screw prominence and removal between the two techniques.
- Symptomatic prominence was significantly lower with S2AI: 1.9% (12/648) versus 6.3% (51/814) for iliac screws, pooled RR difference 0.08 (p < 0.001), with low heterogeneity (I-squared 3.32%).
- Of the symptomatic screws, none of the S2AI screws (0/12) were removed for prominence against 27.5% (14/51) of iliac screws - so iliac prominence is not only commoner but more often needs an operation.
Incidence, mechanism and protective strategies for 2-year pelvic fixation failure after adult spinal deformity surgery
- Among 253 adult deformity patients with at least six instrumented levels and pelvic fixation, the 2-year pelvic fixation failure rate was 4.3% (11 patients); mean pelvic screw diameter and length were 8.6 mm and 87 mm.
- Seven of the 11 failures were rod fracture (4) or pseudarthrosis (3) across the lumbosacral junction rather than failure of the pelvic anchor itself.
- More rods crossing the lumbopelvic junction (OR 0.15, p = 0.002) and an accessory rod reaching S2 or the ilium rather than S1 (OR 0.2, p = 0.004) were protective, while worse post-operative coronal vertical axis was an independent risk factor (OR 1.5, p = 0.028).
The lexicon of multirod constructs in adult spinal deformity: when, why and how
- Defines the supplementary rods whose names are used inconsistently in practice: primary, secondary, satellite, accessory, delta and kickstand.
- Accessory rods connect to the primary rod by side connectors and buttress it where rod strain is highest - explicitly including the lumbosacral junction as well as three-column osteotomy sites.
- Multirod use grew alongside deformity correction specifically to prevent rod fracture and pseudarthrosis at high-strain points.
Robotic versus freehand S2-alar-iliac fixation: technical considerations
- The S2AI trajectory was introduced to decrease strain on the S1 screws and, by aligning with the proximal pedicle screw instrumentation, avoids the offset connectors needed for traditional iliac screws.
- S2AI screws are effective with low complication rates, but their path is intimately associated with major neural and vascular structures.
- Robotic guidance obtains the correct S2AI trajectory safely and effectively with over 95% accuracy.
The biomechanical rationale (S2AI screws crossing the SI-joint cortices to improve lumbosacral stability), the improved clinical outcomes and the specific complications (SI joint pain 3.2%, periscrew lucency 2.2%, set-screw dislodgement 2.2%, screw fracture 1.9%, revision 1.6%, all from 312 consecutive screws) come from the cited Hyun series. The quantified prominence advantage of S2AI over the iliac screw - 1.9% of 648 versus 6.3% of 814, and 0 of 12 versus 14 of 51 removed - is the cited Garcia meta-analysis of 18 studies, and is what turns "S2AI is less prominent" from an assertion into a measured difference. The failure mechanisms, the protective effect of more rods across the lumbopelvic junction and of an accessory rod reaching S2 or the ilium, the coronal-alignment risk factor, and the 8.6 mm by 87 mm mean screw dimensions come from the cited Lee series; the definitions of the supplementary rods from the cited Ramey lexicon.
The S2AI trajectory's purpose (decreasing S1 strain), its in-line alignment avoiding offset connectors, its proximity to neurovascular structures, and the over-95% accuracy figure for robotic guidance come from the cited Laratta paper - which is a technical review rather than a comparative trial, so the figure describes what robotic placement achieves and is not evidence that it outperforms accurate freehand or navigated placement. The indications for pelvic fixation, the iliac-screw technique and the placement landmarks are standard, well-established teaching. (See also Adult Spinal Deformity and Spondylolisthesis for high-grade slips.)